Spring in Action, 4th Edition: Covers Spring 4 (2015)
Part 2. Spring on the web
Spring is often used to develop web applications. Therefore, in part 2 you’ll see how to use Spring’s MVC framework to add a web front end to your application.
In chapter 5, “Building Spring web applications,” you’ll learn the basics of Spring MVC, a web framework built on the principles of the Spring Framework. You’ll discover how to write controllers to handle web requests and see how to transparently bind request parameters and payload to your business objects while providing validation and error handling at the same time.
Chapter 6, “Rendering web views,” continues what chapter 5 started by showing you how to take model data produced in Spring MVC controllers and render it as HTML to be served to a user’s browser. This chapter includes discussions of JavaServer Pages (JSP), Apache Tiles, and Thymeleaf templates.
In Chapter 7, “Advanced Spring MVC,” you’ll learn a few more advanced techniques to use when building web applications, including custom Spring MVC configuration options, handling multipart file uploads, dealing with exceptions, and passing data across requests using flash attributes.
Chapter 8, “Working with Spring Web Flow,” will show you how to build conversation, flow-based web applications using the Spring Web Flow framework.
As security is an important aspect of many applications, chapter 9, “Securing Spring,” will show you how to use Spring Security to secure your web application and protect the information it serves.
Chapter 5. Building Spring web applications
This chapter covers
· Mapping requests to Spring controllers
· Transparently binding form parameters
· Validating form submissions
As an enterprise Java developer, you’ve likely developed a web-based application or two. For many Java developers, web-based applications are their primary focus. If this is your experience, then you’re well aware of the challenges that come with these systems. Specifically, state management, workflow, and validation are all important features that need to be addressed. None of these is made any easier given the HTTP protocol’s stateless nature.
Spring’s web framework is designed to help you address these concerns. Based on the Model-View-Controller (MVC) pattern, Spring MVC helps you build web-based applications that are as flexible and as loosely coupled as the Spring Framework itself.
In this chapter, we’ll explore the essentials of Spring’s MVC web framework. We’ll focus on using annotations to create controllers that handle various kinds of web requests, parameters, and form input. Before we go too deep with the specifics of Spring MVC, let’s start with a high-level view and set up the basic plumbing needed to make Spring MVC work.
5.1. Getting started with Spring MVC
Have you ever seen the children’s game Mousetrap? It’s crazy. The goal is to send a small steel ball through a series of wacky contraptions in order to trigger a mousetrap. The ball navigates all kinds of intricate gadgets, from rolling down a curvy ramp to springing off a teeter-totter to spinning on a miniature Ferris wheel to being kicked out of a bucket by a rubber boot. It goes through all this to spring a trap on a poor, unsuspecting plastic mouse.
At first glance, you may think that Spring’s MVC framework is a lot like Mousetrap. Instead of moving a ball through various ramps, teeter-totters, and wheels, Spring moves requests between a dispatcher servlet, handler mappings, controllers, and view resolvers. But don’t draw too strong a comparison between Spring MVC and the Rube Goldberg-esque game of Mousetrap. Each of the components in Spring MVC performs a specific purpose. And it’s really not that complex.
Let’s take a look at how a request makes its way from the client through the components in Spring MVC, ultimately resulting in a request that goes back to the client.
5.1.1. Following the life of a request
Every time a user clicks a link or submits a form in their web browser, a request goes to work. A request’s job description is that of a courier. Just like a postal carrier or a FedEx delivery person, a request lives to carry information from one place to another.
The request is a busy creature. From the time it leaves the browser until it returns with a response, it makes several stops, each time dropping off a bit of information and picking up some more. Figure 5.1 shows all the stops the request makes as it travels through Spring MVC.
Figure 5.1. A request couriers information to several stops on its way to producing the desired results.

When the request leaves the browser ![]() , it carries information about what the user is asking for. At the least, the request will be carrying the requested URL. But it may also carry additional data, such as the information submitted in a form by the user.
, it carries information about what the user is asking for. At the least, the request will be carrying the requested URL. But it may also carry additional data, such as the information submitted in a form by the user.
The first stop in the request’s travels is at Spring’s DispatcherServlet. Like most Java-based web frameworks, Spring MVC funnels requests through a single front controller servlet. A front controller is a common web application pattern where a single servlet delegates responsibility for a request to other components of an application to perform actual processing. In the case of Spring MVC, DispatcherServlet is the front controller.
The DispatcherServlet’s job is to send the request on to a Spring MVC controller. A controller is a Spring component that processes the request. But a typical application may have several controllers, and DispatcherServlet needs some help deciding which controller to send the request to. So the DispatcherServlet consults one or more handler mappings ![]() to figure out where the request’s next stop will be. The handler mapping pays particular attention to the URL carried by the request when making its decision.
to figure out where the request’s next stop will be. The handler mapping pays particular attention to the URL carried by the request when making its decision.
Once an appropriate controller has been chosen, DispatcherServlet sends the request on its merry way to the chosen controller ![]() . At the controller, the request drops off its payload (the information submitted by the user) and patiently waits while the controller processes that information. (Actually, a well-designed controller performs little or no processing itself and instead delegates responsibility for the business logic to one or more service objects.)
. At the controller, the request drops off its payload (the information submitted by the user) and patiently waits while the controller processes that information. (Actually, a well-designed controller performs little or no processing itself and instead delegates responsibility for the business logic to one or more service objects.)
The logic performed by a controller often results in some information that needs to be carried back to the user and displayed in the browser. This information is referred to as the model. But sending raw information back to the user isn’t sufficient—it needs to be formatted in a user-friendly format, typically HTML. For that, the information needs to be given to a view, typically a JavaServer Page (JSP).
One of the last things a controller does is package up the model data and identify the name of a view that should render the output. It then sends the request, along with the model and view name, back to the DispatcherServlet ![]() .
.
So that the controller doesn’t get coupled to a particular view, the view name passed back to DispatcherServlet doesn’t directly identify a specific JSP. It doesn’t even necessarily suggest that the view is a JSP. Instead, it only carries a logical name that will be used to look up the actual view that will produce the result. The DispatcherServlet consults a view resolver ![]() to map the logical view name to a specific view implementation, which may or may not be a JSP.
to map the logical view name to a specific view implementation, which may or may not be a JSP.
Now that DispatcherServlet knows which view will render the result, the request’s job is almost over. Its final stop is at the view implementation ![]() , typically a JSP, where it delivers the model data. The request’s job is finally done. The view will use the model data to render output that will be carried back to the client by the (not-so-hardworking) response object
, typically a JSP, where it delivers the model data. The request’s job is finally done. The view will use the model data to render output that will be carried back to the client by the (not-so-hardworking) response object ![]() .
.
As you can see, a request goes through several steps along its way to producing a response for the client. Most of these steps take place within the Spring MVC framework, in the components shown in figure 5.1. Although the bulk of this chapter will focus on writing controllers, let’s take a moment to set up the essential components of Spring MVC.
5.1.2. Setting up Spring MVC
Based on figure 5.1, it looks like there are a lot of moving parts to be configured. Fortunately, thanks to some advancements in the most recent versions of Spring, it’s easy to get started with Spring MVC. For now, you’ll take the simplest approach to configuring Spring MVC: you’ll do just enough configuring to be able to run the controllers you create. In chapter 7, we’ll look at some additional setup options.
Configuring DispatcherServlet
DispatcherServlet is the centerpiece of Spring MVC. It’s where the request first hits the framework, and it’s responsible for routing the request through all the other components.
Historically, servlets like DispatcherServlet have been configured in a web.xml file that’s carried in the web application’s WAR file. Certainly that’s one option for configuring DispatcherServlet. But thanks to recent advances in the Servlet 3 specification and in Spring 3.1, it’s not the only option. And it’s not the option we’ll go with in this chapter.
Instead of a web.xml file, you’re going to use Java to configure DispatcherServlet in the servlet container. The following listing shows the Java class you’ll need.
Listing 5.1. Configuring DispatcherServlet

Before we dive into the details of listing 5.1, you may wonder what the word spittr has to do with anything. The class is named SpittrWebAppInitializer, and it’s in a package named spittr.config. I’ll explain that in a moment (in section 5.1.3), but for now, suffice it to say that the application you’ll create is named Spittr.
To understand how listing 5.1 works, it’s probably sufficient to know that any class that extends AbstractAnnotationConfigDispatcherServletInitializer will automatically be used to configure DispatcherServlet and the Spring application context in the application’s servlet context.
AbstractAnnotationConfigDispatcherServletInitializer exposed
If you insist on the more detailed explanation, here it is. In a Servlet 3.0 environment, the container looks for any classes in the classpath that implement the javax.servlet.ServletContainerInitializer interface; if any are found, they’re used to configure the servlet container.
Spring supplies an implementation of that interface called SpringServletContainerInitializer that, in turn, seeks out any classes that implement WebApplicationInitializer and delegates to them for configuration. Spring 3.2 introduced a convenient base implementation ofWebApplicationInitializer called AbstractAnnotationConfigDispatcherServletInitializer. Because your SpittrWebAppInitializer extends AbstractAnnotationConfigDispatcherServletInitializer (and thus implementsWebApplicationInitializer), it will be automatically discovered when deployed in a Servlet 3.0 container and be used to configure the servlet context.
Even though its name is extremely long, AbstractAnnotationConfigDispatcher-ServletInitializer is a snap to use. Looking at listing 5.1, you can see that SpittrWebAppInitializer overrides three methods.
The first method, getServletMappings(), identifies one or more paths that DispatcherServlet will be mapped to. In this case, it’s mapped to /, indicating that it will be the application’s default servlet. It will handle all requests coming into the application.
In order to understand the other two methods, you must first understand the relationship between DispatcherServlet and a servlet listener known as ContextLoaderListener.
A Tale of Two Application Contexts
When DispatcherServlet starts up, it creates a Spring application context and starts loading it with beans declared in the configuration files or classes that it’s given. With the getServletConfigClasses() method in listing 5.1, you’ve asked that DispatcherServlet load its application context with beans defined in the WebConfig configuration class (using Java configuration).
But in Spring web applications, there’s often another application context. This other application context is created by ContextLoaderListener.
Whereas DispatcherServlet is expected to load beans containing web components such as controllers, view resolvers, and handler mappings, ContextLoaderListener is expected to load the other beans in your application. These beans are typically the middle-tier and data-tier components that drive the back end of the application.
Under the covers, AbstractAnnotationConfigDispatcherServletInitializer creates both a DispatcherServlet and a ContextLoaderListener. The @Configuration classes returned from getServletConfigClasses() will define beans forDispatcherServlet’s application context. Meanwhile, the @Configuration class’s returned getRootConfigClasses() will be used to configure the application context created by ContextLoaderListener.
In this case, your root configuration is defined in RootConfig, whereas DispatcherServlet’s configuration is declared in WebConfig. You’ll see what those two configuration classes look like in a moment.
It’s important to realize that configuring DispatcherServlet via Abstract-AnnotationConfigDispatcherServletInitializer is an alternative to the traditional web.xml file. Although you can include a web.xml file alongside a subclass ofAbstractAnnotationConfigDispatcherServletInitializer if you like, it’s not necessary.
The only gotcha with configuring DispatcherServlet in this way, as opposed to in a web.xml file, is that it will only work when deploying to a server that supports Servlet 3.0, such as Apache Tomcat 7 or higher. The Servlet 3.0 specification has been final since December 2009, and the odds are good that you’ll be deploying your applications to a servlet container that supports Servlet 3.0.
If you’re not yet working with a Servlet 3.0-capable server, then configuring DispatcherServlet in a subclass of AbstractAnnotationConfigDispatcherServlet-Initializer won’t work for you. You’ll have no choice but to configure DispatcherServlet in web.xml. We’ll look at web.xml and other configuration options in chapter 7. For now, though, let’s look at WebConfig and RootConfig, the two configuration classes referred to in listing 5.1, and see how to enable Spring MVC.
Enabling Spring MVC
Just as there are several ways of configuring DispatcherServlet, there’s more than one way to enable Spring MVC components. Historically, Spring has been configured using XML, and there’s an <mvc:annotation-driven> element that you can use to enable annotation-driven Spring MVC.
We’ll talk about <mvc:annotation-driven>, among other Spring MVC configuration options, in chapter 7. But for now, you’ll keep your Spring MVC setup simple and Java-based.
The very simplest Spring MVC configuration you can create is a class annotated with @EnableWebMvc:
package spittr.config;
import org.springframework.context.annotation.Configuration;
import org.springframework.web.servlet.config.annotation.EnableWebMvc;
@Configuration
@EnableWebMvc
public class WebConfig {
}
This will work, and it will enable Spring MVC. But it leaves a lot to be desired:
· No view resolver is configured. As such, Spring will default to using BeanNameViewResolver, a view resolver that resolves views by looking for beans whose ID matches the view name and whose class implements the View interface.
· Component-scanning isn’t enabled. Consequently, the only way Spring will find any controllers is if you declare them explicitly in the configuration.
· As it is, DispatcherServlet is mapped as the default servlet for the application and will handle all requests, including requests for static resources, such as images and stylesheets (which is probably not what you want in most cases).
Therefore, you need to add a bit more configuration in WebConfig on top of this bare minimum Spring MVC configuration to make it useful. The new WebConfig in the next listing addresses these concerns.
Listing 5.2. A minimal yet useful configuration for Spring MVC


The first thing to notice in listing 5.2 is that WebConfig is now annotated with @ComponentScan so that the spitter.web package will be scanned for components. As you’ll soon see, the controllers you write will be annotated with @Controller, which will make them candidates for component-scanning. Consequently, you won’t have to explicitly declare any controllers in the configuration class.
Next, you add a ViewResolver bean. More specifically, it’s an InternalResourceViewResolver. We’ll talk more about view resolvers in chapter 6. For now, just know that it’s configured to look for JSP files by wrapping view names with a specific prefix and suffix (for example, a view name of home will be resolved as /WEB-INF/views/home.jsp).
Finally, this new WebConfig class extends WebMvcConfigurerAdapter and overrides its configureDefaultServletHandling() method. By calling enable() on the given DefaultServletHandlerConfigurer, you’re asking DispatcherServlet to forward requests for static resources to the servlet container’s default servlet and not to try to handle them itself.
With WebConfig settled, what about RootConfig? Because this chapter is focused on web development, and web configuration is done in the application context created by DispatcherServlet, you’ll keep RootConfig relatively simple for now:
package spittr.config;
import org.springframework.context.annotation.ComponentScan;
import org.springframework.context.annotation.ComponentScan.Filter;
import org.springframework.context.annotation.Configuration;
import org.springframework.context.annotation.FilterType;
import org.springframework.web.servlet.config.annotation.EnableWebMvc;
@Configuration
@ComponentScan(basePackages={"spitter"},
excludeFilters={
@Filter(type=FilterType.ANNOTATION, value=EnableWebMvc.class)
})
public class RootConfig {
}
The only significant thing to note in RootConfig is that it’s annotated with @ComponentScan. There will be plenty of opportunities throughout this book to flesh out Root-Config with non-web components.
You’re almost ready to start building a web application with Spring MVC. The big question at this point is what application you’ll build.
5.1.3. Introducing the Spittr application
In an attempt to get in on the online social networking game, you’re going to develop a simple microblogging application. In many ways, your application will be much like the original microblogging application, Twitter. You’ll add some little twists on the idea along the way. And, of course, you’ll develop it using Spring.
Borrowing some ideas from Twitter and implementing them in Spring gives the application a working title: Spitter. Taking it a step further and applying a naming pattern that’s popular with sites like Flickr, let’s drop the e and call the app Spittr. This name will also be helpful in differentiating the application name from a domain type you’ll create called Spitter.
The Spittr application has two essential domain concepts: spitters (the users of the application) and spittles (the brief status updates that users publish). We’ll draw primarily on these two domain concepts throughout this book as we flesh out the functionality of the Spittr application. Initially, in this chapter, you’ll build out the web layer of the application, create controllers that display spittles, and process forms where users register as spitters.
The stage is now set. You’ve configured DispatcherServlet, enabled essential Spring MVC components, and established a target application. Let’s turn to the meat of the chapter: handling web requests with Spring MVC controllers.
5.2. Writing a simple controller
In Spring MVC, controllers are just classes with methods that are annotated with @RequestMapping to declare the kind of requests they’ll handle.
Starting simple, let’s imagine a controller class that handles requests for / and renders the application’s home page. HomeController, shown in the following listing, is an example of what might be the simplest possible Spring MVC controller class.
Listing 5.3. HomeController: an example of an extremely simple controller

The first thing you’ll notice about HomeController is that it’s annotated with @Controller. Although it’s clear that this annotation declares a controller, the annotation has little to do with Spring MVC.
@Controller is a stereotype annotation, based on the @Component annotation. Its purpose here is entirely for the benefit of component-scanning. Because HomeController is annotated with @Controller, the component scanner will automatically pick up HomeController and declare it as a bean in the Spring application context. You could have annotated HomeController with @Component, and it would have had the same effect, but it would have been less expressive about what type of component HomeController is.
HomeController’s only method, the home() method, is annotated with @Request-Mapping. The value attribute specifies the request path that this method will handle, and the method attribute details the HTTP method that it can handle. In this case, whenever an HTTP GET request comes in for /, the home() method will be called.
As you can see, the home() method doesn’t do much: it returns a String value of “home”. This String will be interpreted by Spring MVC as the name of the view that will be rendered. DispatcherServlet will ask the view resolver to resolve this logical view name into an actual view.
Given the way you configured InternalResourceViewResolver, the view name “home” will be resolved as a JSP at /WEB-INF/views/home.jsp. For now, you’ll keep the Spittr application’s home page rather basic, as shown next.
Listing 5.4. Spittr home page, defined as a simple JSP
<%@ taglib uri="http://java.sun.com/jsp/jstl/core" prefix="c" %>
<%@ page session="false" %>
<html>
<head>
<title>Spittr</title>
<link rel="stylesheet"
type="text/css"
href="<c:url value="/resources/style.css" />" >
</head>
<body>
<h1>Welcome to Spittr</h1>
<a href="<c:url value="/spittles" />">Spittles</a> |
<a href="<c:url value="/spitter/register" />">Register</a>
</body>
</html>
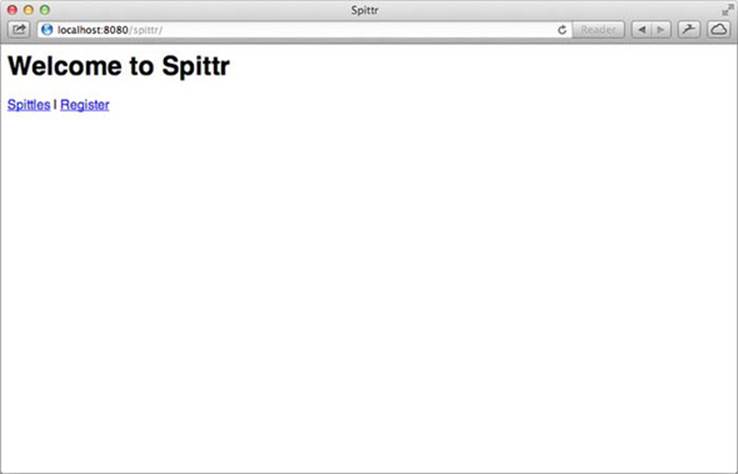
There’s nothing noteworthy about this JSP. It merely welcomes the user to the application and offers two links: one to view a Spittle list and another to register with the application. Figure 5.2 shows what the home page looks like at this point.
Figure 5.2. The Spittr home page in action
Before this chapter is complete, you’ll have implemented the controller methods to handle those requests. But for now, let’s throw some requests at this controller and see if it works. The obvious way to test a controller may be to build and deploy the application and poke at it with a web browser, but an automated test will give you quicker feedback and more consistent hands-off results. So, let’s cover HomeController with a test.
5.2.1. Testing the controller
Take another look at HomeController. If you squint really hard—so hard that you can’t see the annotations—you’ll see that what’s left is a simple POJO. And you know it’s easy to test POJOs. Therefore, you can test HomeController by writing a simple test like the following.
Listing 5.5. HomeControllerTest: tests HomeController
package spittr.web;
import static org.junit.Assert.assertEquals;
import org.junit.Test;
import spittr.web.HomeController;
public class HomeControllerTest {
@Test
public void testHomePage() throws Exception {
HomeController controller = new HomeController();
assertEquals("home", controller.home());
}
}
Although the test in listing 5.5 is straightforward, it only tests what happens in the home() method. It calls home() directly and asserts that a String containing the value “home” is returned. It completely fails to test what makes that method a Spring MVC controller method. Nothing about the test asserts that home() will be called when a GET request for / comes in. And just because it returns “home”, there’s nothing to truly test that home is the name of the view.
Starting with Spring 3.2, however, you have a way to test Spring MVC controllers as controllers, not merely as POJOs. Spring now includes a mechanism for mocking all the mechanics of Spring MVC and executing HTTP requests against controllers. This will enable you to test your controllers without firing up a web server or web browser.
To demonstrate proper testing of a Spring MVC controller, you can rewrite Home-ControllerTest to take advantage of the new Spring MVC testing features. The following listing shows the new HomeControllerTest.
Listing 5.6. Revised HomeControllerTest

Even though this new version of the test is a few lines longer than its predecessor, it more completely tests HomeController. Rather than call home() directly and test its return value, this test issues a GET request for / and asserts that the resulting view is named home. It starts by passing an instance of HomeController to MockMvcBuilders .standaloneSetup() and calling build() to set up the MockMvc instance. Then it asks the MockMvc instance to perform a GET request for / and sets an expectation for the view name.
5.2.2. Defining class-level request handling
Now that you have a test around HomeController, you can do a bit of refactoring to be certain that nothing breaks. One thing you can do is split up @RequestMapping by placing the path-mapping portion of it at the class level. The next listing shows how this is done.
Listing 5.7. Splitting the @RequestMapping in HomeController

In this new version of HomeController, the path has been moved up to a new class-level @RequestMapping, whereas the HTTP method is still mapped at the method level. Any time there’s a class-level @RequestMapping on a controller class, it applies to all handler methods in the controller. Then any @RequestMapping annotations on handler methods will complement the class-level @RequestMapping.
In the case of HomeController, there’s only one handler method. Its @RequestMapping, when taken together with the class-level @RequestMapping, indicates that the home() method will handle GET requests for /.
In other words, you really haven’t changed anything. You’ve moved a few things around, but HomeController still does the same thing as before. Because you have a test, you can be sure you haven’t broken anything along the way.
While you’re tinkering with the @RequestMapping annotations, you can make another tweak to HomeController. The value attribute of @RequestMapping accepts an array of String. So far, you’ve only given it a single String value of “/”. But you can also map it to requests whose path is /homepage by changing the class-level @RequestMapping to look like this:
@Controller
@RequestMapping({"/", "/homepage"})
public class HomeController {
...
}
Now HomeController’s home() method is mapped to handle GET requests for both / and /homepage requests.
5.2.3. Passing model data to the view
As it stands now, HomeController is a great example of how to write an extremely simple controller. But most controllers aren’t this simple. In the Spittr application, you’ll need a page that displays a list of the most recent spittles that have been submitted. Therefore, you’ll need a new method to serve such a page.
First you need to define a repository for data access. For decoupling purposes, and so you don’t get bogged down in database specifics, you’ll define the repository as an interface now and create an implementation of it later (in chapter 10). At the moment, you only need a repository that can fetch a list of the spittles. SpittleRepository, as defined here, is a sufficient start:
package spittr.data;
import java.util.List;
import spittr.Spittle;
public interface SpittleRepository {
List<Spittle> findSpittles(long max, int count);
}
The findSpittles() method takes two parameters. The max parameter is a Spittle ID that represents the maximum ID of any Spittle that should be returned. As for the count parameter, it indicates how many Spittle objects to return. In order to get the 20 most recent Spittleobjects, you can call findSpittles() like this:
List<Spittle> recent =
spittleRepository.findSpittles(Long.MAX_VALUE, 20);
You’ll keep the Spittle class fairly simple for now, as shown next. It will have properties to carry a message, a timestamp, and the latitude/longitude of the location from which the spittle was posted.
Listing 5.8. Spittle class: carries a message, a timestamp, and a location
package spittr;
import java.util.Date;
public class Spittle {
private final Long id;
private final String message;
private final Date time;
private Double latitude;
private Double longitude;
public Spittle(String message, Date time) {
this(message, time, null, null);
}
public Spittle(
String message, Date time, Double longitude, Double latitude) {
this.id = null;
this.message = message;
this.time = time;
this.longitude = longitude;
this.latitude = latitude;
}
public long getId() {
return id;
}
public String getMessage() {
return message;
}
public Date getTime() {
return time;
}
public Double getLongitude() {
return longitude;
}
public Double getLatitude() {
return latitude;
}
@Override
public boolean equals(Object that) {
return EqualsBuilder.reflectionEquals(this, that, "id", "time");
}
@Override
public int hashCode() {
return HashCodeBuilder.reflectionHashCode(this, "id", "time");
}
}
For the most part, Spittle is a basic POJO data object—nothing complicated. The only thing to note is that you’re using Apache Commons Lang for easy implementation of the equals() and hashCode() methods. Aside from the general utility value of those methods, they’ll be valuable in writing a test for the controller handler method.
While we’re on the subject of testing, let’s go ahead and write a test for the new controller method. The following listing uses Spring’s MockMvc to assert the behavior you want in the new handler method.
Listing 5.9. Testing that SpittleController handles GET requests for /spittles
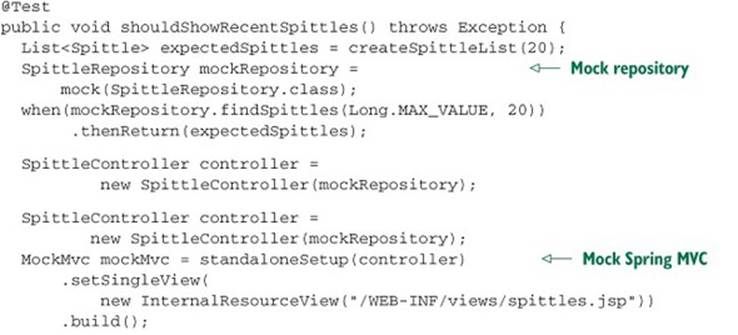
This test starts by creating a mock implementation of the SpittleRepository interface that will return a list of 20 Spittle objects from its findSpittles() method. It then injects that repository into a new SpittleController instance and sets up Mock-Mvc to use that controller.
Notice that unlike HomeControllerTest, this test calls setSingleView() on the MockMvc builder. This is so the mock framework won’t try to resolve the view name coming from the controller on its own. In many cases, this is unnecessary. But for this controller method, the view name will be similar to the request’s path; left to its default view resolution, MockMvc will fail because the view path will be confused with the controller’s path. The actual path given when constructing the Internal-ResourceView is unimportant in this test, but you set it to be consistent with how you’ve configured InternalResourceViewResolver.
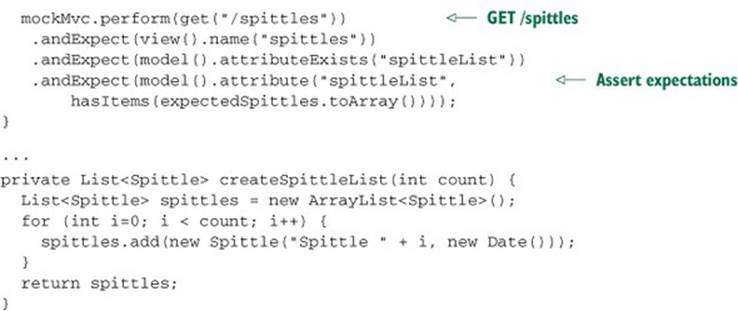
The test wraps up by performing a GET request for /spittles and asserting that the view name is spittles and that the model has an attribute named spittleList with the expected contents.
Of course, if you ran the test at this point, it would fail. It wouldn’t just fail to run; it would fail to compile. That’s because you haven’t yet written the Spittle-Controller. Let’s create a SpittleController so that it satisfies the expectations of the test in listing 5.9. Here’s an implementation of SpittleController that should satisfy the test.
Listing 5.10. SpittleController: places a list of recent spittles in the model

As you can see, SpittleController has a constructor that’s annotated with @Autowired to be given a SpittleRepository. That SpittleRepository is then used in the spittles() method to fetch a list of recent spittles.
Notice that the spittles() method is given a Model as a parameter. This is so that spittles() can populate the model with the Spittle list it retrieves from the repository. The Model is essentially a map (that is, a collection of key-value pairs) that will be handed off to the view so that the data can be rendered to the client. When add-Attribute() is called without specifying a key, the key is inferred from the type of object being set as the value. In this case, because it’s a List<Spittle>, the key will be inferred as spittleList.
The last thing spittles() does is return spittles as the name of the view that will render the model.
If you’d prefer to be explicit about the model key, you’re welcome to specify it. For example, the following version of spittles() is equivalent to the one in listing 5.10:
@RequestMapping(method=RequestMethod.GET)
public String spittles(Model model) {
model.addAttribute("spittleList",
spittleRepository.findSpittles(Long.MAX_VALUE, 20));
return "spittles";
}
Likewise, if you’d prefer to work with a non-Spring type, you can ask for a java .util.Map instead of Model. Here’s another version of spittles() that’s functionally equivalent to the others:
@RequestMapping(method=RequestMethod.GET)
public String spittles(Map model) {
model.put("spittleList",
spittleRepository.findSpittles(Long.MAX_VALUE, 20));
return "spittles";
}
And while we’re on the subject of alternate implementations, here’s another way to write the spittles() method:
@RequestMapping(method=RequestMethod.GET)
public List<Spittle> spittles() {
return spittleRepository.findSpittles(Long.MAX_VALUE, 20));
}
This version is quite a bit different from the others. Rather than return a logical view name and explicitly setting the model, this method returns the Spittle list. When a handler method returns an object or a collection like this, the value returned is put into the model, and the model key is inferred from its type (spittleList, as in the other examples).
As for the logical view name, it’s inferred from the request path. Because this method handles GET requests for /spittles, the view name is spittles (chopping off the leading slash).
No matter which way you choose to write the spittles() method, the result is the same. A list of Spittle objects is stored in the model with a key of spittleList and given to the view whose name is spittles. Given the way you’ve configuredInternalResourceViewResolver, that view is a JSP at /WEB-INF/views/spittles.jsp.
Now that there’s data in the model, how does the JSP access it? As it turns out, when the view is a JSP, the model data is copied into the request as request attributes. Therefore, the spittles.jsp file can use JavaServer Pages Standard Tag Library’s (JSTL) <c:forEach> tag to render the list of spittles:
<c:forEach items="${spittleList}" var="spittle" >
<li id="spittle_<c:out value="spittle.id"/>">
<div class="spittleMessage">
<c:out value="${spittle.message}" />
</div>
<div>
<span class="spittleTime"><c:out value="${spittle.time}" /></span>
<span class="spittleLocation">
(<c:out value="${spittle.latitude}" />,
<c:out value="${spittle.longitude}" />)</span>
</div>
</li>
</c:forEach>
Figure 5.3 will help you visualize how this might look in your web browser.
Figure 5.3. Spittle model data from a controller is made available as request parameters and rendered as a list on a web page.

Although SpittleController is simple, it’s still a step up from what you wrote in HomeController. One thing that neither HomeController nor SpittleController does, however, is handle any form of input. Let’s expand on SpittleController to take some input from the client.
5.3. Accepting request input
Some web applications are read-only. Humans poke about on the website in their web browser, reading whatever content the server sends to the browser.
The good news is that it doesn’t have to be that way. Many web applications give the user an opportunity to chime in and send data back to the server. Without this capability, the web would be a very different place.
Spring MVC provides several ways that a client can pass data into a controller’s handler method. These include
· Query parameters
· Form parameters
· Path variables
You’ll see how to write controllers to handle input using all of these mechanisms. For a start, let’s look at handling requests with query parameters, the simplest and most straightforward way to send data from the client to the server.
5.3.1. Taking query parameters
One thing that your Spittr application will need to do is display a paged list of spittles. As it is, SpittleController only displays the most recent spittles; it offers no way to page back through the history of the spittles that have been written. If you’re going to let users go through spittle history a page at a time, you’ll need to offer a way for them to pass in parameters that determine which set of spittles to display.
In deciding how to do this, consider that if you’re viewing a page of spittles, it’s ordered with the most recent spittle first. Therefore, the first spittle on the next page should have an ID that is before the ID of the last spittle on the current page. So, in order to display the next page of spittles, you should be able to pass in a spittle ID that is just less than the ID of the last spittle on the current page. You can also pass in a parameter saying how many spittles to display.
To implement this paging solution, you’ll need to write a handler method that accepts the following:
· A before parameter (which indicates the ID of the Spittle that all Spittle objects in the results are before)
· A count parameter (which indicates how many spittles to include in the result)
To achieve this, let’s replace the spittles() method you created in listing 5.10 with a new spittles() method that works with the before and count parameters. You’ll start by adding a test to reflect the functionality you want to see from the new spittles() method.
Listing 5.11. New method to test for a paged list of spittles

The key difference between this test method and the one in listing 5.9 is that it performs a GET request against /spittles, passing in values for the max and count parameters. This tests the handler method when those parameters are present; the other test method tests for when those parameters are absent. With both tests in place, you can be assured that no matter what changes you make to the controller, it will still be able to handle both kinds of requests:
@RequestMapping(method=RequestMethod.GET)
public List<Spittle> spittles(
@RequestParam("max") long max,
@RequestParam("count") int count) {
return spittleRepository.findSpittles(max, count);
}
If the handler method in SpittleController is going to handle requests with or without the max and count parameters, you’ll need to change it to accept those parameters but still default to Long.MAX_VALUE and 20 if those parameters are absent on the request. The defaultValueattribute of @RequestParam will do the trick:
@RequestMapping(method=RequestMethod.GET)
public List<Spittle> spittles(
@RequestParam(value="max",
defaultValue=MAX_LONG_AS_STRING) long max,
@RequestParam(value="count", defaultValue="20") int count) {
return spittleRepository.findSpittles(max, count);
}
Now, if the max parameter isn’t specified, it will default to the maximum value of Long. Because query parameters are always of type String, the defaultValue attribute requires a String value. Therefore, Long.MAX_VALUE won’t work. Instead, you can capture Long.MAX_VALUE in a String constant named MAX_LONG_AS_STRING:
private static final String MAX_LONG_AS_STRING =
Long.toString(Long.MAX_VALUE);
Even though the defaultValue is given as a String, it will be converted to a Long when bound to the method’s max parameter.
The count parameter will default to 20 if the request doesn’t have a count parameter.
Query parameters are a common way to pass information to a controller in a request. Another way that’s popular, especially in a discussion of building resource-oriented controllers, is to pass parameters as part of the request path. Let’s see how to use path variables to take input as part of the request path.
5.3.2. Taking input via path parameters
Let’s say your application needs to support the display of a single Spittle, given its ID. One option you have is to write a handler method that accepts the ID as a query parameter using @RequestParam:
@RequestMapping(value="/show", method=RequestMethod.GET)
public String showSpittle(
@RequestParam("spittle_id") long spittleId,
Model model) {
model.addAttribute(spittleRepository.findOne(spittleId));
return "spittle";
}
This handler method would handle requests such as /spittles/show?spittle_id=12345. Although this could be made to work, it’s not ideal from a resource-orientation perspective. Ideally, the resource being identified (the Spittle) would be identified by the URL path, not by query parameters. As a general rule, query parameters should not be used to identify a resource. A GET request for /spittles/12345 is better than one for /spittles/show?spittle_id=12345. The former identifies a resource to be retrieved. The latter describes an operation with a parameter—essentially RPC over HTTP.
With the goal of resource-oriented controllers in mind, let’s capture this requirement in a test. The following listing shows a new test method to assert resource-oriented request handling in SpittleController.
Listing 5.12. Testing a request for a Spittle with ID specified in a path variable

As you can see, this test sets up a mock repository, a controller, and MockMvc, much like the other tests you’ve written in this chapter. The most important part of the test is in the last few lines, where it performs a GET request for /spittles/12345 and asserts that the view name is spittle and that the expected Spittle object is placed in the model. Because you haven’t yet implemented the handler method for that kind of request, the request will fail. But you can fix that by adding a new method to Spittle-Controller.
Up to this point, all of your controller methods have been mapped (via @Request-Mapping) to a statically defined path. But if you’re going to make this test pass, you’ll need to write an @RequestMapping that has a variable portion of the path that represents the Spittle ID.
To accommodate these path variables, Spring MVC allows for placeholders in an @RequestMapping path. The placeholders are names surrounded by curly braces ({ and }). Although all the other parts of the path need to match exactly for the request to be handled, the placeholder can carry any value.
Here’s a handler method that uses placeholders to accept a Spittle ID as part of the path:
@RequestMapping(value="/{spittleId}", method=RequestMethod.GET)
public String spittle(
@PathVariable("spittleId") long spittleId,
Model model) {
model.addAttribute(spittleRepository.findOne(spittleId));
return "spittle";
}
For example, it can handle requests for /spittles/12345, the path being tested for in listing 5.12.
As you can see, spittle() has a spittleId parameter that is annotated with @PathVariable("spittleId"). This indicates that whatever value is at the placeholder position in the request path will be passed into the handler method’s spittleId parameter. If the request is a GETrequest for /spittles/54321, then 54321 will be passed in as the value of spittleId.
Notice that the phrase spittleId is repeated a few times in the example: in the @RequestMapping path, as the value attribute of @PathVariable, and again as a method parameter name. Because the method parameter name happens to be the same as the placeholder name, you can optionally omit the value parameter on @PathVariable:
@RequestMapping(value="/{spittleId}", method=RequestMethod.GET)
public String spittle(@PathVariable long spittleId, Model model) {
model.addAttribute(spittleRepository.findOne(spittleId));
return "spittle";
}
If no value attribute is given for @PathVariable, it assumes the placeholder’s name is the same as the method parameter name. This can make the code a little cleaner by not duplicating the placeholder name any more than necessary. But be cautioned: if you decide to rename the parameter, you must also change the placeholder name to match.
The spittle() method will pass the parameter along to the findOne() method on the SpittleRepository to find a single Spittle object and will add that Spittle to the model. The model key will be spittle, inferred by the type passed in to add-Attribute().
The data in the Spittle object can then be rendered in the view by referring to the request attribute whose key is spittle (the same as the model key). Here’s a snippet of a JSP view that renders the Spittle:
<div class="spittleView">
<div class="spittleMessage"><c:out value="${spittle.message}" /></div>
<div>
<span class="spittleTime"><c:out value="${spittle.time}" /></span>
</div>
</div>
There’s nothing flashy about this view, as you can see from the screenshot in figure 5.4.
Figure 5.4. Displaying a spittle in the browser

Query parameters and path parameters are fine for passing small amounts of data on a request. But often you need to pass a lot of data (perhaps data coming from a form submission), and query parameters are too awkward and limited for that. Let’s see how you can write controller methods that handle form submissions.
5.4. Processing forms
Web applications typically do more than just push content out to the user. Most also let users participate in the conversation by filling out forms and submitting data back into the application. Spring MVC controllers are well-suited for form processing as well as serving content.
There are two sides to working with forms: displaying the form and processing the data the user submits from the form. In the Spittr application, you’ll need a form for new users to register with the application. SpitterController is a new controller with a single request-handling method for displaying the registration form.
Listing 5.13. SpitterController: displays a form for users to sign up with the app

The showRegistrationForm() method’s @RequestMapping annotation, along with the class-level @RequestMapping annotation, declares that it will handle HTTP GET requests for /spitter/register. It’s a simple method, taking no input and only returning a logical view namedregisterForm. Given how you’ve configured InternalResourceView-Resolver, that means the JSP at /WEB-INF/views/registerForm.jsp will be called on to render the registration form.
As simple as showRegistrationForm() is, it still deserves to be covered by a test. Because it’s a simple method, its test will be equally simple.
Listing 5.14. Testing a form-displaying controller method

This test method is very similar to the test for the home page controller method. It performs a GET request for /spitter/register and then asserts that the resulting view is named registerForm.
Now let’s get back to the view. Because the view name is registerForm, you’ll need a JSP named registerForm.jsp. This JSP must include an HTML <form> where the user will enter information to sign up with the application. Here’s the JSP you’ll use for now.
Listing 5.15. JSP to render a registration form
<%@ taglib uri="http://java.sun.com/jsp/jstl/core" prefix="c" %>
<%@ page session="false" %>
<html>
<head>
<title>Spittr</title>
<link rel="stylesheet" type="text/css"
href="<c:url value="/resources/style.css" />" >
</head>
<body>
<h1>Register</h1>
<form method="POST">
First Name: <input type="text" name="firstName" /><br/>
Last Name: <input type="text" name="lastName" /><br/>
Username: <input type="text" name="username" /><br/>
Password: <input type="password" name="password" /><br/>
<input type="submit" value="Register" />
</form>
</body>
</html>
As you can see, this JSP is fairly basic. It has HTML form fields to capture the user’s first name, last name, a username, and a password, as well as a button to submit the form. Rendered in the browser, it looks a little something like figure 5.5.
Figure 5.5. The registration page offers a form that will be processed by SpitterController to add a new user to the application.

Notice that the <form> tag doesn’t have an action parameter set. Because of that, when this form is submitted, it will be posted back to the same URL path that displayed it. That is, it will be posted back to /spitters/register.
That means you’ll need something back on the server to handle the HTTP POST request. Let’s add another method to SpitterController to handle form submission.
5.4.1. Writing a form-handling controller
When processing the POST request from the registration form, the controller needs to accept the form data and save the form data as a Spitter object. Finally, in order to prevent a duplicate submission (such as might happen if the user clicked their browser’s Refresh button), it should redirect the browser to the newly created user’s profile page. This behavior is captured and tested in shouldProcessRegistration().
Listing 5.16. Testing form-handling controller methods

Clearly, this test is more involved than the test for displaying the registration form. After setting up a mock implementation of SpitterRepository and creating a controller and MockMvc setup to execute against, shouldProcessRegistration() performs a POST request against /spitter/register. As part of that POST request, user information is passed as parameters on the request to simulate a form being submitted.
When handling a POST request, it’s usually a good idea to send a redirect after the POST has completed processing so that a browser refresh won’t accidentally submit the form a second time. This test expects that the request will end in a redirect to /spitter /jbauer, the URL path of the new user’s profile page.
Finally, the test verifies that the mocked SpitterRepository was actually used to save the data coming in on the form.
Now let’s implement the controller method that will handle this form submission test. shouldProcessRegistration() may have left you with the impression that a chunk of work is required to satisfy the test. But as you can see in the new Spitter-Controller in this listing, there’s not much to it.
Listing 5.17. Handling form submission to register a new user


The showRegistrationForm() method is still in place. But notice the new process-Registration() method: it’s given a Spitter object as a parameter. This object has firstName, lastName, username, and password properties that will be populated from the request parameters of the same name.
Once it’s called with the Spitter object, processRegistration() calls the save() method on the SpitterRepository that is now injected into SpitterController in the constructor.
The last thing that processRegistration() does is return a String specifying the view. But this view specification is different from what you’ve seen before. Rather than just return a view name and let the view resolver sort it out, here you’re returning a redirect specification.
When InternalResourceViewResolver sees the redirect: prefix on the view specification, it knows to interpret it as a redirect specification instead of as a view name. In this case, it will redirect to the path for a user’s profile page. For example, if the Spitter .username property is jbauer, then the view will redirect to /spitter/jbauer.
It’s worth noting that in addition to redirect:, InternalResourceViewResolver also recognizes the forward: prefix. When it sees a view specification prefixed with forward:, the request is forwarded to the given URL path instead of redirected.
Perfect! At this point, the test in listing 5.16 should pass. But you’re not finished yet. Because you’re redirecting to the user’s profile page, you should probably add a handler method to SpitterController to handle requests for the profile page. Here’s a showSpitterProfile()method that will do the trick:
@RequestMapping(value="/{username}", method=GET)
public String showSpitterProfile(
@PathVariable String username, Model model) {
Spitter spitter = spitterRepository.findByUsername(username);
model.addAttribute(spitter);
return "profile";
}
showSpitterProfile() fetches a Spitter object from the SpitterRepository by the username. It adds the Spitter to the model and then returns profile, the logical view name for the profile view. Like all the other views presented in this chapter, you’ll keep the profile view simple for now:
<h1>Your Profile</h1>
<c:out value="${spitter.username}" /><br/>
<c:out value="${spitter.firstName}" />
<c:out value="${spitter.lastName}" />
Figure 5.6 shows the profile page as rendered in a web browser.
Figure 5.6. The Spittr profile page displays a user’s information, as populated into the model by SpitterController.

What will happen if the form doesn’t send a username or password parameter? Or what if the firstName or lastName value is empty or too long? Let’s look at how to add validation to the form submission to prevent inconsistencies in the data presented.
5.4.2. Validating forms
If the user were to leave the username or password field empty when submitting the form, it could result in the creation of a new Spitter object whose username and password were empty Strings. At the very least, this is odd behavior. But left unchecked, it could present a security concern where anyone could sign in to the application by submitting an empty login form.
Also, you should take steps to prevent the user from submitting an empty firstName and/or lastName in an effort to maintain some level of anonymity. And it’s probably a good idea to limit the length of the values given in those fields, keeping them at a reasonable size and avoiding misuse of the fields.
One way to handle validation, albeit naive, is to add code to the process-Registration() method to check for invalid values and send the user back to the registration form unless the data is valid. It’s a short method, so tossing in a few extra if statements won’t do much harm. Right?
Rather than litter your handler methods with validation logic, however, you can take advantage of Spring’s support for the Java Validation API (a.k.a. JSR-303). Starting with Spring 3.0, Spring supports the Java Validation API in Spring MVC. No extra configuration is required to make Java Validation work in Spring MVC. You just need to make sure an implementation of the Java API, such as Hibernate Validator, is in the project’s classpath.
The Java Validation API defines several annotations that you can put on properties to place constraints on the values of those properties. All of these annotations are in the javax.validation.constraints package. Table 5.1 lists these validation annotations.
Table 5.1. Validation annotations provided by the Java Validation API
|
Annotation |
Description |
|
@AssertFalse |
The annotated element must be a Boolean type and be false. |
|
@AssertTrue |
The annotated element must be a Boolean type and be true. |
|
@DecimalMax |
The annotated element must be a number whose value is less than or equal to a given BigDecimalString value. |
|
@DecimalMin |
The annotated element must be a number whose value is greater than or equal to a given BigDecimalString value. |
|
@Digits |
The annotated element must be a number whose value has a specified number of digits. |
|
@Future |
The value of the annotated element must be a date in the future. |
|
@Max |
The annotated element must be a number whose value is less than or equal to a given value. |
|
@Min |
The annotated element must be a number whose value is greater than or equal to a given value. |
|
@NotNull |
The value of the annotated element must not be null. |
|
@Null |
The value of the annotated element must be null. |
|
@Past |
The value of the annotated element must be a date in the past. |
|
@Pattern |
The value of the annotated element must match a given regular expression. |
|
@Size |
The value of the annotated element must be either a String, a collection, or an array whose length fits within the given range. |
In addition to the annotations in table 5.1, Java Validation API implementations may provide additional validation annotations. And it’s also possible to define your own constraints. But for our purposes, we’ll focus on a couple of the core constraint validations from the table.
Thinking over the constraints you need to apply to the fields in Spitter, it seems you’ll probably need the @NotNull and @Size annotations. All you need to do is toss those annotations around on the properties of Spitter. The next listing shows Spitter with its properties annotated for validation.
Listing 5.18. SpittleForm: carries only fields submitted in a SpittlePOST request

All the properties of Spitter are now annotated with @NotNull to ensure that they aren’t left null. Similarly, the @Size annotation is placed on the properties to constrain them between minimum and maximum lengths. What this means in the Spittr application is that the user must completely fill out the registration form with values that fit within the size constraints.
Now that you have annotated Spitter with validation constraints, you need to change the processRegistration() method to apply validation. The new validation-enabled processRegistration() is shown next.
Listing 5.19. processRegistration(): ensures that data submitted is valid

A lot has changed since the original processRegistration() in listing 5.17. The Spitter parameter is now annotated with @Valid to indicate to Spring that the command object has validation constraints that should be enforced.
Just having validation constraints on the Spitter’s properties won’t prevent the form from being submitted. Even if the user fails to fill in a field on the form or gives a value whose length exceeds the maximum length, the processRegistration() method will still be called. This gives you a chance to deal with the validation problems however you see fit in processRegistration().
If there are any validation errors, they’re available in the Errors object that you’re now asking for as a parameter to processRegistration(). (Note that it’s important that the Errors parameter immediately follow the @Valid-annotated parameter that’s being validated.) The first thingprocessRegistration() does is call Errors.has-Errors() to check for any errors.
If there are errors, Errors.hasErrors() returns registerForm, the view name for the registration form. This will take the user’s browser back to the registration form so they can correct any problems and try again. For now, the blank form will be displayed, but in the next chapter, you’ll adapt the form to show the values that were originally submitted and communicate validation problems to the user.
If there are no errors, the Spitter is saved via the repository, and the controller redirects to the profile page as before.
5.5. Summary
In this chapter, you’ve made a good start on the web portion of your application. As you’ve seen, Spring comes with a powerful and flexible web framework. Employing annotations, Spring MVC offers a near-POJO development model, making simple work of developing controllers that handle requests and are easy to test.
When it comes to writing controller handler methods, Spring MVC is extremely flexible. As a rule of thumb, if your handler method needs something, then it should ask for that object as a parameter. Likewise, anything it doesn’t need should be left out of the parameter list. This leads to infinite possibilities in request handling, while maintaining a simple programming model.
Although much of this chapter focused on request handling with controllers, response rendering is also important. We briefly looked at how to write views for your controllers using JSPs. But there’s more to Spring MVC views than the basic JSPs you wrote in this chapter.
Coming up in chapter 6, we’ll dig deeper into Spring views, expanding on how you can take advantage of Spring tag libraries in JSP. You’ll also see how to add consistent layouts to your views using Apache Tiles. And we’ll look at Thymeleaf, an exciting alternative to JSP that comes with built-in Spring support.