Excel 2016 Power Programming with VBA (2016)
Part I. Introduction to Excel VBA
Chapter 6. Understanding Excel’s Events
In This Chapter
· Recognizing the types of events that Excel can monitor
· Figuring out what you need to know to work with events
· Exploring examples of Workbook events, and Worksheet events
· Using Application events to monitor all open workbooks
· Seeing examples of processing time-based events and keystroke events
What You Should Know about Events
In many of the example macros in this book, there will be code implemented as event procedures, which are procedures that automatically trigger upon the occurrence of an event. An event is nothing more than an action that takes place during a session in Excel.
Everything that happens in Excel happens to an object through an event. A few examples of events are opening a workbook, adding a worksheet, changing a value in a cell, saving a workbook, double-clicking a cell, and the list goes on. The nifty thing is that you can tell Excel to run a certain macro or piece of code when a particular event occurs.
Excel is programmed to monitor many different events. These events can be classified as:
· Workbook events: Events that occur for a particular workbook. Examples of such events include Open (the workbook is opened or created), BeforeSave (the workbook is about to be saved), and NewSheet (a new sheet is added).
· Worksheet events: Events that occur for a particular worksheet. Examples include Change (a cell on the sheet is changed), SelectionChange (the user moves the cell indicator), and Calculate (the worksheet is recalculated).
· Chart events: Events that occur for a particular chart. These events include Select (an object in the chart is selected) and SeriesChange (a value of a data point in a series is changed).
· Application events: Events that occur for the application (Excel). Examples include NewWorkbook (a new workbook is created), WorkbookBeforeClose (any workbook is about to be closed), and SheetChange (a cell in any open workbook is altered). To monitorApplication-level events, you need to use a class module.
· UserForm events: Events that occur for a particular UserForm or an object contained on the UserForm. For example, a UserForm has an Initialize event (occurs before the UserForm is displayed), and a CommandButton on a UserForm has a Click event (occurs when the button is clicked).
· Events not associated with objects: The final category consists of two useful Application-level events that we call On events: OnTime and OnKey. These work in a different manner than other events.
In the following sections, you’ll explore a few examples that demonstrate some of these events.
Understanding event sequences
Some actions trigger multiple events. For example, when you insert a new worksheet into a workbook, three Application-level events are triggered:
· WorkbookNewSheet: Occurs when a new worksheet is added
· SheetDeactivate: Occurs when the active worksheet is deactivated
· SheetActivate: Occurs when the newly added worksheet is activated
 Note
Note
Event sequencing is a bit more complicated than you might think. The preceding events are Application-level events. When adding a new worksheet, additional events occur at the Workbook level and at the Worksheet level.
At this point, just keep in mind that events fire in a particular sequence, and knowing that sequence may be critical when writing event-handler procedures. Later in this chapter, we describe how to determine the order of the events that occur for a particular action (see “Monitoring Application-level events”).
Where to put event-handler procedures
VBA newcomers often wonder why their event-handler procedures aren’t being executed when the corresponding event occurs. The answer is almost always because these procedures are located in the wrong place.
In the Visual Basic Editor (VBE) window, each project (one project per workbook) is listed in the Projects window. The project components are arranged in a collapsible list, as shown in Figure 6.1.
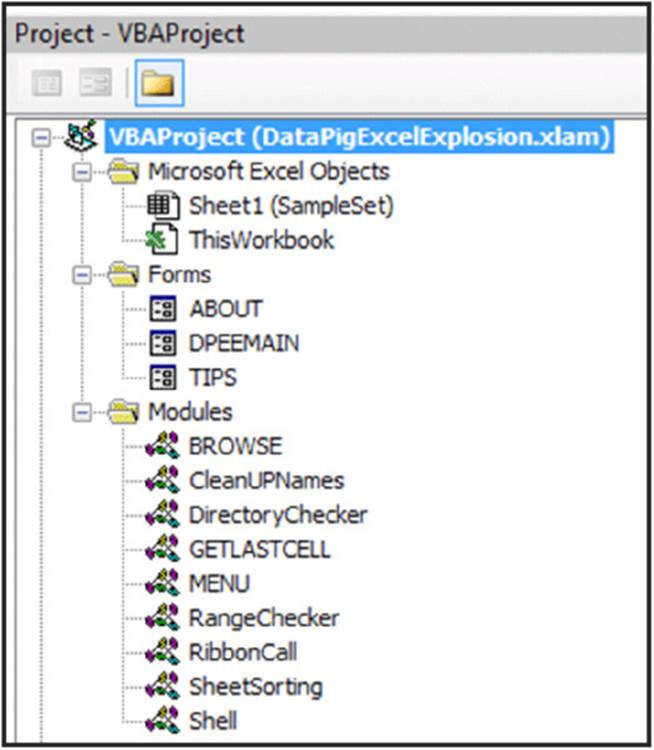
Figure 6.1 The components for each VBA project are listed in the Project window.
Each of the following components has its own code module:
· Sheet objects (for example, Sheet1, Sheet2, and so on): Use this module for event-handler code related to the particular worksheet.
· Chart objects (that is, chart sheets): Use this module for event-handler code related to the chart.
· ThisWorkbook object: Use this module for event-handler code related to the workbook.
· General VBA modules: You never put event-handler procedures in a general (that is, nonobject) module.
· UserForm objects: Use this module for event-handler code related to the UserForm or controls on the UserForm.
· Class modules: Use class modules for special-purpose event handlers, including application-level events and events for embedded charts.
Even though the event-handler procedure must be located in the correct module, the procedure can call other standard procedures stored in other modules. For example, the following event-handler procedure, located in the module for the ThisWorkbook object, calls a procedure named WorkbookSetup, which you can store in a regular VBA module:
Private Sub Workbook_Open()
Call WorkbookSetup
End Sub
 Events in older versions of Excel
Versions of Excel prior to Office 97 also supported events, but the programming techniques required to take advantage of those were quite different from what we describe in this chapter.
For example, if you had a procedure named Auto_Open stored in a regular VBA module, this procedure would be executed when the workbook was opened. Beginning with Excel 97, the Auto_Open procedure was supplemented by the Workbook_Open event-handler procedure, which was stored in the code module for the ThisWorkbook object and was executed prior to Auto_Open.
Before Excel 97, you often needed to explicitly set up events. For example, if you needed to execute a procedure whenever data was entered in a cell, you would need to execute a statement such as the following:
Sheets("Sheet1").OnEntry ="ValidateEntry"
This statement instructs Excel to execute the procedure named ValidateEntry whenever data is entered in a cell. With Excel 97 and later, you simply create a procedure named Worksheet_Change and store it in the code module for the Sheet1 object.
For compatibility, Excel 97 and later versions still support the older event mechanism (although they are no longer documented in the Help system).
Disabling events
By default, all events are enabled. To disable all events, execute the following VBA instruction:
Application.EnableEvents = False
To enable events, use this one:
Application.EnableEvents = True
Note
Disabling events does not apply to events triggered by UserForm controls — for example, the Click event generated by clicking a CommandButton control on a UserForm.
Why would you need to disable events? One common reason is to prevent an infinite loop of cascading events.
For example, suppose that cell A1 of your worksheet must always contain a value less than or equal to 12. You can write some code that is executed whenever data is entered in a cell to validate the cell’s contents. In this case, you’re monitoring the Change event for aWorksheet with a procedure named Worksheet_Change. Your procedure checks the user’s entry, and, if the entry isn’t less than or equal to 12, it displays a message and then clears that entry. The problem is that clearing the entry with your VBA code generates a newChange event, so your event-handler procedure is executed again. This is not what you want to happen, so you need to disable events before you clear the cell, and then enable events again so that you can monitor the user’s next entry.
Another way to prevent an infinite loop of cascading events is to declare a Static Boolean variable at the beginning of your event-handler procedure, such as this:
Static AbortProc As Boolean
Whenever the procedure needs to make its own changes, set the AbortProc variable to True (otherwise, make sure that it’s set to False). Insert the following code at the top of the procedure:
If AbortProc Then
AbortProc = False
Exit Sub
End if
The event procedure is reentered, but the True state of AbortProc causes the procedure to end. In addition, AbortProc is reset to False.
 Cross-Ref
For a practical example of validating data, see “Monitoring a range to validate data entry,” later in this chapter.
 Caution
Disabling events in Excel applies to all workbooks. For example, if you disable events in your procedure and then open another workbook that has, say, a Workbook_Open procedure, that procedure will not execute.
Entering event-handler code
Every event-handler procedure has a predetermined name, and you can’t change those names. Following are some examples of event-handler procedure names:
· Worksheet_SelectionChange
· Workbook_Open
· Chart_Activate
· Class_Initialize
You can declare the procedure by typing it manually, but a much better approach is to let VBE declare it for you.
Figure 6.2 shows the code module for the ThisWorkbook object. To insert a procedure declaration, select Workbook from the objects list on the left. Then select the event from the procedures list on the right. When you do so, you get a procedure shell that contains the procedure declaration line and an End Sub statement.
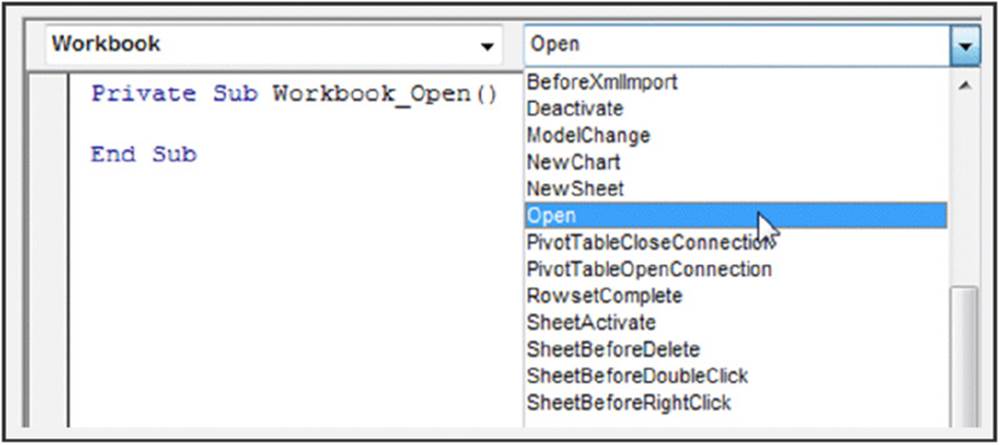
Figure 6.2 The best way to create an event procedure is to let VBE do it for you.
For example, if you select Workbook from the objects list and Open from the procedures list, VBE inserts the following (empty) procedure:
Private Sub Workbook_Open()
End Sub
Your VBA code, of course, goes between these two statements.
Note
Note that as soon as you select an item from the objects list (for example, Workbook or Worksheet), VBE inserts a procedure declaration automatically. Usually, the procedure definition is not the one you want. Simply choose the event you want from the procedures list on the right, and then delete the one that was generated automatically.
Event-handler procedures that use arguments
Some event-handler procedures use an argument list. For example, you may need to create an event-handler procedure to monitor the SheetActivate event for a workbook. If you use the technique described in the preceding section, VBE creates the following procedure in the code module for the ThisWorkbook object:
Private Sub Workbook_SheetActivate(ByVal Sh As Object)
End Sub
This procedure uses one argument (Sh), which represents the sheet that was activated. In this case, Sh is declared as an Object data type rather than a Worksheet data type because the activated sheet can also be a chart sheet.
Your code can use the data passed as an argument. The following procedure is executed whenever a sheet is activated. It displays the type and name of the activated sheet by using VBA’s TypeName function and accessing the Name property of the object passed in the argument:
Private Sub Workbook_SheetActivate(ByVal Sh As Object)
MsgBox TypeName(Sh) & vbCrLf & Sh.Name
End Sub
Figure 6.3 shows the message that appears when Sheet3 is activated.
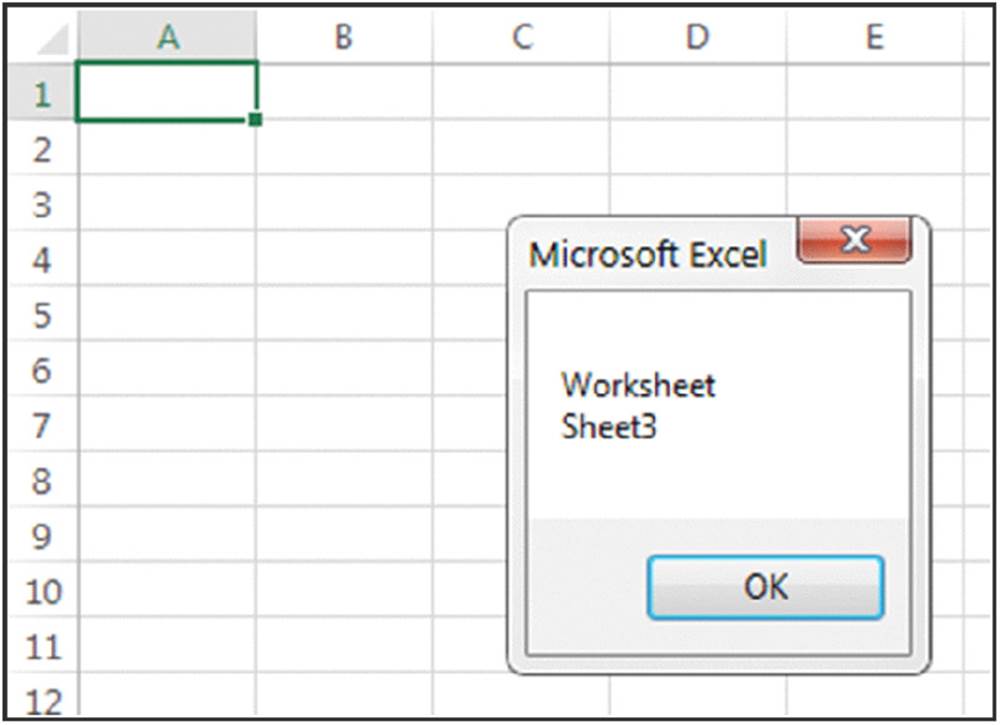
Figure 6.3 This message box was triggered by a SheetActivate event.
Several event-handler procedures use a Boolean argument named Cancel. For example, the declaration for a workbook’s BeforePrint event is as follows:
Private Sub Workbook_BeforePrint(Cancel As Boolean)
The value of Cancel passed to the procedure is False. However, your code can set Cancel to True, which will cancel the printing. The following example demonstrates this:
Private Sub Workbook_BeforePrint(Cancel As Boolean)
Dim Msg As String, Ans As Integer
Msg ="Have you loaded the 5164 label stock?"
Ans = MsgBox(Msg, vbYesNo,"About to print...")
If Ans = vbNo Then Cancel = True
End Sub
The Workbook_BeforePrint procedure is executed before the workbook is printed. This routine displays the message box shown in Figure 6.4. If the user clicks the No button, Cancel is set to True, and nothing is printed.
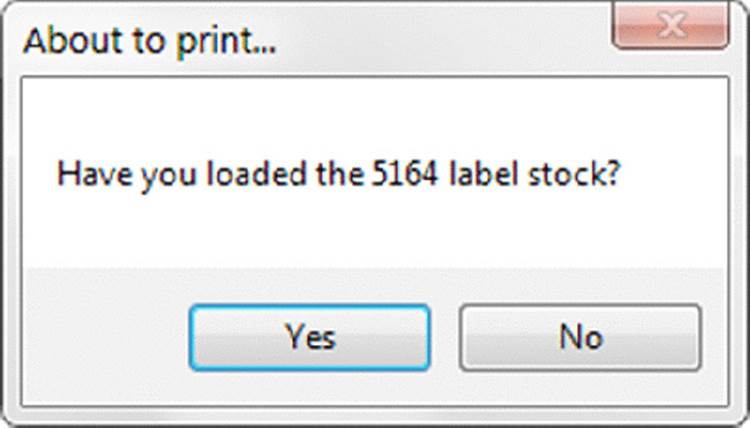
Figure 6.4 Clicking No cancels the print operation by changing the Cancel argument in the event-handler procedure.
 Tip
Tip
The BeforePrint event also occurs when the user previews a worksheet.
Unfortunately, Excel doesn’t provide a sheet-level BeforePrint event. Therefore, your code can’t determine which sheet is about to be printed. Often, you can assume that the ActiveSheet is the sheet that will be printed. However, there is no way to detect if the user requests that the entire workbook be printed.
Getting Acquainted with Workbook-Level Events
Workbook-level events occur in a particular workbook. Table 6.1 lists the commonly used workbook events, along with a brief description of each. Consult the Help system for a complete list of Workbook-level events. Workbook event-handler procedures are stored in the code module for the ThisWorkbook object.
Table 6.1 Commonly Used Workbook Events
|
Event |
Action That Triggers the Event |
|
Activate |
A workbook is activated. |
|
AddinInstall |
A workbook is installed as an add-in. |
|
AddinUninstall |
A workbook is uninstalled as an add-in. |
|
AfterSave |
A workbook has been saved. |
|
BeforeClose |
A workbook is about to be closed. |
|
BeforePrint |
A workbook (or anything in it) is about to be printed or previewed. |
|
BeforeSave |
A workbook is about to be saved. |
|
Deactivate |
A workbook is deactivated. |
|
NewSheet |
A new sheet is created in a workbook. |
|
Open |
A workbook is opened. |
|
SheetActivate |
Any sheet is activated. |
|
SheetBeforeDoubleClick |
Any worksheet is double-clicked. This event occurs before the default double-click action. |
|
SheetBeforeRightClick |
Any worksheet is right-clicked. This event occurs before the default right-click action. |
|
SheetCalculate |
Any worksheet is calculated (or recalculated). |
|
SheetChange |
Any worksheet is changed by the user or by an external link. |
|
SheetDeactivate |
Any sheet is deactivated. |
|
SheetFollowHyperlink |
A hyperlink on a sheet is clicked. |
|
SheetPivotTableUpdate |
A pivot table is changed or refreshed. |
|
SheetSelectionChange |
The selection on any worksheet is changed. |
|
WindowActivate |
Any workbook window is activated. |
|
WindowDeactivate |
Any workbook window is deactivated. |
|
WindowResize |
Any workbook window is resized. |
Cross-Ref
If you need to monitor events for any workbook, you need to work with Application-level events (see “Monitoring with Application Events,” later in this chapter). The remainder of this section presents examples of using Workbook-level events. All the example procedures that follow must be located in the code module for the ThisWorkbook object. If you put them into any other type of code module, they won’t work.
The Open event
One of the most common monitored events is the Open event for a workbook. This event is triggered when the workbook (or add-in) is opened and executes the procedure named Workbook_Open. A Workbook_Open procedure is often used for tasks such as these:
· Displaying welcome messages.
· Opening other workbooks.
· Setting up shortcut menus.
· Activating a particular sheet or cell.
· Ensuring that certain conditions are met. For example, a workbook may require that a particular add-in be installed.
· Setting up certain automatic features. For example, you can define key combinations (see “The OnKey event” section, later in this chapter).
· Setting a worksheet’s ScrollArea property (which isn’t stored with the workbook).
· Setting UserInterfaceOnly protection for worksheets so that your code can operate on protected sheets. This setting is an argument for the Protect method and isn’t stored with the workbook.
Note
Creating event-handler procedures doesn’t guarantee that they will be executed. If the user holds down the Shift key when opening a workbook, the workbook’s Workbook_Open procedure won’t execute. And, of course, the procedure won’t execute if the workbook is opened with macros disabled.
Following is an example of a Workbook_Open procedure. It uses the VBA Weekday function to determine the day of the week. If it’s Friday, a message box appears, reminding the user to submit a weekly report. If it’s not Friday, nothing happens.
Private Sub Workbook_Open()
If Weekday(Now) = vbFriday Then
Msg ="Today is Friday. Make sure that you"
Msg = Msg &"submit the TPS Report."
MsgBox Msg, vbInformation
End If
End Sub
The Activate event
The following procedure is executed whenever the workbook is activated. This procedure simply maximizes the active window. If the workbook window is already maximized, the procedure has no effect.
Private Sub Workbook_Activate()
ActiveWindow.WindowState = xlMaximized
End Sub
The SheetActivate event
The following procedure is executed whenever the user activates any sheet in the workbook. If the sheet is a worksheet, the code selects cell A1. If the sheet isn’t a worksheet, nothing happens. This procedure uses the VBA TypeName function to ensure that the activated sheet is a worksheet (as opposed to a chart sheet).
Private Sub Workbook_SheetActivate(ByVal Sh As Object)
If TypeName(Sh) ="Worksheet" Then Range("A1").Select
End Sub
The following procedure demonstrates an alternative method that doesn’t require checking the sheet type. In this procedure, the error is just ignored.
Private Sub Workbook_SheetActivate(ByVal Sh As Object)
On Error Resume Next
Range("A1").Select
End Sub
The NewSheet event
The following procedure is executed whenever a new sheet is added to the workbook. The sheet is passed to the procedure as an argument. Because a new sheet can be a worksheet or a chart sheet, this procedure determines the sheet type. If it’s a worksheet, the code adjusts the width of all columns and inserts a date and time stamp in cell A1 on the new sheet.
Private Sub Workbook_NewSheet(ByVal Sh As Object)
If TypeName(Sh) ="Worksheet" Then
Sh.Cells.ColumnWidth = 35
Sh.Range("A1") ="Sheet added" & Now()
End If
End Sub
The BeforeSave event
The BeforeSave event occurs before the workbook is saved. As you know, choosing the File ➜ Save command sometimes brings up the Save As dialog box. This dialog box appears if the workbook has never been saved or if it was opened in read-only mode.
When the Workbook_BeforeSave procedure is executed, it receives an argument (SaveAsUI) that indicates whether the Save As dialog box will be displayed. The following example demonstrates how to use the SaveAsUI argument:
Private Sub Workbook_BeforeSave _
(ByVal SaveAsUI As Boolean, Cancel As Boolean)
If SaveAsUI Then
MsgBox"Make sure you save this file on drive J."
End If
End Sub
When the user attempts to save the workbook, the Workbook_BeforeSave procedure is executed. If the save operation will display Excel’s Save As dialog box, the SaveAsUI variable is True. The Workbook_BeforeSave procedure checks this variable and displays a message only if the Save As dialog box will be displayed. If the procedure sets the Cancel argument to True, the file won’t be saved (or the Save As dialog box won’t be shown).
The Deactivate event
The following example demonstrates the Deactivate event. This procedure is executed whenever the workbook is deactivated and essentially never lets the user deactivate the workbook. One way to trigger the Deactivate event is to activate a different workbook window. When the Deactivate event occurs, the code reactivates the workbook and displays a message.
Private Sub Workbook_Deactivate()
Me.Activate
MsgBox"Sorry, you may not leave this workbook"
End Sub
This example also illustrates the importance of understanding event sequences. If you try out this procedure, you’ll see that it works well if the user attempts to activate another workbook. However, it’s important to understand that the workbook Deactivate event is also triggered by the following actions:
· Closing the workbook
· Opening a new workbook
· Minimizing the workbook
In other words, this procedure may not perform as it was originally intended. When programming event procedures, you need to make sure that you understand all the actions that can trigger the events.
The BeforePrint event
The BeforePrint event occurs when the user requests a print or a print preview but before the printing or previewing occurs. The event uses a Cancel argument, so your code can cancel the printing or previewing by setting the Cancel variable to True. Unfortunately, you can’t determine whether the BeforePrint event was triggered by a print request or by a preview request.
Updating a header or footer
Excel’s page header and footer options are flexible, but these options don’t include a common request: the capability to print the contents of a specific cell in the header or footer. The Workbook_BeforePrint event provides a way to display the current contents of a cell in the header or footer when the workbook is printed. The following code updates each sheet’s left footer whenever the workbook is printed or previewed. Specifically, it inserts the contents of cell A1 on Sheet1:
Private Sub Workbook_BeforePrint(Cancel As Boolean)
Dim sht As Object
For Each sht In ThisWorkbook.Sheets
sht.PageSetup.LeftFooter = Worksheets("Sheet1").Range("A1")
Next sht
End Sub
This procedure loops through each sheet in the workbook and sets the LeftFooter property of the PageSetup object to the value in cell A1 on Sheet1.
Hiding columns before printing
The example that follows uses a Workbook_BeforePrint procedure to hide columns B:D in Sheet1 before printing or previewing:
Private Sub Workbook_BeforePrint(Cancel As Boolean)
'Hide columns B:D on Sheet1 before printing
Worksheets("Sheet1").Range("B:D").EntireColumn.Hidden = True
End Sub
Ideally, you would want to unhide the columns after printing has occurred. It would be nice if Excel provided an AfterPrint event, but that event doesn’t exist. However, there is a way to unhide the columns automatically. The modified procedure that follows schedules an OnTime event, which calls a procedure named UnhideColumns five seconds after printing or previewing:
Private Sub Workbook_BeforePrint(Cancel As Boolean)
'Hide columns B:D on Sheet1 before printing
Worksheets("Sheet1").Range("B:D").EntireColumn.Hidden = True
Application.OnTime Now()+ TimeValue("0:00:05"),"UnhideColumns"
End Sub
The UnhideColumns procedure goes in a standard VBA module:
Sub UnhideColumns()
Worksheets("Sheet1").Range("B:D").EntireColumn.Hidden = False
End Sub
 On the Web
This example, named hide columns before printing.xlsm, is available on the book’s website.
Cross-Ref
For more information about OnTime events, see “The OnTime event,” later in this chapter.
The BeforeClose event
The BeforeClose event occurs before a workbook is closed. This event is often used with a Workbook_Open event handler. For example, you might use the Workbook_Open procedure to add shortcut menu items for your workbook and then use the Workbook_BeforeCloseprocedure to delete the shortcut menu items when the workbook is closed. That way, the custom menu is available only when the workbook is open.
Unfortunately, the Workbook_BeforeClose event isn’t implemented very well. For example, if you attempt to close a workbook that hasn’t been saved, Excel displays a prompt asking whether you want to save the workbook before closing, as shown in Figure 6.5. The problem is that the Workbook_BeforeClose event has already occurred by the time the user sees this message. If the user cancels, your event-handler procedure has already executed.

Figure 6.5 When this message appears, Workbook_BeforeClose has already done its thing.
Consider this scenario: You need to display custom shortcut menus when a particular workbook is open. Therefore, your workbook uses a Workbook_Open procedure to create the menu items when the workbook is opened and a Workbook_BeforeClose procedure to remove the menu items when the workbook is closed. These two event-handler procedures follow. Both of these call other procedures, which aren’t shown here.
Private Sub Workbook_Open()
Call CreateShortcutMenuItems
End Sub
Private Sub Workbook_BeforeClose(Cancel As Boolean)
Call DeleteShortcutMenuItems
End Sub
As we note earlier, the Excel Do you want to save ... prompt is displayed after the Workbook_BeforeClose event handler runs. So, if the user clicks Cancel, the workbook remains open, but the custom menu items have already been deleted.
One solution to this problem is to bypass Excel’s prompt and write your own code in the Workbook_BeforeClose procedure to ask the user to save the workbook. The following code demonstrates this solution:
Private Sub Workbook_BeforeClose(Cancel As Boolean)
Dim Msg As String
If Me.Saved = False Then
Msg ="Do you want to save the changes you made to"
Msg = Msg & Me.Name &"?"
Ans = MsgBox(Msg, vbQuestion + vbYesNoCancel)
Select Case Ans
Case vbYes
Me.Save
Case vbCancel
Cancel = True
Exit Sub
End Select
End If
Call DeleteShortcutMenuItems
Me.Saved = True
End Sub
This procedure checks the Saved property of the Workbook object to determine whether the workbook has been saved. If so, no problem — the DeleteShortcutMenuItems procedure is executed, and the workbook is closed. But if the workbook hasn’t been saved, the procedure displays a message box similar to the one that Excel would normally show (see Figure 6.6). The following lists details the effect of clicking each of the three buttons:
· Yes: The workbook is saved, the shortcut menu items are deleted, and the workbook is closed.
· No: The code sets the Saved property of the Workbook object to True (but doesn’t actually save the file), deletes the menu items, and closes the file.
· Cancel: The BeforeClose event is canceled, and the procedure ends without deleting the shortcut menu items.
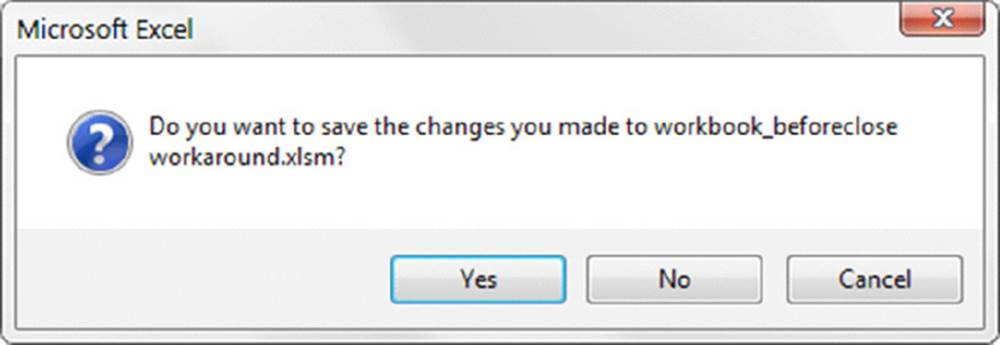
Figure 6.6 A message displayed by the Workbook_BeforeClose event procedure.
On the Web
A workbook with this example is available on the book’s website in the workbook_beforeclose workaround.xlsm file.
Examining Worksheet Events
The events for a Worksheet object are some of the most useful, because most of what happens in Excel occurs on a worksheet. Monitoring these events can make your applications perform feats that would otherwise be impossible.
Table 6.2 lists the most commonly used worksheet events, with a brief description of each.
Table 6.2 Commonly Used Worksheet Events
|
Event |
Action That Triggers the Event |
|
Activate |
The worksheet is activated. |
|
BeforeDelete |
The worksheet is about to be deleted. |
|
BeforeDoubleClick |
The worksheet is double-clicked. |
|
BeforeRightClick |
The worksheet is right-clicked. |
|
Calculate |
The worksheet is calculated (or recalculated). |
|
Change |
Cells on the worksheet are changed by the user or by an external link. |
|
Deactivate |
The worksheet is deactivated. |
|
FollowHyperlink |
A hyperlink on the sheet is clicked. |
|
PivotTableUpdate |
A pivot table on the sheet is updated. |
|
SelectionChange |
The selection on the worksheet is changed or refreshed. |
Remember that the code for a worksheet event must be stored in the code module for the specific worksheet.
Tip
To quickly activate the code module for a worksheet, right-click the sheet tab and then choose View Code.
The Change event
The Change event occurs when any cell in a worksheet is changed by the user or by a VBA procedure. The Change event does not occur when a calculation generates a different value for a formula or when an object is added to the sheet.
When the Worksheet_Change procedure is executed, it receives a Range object as its Target argument. This Range object represents the changed cell or range that triggered the event. The following procedure is executed whenever the worksheet is changed. It displays a message box that shows the address of the Target range:
Private Sub Worksheet_Change(ByVal Target As Range)
MsgBox"Range" & Target.Address &" was changed."
End Sub
To get a better feel for the types of actions that generate a Change event for a worksheet, enter the preceding procedure in the code module for a Worksheet object. After entering this procedure, activate Excel and make some changes to the worksheet by using various techniques. Every time the Change event occurs, you’ll see a message box that displays the address of the range that was changed.
When you run this procedure, you’ll discover some interesting quirks. Some actions that should trigger the event don’t, and other actions that shouldn’t trigger the event do!
· Changing the formatting of a cell doesn’t trigger the Change event (as expected). But copying and pasting formatting does trigger the Change event. Choosing the Home ➜ Editing ➜ Clear ➜ Clear Formats command also triggers the event.
· Merging cells doesn’t trigger the Change event, even if the contents of some of the merged cells are deleted in the process.
· Adding, editing, or deleting a cell comment doesn’t trigger the Change event.
· Pressing Delete generates an event even if the cell is empty to start with.
· Cells that are changed by using Excel commands may or may not trigger the Change event. For example, sorting a range or using Goal Seeker to change a cell does not trigger the event. But using the spell checker does.
· If your VBA procedure changes the contents of a cell, it does trigger the Change event.
As you can see from the preceding list, it’s not a good idea to rely on the Change event to detect cell changes for critical applications.
Monitoring a specific range for changes
The Change event occurs when any cell on the worksheet is changed. But, in most cases, all you care about are changes made to a specific cell or range. When the Worksheet_Change event handler procedure is called, it receives a Range object as its argument. This Rangeobject represents the cell or cells that were changed.
Assume that your worksheet has a range named InputRange, and you’d like to monitor changes made only within this range. There is no Change event for a Range object, but you can perform a quick check in the Worksheet_Change procedure:
Private Sub Worksheet_Change(ByVal Target As Range)
Dim MRange As Range
Set MRange = Range("InputRange")
If Not Intersect(Target, MRange) Is Nothing Then _
MsgBox"A changed cell is in the input range."
End Sub
This example uses a Range object variable named MRange, which represents the worksheet range that you want to monitor for changes. The procedure uses the VBA Intersect function to determine whether the Target range (passed to the procedure in its argument) intersects with MRange. The Intersect function returns an object that consists of all cells contained in both of its arguments. If the Intersect function returns Nothing, the ranges have no cells in common. The Not operator is used so that the expression returns True if the ranges do have at least one cell in common. Therefore, if the changed range has any cells in common with the range named InputRange, a message box is displayed. Otherwise, the procedure ends, and nothing happens.
Monitoring a range to make formulas bold
The following example monitors a worksheet and also makes formula entries bold and nonformula entries not bold:
Private Sub Worksheet_Change(ByVal Target As Range)
Dim cell As Range
For Each cell In Target
If cell.HasFormula Then cell.Font.Bold = True
Next cell
End Sub
Because the object passed to the Worksheet_Change procedure can consist of a multicell range, the procedure loops through each cell in the Target range. If the cell has a formula, the cell is made bold. Otherwise, the Bold property is set to False.
The procedure works, but it has a problem. What if the user deletes a row or column? In such a case, the Target range consists of a huge number of cells. The For Each loop would take a long time to examine them all — and it wouldn’t find any formulas.
The modified procedure listed next solves this problem by changing the Target range to the intersection of the Target range and the worksheet’s used range. The check to ensure that Target is Not Nothing handles the case in which an empty row or column outside the used range is deleted.
Private Sub Worksheet_Change(ByVal Target As Range)
Dim cell As Range
Set Target = Intersect(Target, Target.Parent.UsedRange)
If Not Target Is Nothing Then
For Each cell In Target
cell.Font.Bold = cell.HasFormula
Next cell
End If
End Sub
On the Web
This example, named make formulas bold.xlsm, is available on the book’s website.
Caution
A Worksheet_Change procedure may affect Excel’s Undo feature, a potentially serious side effect. Excel’s Undo stack is destroyed whenever an event procedure makes a change to the worksheet. In the preceding example, making a cell entry triggers a formatting change — which destroys the Undo stack.
Monitoring a range to validate data entry
Excel’s data validation feature is a useful tool, but it suffers from a potentially serious problem. When you paste data to a cell that uses data validation, the pasted value not only fails to get validated but also deletes the validation rules associated with the cell! This fact makes the data validation feature practically worthless for critical applications. In this section, we demonstrate how you can use the Change event for a worksheet to create your own data validation procedure.
On the Web
The book’s website contains two versions of this example. One (named validate entry1.xlsm) uses the EnableEvents property to prevent cascading Change events; the other (named validate entry2.xlsm) uses a Static variable. See “Disabling events,” earlier in this chapter.
The Worksheet_Change procedure that follows is executed when a user changes a cell. The validation is restricted to the range named InputRange. Values entered into this range must be integers between 1 and 12.
Private Sub Worksheet_Change(ByVal Target As Range)
Dim VRange As Range, cell As Range
Dim Msg As String
Dim ValidateCode As Variant
Set VRange = Range("InputRange")
If Intersect(VRange, Target) Is Nothing Then Exit Sub
For Each cell In Intersect(VRange, Target)
ValidateCode = EntryIsValid(cell)
If TypeName(ValidateCode) ="String" Then
Msg ="Cell" & cell.Address(False, False) &":"
Msg = Msg & vbCrLf & vbCrLf & ValidateCode
MsgBox Msg, vbCritical,"Invalid Entry"
Application.EnableEvents = False
cell.ClearContents
cell.Activate
Application.EnableEvents = True
End If
Next cell
End Sub
The Worksheet_Change procedure creates a Range object (named VRange) that represents the worksheet range that is validated. Then it loops through each cell in the Target argument, which represents the cell or cells that were changed. The code determines whether each cell is contained in the range to be validated. If so, it passes the cell as an argument to a custom function (EntryIsValid), which returns True if the cell is a valid entry.
If the entry isn’t valid, the EntryIsValid function returns a string that describes the problem, and the user is informed by a message box (see Figure 6.7). When the message box is dismissed, the invalid entry is cleared from the cell and the cell is activated. Note that events are disabled before the cell is cleared. If events weren’t disabled, clearing the cell would produce a Change event that causes an endless loop.
Also, note that entering an invalid value clears Excel’s Undo stack.
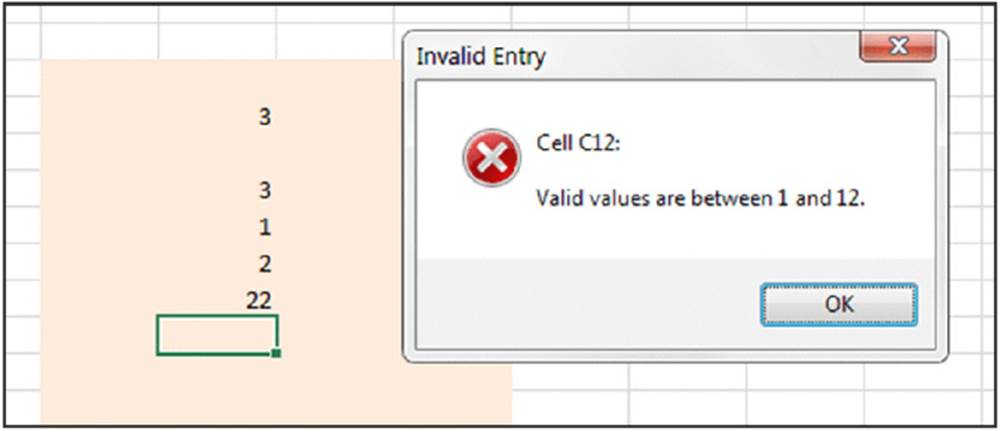
Figure 6.7 This message box describes the problem when the user makes an invalid entry.
The EntryIsValid function procedure is shown here:
Private Function EntryIsValid(cell) As Variant
' Returns True if cell is an integer between 1 and 12
' Otherwise it returns a string that describes the problem
' Numeric?
If Not WorksheetFunction.IsNumber (cell) Then
EntryIsValid ="Non-numeric entry."
Exit Function
End If
' Integer?
If CInt(cell) <> cell Then
EntryIsValid ="Integer required."
Exit Function
End If
' Between 1 and 12?
If cell < 1 Or cell > 12 Then
EntryIsValid ="Valid values are between 1 and 12."
Exit Function
End If
' It passed all the tests
EntryIsValid = True
End Function
The preceding technique works, but setting it up is tedious. Wouldn’t it be nice if you could take advantage of Excel’s data validation feature, yet ensure that the data validation rules aren’t deleted if the user pastes data into the validation range? The next example does the trick:
Private Sub Worksheet_Change(ByVal Target As Range)
Dim VT As Long
'Do all cells in the validation range
'still have validation?
On Error Resume Next
VT = Range("InputRange").Validation.Type
If Err.Number <> 0 Then
Application.Undo
MsgBox"Your last operation was canceled." & _
"It would have deleted data validation rules.", vbCritical
End If
End Sub
This event procedure checks the validation type of InputRange, the range that is supposed to contain the data validation rules. If the VT variable contains an error, one or more cells in the InputRange no longer contain data validation. In other words, the worksheet change probably resulted from data being copied into the range that contains data validation. If that’s the case, the code executes the Undo method of the Application object and reverses the user’s action. Then it displays the message box shown in Figure 6.8.
Note
This procedure works correctly only if all cells in the validation range contain the same type of data validation.
Note
A nice side-benefit to using this procedure is that the Undo stack isn’t destroyed.
On the Web
This example, named validate entry3.xlsm, is available on the book’s website.

Figure 6.8 The Worksheet_Change procedure ensures that data validation isn’t deleted.
The SelectionChange event
The following procedure demonstrates the SelectionChange event. It’s executed whenever the user makes a new selection in the worksheet.
Private Sub Worksheet_SelectionChange(ByVal Target As Range)
Cells.Interior.ColorIndex = xlNone
With ActiveCell
.EntireRow.Interior.Color = RGB(219, 229, 241)
.EntireColumn.Interior.Color = RGB(219, 229, 241)
End With
End Sub
This procedure shades the row and column of the active cell, which makes identifying the active cell easy. The first statement removes the background color for all cells in the worksheet. Next, the entire row and column of the active cell is shaded. Figure 6.9 shows the shading in effect.
Figure 6.9 Moving the cell cursor shades the active cell’s row and column.
You won’t want to use the procedure if your worksheet contains any background shading because the shading will be wiped out. The exceptions are tables with a style applied and background colors resulting from conditional formatting. In both these instances, the background color is maintained. Keep in mind, however, that executing the Worksheet_SelectionChange macro destroys the Undo stack, so using this technique essentially disables Excel’s Undo feature.
On the Web
This example, named shade active row and column.xlsm, is available on the book’s website.
The BeforeDoubleClick event
You can set up a VBA procedure to be executed when the user double-clicks a cell. In the following example (which is stored in the code window for a Sheet object), double-clicking a cell toggles the cell’s style. If the cell style is "Normal", it applies the "Good" style. If the style is "Good", it applies the "Normal" style.
Private Sub Worksheet_BeforeDoubleClick _
(ByVal Target As Range, Cancel As Boolean)
If Target.Style ="Good" Then
Target.Style ="Normal"
Else
Target.Style ="Good"
End If
Cancel = True
End Sub
If Cancel is set to True, the default double-click action doesn’t occur. In other words, double-clicking the cell won’t put Excel into cell edit mode. Keep in mind that every-double click also destroys the Undo stack.
The BeforeRightClick event
When the user right-clicks in a worksheet, Excel displays a shortcut menu. If, for some reason, you’d like to prevent the shortcut menu from appearing in a particular sheet, you can trap the RightClick event. The following procedure sets the Cancel argument to True, which cancels the RightClick event and thereby cancels the shortcut menu, and then displays a message box:
Private Sub Worksheet_BeforeRightClick _
(ByVal Target As Range, Cancel As Boolean)
Cancel = True
MsgBox"The shortcut menu is not available."
End Sub
Keep in mind that the user can still access the shortcut menu by using Shift+F10. However, only a tiny percentage of Excel users are aware of that keystroke combination.
Cross-Ref
To find out how to intercept the Shift+F10 key combination, see “The OnKey event,” later in this chapter. Chapter 18 describes other methods for disabling shortcut menus.
Following is another example that uses the BeforeRightClick event. This procedure checks to see whether the cell that was right-clicked contains a numeric value. If so, the code displays the Number tab of the Format Cells dialog box and sets the Cancel argument toTrue (avoiding the normal shortcut menu display). If the cell doesn’t contain a numeric value, nothing special happens — the shortcut menu is displayed as usual.
Private Sub Worksheet_BeforeRightClick _
(ByVal Target As Range, Cancel As Boolean)
If IsNumeric(Target) And Not IsEmpty(Target) Then
Application.CommandBars.ExecuteMso ("NumberFormatsDialog")
Cancel = True
End If
End Sub
Note that the code makes an additional check to determine if the cell is not empty. This check is added because VBA considers empty cells to be numeric.
Using the Object Browser to locate events
The Object Browser is a useful tool that can help you learn about objects and their properties and methods. It can also help you find out which objects support a particular event. For example, say you’d like to find out which objects support the MouseMoveevent. Activate VBE and press F2 to display the Object Browser window. Make sure that <All Libraries> is selected; then type MouseMove and click the binoculars icon.
The Object Browser displays a list of matching items. Events are indicated with a small yellow lightning bolt icon next to the event name. Click the event you are looking for, and check the status bar at the bottom of the list for the appropriate usage syntax.
Monitoring with Application Events
In earlier sections, we discuss Workbook events and Worksheet events. Those events are monitored for a particular workbook. If you want to monitor events for all open workbooks or all worksheets, you use Application-level events.
Note
Creating event-handler procedures to handle Application events always requires a class module and some setup work.
Table 6.3 lists commonly used Application events with a brief description of each. Consult the Help system for details.
Table 6.3 Commonly Used Events Recognized by the Application Object
|
Event |
Action That Triggers the Event |
|
AfterCalculate |
A calculation has been completed and no outstanding queries exist. |
|
NewWorkbook |
A new workbook is created. |
|
SheetActivate |
Any sheet is activated. |
|
SheetBeforeDoubleClick |
Any worksheet is double-clicked. This event occurs before the default double-click action. |
|
SheetBeforeRightClick |
Any worksheet is right-clicked. This event occurs before the default right-click action. |
|
SheetCalculate |
Any worksheet is calculated (or recalculated). |
|
SheetChange |
Cells in any worksheet are changed by the user or by an external link. |
|
SheetDeactivate |
Any sheet is deactivated. |
|
SheetFollowHyperlink |
A hyperlink is clicked. |
|
SheetPivotTableUpdate |
Any pivot table is updated. |
|
SheetSelectionChange |
The selection changes on any worksheet except a chart sheet. |
|
WindowActivate |
Any workbook window is activated. |
|
WindowDeactivate |
Any workbook window is deactivated. |
|
WindowResize |
Any workbook window is resized. |
|
WorkbookActivate |
Any workbook is activated. |
|
WorkbookAddinInstall |
A workbook is installed as an add-in. |
|
WorkbookAddinUninstall |
Any add-in workbook is uninstalled. |
|
WorkbookBeforeClose |
Any open workbook is closed. |
|
WorkbookBeforePrint |
Any open workbook is printed. |
|
WorkbookBeforeSave |
Any open workbook is saved. |
|
WorkbookDeactivate |
Any open workbook is deactivated. |
|
WorkbookNewSheet |
A new sheet is created in any open workbook. |
|
WorkbookOpen |
A workbook is opened. |
Enabling Application-level events
To use Application-level events, you need to do the following:
1. Insert a new class module.
2. Set a name for this class module in the Properties window under Name.
By default, VBA gives each new class module a default name like Class1, Class2, and so on. You may want to give your class module a more meaningful name, such as clsApp.
3. In the class module, declare a public Application object by using the WithEvents keyword.
For example:
Public WithEvents XL As Application
4. Create a variable that you’ll use to refer to the declared Application object in the class module.
It should be a module-level object variable declared in a regular VBA module (not in the class module). For example:
Dim X As New clsApp
5. Connect the declared object with the Application object.
This step is often done in a Workbook_Open procedure. For example:
Set X.XL = Application
6. Write event-handler procedures for the XL object in the class module.
Determining when a workbook is opened
The example in this section keeps track of every workbook that is opened by storing information in a comma-separated variable (CSV) text file. You can import this file into Excel.
We start by inserting a new class module and naming it clsApp. The code in the class module is:
Public WithEvents AppEvents As Application
Private Sub AppEvents_WorkbookOpen (ByVal Wb As Excel.Workbook)
Call UpdateLogFile(Wb)
End Sub
This code declares AppEvents as an Application object with events. The AppEvents_WorkbookOpen procedure will be called whenever a workbook is opened. This event-handler procedure calls UpdateLogFile and passes the Wb variable, which represents the workbook that was opened. We then added a VBA module and inserted the following code:
Dim AppObject As New clsApp
Sub Init()
' Called by Workbook_Open
Set AppObject.AppEvents = Application
End Sub
Sub UpdateLogFile(Wb)
Dim txt As String
Dim Fname As String
txt = Wb.FullName
txt = txt &"," & Date &"," & Time
txt = txt &"," & Application.UserName
Fname = Application.DefaultFilePath &"\logfile.csv"
Open Fname For Append As #1
Print #1, txt
Close #1
MsgBox txt
End Sub
Note at the top that the AppObject variable is declared as type clsApp (the name of the class module). The call to Init is in the Workbook_Open procedure, which is in the code module for ThisWorkbook. This procedure is as follows:
Private Sub Workbook_Open()
Call Init
End Sub
The UpdateLogFile procedure opens a text file — or creates the text file if it doesn’t exist. The procedure then writes key information about the workbook that was opened: the filename and full path, the date, the time, and the username.
The Workbook_Open procedure calls the Init procedure. Therefore, when the workbook opens, the Init procedure creates the object variable. The final statement uses a message box to display the information that was written to the CSV file. You can delete this statement if you prefer not to see that message.
On the Web
This example, named log workbook open.xlsm, is available on the book’s website.
Monitoring Application-level events
To get a feel for the event-generation process, you may find it helpful to see a list of events that get generated as you go about your work.
Figure 6.10 illustrates a workbook (ApplicationEventTracker.xlsm) found with the sample files for this chapter. This workbook displays descriptions for various Application-level events as they occur. You might find this workbook helpful when learning about the types and sequence of events that occur.
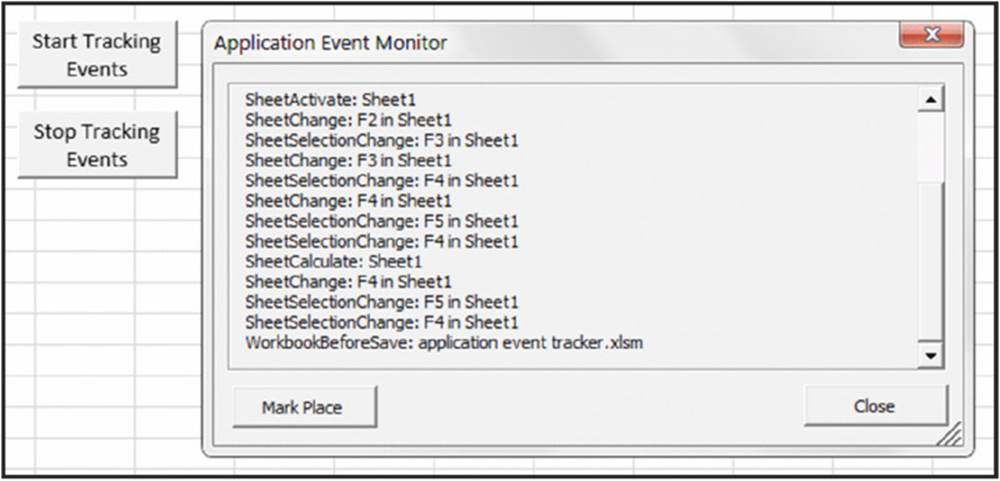
Figure 6.10 This workbook uses a class module to monitor all Application-level events.
On the Web
This example is available on the book’s website in the ApplicationEventTracker .xlsm file.
The workbook contains a class module with 21 procedures defined, one for each of the commonly used Application-level events.
Accessing Events Not Associated with an Object
The events that we discuss earlier in this chapter are all associated with an object (Application, Workbook, Sheet, and so on). In this section, we discuss two additional rogue events: OnTime and OnKey. Instead of being associated with an object, these events are accessed by using methods of the Application object.
Note
Unlike the other events discussed in this chapter, you program these On events in a general VBA module.
The OnTime event
The OnTime event occurs at a specified time of day. The following example demonstrates how to program Excel so that it beeps and displays a message at 3 p.m.:
Sub SetAlarm()
Application.OnTime TimeValue("15:00:00"),"DisplayAlarm"
End Sub
Sub DisplayAlarm()
Beep
MsgBox"Wake up. It's time for your afternoon break!"
End Sub
In this example, the SetAlarm procedure uses the OnTime method of the Application object to set up the OnTime event. This method takes two arguments: the time (3 p.m., in the example) and the procedure to execute when the time occurs (DisplayAlarm in the example). After SetAlarm is executed, the DisplayAlarm procedure will be called at 3 p.m., displaying the message in Figure 6.11.
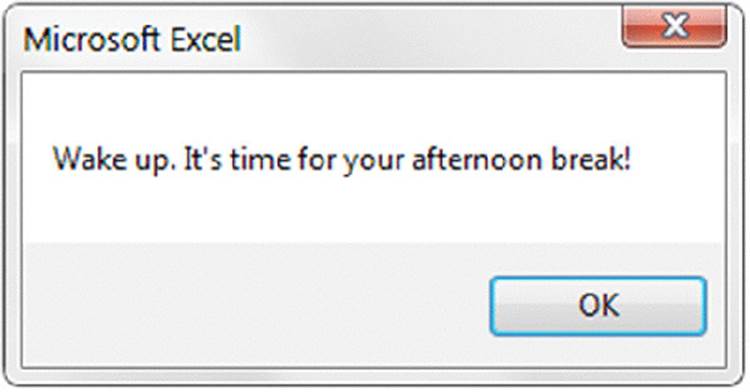
Figure 6.11 This message box was programmed to display at a particular time of day.
If you want to schedule an event relative to the current time — for example, 20 minutes from now — you can write an instruction like this:
Application.OnTime Now + TimeValue("00:20:00"),"DisplayAlarm"
You can also use the OnTime method to schedule a procedure on a particular day. The following statement runs the DisplayAlarm procedure at 12:01 a.m. on April 1, 2013:
Application.OnTime DateSerial(2013, 4, 1) + _
TimeValue("00:00:01"),"DisplayAlarm"
Note
The OnTime method has two additional arguments. If you plan to use this method, you should refer to the online help for complete details.
The two procedures that follow demonstrate how to program a repeated event. In this case, cell A1 is updated with the current time every five seconds. Executing the UpdateClock procedure writes the time to cell A1 and also programs another event five seconds later. This event reruns the UpdateClock procedure. To stop the events, execute the StopClock procedure (which cancels the event). Note that NextTick is a module-level variable that stores the time for the next event.
On the Web
This example, named ontime event demo.xlsm, is available on the book’s website.
Dim NextTick As Date
Sub UpdateClock()
' Updates cell A1 with the current time
ThisWorkbook.Sheets(1).Range("A1") = Time
' Set up the next event five seconds from now
NextTick = Now + TimeValue("00:00:05")
Application.OnTime NextTick,"UpdateClock"
End Sub
Sub StopClock()
' Cancels the OnTime event (stops the clock)
On Error Resume Next
Application.OnTime NextTick,"UpdateClock", , False
End Sub
Caution
The OnTime event persists even after the workbook is closed. In other words, if you close the workbook without running the StopClock procedure, the workbook will reopen itself in five seconds (assuming that Excel is still running). To prevent this, use aWorkbook_BeforeClose event procedure that contains the following statement:
Call StopClock
The OnKey event
While you’re working, Excel constantly monitors what you type. Because of this monitoring, you can set up a keystroke or a key combination that, when pressed, executes a particular procedure. The only time these keystrokes won’t be recognized is when you’re entering a formula or working with a dialog box.
Caution
It’s important to understand that creating a procedure to respond to an OnKey event isn’t limited to a single workbook. The re-mapped keystroke is valid in all open workbooks, not just the one in which you created the event procedure.
Also, if you set up an OnKey event, make sure that you provide a way to cancel the event. A common way to do this is to use the Workbook_BeforeClose event procedure.
An OnKey event example
The following example uses the OnKey method to set up an OnKey event. This event reassigns the PgDn and PgUp keys. After the Setup_OnKey procedure is executed, pressing PgDn executes the PgDn_Sub procedure, and pressing PgUp executes the PgUp_Sub procedure. The net effect is that pressing PgDn moves the cursor down one row, and pressing PgUp moves the cursor up one row. Key combinations that use PgUp and PgDn aren’t affected. So, for example, Ctrl+PgDn will continue to activate the next worksheet in a workbook.
Sub Setup_OnKey()
Application.OnKey"{PgDn}","PgDn_Sub"
Application.OnKey"{PgUp}","PgUp_Sub"
End Sub
Sub PgDn_Sub()
On Error Resume Next
ActiveCell.Offset(1, 0).Activate
End Sub
Sub PgUp_Sub()
On Error Resume Next
ActiveCell.Offset(-1, 0).Activate
End Sub
On the Web
This example, named onkey event demo.xlsm, is available on the book’s website.
In the previous examples, we use On Error Resume Next to ignore any errors that are generated. For example, if the active cell is in the first row, trying to move up one row causes an error. Also, if the active sheet is a chart sheet, an error will occur because there is no such thing as an active cell in a chart sheet.
By executing the following procedure, you cancel the OnKey events and return these keys to their normal functionality:
Sub Cancel_OnKey()
Application.OnKey"{PgDn}"
Application.OnKey"{PgUp}"
End Sub
Contrary to what you might expect, using an empty string as the second argument for the OnKey method does not cancel the OnKey event. Rather, it causes Excel to simply ignore the keystroke and do nothing. For example, the following instruction tells Excel to ignore Alt+F4 (the percent sign represents the Alt key):
Application.OnKey"%{F4}",""
Cross-Ref
Although you can use the OnKey method to assign a shortcut key for executing a macro, it’s better to use the Macro Options dialog box for this task. For more details, see Chapter 4.
Key Codes
In the previous section, note that the PgDn keystroke appears in braces. Table 6.4 shows the key codes that you can use in your OnKey procedures.
Table 6.4 Key Codes for the OnKey Event
|
Key |
Code |
|
Backspace |
{BACKSPACE} or {BS} |
|
Break |
{BREAK} |
|
Caps Lock |
{CAPSLOCK} |
|
Delete or Del |
{DELETE} or {DEL} |
|
Down Arrow |
{DOWN} |
|
End |
{END} |
|
Enter |
∼ (tilde) |
|
Enter (on the numeric keypad) |
{ENTER} |
|
Escape |
{ESCAPE} or {ESC} |
|
Home |
{HOME} |
|
Ins |
{INSERT} |
|
Left Arrow |
{LEFT} |
|
NumLock |
{NUMLOCK} |
|
PgDn |
{PGDN} |
|
PgUp |
{PGUP} |
|
Right Arrow |
{RIGHT} |
|
Scroll Lock |
{SCROLLLOCK} |
|
Tab |
{TAB} |
|
Up Arrow |
{UP} |
|
F1 through F15 |
{F1} through {F15} |
You can also specify keys combined with Shift, Ctrl, and Alt. To specify a key combined with another key or keys, use the following symbols:
· Shift: Plus sign (+)
· Ctrl: Caret (^)
· Alt: Percent sign (%)
For example, to assign a procedure to the Ctrl+Shift+A key, use this code:
Application.OnKey"^+A","SubName"
To assign a procedure to Alt+F11 (which is normally used to switch to the VB Editor window), use this code:
Application.OnKey"%{F11}","SubName"
Disabling shortcut menus
Earlier in this chapter, we discuss a Worksheet_BeforeRightClick procedure that disables the right-click shortcut menu. The following procedure is placed in the ThisWorkbook code module:
Private Sub Worksheet_BeforeRightClick _
(ByVal Target As Range, Cancel As Boolean)Cancel = True
MsgBox"The shortcut menu is not available."
End Sub
The user could still display the shortcut menu by pressing Shift+F10. To intercept the Shift+F10 key combination, add these procedures to a standard VBA module:
Sub SetupNoShiftF10()
Application.OnKey"+{F10}","NoShiftF10"
End Sub
Sub TurnOffNoShiftF10()
Application.OnKey"+{F10}"
End Sub
Sub NoShiftF10()
MsgBox"Nice try, but that doesn't work either."
End Sub
After the SetupNoShiftF10 procedure is executed, pressing Shift+F10 displays the message box shown in Figure 6.12. Remember that the Worksheet_BeforeRightClick procedure is valid only in its own workbook. The Shift+F10 key event, on the other hand, applies to all open workbooks.
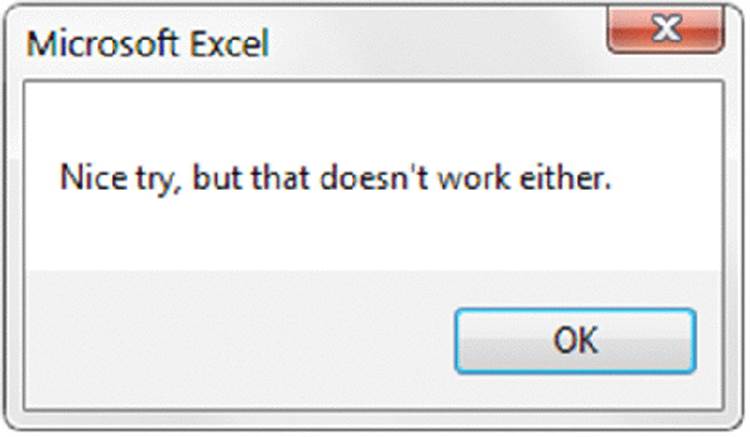
Figure 6.12 Pressing Shift+F10 displays this message.
On the Web
The book’s website contains a workbook that includes all the OnKey procedures. The file, named no shortcut menus.xlsm, includes workbook event-handler procedures: Workbook_Open executes the SetupNoShiftF10 procedure, and Workbook_BeforeClose calls theTurnOffNoShiftF10 procedure.