Scaling PHP Applications (2014)
Case Study: Optimizing image handling in PHP
As you can probably imagine, resizing images is a huge part of the workload that our systems spend time on at Twitpic. With the 8MP camera in an iPhone 5 (and up to 13MP in some of the newer Android phones), even mobile users are capable of snapping and uploading pictures that easily exceed 10MB.
Almost anytime an image is uploaded by a user into a web application, it needs to be resized and post-processed for a few different reasons.
1. Reduce the file size, sending a 10MB image to the browser is not a best practice :)
2. Standardize on a dimension size. For Twitpic, it’s 600px wide
3. Standardize on a particular image format (usually, but not always, JPEG)
4. Generate multiple image versions (several thumbnails, retina versions)
5. Rotate the image to align it with the orientation of the camera when it was taken
6. Strip out EXIF, Camera Model, GPS Coordinates, and other sensitive information from headers
Processing images in your stack can be tricky, though, since post-processing and resizing tend to be CPU intensive and moving large files around consumes a noticeable amount of Disk I/O and Network Bandwidth.
The naive “PHP Tutorial” way
If you look for information on basic image processing in PHP, you’ll almost exclusively find references telling you that you should be using ImageMagick— and for good reason! ImageMagick is a very robust, well-supported library can convert, resize, and modify almost any any image format. It’s like Adobe Photoshop™ for the command-line.
What does the naive, unoptimized image upload and resizing code look like with ImageMagick? The example below shows you some example code to receive a file upload, scale it to a 600px JPEG, and create a 150x150 thumbnail.
1 <?php
2
3 class Image_Controller extends Controller {
4
5 // Image upload is posted to this method
6 public function create() {
7
8 if (isset($_FILES["upload"])) {
9
10 $tmp = $_FILES["upload"]["tmp_file"];
11
12 // Create the Scaled 600x400 Size
13 exec("convert -resize 600x400 {$tmp} /u/scaled.jpg");
14
15 // Create the 150x150 Thumbnail
16 exec("convert -thumbnail x300 -resize 150x< -resize 50%
17 -gravity center -crop 150x150+0+0 +repage
18 {$tmp} /u/thumbnail.jpg");
19
20 // Delete the temporary file
21 @unlink($tmp);
22 }
23 }
24 }
Well, what’s so bad about this code? It’s just taking the raw image (from $tmp) and running some ImageMagick commands on it. Performance-wise, there are a handful of problems wrong with the code. Can you guess them?
1. Image resizing is a CPU-heavy and slow process, especially on big images. If possible, resizing and post-processing should be moved to a Resque worker. Admittedly, in most scenarios the user expects the image to be resized and available immediately, so a background worker is not always possible. We’ll assume, for the rest of this case study, that using a Resque worker is not an option.
2. ImageMagick doesn’t have a very actively updated PECL extension, so using the C library is out of the question— we have to use exec() to fork a new process and run it from the command-line. Calling exec() is a SLLOOOWW call, and on EC2 (or any Xen-based virtualization), can take up to 1 or 2 seconds JUST FOR THE process to fork()! Not only is it slow, but it can also be a vector for DOS attacking your servers.
3. When making multiple versions of an image, it’s better to use the smallest size available instead of resizing the raw image multiple times. It’s much faster to create the 150x150 thumbnail from the newly created 600x400 instead of re-processing the raw 10MB, 4096x2048 pixel image each time.
It’s not all in the code— tracing file uploads through the stack
Fixing the three issues previously mentioned will certainly improve your image handling performance, but there’s a less apparent problem hidden in the LHNMPRR stack.
Let’s assume a 10MB image is uploaded by one of your users. This is how it would flow through your stack if you designed it exactly as described in this book.
Deconstructing a file upload
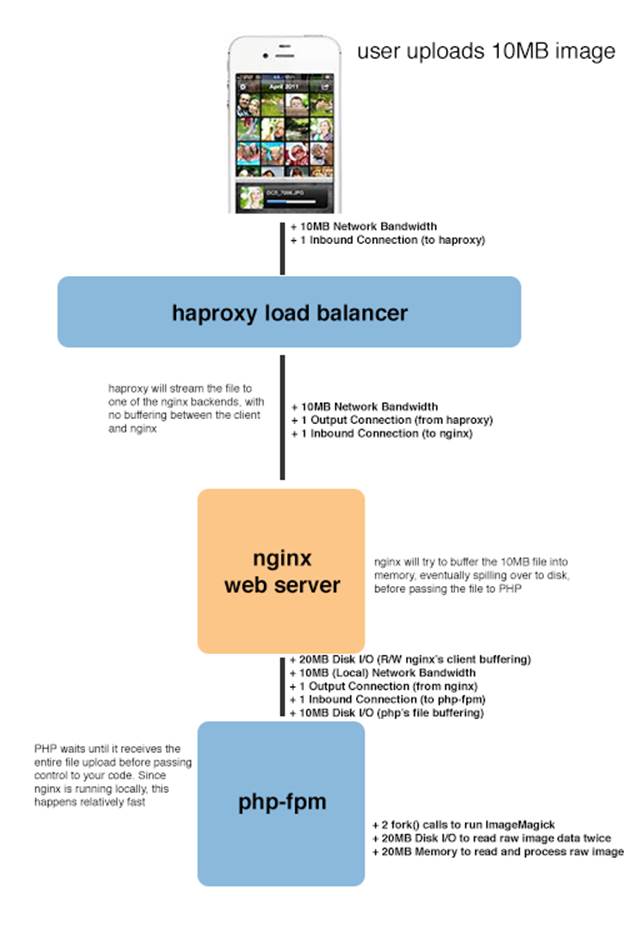
Moving a 10MB image through the LNHMPRR stack
1. The user kicks the process off by uploading their file, via web browser or mobile app, by sending an HTTP POST with the file (+10MB Network Bandwidth). The HAProxy load balancer receives this file upload and immediately starts streaming it to one of the nginx App Servers (+10MB Network Bandwidth). HAProxy does not buffer any of the data from the client in memory or onto disk, it passes straight through.
2. Nginx begins receiving the file upload from HAProxy and begins buffering it into memory. Depending on the size of client_body_buffer_size (8KB out of the box), nginx will spill over to disk and stop buffering the file in memory until the entire file has been transferred. (+10MB Disk Write I/O)
3. Once the file upload has been completely transferred from HAProxy, nginx will begin reading the file back (+10MB Disk Read I/O) as it transfers it to PHP-FPM using FastCGI (+10MB Local Network Bandwidth). Since PHP-FPM is running locally and (hopefully) using Unix Sockets, this is a quick operation.
4. PHP-FPM notices the file upload and begins streaming it, you guessed it, back onto disk (+10MB Disk Write I/O). This PHP-FPM worker will be stuck in a “busy” state and your PHP code will not begin executing until the entire file is received from nginx.
5. Once the file upload finally makes it into PHP and your code starts running, the ImageMagick resizing runs, reading the file into memory twice to process it. (+20MB Disk Read I/O, +20MB Memory).
It turns out, moving that image around actually consumes far more than just 10MB of resources! In fact, at the end of the day, it takes 50MB of Disk I/O, 30MB of Network Bandwidth, and 20MB of Memory. Crazy! Imagine if you were working with videos!
|
Resource |
Amount |
|
Network Bandwidth |
30MB |
|
Disk I/O |
50MB |
|
Memory |
20MB |
What an inefficient process that just seems to juggle the exact same data around from system to system. We can optimize this by avoiding Disk I/O and trying to keep the data in memory for as long as possible.
There are two places the file goes in and out of memory— the first is during the nginx buffering process and the second is when it’s received by PHP. We’ll tackle each one individually.
On the nginx side, we can change the client_body_buffer_size setting to something larger than 8KB, which would mean larger amounts of data staying being buffered in memory before hitting disk.
Instead of doing it this way, I prefer to keep client_body_buffer_size at the default and setup tmpfs as covered in Chapter 5. With tmpfs setup, the client_body_temp_path setting can be changed to the /tmp directory, optimizing out the Disk I/O overhead while still keeping the nginx memory footprint low.
On the php side, it’s easy since the hard work has been done for us with the tmpfs change. If we just modify php.ini and change upload_tmp_dir to somewhere in /tmp, the file data just gets written back out into memory when it’s moved from nginx to PHP. Not ideal, but much better than getting pushed back-and-forth from disk 3 times.
|
|
Unlike HAProxy, when using nginx with the HTTP Proxy Module or FastCGI, the entire client request (from a load balancer or even directly from a web user) will be buffered in nginx before moving upstream— the data will never be streamed in real-time. On the plus side, this prevents Slowloris attacks, but will break PHP’s file upload progress meter. Nginx offers a Upload Progress Module if upload progress is an essential feature. |

The Nginx HTTP Upload Module
Even with both of the tmpfs changes described above, it still feels gross to me because no matter which way you slice it, the data gets copied around more times than it needs to be. And, tmpfs won’t work for everyone! If you’re handling very large file uploads (i.e, videos), you don’t really want those large files buffered into memory anyways.
The more efficient, albeit more complicated and involved, solution is to use the HTTP Upload Module that comes with nginx. Instead of sending the raw file upload to PHP, the HTTP Upload Module will just send the file location to PHP, completely avoiding the double copy.
If you’re using the Dotdeb Apt Repository as mentioned in Chapter 5, great news— you just need to install nginx-extras to get the HTTP Upload Module. Otherwise, you’ll have to compile it from source, which I’ll leave as an exercise for the reader.
You can quickly determine if you have the HTTP Upload Module with nginx -V and grep. It will show 1 if you have the module, 0 if you don’t.
1 > nginx -V 2>&1 | grep -c "nginx-upload-module"
If you don’t have it, install it with apt-get.
1 > apt-get install nginx-extras
|
|
I had some trouble installing nginx-extras on Ubuntu 12.04 (because of perlapi errors), but was able to install it fine on Debian Squeeze. If you’re on Ubuntu, you may need to compile nginx from source to get the HTTP Upload Module. |

Hold up, before you get going, the module needs to be configured to intercept the file uploads. Pop open my_app.conf from Chapter 5 and add the following location block.
1 > vi /etc/nginx/sites-available/my_app.conf
2
3 location /upload {
4 upload_pass /index.php;
5 upload_store /tmp/nginx/upload 1;
6 upload_set_form_field $upload_field_name.name "$upload_file_name";
7 upload_set_form_field $upload_field_name.content_type "$upload_content_type";
8 upload_set_form_field $upload_field_name.path "$upload_tmp_path";
9
10 # Delete the file if PHP returns any of these errors
11 upload_cleanup 400 404 499 500-505;
12 }
Alright, all configured, just have to reload nginx and create the temporary directories needed for upload_store.
1 > service nginx reload
2 > mkdir -p /tmp/nginx/upload/{1,2,3,4,5,6,7,8,9,0}
Lastly, the only change we have to make to the code is to use the $_POST["file_path"] variable instead of $_FILES["upload"]["tmp_file"].
1 <?php
2
3 class Image_Controller extends Controller {
4
5 // Image upload is posted to this method
6 public function create() {
7
8 if (isset($_POST["file_path"])) {
9
10 $tmp = $_POST["file_path"];
11
12 // Create the Scaled 600x400 Size
13 exec("convert -resize 600x400 {$tmp} /u/scaled.jpg");
14
15 // Create the 150x150 Thumbnail
16 exec("convert -thumbnail x300 -resize 150x< -resize 50%
17 -gravity center -crop 150x150+0+0 +repage
18 {$tmp} /u/thumbnail.jpg");
19
20 // Delete the temporary file
21 @unlink($tmp);
22 }
23 }
24 }
We also need to change our form to POST the file to /upload instead of the normal index.php endpoint (specified by the location block that we added to my_app.conf).
Benchmarking the file upload process
I have something embarrassing to admit. I wrote this entire chapter based on theory alone. I’ve implemented all of these techniques at Twitpic, because on paper— IN THEORY, it makes complete sense. These changes will cut our the cruft, reduce useless data shuffling, and optimize the whole process. Right? Right!?
Well, when I went to benchmark each individual change, it turns out… not so much. In fact, each optimization described (tmpfs, client_body_buffer_size, and HTTP Upload Module) only added, at best, a 5% performance improvement over the “default” setup. Oops. And Ouch. It’s a lesson in premature optimization, for sure, and why you should benchmark everything! Regardless, I’ve kept this case study for two reasons:
1. It’s really important to understand EXACTLY how data finds its way to your PHP code. Following the code path is a journey that everyone should make. This knowledge will help you debug in the future.
2. To drive home the whole premature optimization thing and that even if an optimization looks correct on paper, it might not actually pan out in the real world.
The only thing that seemed to make a large, measurable impact was the difference between ImageMagick and GraphicsMagick, which I talk about in the next section.
I benchmarked the different settings, one by one, using ab (Apache Benchmark), with 1000 uploads and a concurrency of 20— that is, 1000 independent uploads with 20 happening at the same time. I used a 10MB JPEG as the test upload. The server, a EC2 m3.xlarge, was running Debian Squeeze 6.0.6, nginx 1.2.7, and PHP 5.4.13 for the benchmark.
These are the different tests, explained one-by-one.
tmpfs
I enabled tmpfs and changed client_body_temp_path in nginx and upload_tmp_dir in php to use it. Little to no difference between the stock setup. Same number of requests/second, same time per request.
Here’s why:
1. Nginx doesn’t fsync the temporary data to disk, and the writes are mostly are mostly sequential, so writing the upload data to disk doesn’t have a huge impact on IO usage.
2. When PHP reads the data back from disk, it’s reading the entire file sequentially, most of which is already in-memory via the operating system’s disk buffer.
Increasing client_body_buffer_size
I increased the client_body_buffer_size variable in nginx to 20MB, so nginx would be able to buffer the entire 10MB file upload in memory and never have to hit disk. Again, no performance improvement (due to the reasons above), except it increased the memory usage of my nginx worker processes to 200-300MB each, instead of the typical 25MB. Fail! There seems to be almost no reason to increase client_body_buffer_size from the default 8KB.
HTTP Upload Module
My last hope— I knew this had to improve performance. Not only does it save the file from being copied, but it saves PHP from having to parse the 10MB of POST data. I saw a small 5% improvement in performance here, mostly in reduction of CPU usage by PHP, as it’s less data PHP needs to chug through before it can run your code. Not worth it.
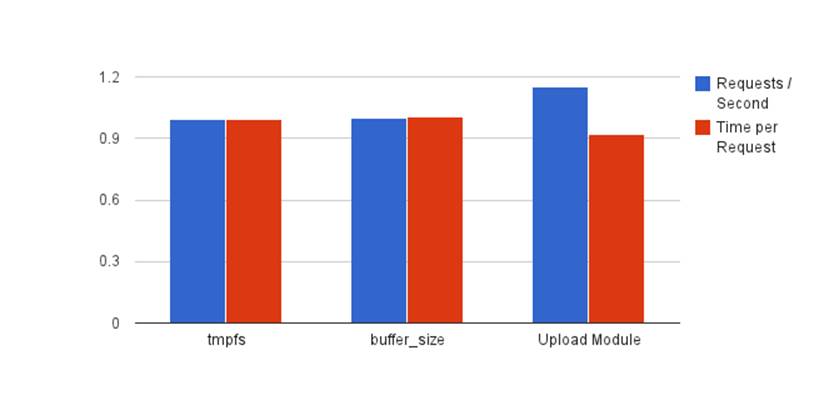
Benchmarks of various changes
Benchmarking file uploads with ab (Apache Benchmark)
I figured I would make a quick note about how you can test this yourself— it took me a long time to figure out a way to easily benchmark/test file uploads from the command line. There are plenty of tutorials on ab, but none really mention how to use it to upload files.
You can only upload raw multipart/form-data with ab, it won’t do any magic for you, so you actually need to assembly the raw multipart/form-data to upload an image with ab. Something about “manual” and “multipart/form-data” just sounds awful.
I used this PHP script to generate it for me, you just need to edit the form field name, file path, and file name. It’ll take care of everything else. I used a PHP script because I had a hell of a time getting all of the \r\n line breaks to be perfect doing it manually— if the format isn’t perfect, your uploads will get ignored by nginx and php.
1 <?php
2
3 $boundary = "1234567890";
4 $field_name = "upload";
5 $file_path = "./";
6 $file_name = "test.jpg";
7
8 echo "--{$boundary}\r\n";
9 echo "Content-Disposition: form-data; name=\"{$field_name}\";";
10 echo " filename=\"{$file_name}\"" . "\r\n";
11 echo "Content-Type: image/jpg\r\n";
12 echo "\r\n";
13
14 echo file_get_contents($file_path . $file_name);
15
16 echo "\r\n";
17 echo "--{$boundary}--\r\n";
Put the script above into a file called generate.php and create a post.txt file holding the multipart/form-data with the following command:
1 > php generate.php > post.txt
Now, you can use post.txt with ab to start benchmarking your own file uploads.
1 > ab -n 50 -c 10 -p post.txt -T "multipart/form-data; boundary=1234567890" htt\
2 p://localhost/upload.php
ImageMagick vs GraphicsMagick
There’s a lesser known image library called GraphicsMagick— a leaner and faster fork of the ImageMagick code. That’s a win in itself (given the same source image and settings, GraphicsMagick will often produce a smaller output image in less time), but it also has a regularly updated PHP C Extension. Having a Native PECL extension is a huge win, because it us allows to remove the two exec() calls from the code and subsequently the two poorly performing fork()s.
The installation is pretty painless, too.
1 > sudo apt-get install php5-dev php-pear build-essential libgraphicsmagick-dev
2 > sudo pecl install --force gmagick
3 > echo "echo "extension=gmagick.so" > /etc/php5/conf.d/gmagick.ini" | sudo sh
You can grab the docs for PECL GMagick here, but it uses very similar options as ImageMagick, except with an object oriented interface instead of command-line arguments.
1 <?php
2
3 class Image_Controller extends Controller {
4
5 // Image upload is posted to this method
6 public function create() {
7 if (isset($_FILES["upload"])) {
8 // Create the Scaled 640x800 Size
9 $gm = new GMagick();
10 $gm->readImage($_FILES["upload"]["tmp_file"]);
11 $gm->setCompressionQuality(90);
12 $gm->scaleimage(640,800);
13 $gm->write("./f/scaled.jpg");
14
15 // Create the 150x150 Thumbnail
16 $gm->cropthumbnailimage(150,150);
17 $gm->write("./f/thumbnail.jpg");
18
19 unlink($_FILES["upload"]["tmp_file"]);
20 }
21 }
22 }
Hooray! No more nasty exec() calls, and since we can share the GMagick object for multiple resizes, we only have to read the raw image data into memory once opposed to twice with ImageMagick. This will only work if you’re downsizing every step.
|
|
Newer versions of GraphicsMagick and ImageMagick are built with OpenMP, a framework for parallelizing image processing across multiple cores. In theory, sounds great— but I ran into a number of issues with random seg faults and crashes. I prefer to either recompile libgraphicsmagick with --disable-openmp or set putenv(MAGICK_THREAD_LIMIT=1); in PHP to disable OpenMP. |
Benchmarking ImageMagick vs GraphicsMagick
In a fairly straightforward benchmark, I found that GraphicsMagick was nearly twice as fast as ImageMagick in terms of requests per second— jumping to more than 3x faster if you’re able to re-use the same GraphicsMagick when doing multiple resizes. That’s an incredible payoff, with little effort, especially if you’re working with an upload-heavy application or have to do the image resizing inside of the web request.
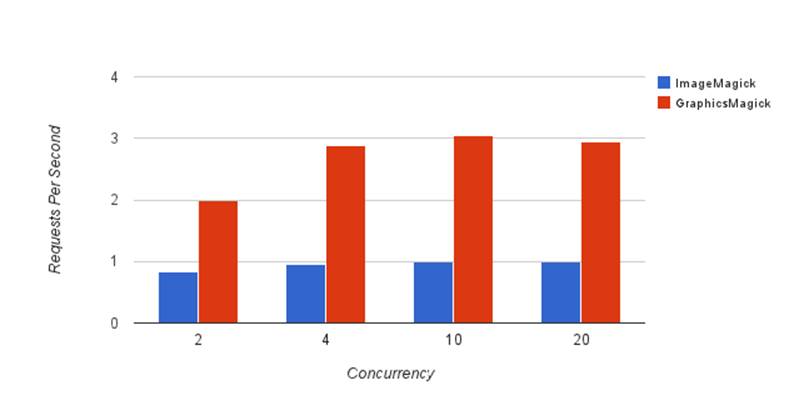
ImageMagick vs GraphicsMagick
Allowing Large File Uploads
Setting up your stack to handle large file uploads can feel like a pain because there are a few different settings you need to change in php.ini and nginx to allow big files to pass through.
nginx.conf
client_max_body_size
Set this to the same as upload_max_filesize in php.ini. 128M is a good starting point.
php.ini
upload_max_filesize
The maximum size of the actual file upload itself. Should be set the same as client_max_body_size in nginx.conf
post_max_size
The maximum size of the entire HTTP POST body, including the multipart file upload. Should be set slightly higher than upload_max_filesize to take into account any extra POST parameters and metadata. I usually set it as 1MB more than upload_max_filesize.
memory_limit
PHP says that it needs enough memory to read the entire file into memory. I typically just disable memory_limit, but if you’re not doing that, than you need to set it atleast the size of post_max_size, preferable a little higher.
max_file_uploads
The maximum number of files that can be in a single POST body, used to provide a sane limit and prevent circumventing upload_max_filesize with lots of small files. Worth pointing out— PHP does count empty file upload fields in a form against this limit.
Stripping EXIF Metadata
When a user uploads a JPG, they are not only sending a picture, but also a wealth of metadata that’s hidden inside of the image. This EXIF metadata can be used for interesting data projects— things like the timestamp, camera type, aperture, shutter speed, and flash brightness are stored within the EXIF data. Cool!
1 print_r(exif_read_data("file.jpg));
2
3 => Array(
4 [FileName] => IMG_1043.jpg
5 [FileSize] => 2464042
6 [Make] => Apple
7 [Model] => iPhone 4S
8 [Software] => QuickTime 7.7.1
9 [DateTime] => 2013:04:01 09:28:30
10 [HostComputer] => Mac OS X 10.8.3
11 [ExposureTime] => 1/20
12 [ISOSpeedRatings] => 200
13 [ShutterSpeedValue] => 2779/643
14 [GPSLatitude] => Array
15 [0] => 32/1
16 [1] => 5126/100
17 [2] => 0/1
18 ...
But there’s also a scary amount of private data that gets tagged inside of the image metadata too, including GPS data. On a picture taken with my iPhone 4S, the Lat/Long EXIF data is accurate within 5 feet of my apartment.
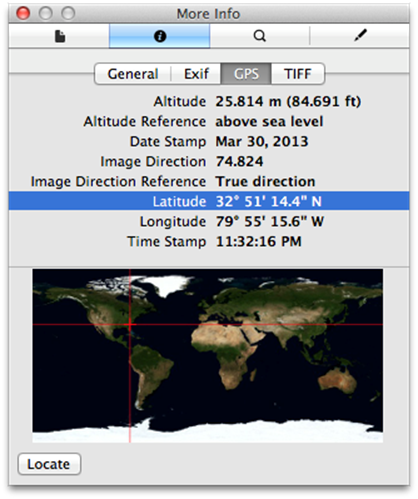
Some information contained in the EXIF metadata
If you’re handling user uploads and displaying them publicly, it’s your responsibility to strip out the EXIF tags from the files that your users upload. Luckily, it’s pretty easy with GraphicsMagick and a call to the stripimage() function.
1 <?php
2 $g = new GMagick("file.jpg");
3 $g->stripimage();
4 $g->write("without_exif.jpg");
When you resize an image with GraphicsMagick, it will not preserve the EXIF data. However, many sites offer a “raw” or “view original” function, where it is absolutely necessary to strip the EXIF data from the image.
Autorotation
Another common issue that people run into with image uploads in PHP is handling orientation and rotation. When you take a picture with a modern camera, the orientation in which the picture was taken is not how it’s saved.
For example, if you take a picture with your iPhone camera upside down, when you open it on your computer or view it in your browser, the picture is going to be upside down. Similarly, if you take a picture in landscape mode, when you view it on your computer or in your browser, it will be displayed vertically instead of as a landscape.
We can fix this by checking the Orientation value inside of the EXIF metadata (before stripping it) and rotating the image accordingly. There are 8 different EXIF Orientation values, each one representing a different state of rotation.
Orientation Value Diagram
When the EXIF Orientation is 1, nothing needs to be done! The image is already correctly rotated. For all of the other values, we need to adjust accordingly. Older PHP tutorials recommend using exec() with the command line tool jpegtran and jhead to accomplish the rotation. You already know the drill. Using exec() during a web request is bad form, extra dependencies, potential security hole, DDoS vector, etc.
Instead, we can adjust the orientation with nothing besides GraphicsMagick.
1 <?php
2
3 $g = new GMagick("file.jpg");
4
5 // Read the Orientation from the EXIF data
6 $exif = exif_read_data("file.jpg");
7 $position = $exif['Orientation'];
8
9 switch($position) {
10 case 2:
11 $g->flopimage();
12 break;
13
14 case 3:
15 $g->rotateimage("#ffffff", 180);
16 break;
17
18 case 4:
19 $g->rotateimage("#ffffff", 180);
20 $g->flopimage();
21 break;
22
23 case 5:
24 $g->rotateimage("#ffffff", 90);
25 $g->flopimage();
26 break;
27
28 case 6:
29 $g->rotateimage("#ffffff", 90);
30 break;
31
32 case 7:
33 $g->rotateimage("#ffffff", -90);
34 $g->flopimage();
35 break;
36
37 case 8:
38 $g->rotateimage("#ffffff", -90);
39 break;
40 }
41
42 // Thumbnail resizing or whatever you need
43 // to do.
44
45 $g->write("oriented.jpg");
|
|
In the example above, what’s the #ffffff argument in the rotateimage() method? GMagick requires you to pass a fill color in case it needs to do a non-right angle rotation, in which case it will need to fill in the blank areas with a color. Since we’re only doing right-angle rotations, the fill color will never be used. |