Adobe After Effects CC Classroom in a Book (2017 release) (2017)
7. Working with Masks
Lesson overview
In this lesson, you’ll learn how to do the following:
• Create a mask using the Pen tool.
• Change a mask’s mode.
• Edit a mask shape by controlling vertices and direction handles.
• Feather a mask edge.
• Replace the contents of a mask shape.
• Adjust the position of a layer in 3D space to blend it with the rest of a shot.
• Create a reflection effect.
• Modify a mask using the Mask Feather tool.
• Create a vignette.
![]()
This lesson will take approximately an hour to complete. Download the project files for this lesson, following the instructions in the Getting Started section under “Accessing the lesson files and Web Edition,” if you haven’t already done so. As you work on this lesson, you’ll preserve the start files. If you need to restore the start files, download them from your Account page.
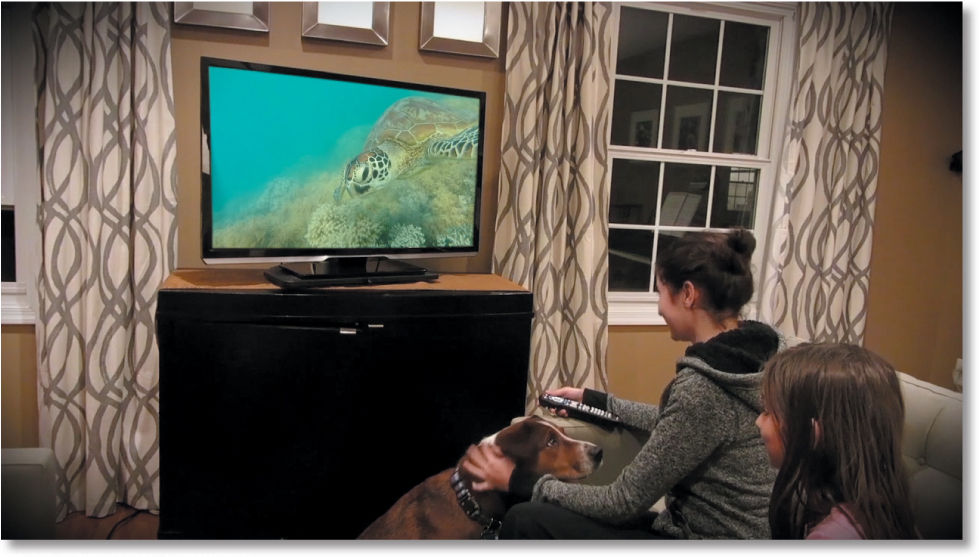
PROJECT: SEQUENCE FROM A COMMERCIAL
There will be times when you won’t need (or want) everything in a shot to be included in the final composite. Use masks to control what appears.
About masks
A mask in Adobe After Effects is a path, or outline, that is used to modify layer effects and properties. The most common use of masks is to modify a layer’s alpha channel. A mask consists of segments and vertices: Segments are the lines or curves that connect vertices. Vertices define where each segment of a path starts and ends.
A mask can be either an open or a closed path. An open path has a beginning point that is not the same as its end point; for example, a straight line is an open path.
A closed path is continuous and has no beginning or end, such as a circle. Closed-path masks can create transparent areas for a layer. Open paths cannot create transparent areas for a layer, but are useful as parameters for an effect. For example, you can use an effect to generate a running light around a mask.
A mask belongs to a specific layer. Each layer can contain multiple masks.
You can draw masks in common geometric shapes—including polygons, ellipses, and stars—with the shape tools, or you can use the Pen tool to draw an arbitrary path.
Getting started
In this lesson, you will create a mask for the screen of a television and replace the screen’s original content with a movie. Then you’ll adjust the positioning of the new footage so that it fits the perspective of the shot. Finally, you’ll polish the scene by adding a reflection, creating a vignette effect, and adjusting the color.
Begin by previewing the movie and setting up the project.
1. Make sure the following files are in the Lessons/Lesson07 folder on your hard disk, or download them from your Account page at www.peachpit.com now:
• In the Assets folder: Turtle.mov, Watching_TV.mov
• In the Sample_Movies folder: Lesson07.avi, Lesson07.mov
2. Open and play the Lesson07.avi sample movie in Windows Media Player or the Lesson07.mov sample movie in QuickTime Player to see what you will create in this lesson. When you are done, close Windows Media Player or QuickTime Player. You may delete the sample movies from your hard disk if you have limited storage space.
When you begin the lesson, restore the default application settings for After Effects. See “Restoring default preferences” on page 2.
3. Start After Effects, and then immediately hold down Ctrl+Alt+Shift (Windows) or Command+Option+Shift (Mac OS) to restore default preferences settings. When prompted, click OK to delete your preferences. Close the Start window.
After Effects opens to display a new, untitled project.
4. Choose File > Save As > Save As, and navigate to the Lessons/Lesson07/Finished_Project folder.
5. Name the project Lesson07_Finished.aep, and then click Save.
Creating the composition
You’ll import two footage items for this exercise. Then, you’ll create the composition based on the aspect ratio and duration of one of the footage items.
1. Double-click an empty area of the Project panel to open the Import File dialog box.
2. Navigate to the Lessons/Lesson07/Assets folder, Shift-click to select the Turtle.mov and Watching_TV.mov files, and then click Import or Open.
3. Select the Watching_TV.mov footage item in the Project panel, and drag it onto the Create A New Composition button (![]() ) at the bottom of the panel.
) at the bottom of the panel.
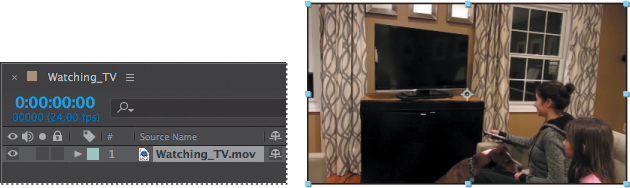
After Effects creates a composition named Watching_TV, and opens it in the Composition and Timeline panels.
4. Choose File > Save to save your work so far.
Creating a mask with the Pen tool
The TV screen is currently blank. To fill it with the video of a sea turtle, you need to mask the screen.
1. Press the Home key, or move the current-time indicator to the beginning of the time ruler.
2. Zoom in to the Composition panel until the TV screen nearly fills the view. You may need to use the Hand tool (![]() ) to reposition the view in the panel.
) to reposition the view in the panel.
3. Make sure the Watching_TV.mov layer is selected in the Timeline panel, and then select the Pen tool (![]() ) in the Tools panel.
) in the Tools panel.
![]() Tip
Tip
You can also create a mask using the mocha shape plug-in, which comes with After Effects, and then import it into After Effects. To learn more about using the plug-in, see After Effects Help.
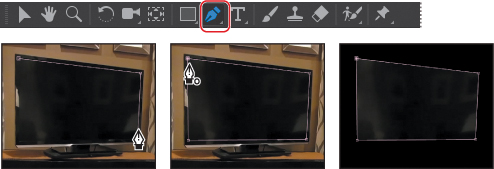
The Pen tool creates straight lines or curved segments. The TV appears to be rectangular, so you’ll try using straight lines first.
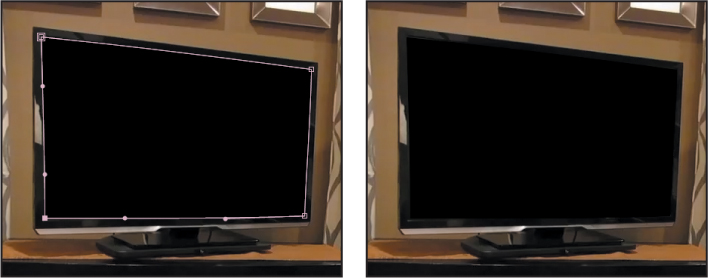
4. Click the upper left corner of the TV screen to place the first vertex.
5. Click the upper right corner of the TV screen to place the second vertex. After Effects connects the two points with a segment.
6. Click to place a third vertex in the lower right corner of the TV screen, and then click to place a fourth vertex in the lower left corner of the screen.
7. Move the Pen tool over the first vertex (in the upper left corner). When a circle appears next to the pointer (as in the middle image below), click to close the mask path.
Editing a mask
The mask looks pretty good, but instead of masking the information inside the monitor, the mask has removed everything outside the monitor. You need to invert the mask. You’ll also use Bezier curves to create a more accurate mask.
Inverting the mask
For this project, you need everything inside the mask to be transparent and everything outside the mask to be opaque. You’ll invert the mask now.
![]() Tip
Tip
Pressing the M key twice in quick succession displays all mask properties for the selected layer.
1. Select the Watching_TV.mov layer in the Timeline panel, and press the M key to see the Mask Path property for the mask.
There are two ways to invert this mask: by choosing Subtract from the Mask Mode pop-up menu, or by selecting the Inverted option.
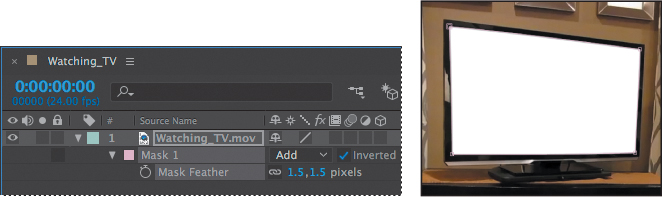
2. Select the Inverted option for Mask 1.
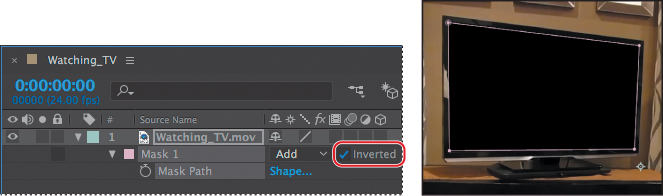
The mask inverts.
3. Press F2, or click an empty area of the Timeline panel, to deselect the Watching_TV.mov layer.
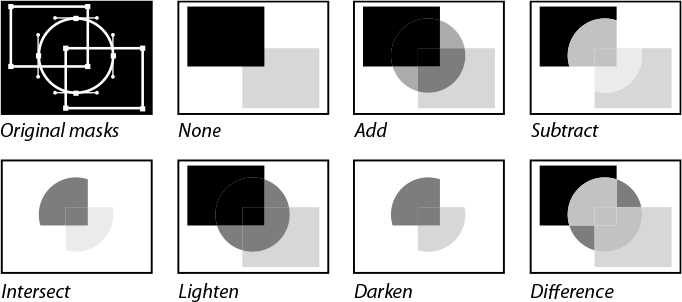
About mask modes
Blending modes for masks (mask modes) control how masks within a layer interact with one another. By default, all masks are set to Add, which combines the transparency values of any masks that overlap on the same layer. You can apply one mode to each mask, but you cannot change a mask’s mode over time.
The first mask you create interacts with the layer’s alpha channel. If that channel doesn’t define the entire image as opaque, then the mask interacts with the layer frame. Each additional mask that you create interacts with masks located above it in the Timeline panel. The results of mask modes vary depending on the modes set for the masks higher up in the Timeline panel. You can use mask modes only between masks in the same layer. Using mask modes, you can create complex mask shapes with multiple transparent areas. For example, you can set a mask mode that combines masks and sets the opaque area to the regions where the masks intersect.
If you look closely at the TV, you will probably see portions of the screen still appearing around the edges of the mask.
These errors will certainly call attention to changes being made to the layer, and they need to be fixed. To fix them, you’ll change the straight lines to subtle curves.
Creating curved masks
Curved or freeform masks use Bezier curves to define the shape of the mask. Bezier curves give you the greatest control over the shape of the mask. With them, you can create straight lines with sharp angles, perfectly smooth curves, or a combination of the two.
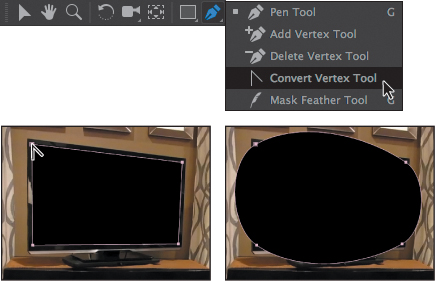
1. In the Timeline panel, select Mask 1, the mask for the Watching_TV.mov layer. Selecting Mask 1 makes the mask active and also selects all the vertices.
2. In the Tools panel, select the Convert Vertex tool (![]() ), which is hidden behind the Pen tool.
), which is hidden behind the Pen tool.
3. In the Composition panel, click any of the vertices. The Convert Vertex tool changes the corner vertices to smooth points.
4. Switch to the Selection tool (![]() ), click anywhere in the Composition panel to deselect the mask, and then click the first vertex that you created.
), click anywhere in the Composition panel to deselect the mask, and then click the first vertex that you created.
Two direction handles extend off the smooth point. The angle and length of these handles control the shape of the mask.
5. Drag the right handle of the first vertex around the screen. Notice how this changes the shape of the mask. Notice also that the closer you drag the handle to another vertex, the less the shape of the path is influenced by the direction handle of the first vertex, and the more it is influenced by the direction handle of the second vertex.
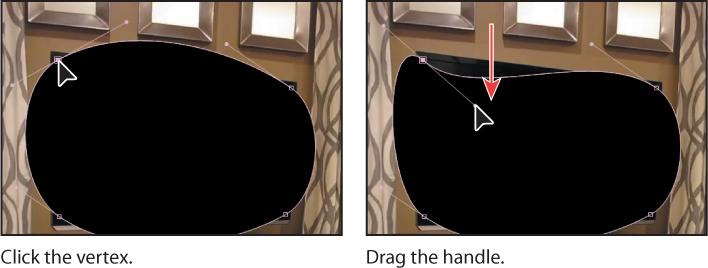
6. Once you are comfortable moving the handles, position the handle of the upper left vertex as in the preceding figure. As you have seen, you can create very fluid shapes.
![]() Tip
Tip
If you make a mistake, press Ctrl+Z (Windows) or Command+Z (Mac OS) to undo your last action. You can also change the zoom level and use the Hand tool to reposition the image in the Composition panel as you work.
Breaking direction handles
By default, the direction handles of any smooth point are connected to one another. As you drag one handle, the opposite handle moves as well. However, you can break this connection to get greater control over the shape of the mask, and you can create sharp points or long, smooth curves.
1. Select the Convert Vertex tool (![]() ) in the Tools panel.
) in the Tools panel.
2. Drag the right direction handle of the upper left vertex. The left direction handle remains stationary.
3. Adjust the right direction handle until the top segment of the mask shape more closely follows the curve of the TV in that corner. It doesn’t have to be perfect.
4. Drag the left direction handle of the same vertex until the left segment of the shape more closely follows the curve of the TV in that corner.
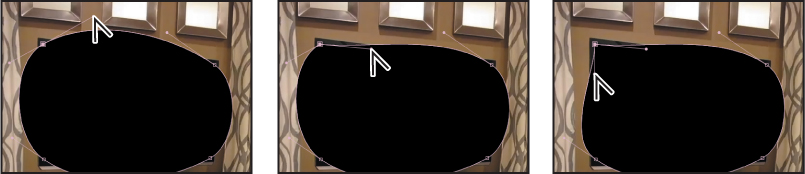
Drag the right direction handle of the upper left vertex, and then the left direction handle, to follow the curve of the TV screen.
![]() Tip
Tip
Again, you may need to adjust your view in the Composition panel as you work. You can drag the image with the Hand tool. To temporarily switch to the Hand tool, press and hold the spacebar.
5. For each of the remaining corner points, click with the Convert Vertex tool, and then repeat steps 2–4 until the mask’s shape more closely matches the curvature of the TV. If you need to shift a corner point, use the Selection tool.
6. When you’re done, deselect the Watching_TV.mov layer in the Timeline panel to check the edge of your mask. You should not see any of the TV screen.
7. Choose File > Save to save your work.
Creating a Bezier mask
You used the Convert Vertex tool to change a corner vertex to a smooth point with Bezier handles, but you could have created a Bezier mask in the first place. To do so, click in the Composition panel with the Pen tool where you want to place the first vertex. Then click where you want to place the next vertex, and drag in the direction you want to create a curve. When you are satisfied with the curve, release the mouse button. Continue to add points until you’ve created the shape you want. Close the mask by either clicking on the first vertex or double-clicking the last vertex. Then switch to the Selection tool to refine the mask.
Feathering the edges of a mask
The mask looks good, but you need to soften the edges a bit.
1. Choose Composition > Composition Settings.
2. Click the Background Color box, and choose white for the background color (R=255, G=255, B=255). Then click OK to close the Color Picker, and OK again to close the Composition Settings dialog box.
The white background allows you to see that the edge of the TV screen looks a little too sharp and unrealistic. To address this, you’ll feather, or soften, the edges.
3. Select the Watching_TV.mov layer in the Timeline panel, and press the F key to display the Mask Feather property for the mask.
4. Increase the Mask Feather amount to 1.5, 1.5 pixels.
5. Hide the properties for the Watching_TV.mov layer, and then choose File > Save to save your work.
Replacing the content of the mask
You are now ready to replace the background with the video of a sea turtle and blend it with the overall shot.
1. In the Project panel, select the Turtle.mov file, and drag it to the Timeline panel, placing it below the Watching_TV.mov layer.
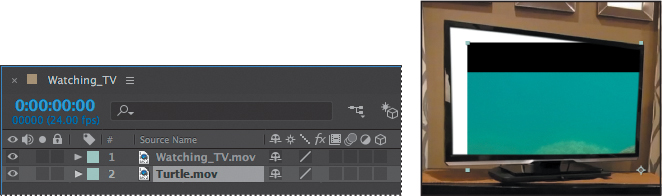
2. Choose Fit Up To 100% from the Magnification Ratio pop-up menu at the bottom of the Composition panel so that you can see the whole composition.
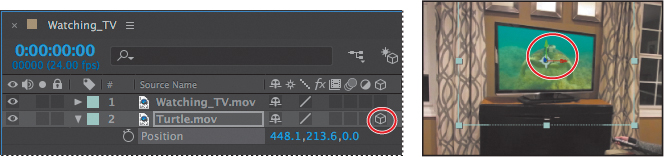
3. Select the Selection tool (![]() ), and then drag the Turtle.mov layer in the Composition panel until the anchor point is centered in the TV screen.
), and then drag the Turtle.mov layer in the Composition panel until the anchor point is centered in the TV screen.
Zooming and panning by touch
If you’re using a touch-enabled device, such as a Microsoft Surface, Wacom Cintiqu Touch, or multi-touch trackpad, you can use your fingers to zoom and pan. Touch gestures let you zoom and pan in the Composition, Layer, Footage, and Timeline panels.
To zoom: Pinch two fingers closer together to zoom in, or move them further apart to zoom out.
To pan: Move two fingers in unison to pan up, down, left, or right in the panel’s current view.
Repositioning and resizing the clip
The sea turtle clip is too big for the TV screen, so you’ll resize it as a 3D layer, which will give you more control over its shape and size.
1. With the Turtle.mov layer selected in the Timeline panel, click the 3D switch (![]() ) for the layer.
) for the layer.
2. Press the P key to show the Position property for the Turtle.mov layer.
The Position property for a 3D layer has three values: From left to right, they represent the x, y, and z axes of the image. The z axis controls the depth of the layer. You can see these axes represented in the Composition panel.
![]() Note
Note
You’ll learn more about 3D layers in Lessons 11, “Using 3D Features,” and 12, “Working with the 3D Camera Tracker.”
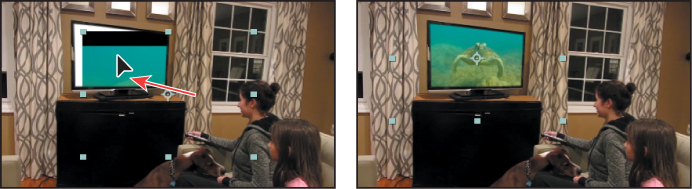
3. Make sure the Selection tool is selected, and then position the pointer in the Composition panel over the red arrow so that a small x appears. The red arrow controls the x (horizontal) axis of the layer.
4. Drag left or right as necessary to center the clip horizontally in the monitor screen.
5. Position the pointer in the Composition panel over the green arrow so that a small y appears. Then drag up or down as necessary to position the clip vertically in the monitor screen.
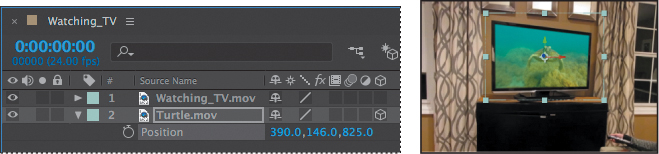
6. Position the pointer in the Composition panel over the blue cube where the red and green arrows meet so that a small z appears. Then drag down and to the right to increase the depth of field, so that the Turtle.mov layer appears smaller.
7. Continue to drag the x, y, and z axes until the entire clip fits into the TV screen, as shown in the following image. Our final x, y, and z values are approximately 390, 146, 825.
![]() Tip
Tip
You can also enter the Position values directly in the Timeline panel instead of dragging in the Composition panel.
Rotating the clip
The video clip fits better, but you need to rotate it slightly to improve the perspective.
1. Select the Turtle.mov layer in the Timeline panel, and press the R key to reveal its Rotation properties.
Again, since this is a 3D layer, you can control rotation on the x, y, and z axes.
2. Change the X Rotation value to 1 degree and the Y Rotation value to –40 degrees. This swivels the layer to match the perspective of the TV screen.
3. Change the Z Rotation value to 1 degree to align the layer with the TV screen.
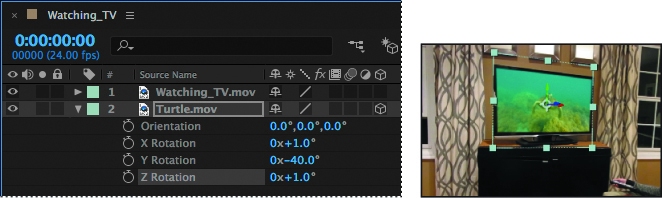
Your composition should now resemble the preceding image.
4. Hide the properties for the Turtle.mov layer, and then choose File > Save to save your work.
Adding a reflection
The masked image looks convincing, but you can make it look even more realistic by adding a reflection to the TV screen.
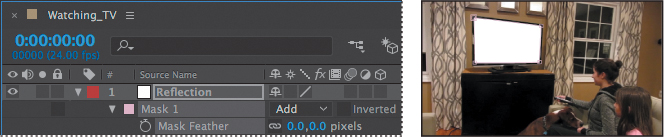
1. Click an empty area in the Timeline panel to deselect all layers, and then choose Layer > New > Solid.
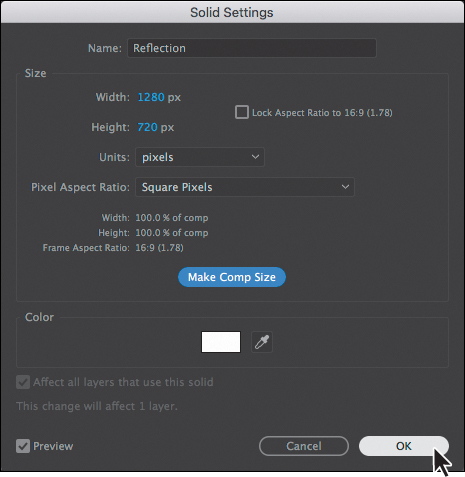
2. In the Solid Settings dialog box, name the layer Reflection, click the Make Comp Size button, change the Color to white, and then click OK.
Instead of trying to exactly re-create the shape of the Watching_TV.mov layer’s mask, it is easier to copy it to the Reflection layer.
3. Select the Watching_TV.mov layer in the Timeline panel, and press the M key to display the Mask Path property for the mask.
4. Select Mask 1, and then choose Edit > Copy or press Ctrl+C (Windows) or Command+C (Mac OS).
5. Select the Reflection layer in the Timeline panel, and then choose Edit > Paste or press Ctrl+V (Windows) or Command+V (Mac OS).
This time, you want to keep the area inside the mask opaque and make the area outside the mask transparent.
6. Select the Watching_TV.mov layer, and then press U to hide the mask properties.
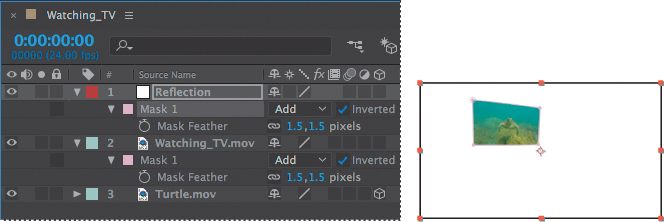
7. Select the Reflection layer in the Timeline panel, and press the F key to reveal the Mask 1 Mask Feather property for the layer.
8. Change the Mask Feather value to 0 (zero).
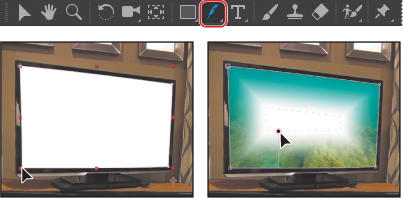
9. Deselect the Inverted option. The Reflection layer now obscures the Turtle.mov layer.
10. Zoom in to see the screen, and then select the Mask Feather tool (![]() ), hidden beneath the Convert Vertex tool (
), hidden beneath the Convert Vertex tool (![]() ) in the Tools panel.
) in the Tools panel.
When you feather a mask, the width of the feather is the same all the way around the mask. The Mask Feather Tool lets you vary the feathering width at points you define on the closed mask.
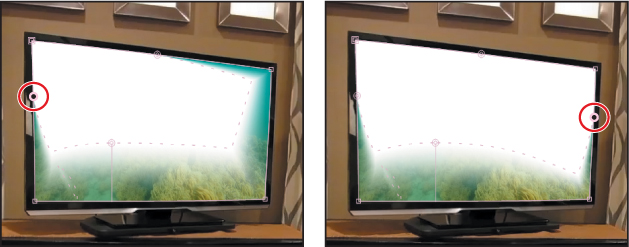
11. Click the Reflection layer in the Timeline panel to select it. Then click the lower left vertex to create a feather point.
12. Click the feather point again, and without releasing the mouse button, drag that feather point inward so that only the center of the screen is reflected, and so that the feather point is positioned as shown in the image below.
Currently the feather extends evenly across the mask. You’ll add more feather points for greater flexibility.
13. Click in the center of the top of the mask to create another feather point. Then drag the feather point down slightly, into the mask.
14. Right-click or Control-click the feather point you just created, and choose Edit Radius. Change the Feather Radius to 0, and click OK.
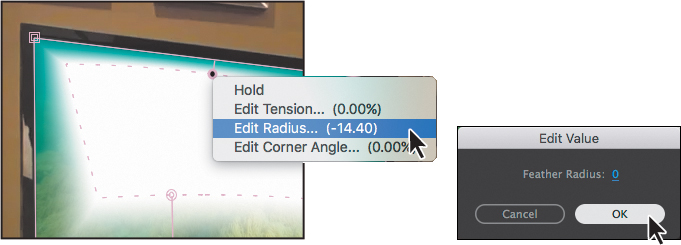
This is a good start, but the sides slope in too sharply. You’ll add more feather points to change the angle.
15. Add another feather point by clicking the left edge of the matte, about one-third of the way from the top.
16. Add a similar feather point on the right side.
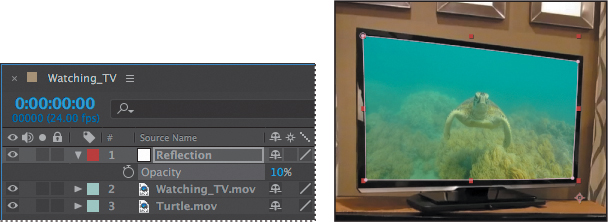
The shape of the reflection is good, but it’s obscuring the image. You’ll change the opacity to reduce its effect.
17. Select the Reflection layer in the Timeline panel, and then press the T key to reveal the Opacity property. Change its value to 10%.
18. Press T to hide the Opacity property, and then press F2 or click an empty area in the Timeline panel to deselect all layers.
Applying a blending mode
To create unique interactions between layers, you may want to experiment with blending modes. Blending modes control how each layer blends with, or reacts to, layers beneath it. Blending modes for layers in After Effects are identical to blending modes in Adobe Photoshop.
1. From the Timeline panel menu, choose Columns > Modes to display the Mode pop-up menu.
2. Choose Add from the Reflection layer’s Mode pop-up menu.
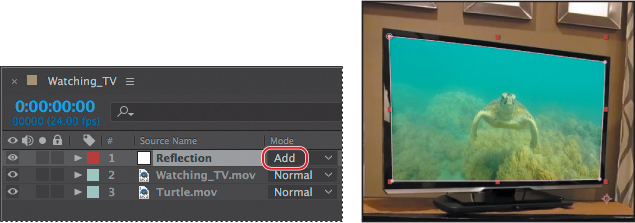
This creates a hard glare on the TV screen image and boosts the colors underneath.
3. Choose File > Save to save your work.
Creating a vignette
A popular effect in motion graphic design is to apply a vignette to the composition. This is often done to simulate light variations of a glass lens. It creates an interesting look that focuses the attention on the subject and sets the shot apart.
1. Zoom out to see the whole image.
2. Choose Layer > New > Solid.
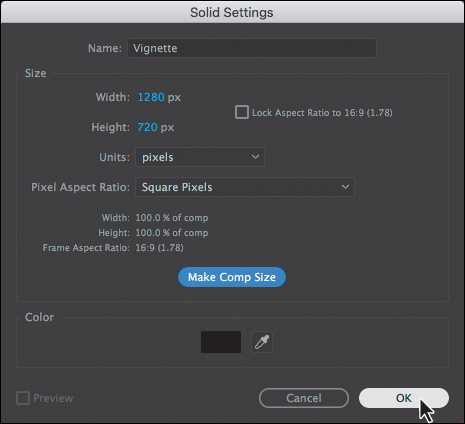
3. In the Solid Settings dialog box, name this layer Vignette, click the Make Comp Size button, change the Color to black (R=0, G=0, B=0), and then click OK.
In addition to the Pen tool, After Effects provides tools that let you easily create square and elliptical masks.
4. In the Tools panel, select the Ellipse tool (![]() ), hidden behind the Rectangle tool (
), hidden behind the Rectangle tool (![]() ).
).
5. In the Composition panel, position the cross-hairs pointer in the upper left corner of the image. Drag to the opposite corner to create an elliptical shape that fills the image. Adjust the shape and position using the Selection tool, if necessary.
6. Expand the Mask 1 property in the Vignette layer to display all of the mask properties for the layer.
7. Choose Subtract from the Mask 1 Mode pop-up menu.
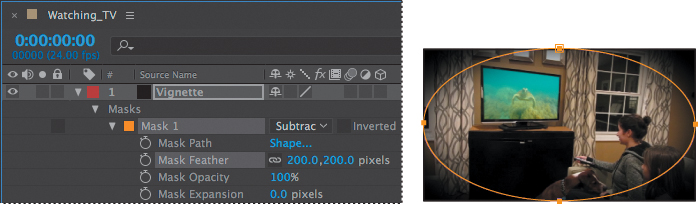
8. Increase the Mask Feather amount to 200, 200 pixels.
Your composition should now resemble the following figure.
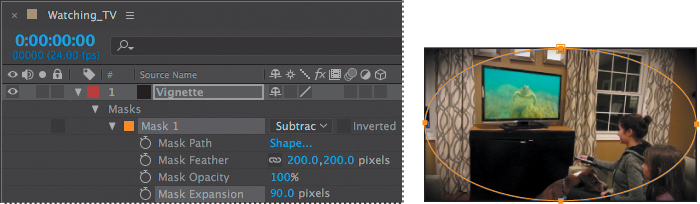
Even with this large feather amount, the vignette is a bit intense and constricting. You can give the composition more breathing room by adjusting the Mask Expansion property. The Mask Expansion property represents, in pixels, how far from the original mask edge you are expanding or contracting the adjusted edge.
9. Increase Mask Expansion to 90 pixels.
10. Hide the properties for the Vignette layer, and then choose File > Save.
Using the Rectangle and Ellipse tools
The Rectangle tool, as the name suggests, creates a rectangle or square. The Ellipse tool creates an ellipse or circle. You create mask shapes with these tools by dragging them in the Composition or Layer panel.
If you want to draw a perfect square or circle, press the Shift key as you drag with the Rectangle tool or the Ellipse tool. To create your mask from the center, press Ctrl (Windows) or Command (Mac OS) after you start to drag. Press Ctrl+Shift or Command+Shift after you start to drag to create a perfect square or circle mask from a center anchor point.
Be careful! If you use these tools without a layer selected, you’ll draw a shape, not a mask.
Adjusting the timing
The sea turtle video shouldn’t appear until the girl turns on the TV. You’ll adjust the Turtle.mov layer’s start point and animate the mask accordingly.
1. Go to 2:00, and then drag the Turtle.mov layer so that it begins at 2:00.
2. Select the Watching_TV.mov layer, and press MM to see the mask properties.
3. Click the stopwatch icon next to Mask Expansion to create a keyframe at 2:00.
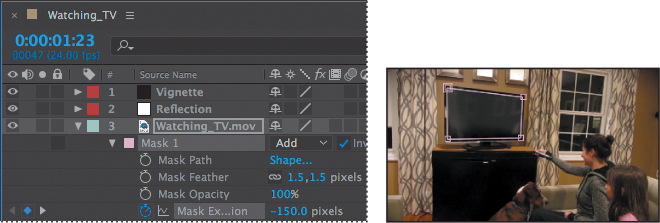
4. Go to 1:23, and change the Mask Expansion value to –150 pixels to reveal the blank TV screen.
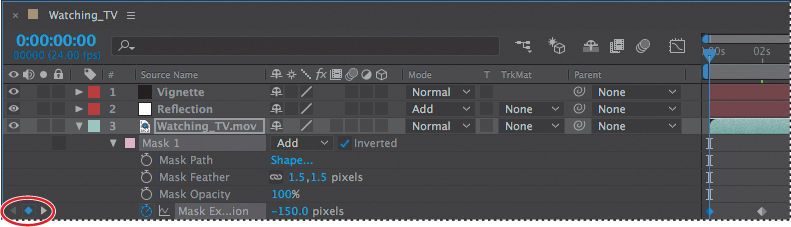
5. Go to the beginning of the time ruler, and click the Add Or Remove Keyframe At Current Time icon to add a keyframe for the mask expansion property.
6. Hide the properties for all layers, and press the spacebar to preview your movie.

Tips for creating masks
If you have worked with Adobe Illustrator or Photoshop, or similar applications, you’re probably familiar with masks and Bezier curves. If not, here are a few additional tips to help you create them effectively:
• Use as few vertices as possible.
• You can close a mask by clicking the starting vertex. To open a closed mask, click a mask segment, choose Layer > Mask And Shape Path, and deselect Closed.
• To add points to an open path, press Ctrl (Windows) or Command (Mac OS), and click the last point on the path with the Pen tool. When the point is selected, you can continue adding points.
![]() Tip
Tip
Alternatively, you can change the duration of the movie to 11:17. To do so, choose Composition > Composition Settings, and then type 11.17 in the Duration box.
Trimming the work area
The Turtle clip is shorter than the Watching_TV clip. Currently, the girls are watching a blank screen at the end of the movie. You’ll move the work area end point to the end of the Turtle.mov layer so only that portion of the movie will render.
1. Go to 11:17, the last frame of the Turtle.mov layer.
2. Press N to move the work area end point to the current time.
3. Choose File > Save to save your work.
In this lesson, you have worked with the mask tools to hide, reveal, and adjust portions of a composition to create a stylized inset shot. Next to keyframes, masks are probably the most-used feature of After Effects.
Review questions
1. What is a mask?
2. Name two ways to adjust the shape of a mask.
3. What is a direction handle used for?
4. What is the difference between an open mask and a closed mask?
5. How is the Mask Feather tool useful?
Review answers
1. A mask in After Effects is a path, or outline, that is used to modify layer effects and properties. The most common use of masks is to modify a layer’s alpha channel. A mask consists of segments and vertices.
2. You can adjust the shape of a mask by dragging individual vertices or by dragging a segment.
3. A direction handle is used to control the shape and angle of a Bezier curve.
4. An open mask can be used to control effects or the placement of text; it does not define a region of transparency. A closed mask defines a region that will affect the alpha channel of a layer.
5. The Mask Feather tool lets you vary the width of feathering at different points on a mask. With the Mask Feather tool, click to add a Feather point, and then drag it.
All materials on the site are licensed Creative Commons Attribution-Sharealike 3.0 Unported CC BY-SA 3.0 & GNU Free Documentation License (GFDL)
If you are the copyright holder of any material contained on our site and intend to remove it, please contact our site administrator for approval.
© 2016-2026 All site design rights belong to S.Y.A.