Adobe Creative Cloud Design Tools All-in-One For Dummies (2013)
Book II
InDesign CC
Chapter 3: Understanding Page Layout
In This Chapter
![]() Working with and importing image files
Working with and importing image files
![]() Selecting images on the page
Selecting images on the page
![]() Knowing page layout settings
Knowing page layout settings
![]() Using text and graphics in your layouts
Using text and graphics in your layouts
![]() Working with pages
Working with pages
![]() Using master pages and spreads
Using master pages and spreads
This chapter shows you how to put graphics and text together so that you can start creating page layouts. Interesting and creative page layouts help draw attention to the pictures and words contained within the publication. An interesting layout motivates more members of the audience to read the text you place on a page.
Importing Images
You can add many kinds of image files to an InDesign document. Some of the most common are AI, PSD, PDF, JPG, PNG, and TIF. Images are imported into graphic frames. You can create the frames before importing, or if you don’t have a frame, InDesign creates one for you instantly when you add the image to the page.
When you import an image into your InDesign layout, the original image is still needed when you print or export the final document. You use special controls to keep track of the linked image and to work on specific settings, such as those that modify the quality and color. You also find additional settings at the time you import an image, which you access using the Image Import Options dialog box. In the Importing other InDesign documents section, later in this chapter, you find out how to change various import options.
For now, follow these steps to import an image into your InDesign layout:
1. Make sure that nothing on the page is selected.
If an object on the page is selected, click an empty area so that everything is deselected before you proceed.
2. Choose File⇒Place.
The Place dialog box opens, where you can browse your hard drive for image files to import. You can use this dialog box to import various kinds of files into InDesign, not just images.
3. Select the image you want to import and click Open.
The Place dialog box closes, and the cursor displays a thumbnail of the image you selected.
 You can import multiple images at a time into an InDesign layout. Simply hold down the Ctrl (Windows) or
 ![]() (Mac) key and select multiple files in the Place dialog box.
(Mac) key and select multiple files in the Place dialog box.
4. Move the cursor to wherever you want the upper-left corner of the first image to be placed on the page, and then click the mouse.
If you’ve selected multiple images, you can use the left and right arrow keys to navigate the thumbnail images in your loaded cursor before clicking on the page. After you click on the page, the next image is placed, until there are no more images to place.
Images are imported and placed into the publication inside a graphic frame. You can resize, move, and modify the image by using the Selection or Direct Selection tool or modify the frame and image together by using the Selection tool.
When placing multiple images, you can place all the selected images in one step — space them evenly in a grid by pressing the Shift+Ctrl (Windows) or Shift+![]() (Mac) keys while dragging a rectangle using your mouse.
(Mac) keys while dragging a rectangle using your mouse.
Don’t worry if the image is imported and is too large for the layout or needs to be cropped. For more information about selecting graphic frames and modifying them, check out Chapter 4 of this minibook. To find out about importing and working with text and stories, see Chapter 2 of this minibook.
It’s sometimes easier to create an empty graphic frame and then add an image to it than to import the image and create the frame at the same time. You can create an empty frame and even set fitting properties before you import an image — so that the image fits correctly at the time you import it. To set the fitting properties in a blank frame, choose Object⇒Fitting⇒Frame Fitting Options.
Importing PDFs
You can import PDF files to place them as images in InDesign layouts. When importing, you can preview and crop the pages by using the Place PDF dialog box. (Choose File⇒Place, select the Show Import Options check box, and then click Open.) You import one page at a time, so you need to use the Forward and Back buttons displayed under the preview to select a page to place. Also, you can’t import any video, sound, or buttons, and you can’t edit the PDF after it’s imported into InDesign — so it is more like importing a static image such as a JPEG file.
The Place PDF dialog box offers the following options:
![]() Crop To: You can crop the page you’re importing using this drop-down list. Some options may be unavailable because they depend on what’s in the PDF you’re importing. The hatched outline in the preview shows you the crop marks.
Crop To: You can crop the page you’re importing using this drop-down list. Some options may be unavailable because they depend on what’s in the PDF you’re importing. The hatched outline in the preview shows you the crop marks.
![]() Transparent Background: Selecting this check box makes the PDF background transparent so that elements on the InDesign page show through. The PDF background is imported as solid white if this option isn’t selected.
Transparent Background: Selecting this check box makes the PDF background transparent so that elements on the InDesign page show through. The PDF background is imported as solid white if this option isn’t selected.
If your monitor is large enough for you to view your document window and folders on your computer, you can click and drag image files directly into your layout, bypassing the Place command altogether.
Importing other InDesign documents
You can place one InDesign document inside another. This feature might sound a bit odd, but it has many uses. For example, if you have a page from a book that you want to promote in a catalog, you can import an image of the book page to place into a catalog — all without converting the book page into some type of image format. This strategy not only removes a step, but also creates a higher-quality version of the image being placed into InDesign.
Here’s how to take advantage of this feature:
1. With a document open, choose File⇒Place or use the keyboard shortcut Ctrl+D (Windows) or ![]() +D (Mac).
+D (Mac).
The Place dialog box appears.
2. Select the Show Import Options check box at the bottom of the Place dialog box.
3. Navigate to an InDesign file and double-click to open it.
The Place InDesign Document dialog box appears, as shown in Figure 3-1, offering you the opportunity to choose which page or pages you want to place.
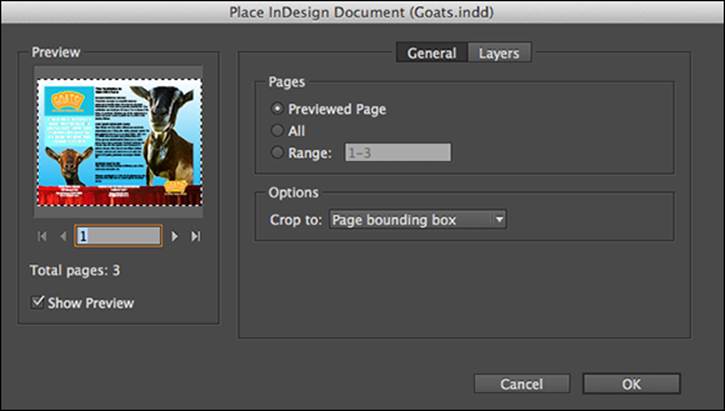
Figure 3-1: Choose pages to import in the Place InDesign Document dialog box.
4. Click OK.
5. Click the page to place the document.
If you’re placing a document with multiple pages, click again to place each additional page.
Linking and Embedding Images
You can have images that you import either linked to your document or embedded in your document. Here’s the difference between linking and embedding:
![]() Linking: The image that appears in the InDesign document is a preview of the image stored somewhere else on your computer or network. If the file you linked to your InDesign document is changed, it must be updated.
Linking: The image that appears in the InDesign document is a preview of the image stored somewhere else on your computer or network. If the file you linked to your InDesign document is changed, it must be updated.
![]() Embedding: The image is copied into and saved within the InDesign document itself. It doesn’t matter where the original file is located or whether you alter the file, because an embedded image is copied and saved directly within the InDesign document.
Embedding: The image is copied into and saved within the InDesign document itself. It doesn’t matter where the original file is located or whether you alter the file, because an embedded image is copied and saved directly within the InDesign document.
When you print or export a document, InDesign uses the linked images to generate the information necessary to create a high-quality printed document, a PDF file, or an image for posting on the web. InDesign keeps track of linked files and alerts you if any of them are moved or changed. You can update links for an image by selecting the image in the Links panel and choosing Update Link or Relink from the Links panel menu. You’re prompted to find that file on your hard drive so that the file can be linked to the new location. And, if you send your InDesign file to someone else, make sure to also send its linked files along with the document. You can gain a better understanding of this process in Chapter 7 of this minibook.
 If you choose to embed images rather than link to images, your publication’s file size increases because of the extra data that’s being stored within it.
To find out which files are embedded or linked, look at the Links panel. (See Figure 3-2.) Choose Window⇒Links to open the panel and see whether any linked or embedded images are listed in the panel.
You can choose to embed a file by using the Links panel menu. Click the triangle in the upper-right corner to access the panel menu and select Embed Link if you want a linked file to be embedded within the document. Alternatively, choose Unembed Link from the Link panel menu to link a file rather than have it embedded in the document. We recommend linking to all images so that your files don’t become too large and because it provides you with flexibility to manipulate the image files separately.
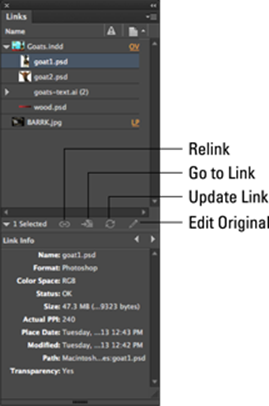
Figure 3-2: The Links panel keeps track of all images used in your documents.
Setting Image Quality and Display
You can select quality settings that determine how images are displayed when they’re part of an InDesign layout. These settings may help speed up your work if your computer is older or slower, or if you have many images. Displaying images at a higher resolution can give you a better idea of the finished print project and may avoid the need to print the project several times for proofing. These settings are applicable only to how you see the images while using InDesign to create a document — they don’t impact the final printed or exported product.
To change the image display quality, choose Edit⇒Preferences⇒Display Performance (Windows) or InDesign⇒Preferences⇒Display Performance (Mac). You can then select one of the following settings from the Default View drop-down list:
![]() Fast: To optimize performance, the entire image or graphic is grayed out.
Fast: To optimize performance, the entire image or graphic is grayed out.
![]() Typical (default): This setting tends to make bitmaps look a little blocky, particularly if you zoom in. The speed of zooming in and out is increased if you select this option. InDesign uses a preview that it created (or that was already imported with the file) to display the image on the screen.
Typical (default): This setting tends to make bitmaps look a little blocky, particularly if you zoom in. The speed of zooming in and out is increased if you select this option. InDesign uses a preview that it created (or that was already imported with the file) to display the image on the screen.
![]() High Quality: The original image is used to display onscreen. You can preview an accurate depiction of the final layout, but you may find that InDesign runs slowly when you use this option.
High Quality: The original image is used to display onscreen. You can preview an accurate depiction of the final layout, but you may find that InDesign runs slowly when you use this option.
Notice the difference among these settings in Figure 3-3.
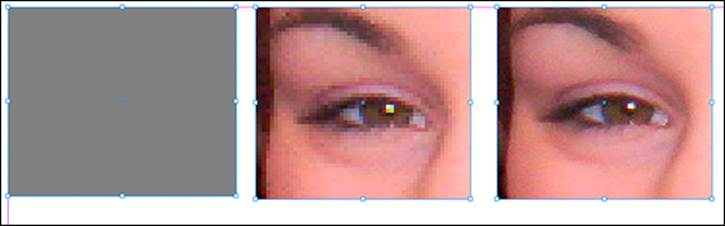
Figure 3-3: From left to right: Fast Display, Typical Display, and High Quality Display.
To change the display for an individual image, select the graphic frame and choose View⇒Display Performance. Then choose one of the three options from the submenu.
Selecting Images
After you import an image into a document, you can select images in several different ways with the Selection or Direct Selection tools. It’s useful to use the different methods depending upon whether you want to select and edit just the graphic frame or just the image inside it.
To select and then edit an image on the page, follow these steps:
1. Place an image on a page by importing it into InDesign.
The image is placed within a graphic frame.
2. With the Selection tool, drag one of the corner handles on the graphic frame in toward the center of the frame.
The graphic frame is resized, but the image isn’t. The image appears to be cropped because you resized the graphic frame — though the image remains the same size within the frame, as shown in the center of Figure 3-4.
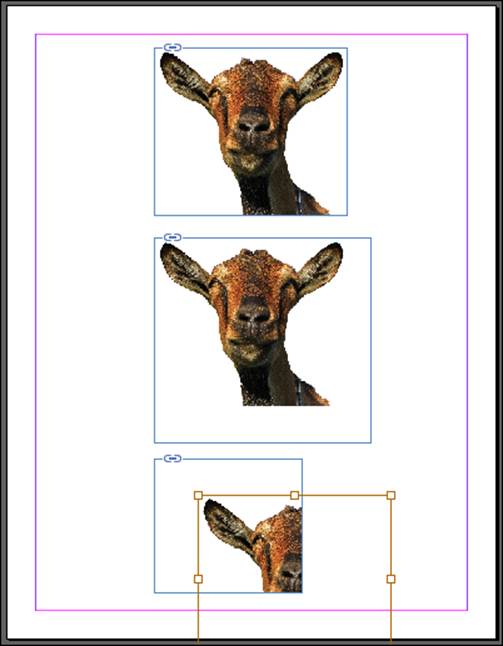
Figure 3-4: The original image in a graphic frame (top); inside a resized frame (center); and reposition-ing an image within the frame (bottom).
3. Choose Edit⇒Undo or press Ctrl+Z (Windows) or ![]() +Z (Mac) to undo changes to the image.
+Z (Mac) to undo changes to the image.
The image returns to its original appearance on the page.
4. Continue to use the Selection tool to click the center of the picture where a circle appears and move the picture within the frame.
The frame remains the same size, but its content is relocated. You can also use the Selection tool to move the frame and contents together by clicking anywhere within the frame; however, it is good practice to click on the center section because this works with both the Selection and Direct Selection tools.
5. Switch to the Direct Selection tool, and then click within the image and drag to move the image within the graphic frame-bounding box.
A hand appears when you move the cursor over the graphic; when you move the image just past the edge of the graphic frame boundaries, that part of the image is no longer visible — it doesn’t print and doesn’t show when exported.
You can set the frame or image to resize by choosing Object⇒Fitting and selecting an option. You can even set this fitting before you place an image, which is especially helpful when creating templates. Resize before an image is placed by choosing Object⇒Fitting⇒Frame Fitting Options.
The Links panel can help you find images within documents, open images so that you can edit them, and view important information about selected images. Figure 3-2 can help you navigate the Links panel and work with your images more effectively.
Manipulating Text and Graphics in a Layout
InDesign offers many tools that help you work with text and graphics together in a layout. From the tools in the Tools panel, to commands, to panel options, InDesign offers you an immense amount of control over the manipulation of graphics and text in a spread.
Page orientation and size
When you create a new document, you can set its page orientation and size. If you ever need to change your settings after you’ve created a document, choose File⇒Document Setup and change the following options, which affect all pages in your document:
![]() Page Orientation: Select either Landscape or Portrait. One of the first things you decide on when you create a new document is how to orient the pages. A landscape page is wider than it is tall; a portrait orientation is taller than it is wide.
Page Orientation: Select either Landscape or Portrait. One of the first things you decide on when you create a new document is how to orient the pages. A landscape page is wider than it is tall; a portrait orientation is taller than it is wide.
![]() Page Size: Choose from many standardized preset sizes, such as Letter, Legal, and Tabloid. Alternatively, you can set a custom page size for the document. Make sure to properly set the page size so that it fits the kind of paper you need to print on, or screen size if you’re publishing your work digitally.
Page Size: Choose from many standardized preset sizes, such as Letter, Legal, and Tabloid. Alternatively, you can set a custom page size for the document. Make sure to properly set the page size so that it fits the kind of paper you need to print on, or screen size if you’re publishing your work digitally.
You can also use the pages panel to adjust the size of individual pages and make some pages a different size. This topic is covered later in this chapter, in the section Working with Pages and the Pages Panel.
Margins, columns, and gutters
Margins, columns, and gutters help divide a page for layout and confine its dimensions:
![]() Margin: The area between the edge of the page and the main printed area. Together, the four margins (top, bottom, left, and right) look like a rectangle around the page’s perimeter. Margins don’t print when you print or export the publication.
Margin: The area between the edge of the page and the main printed area. Together, the four margins (top, bottom, left, and right) look like a rectangle around the page’s perimeter. Margins don’t print when you print or export the publication.
![]() Column: Divide a page into sections used for laying out text and graphics on a page. A page has at least one column when you start, which is between the margins. You can add column guides, represented by a pair of lines separated by a gutter area. Column guides aren’t printed when you print or export the publication.
Column: Divide a page into sections used for laying out text and graphics on a page. A page has at least one column when you start, which is between the margins. You can add column guides, represented by a pair of lines separated by a gutter area. Column guides aren’t printed when you print or export the publication.
![]() Gutter: The space between two columns on the page. A gutter prevents columns from running together. You can define the gutter’s width by choosing Object⇒Text Frame Options; see Chapter 2 of this minibook for more information.
Gutter: The space between two columns on the page. A gutter prevents columns from running together. You can define the gutter’s width by choosing Object⇒Text Frame Options; see Chapter 2 of this minibook for more information.
You can set margins and columns when you create a new document, which we discuss in Chapter 1 of this minibook. However, you can also modify margins and columns after the document has been created and specify different values for each page. You can modify the gutter, which is the width of the space between each column.
You can change margins and columns by setting new values in the Margins and Columns dialog box. Choose Layout⇒Margins and Columns, and then modify each individual page.
Margins and columns are useful for placing and aligning elements on a page. These guides can have objects snap to them, enabling you to accurately align multiple objects on a page.
Using guides and snapping
Using guides when you’re creating page layouts is a good idea because guides help you more precisely align elements on a page and position objects in the layout. Aligning objects by eyeballing them is difficult because you often can’t tell whether an object is out of alignment by a small amount unless you zoom in to a large percentage.
Make sure that snapping is enabled by choosing View⇒Grids and Guides⇒Snap to Guides. Snapping makes guides and grids useful. When you drag the object close to the grid, the object attaches to the guideline like it’s a magnet. Aligning an object to a guide is easy after you create a guide, and you’ll notice that InDesign displays temporary guides when you move an object near another object or near a guide.
Because guides are useful in creating a layout, check out the following kinds, available in InDesign (see Figure 3-5):
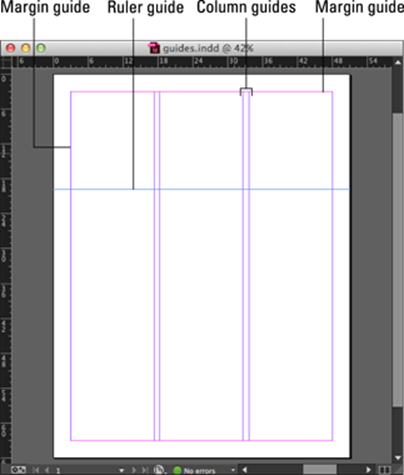
Figure 3-5: Column guides, margin guides, and ruler guides help create a layout.
![]() Column guides: Evenly distribute a page into columns and can be used to align text frames in a document. These guides are set when you open a new document in InDesign that contains more than one column. Column guides can also be adjusted after a document is created by choosing Layout⇒Margins and Columns.
Column guides: Evenly distribute a page into columns and can be used to align text frames in a document. These guides are set when you open a new document in InDesign that contains more than one column. Column guides can also be adjusted after a document is created by choosing Layout⇒Margins and Columns.
![]() Margin guides: Define the area between the edge of the page and the main printable area. (We discuss these guides in the preceding section.)
Margin guides: Define the area between the edge of the page and the main printable area. (We discuss these guides in the preceding section.)
![]() Ruler guides: Manually defined and can be used to align graphics, measure objects, or specify the location of a particular asset you want to lay out. See Chapter 1 of this minibook for details about adding ruler guides to the workspace.
Ruler guides: Manually defined and can be used to align graphics, measure objects, or specify the location of a particular asset you want to lay out. See Chapter 1 of this minibook for details about adding ruler guides to the workspace.
![]() Smart guides: As previously mentioned, smart guides offer the capability to align objects on an InDesign page to other objects or even to the page. Smart Object alignment allows for easy snapping to page item centers or edges or page centers. In addition to snapping, smart guides give feedback to the user indicating the object to which you are snapping.
Smart guides: As previously mentioned, smart guides offer the capability to align objects on an InDesign page to other objects or even to the page. Smart Object alignment allows for easy snapping to page item centers or edges or page centers. In addition to snapping, smart guides give feedback to the user indicating the object to which you are snapping.
![]() Liquid guides: Liquid guides are useful when creating layouts that will be displayed on a variety of tablets. They are discussed more in Chapter 8 of this minibook.
Liquid guides: Liquid guides are useful when creating layouts that will be displayed on a variety of tablets. They are discussed more in Chapter 8 of this minibook.
To find out how to show and hide grids and guides, see Chapter 1 of this minibook.
With InDesign CC you can delete all guides at once by right-clicking the ruler (Windows) or Control-clicking the ruler (Mac) and selecting Delete All Guides on Spread from the contextual menu.
Locking objects and guides
You can lock in place elements such as objects and guides. This feature is particularly useful after you’ve carefully aligned elements on a page. Locking objects or guides prevents you from accidentally moving them from that position.
To lock an element, follow these steps:
1. Use a drawing tool to create an object on a page, and then select the object with the Selection tool.
A bounding box with handles appears when the object is selected.
2. Choose Object⇒Lock.
The object is locked in position. Now when you try to use the Selection or Direct Selection tools to move the object, it doesn’t move from its current position.
To lock guides in place, follow these steps:
1. Drag a couple of ruler guides to the page by clicking within a ruler and dragging toward the page.
A line appears on the page. (If rulers aren’t visible around the pasteboard, choose View⇒Rulers.)
2. Drag a ruler guide to a new location, if needed; when you’re happy with the ruler guides’ placements, choose View⇒Grids & Guides⇒Lock Guides.
All guides in the workspace are locked. If you try selecting a guide and moving it, the guide remains in its present position and cannot be moved. If you have any column guides on the page, they’re locked as well.
Use layers in your publications for organizing different types of content, including guides. Layers are a lot like transparencies that lie on top of each other, so they can be used for stacking elements on a page. For example, you may want to stack graphics or arrange similar items (such as images or text) on the same layer. Each layer has its own bounding box color, which helps you determine which item is on which corresponding layer. For more information on layers in general, see Book III, Chapter 8.
Merging Text and Graphics
When you have text and graphics together on a page, they should flow and work with each other to create an aesthetic layout. Luckily, you can work with text wrap to achieve a visual flow between text and graphics. In this section, you find out how to wrap text around images and graphics in your publications.
Wrapping objects with text
Images can have text wrapped around them, as shown in Figure 3-6. Wrapping is a typical feature of page layout in print and on the web. You can choose different text wrap options by using the Text Wrap panel, which you open by choosing Window⇒Text Wrap. Use the five buttons at the top of the panel to specify which kind of text wrapping to use for the selected object. Below the buttons are text fields where you can enter offset values for the text wrap. The fields are grayed out if the option isn’t available.
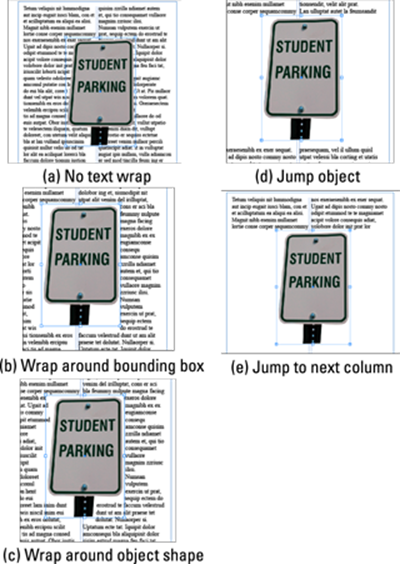
Figure 3-6: You can wrap text around images in InDesign in several ways.
You use the drop-down list at the bottom of the Text Wrap panel to choose from various contour options. The following list describes what happens when you click one of these buttons to wrap text around an object’s shape:
![]() No Text Wrap: Use the default setting to remove any text wrapping from the selected object.
No Text Wrap: Use the default setting to remove any text wrapping from the selected object.
![]() Wrap around Bounding Box: Wrap text around all sides of the bounding box of the object.
Wrap around Bounding Box: Wrap text around all sides of the bounding box of the object.
![]() Wrap around Object Shape: Wrap text around the edges of an object.
Wrap around Object Shape: Wrap text around the edges of an object.
![]() Jump Object: Make the text wrapping around the image jump from above the image to below it, with no text wrapping to the left or right of the object in the column.
Jump Object: Make the text wrapping around the image jump from above the image to below it, with no text wrapping to the left or right of the object in the column.
![]() Jump to Next Column: Make text end above the image and then jump to the next column. No text is wrapped to the left or right of the image.
Jump to Next Column: Make text end above the image and then jump to the next column. No text is wrapped to the left or right of the image.
![]() Offset: Enter offset values for text wrapping on all sides of the object.
Offset: Enter offset values for text wrapping on all sides of the object.
![]() Wrap Options: Select an option to determine on which sides of the object text will wrap.
Wrap Options: Select an option to determine on which sides of the object text will wrap.
![]() Contour Options: Select a contour from this drop-down list, which tells InDesign how the edges of the image are determined. You can choose from various vector paths or the edges to be detected around an object or image with transparency.
Contour Options: Select a contour from this drop-down list, which tells InDesign how the edges of the image are determined. You can choose from various vector paths or the edges to be detected around an object or image with transparency.
To add text wrapping to an object (a drawing or an image), follow these steps:
1. Create a text frame on a page with a graphic.
Add text to the text frame by typing text, pasting text from elsewhere, or filling the frame with placeholder text. This text wraps around the image, so make sure that the text frame is slightly larger than the graphic frame you’ll use.
2. Use the Selection tool to select a graphic frame on the page and move it over the text frame.
Bounding box handles appear around the edges of the image or graphic.
3. Choose Window⇒Text Wrap to open the Text Wrap panel.
The Text Wrap panel opens.
4. With the graphic frame still selected, click the Wrap around Object Shape button.
The text wraps around the image instead of hiding behind it.
5. If you’re working with an image that has a transparent background, select Detect Edges or Alpha Channel from the Contour Options drop-down list.
The text wraps around the edges of the image, as in Figure 3-7.
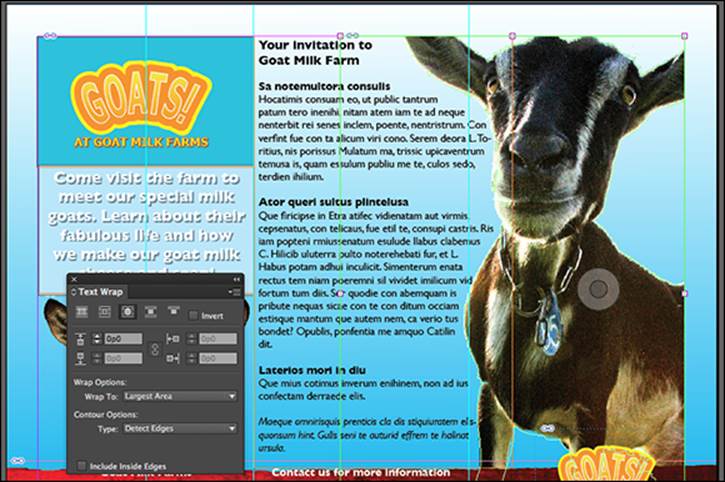
Figure 3-7: You can wrap text around an image with a transparent background.
Modifying a text wrap
If you’ve applied a text wrap around an object (as we show you how to do in the preceding section), you can then modify that text wrap. If you have an image with a transparent background around which you’ve wrapped text, InDesign created a path around the edge of the image; if you have a shape you created with the drawing tools, InDesign automatically uses those paths to wrap text around.
 Before proceeding with the following steps, be sure that the object uses the Wrap around Object Shape text wrap. (If not, open the Text Wrap panel and click the Wrap around Object Shape button to apply text wrapping.) Remember to choose Detect Edges if you’re using an image with a transparent background.
To modify the path around an image with text wrapping, using the Direct Selection tool, follow these steps:
1. Select the object by using the Direct Selection tool.
The image is selected, and you can see the path around the object.
2. Click to select one of the anchor points on the text wrap path by using the Direct Selection tool; then click and drag the point to move it.
The path is modified according to how you move the point. (For more about manipulating paths, take a look at Chapter 4 of this minibook.) The text wrapping immediately changes, based on the modifications you make to the path around the object.
3. Select the Delete Anchor Point tool from the Tools panel and delete an anchor point.
The path changes again, and the text wrapping modifies around the object accordingly.
You can also use the Offset values in the Text Wrap panel to determine the distance between the wrapping text and the edge of the object. Simply increase the values to move the text farther from the object’s edge.
Working with Pages and the Pages Panel
The page is the central part of any publication — it’s where the visible part of your publication is created. Navigating and controlling pages are important parts of working in InDesign. The Pages panel allows you to select, adjust, move, and navigate pages in a publication. When you use default settings, pages are created as facing pages, which means that they’re laid out as two-page pairs, or spreads. Otherwise, pages are laid out individually. Whether a page is part of a spread or a single page is reflected in the Pages panel, the option is specified when you create a new document and can be changed in the Document Setup window.
The Pages panel, which you open by choosing Window⇒Pages, also lets you add new pages to the document, duplicate pages, delete a page, or change the size of a page. The pages panel, shown in Figure 3-8, contains two main areas: the master pages (upper) section and the (lower) section containing the document’s pages.

Figure 3-8: The Pages panel with page previews.
To discover more about master pages and how they differ from regular pages in your document, see the Using Master Spreads in Page Layout section, later in this chapter.
Selecting and moving pages
Use the Pages panel to select a page or spread in your publication. Select a page by clicking the page. If you Ctrl-click (Windows) or ![]() -click (Mac) pages, you can select more than one page at a time. The Pages panel also lets you move pages to a new position in the document: Select a page in the document pages area of the panel, and then drag it wherever you want to move the page. A small line and changed cursor indicate where the page will be moved. You can move a page so that it’s between two pages in a spread; a hollow line indicates where you’re moving the page. If you move a page after a spread, a solid line appears. Release the mouse button to move the page to the new location.
-click (Mac) pages, you can select more than one page at a time. The Pages panel also lets you move pages to a new position in the document: Select a page in the document pages area of the panel, and then drag it wherever you want to move the page. A small line and changed cursor indicate where the page will be moved. You can move a page so that it’s between two pages in a spread; a hollow line indicates where you’re moving the page. If you move a page after a spread, a solid line appears. Release the mouse button to move the page to the new location.
Adding and deleting pages
You can also add new pages to the publication by using the Pages panel. To add a new page, follow these steps:
1. Choose Window⇒Pages to open the Pages panel.
The Pages panel opens.
2. Click the Create New Page button.
A new page is added to the document.
 Alt-click (Windows) or Option-click (Mac OS) the Create New Page button, and you can then specify the exact number of pages to add and the location of these new pages.
3. Select a page in the Pages panel.
The selected page is highlighted in the Pages panel.
4. Click the Create New Page button again.
A new page is added following the selected page.
To delete a page, select it in the Pages panel and click the Delete Selected Pages button. The selected page is removed from the document.
You can also add, delete, and move pages and more without the Pages panel by choosing from the Layout⇒Pages submenu.
Numbering your pages
When you’re working with longer documents, adding page numbers before you print or export the publication is a good idea. You don’t have to add them manually: A special InDesign tool lets you number pages automatically. This tool is particularly useful when you move pages around the document. You don’t have to keep track of updating the numbering when you make these kinds of edits.
To number pages, follow these steps:
1. Using the Type tool, create a text frame on the page where you want the page number to be added.
2. Choose Type⇒Insert Special Character⇒Markers⇒Current Page Number.
The current page number appears in the text frame you selected. If you added the page number to a master page, the master page’s letter appears in the field instead.
If you want page numbers to appear on all pages in the document, add the text frame to a master page. Remember that page numbers are added only to the pages in your document that are associated with that master page. If you want to add page numbers to the left and right sides of a book or magazine, you need to repeat this process on the left and right sides of the master pages. Remember that if you add a page number only on a document page — and not on a master — the page number is added to only that single page.
To modify automatic-numbering settings, choose Layout⇒Numbering and Section Options. You can choose to have numbering start from a specific number or use a different style, such as Roman numerals.
Using Master Spreads in Page Layout
Master pages are a lot like templates you use to format page layouts. The settings, such as margins and columns, are applied to each layout that the master page is applied to. If you put a page number on a master page, the number also appears on every page that uses the layout. You can have more than one master page in a single publication, and you can choose which pages use a particular master page.
A master page or spread typically contains parts of a layout that are applied to many pages. The master page has elements that are used on many pages, such as page numbering, text frames to enter text into, background images, or a heading that’s used on every page. By default, you don’t edit the items you have on a master page on the pages assigned to it — you can edit those items on the master page. You can, however, override or even completely detach these master page elements to modify them directly on a document page. This functionality can be useful for special cases like changing the background of just one page in your document, but this is beyond the scope of this book.
 Master pages are lettered. The first master page is the A-Master by default. If you create a second master page, it’s the B-Master by default. When you create a new publication, the A-Master is applied to all pages you initially open in the document. You can add pages at the end that don’t have a master page applied to them.
Creating master pages and applying them to your publication enables you to create a reusable format for it, which can dramatically speed up your workflow when you put together documents with InDesign.
Creating a master spread
You may need more than one master page or master spread for a document. You may have another series of pages that need a unique format. In this situation, you need to create a second master page. You can create a master page or a master spread from any other page in the publication, or you can create a new one with the Pages panel.
To create a master page by using a page in the publication, do one of the following:
![]() Choose New Master from the Page panel’s menu, and then click OK. A blank master page is created.
Choose New Master from the Page panel’s menu, and then click OK. A blank master page is created.
![]() Drag a page from the pages section of the panel into the master page section of the Pages panel. The document page turns into a master page.
Drag a page from the pages section of the panel into the master page section of the Pages panel. The document page turns into a master page.
 If the page you’re trying to drag into the master pages section is part of a spread, select both pages in the spread before you drag it into the master pages section. You can drag individual pages into the master page section only if they’re not part of a spread.
Applying, removing, and deleting master pages
After you create a master page, you can apply it to a page. You can also remove a page from a master page layout and delete a master page altogether:
![]() To add master page formatting to a page or spread in a publication: In the Pages panel, drag the master page you want to use from the master page section on top of the page you want to format in the document pages section. When you drag the master page on top of the page, it has a thick outline around it. Release the mouse button when you see this outline, and the formatting is applied to the page.
To add master page formatting to a page or spread in a publication: In the Pages panel, drag the master page you want to use from the master page section on top of the page you want to format in the document pages section. When you drag the master page on top of the page, it has a thick outline around it. Release the mouse button when you see this outline, and the formatting is applied to the page.
![]() To remove any master page applied to a document page: In the Pages panel, drag the None page from the master area in the Pages panel to that document page. You may need to use the scroll bar in the master pages area of the Pages panel to find the None page.
To remove any master page applied to a document page: In the Pages panel, drag the None page from the master area in the Pages panel to that document page. You may need to use the scroll bar in the master pages area of the Pages panel to find the None page.
![]() To delete a master page: In the Pages panel, select the unwanted master page, and then choose Delete Master Page from the panel menu.
To delete a master page: In the Pages panel, select the unwanted master page, and then choose Delete Master Page from the panel menu.
This action permanently deletes the master page — you can’t get it back — so think carefully before deleting a master page.
Changing individual page sizes
Using the Pages panel, you can change the size of individual pages in a document, which is useful if you have one page that folds out and is larger than others. Or, maybe you want to create a single document that includes a business card, an envelope, and a letterhead.
To change the size of individual pages using the Pages panel, follow these steps:
1. In the Pages panel, click to select the page you want to modify.
2. Click the Edit Page Size button at the bottom of the Pages panel and select the new size.
3. Repeat the process to adjust the size for any pages you want to modify.
When you’re done editing the size of the pages, continue to work on their design and layout like you would work on any other pages. The only difference is that some pages in your document may be a different size.
You can also use the Pages panel to create alternative layouts for display on various tablet devices. These alternative layouts are discussed in Chapter 8 of this minibook.
All materials on the site are licensed Creative Commons Attribution-Sharealike 3.0 Unported CC BY-SA 3.0 & GNU Free Documentation License (GFDL)
If you are the copyright holder of any material contained on our site and intend to remove it, please contact our site administrator for approval.
© 2016-2026 All site design rights belong to S.Y.A.