Adobe Creative Cloud Design Tools All-in-One For Dummies (2013)
Book III
Illustrator CC
Chapter 4: Creating Basic Shapes
In This Chapter
![]() Creating rectangles, ellipses, stars, and polygons
Creating rectangles, ellipses, stars, and polygons
![]() Resizing shapes
Resizing shapes
![]() Using the Pathfinder panel
Using the Pathfinder panel
![]() Using the Shape Builder tool
Using the Shape Builder tool
Basic shapes, such as squares, circles, polygons, and stars, are used in all types of illustrations. With the right know-how and use of the right tools, you can easily create any shape that you want for your artwork. In this chapter, you find out how to use the shape tools to create shapes based on precise measurements, and combine shapes to create custom shapes. You also learn how to edit and resize your shapes.
The Basic Shape Tools
As a default, the only visible shape tool in the Tools panel is the Rectangle tool. If you click and hold down that tool, you can access hidden tools such as the Rounded Rectangle, Ellipse, Polygon, and Star tools, shown in Figure 4-1. (Although you see the Flare tool, it isn’t a basic shape.)
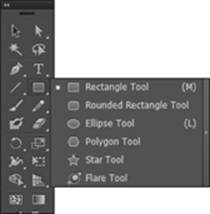
Figure 4-1: Basic shape tools.
 You can tear off this tool set so that you don’t have to find the hidden shapes later. Click and hold the Rectangle tool and drag to the arrow on the far-right side, and then release the mouse button. These tools are now on a free-floating toolbar that you can drag to another location.
Creating rectangles and ellipses
Rectangles and ellipses are the most fundamental shapes you can create. (See Figure 4-2.) To create a rectangle shape freehand, select the Rectangle tool and simply click the page where you want the shape to appear. Then drag diagonally toward the opposite side, drag your mouse the distance you want the shape to be in size, and release the mouse button. You can drag up or down. You do the same to create a circle or oval by using the Ellipse tool.
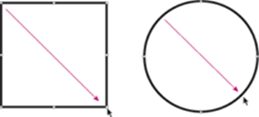
Figure 4-2: Click and drag diagonally to create a shape.
 After you create the shape, adjust its size and position by using the Selection tool. Reposition the shape by clicking the selected object and dragging. Resize the object by grabbing a handle and adjusting in or out. To adjust two sides together, grab a corner handle. To resize a shape proportionally, Shift+drag a corner handle.
Using the Rounded Rectangle tool
You can create a rounded rectangle by using one of two methods:
![]() Click and drag freehand to create the rounded rectangle shape.
Click and drag freehand to create the rounded rectangle shape.
![]() Click the artboard once to open the Rounded Rectangle dialog box, where you can enter values to define the shape.
Click the artboard once to open the Rounded Rectangle dialog box, where you can enter values to define the shape.
The difference between these two methods is that when you open the Rounded Rectangle dialog box (see Figure 4-3), you can enter a value in the Corner Radius text field, which determines how much rounding is applied to the corners of the shape.
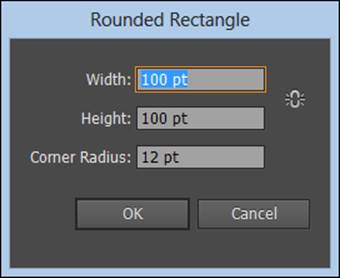
Figure 4-3: Customize the size of a rounded rectangle.
Change the rounded corner visually by pressing the up and down keys on your keyboard while you’re dragging out the Rounded Rectangle shape on the artboard.
The smaller the value, the less rounded the corners; the higher the value, the more rounded the corners. Be careful: You can round a rectangle’s corners so much that it becomes an ellipse!
Using the Polygon tool
You create stars and polygons in much the same way as you create rectangles and ellipses. Select the Polygon tool and click and drag from one corner to another to create the default six-sided polygon shape. You can also select the Polygon tool and click once on the artboard to change the Polygon tool options in the Polygon dialog box.
You can change the polygon shape by entering new values in the Radius and Sides text fields, as shown in Figure 4-4. The radius is determined from the center to the edge of the polygon. The value for the number of sides can range from 3 (making triangles a breeze to create) to 1,000. Whoa — a polygon with 1,000 sides would look like a circle unless it was the size of Texas!
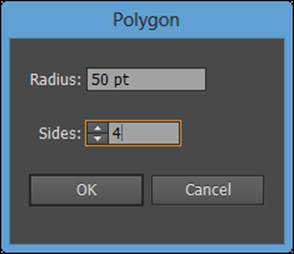
Figure 4-4: Creating a polygon shape.
Using the Star tool
To create a star shape, select the Star tool from the Tools panel. (Remember that it may hide under other shape tools.) If you click the artboard once to open the Star dialog box, you see three text fields in which you can enter values to customize your star shape:
![]() Radius 1: Distance from the outer points to the center of the star
Radius 1: Distance from the outer points to the center of the star
![]() Radius 2: Distance from the inner points to the center of the star
Radius 2: Distance from the inner points to the center of the star
![]() Points: Number of points that comprise the star
Points: Number of points that comprise the star
The closer together the Radius 1 and Radius 2 values are to each other, the shorter the points on your star. In other words, you can go from a starburst to a seal of approval by entering values that are close in the Radius 1 and Radius 2 text fields, as shown in Figure 4-5.
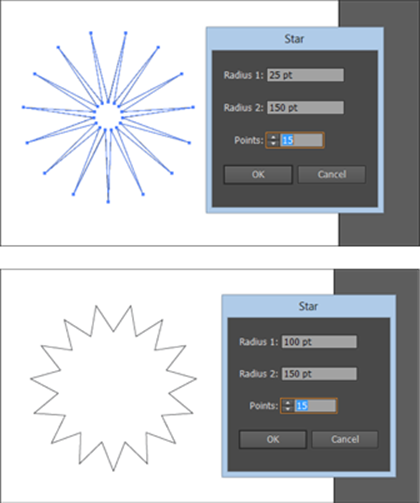
Figure 4-5: Radius 1 and Radius 2 are closer to each other in the star on the bottom.
Resizing Shapes
You often need a shape to be an exact size (for example, 2 x 3 inches). After you create a shape, the best way to resize it to exact measurements is to use the Transform panel, shown in Figure 4-6. Have the object selected and then choose Window⇒Transform to open the Transform panel. Note that on this panel you can enter values to place an object in the X and Y fields as well as enter values in the width (W) and height (H) text fields to determine the exact size of an object.
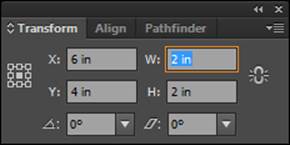
Figure 4-6: Precisely set the size of a shape.
In many Adobe Illustrator panels, you may see measurement increments consisting of points, picas, millimeters, centimeters, or inches, which can be confusing and maybe even intimidating. But you can control which measurement increments to use.
Show rulers by choosing View⇒Rulers⇒Show Rulers or press Ctrl+R (Windows) or ![]() +R (Mac). Then right-click (Windows) or Control-click (Mac) the ruler to change the measurement increment to an increment you’re more familiar with. Using the contextual menu that appears, you can change the measurement increment directly on the document.
+R (Mac). Then right-click (Windows) or Control-click (Mac) the ruler to change the measurement increment to an increment you’re more familiar with. Using the contextual menu that appears, you can change the measurement increment directly on the document.
Alternatively, you can simply type the number followed by a measurement extension into the width and height text fields in the Transform panel (refer to Figure 4-6), and the measurement converts properly for you. Table 4-1 lists the extensions you can use.
Table 4-1 Measurement Extensions
|
Extension |
Measurement Unit |
|
in (or “) |
Inch |
|
pt |
Point |
|
mm |
Millimeter |
|
pp |
Pica |
If you don’t want to bother creating a freehand shape and then changing its size, select the Shape tool and click the artboard. The Options dialog box specific to the shape you’re creating appears, and you can type values into the Width and Height text fields.
If you accidentally click and drag, you end up with a tiny shape on your page. Don’t fret. Simply get rid of the small shape by selecting it and pressing the Delete key, and then you can try again.
Tips for Creating Shapes
The following simple tips can improve your skills at creating basic shapes in Illustrator:
![]() Press and hold the Shift key while dragging with the Rectangle or Ellipse tool to create a perfect square or circle. (See Figure 4-7.) This trick is also helpful when you’re using the Polygon and Star tools — holding down the Shift key constrains them so that they’re straight.
Press and hold the Shift key while dragging with the Rectangle or Ellipse tool to create a perfect square or circle. (See Figure 4-7.) This trick is also helpful when you’re using the Polygon and Star tools — holding down the Shift key constrains them so that they’re straight.
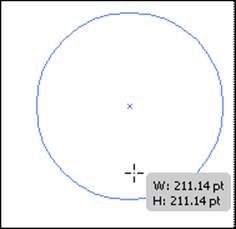
Figure 4-7: Use the Shift key to constrain a shape while you create it.
![]() Create a shape from the center out by holding down the Alt (Windows) or Option (Mac) key while dragging. Hold down Alt+Shift (Windows) or Option+Shift (Mac) to pull a constrained shape out from the center.
Create a shape from the center out by holding down the Alt (Windows) or Option (Mac) key while dragging. Hold down Alt+Shift (Windows) or Option+Shift (Mac) to pull a constrained shape out from the center.
![]() When creating a star or polygon shape by clicking and dragging, if you keep the mouse button down, you can then press the up- or down-arrow key to interactively add points or sides to your shape.
When creating a star or polygon shape by clicking and dragging, if you keep the mouse button down, you can then press the up- or down-arrow key to interactively add points or sides to your shape.
Creating advanced shapes
At times, it may be wise to use advanced tools in Illustrator to create unique shapes. The Pathfinder panel is an incredible tool you can use to combine, knock out (eliminate one shape from another), and even create shapes from other intersected shapes.
You use the Pathfinder panel, shown in Figure 4-8, to combine objects into new shapes. To use the Pathfinder panel, choose Window⇒Pathfinder.
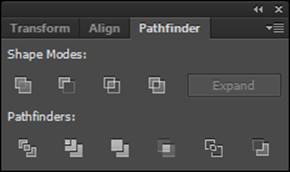
Figure 4-8: Combine objects into new shapes.
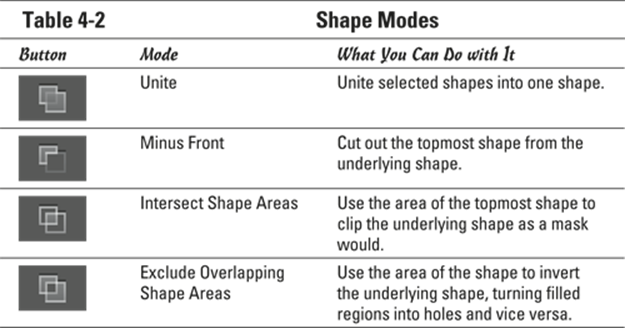
Across the top row of the Pathfinder panel are the Shape modes, which let you control the interaction between selected shapes. You can choose from the Shape modes listed in Table 4-2.
If you like the result from using Exclude Overlapping Shapes mode, you can also create a similar effect by selecting several shapes and choosing Object⇒Compound Path⇒Make. This command “punches” the topmost shapes from the bottom shape.
The shapes remain separate so that you can still adjust them, which is helpful if you like to tweak your artwork (but it drives some people crazy). You can turn the result of using the Shape Mode buttons into one shape by either clicking the Expand button after selecting the Shape mode or holding down the Alt key (Windows) or Option key (Mac) when clicking a Shape Mode button.
Using the Pathfinders
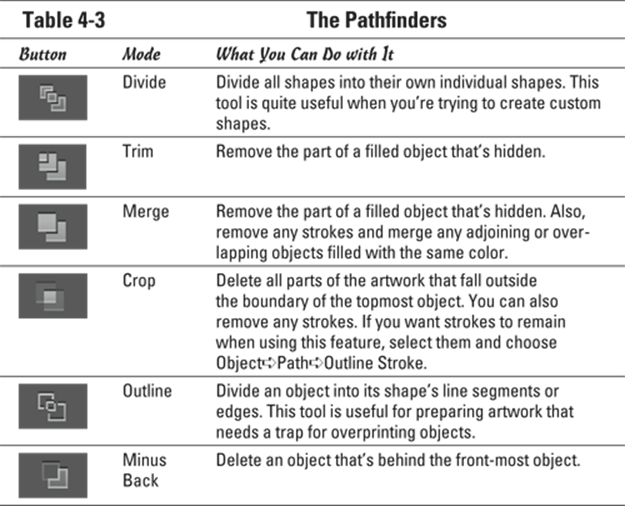
Pathfinders are the buttons at the bottom of the Pathfinder panel that let you create new shapes from overlapping objects. Table 4-3 summarizes what each Pathfinder does.
Using the Shape Builder tool
Using the Shape Builder tool, you can intuitively combine, edit, and fill shapes on your artboard. Follow these steps to create your own unique shape using the Shape Builder tool:
1. Create several overlapping shapes.
2. Select the shapes that you want to combine.
![]() 3. Select the Shape Builder tool and then click and drag across the selected shapes, as shown on the left in Figure 4-9.
3. Select the Shape Builder tool and then click and drag across the selected shapes, as shown on the left in Figure 4-9.
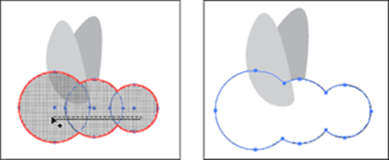
Figure 4-9: Create several shapes in order to use the Shape Builder tool.
The selected shapes are combined into one shape, as shown on the right in Figure 4-10.
The Shape Builder tool also enables merging objects, breaking overlapping shapes, subtracting areas, and more.
4. Create another shape that overlaps your new combined shape.
5. Using the Selection tool, select both shapes.
6. Select the Shape Builder tool again.
7. Hold down the Alt (Windows) or Option (Mac) key and click and drag across the newly added shape, as shown in Figure 4-10.
It’s subtracted from the underlying shape.
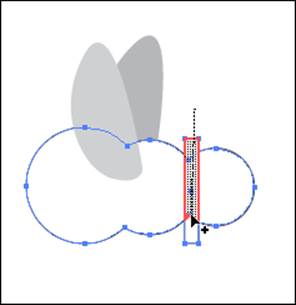
Figure 4-10: Use the Shape Builder tool to subtract from another shape.
![]() Coloring fills and strokes is easier now, too. When you’re finished making your shape, you can use the Live Paint Bucket tool that is hidden in the Shape Builder tool to intuitively fill your shape with color.
Coloring fills and strokes is easier now, too. When you’re finished making your shape, you can use the Live Paint Bucket tool that is hidden in the Shape Builder tool to intuitively fill your shape with color.
All materials on the site are licensed Creative Commons Attribution-Sharealike 3.0 Unported CC BY-SA 3.0 & GNU Free Documentation License (GFDL)
If you are the copyright holder of any material contained on our site and intend to remove it, please contact our site administrator for approval.
© 2016-2026 All site design rights belong to S.Y.A.