Adobe Creative Cloud Design Tools All-in-One For Dummies (2013)
Book III
Illustrator CC
Chapter 10: Using the Transform and Distortion Tools
In This Chapter
![]() Discovering transformation methods
Discovering transformation methods
![]() Putting the Transform tools to work
Putting the Transform tools to work
![]() Becoming familiar with the Liquify tools
Becoming familiar with the Liquify tools
![]() Distorting, warping, and otherwise reshaping objects
Distorting, warping, and otherwise reshaping objects
You can apply transformations to objects in Illustrator that include scaling, rotating, skewing, and distorting. In this chapter, you discover how to use the general transform tools as well as some of the interesting liquify and envelope distort features available in Illustrator.
Working with Transformations
Using just the Selection tool, you can scale and rotate a selected object. Drag the bounding box handles to resize the object, shown in Figure 10-1, or move outside a handle and then, when the cursor changes to a flippy arrow (a curved arrow with arrowheads on both ends), drag to rotate the object.
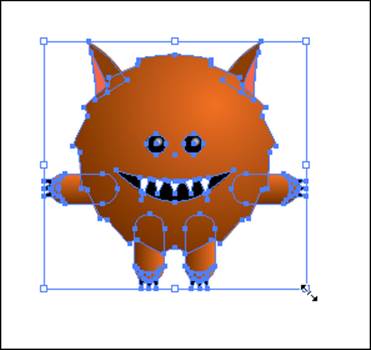
Figure 10-1: Use the bounding box to resize or rotate a selected object.
 If you want to scale proportionally, hold down the Shift key while you drag to resize. To rotate an object at 45-degree increments, hold down the Shift key while you’re rotating.
When you use the bounding box to rotate a selection, the bounding box rotates with the object, but its handles show the object’s original orientation, as shown in Figure 10-2. The orientation can help you keep track of the original placement but can also interfere when you’re building additional artwork. To reset the bounding box so that it’s straight at the new orientation, choose Object⇒Transform⇒Reset Bounding Box.
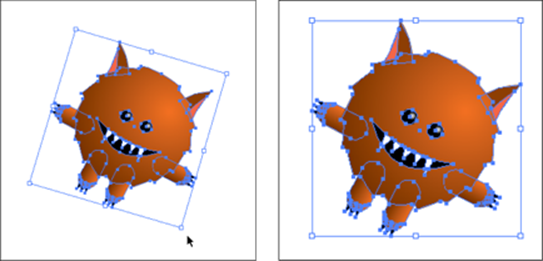
Figure 10-2: The bounding box in its original position and after it has been reset.
 When you scale, rotate, or use any other type of transformation in Illustrator, the final location becomes the zero point. In other applications, such as InDesign, you can rotate an object by any number of degrees (45 degrees, for example) and later enter 0 for the rotation angle in the Transform panel or in the Rotate dialog box to return the object to its original position. In Illustrator, if you enter 0 for the rotation angle to return a rotated object to its original position, the object doesn’t change its position. To return the object to the previous position in Illustrator, you have to enter the negative of the number you originally entered to rotate the object, so you would enter -45 for the degree of rotation in this example.
Transforming an object
The Rotate, Reflect, Scale, and Shear tools all use the same basic steps to perform transformations. Read on for those basic steps and then follow some individual examples of the most often used Transform tools. The following sections show five ways to transform an object: one for an arbitrary transformation and four others for exact transformations based on a numeric amount you enter.
Arbitrary transformation method
Because this transformation method is arbitrary, you’re eyeballing the transformation of an object — in other words, you don’t have an exact percentage or angle in mind, and you want to freely transform the object until it looks right. Just follow these steps:
1. Select an object and then choose a Transform tool (Rotate, Reflect, Scale, or Shear).
2. Click the artboard once.
Be careful where you click because the click determines the point of reference, or axis point, for the transformation. In Figure 10-3, the click put the axis point above the right ear. The image is rotated on the axis created at that point.
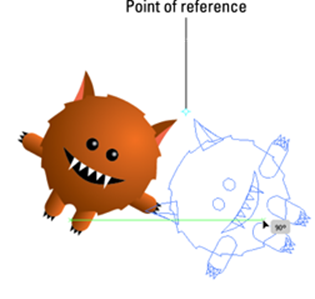
Figure 10-3: The first mouse click creates the axis point.
3. Drag in one smooth movement.
Just drag until you create the transformation you want.
Hold down the Alt (Windows) or Option (Mac) key when dragging to clone a newly transformed item while keeping the original object intact. This trick is especially helpful when you’re using the Reflect tool.
Exact transformation methods
In the methods in this section, you discover how to perform transformations using specific numeric information:
Exact transformation method 1 — using the tool’s dialog box:
1. Select an object and then choose the Rotate, Reflect, Scale, or Shear tool.
2. Double-click the Transform tool that you selected in the Tools panel.
A dialog box specific to your chosen tool appears, as shown in Figure 10-4. In this example, the Rotate tool was selected to open the Rotate dialog box.
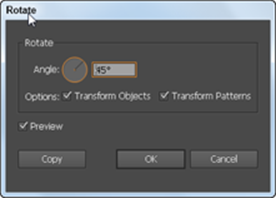
Figure 10-4: Double-click a Transform tool to open its dialog box.
3. Type an angle, a scaled amount, or a percentage in the appropriate text field.
In Figure 10-4, 45 degrees is entered.
4. Select the Preview check box to see the effect of the transformation before you click OK; click the Copy button instead of OK to keep the original object intact and transform a copy.
Exact transformation method 2 — using the reference point:
1. Select an object and then choose the Rotate, Reflect, Scale, or Shear tool.
2. Alt-click (Windows) or Option-click (Mac) wherever you want to place the reference point.
3. In the Transform tool dialog box that appears, enter values and click OK or click the Copy button to apply the transformation.
This method is the best one to use if you need to rotate an object an exact amount on a defined axis.
Exact transformation method 3 — using the Transform menu:
1. Select an object and then choose a transform option from the Object⇒Transform menu.
The appropriate transform dialog box appears.
2. Enter some values and click OK or the Copy button.
Exact transformation method 4 — using the Transform panel:
1. Select an object and choose Window⇒Transform to access the Transform panel, shown in Figure 10-5.
2. Set your options.
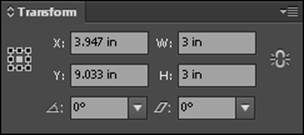
Figure 10-5: Enter values on the Transform panel.
Though using the Transform panel is probably the easiest way to change values, it doesn’t offer you the capability to specify an exact reference point or other options that apply to the individual Transform tools. Keep in mind that by using the square grid on the left side of the grid you can select a point of reference for your object. By using this grid, you can measure from the corners or center point of an object.
Aligning to the Grid using the Transform panel
Chapter 9 discusses the Align New Objects to Pixel Grid feature as a method to keep your onscreen graphics crisp and clean on the edges. If you’ve already created your document (without selecting the Align New Objects to Pixel Grid check box in the New Document window), you can align your artwork to the grid at any time by selecting an object(s) and selecting the Align New Objects to Pixel Grid option from the panel menu of the Transform panel, as shown in Figure 10-6.

Figure 10-6: You can choose to align selected objects to the pixel grid using the Transform panel.
Using the Transform tools
In the following sections, you discover how to use some of the most popular Transform tools to create transformations.
The Reflect tool
Nothing in life is perfectly symmetrical, right? Maybe not, but objects not created symmetrically in Illustrator can look off-kilter. Using the Reflect tool, you can reflect an object to create an exact mirrored shape of it; just follow these steps:
1. Open a new document in Illustrator and type some text or create an object.
If you want to reflect text, make sure that you use at least 60-point type so that you can easily see it.
 2. Select the Reflect tool (hidden under the Rotate tool) and click the object; if you’re using text, click in the middle of the text baseline.
This step sets the reference point for the reflection.
3. Alt+Shift+drag (Windows) or Option+Shift+drag (Mac) and release when the object or text is reflecting itself, as shown in Figure 10-7.
This step not only clones the reflected object or text, but also snaps it to 45-degree angles.

Figure 10-7: The completed reflection.
The Scale tool
Using the Scale tool, you can scale an object proportionally or non-uniformly. Most people like to be scaled non-uniformly — maybe a little taller, a little thinner — but on with the topic. Follow these steps to see the Scale tool in action:
1. Create a shape and give it no fill and a 5-point black stroke.
For this example, we created a circle. See Chapter 4 of this minibook if you need a reminder on how to do it.
![]() 2. Select the shape and double-click the Scale tool.
2. Select the shape and double-click the Scale tool.
The Scale dialog box appears.
3. Type a number in the Scale text field (in the Uniform section) and click the Copy button.
We entered 125 in the Scale text field to increase the size of the object by 125 percent.
4. Press Ctrl+D (Windows) or ![]() +D (Mac) to repeat the transformation as many times as you want.
+D (Mac) to repeat the transformation as many times as you want.
Every time you press Ctrl+D (Windows) or ![]() +D (Mac), the shape is copied and sized by the percentage you entered in the Scale text field. This trick, especially handy with circles, creates an instant bull’s-eye!
+D (Mac), the shape is copied and sized by the percentage you entered in the Scale text field. This trick, especially handy with circles, creates an instant bull’s-eye!
To experiment with the Scale tool, create different shapes in Step 1 and enter different values in Step 3. Remember that if you type 50% in the Scale text field, the object is made smaller; surpass 100 percent — say, to 150 percent — to make the object larger. Leaving the Scale text field at 100 percent has no effect on the object.
The Shear tool
 The Shear tool lets you shear an object by selecting an axis and dragging to set a shear angle, as shown in Figure 10-8.

Figure 10-8: Create perspective with the Shear tool.
The axis is always the center of the object unless you use method 1 or 2 from the earlier section Exact transformation methods. Use the Shear tool in combination with the Rotate tool to give an object perspective.
The Reshape tool
The Reshape tool lets you select anchor points and sections of paths and adjust them in one direction. You determine that direction by dragging an anchor point with the Reshape tool selected.
![]() The Reshape tool works differently from the other Transform tools. To use it, follow these steps:
The Reshape tool works differently from the other Transform tools. To use it, follow these steps:
1. Select just the anchor points on the paths that you want to reshape. Deselect any points that you want to remain in place.
2. Select the Reshape tool (hidden under the Scale tool) and position the cursor over the anchor point you want to modify; click the anchor point.
If you click a path segment, a highlighted anchor point with a square around it is added to the path.
3. Shift-click more anchor points or path segments to act as selection points.
You can highlight an unlimited number of anchor points or path segments.
4. Drag the highlighted anchor points to adjust the path.
The Free Transform tool
![]() You use the Free Transform tool in much the same way as you use the bounding box. (See the earlier section Working with Transformations.) This tool is necessary only if you choose View⇒Hide Bounding Box but want free transform capabilities.
You use the Free Transform tool in much the same way as you use the bounding box. (See the earlier section Working with Transformations.) This tool is necessary only if you choose View⇒Hide Bounding Box but want free transform capabilities.
Creating Distortions
You can bend objects — make them wavy, gooey, or spiky — by creating simple to complex distortions with the Liquify tools and the Envelope Distort features.
The Liquify tools
The Liquify tools can accomplish all sorts of creative or wacky (depending on how you look at it) distortions to your objects.
A number of keyboard shortcuts are available for the Width tool. (See Table 10-1.) In addition to these shortcuts, you can globally adjust the stroke weight for all the width points by specifying the stroke weight in the Weight drop-down list of the Stroke panel.
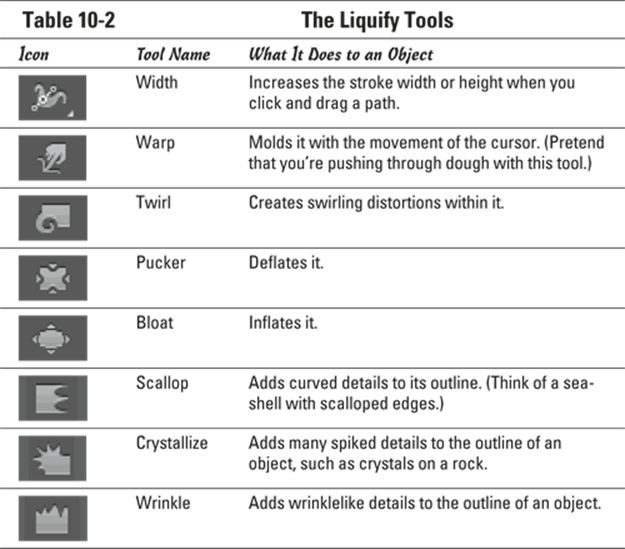
You can choose from eight Liquify tools. Even though we define them for you in Table 10-2, you should experiment with these tools to understand their full capabilities. Here are some tips:
![]() A variety of Liquify tools are available by holding down the mouse button on the default selection, the Width tool. If you use the tools frequently, drag to the arrow at the end of the tools. You can then position the tools anywhere in your work area.
A variety of Liquify tools are available by holding down the mouse button on the default selection, the Width tool. If you use the tools frequently, drag to the arrow at the end of the tools. You can then position the tools anywhere in your work area.
![]() Double-click any Liquify tool to open a dialog box specific to the selected tool.
Double-click any Liquify tool to open a dialog box specific to the selected tool.
![]() When a Liquify tool is selected, the brush size appears. Adjust the diameter and shape of the Liquify tool by holding down the Alt (Windows) or Option (Mac) key while dragging the brush shape smaller or larger. Press the Shift key to constrain the shape to a circle.
When a Liquify tool is selected, the brush size appears. Adjust the diameter and shape of the Liquify tool by holding down the Alt (Windows) or Option (Mac) key while dragging the brush shape smaller or larger. Press the Shift key to constrain the shape to a circle.
![]() Using the Width tool, cross over a selected path. When a hollow square appears, click and drag outward (or inward), and the stroke width at that location is adjusted. See Figure 10-9.
Using the Width tool, cross over a selected path. When a hollow square appears, click and drag outward (or inward), and the stroke width at that location is adjusted. See Figure 10-9.
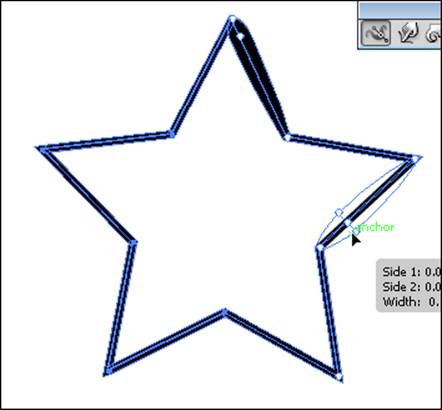
Figure 10-9: Use the Width tool.
If you want a little more accuracy, you can double-click the stroke by using the Width tool and create, modify, or delete the width point by using the Width Point Edit dialog box, shown in Figure 10-10.
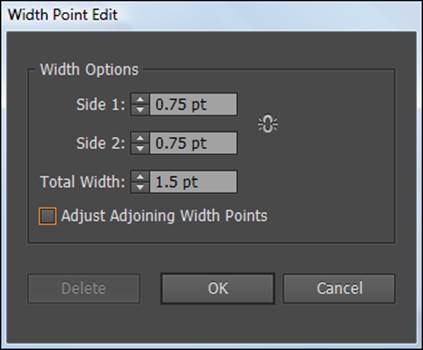
Figure 10-10: Customize the Width tool in this dialog box.
To create a discontinuous width point, just create two width points on a stroke with different stroke widths and then drag one width point on to the other width point to create a discontinuous width point for the stroke.
Table 10-1 Width Tool Keyboard Shortcuts
|
Width Tool Function |
Windows |
Mac OS |
|
Create non-uniform widths |
Alt+drag |
Opt+drag |
|
Create a copy of the width point |
Alt+drag the width point |
Opt+drag the width point |
|
Copy and move all the points along the path |
Alt+Shift+drag |
Opt+Shift+drag |
|
Change the position of multiple width points |
Shift+drag |
Shift+drag |
|
Select multiple width points |
Shift+click |
Shift+click |
|
Delete selected width points |
Delete |
Delete |
|
Deselect a width point |
Esc |
Esc |
Using the Envelope Distort Command
Use the Envelope Distort command to arch text and apply other creative distortions to an Illustrator object. To use the Envelope Distort command, you can use a preset warp (the easiest method), a grid, or a top object to determine the amount and type of distortion. In this section, we discuss all three methods.
Using the preset warps
Experimenting with warp presets is a little more interesting if you have a word or an object selected before trying out the warp options. To warp an object or some text to a preset style, follow these steps:
1. Select the text or object that you want to distort and then choose Object⇒Envelope Distort⇒Make with Warp.
The Warp Options dialog box appears.
2. Select a warp style from the Style drop-down list and then specify any other options you want.
3. Click OK to apply the distortion.
If you want to experiment with warping but also want to revert to the original at any time, choose Effect⇒Warp. You later change or delete the warp effect by double-clicking it in the Appearance panel or by dragging the effect to the trash can in the Appearance panel. Find out more in Chapter 12 of this minibook about exciting effects you can apply to objects.
Reshaping with a mesh grid
You can assign a grid to an object so that you can drag different points and create your own, custom distortion, as shown in Figure 10-11.

Figure 10-11: Custom distortion using a mesh grid.
Follow these steps to apply a mesh grid:
1. Using the Selection tool, select the text or object that you want to distort and then choose Object⇒Envelope Distort⇒Make with Mesh.
The Envelope Mesh dialog box appears.
2. Specify the number of rows and columns you want the mesh to contain and then click OK.
3. Drag any anchor point on the mesh grid with the Direct Selection tool to reshape the object.
To delete anchor points on the mesh grid, select an anchor point by using the Direct Selection tool and press the Delete key.
![]() You can also use the Mesh tool to edit and delete points when using a mesh grid on objects.
You can also use the Mesh tool to edit and delete points when using a mesh grid on objects.
Reshaping an object with a different object
To form letters into the shape of an oval or to distort selected objects into another object, use this technique:
1. Create text that you want to distort.
2. Create the object you want to use as the envelope (the object to be used to define the distortion).
3. Choose Object⇒Arrange to ensure that the envelope object is on top, as shown in Figure 10-12.
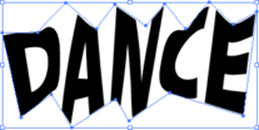
Figure 10-12: Position the shape over the text.
4. Select the text and Shift-click to select the envelope object.
5. Choose Object⇒Envelope Distort⇒Make with Top Object.
The underlying object is distorted to fit the shape of the top (envelope) object.
Choose Effect⇒Distort and Transform⇒Free Distort to take advantage of the Free Distort dialog box, shown in Figure 10-13. You can edit or undo effects at any time by clicking or deleting the Free Distort effect from the Appearance menu.
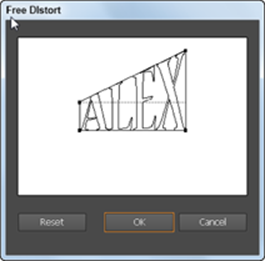
Figure 10-13: Distort an object from the Free Distort dialog box.
All materials on the site are licensed Creative Commons Attribution-Sharealike 3.0 Unported CC BY-SA 3.0 & GNU Free Documentation License (GFDL)
If you are the copyright holder of any material contained on our site and intend to remove it, please contact our site administrator for approval.
© 2016-2026 All site design rights belong to S.Y.A.