Adobe Creative Cloud Design Tools All-in-One For Dummies (2013)
Book III
Illustrator CC
Chapter 11: Working with Transparency and Special Effects Tools
In This Chapter
![]() Adding dimension with the Mesh tool
Adding dimension with the Mesh tool
![]() Getting to know the Blend tool
Getting to know the Blend tool
![]() Using the Symbol Sprayer tool
Using the Symbol Sprayer tool
![]() Discovering transparency, blend modes, and opacity masks
Discovering transparency, blend modes, and opacity masks
This chapter is full of neat things you can do using some of the more advanced features in Adobe Illustrator. These special effects tools can help you create art that makes an impact: Discover how to make your art look like a painting with the Gradient Mesh tool, create morphlike blends with the Blend tool, become a graffiti artist by trying out the Symbol Sprayer tool, and see what’s underneath objects by using transparency.
The Mesh Tool
If you’re creating art in Illustrator that requires solid colors or continuous patterns, you can achieve those results quite easily. But if you’re working on an element that requires continuous tones, such as a person’s face, you turn to the handy Mesh tool to create smooth tonal variations in your illustration. Choose to blend one color into another and then use the Mesh tool to adjust your blend. You can also apply varying levels of transparency to these mesh points.
The Mesh tool can be as complex or simple as you want. Using the Mesh tool, you can create intense illustrations that look like they were painted with an airbrush or just use the tool to give dimension to an object, as in the illustration shown in Figure 11-1.
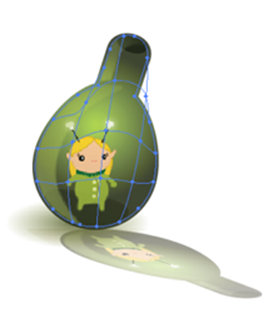
Figure 11-1: Mesh tool illustrations can be complex or simple.
In this chapter, you discover two ways to create gradient meshes in Illustrator, manually and automatically. By manually selecting where you want mesh points, you gain more freedom. By automatically defining rows and columns, you can be more precise in the placement of your mesh points.
To create a gradient mesh by clicking, follow these steps:
1. Create any shape by using the shape tools. Make sure the shape has a solid color; any color will do.
2. Deselect all objects by choosing Select⇒Deselect.
3. Select a fill color that you want to apply as a mesh point to an object.
For example, if you want to add a shaded white spot to a red circle, choose white for the fill color.
![]() 4. Select the Mesh tool (the keyboard shortcut is U) and click anywhere in a filled vector object.
4. Select the Mesh tool (the keyboard shortcut is U) and click anywhere in a filled vector object.
The object is converted to a mesh object.
5. Click the object as many times as you want to add more mesh points.
To create a gradient mesh by setting the number of rows and columns, follow these steps:
1. Select an object.
2. Choose Object⇒Create Gradient Mesh.
The Create Gradient Mesh dialog box appears.
3. Set the number of rows and columns of mesh lines to create on the object by entering numbers in the Rows and Columns text fields.
4. Choose the direction of the highlight from the Appearance drop-down list.
The direction of the highlight determines which way the gradient flows (see Figure 11-2); you have these choices:
• Flat: Applies the object’s original color evenly across the surface, resulting in no highlight
• To Center: Creates a highlight in the center of the object
• To Edge: Creates a highlight on the edges of the object
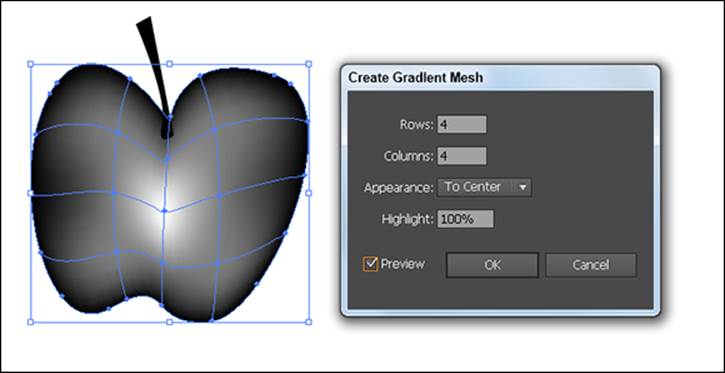
Figure 11-2: Choose a highlight direction.
5. Enter a percentage of white highlight to apply to the mesh object in the Highlight text field.
6. Click OK to apply the gradient mesh to the object.
You can select individual or multiple mesh points and apply varying levels of transparency to them. Follow these steps to apply transparency to a gradient mesh:
1. Select a shape tool and click and drag to the artboard to add the shape to your document.
2. Give the shape a solid fill (any color) and no stroke.
3. Choose the Mesh tool and click anywhere in the object.
This step adds a mesh point to your object.
4. Choose Window⇒Transparency and select a percent from the Opacity drop-down list or type in any other value you want in the Opacity text field.
As you can see in Figure 11-3, an illustration was sent behind the object to demonstrate transparency in the object.
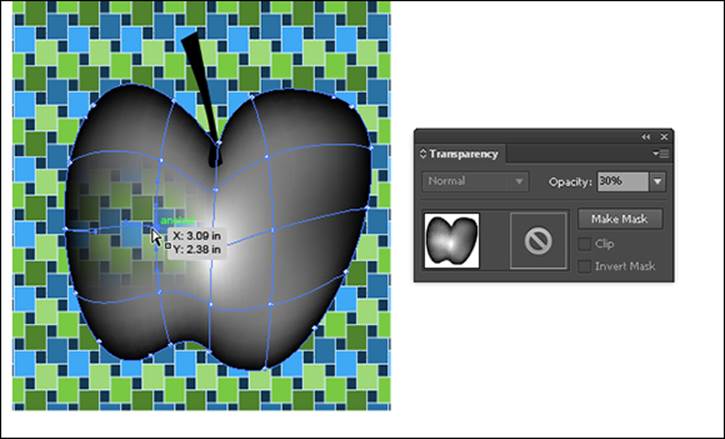
Figure 11-3: The transpar-ency of these mesh points varies.
 You can change the color in mesh points by choosing the Direct Selection tool and then either clicking a mesh point and picking a fill color or clicking in the center of a mesh area and choosing a fill. Whether you select the mesh point (see the left side of Figure 11-4) or the area between the mesh points (see the right side of Figure 11-4), it changes the painting result. To add a mesh point without changing to the current fill color, Shift-click anywhere in a filled vector object.
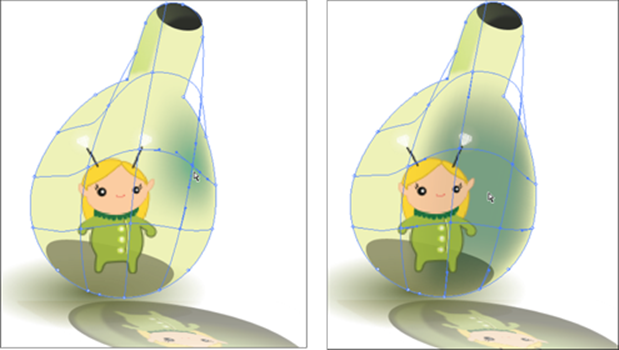
Figure 11-4: The mesh point changes the painting result.
The Blend Tool
![]() Use the Blend tool (located in the main Illustrator Tools panel) to transform one object to another to create interesting morphed artwork or to create shaded objects. Using the Blend tool, you can give illustrations a rendered look by blending from one color to another or create an even number of shapes from one point to another. Figure 11-5 shows examples of what you can do with this tool.
Use the Blend tool (located in the main Illustrator Tools panel) to transform one object to another to create interesting morphed artwork or to create shaded objects. Using the Blend tool, you can give illustrations a rendered look by blending from one color to another or create an even number of shapes from one point to another. Figure 11-5 shows examples of what you can do with this tool.
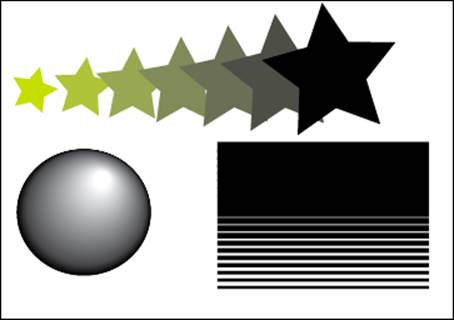
Figure 11-5: Some objects using the Blend tool.
Creating a blend
Creating a blend isn’t difficult, and as you get used to it you can take the process even further, to create incredibly realistic effects. Follow these steps to create a simple blend from one rectangle size to another, creating an algorithmic stripe pattern (a rectangle of one height blended to a rectangle of another height):
1. Create a rectangle.
Size doesn’t matter in this example; just be sure that you can see a difference in shapes when you blend. This example uses a rectangle that measures roughly 4 x 1 inches.
2. Give your shape a fill and assign None to the stroke.
You can use other settings, but we recommend keeping it simple if you’re new to working with blends.
3. Using the Selection tool, click the rectangle and Alt+drag (Windows) or Option+drag (Mac) toward the bottom of the artboard to clone your shape; press the Shift key before you release the mouse button to make sure that the cloned shape stays perfectly aligned with the original shape.
4. Reduce the cloned shape to about half its original height by using the Transform panel.
If the Transform panel isn’t visible, choose Window⇒Transform.
Alternatively, you can hold down the Shift key and drag the lower-middle bounding box handle, shown in Figure 11-6.
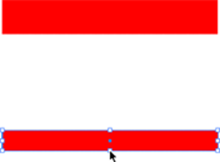
Figure 11-6: Reduce the size of the cloned shape.
5. In the Swatches panel (choose Window⇒Swatches), change the cloned shape’s fill to a different color but keep the stroke set to None.
Changing the color just helps you see the blend effect a little better.
6. Using the Blend tool, click the original shape and then click the cloned shape.
As a default action, the Blend tool creates a smooth blend that transitions from one color to another, as shown in Figure 11-7. To change the blend effect, experiment with the Blend Options dialog box.
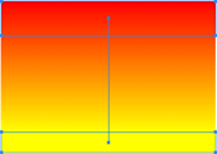
Figure 11-7: Creating a smooth transition between rectangles.
Setting Blend options
You can change the way a blend appears by using the Blend Options dialog box: Choose Object⇒Blend⇒Blend Options. From the Spacing drop-down list, change the blend to one of these options:
![]() Smooth Color: Blend steps are calculated to provide the optimum number of steps for a smooth transition.
Smooth Color: Blend steps are calculated to provide the optimum number of steps for a smooth transition.
![]() Specified Steps: Determine the number of steps in a blend by typing a number in the text field to the right of the drop-down list.
Specified Steps: Determine the number of steps in a blend by typing a number in the text field to the right of the drop-down list.
![]() Specified Distance: Control the distance between steps in the blend by typing a number in the text field to the right of the drop-down list.
Specified Distance: Control the distance between steps in the blend by typing a number in the text field to the right of the drop-down list.
You can also choose between two orientation options:
![]() Align to Page: Orients the blend perpendicular to the x-axis of the page.
Align to Page: Orients the blend perpendicular to the x-axis of the page.
![]() Align to Path: Orients the blend perpendicular to the path. You probably won’t see a difference when changing orientation unless you’ve edited the blend path.
Align to Path: Orients the blend perpendicular to the path. You probably won’t see a difference when changing orientation unless you’ve edited the blend path.
You can easily access the Blend tool options by selecting a blended object and double-clicking the Blend tool in the Tools panel.
If you’re feeling adventurous, try changing a smooth blend (such as the one you create in the preceding step list) into a logarithmic blend. In the Blend Options dialog box, select Specified Steps from the Spacing drop-down list and change the value to 5. This change creates the blend in 5 steps rather than in the more than 200 steps that may have been necessary to create the smooth blend.
Here are a few more tips to help you become more comfortable using blends. You can
![]() Blend between an unlimited number of objects, colors, opacities, or gradients.
Blend between an unlimited number of objects, colors, opacities, or gradients.
![]() Edit blends directly with tools, such as Selection, Rotate, or Scale.
Edit blends directly with tools, such as Selection, Rotate, or Scale.
![]() Switch to the Direct Selection tool and edit the blend path by dragging anchor points. A straight path is created between blended objects when the blend is first applied.
Switch to the Direct Selection tool and edit the blend path by dragging anchor points. A straight path is created between blended objects when the blend is first applied.
![]() Edit blends that you created by moving, resizing, deleting, or adding objects. After you make editing changes, the artwork is blended again automatically.
Edit blends that you created by moving, resizing, deleting, or adding objects. After you make editing changes, the artwork is blended again automatically.
The Symbol Sprayer Tool
The super Symbol Sprayer tool is one you must experiment with in order to understand its full potential. In a nutshell, it works like a can of spray paint that sprays, rather than paints, symbols — objects that, in Illustrator, can be either vector- or pixel-based. Each symbol is an instance.
Exploring the symbol tools
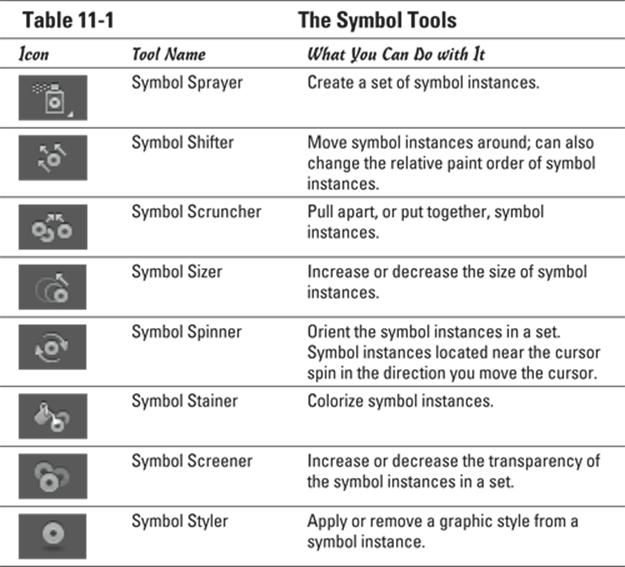
Illustrator comes with a library of symbols ready for use in the symbols panel. (If the symbols panel isn’t visible, choose Window⇒Symbols.) Use this panel as a storage bin or library to save repeatedly used artwork or to create your own symbols to apply as instances in your artwork, like blades of grass or stars in the sky. You can then use the symbolism tools, described in Table 11-1, to adjust and change the appearance of the symbol instances.
Press the Alt (Windows) or Option (Mac) key to reduce the effect of the symbolism tools. In other words, if you’re using the Symbol Sizer tool, you click and hold to make the symbol instances larger; hold down the Alt (Windows) or Option (Mac) key to make the symbol instances smaller.
You can also selectively choose the symbols you want to affect with the Symbolism tools by activating them in the Symbols panel. Ctrl-click (Windows) or ![]() -click (Mac) multiple symbols to change them at the same time.
-click (Mac) multiple symbols to change them at the same time.
 Just about anything can be a symbol, including placed objects and objects with patterns and gradients. If you’re going to use placed images as symbols, however, choose File⇒Place and deselect the Link check box in the Place dialog box.
Creating and spraying symbols on the artboard
To create a symbol, select the object and drag it to the Symbols panel or click the New Symbol button at the bottom of the Symbols panel. Yes, it’s that easy. Then use the Symbol Sprayer tool to apply the symbol instance on the artboard by following these steps:
1. Select the symbol instance in the Symbols panel.
Either create your own symbol or use one of the default symbols supplied in the panel.
2. Drag with the Symbol Sprayer tool, spraying the symbol on the artboard. (See Figure 11-8.)
That’s it. You can increase or reduce the area affected by the Symbol Sprayer tool by pressing the bracket keys. Press ] repeatedly to enlarge the application area for the symbol or press [ to make it smaller.
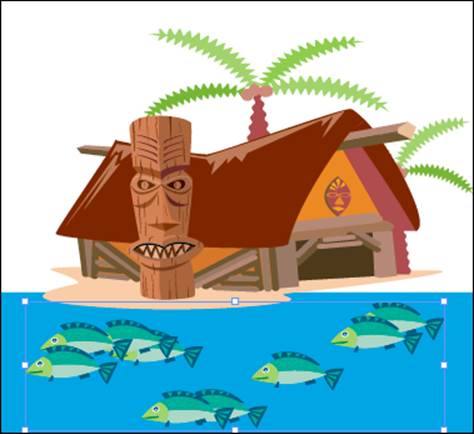
Figure 11-8: Using the Symbol Sprayer tool to create fish.
Note that you can access all sorts of symbol libraries from the Symbols panel menu. Find 3D, nature, map, flower, and even hair and fur symbol collections by selecting Open Symbol Library.
If you want to store artwork that you frequently need to access, simply drag selected objects to the Symbols panel or Alt-click (Windows) or Option-click (Mac) the New Symbol button to name and store the artwork. Retrieve the artwork later by dragging it from the Symbols panel to the artboard. In fact, you can drag any symbol out to your artboard to change or use it in your own artwork. To release the symbol back into its original art elements, choose Object⇒Expand. In the Expand dialog box, click OK to restore the defaults.
Transparency
Using transparency can add a new level to your illustrations. The transparency feature does exactly what its name implies — changes an object to make it transparent so that what’s underneath that object is visible to varying degrees. You can use the Transparency panel for simple applications of transparency to show through to underlying objects or for more complex artwork using opacity masks, which can control the visibility of selected objects.
Choosing Window⇒Transparency opens the Transparency panel, where you can apply different levels of transparency to objects. To do so, create an arrangement of objects that intersect, select the topmost object, and then change the transparency level of the object in the Transparency panel, by either selecting a percentage from the Opacity drop-down list or entering a value of less than 100 in the Opacity text field.
Blend modes
A blending mode determines how the resulting transparency will look. To achieve different blending effects, choose different blend modes from the Blend Mode drop-down list in the Transparency panel.
Truly, the best way to find out what all these modes do is to create two overlapping shapes and start experimenting. Give the shapes differently colored fills (but note that many blending modes don’t work with black-and-white fills). Then select the topmost object and change the opacity to anything other than 0% or 100% and change the blending mode by selecting an option from the Blend Mode drop-down list in the Transparency panel. You see all sorts of neat effects and might even pick a few favorites.
We define each blend mode in the following list, but we’ll say it again: The best way to see what each mode does is to apply it — so start experimenting.
![]() Normal: Creates no interaction with underlying colors.
Normal: Creates no interaction with underlying colors.
![]() Darken: Replaces only the areas that are lighter than the blend color. Areas darker than the blend color don’t change.
Darken: Replaces only the areas that are lighter than the blend color. Areas darker than the blend color don’t change.
![]() Multiply: Creates an effect similar to drawing on the page with magic markers, or like the colored film you see on theater lights.
Multiply: Creates an effect similar to drawing on the page with magic markers, or like the colored film you see on theater lights.
![]() Color Burn: Darkens the base color to reflect the blend color. If you’re using white, no change occurs.
Color Burn: Darkens the base color to reflect the blend color. If you’re using white, no change occurs.
![]() Lighten: Replaces only the areas that are darker than the blend color. Areas lighter than the blend color don’t change.
Lighten: Replaces only the areas that are darker than the blend color. Areas lighter than the blend color don’t change.
![]() Screen: Multiplies the inverse of the underlying colors. The resulting color is always a lighter color.
Screen: Multiplies the inverse of the underlying colors. The resulting color is always a lighter color.
![]() Color Dodge: Brightens the underlying color to reflect the blend color. If you’re using black, there’s no change.
Color Dodge: Brightens the underlying color to reflect the blend color. If you’re using black, there’s no change.
![]() Overlay: Multiplies or screens the colors, depending on the base color.
Overlay: Multiplies or screens the colors, depending on the base color.
![]() Soft Light: Darkens or lightens colors, depending on the blend color. The effect is similar to shining a diffused spotlight on the artwork.
Soft Light: Darkens or lightens colors, depending on the blend color. The effect is similar to shining a diffused spotlight on the artwork.
![]() Hard Light: Multiplies or screens colors, depending on the blend color. The effect is similar to shining a harsh spotlight on the artwork.
Hard Light: Multiplies or screens colors, depending on the blend color. The effect is similar to shining a harsh spotlight on the artwork.
![]() Difference: Subtracts either the blend color from the base color or the base color from the blend color, depending on which has the greater brightness value. The effect is similar to a color negative.
Difference: Subtracts either the blend color from the base color or the base color from the blend color, depending on which has the greater brightness value. The effect is similar to a color negative.
![]() Exclusion: Creates an effect similar to, but with less contrast than, Difference mode.
Exclusion: Creates an effect similar to, but with less contrast than, Difference mode.
![]() Hue: Applies the hue (color) of the blend object to underlying objects but keeps the underlying shading, or luminosity.
Hue: Applies the hue (color) of the blend object to underlying objects but keeps the underlying shading, or luminosity.
![]() Saturation: Applies the saturation of the blend color but uses the luminance and hue of the base color.
Saturation: Applies the saturation of the blend color but uses the luminance and hue of the base color.
![]() Color: Applies the blend object’s color to the underlying objects but preserves the gray levels in the artwork; works well for tinting objects or changing their colors.
Color: Applies the blend object’s color to the underlying objects but preserves the gray levels in the artwork; works well for tinting objects or changing their colors.
![]() Luminosity: Creates a resulting color with the hue and saturation of the base color and the luminance of the blend color. This mode is essentially the opposite of Color mode.
Luminosity: Creates a resulting color with the hue and saturation of the base color and the luminance of the blend color. This mode is essentially the opposite of Color mode.
Opacity masks
Just like in Photoshop, you can use masks to make more interesting artwork in Illustrator. You can create an opacity mask from the topmost object in a selection or by drawing a mask on a single object. The mask uses the grayscale of the selected object as its opacity mask. Black areas are transparent; shades of gray are semitransparent, depending on the amount of gray; white areas are opaque. Figure 11-9 shows the effect of using an opacity mask.
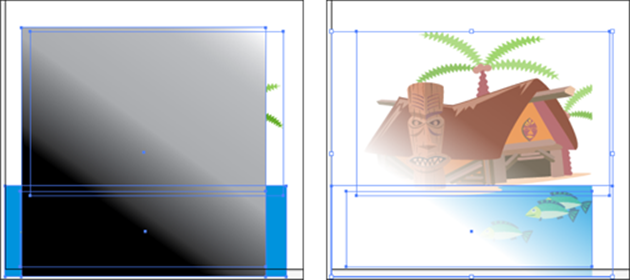
Figure 11-9: An opacity mask converts the topmost object into a mask that then masks out the underlying objects.
To create an opacity mask, follow these steps:
1. Open the Transparency panel menu.
2. Make sure that the Blend Mode drop-down list is set to Normal.
3. Create a shape anywhere on the artboard or open a document that has artwork on it.
We’re using a circle, but the shape doesn’t matter. Make sure that the artwork has a fill. A solid color helps you see the effect.
4. Open the Symbols panel (choose Window⇒Symbols Panel) and drag a symbol to the artboard.
In this example, we’re using the drums symbol.
5. Using the Selection tool, enlarge your symbol so that it fills the shape.
See the image on the left in Figure 11-10.

Figure 11-10: Creating an opacity mask.
6. Select both the symbol and the shape and then click the Make Mask button.
See the image on the right in Figure 11-10.
The symbol turns into a mask, showing varying levels of the underlying box of the newly created mask, depending on the original color value. To delete an opacity mask, click the Release button.
Click the right thumbnail (which represents the mask) in the Transparency panel, and a black border appears around it, indicating that it’s active. You can move the items on the mask or even create items to be added to the mask. The mask works just like the regular artboard, except that anything done on the mask side is used only as an opacity mask. To work on the regular artboard, click the left thumbnail.
All materials on the site are licensed Creative Commons Attribution-Sharealike 3.0 Unported CC BY-SA 3.0 & GNU Free Documentation License (GFDL)
If you are the copyright holder of any material contained on our site and intend to remove it, please contact our site administrator for approval.
© 2016-2026 All site design rights belong to S.Y.A.