Adobe Creative Cloud Design Tools All-in-One For Dummies (2013)
Book IV
Photoshop CC
Chapter 2: Getting into Photoshop CC Basics
In This Chapter
![]() Discovering the Photoshop tools
Discovering the Photoshop tools
![]() Navigating your work area
Navigating your work area
![]() Changing screen modes
Changing screen modes
![]() Performing basic tasks in Photoshop CC
Performing basic tasks in Photoshop CC
In this chapter, we introduce you to the Photoshop CC work area and tools. You also find out how to neatly organize and hide panels. To start building your Photoshop skills, we also show you how to do basic tasks, such as open an image, crop it to a different size, and then resave it.
Getting to Know the Tools
You use tools to create, select, and manipulate objects in Photoshop CC. When you open Photoshop, the Tools panel appears along the left edge of the workspace (see Figure 2-1), and panels appear on the right side of the screen. (We discuss panels in the later section Navigating the Work Area.)

Figure 2-1: The Photo-shop CC workspace includes the Tools panel.
 In the Tools panel, look for a tooltip when you hover the cursor over any one of the tools. Following the tool name is a letter in parentheses, which is the keyboard shortcut you can use to access that tool. Simply press the Shift key along with the key command you see to access any hidden tools. In other words, pressing P activates the Pen tool, and pressing Shift+P rotates through the hidden tools under the Pen tool. When you see a small triangle in the lower-right corner of the tool icon, you know that the tool contains hidden tools.
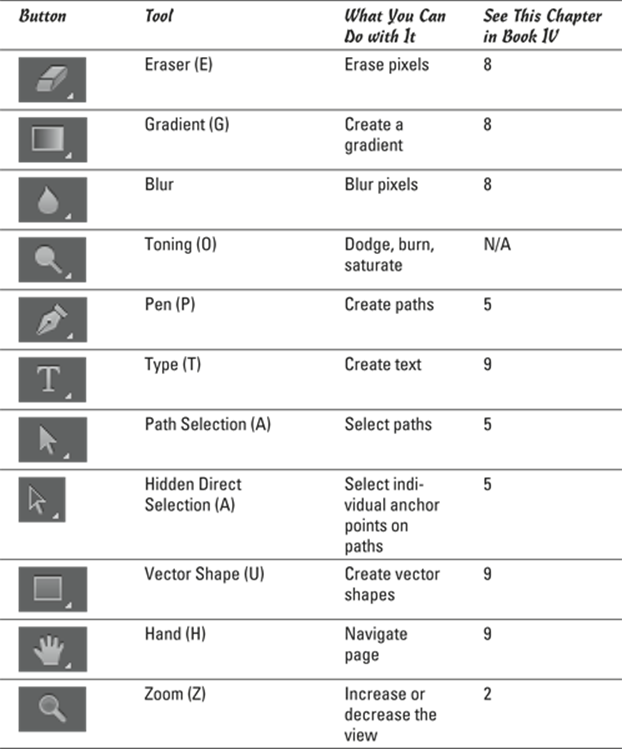
Table 2-1 lists the Photoshop tools, describes what each one is used for, and specifies in which chapter you can find more information about each one.
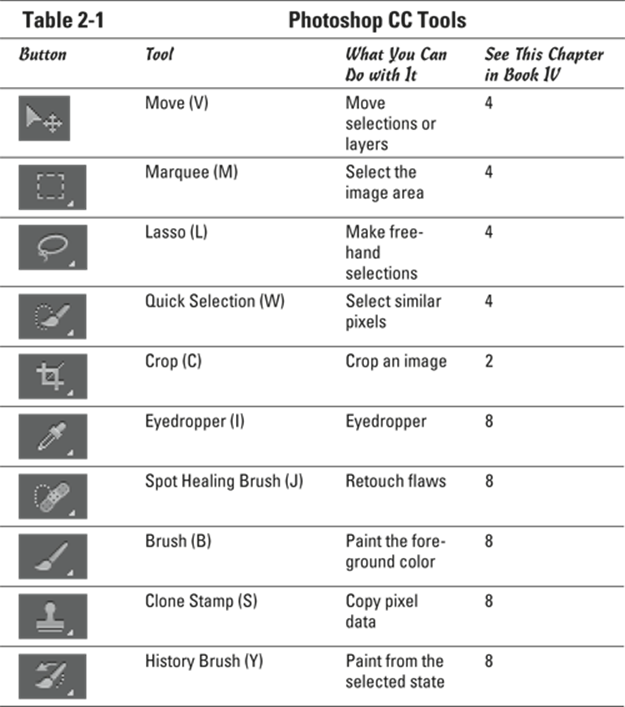
Looking for the Magic Wand tool? Click and hold the Quick Selection tool in the Tools panel to access it.
Navigating the Work Area
Navigating in Photoshop isn’t much different from getting around in other Adobe applications. All Adobe applications make extensive use of panels. In the following sections, we cover the highlights of navigating in Photoshop.
Docking and saving panels
Panels, panels everywhere — do you really need them all? Maybe not just yet, but as you increase your skill level, you’ll start to take advantage of more of those Photoshop panels. Panels give you easy access to important functions. Book I, Chapter 3, provides a lot of basic information about using panels in the Adobe Creative Cloud, so check out that chapter if you need a refresher on using panels. We add only a few topics here that are specific to using the panels in Photoshop.
 When you work in Photoshop, keep in mind these two key commands:
![]() Press Tab to switch between hiding and showing the tools and panels.
Press Tab to switch between hiding and showing the tools and panels.
![]() Press Shift+Tab to hide the panels, leaving only the Tools panel visible.
Press Shift+Tab to hide the panels, leaving only the Tools panel visible.
If you find that you’re always using the same panels, hide the panels you don’t need and arrange the others onscreen where you want them. Then follow these steps to save that panel configuration:
1. Choose Window⇒Workspace⇒New Workspace.
The New Workspace dialog box appears.
2. Name your workspace and click Save.
3. Any time you want the panels to return to your saved locations, choose Window⇒Workspace⇒Name of Workspace.
Name of Workspace is the name you supplied in Step 2.
Choose Window⇒Workspace⇒Reset Essentials to restore the panels to the order they were in after the initial installation.
Taking advantage of workspace features
Photoshop includes default workspaces that you can take advantage of to streamline workspaces and open the panels you need for specific tasks. You can use some of these workspaces for photography, painting, or design, for example.
Increase your work area by turning panels into icons, as shown in Figure 2-2. Do so by either right-clicking the tab of a panel and selecting Collapse to Icons or clicking the double arrows.
Zooming in to get a better look
Images that look fine at one zoom level may look extremely bad at another. You’ll zoom in and out quite often while working on images in Photoshop. You can find menu choices for zooming on the View menu; a quicker way to zoom is to use the keyboard commands listed in Table 2-2.
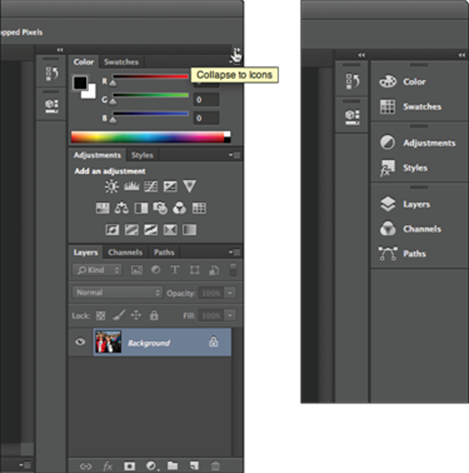
Figure 2-2: Turn panels into icons.
Table 2-2 Zooming and Navigation Keyboard Shortcuts
|
Command |
Windows Shortcut |
Mac Shortcut |
|
Actual size |
Alt+Ctrl+0 (zero) |
|
|
Fit in window |
Ctrl+0 (zero) |
|
|
Zoom in |
Ctrl++ (plus sign) or Ctrl+spacebar |
|
|
Zoom out |
Ctrl+- (minus) or Alt+spacebar |
|
|
Hand tool |
Spacebar |
Spacebar |
This list describes a few advantages of working with the Zoom tool to get a better look at your work:
![]() 100 percent view: Double-clicking the Zoom tool in the Tools panel gives you a 100 percent view. Do it before using filters to see a more realistic result of making changes.
100 percent view: Double-clicking the Zoom tool in the Tools panel gives you a 100 percent view. Do it before using filters to see a more realistic result of making changes.
![]() Zoom marquee: Drag from the upper-left corner to the lower-right corner of the area you want to zoom to. While you drag, a marquee appears; when you release the mouse button, the marqueed area zooms to fill the image window. The Zoom marquee gives you much more control than just clicking the image with the Zoom tool. Zoom out again to see the entire image by pressing Ctrl+0 (Windows) or
Zoom marquee: Drag from the upper-left corner to the lower-right corner of the area you want to zoom to. While you drag, a marquee appears; when you release the mouse button, the marqueed area zooms to fill the image window. The Zoom marquee gives you much more control than just clicking the image with the Zoom tool. Zoom out again to see the entire image by pressing Ctrl+0 (Windows) or ![]() +0 (Mac). Doing so fits the entire image in the viewing area.
+0 (Mac). Doing so fits the entire image in the viewing area.
![]() Keyboard shortcuts: If a dialog box is open and you need to reposition or zoom to a new location on an image, you can use the keyboard commands without closing the dialog box.
Keyboard shortcuts: If a dialog box is open and you need to reposition or zoom to a new location on an image, you can use the keyboard commands without closing the dialog box.
![]() A new window for a different look: Choose Window⇒Arrange⇒New Window to create an additional window for the frontmost image. This technique is helpful when you want to see the entire image (say, at actual size) to see the results as a whole yet zoom in to focus on a small area of the image to do some fine-tuning. The new window is linked dynamically to the original window so that when you make changes, the original and any other new windows created from the original are immediately updated.
A new window for a different look: Choose Window⇒Arrange⇒New Window to create an additional window for the frontmost image. This technique is helpful when you want to see the entire image (say, at actual size) to see the results as a whole yet zoom in to focus on a small area of the image to do some fine-tuning. The new window is linked dynamically to the original window so that when you make changes, the original and any other new windows created from the original are immediately updated.
![]() Cycle through images: Press Ctrl+Tab (Windows) or
Cycle through images: Press Ctrl+Tab (Windows) or ![]() +Tab (Mac) to cycle through open images.
+Tab (Mac) to cycle through open images.
Choosing Your Screen Mode
You have a choice of three screen modes in which to work. Most users start and stay in the default (standard screen) mode until they inadvertently end up in another. The modes are accessible by clicking and holding Screen Mode, located at the bottom of the Tools panel, as shown inFigure 2-3.
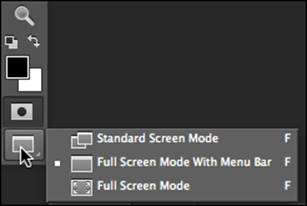
Figure 2-3: Change your screen mode.
![]() Standard Screen Mode: In this typical view, an image window is open, but you can see your desktop and other images open behind it.
Standard Screen Mode: In this typical view, an image window is open, but you can see your desktop and other images open behind it.
![]() Full Screen Mode with Menu Bar: In this view, the image is surrounded, to the edge of the work area, with neutral gray. Working in this mode prevents you not only from accidentally clicking out of an image and leaving Photoshop, but also from seeing other images behind the working image.
Full Screen Mode with Menu Bar: In this view, the image is surrounded, to the edge of the work area, with neutral gray. Working in this mode prevents you not only from accidentally clicking out of an image and leaving Photoshop, but also from seeing other images behind the working image.
![]() Full Screen Mode: A maximized document window fills all available space between docks and resizes when dock widths change.
Full Screen Mode: A maximized document window fills all available space between docks and resizes when dock widths change.
Getting Started with Basic Tasks in Photoshop CC
Unless you use Photoshop as a blank canvas for painting, you may rarely create a new file in Photoshop. This is because you typically have a source image you start with that may have been generated by a digital camera, or stock image library, or scanner.
The following sections show you how to open an existing image file in Photoshop, create a new image (if you want to use Photoshop to paint, for example), crop an image, and save an edited image.
Opening an image
You can open an existing Photoshop image in one of several ways:
![]() Choose File⇒Open, select the file in the Open dialog box and then click the Open button.
Choose File⇒Open, select the file in the Open dialog box and then click the Open button.
![]() Choose File⇒Browse in Bridge. By selecting Browse in Bridge instead of Open, you launch the Adobe Bridge application. Read more about Adobe Bridge later in this section and also in Book I, Chapter 5.
Choose File⇒Browse in Bridge. By selecting Browse in Bridge instead of Open, you launch the Adobe Bridge application. Read more about Adobe Bridge later in this section and also in Book I, Chapter 5.
![]() Double-click an image in the Mini Bridge panel.
Double-click an image in the Mini Bridge panel.
Photoshop can open a multitude of file formats, even if the image was created in another application, such as Illustrator or another image-editing program. However, you have to open the image in Photoshop by choosing File⇒Open or, using Adobe Bridge, by selecting an image and dragging it to the Photoshop icon on the taskbar (Windows) or Dock (Mac). If you double-click an image file (one that wasn’t originally created in Photoshop, or from different versions) in a folder, the image may open only in a preview application.
If you’re opening a folder of images that you want to investigate first, choose File⇒Browse to open Adobe Bridge, the control center for Adobe Creative Cloud. You can use Adobe Bridge to organize, browse, and locate the assets you need to create your content. Adobe Bridge keeps available, for easy access, native AI, INDD, PSD, and Adobe PDF files as well as other Adobe and non-Adobe application files. Adobe Bridge does not install by default with Adobe Photoshop. If you do not have it loaded, the Adobe Application Manager will launch, offering you the opportunity to download and install Bridge.
You can access the stand-alone Adobe Bridge application from all applications in the Creative Cloud by choosing File⇒Browse in Bridge. Use the Bridge interface to view images as thumbnails and look for metadata information. For a condensed version of Bridge, click the Mini Bridge tab on the panel at the bottom-left of the screen.
Discover Camera Raw
If you haven't discovered the Camera Raw capabilities in Adobe Photoshop, you'll want to give them a try. The Camera Raw format is available for image capture in many cameras. Simply choose the format in your camera's settings as Raw instead of JPEG or TIFF. These Raw files are a bit larger than standard JPEG files, but you capture an enormous amount of data with the image that you can retrieve after opening. (See www.adobe.com for a complete list of cameras that support Camera Raw.)
A Camera Raw file contains unprocessed picture data from a digital camera’s image sensor, along with information about how the image was captured, such as camera and lens type, exposure settings, and white balance setting. When you open the file in Adobe Photoshop CC, the built-in Camera Raw plug-in interprets the Raw file on your computer, making adjustments for image color and tonal scale.
When you shoot JPEG images with your camera, you’re locked into the processing done by your camera, but working with Camera Raw files gives you maximum control over images, such as controlling their white balance, tonal range, contrast, color saturation, and image sharpening. Cameras that can shoot in Raw format have a setting on the camera that changes its capture mode to Raw. Rather than write a final JPEG file, a Raw data file is written, which consists of black-and-white brightness levels from each of the several million pixel sites on the imaging sensor. The actual image hasn’t yet been produced, and unless you have specific software, such as the plug-in built in to Adobe Photoshop, opening the file can be difficult, if not impossible.
To open a Camera Raw file, simply choose File⇒Browse in Bridge. Adobe Bridge opens, and you see several panels, including the Folders, Content, Preview, and Metadata panels. In the Folders panel, navigate to the location on your computer where you’ve saved Camera Raw images; thumbnail previews appear in the Content panel. Think of Camera Raw files as photo negatives. You can reprocess them at any time to achieve the results you want.
Right-click (Windows) or Control-click (Mac) a JPEG or TIFF file and choose Open in Camera Raw from the contextual menu. This is a great way to experiment with all the cool features available with this plug-in, but your results aren’t as good as if you used an actual Raw file.
If Adobe Photoshop CC doesn't open your Raw file, you may need to update the Raw plug-in. (See www.adobe.com for the latest plug-in.) The plug-in should be downloaded and placed in this location in Windows: C:\Program Files\Common Files\Adobe\Plug-Ins\CS7\File Formats. On the Macintosh, place the plug-in here: Library\Application Support\Adobe\Plug-Ins\CS7\File Formats.
Creating a new file
If you’re creating a new file, you may be doing so to create a composite of existing files or to start with a blank canvas because you’re supercreative.
For whatever reason, note that when you choose File⇒New, you can choose from a multitude of basic format choices on the Preset menu. They range from basic sizes and resolutions, such as U.S. Paper or Photo, to other final output options such as Web, Mobile & Devices, or Film & Video.
Keep in mind that you’re determining not only size but also resolution in the new file. If it will contain images from other files, make sure that the new file is the same resolution. Otherwise, you may see unexpected size results when cutting and pasting or dragging images into the new file. Choose Image⇒Image Size to see the document dimensions.
Cropping an image
A simple but essential task is to crop an image. Cropping means to eliminate all parts of the image that aren’t important to its composition.
Cropping is especially important in Photoshop. Each pixel, no matter what color, takes up the same amount of information, so cropping eliminates unneeded pixels and saves on file size and processing time. For that reason, you should crop images before you start working on them.
You can crop an image in Photoshop CC in two ways:
![]()
![]() Use the Crop tool.
Use the Crop tool.
![]() Select an area with the Marquee tool and choose Image⇒Crop.
Select an area with the Marquee tool and choose Image⇒Crop.
To crop an image by using the Crop tool, follow these steps:
1. Press C to access the Crop tool.
Make sure that the preset (in the upper-left corner of the control panel) is set to Ratio, or to a specific preset size if you wish, in the Presets drop-down list, as shown in Figure 2-4.
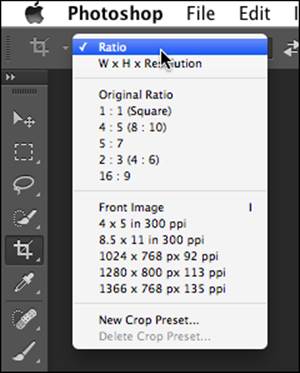
Figure 2-4: Select the Crop tool preset before you click and drag.
2. Click and drag over the area of the image you want to keep.
3. If you need to adjust the crop area, drag the handles in the crop-bounding area.
4. When you’re satisfied with the crop-bounding area, double-click in the center of the crop area or press the Return or Enter key to crop the image.
5. If you want to cancel the crop, press the Esc key.
Ever scan in an image that ends up crooked? When using the Crop tool, if you position the cursor outside any handle, a rotate symbol appears. Drag the crop-bounding area to rotate it and line it up the way you want it cropped. When you press Return or Enter, the image straightens out.
Using grids as you crop
As a default, a three-row and three-column grid appears after you click and drag over an area with your Crop tool. This grid can be used as a guide to help you create more dynamically cropped images. Images whose points of interest appear on the intersections of this grid, or divide an image into the sections of the grid, are generally considered to be more interesting. (This is the called the Rule of Thirds.) See the before (top) and after (bottom) images in Figure 2-5 and decide yourself whether you like the use of the grid.
If you prefer to change or turn off the overlay, select the Never Show Overlay option from the Set the Overlay Options drop-down list, as shown in Figure 2-6. Keep in mind that you must have already clicked and dragged out your crop area before you can make changes to the overlay.
Saving images
Save an image file by choosing File⇒Save. If you’re saving the file for the first time, the Save As dialog box appears. Notice in the Format drop-down list that you have plenty of choices for file formats. (File formats are discussed in more detail in Chapter 10 of this minibook.) You can always play it safe by choosing the native Photoshop (PSD) file format, which supports all Photoshop features, such as channels, layers, text, and other vector objects that are discussed throughout this minibook. Choosing certain other formats may eliminate layers, channels, and other special features.
Many users choose to save a native Photoshop file as a backup to any other file format. Be sure to have a backup or an original file saved as a native Photoshop (PSD) file when you start taking advantage of layers and other outstanding Photoshop elements. As a Creative Cloud user, keep in mind that you can use the native file format for Photoshop in all other Creative Cloud applications.
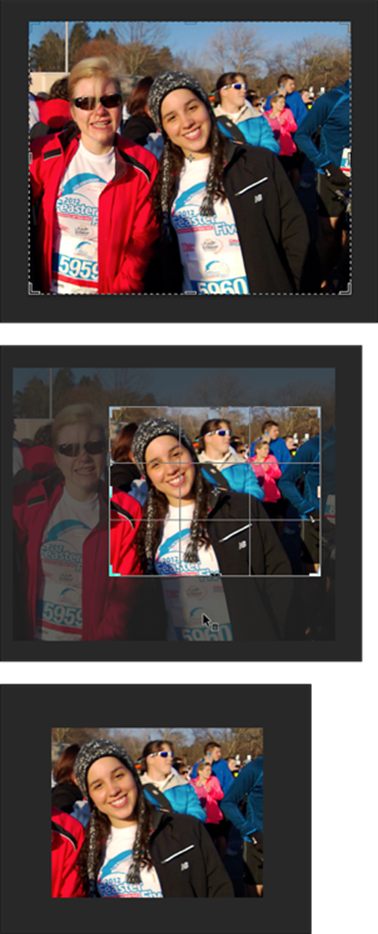
Figure 2-5:Use of the Rule of Thirds overlay in the Crop tool.
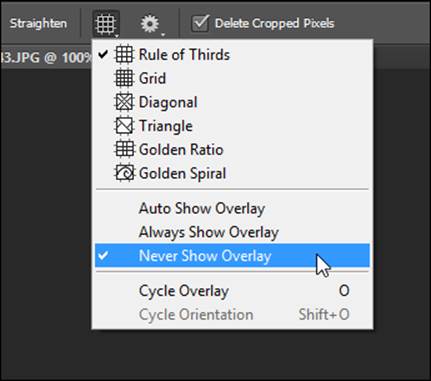
Figure 2-6: Select from a multitude of overlays to use as guides, or turn the overlay off.
All materials on the site are licensed Creative Commons Attribution-Sharealike 3.0 Unported CC BY-SA 3.0 & GNU Free Documentation License (GFDL)
If you are the copyright holder of any material contained on our site and intend to remove it, please contact our site administrator for approval.
© 2016-2026 All site design rights belong to S.Y.A.