Adobe Creative Cloud Design Tools All-in-One For Dummies (2013)
Book V
Acrobat XI
Chapter 2: Creating PDF Files
In This Chapter
![]() Creating PDF files from Microsoft Office documents
Creating PDF files from Microsoft Office documents
![]() Creating PDF files from other Creative Cloud applications
Creating PDF files from other Creative Cloud applications
![]() Creating PDF files from all other electronic formats
Creating PDF files from all other electronic formats
![]() Creating PDF files from paper documents and the web
Creating PDF files from paper documents and the web
![]() Creating PDF portfolios
Creating PDF portfolios
Converting documents to the Portable Document Format (PDF) is a great way to share files when readers don’t have the same software as you or when you want to consolidate multiple file types into a single document. Adobe Acrobat lets you create files from all software programs and scanned documents and even pages from the web. Although you can also create PDF files from other Adobe Creative Cloud documents, you don’t need Acrobat for this because the capability to create PDF files is built into the individual Creative Cloud programs, such as Photoshop, Illustrator, and InDesign. In this chapter, you find out how to create Adobe PDF files from a variety of programs.
Creating PDF Files from Microsoft Office
Adobe Acrobat includes tools that make it easy to convert Microsoft Word, Excel, and PowerPoint files to PDF.
 These capabilities are much more robust for the Windows versions of these programs, so Macintosh users may discover that not all these options are available.
When you install Acrobat on your computer, it looks for Microsoft Office programs. If Acrobat locates Word, Excel, PowerPoint, or Outlook, it installs an add-in — the PDF Maker — to these programs that helps convert Microsoft Office documents to PDF in a single click.
You can tell whether the PDF Maker add-in has been installed in your Microsoft Office programs by looking for the Acrobat toolbar or the Acrobat tab, depending upon which version of Microsoft Office you use. In Office 2010, the Acrobat tab appears to the right of the View tab. In earlier versions of Microsoft Office, the toolbar appears at the top of the Document window. If the toolbar isn’t visible, choose View⇒Toolbars to see whether the Acrobat toolbar is available in the Toolbars submenu. If it remains unavailable, you may need to reinstall Adobe Acrobat to gain access to the PDF Maker tools.
 When you convert documents to PDF, the original file remains unchanged, so you have both the original file and a separate PDF document. The original document and the PDF file aren’t linked, so changes to the original source file aren’t reflected in the PDF file. When you edit the PDF document, the changes don’t update in the original file.
PDF conversion options
PDF Maker is installed within Microsoft Office at the time you install Acrobat. PDF Maker provides a variety of controls over how PDF files are created from Microsoft Office programs, such as Word and Excel. For example, you can have PDF Maker create PDF files from your Microsoft Office documents each time you click the Create PDF button, without asking you to confirm the location and name of the file. Acrobat simply saves the file in the same location as the original document. Similarly, you can choose to create PDF files that balance your need for quality and file size.
PDF Maker also provides controls over the type of PDF file you create because some PDF files may need to be of a higher quality for printing and others may need to be smaller to allow for fast electronic distribution. For example, you may want to post a PDF document to a website, where you want to make the file small so that it can be downloaded quickly.
When working in Microsoft Word, Excel, or PowerPoint, you can access the PDF Maker controls by clicking the Acrobat tab and then clicking the Preferences button (Office 2010) or by choosing Adobe PDF⇒Change Conversion Settings (earlier versions of Microsoft Office). In the Acrobat PDF Maker dialog box that appears, you can then choose from a variety of settings that control how the PDF file is created. In this section, we focus on the most useful options for Microsoft Office users.
After you click the Preferences button, the Acrobat PDF Maker dialog box opens. In this dialog box, use the Conversion Settings drop-down list to control how the PDF file is generated:
![]() Standard: Select this option to create PDF files that will be printed on an office laser printer or distributed via e-mail. This setting meets the needs of most users — it provides some compression of graphics, but they remain clear onscreen and look reasonably good when printed. In addition, this setting builds the fonts into the PDF file to maintain an exact representation of the document, regardless of where the file is viewed.
Standard: Select this option to create PDF files that will be printed on an office laser printer or distributed via e-mail. This setting meets the needs of most users — it provides some compression of graphics, but they remain clear onscreen and look reasonably good when printed. In addition, this setting builds the fonts into the PDF file to maintain an exact representation of the document, regardless of where the file is viewed.
![]() Smallest File Size: With this setting, you can control the file size of the PDF documents you create. This setting provides significant compression of images and also reduces resolution, which causes graphics within the files to lose some clarity and perhaps appear jagged.
Smallest File Size: With this setting, you can control the file size of the PDF documents you create. This setting provides significant compression of images and also reduces resolution, which causes graphics within the files to lose some clarity and perhaps appear jagged.
In addition, fonts aren’t embedded in PDF files created with this setting. If the fonts used in the document aren’t available on a computer where a PDF created with the Smallest File Size setting is viewed, Acrobat uses a font substitution technology to replicate the size and shape of the fonts used in the document. This feature typically provides a similar appearance to the original document, but it’s not always an exact match of the original file.
Because this setting is so lossy, use it only if you need to compress a large file to a small enough size to send as an e-mail attachment. Make certain the recipient has the fonts used in the document installed on his or her computer. Otherwise, Adobe uses font substitution.
![]() High Quality Print and Press Quality: If you need to provide PDF files to your commercial printer or copy shop, use these settings to create a PDF file that’s designed for high-quality print reproduction. Along with including fonts in the PDF file, the graphics aren’t significantly compressed, and they maintain a much higher resolution. Overall, these files tend to be larger than similar PDF files created with different settings, but the quality of the PDF file is more important than the file size when you’re having the PDF professionally printed. High Quality Print is suitable for a color copier or high-quality laser printer, whereas Press Quality is suitable for a PDF that is sent to a commercial printer.
High Quality Print and Press Quality: If you need to provide PDF files to your commercial printer or copy shop, use these settings to create a PDF file that’s designed for high-quality print reproduction. Along with including fonts in the PDF file, the graphics aren’t significantly compressed, and they maintain a much higher resolution. Overall, these files tend to be larger than similar PDF files created with different settings, but the quality of the PDF file is more important than the file size when you’re having the PDF professionally printed. High Quality Print is suitable for a color copier or high-quality laser printer, whereas Press Quality is suitable for a PDF that is sent to a commercial printer.
Several other highly technical options might be useful for you if you have a specialized profession. For example, the PDF/X options are useful if you’re submitting advertisements to publications that require the PDF advertisements to adhere to the PDF/X standard.
PDF conversion options from Microsoft Word and Excel
Although Microsoft Word and Excel are widely used, they aren’t always the best choice for distributing documents. Formatting of Microsoft Word documents and Excel spreadsheets changes depending on the fonts available on users’ computers or even the printers with which they print. PDF files, on the other hand, are able to maintain a consistent appearance on various computer types, regardless of fonts installed or printers being used. Microsoft Word and Excel files can be easily edited, and users can also copy and extract information from these files with few limitations. This differs from PDF files that are more difficult to copy from, and offer robust security options.
Converting a Word or Excel file to a PDF file lets you distribute the file to a wide audience, even to people who don’t have Word or Excel, and you don’t need to worry about the document format or layout changing. There are two methods for converting Word or Excel documents to PDF, and the method you use depends on which version of Microsoft Office you’re using:
![]() With Microsoft Office, convert your document from inside Microsoft Word or Excel — make sure that the document you want to convert to a PDF file is open and then click the Create PDF button in the Acrobat portion of the main toolbar.
With Microsoft Office, convert your document from inside Microsoft Word or Excel — make sure that the document you want to convert to a PDF file is open and then click the Create PDF button in the Acrobat portion of the main toolbar.
![]() With Office 2003 or earlier, choose Adobe PDF⇒Convert to Adobe PDF.
With Office 2003 or earlier, choose Adobe PDF⇒Convert to Adobe PDF.
After you choose to create a PDF file from your Microsoft Office document, you must specify the location of the PDF file that’s created and name the file.
 In Office 2010, click the Preferences button on the Acrobat tab, or with earlier versions of Office, choose Acrobat⇒Change Conversion Settings. In the Adobe PDF Maker dialog box, deselect the Prompt for PDF Filename option so that PDF files are generated in one step, without inputting the PDF filename. This saves you the step of naming the PDF file each time you create a PDF document.
You can also add more functionality into the PDF documents you create. Click the Preference tab if you’re working in Office 2010 or choose Acrobat⇒Change Conversion Settings in earlier versions of Office. In the dialog box that appears, review the following settings:
![]() Attach Source File: Causes the original Office document to become embedded within the PDF file as an attachment. When the PDF file is distributed, the original source file is included within the PDF file.
Attach Source File: Causes the original Office document to become embedded within the PDF file as an attachment. When the PDF file is distributed, the original source file is included within the PDF file.
![]() Create Bookmarks: Adds interactive bookmarks that make navigating the PDF file easy. Bookmarks are added based on Microsoft Word styles, such as text that’s styled as Heading 1. The bookmarks appear in the Bookmarks panel when viewing the PDF.
Create Bookmarks: Adds interactive bookmarks that make navigating the PDF file easy. Bookmarks are added based on Microsoft Word styles, such as text that’s styled as Heading 1. The bookmarks appear in the Bookmarks panel when viewing the PDF.
![]() Add Links: Automatically converts Word links, such as web addresses, into PDF links that you can use when viewing the file in Acrobat or Adobe Reader. Within the PDF Maker preferences dialog box, click the Word tab to access additional link options that can be built into PDF files created from Word.
Add Links: Automatically converts Word links, such as web addresses, into PDF links that you can use when viewing the file in Acrobat or Adobe Reader. Within the PDF Maker preferences dialog box, click the Word tab to access additional link options that can be built into PDF files created from Word.
Converting PowerPoint files to PDF
You can convert your PowerPoint presentations to Adobe PDF documents with the PDF Maker add-in that installs with Adobe Acrobat. You can then distribute PDF versions of your PowerPoint presentations, avoiding concerns about your presentation file being edited or concerns that the recipient may not have the same fonts that you used. Distributing the presentation as a PDF ensures the document will look consistent on all computers.
From PowerPoint, click the Acrobat tab on the Ribbon and then click the Create PDF button to save the file as a PDF file. In older versions of Office, you can also choose Acrobat⇒Convert to Adobe PDF from PowerPoint’s main menu. If you’re working with a new PowerPoint file or one that you’ve edited, you must save it before PDF Maker will convert the file.
As with Word and Excel, you can select options relating to the conversion of your PowerPoint documents to PDF. To access the preferences, click the Preference button in the Acrobat tab, or if you’re using an older version of Office, choose Adobe PDF⇒Change Conversion Settings. Along with the conversion settings that impact the quality of the resulting PDF file, two additional options can enhance your presentation as a PDF:
![]() Preserve Slide Transitions: With this option, you can convert the slide transitions created in PowerPoint into PDF transitions that will be used when the presentation is delivered using the Adobe Acrobat Full Screen mode option.
Preserve Slide Transitions: With this option, you can convert the slide transitions created in PowerPoint into PDF transitions that will be used when the presentation is delivered using the Adobe Acrobat Full Screen mode option.
![]() Convert Multimedia: Because Adobe PDF files can contain integrated sound and movie files, you can choose this option to have sounds and movies used in a PowerPoint file converted into the PDF document.
Convert Multimedia: Because Adobe PDF files can contain integrated sound and movie files, you can choose this option to have sounds and movies used in a PowerPoint file converted into the PDF document.
After you create the PDF, you can use Acrobat as the tool for delivering your presentations that have been created using PowerPoint. After you convert the file to PDF, open it in Acrobat and choose View⇒Full Screen Mode. Press Esc to stop viewing a document in the Full Screen mode. You can even distribute the document to users with the free Adobe Reader, and they can use the free Adobe Reader software to view and display the PowerPoint presentation file. To distribute a document so that it always opens in Full Screen mode, open the document, choose File⇒Properties, and select the Open in Full Screen Mode check box under the Initial View tab.
Creating PDF Files from Adobe Creative Cloud Applications
You can also convert Photoshop files, Illustrator files, or InDesign documents to the PDF format. In the following sections, we show you how.
Converting Photoshop and Illustrator files to PDF
Both Adobe Photoshop CC and Adobe Illustrator CC can save documents directly in the Adobe PDF file format. To do so, simply choose File⇒Save or File⇒Save As. Then, from the File Type drop-down list, choose Adobe PDF (Illustrator) or Photoshop PDF (Photoshop). In these programs, you can create PDF files without Adobe Acrobat or Acrobat Distiller because PDF creation capabilities are integrated into them.
You can use Adobe Reader or Acrobat to view PDF files created from Photoshop or Illustrator. You can also open and edit PDF files using the same program in which they were created — so Photoshop PDF files can be reopened and edited using Photoshop, and the same is true for Illustrator PDF files.
Converting InDesign documents to PDF
Like Photoshop and Illustrator, the capability to convert InDesign documents to PDF is integrated into the application. With Adobe InDesign, you can choose File⇒Export and select either Adobe PDF (Interactive) or Adobe PDF (Print) from the File Type drop-down list. Interactive PDF documents are suitable for sharing online, such as by posting the file to a website, and are designed primarily to incorporate interactive PDF features such as buttons, page transitions, and multimedia elements. If you’re creating a PDF document that will be printed, your best option is to select Adobe PDF (Print), even if it will be posted to a website.
If you choose Adobe PDF (Print) when exporting from InDesign, you will find many options for controlling the size and quality of the resulting PDF file. Many of these options are similar to those available for PDF Maker for Microsoft Office.
In the Export PDF dialog box from Adobe InDesign, you can choose from the Preset drop-down list at the top of the dialog box. The choices are many, but we list and describe here the most commonly used settings:
![]() Smallest File Size: Creates compact Adobe PDF files that are intended for display on the Internet or to be distributed via e-mail. Use this setting to create PDF files that will be viewed primarily onscreen.
Smallest File Size: Creates compact Adobe PDF files that are intended for display on the Internet or to be distributed via e-mail. Use this setting to create PDF files that will be viewed primarily onscreen.
![]() High Quality Print: Creates Adobe PDF files that are intended for desktop printers and digital copiers.
High Quality Print: Creates Adobe PDF files that are intended for desktop printers and digital copiers.
![]() Press Quality: Use this setting to create PDF files that will be delivered to a commercial printer for high-quality, offset print reproduction.
Press Quality: Use this setting to create PDF files that will be delivered to a commercial printer for high-quality, offset print reproduction.
When creating PDF files to be used for high-resolution printing, here are some settings you should use. Select Marks and Bleeds in the list on the left of the Export Adobe PDF dialog box, as shown in Figure 2-1, and specify the amount of space items need to extend off the page, referred to as bleed. If you’re delivering the file to a printing firm, it can provide you with guidance regarding the required value. A good rule to follow is to use at least 0.125 inch if you have any items in your layout that extend to the edge of your document pages and beyond. Specify the value you want by entering the number in the Bleed and Slug section of the Marks and Bleeds tab. If the amount of bleed needs to be the same on all four sides, type the value in the Top text box and then click the link icon to the right of the Top and Bottom Bleed text boxes.
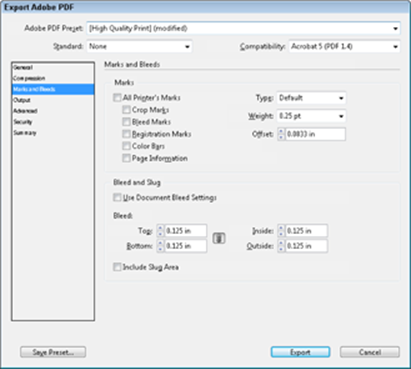
Figure 2-1: Setting the bleed values in the Export Adobe PDF dialog box.
Converting Other Electronic Documents to PDF
As described earlier in this chapter, creating PDF files from Creative Cloud applications and Microsoft Office programs is simple. But you aren’t limited to creating PDF files from these programs. This section explains how you can create PDF files from many other programs. When you installed the Adobe Creative Cloud on your computer, you also installed a new printer — the Adobe PDF printer — which is used to convert electronic documents to PDF files. The Adobe PDF printer captures all the same information that’s normally sent to your printer, and, instead of printing on paper, the information is converted into an Adobe PDF file.
To create a PDF file from any program, choose File⇒Print. In the Print dialog box, select Adobe PDF as the printer and click OK (Windows) or Print (Mac).
To change the type of PDF file that’s created, such as a smaller file for web posting or a higher-quality file for delivery to a commercial printer, do this:
![]() Windows: Click the Printer Properties button in the Print dialog box to open the Adobe PDF Document Properties dialog box, as shown in Figure 2-2. Here, you can choose the settings you want to use to control the quality and size of the resulting PDF file.
Windows: Click the Printer Properties button in the Print dialog box to open the Adobe PDF Document Properties dialog box, as shown in Figure 2-2. Here, you can choose the settings you want to use to control the quality and size of the resulting PDF file.
![]() Mac: Select PDF Options from the Copies and Pages drop-down list in the Print dialog box and then select the PDF settings you want to use.
Mac: Select PDF Options from the Copies and Pages drop-down list in the Print dialog box and then select the PDF settings you want to use.
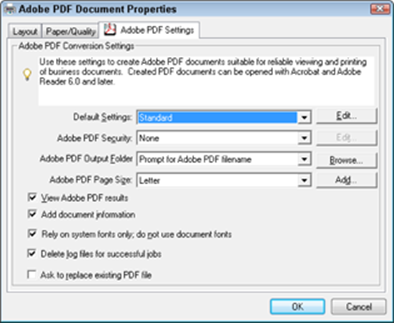
Figure 2-2: You can change conversion settings when printing to the Adobe PDF printer.
We discuss the PDF conversion settings earlier in this chapter, in the PDF conversion options section.
Using the Print menu to control the quality of PDF files created from non-Adobe programs may appear strange, but it’s the easiest way for Adobe to capture all the same information that you’d expect to see when you print your files. This is an easy and standard method for generating PDF files from any program. It’s useful to have this method available as an option, and you can use it even if you’re having difficulty with the Export command from an Adobe Creative Cloud application. Because the Print and Export commands use different processes for creating PDF files, you can use one option if you have difficulty with the other when creating PDF files from Creative Cloud programs.
 Bookmarks, links, page transitions, and multimedia aren’t included if a PDF is generated with the Print menu option. You must use the Export or Save As option to have these items included in PDF files.
Creating PDF Files from Paper Documents and the Web
Adobe Acrobat provides options for converting paper documents and even web pages into PDF format. PDF can be a great way to share documents that you’ve scanned into your computer, or web pages that may change or that you want to review when you aren’t connected to the Internet.
Converting paper documents to PDF
To convert paper documents into PDF, you need a scanner to digitize the information. If you expect to scan a large number of pages into PDF, consider purchasing a scanner with an automatic document feeder. Some scanners can scan both the front and backside of a document at the same time. Some scanners now fit easily on your desktop and let you convert a large number of paper documents to PDF in a short period of time, and many printers now include scanners. If a scanner is already hooked to the computer on which you use Acrobat, follow these steps to scan in a paper document and then convert it to PDF format:
1. From the Acrobat main menu, choose File⇒Create⇒PDF From Scanner.
Then choose the type of PDF document you want to create. For pages with text, choose one of the Document options: Black and White for line art or text that contains no shades of gray; Grayscale for documents that contain varying shades of gray; or Color for documents that contain color. For photographs, choose the Color Image option.
2. Make sure that your scanner is turned on, put the document to be scanned into the scanner, and then click the Scan button.
If necessary, continue to scan multiple pages into a single document. When you’re done scanning, the scanned page appears in Acrobat.
If you have a PDF open and choose Create PDF from Scanner, a window appears, giving you the opportunity to append the file (add to the existing file) or create a new PDF file.
The scanned document opens in Acrobat.
If the pages need to be rotated, choose View⇒Rotate View and select the option to rotate the view either clockwise or counterclockwise.
3. Choose File⇒Save to save the finished document as a PDF.
If the document you scanned contains text, the text will be fully searchable if you use one of the Document preset choices because Acrobat uses Optical Character Recognition (OCR) to convert the image to text. However, if you use one of the Image preset choices, you must manually tell Acrobat to detect the text before it will be searchable. To do this, open a previously scanned file and use the Tools button to access the commands. Choose Tools⇒Content⇒Recognize Text⇒In This File. This command makes previously scanned text searchable.
Converting web pages to PDFs
By converting online content to Adobe PDF, you can capture content from a website. Because web content can change rapidly, you can capture something that may not remain online for a long period of time. You can convert things, such as news stories or business information, from a website into PDF. Because PDF files can easily be combined together, you can merge a PDF from a website with other PDF files, such as spreadsheets, word-processing documents, and brochures.
If you enable the Acrobat Add-on in Internet Explorer you can click the Convert Web Page to PDF button to create a single page PDF. This step converts the current web page to a PDF. At the time of writing, the Convert Web Page to PDF feature was not compatible with current versions of major web browsers other than Internet Explorer.
If you want to convert more than a single web page to a PDF, follow these steps from within Acrobat (not your web browser):
1. From the Acrobat main menu, choose File⇒Create⇒PDF From Web Page.
The Create PDF from Web Page dialog box opens.
2. In the URL text box, enter the URL for the website you’re converting to PDF.
3. To capture additional pages that are linked from the main page you’re capturing, click the Capture Multiple Levels button and then select one of the following:
• Select the Stay On Same Path check box if you want only pages from the entered URL converted to PDF.
• Select the Stay On Same Server check box to download only pages that are on the same server as the entered URL.
Be cautious about selecting the Get Entire Site radio button instead of the Get Only radio button. The Get Entire Site option may take an enormous amount of time and not have any relevance to what you need.
4. Click the Settings button to open the Web Page Conversion Settings dialog box and see accepted file types and change PDF settings (on the General tab).
5. On the Page Layout tab of the Web Page Conversion Settings dialog box, make changes to page size, orientation, and margins if the web page requires a wider or longer layout. See Figure 2-3.
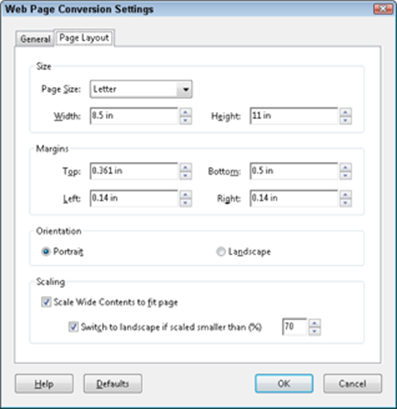
Figure 2-3: Changing the layout of web pages converted to PDF.
6. When you’re done making changes in the Web Page Conversion Settings dialog box, click OK.
7. In the Create PDF from Web Page dialog box, click the Create button to generate a PDF.
The Downloading Status window opens, showing the rate of download.
When the download is complete, the selected web page (for the entered URL) appears as a PDF document with hyperlinks (links to other pages within the site) intact. When you select links on the converted web page, you can open the linked page either in Acrobat or the web browser by making your choice after clicking on a link
All materials on the site are licensed Creative Commons Attribution-Sharealike 3.0 Unported CC BY-SA 3.0 & GNU Free Documentation License (GFDL)
If you are the copyright holder of any material contained on our site and intend to remove it, please contact our site administrator for approval.
© 2016-2026 All site design rights belong to S.Y.A.