Adobe Creative Cloud Design Tools All-in-One For Dummies (2013)
Book VI
Dreamweaver CC
Chapter 5: Adding and Formatting Text
In This Chapter
![]() Adding text to a page
Adding text to a page
![]() Choosing and editing fonts
Choosing and editing fonts
![]() Using the Property inspector to style text
Using the Property inspector to style text
![]() Understanding CSS
Understanding CSS
![]() Creating an external style sheet
Creating an external style sheet
Adding text to a web page requires more than just typing on the page. You must carefully plan your web pages so that search engines (and viewers) can easily find relevant content on your website. In this chapter, you read about the fundamentals of text formatting for web pages, from the basic principles of choosing a font size and font family to spell-checking text and implementing Cascading Style Sheets (CSS).
The various menus and panels in Dreamweaver enable you to assign type properties quickly and to update several instances in a few easy steps with CSS. From a content perspective, when you add text to your pages, make it relevant to and descriptive of your site’s business and purpose. This strategy makes your page more relevant to search engines and viewers.
 Text formatting in CC can be accomplished in two ways: by adding special HTML tags (such as those to bold or italicize text) or by marrying text to CSS rules (styles) for color, size, font family, or line spacing. Note that in certain cases, HTML tags and CSS properties can do the same thing; however, you discover later in this chapter why you should choose one method over another.
Adding Text
To add text to your web page, simply click the page wherever you want the text to appear; an insertion point appears where you can start typing. You can add text right to the page and inside almost any page element (such as a div, which is a section of an HTML document, or a table).
Formatting text
Formatting text in Dreamweaver can be as simple as formatting text in any word processing application or even applications such as Illustrator and InDesign. By using the Property inspector (and in some cases, the Insert panel), you can easily apply basic font attributes, such as color, typeface, size, and alignment options. The Property inspector gives you several different HTML text tags to apply to selected text. (See Figure 5-1.)

Figure 5-1: You can use the Property inspector to apply basic text formatting with HTML tags. Select the CSS button to access more options.
Many options in the Property inspector are apparent, but here’s a breakdown of some text tags that may be unfamiliar to you. To use these tags, simply select the text that you want the tag to be applied to and then click the tag in the Property inspector. Here’s a description of a few options on this panel:
![]() Bold: Choosing this option bolds the selected text. This applies the <strong> tag around selected text.
Bold: Choosing this option bolds the selected text. This applies the <strong> tag around selected text.
![]() Italic: Choose this option to indicate emphasis, which applies the <em> tag around the selected text.
Italic: Choose this option to indicate emphasis, which applies the <em> tag around the selected text.
 For several versions now, Dreamweaver has favored the semantically friendly <strong> and <em> tags over <b> and <i>. Although both methods bold and italicize text, <strong> and <em> are used in almost all cases, even when you click the B and I buttons. However, the current draft of the HTML5 specification reintroduces the use of <b> and <i> with new semantic meaning. If you need to place these tags specifically, you have to do so by manually typing the code into the code editor. (See Figure 5-2)
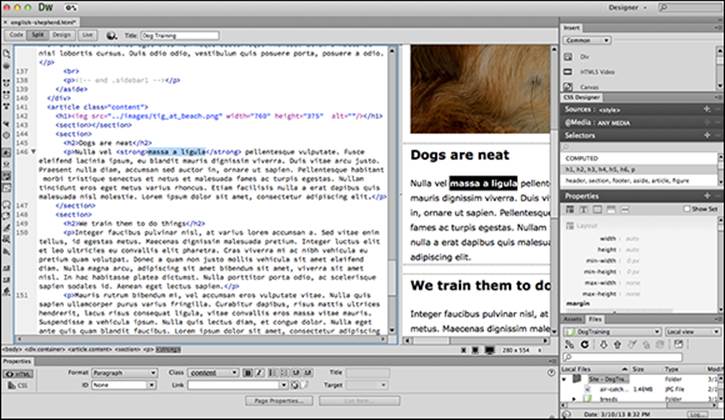
Figure 5-2: A selection of text with the B or I button applied produces the <strong> or <em> tag that instructs the browser to boldface or italicize text, respectively.
![]() Format: Options for Paragraph or heading tags to create heading levels; h1 is the largest. This is covered in greater detail in the next section.
Format: Options for Paragraph or heading tags to create heading levels; h1 is the largest. This is covered in greater detail in the next section.
![]() UL (unordered list): This setting creates a bulleted list from the selected text.
UL (unordered list): This setting creates a bulleted list from the selected text.
![]() OL (ordered list): Use this option to create an ordered (numbered) list from the selected text.
OL (ordered list): Use this option to create an ordered (numbered) list from the selected text.
![]() Blockquote: Use this option to add or remove the <blockquote> tag, which you use to indent content on the page.
Blockquote: Use this option to add or remove the <blockquote> tag, which you use to indent content on the page.
When you press the Enter or Return key, a <p> tag is created automatically in the HTML source code. This tag may create more space than you like between lines and create new list items. Pressing Shift+Enter (Windows) or Shift+Return (Mac) creates a <br> tag, which is essentially a line break or soft return. See Figure 5-3.
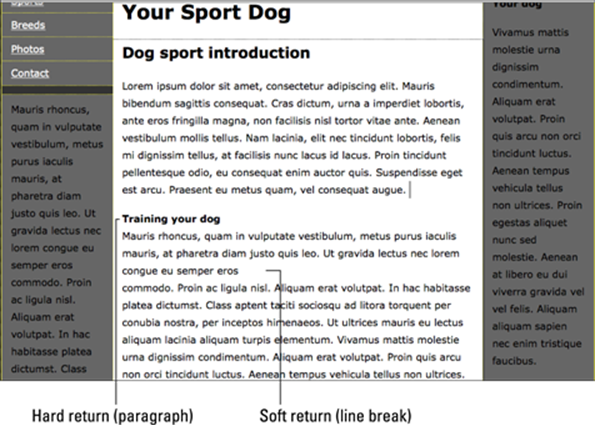
Figure 5-3: A new paragraph (hard return) and line break (soft return).
Using the Property inspector to style text
Use the Property inspector, shown in Figure 5-4, to apply HTML tags and build CSS classes to format text color, font face, size, and other characteristics. The Property inspector is divided into two views: HTML and CSS. You can toggle them by using the buttons on the left side of the panel.
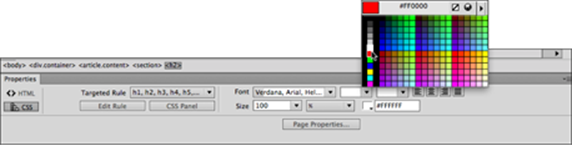
Figure 5-4: Use the CSS Property inspector to apply or change text attributes such as color and font.
Here’s what all the buttons on the Property inspector mean:
![]() Format (HTML): Use the Format drop-down list to apply HTML tags that format an entire paragraph, including heading tags (Heading 1 through Heading 6) that are generally applied to headers and titles, the paragraph tag, and the preformatted text tag. You can easily fine-tune each of these tags’ attributes (color, size, and font family, for example) later by using CSS.
Format (HTML): Use the Format drop-down list to apply HTML tags that format an entire paragraph, including heading tags (Heading 1 through Heading 6) that are generally applied to headers and titles, the paragraph tag, and the preformatted text tag. You can easily fine-tune each of these tags’ attributes (color, size, and font family, for example) later by using CSS.
Note that Heading 1 is the largest format size (on average, 24-point text), and Heading 6 is the smallest. These headings should be used carefully to apply semantic structure to your document, where text contained in Heading 1 should be treated as categorically higher than text in Heading 2 or Heading 3. For example, the name of your company might be formatted with the Heading 1 tag, and the service categories arranged below it might be formatted using Heading 2 tags.
The last choice in the Format drop-down list is Preformatted. Sometimes you want the browser to display text exactly the way you composed it — with indents, line breaks, and extra spaces. You can line up text this way if you choose Preformatted; it’s not pretty, but for down-and-dirty lists and columns, it can work well.
![]() ID (HTML): This setting applies an ID style to an element. IDs can be associated with CSS styles to apply unique formatting to this item (for instance, positioning information for a div).
ID (HTML): This setting applies an ID style to an element. IDs can be associated with CSS styles to apply unique formatting to this item (for instance, positioning information for a div).
![]() Class (HTML): This drop-down list applies an existing CSS class style to a selection on the page. Class styles can apply the same formatting to multiple items on a page, and can be created with the Property inspector (discussed later in this chapter) or directly from the CSS Designer panel.
Class (HTML): This drop-down list applies an existing CSS class style to a selection on the page. Class styles can apply the same formatting to multiple items on a page, and can be created with the Property inspector (discussed later in this chapter) or directly from the CSS Designer panel.
![]() Link (HTML): Type a hyperlink (such as http://www.wiley.com) or click the folder icon to browse and link to another page within your website. The selected text becomes linked. (Preview your page in a browser or enable Live view to see it work.)
Link (HTML): Type a hyperlink (such as http://www.wiley.com) or click the folder icon to browse and link to another page within your website. The selected text becomes linked. (Preview your page in a browser or enable Live view to see it work.)
![]() Target (HTML): Choose where the linked target will appear. (You can read about targets in Chapter 6 of this minibook.)
Target (HTML): Choose where the linked target will appear. (You can read about targets in Chapter 6 of this minibook.)
![]() Bold (HTML): Bold selected text.
Bold (HTML): Bold selected text.
![]() Italic (HTML): Italicize selected text.
Italic (HTML): Italicize selected text.
![]() Unordered List (HTML): Creates a bulleted list from selected items. As you advance in the use of CSS, you can apply many more attributes to lists, including customizing the bullets.
Unordered List (HTML): Creates a bulleted list from selected items. As you advance in the use of CSS, you can apply many more attributes to lists, including customizing the bullets.
![]() Ordered List (HTML): Creates a numbered list from selected items.
Ordered List (HTML): Creates a numbered list from selected items.
Every time you press the Enter (Windows) or Return (Mac) key within an unordered or ordered list, a new list item is created. To force text within a list item to another line without adding a new list item, press Shift+Enter (Windows) or Shift+Return (Mac).
![]() Remove Blockquote (HTML): Undo pressing the Indent with the Text Outdent button. This option removes the <blockquote> tag that the Text Indent button creates.
Remove Blockquote (HTML): Undo pressing the Indent with the Text Outdent button. This option removes the <blockquote> tag that the Text Indent button creates.
![]() Blockquote (HTML): Use this option to indent text. Simply put the cursor in the paragraph of text that you want to indent and press the Text Indent button. A <blockquote> tag is applied. You can apply this tag multiple times to a paragraph to indent it even further.
Blockquote (HTML): Use this option to indent text. Simply put the cursor in the paragraph of text that you want to indent and press the Text Indent button. A <blockquote> tag is applied. You can apply this tag multiple times to a paragraph to indent it even further.
![]() Alignment (CSS): You can click the alignment buttons on the toolbar to apply left, center, and right alignment to a paragraph. To revert to the default left alignment, click the selected alignment button again.
Alignment (CSS): You can click the alignment buttons on the toolbar to apply left, center, and right alignment to a paragraph. To revert to the default left alignment, click the selected alignment button again.
![]() Targeted Rule (CSS): Modify an existing CSS rule or create a new one. This drop-down list makes it clear whether you are creating a new rule or modifying an existing one in the Property inspector.
Targeted Rule (CSS): Modify an existing CSS rule or create a new one. This drop-down list makes it clear whether you are creating a new rule or modifying an existing one in the Property inspector.
![]() Edit Rule / CSS Panel buttons (CSS): For the rule shown in the Targeted Rule drop-down list, you can either edit the properties and values for that rule in the CSS Rule Definition dialog box or view it in the CSS Styles panel on the right, respectively.
Edit Rule / CSS Panel buttons (CSS): For the rule shown in the Targeted Rule drop-down list, you can either edit the properties and values for that rule in the CSS Rule Definition dialog box or view it in the CSS Styles panel on the right, respectively.
![]() Font (CSS): Use this drop-down list to select a font family. The font is the typeface you choose for displaying text. The lack of typeface selection isn’t a restriction in Dreamweaver, but rather in web design as a whole. Keep in mind that what font the viewer sees on your web page is based on the availability of the fonts on that user’s computer. For this reason, font sets are limited to basic system fonts that are installed on most every computer, regardless of operating system.
Font (CSS): Use this drop-down list to select a font family. The font is the typeface you choose for displaying text. The lack of typeface selection isn’t a restriction in Dreamweaver, but rather in web design as a whole. Keep in mind that what font the viewer sees on your web page is based on the availability of the fonts on that user’s computer. For this reason, font sets are limited to basic system fonts that are installed on most every computer, regardless of operating system.
The viewer may not have fonts that you load in your font sets, so try to stick to such common typefaces as the ones already included in the existing Dreamweaver font sets.
![]() Size (CSS): Using the Font Size drop-down list, you can apply a fixed font size from 9 to 36 (pixels) or enter a value by entering it directly. You can use the relative sizes shown (x-small and small, for example), which resize the font relatively larger or smaller according to the user’s browser font size preferences. If you don’t change the font size, it defaults to 12 pixels (px). By default, the unit of measurement is set to pixels, but you can use the neighboring drop-down list to set other units of measurement, including points, picas, ems, and more. Pixels, ems, or percentage-based values are recommended for web use.
Size (CSS): Using the Font Size drop-down list, you can apply a fixed font size from 9 to 36 (pixels) or enter a value by entering it directly. You can use the relative sizes shown (x-small and small, for example), which resize the font relatively larger or smaller according to the user’s browser font size preferences. If you don’t change the font size, it defaults to 12 pixels (px). By default, the unit of measurement is set to pixels, but you can use the neighboring drop-down list to set other units of measurement, including points, picas, ems, and more. Pixels, ems, or percentage-based values are recommended for web use.
 Keep in mind that the user can set browser preferences to override the size settings you’ve chosen, especially for em or percentage-based font size values. On the other hand, be careful about where and when you use fixed-size fonts (pixels), because a user may have difficulty reading a small font and be unable to override it if necessary.
![]() Color (CSS): Assign a color to your selection by clicking the swatch icon and selecting a swatch from the panel that appears. Colors are represented in HTML and CSS by hexadecimal codes, six-character codes that represent the RGB (Red, Green, Blue) values that form that color. This code is shown at the top of the Swatches panel whenever you select a color.
Color (CSS): Assign a color to your selection by clicking the swatch icon and selecting a swatch from the panel that appears. Colors are represented in HTML and CSS by hexadecimal codes, six-character codes that represent the RGB (Red, Green, Blue) values that form that color. This code is shown at the top of the Swatches panel whenever you select a color.
Assigning and editing fonts
When a viewer opens a page referencing a font set, the text is displayed using the first available font in the font family. The user’s machine must have that same font installed in order for it to display as intended. If the first font face on the list isn’t available, the next font face is referenced, continuing down the list in the font family until a font in the font set is found on the viewer’s computer. If you choose Manage Fonts from the Font drop-down list, the Manage Fonts dialog box appears. (See the figure.)
Click the existing font lists in the Custom Font Stacks tab to see which fonts are included in each set. You can add new fonts to the sets by clicking the double arrow pointing from the Available Fonts panel into the Chosen Fonts panel. Delete a font from an existing font list by clicking the font in the Chosen Fonts panel and clicking the double arrow pointing toward the Available Fonts panel. You can even create an entirely new list by clicking the plus sign (+) in the upper-left corner of the Manage Fonts dialog box, or experiment with fonts served online by TypeKit in the Adobe Edge Web Fonts tab.
Spell-checking your text
You can spell-check only the file you have open or multiple files by choosing Commands⇒Check Spelling. From the Check Spelling dialog box, shown in Figure 5-5, you can choose to add words to your personal dictionary, ignore words, or change the spelling of words.
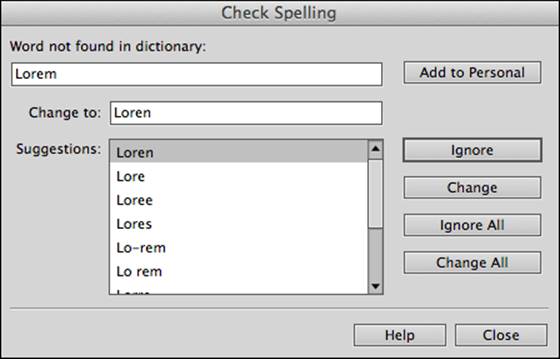
Figure 5-5: Make a habit of checking spelling on your pages.
Understanding Cascading Style Sheets
CSS is the standard method for styling web pages. Think of CSS as a series of formatting instructions that works hand in hand with HTML to apply visual properties (including layout and positioning) to text and other elements on a page. The Dreamweaver workspace allows you to assign properties to type and other page elements quickly and update several instances in a few easy steps.
Although some HTML tags and attributes offer some formatting functionality (such as bold, italic, and paragraph alignment), in modern web design it’s standard practice to leave all such formatting up to CSS and to use HTML for content and semantic structure only. Generally, you create a CSS rule (sometimes referred to as a style) and apply it to an element on the page, such as a paragraph or table cell. In Figure 5-6, you can see how CSS rules are created to format certain types of HTML elements, or elements on a page that match a specific assigned ID.
 Although many CSS properties and features are consistent across most modern browser versions, some older browsers may not provide consistent support for CSS. Always preview pages in multiple browsers (the Adobe BrowserLab lets you do this easily without the need to install multiple browsers) to catch any potential CSS incompatibilities. This is especially true if you’re using newer CSS3 properties.
In this chapter (and in Chapter 8), we offer the quick-and-dirty course on CSS, but if you’re interested in finding out more, check out HTML, XHTML & CSS For Dummies, 7th Edition, by Ed Tittel and Jeff Noble (John Wiley & Sons, Inc.).
Introducing CSS3
You’ve likely heard a lot about CSS3, and for good reason. The newest proposed specification of CSS includes some amazing new capabilities that give both designers and developers the ability to do more with their web pages. With the addition of gradients, native CSS animations, rounded corners, and drop shadows, CSS can do a lot without the need for JavaScript or workarounds using images.
As of this writing, the CSS3 spec is not finalized; however, modern browser versions of Firefox, Safari, Chrome, and Internet Explorer have already included support for many popular CSS3 features. The Dreamweaver CSS Rules panel and other views have already added support for many common CSS3 properties as well.
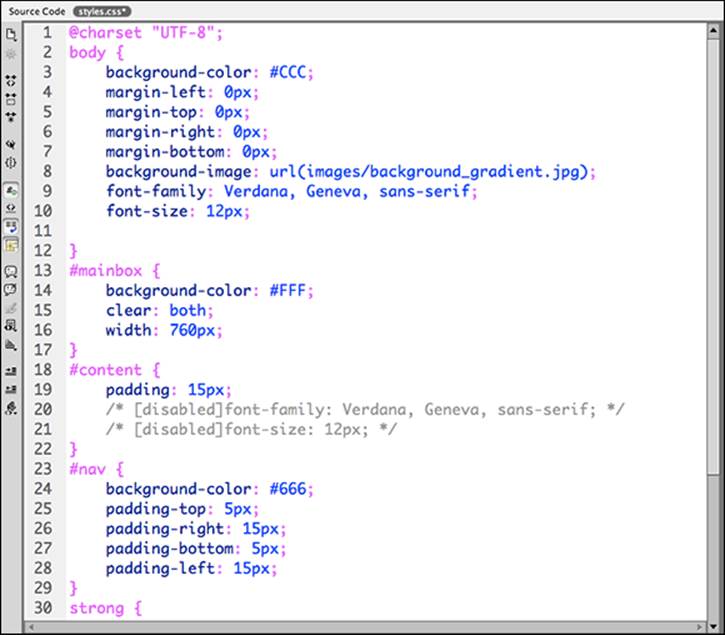
Figure 5-6: A peek at a typical style sheet, as well as the CSS language itself.
Using CSS for text
Using Cascading Style Sheets in Dreamweaver is extremely intuitive; simply select some text on your page and begin styling your selection directly in the CSS Property inspector by selecting properties for color, size, typeface, and more.
Assigning formatting to a selection opens the New CSS Rule dialog box, allowing you to save choices you’ve made into a new CSS rule (or style). You can choose a name, selector type, and location for the new rule.
Several types of selectors determine which style properties should be applied and where. When Dreamweaver finds a selector, it applies the properties and values you’ve chosen. In many cases, you can make formatting choices once and reapply them repeatedly in a single click!
You can find out how to use CSS to create entire page layouts in Chapter 8 of this minibook.
Creating a new type selector
Creating a type selector (or tag style) is a simple and safe route for new users to understand CSS because it targets existing HTML tags, such as P, H1, and H2. Using existing tags on your page, you can choose to apply automatic formatting wherever certain HTML tags are used. For instance, you can make any text inside of an <h1> (Heading 1) <strong> tag automatically bold, 36 pixels, and red.
To create a tag style with the Property inspector, follow these steps:
1. Open an HTML page that contains text.
2. On the Property inspector, click the HTML button on the left side of the panel to display the HTML Property inspector.
3. Select a line of text and bold it by clicking the B button located in the Property inspector.
4. Open the CSS Designer panel.
The goal is to assign definitive style information to the tag that bolds text, so any bold text on the page also appears red.
5. Leave the bolded text selected, and click the + button to the right of Selectors to add a new selector, as shown in Figure 5-7.
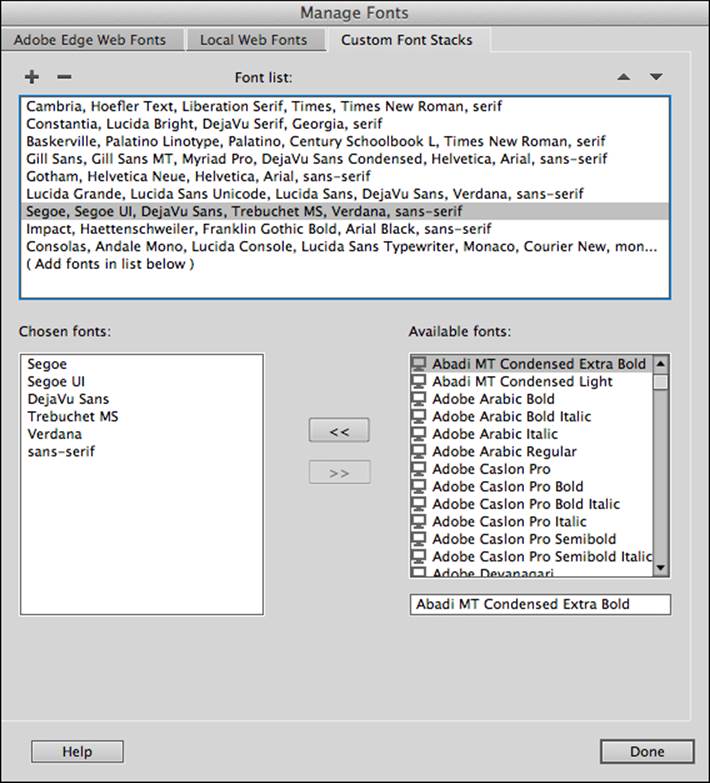
6. With the new selector selected, change the Text color to red in the Properties section, as shown in Figure 5-8.
7. Click OK to create the new tag style and close the panel.
Now, every time you apply the <strong> tag to make bold text (using the B button or other shortcuts), that bold text also appears red. You've created a tag style that determines how bold text appears any time it appears in a document.
You can further refine this new tag style by selecting any bold text and continuing to modify text properties from the Property inspector.
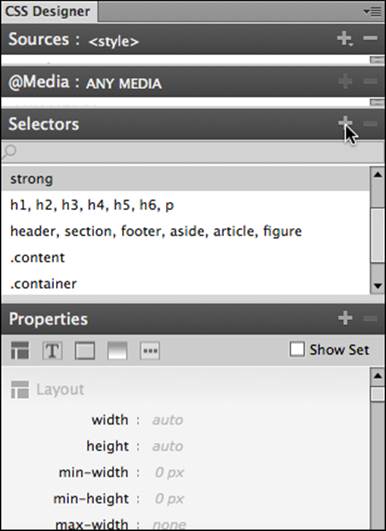
Figure 5-7: Add a new selector.

Figure 5-8: Change text properties to add additional properties to your new selector.
If you’d like to edit and fine-tune the rule you’ve created, select your formatted content and click the Edit Rule button below the Targeted Rule drop-down list in the CSS Property inspector. This opens the CSS Rule Definition dialog box, which opens by default to the Type category where you can modify type-related properties. Some common type properties you can find in this category are as follows:
![]() Font family: You can apply a font family by using the Font drop-down list. Generally these are font sets with multiple fonts specified.
Font family: You can apply a font family by using the Font drop-down list. Generally these are font sets with multiple fonts specified.
![]() Font size: Enter a text size and then, with the Unit drop-down list to the right of the size, enter it in pixels, points, inches, centimeters, or other units of measurement. For web use, it’s recommended to stick with pixels, ems, or percentage-based values.
Font size: Enter a text size and then, with the Unit drop-down list to the right of the size, enter it in pixels, points, inches, centimeters, or other units of measurement. For web use, it’s recommended to stick with pixels, ems, or percentage-based values.
![]() Line height: By assigning a size in any unit, you can define the space between lines of text. If you come from the typesetting or design world, it works much like leading.
Line height: By assigning a size in any unit, you can define the space between lines of text. If you come from the typesetting or design world, it works much like leading.
![]() Text decoration: Text decoration refers to text modifiers such as underlines and strikethroughs. And while you may be tempted, avoid using Blink. The effect will give your users a headache.
Text decoration: Text decoration refers to text modifiers such as underlines and strikethroughs. And while you may be tempted, avoid using Blink. The effect will give your users a headache.
Don't like underlines under links? Create a tag style for the <a> tag (this HTML tag is the one used to create a link) and select None in the Decoration drop-down list to remove the underline that appears under hyperlinks by default.
![]() Font-Weight: Make text lighter or heavier with this drop-down list. Just so you know, a value of 700 is the typical boldness of bold text; any heavier is bolder than bold.
Font-Weight: Make text lighter or heavier with this drop-down list. Just so you know, a value of 700 is the typical boldness of bold text; any heavier is bolder than bold.
![]() Font-Variant: Use this drop-down list to choose small caps.
Font-Variant: Use this drop-down list to choose small caps.
You may be wondering why Normal is a choice in the Style drop-down list. It's because you may have defined small caps, for example, as the variant for all instances of the <strong> tag but then decided that on one page you want to override that attribute. By creating a style defined in the document only with Normal selected in Font-Variant, you can override the style (small caps) definition on the external style sheet.
![]() Text-Transform: Choose from Capitalize, Uppercase, Lowercase, and None.
Text-Transform: Choose from Capitalize, Uppercase, Lowercase, and None.
![]() Color: Assign a color to your selector by clicking the arrow in the lower-right corner of the Color definition swatch or type a number in the Color text box.
Color: Assign a color to your selector by clicking the arrow in the lower-right corner of the Color definition swatch or type a number in the Color text box.
When you’re finished fine-tuning your tag style, click Apply at the bottom of the dialog box to see your changes. You can also click OK to apply your changes and exit the dialog box.
What is a style sheet?
The term style sheet refers to a collection of CSS rules. Style sheets can be defined within a single page using the <style> tag, or externally in a plain text file with a .css extension. A page can have multiple style sheets applied, although depending on the order and rules you've defined, one may override or complement another. If you have not defined an external style sheet, most of the CSS rules you've created so far have likely been written into the page itself. Switch to Code view and look for the <style> tag at the top of your page to see what was created, as shown inFigure 5-9. Embedded style sheets such as the one in the figure appear within <style> tags at the top of the page.
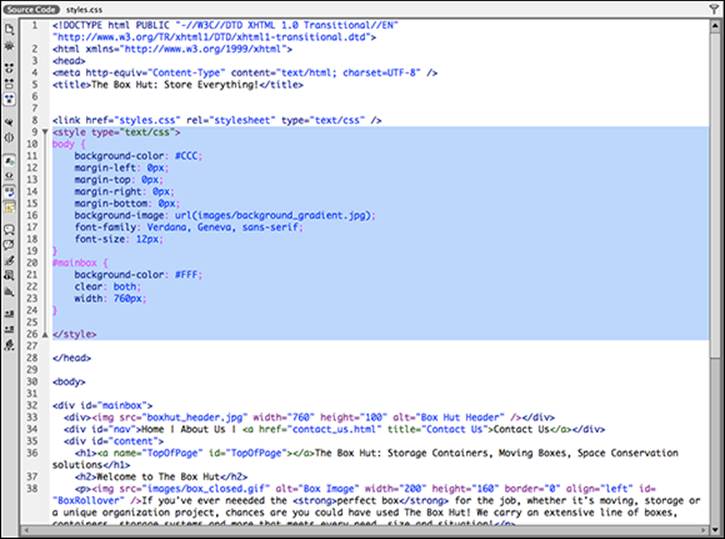
Figure 5-9: A typical style sheet, which contains multiple CSS rules.
External style sheets are generally considered a better practice because they can be shared across multiple pages, reducing duplication and work.
Block versus inline elements
You may find that when you assign certain properties, you see varying results because some properties you select affect only block elements as compared to inline elements. Block-level elements apply to elements that take up their own horizontal space on a page, such as an entire paragraph, a table, or an unordered list. If you create a Pelement style and change the line spacing, the space takes effect within the block-level element.
An inline element is one that flows with other elements on the page or within text, such as the <span>, <a>, and <strong> tags. If you choose to apply line spacing to the b element, the leading in paragraphs that contain the <strong> tag aren't affected.
You’ll eventually figure out which properties work with which tags. Just keep this point in mind so that you’re not dumbfounded when some properties don’t work as expected!
Creating a new class selector
For more styling control over pages, you can create class selectors, which are named styles that you can apply to a number of elements across a page. Unlike styles, you can name a class style just about anything you want and apply it selectively to several items.
If you choose properties that work on a variety of elements, you can get a lot of mileage from a single class selector in many places throughout your site. Essentially, class styles are like creating your own character or paragraph styles, in applications such as Word or InDesign, and are just as easy to update.
This time, you can also make your new rule available to more than one page in your site by defining a new external style sheet. This method saves your rules in an external file that can be attached to several pages at a time.
Follow these steps to create a class style from the CSS Styles panel:
1. Open the CSS Styles panel (Window⇒CSS Styles), and choose New from the panel menu.
The New CSS Rule dialog box appears.
2. From the Selector Type drop-down list, select Class (Can Apply to Any HTML Element).
3. In the Selector Name text box, enter a name for your new class.
You can enter any name you want, but make sure that it has no spaces and is descriptive of how you'll use it. Reallycoolstyle is a bad name; headlinestyle is a better name. Dreamweaver inserts the period at the front of the style name because it's a necessary naming convention.
4. From the Rule Definition drop-down list at the bottom, select (New Style Sheet File).
5. Click OK.
The Save Style Sheet File As dialog box appears. Locate your site folder. If you haven’t defined a site, locate a folder where you’ll keep all relevant information, such as image files and pages for your site.
6. Enter a name for the style sheet.
Enter an appropriate name, such as styles.css or main.css if it's the main set of styles you're creating for your website. (Dreamweaver adds the mandatory .css extension at the end of the filename.)
7. Leave the URL as is and the Relative To drop-down list set to Document.
8. Click Save.
You've created a new .css file, or an external stylesheet. The CSS Rule Definition dialog box appears.
In this dialog box, you can create the set of attributes that you want included in the CSS definition for the style you’re creating. As you might notice, this dialog box is the same one you work with when you edit an existing CSS style. (See the previous section.) The difference with the tag and class styles lies only in the fact that you must choose to apply a class style to a selected element using the Property inspector for it to take effect (via the Class or Style drop-down lists).
9. Apply a font, size, style, line height (leading), color, and any other attributes that you’d like to include.
10. After you select attributes for your class style, click OK to close the dialog box and return to your page.
Now you can apply the CSS class style to some text. When applying a class style, you can choose to apply it to only some text or to an entire paragraph of text. Follow these steps to apply a class style to an entire paragraph:
1. Place the cursor in a paragraph of text or click and drag to select a line of text.
2. If the Property inspector isn’t visible, choose Window⇒Properties. Click the HTML button on the left side of the Property inspector to toggle to HTML view.
3. From the Class drop-down list in the Property inspector, select a new style, as shown in Figure 5-10.
The new style is applied to the selection.
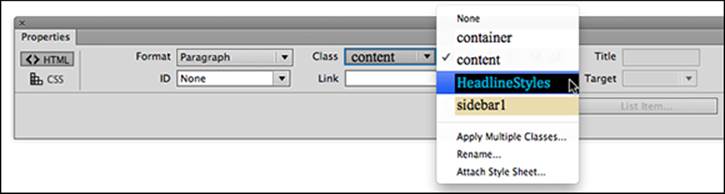
Figure 5-10: Apply a class style to a selected piece of text by using the Class drop-down list on the Property inspector.
All materials on the site are licensed Creative Commons Attribution-Sharealike 3.0 Unported CC BY-SA 3.0 & GNU Free Documentation License (GFDL)
If you are the copyright holder of any material contained on our site and intend to remove it, please contact our site administrator for approval.
© 2016-2026 All site design rights belong to S.Y.A.