Adobe Creative Cloud Design Tools All-in-One For Dummies (2013)
Book VII
Flash Professional CC
 At www.dummies.com/extras/adobecreativeclouddesigntoolsaio you'll find a short tutorial that shows you how to animate an imported image in Flash CC using a color effect. Follow the steps to import a file, prepare it for animation, and apply and adjust an effect so the image color animates when you test the movie.
Contents at a Glance
Chapter 1: Getting Started in Flash CC
Chapter 2: Creating Artwork and Text
Chapter 3: Symbols and Animation
Chapter 4: Applying Advanced Animation
Chapter 5: Adding Graphics, Audio, and Video
Chapter 6: Lights, Camera, Movie Clips!
Chapter 7: Controlling Your Movie with ActionScript
Chapter 8: Getting into the (Work)Flow
Chapter 9: Publishing and Final Delivery
Chapter 1: Getting Started in Flash CC
In This Chapter
![]() Creating, saving, and opening documents
Creating, saving, and opening documents
![]() Getting familiar with the workspace and tools
Getting familiar with the workspace and tools
![]() Creating and saving workspaces
Creating and saving workspaces
![]() Introducing Flash Player
Introducing Flash Player
![]() Understanding layers
Understanding layers
![]() Importing and exporting files
Importing and exporting files
![]() Understanding the publishing process
Understanding the publishing process
Flash has been the staple application for developing highly interactive motion graphics and interactive content for the web for more than a decade. With a familiar CS interface, robust drawing and animation tools, and a powerful built-in scripting language, Flash is capable of building full websites, complex games, and highly functional, rich Internet applications. Many of the most popular websites have been built and defined on Flash technology.
Although previous versions of Flash have focused primarily on authoring for the Flash platform, Flash CC allows for the publishing of content as desktop, native iOS, and Android mobile applications using the Adobe Integrated Runtime (AIR) platform.
Creating Your First Flash Document
You can create new documents for a few different types of projects in Flash, but the most common will be Flash (ActionScript 3.0). You can create a new, blank document and set up your workspace in one of two ways:
![]() From the Start page, choose ActionScript 3.0 under the Create New column.
From the Start page, choose ActionScript 3.0 under the Create New column.
![]() Choose File⇒New⇒ActionScript 3.0 and click OK.
Choose File⇒New⇒ActionScript 3.0 and click OK.
Your new document is created, and the workspace appears. Before you get to work, specify some important settings, such as width and height, for your file by using the Document Properties dialog box.
To open the Document Properties dialog box, choose Modify⇒Document and set these options:
![]() Frame Rate: Because Flash files behave like movies, the frame rate is an important setting that affects the performance and playback speed of your movie. The default setting of 24 frames per second (fps) should work well.
Frame Rate: Because Flash files behave like movies, the frame rate is an important setting that affects the performance and playback speed of your movie. The default setting of 24 frames per second (fps) should work well.
![]() Dimensions: The width and height you specify determine the size of your stage and in turn, the visible area of your finished movie. For now, leave the default setting of 550 pixels wide by 400 pixels high.
Dimensions: The width and height you specify determine the size of your stage and in turn, the visible area of your finished movie. For now, leave the default setting of 550 pixels wide by 400 pixels high.
![]() Background Color: Click the swatch to pick a background color for your stage from the web-safe color palette. This setting also determines the background color of any web pages created by Flash when you publish your movie to the web.
Background Color: Click the swatch to pick a background color for your stage from the web-safe color palette. This setting also determines the background color of any web pages created by Flash when you publish your movie to the web.
![]() Ruler Units: Select from this drop-down list the unit of measurement used for all measurement values in your document, including document size, width and height values, and ruler increments when rules are visible in the workspace.
Ruler Units: Select from this drop-down list the unit of measurement used for all measurement values in your document, including document size, width and height values, and ruler increments when rules are visible in the workspace.
When you’re done fine-tuning your document’s properties, click OK.
 Choose File⇒New⇒ActionScript 3.0 to open the New Document dialog box and set your document’s options before creating a new document. The new document will be created with the options that you select.
Getting Familiar with the Workspace
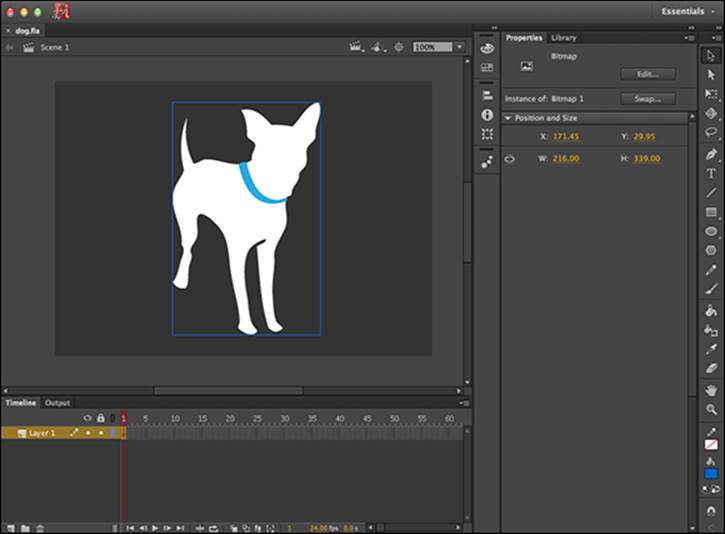
On the Flash workspace, shown in Figure 1-1, you create your Flash movies. The most prominent item you’ll notice is at the top of your screen: The stage is where the action happens — where you draw, build, or import graphics, create text, and construct layouts.
The gray area surrounding the stage is the pasteboard. Items placed on it aren’t visible in your finished movie because they’re outside the bounds of the stage. However, it helps to think of this area as the backstage — where text, artwork, and images can make their entrances or exits or be placed until they’re ready to appear in your movie.
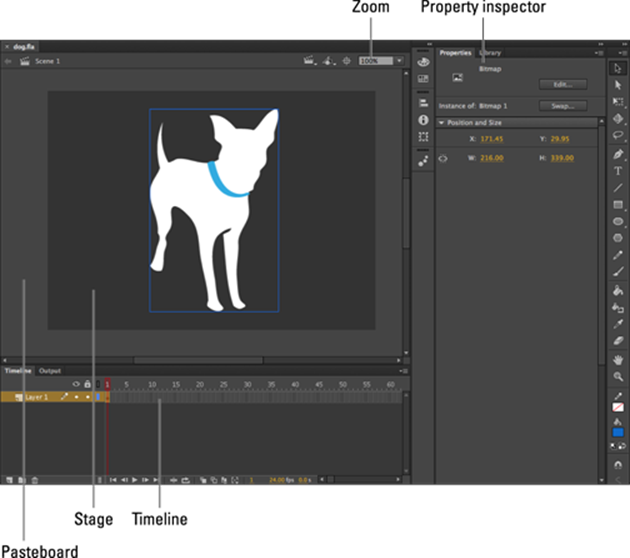
Figure 1-1: The Flash workspace.
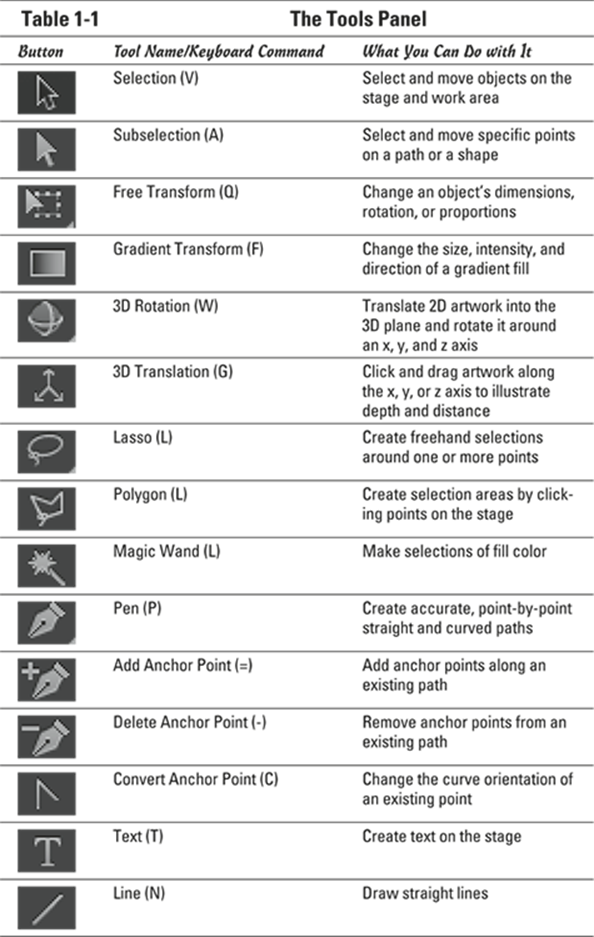
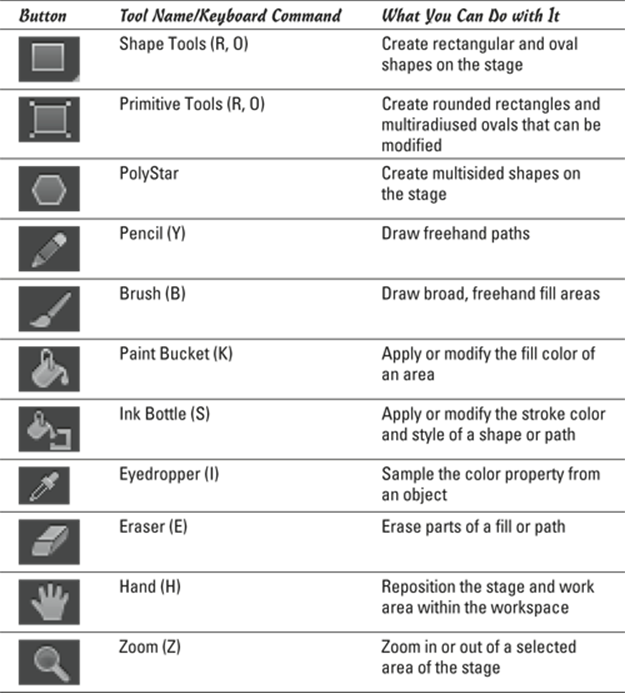
The Tools panel
What CC application would be complete without a fancy toolbar? Flash has a comprehensive set of tools for just about any drawing task you need to wrap your hands around. Table 1-1 gives you a rundown and description of the tools you’ll find. The Tools panel has been designed to make your work area flow smoothly. A double arrow at the top lets you toggle between expanded and icon views to maximize your work area.
Click and hold down your mouse on a tool to reveal other tools underneath. For example, hold down your mouse button on the Rectangle tool to reveal the Oval, Rectangle Primitive, and Oval Primitive tools.
The Timeline
Below the stage sits the Timeline, where you bring your artwork to life through animation. The Timeline is composed of frames, each one representing a point in time moving from left to right. The Timeline is further broken out into layers; new documents automatically contain one new layer labeled Layer 1. Each layer on the Timeline is composed of frames that span horizontally from left to right, each one representing a point in time, just like frames in a movie reel. (See Figure 1-2.)
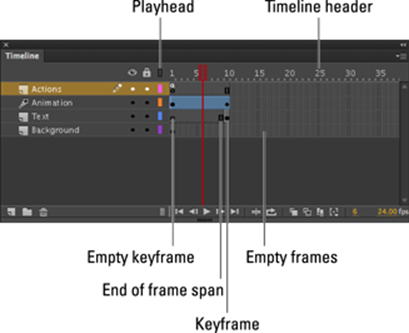
Figure 1-2: The Timeline contains frames and layers.
The Property inspector
Sitting at the right side of your workspace, the Property inspector lets you get (and set) attributes, such as height and width, for a selected item on the stage or pasteboard. (See Figure 1-3.) The contextual Property inspector displays adjustable options for any item you select, such as width and height for a selected shape or fill and stroke color. When you don’t have any objects selected, the Property inspector will display global document properties, such as the document’s filename and frame rate.
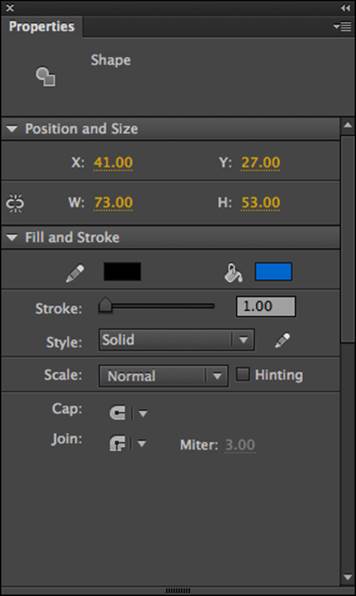
Figure 1-3:The Property inspector shows options for selected graphics, symbols, frames, animation, or tools.
To modify a document’s properties, such as frame rate and dimensions, at any time, either use the Property inspector when no items are selected (try clicking an empty area on the pasteboard) or choose Modify⇒Document.
Panels (right side)
The numerous panels included in Flash give you total control over most aspects of your movie, from creating and managing colors to exploring the structure of your project and adding code to frames.
The default (Essentials) workspace (Window⇒Workspaces⇒Essentials) launches with the Property inspector and Library panels as tabs, as well as a minimized group of six panels that include
![]() Color
Color
![]() Swatches
Swatches
![]() Align
Align
![]() Info
Info
![]() Transform
Transform
![]() Motion Presets
Motion Presets
Get familiar with panel behaviors and features so that you can manage their appearance and make organizing your workspace a snap.
Taking a look at the panel group
The panel group sits on the right side of the workspace and features multiple grouped panels. Panels can be added to or removed from the panel group on the right.
While docked, you can’t freely reposition the panel group in the workspace. However, you can resize or collapse it to icon view with the double arrows found in its upper-right corner of the group’s column.
You can remove and float panels from the panel group. Simply click and drag a panel away from the group by its title tab so it is “floating” in the workspace. To add a panel to a group, drag it into the panel group column and release the mouse when you see a blue highlight bar. Then the panel is docked again.
Managing individual panels
You can position each panel individually anywhere in the workspace by dragging it by its title tab. You can find additional appearance options under each panel’s menu, accessible from the icon in its upper-right corner. (See Figure 1-4.) This panel menu also provides another way of reaching that panel’s primary tasks.
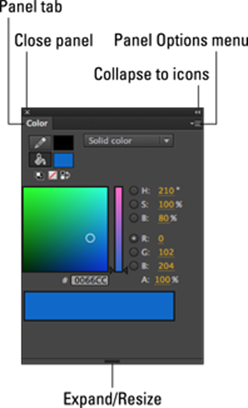
Figure 1-4: Anatomy of a panel. This panel is “floating” above the UI. Close a panel from the Panel menu when it is docked.
To group panels, simply drag one on top of the other; after they’re grouped, you can move and minimize several panels as one unit. This technique is handy for keeping commonly used or related panels together.
You can save panel groups and panel positions as part of custom workspaces. (See the next section, Creating and Saving Workspaces.)
Panels can always be toggled on or off from the Window menu. If you don’t see a panel you need or have accidentally closed one, look for it on the Window menu. Many panels have shortcut keys; if you use a panel often, use its shortcut key combination for easy access.
Working in full screen
You can change the workspace to full-screen mode, in which all panels turn into overlay panels and are hidden by default so the primary element is the stage. In this mode, you primarily use keyboard shortcuts to activate tools or press F4 to temporarily access panels.
To enter full-screen editing mode, choose View⇒Screen Mode⇒Full Screen Mode. Press Esc to exit this mode.
Creating and Saving Workspaces
One of the most useful additions in recent versions of Flash is its capability to save your workspaces, or the appearance and layout of workspace items such as the toolbar, Timeline, Property inspector, and panels.
Saving workspaces is essential if you’re sharing a computer workstation with other people and want to recall your favorite panels and setup instantly. However, a workspace can also be useful for maintaining different views for different projects, even if you’re the only person working on your computer.
To create and save your workspace layout, follow these steps:
1. Open and position any panels you want to make available, including the Tools panel, Timeline, and Property inspector.
You can toggle panels on or off from the Window menu.
2. Choose Window⇒Workspaces⇒New Workspace.
3. Enter a new name for your workspace and click OK.
To recall a workspace, choose Window⇒Workspaces⇒Your Workspace Name or select a workspace from the Workspace selector in the upper-right corner of your screen. The current workspace rebuilds and appears exactly as you saved it.
 You can’t modify, delete, or rename built-in workspaces, such as Essentials, Classic, and Designer.
Changing General Preferences
You can change the overall document preferences, and how the workspace appears, by opening the Preferences window. This window gives you the settings to control levels of Undo, the color scheme of the interface, Code Editor display, drawing preferences, and more.
To open this window and change your document preferences, follow these steps:
1. Choose Edit⇒Preferences (Windows) or Flash⇒Preferences (Mac).
2. Select the type of preferences you want to modify from the sections on the left of the panel.
• General: Control Undo levels, Auto-Recovery save interval, the color, and other general settings for the Flash workspace.
• Code Editor: Control font style and color and how code is edited and formatted as you type. You can also access ActionScript 3.0 settings from this section.
• Text: Control how fonts are mapped and the appearance of the font menu.
• Drawing: Control selection, pen preview, and how lines and curves are handled by default.
3. Select check boxes or menu options, or enter new values, and click OK.
Saving and Opening Documents
Always save a document after you make significant changes or additions to it, and always save (though it isn't necessary) a new document immediately after you create it. To save a document, choose File⇒Save. Enter a name for the file and choose a location on your hard drive to save it. You can save Flash work files in .fla format or the new .xfl file format.
To open an existing document, choose File⇒Open and locate the Flash file on your hard drive. Flash files are saved using the .fla extension, and published Flash movies are saved using the .swf extension.
To save a copy of your document under a new name, choose File⇒Save As. Choose a location on your hard drive and enter a new filename.
FLA versus XFL File Format
The XFL file format (introduced in CS5) is an uncompressed file format that results in a project folder containing a number of .xml files and any original assets (such as images and audio files) that you may have imported into your project's library. Because of this open file format, resources in your project can be exchanged with and opened in other applications. The XFL file format enables exchange between Flash and other Creative Cloud applications, and opens up the possibility of Flash files eventually being editable in other applications.
The traditional FLA file format combines all your project’s vital information and resource files into a single file, making it more portable but less likely to exchange with other applications. You don’t have direct access to assets you’ve imported into your project; for most purposes, however, the standard FLA file format is suitable, especially if Flash CC Professional is your sole editor for Flash applications.
Getting to Know Flash Player
Flash Player is at the heart of Flash technology. The player, which you can find as a plug-in to web browsers or as a stand-alone application, runs and plays completed Flash movies, known as SWF (“swiff”) files.
Beyond simple playback, Flash Player is also responsible for deciphering and carrying out instructions written in ActionScript, the powerful, built-in Flash scripting language. ActionScript, discussed in Chapter 7 in this minibook, gives your Flash movies many more capabilities, including playback control, real-time user interaction, and complex effects.
Users must have Flash Player installed in order to view movies, unless you are publishing as HTML or AIR (including AIR for iOS and Android). If you don't have it installed, you can get the free download from the Adobe website at www.adobe.com. Fortunately, Flash Player is installed on more than 90 percent of Internet-enabled PCs on average worldwide.
Talking about Layers
If you’ve worked with other programs that use layers (such as Photoshop or Illustrator), the concept is much the same as using layers to arrange and stack artwork in these applications. If you’re new to layers, think of them as clear pieces of film stacked on top of each other. Each layer can contain its own artwork and animations.
In Flash, you use layers to stack artwork and animations on the stage, allowing them to exist together visually but to be edited or moved independently from one another. You can reorder layers to position artwork in front of or behind artwork on other layers.
 To create a new layer, click the New Layer icon at the bottom of the Timeline. The layer is automatically assigned a name; you can rename any layer by double-clicking its name and typing a new name.
To delete a layer, follow these steps:
1. In the Timeline below the stage, select the layer you want to delete.
Hold down Command (Mac) or Ctrl (Windows) to select multiple layers. You can then click the Trash icon to delete all selected layers at one time.
 2. Click the Delete Layer icon below the Timeline.
The beauty of working with layers is that you can easily change the stacking order and appearance of artwork and animations distributed across those layers. To reorder layers, simply select a layer by clicking its label on the Timeline and then click and drag the layer up or down in the stacking order and release it to its new position. (See Figure 1-5.) Layers at the top of the list appear in front of other objects in lower layers; in contrast, layers at the bottom of the list appear below or behind items on higher layers.
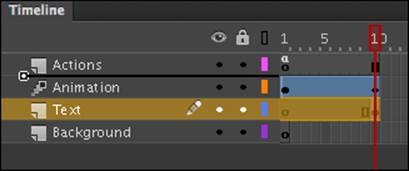
Figure 1-5: Shuffling layers is easy — just drag and release.
Two additional aspects of managing layers include toggling a layer and its contents to be visible or invisible and locking layers to prevent their contents from being accidentally moved or modified.
 To toggle a layer’s visibility on or off, click any layer in the column below the Eye icon (an X will appear, indicating the layer’s visibility is off). To toggle all layers on or off, click the Eye icon at the top of the column.
 To prevent layer contents from being modified, click any layer in the column below the Lock icon. To unlock it, click the Lock icon again. To lock or unlock all layers, click the Lock icon at the top of the column.
Locking layers ensures that you don’t accidentally move or delete the artwork it contains. Make a habit of locking layers whenever you aren’t working with them.
Layer visibility affects only what you see inside the authoring environment and has no effect on the finished SWF file. By default, layers whose visibility is toggled off in your document still appear when published. You can, however, override this behavior in your document’s publish settings, discussed in Chapter 9 of this minibook.
Importing Files
Sometimes you need to use assets — such as artwork or photo files created in Adobe Photoshop or Illustrator, MP3 sound files, and even video files — that weren’t created in Flash. Here are some of the file formats you can import into your Flash movie:
![]() Images: EPS, GIF, JPEG, PNG
Images: EPS, GIF, JPEG, PNG
![]() Flash SWF
Flash SWF
![]() Layered artwork files: AI (Adobe Illustrator) and PSD (Photoshop)
Layered artwork files: AI (Adobe Illustrator) and PSD (Photoshop)
![]() Audio files: MP3 and WAV
Audio files: MP3 and WAV
![]() Video files: DV, F4V, FLV, MOV, MPEG, QuickTime
Video files: DV, F4V, FLV, MOV, MPEG, QuickTime
You can import these types of files directly to the stage for immediate use or to your document’s library (see Chapter 3 of this minibook) for storage until you’re ready to place them on the stage.
Follow these steps to import files to the stage:
1. Choose File⇒Import⇒Import to Stage.
2. Select from your hard drive the file or files you want to import.
Imported items are placed on the stage on the selected layer and frame.
Follow these steps to import files directly to the library:
1. Choose File⇒Import⇒Import to Library.
2. Select the files from your hard drive that you want to import and click the Open button.
Imported files don’t appear on the stage but are available in the Library panel for later use.
To select multiple files for import, hold down Ctrl (Windows) or Command (Mac) when prompted to select files from your hard drive. You can bring several files to the stage or library in one step.
Exporting Files from Flash
In contrast to the Import menu, the Export menu is used to generate files from your current document out of Flash, most often to create a compressed SWF file (movie) for final delivery. Additionally, you can use the menu to generate static (such as JPEG or GIF) images from specific frames in your movie.
FLA and XFL files
The life of a Flash project involves at least two types of files: your authoring (FLA or XFL) file, in which all your work is created, and the final product, your compressed movie or SWF file.
FLA and XFL are used only during the authoring process. When you’re ready to distribute your finished movie, publish a SWF file that can be displayed by Flash Player.
These SWF files can be created from either the Publish or Export menu options and are compressed movie files (typically smaller than their FLA and XFL counterparts) that contain all the graphics and information necessary to display your movie.
Flash Player can’t read FLA or XFL files, and SWF files can’t be deconstructed into usable FLA files. Changes to your Flash movie are always made in the original FLA or XFL file and must be exported to a new SWF file again if you want to view them in Flash Player.
Publishing Your Movie
The final step in preparing your movie to be posted on the web, or distributed as a mobile or desktop application is the publishing process, which includes these important tasks:
![]() For web publishing: Export the final SWF or HTML file that’s playable by Flash Player and create all additional files (such as web pages and JavaScript) necessary to display your movie.
For web publishing: Export the final SWF or HTML file that’s playable by Flash Player and create all additional files (such as web pages and JavaScript) necessary to display your movie.
![]() For desktop applications: Create an AIR application that’s viewable in the AIR runtime that runs on the desktop.
For desktop applications: Create an AIR application that’s viewable in the AIR runtime that runs on the desktop.
![]() For distribution as a mobile application: Create AIR applications for iOS or Android platforms.
For distribution as a mobile application: Create AIR applications for iOS or Android platforms.
![]() Other: Publish to video format (MOV), or other file types such as SWC.
Other: Publish to video format (MOV), or other file types such as SWC.
Publish Settings (File⇒Publish Settings) handles the setup and publication of your movie.
Flash can create all these file types at publish-time:
![]() SWF: This is the most common format in which you’ll publish your Flash movies. SWF files are playable in the Flash player/plug-in and are compressed, ready-to-view versions of your original file.
SWF: This is the most common format in which you’ll publish your Flash movies. SWF files are playable in the Flash player/plug-in and are compressed, ready-to-view versions of your original file.
![]() SWC: For sharing and distributing your movie as a library.
SWC: For sharing and distributing your movie as a library.
![]() HTML Wrapper: Formerly just “HTML” in previous versions, this now refers to the HTML page generated to contain SWF movies for web viewing.
HTML Wrapper: Formerly just “HTML” in previous versions, this now refers to the HTML page generated to contain SWF movies for web viewing.
![]() JPG, GIF, or PNG: You can create static images from the first frame of your Flash movie in these web-friendly image formats. These are useful for a number of purposes, including previews or stand-ins when the Flash plug-in is not available.
JPG, GIF, or PNG: You can create static images from the first frame of your Flash movie in these web-friendly image formats. These are useful for a number of purposes, including previews or stand-ins when the Flash plug-in is not available.
Chapter 9 of this minibook explores publishing in more detail.
All materials on the site are licensed Creative Commons Attribution-Sharealike 3.0 Unported CC BY-SA 3.0 & GNU Free Documentation License (GFDL)
If you are the copyright holder of any material contained on our site and intend to remove it, please contact our site administrator for approval.
© 2016-2026 All site design rights belong to S.Y.A.