Adobe Creative Cloud Design Tools All-in-One For Dummies (2013)
Book II
InDesign CC
 Discover how to create beautiful drop caps in InDesign, how to use kerning to adjust spacing between characters, and how to use baseline shift to improve line spacing at www.dummies.com/extras/adobecreativeclouddesigntoolsaio.
Contents at a Glance
Chapter 1: Introducing InDesign CC
Chapter 2: Working with Text and Text Frames
Chapter 3: Understanding Page Layout
Chapter 4: Drawing in InDesign
Chapter 5: Understanding Color
Chapter 6: Clipping Paths, Alignment, and Object Transformation
Chapter 7: Exporting to PDF, Flash, and Printing
Chapter 8: Creating Digital Documents Using HTML and EPUB
Chapter 1: Introducing InDesign CC
In This Chapter
![]() Opening InDesign
Opening InDesign
![]() Creating new documents
Creating new documents
![]() Looking at and setting up the workspace
Looking at and setting up the workspace
![]() Creating your first publication
Creating your first publication
InDesign is a sophisticated page-layout program. You can use it to create professional-looking documents, including newsletters, books, and magazines. You can also use it to create documents for distribution on a tablet such as an iPad, and even documents that include interactivity or videos. InDesign has evolved into a tool that lets you publish content to just about any device or in print. For example, using InDesign you can create a document and distribute content in print and then add hyperlinks and video and export it to PDF or HTML.
As powerful an application as InDesign is, you’d think it would be difficult to use, but you’ll find that creating most basic documents is a snap. This minibook shows you how to use InDesign to make creative page layouts. In this chapter, you discover the InDesign interface and start your first publication.
Getting Started with InDesign CC
InDesign is used for creating page layouts that include type, graphics (such as fills and strokes), and images. The InDesign document you see in Figure 1-1 includes elements from Adobe Illustrator (logos) and Photoshop (images). If this file were to be exported as a PDF or an HTML file, it could include video or interactive buttons.
In the following sections, you get familiar with creating and opening documents in InDesign. In Chapters 2 through 8 in this minibook, you see how to add various elements to your pages.
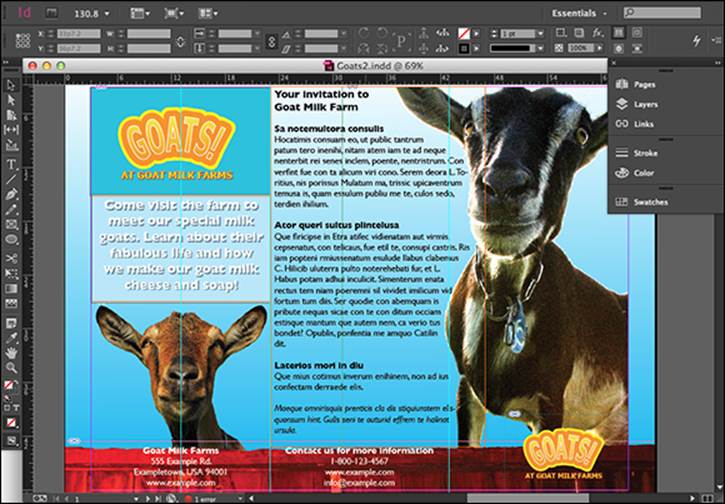
Figure 1-1: A sample page layout created using InDesign CC.
Creating a new publication
After you launch InDesign, you can create a new InDesign document. Just follow these steps to create a new publication:
1. Choose File⇒New⇒Document.
The New Document dialog box opens, as shown in Figure 1-2.
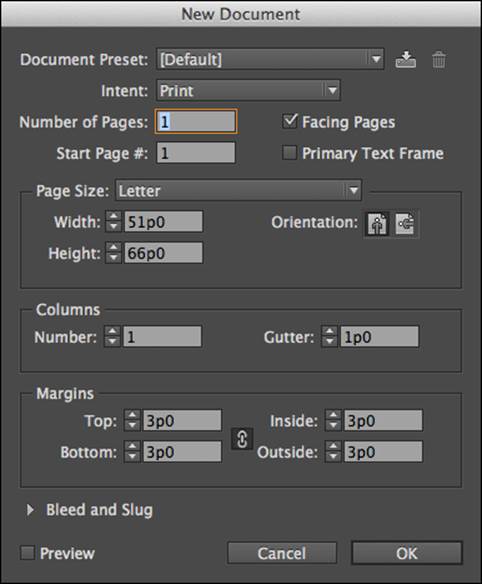
Figure 1-2: Setting up a new document with InDesign.
2. Select whether you’re designing a Print, Web, or Digital Publishing (digital) document from the Intent drop-down menu.
 If you want to preview your adjustments in this panel, select the Preview option at the bottom of the New Document window. Your updates in the steps that follow will adjust the appearance of the document in InDesign while you make your settings.
3. Enter a value in the Number of Pages text field for the number of pages in the document.
This value can be between 1 and 9999. If you aren’t sure how many pages will be in your document, take a guess. You can easily add pages later using the Pages panel. (See the section, Pages panel, later in this chapter.)
4. For this example, select the Facing Pages check box to have the pages arranged as spreads with left and right pages.
With this option selected, pages in your document are arranged in pairs, so you have spreads, which are facing or adjacent pages in a layout. For example, you select this option if you’re creating a publication that will be arranged like a book or magazine. If you deselect this option, pages are arranged individually, which is a good choice for a single-page flyer or a document with only a front and back side.
5. Choose a page size for the document from the Page Size drop-down list.
The page size should be set to the size of paper you intend to print on or the size at which the content will be displayed. The Width and Height values below this drop-down list change, depending on the size you choose.
You can also enter your own settings to create a custom size. The Orientation setting changes from Portrait (tall) to Landscape (wide) based on the settings you enter in the Width and Height fields of the Page Size section.
The Intent selection you make determines the choices in the Page Size drop-down list. If you select Web for the Intent, you can choose from various screen resolutions, whereas if you select Digital Publishing, you can select from various popular tablet sizes, such as the iPad, NOOK/Kindle Fire, or Android.
You can enter page sizes using most common forms of measurement or just use the appropriate abbreviation. For example, you enter 8 in for 8 inches or 15 cm for 15 centimeters. You can use most forms of measurement in all InDesign dialog boxes and panels; just make sure to specify the form of measurement you want to use. When creating web or digital documents, these values switch to pixels.
6. Choose a number for the columns on the page.
This step creates guides for columns that do not print or display in the completed project. These guides help you organize your pages as you create them. You can also enter a value in the Gutter field, which specifies the space between each of the columns. For more information about using columns in page layout, see Chapter 3 of this minibook.
7. Choose values for the page margins.
Notice the Make All Settings the Same button, which is a chain icon, in the middle of the four text fields where you enter margin values. Toggle this button to set all margins to the same value, or set different values (broken chain icon).
If you see Top, Bottom, Inside, and Outside, you’re specifying margins for a page layout that has facing pages, which you specified earlier. If you see Top, Bottom, Left, and Right, you’re creating a page layout without facing pages. The inside margins refer to the margins at the middle of the spread, and the outside margins refer to the outer left and right margins of a book or magazine. You can set the Inside setting to accommodate the binding of a book, which may need wider margins than the outside.
If you use the same settings repeatedly, saving those settings as a preset is a good idea. Get your settings the way you want them, and then click the Save Document Preset button, located to the right of the Document Preset drop-down list in the New Document dialog box, before you click OK. Enter a name for the preset, and then click OK. After you save your settings, you can select settings from the Document Preset drop-down list (refer to the top of Figure 1-2) whenever you create a new document.
8. When you’re finished, click OK.
After you click OK in the New Document dialog box, the new document is created with the settings you just specified.
Margins, columns, orientation, and page size are discussed in more detail in Chapter 3 of this minibook.
Opening an existing publication
You may have InDesign files on your hard drive that you created or have saved from another source. To open existing InDesign documents (files that end with .indd), follow these steps:
1. Choose File⇒Open.
The Open dialog box appears.
2. Browse your hard drive and select a file to open.
Select a file by clicking the document’s title. To select more than one document, press Ctrl (![]() on the Mac) while you click the filenames.
on the Mac) while you click the filenames.
3. Click the Open button to open the file.
The file opens in the workspace.
Looking at the document setup
If you need to change the size of your pages or the number of pages in a document that’s already open in the workspace, you can make those changes in the Document Setup dialog box. To access and modify settings in the Document Setup dialog box, follow these steps:
1. Choose File⇒Document Setup.
The Document Setup dialog box opens.
Note: You can change the value in the Number of Pages text field if you need the number of pages in your document to be greater than or less than the current value.
The number of pages in your document updates after you close this dialog box. You can also add more pages by choosing Layout⇒Pages⇒Insert Pages to insert several pages, or Layout⇒Pages⇒Add Page to add a single page, or by using the Pages panel.
2. Select a new option from the Page Size drop-down list or manually enter values into the Width and Height text fields to change the page size.
You can also click the up and down arrows in the Width and Height text fields to choose a new value.
3. Click the Portrait or Landscape button to change the page orientation.
The page orientation updates in the workspace after you close this dialog box.
4. Click OK when you finish changing your document setup.
The modifications are applied to the open document.
If you make changes to the Document Setup dialog box when you have no documents open, the changes become the default settings for all new documents you create.
Touring the Workspace
Just like the other applications in the Creative Cloud, InDesign has a standardized layout. Using panels that can be docked and a single-row Tools panel, you can keep much more space open in your work area.
The InDesign workspace, or user interface, includes a large number of tools and panels — but most users use only a few. You’ll likely use several panels over and over again, so you should keep them easily accessible. In the default user workspace, many of these panels are already docked to the right. Figure 1-3 shows how the InDesign workspace layout looks when you open a new document. The Windows workspace is nearly identical to the Macintosh version of InDesign.
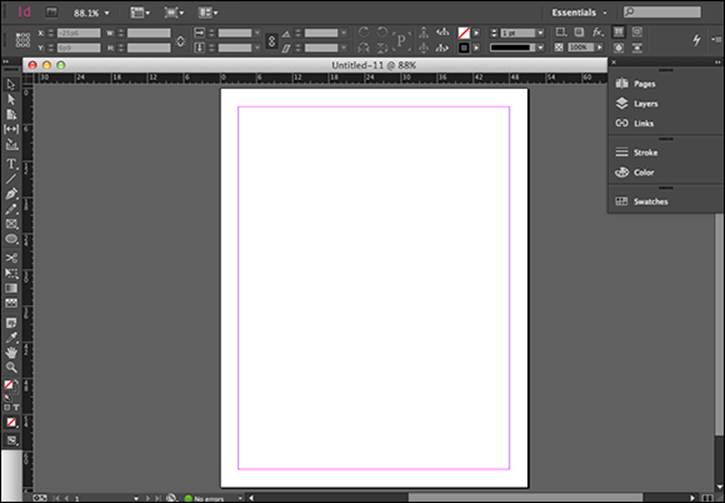
Figure 1-3:The InDesign default workspace.
Here are the elements that create the InDesign workspace:
![]() Page: The main area of the InDesign workspace is a page. It’s the area that’s printed or exported when you finish making a layout.
Page: The main area of the InDesign workspace is a page. It’s the area that’s printed or exported when you finish making a layout.
![]() Master pages: You can define how certain text elements and graphics appear in an entire document (or just portions of it) by using a master page. It’s much like a template for your document because you can reuse elements throughout the pages. For example, if you have an element you want on each page (such as page numbering), you can create it on the master page. If you need to change an element on the master page, you can change it at any time, and your changes are reflected on every page that the master page is applied to. You access master pages in the Pages panel. (You find out more about master pages in Chapter 3 of this minibook.)
Master pages: You can define how certain text elements and graphics appear in an entire document (or just portions of it) by using a master page. It’s much like a template for your document because you can reuse elements throughout the pages. For example, if you have an element you want on each page (such as page numbering), you can create it on the master page. If you need to change an element on the master page, you can change it at any time, and your changes are reflected on every page that the master page is applied to. You access master pages in the Pages panel. (You find out more about master pages in Chapter 3 of this minibook.)
![]() Spread: A spread refers to a set of two or more pages that will be printed side by side. You usually see spreads in magazines and books when you open them — just like the book you’re holding now. If your document has only a single page — front and back, or with only one side — you will not see a spread in the InDesign document window. InDesign will display only the one page, or, for a two-sided page, both pages (if you reduce the magnification).
Spread: A spread refers to a set of two or more pages that will be printed side by side. You usually see spreads in magazines and books when you open them — just like the book you’re holding now. If your document has only a single page — front and back, or with only one side — you will not see a spread in the InDesign document window. InDesign will display only the one page, or, for a two-sided page, both pages (if you reduce the magnification).
![]() Pasteboard: The pasteboard is the area around the edge of a page. You can use the pasteboard to store objects until you’re ready to put them into your layout. Pasteboards aren’t shared between pages or spreads. For example, if you have certain elements placed on a pasteboard for pages 4 and 5, you can’t access these elements when you’re working on pages 8 and 9 — so each page or spread has its own pasteboard.
Pasteboard: The pasteboard is the area around the edge of a page. You can use the pasteboard to store objects until you’re ready to put them into your layout. Pasteboards aren’t shared between pages or spreads. For example, if you have certain elements placed on a pasteboard for pages 4 and 5, you can’t access these elements when you’re working on pages 8 and 9 — so each page or spread has its own pasteboard.
Tools
The Tools panel is where you find tools to edit, manipulate, or select elements in your document, as well as tools to make adjustments to pages. Simply use the cursor and click a tool to select it. See Figure 1-4 for the default Tools panel layout.
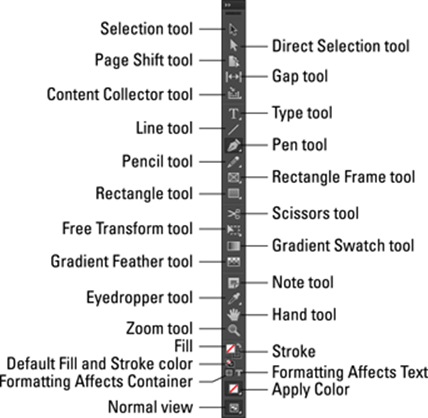
Figure 1-4:The Tools panel contains tools for creating, selecting, and editing elements and adjusting pages.
If you decide that a single row of tools just isn’t for you, you can go back to an older version’s Tools panel by clicking the two arrows in the gray bar at the top of the Tools panel. If you want to relocate the tools, click the bar at the top of the tools, under the double arrows, and drag the tools panel to a new location.
You find out more about these tools and how to use them in the related chapters of this minibook. For example, we discuss the drawing tools in Chapter 4 of this minibook.
With the tools in the Tools panel, you can do the following:
![]() Create stunning new content on a page using drawing, frame, and text tools.
Create stunning new content on a page using drawing, frame, and text tools.
![]() Select existing content on a page to move or edit.
Select existing content on a page to move or edit.
![]() View the page in different ways by moving (panning) and magnifying the page or spread.
View the page in different ways by moving (panning) and magnifying the page or spread.
![]() Edit existing objects, such as shapes, lines, and text. Use the Selection tool to select existing objects so that you can change them.
Edit existing objects, such as shapes, lines, and text. Use the Selection tool to select existing objects so that you can change them.
When a tool has a small arrow next to the button’s icon, more tools are hiding behind it. When you click the tool and hold down the mouse button, a menu opens that shows you other available tools. While pressing the mouse button, move the cursor to the tool you want and release the mouse button after it’s highlighted.
Menus
The menus on the main menu bar are used to access some of the main commands and control the user interface of InDesign. They also allow you to open and close panels used to edit and make settings for the publication.
InDesign menu commands such as New, Open, and Save are similar to most other applications you’re probably familiar with. The InDesign menus also include commands that are especially used for page layout, such as Insert with Placeholder Text. For more information on using menus, see Book I, Chapter 2. Remember to refer to the common commands and shortcuts that are also detailed in that chapter.
The InDesign main menu has the following options:
![]() File: This menu includes some of the basic commands to create, open, and save documents. It also includes the Place command to import new content and many options to control document settings, exporting documents, and printing.
File: This menu includes some of the basic commands to create, open, and save documents. It also includes the Place command to import new content and many options to control document settings, exporting documents, and printing.
![]() Edit: You can access many commands for editing and controlling selections in this menu — such as copying and keyboard shortcuts. The dictionary and spell checker are on this menu, too.
Edit: You can access many commands for editing and controlling selections in this menu — such as copying and keyboard shortcuts. The dictionary and spell checker are on this menu, too.
![]() Layout: Use this menu to create guides. These options help you lay elements on the page accurately and properly align them. Use the menu to navigate the document’s pages and spreads.
Layout: Use this menu to create guides. These options help you lay elements on the page accurately and properly align them. Use the menu to navigate the document’s pages and spreads.
![]() Type: From this menu, you can select fonts and control characters in the layout. You can access the many settings related to text from this menu, which opens the associated panel where you make the changes.
Type: From this menu, you can select fonts and control characters in the layout. You can access the many settings related to text from this menu, which opens the associated panel where you make the changes.
![]() Object: You can modify the look and placement of objects on the page with this menu. Which options are available on this menu depends on which element you’ve selected in the workspace, such as a text field or an image.
Object: You can modify the look and placement of objects on the page with this menu. Which options are available on this menu depends on which element you’ve selected in the workspace, such as a text field or an image.
![]() Table: Use this menu to create, set up, modify, and control tables on the page.
Table: Use this menu to create, set up, modify, and control tables on the page.
![]() View: You can modify the view of the page from this menu, including zooming in and out, as well as work with guides, rulers, or grids to help you lay out elements.
View: You can modify the view of the page from this menu, including zooming in and out, as well as work with guides, rulers, or grids to help you lay out elements.
![]() Window: Use this menu to open and close panels or switch between open documents.
Window: Use this menu to open and close panels or switch between open documents.
![]() Help: This menu is where you can access the Help documents for InDesign and configure any plug-ins you have installed.
Help: This menu is where you can access the Help documents for InDesign and configure any plug-ins you have installed.
Panels
In the default layout, you see a large area for the document. To the right of the document are several panels that snap to the edge of the workspace — panels that are attached to the edge of the workspace are considered docked. Panels are used to control the publication and edit elements on pages. Panels can be maximized, minimized, moved around, or closed altogether.
To expand a panel, you can simply click the panel name, and it expands. The panels you expand are automatically collapsed again when a different panel is selected.
If you’d rather work with all panels expanded, simply click the left-facing double arrows on the gray bar above the panels. You can collapse all the panels again by clicking the right-facing double arrows on the gray bar above the expanded panels.
Even though some InDesign panels perform different functions, similar panels are grouped together depending on what they’re used for. You can change the groupings by clicking and dragging a panel’s tab into another grouping.
Some panels change when you’re manipulating specific types of content on an InDesign page. Throughout Chapters 2 through 8 of this minibook, you discover these specific panels as you create layouts. For now, we briefly show you two general InDesign panels: Control and Pages.
Control panel
The Control panel, located across the top of the document window, is used to edit just about any element you have selected in InDesign, as shown for the Type tool in Figure 1-5. This panel is context sensitive, so it changes depending on which element you’ve selected on a page. For example, if you have selected text within a frame on the page, the Control panel displays options allowing you to edit the text. If you have a shape selected, the panel displays options allowing you to modify the shape.
![]()
Figure 1-5: The Control panel, when the Type tool is active.
Figure 1-6 shows the Control panel when a frame is selected using the Selection tool. The Control panel menu allows you to select options for the frame.
![]()
Figure 1-6: The Control panel, when a frame is selected using the Selection tool.
Pages panel
You can control pages by using the Pages panel, as shown in Figure 1-7. This panel allows you to arrange, add, and delete pages in your document. If you are creating electronic documents, you can also use the Pages panel for creating alternative layouts for vertical and horizontal displays on a tablet. You can also navigate among pages with this panel, which we discuss further in Chapter 3 of this minibook.
You can also add and delete pages by choosing Layout⇒Pages, and even use a keyboard shortcut to add pages, Ctrl+Shift+P (Windows) or ![]() +Shift+P (Mac).
+Shift+P (Mac).
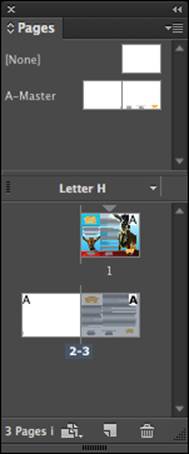
Figure 1-7: Use the Pages panel to add, delete, and move pages, as well as create alternative layouts for tablet displays.
 You can hide all open panels (including the Control panel) by pressing the Tab key; press Tab for them to return to view. In InDesign CC, you can leave tools and panels hidden and access them when you want by moving the cursor to the left or right side of the work area. Hover your cursor over the thin vertical gray bar on either side, and the tools or panels (depending on which side of the workspace you’re in) reappear! By the way, they go away again after you leave the area.
You can navigate the document’s pages by using the left- and right-arrow buttons on either side of the page number in the lower-left corner of the document window. You can also move to a specific page by entering a page number into the page field and pressing Enter/Return or by selecting the page from the drop-down list in the lower-left corner of the Document window.
Contextual menus
Contextual menus (or context menus) are menus that pop up when you right-click (Windows) or Control-click (Mac) the mouse. Contextual menus change depending on which element you click and which tool you’re using. If you have no elements selected, the contextual menu opens for the overall InDesign document, allowing you to select options such as Zoom, Paste, Rulers, and Guides. If you have an element selected, your options include transforming, modifying, and editing the object.
Contextual menus are context sensitive (hence the name!). Remember to select an element on the page before you right-click (Windows) or Control-click (Mac) to open the contextual menu. If you don’t select the object first, the menu that displays is for the document instead of for an object.
You can find out more about editing and transforming elements in Chapters 2 and 3 of this minibook.
Setting Up the Workspace
Workspace settings are important because they help you quickly create the type of layout you need. Overall document settings control elements such as grids or guides that help you align elements on the page. Neither guides nor grids print when you print or publish your document.
Showing and hiding grids and guides
Grids and guides are onscreen lines that help you with your layout but that, by default, don’t appear when printing. A document grid is applied across the entire document page area. Use the document grid when you need to divide a document into sections to achieve your intended design. You can have objects on a page align to the document grid, which helps you accurately line up or space objects on your page.
Another type of grid is the baseline grid, which runs horizontally across the page. Use the baseline grid to make sure that text in different columns is aligned, thus creating a cleaner page layout.
The document grid is used for aligning elements on the page, and the baseline grid is used for aligning the bottom of text across multiple columns.
![]() To show or hide the document grid, choose View⇒Grids & Guides⇒Show (or Hide) Document Grid.
To show or hide the document grid, choose View⇒Grids & Guides⇒Show (or Hide) Document Grid.
![]() To show or hide the baseline grid, choose View⇒Grids & Guides⇒Show (or Hide) Baseline Grid.
To show or hide the baseline grid, choose View⇒Grids & Guides⇒Show (or Hide) Baseline Grid.
You can immediately see the difference between these two kinds of grids.
Guides can be placed anywhere on the page (or pasteboard) and are used to accurately position objects in a layout. Unlike grids, guides are typically created individually. Use them to align specific objects — such as the tops of several images — that appear across a page. Objects can snap to guides just like they can snap to a grid.
To create a guide and show or hide guides, follow these steps:
1. Make sure that rulers are visible by choosing View⇒Show Rulers.
Rulers appear in the workspace. If you already have rulers visible, the option View⇒Hide Rulers is on the View menu. Don’t hide the rulers.
2. Move the cursor to a horizontal or vertical ruler.
Make sure that the cursor is over a ruler.
3. Click the ruler and drag the mouse toward the page.
A ruler guide shows on the page as a line.
4. Release the mouse where you want the guide.
You just created a ruler guide!
5. To hide the guide, choose View⇒Grids & Guides⇒Hide Guides.
This step hides the guide you created but doesn’t delete it. You can make the guide reappear easily in the next step.
6. To see the guide again, choose View⇒Grids & Guides⇒Show Guides.
The guide you created is shown on the page again.
You can edit the color of the ruler guide you created by positioning the mouse over it, clicking once to select it, and then right-clicking (Windows) or Control-clicking it (Mac) and selecting a new color from the Ruler Guides option.
You can find out more about the different kinds of guides and how to use them in page layout in Chapter 3 of this minibook.
You can also control the color of the guides and grid in your preferences. Access them by choosing Edit⇒Preferences⇒Grids (Windows) or InDesign⇒Preferences⇒Grids (Mac). When the Preferences dialog box opens, you can change the color and spacing of the lines. Click Guides & Pasteboards in the list on the left to change the color settings for guides.
Snapping to a grid or a guide
You can have elements on the page snap to a grid or a guide. Grid or guide snapping is useful so that you don’t have to eyeball the alignment of several elements to one another, because they’re precisely aligned to a grid or guide. To make sure that this setting is enabled, choose View⇒Grids & Guides⇒Snap to Document Grid or View⇒Grids & Guides⇒Snap to Guides. If these options are already selected, clicking them will turn them off.
Using Smart Guides
Give yourself an added hand when aligning objects on the InDesign page with Smart Guides. Illustrator and Photoshop users may be familiar with these interactive guides, but if you’re not, read on to discover how you can take advantage of them.
You can experiment with this capability by creating two objects in an InDesign document. It doesn’t matter which object or shape — any will do!
With the Selection tool, click and slowly drag one object in a circular motion around the other. You’ll notice guides appear and disappear, indicating when the objects are aligned on the top, center, or bottom of the other object, as shown in Figure 1-8.
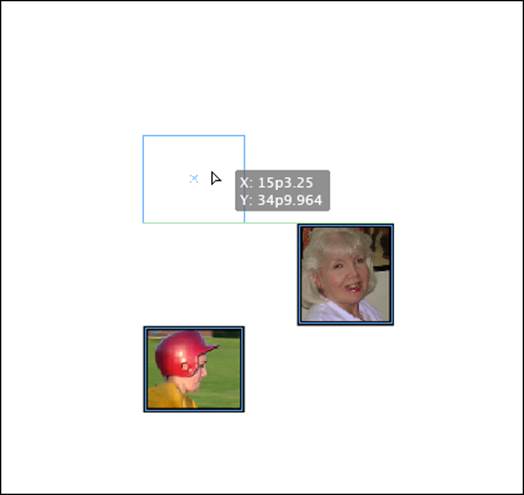
Figure 1-8: Click and drag one shape around another to see the interaction with Smart Guides.
As a default, pink guides appear when you align an object with the center of the page, as shown in Figure 1-9.
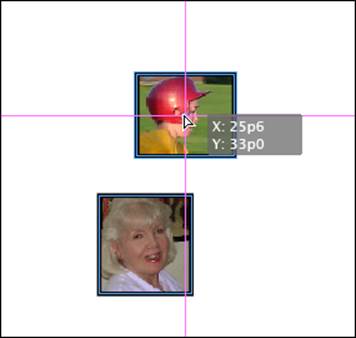
Figure 1-9: Know when your object is at the exact center of the page when a guide cross hair appears.
 You can see a print preview of your document by clicking the Preview Mode button at the bottom of the Tools panel. When you click this button, all object bounding boxes, guides, and the grid disappear.
Customizing menus
InDesign has many menus and many choices under each menu. It’s likely you’ll need to use only some of these menu choices. If you discover that you’re wading through many menu items to find the items you need, you can customize InDesign to hide menu items you don’t use.
To customize your InDesign menus, follow these steps:
1. Choose Edit⇒Menus.
The Menu Customization window opens.
2. In the Application Menu Command column, click the triangle next to the menu(s) you want to customize.
For example, if you never expect to import XML, which is located under the File menu, click the triangle to the left of the File menu to display this menu item.
3. Click the eye icon next to the menu item that you want to hide.
Or if you want to highlight a menu item, click the color column to the right of the eye icon to add a color to the menu choice.
4. Click the Save As button at the top of the window to save the menu customization set. Enter a name for your customized menu set, click OK to save the name, and then click OK again to close the Menu Customization window.
The customized menus are saved. To return to the original default menus, or to further customize the menus, choose Edit⇒Menus at any time you’re using InDesign.
Customizing the interface appearance
InDesign lets you adjust the overall appearance of the workspace to customize the color theme. You can set exactly how dark or light you would like the panels and pasteboard to be, or select between several predefined settings.
To customize the InDesign interface appearance, follow these steps:
1. Choose Edit⇒Preferences⇒Interface (Windows) or InDesign⇒Preferences⇒Interface (Mac).
The Preferences window opens, with the Interface category active. The Appearance section at the top of this window is where you adjust settings that affect the user interface appearance.
2. In the Appearance section, adjust the color theme for the user interface and pasteboard.
The default setting is Medium Dark, and you can switch between each setting and InDesign will preview your selection. Alternatively, you can enter a custom percentage setting to fine-tune the brightness setting.
3. Select or deselect Match Pasteboard to Theme Color.
The option is selected by default, which means the pasteboard (the area around your document) is a darker shade. Deselect this option if you prefer a white pasteboard.
4. Click OK to apply your changes.
The workspace appearance updates.
Saving a custom workspace
You’ve seen that InDesign has a number of panels. If you find that you’re using some panels more than others, you can have InDesign remember the grouping of panels you use most frequently, including which ones are visible and which ones are hidden. InDesign calls this a workspace.The next time you want a certain group of panels open together, you can return to the workspace you previously saved. The workspace isn’t attached to a particular document, so you can have one workspace for editing text and another for working with a layout.
To save a custom workspace, follow these steps:
1. Have the InDesign workspace configured in the way you want to save it — with any panels open that you might want to access together.
The open panels will be saved as a custom workspace.
2. Choose Window⇒Workspace⇒New Workspace.
The New Workspace dialog box opens.
3. Choose whether to save the panel menu locations or any menus that have been customized. Type a new name for the workspace in the Name text field.
Enter a name that reflects the type of work you do in that workspace, such as text editing or layout.
4. Click OK.
The custom workspace is saved. The name you entered for your workspace is displayed on the Workspaces menu.
To access your workspace, choose Window⇒Workspace⇒Your Workspace (where Your Workspace is the name you gave the workspace in Step 3).
You can delete the workspace if you no longer want it saved. Simply choose Window⇒Workspace⇒Delete Workspace.
Working with Documents
After you’re comfortable getting around the InDesign workspace, you’re ready to begin working with a new document. After you’ve started working on a document, you should find out how to import content from other programs and to save that document on your hard drive. A lot of the content you use when creating layouts with InDesign is imported from other programs — both Creative Cloud applications like Photoshop and Illustrator, and non-Creative Cloud applications like Microsoft Word and Excel. You use InDesign to organize, modify, and integrate text and graphics into a layout. To begin, we show you the steps needed to import content and save new files.
We show you how to open new and existing documents earlier in this chapter, in the sections Creating a new publication and Opening an existing publication.
 You may also be working with a template, which is a layout you reuse by applying it to a document that requires a particular predesigned format. For example, a company may use a template for its official letterhead because every new letter requires the same page format and design. InDesign templates use the .indt file extension.
Importing new content
You can use many different kinds of content in an InDesign document because you can import many supported file types. You can import text, formatted tables, and graphics that help you create an effective layout. This capability makes integration with many different programs easy.
Follow these steps to import an image file into InDesign (in this example, we import a bitmap graphic file):
1. Choose File⇒New⇒Document.
The New Document dialog box appears.
2. Review the settings, make any changes depending upon the size and type of document you want to create, and then click OK.
A new document opens. Feel free to alter the settings to change the number of pages, page size, and intent before clicking OK.
3. Choose File⇒Place.
The Place dialog box opens, enabling you to browse the contents of your hard drive for supported files. If you were to select the Show Import Options check box, another dialog box opens before the file imports. Leave this option deselected for now.
4. Click the file you want to import, and then click Open.
Certain files, such as bitmap photo, graphic, and PDF files, show a thumbnail preview at the bottom or to the right of the dialog box.
When you click Open, the Place dialog box closes, and the cursor becomes an upside-down L.
5. Click the location on the page where you want the upper-left corner of the imported file (for example, an image) to appear.
The imported file is placed on the page.
 Click and drag to place the file into a specific frame size, or if you’ve created an empty frame on the page, clicking on top of the frame causes the object being imported — whether it’s text or an image — to be placed inside the frame.
You can Ctrl-click (Windows) or ![]() -click (Mac) to place multiple files. After you select the images and click OK, each click places an image on the page, or you can hold down the Shift+Ctrl (Windows) or Shift+
-click (Mac) to place multiple files. After you select the images and click OK, each click places an image on the page, or you can hold down the Shift+Ctrl (Windows) or Shift+![]() (Mac) while dragging a rectangle to have all selected images placed, spaced evenly, in a grid.
(Mac) while dragging a rectangle to have all selected images placed, spaced evenly, in a grid.
Note that when you’re placing multiple images, you can see a thumbnail of each image before it’s placed. You can also scroll through the loaded images by pressing the arrow keys on your keyboard.
For general information about importing and exporting using the Adobe Creative Cloud, check out Book I, Chapter 5. For more information on importing different kinds of file formats, such as text, images, spreadsheets, and PDFs, see Chapters 2 and 3 in this minibook.
Viewing content
You can view elements in several different ways on your document’s pages. For example, sometimes you need to see objects on a page close up so that you can make precise edits. InDesign offers several ways to navigate documents:
![]() Scroll bars: You can use the scroll bars to move pages around. The scroll bars are located below and to the right of the pasteboard. Click a scroll bar handle and drag it left and right or up and down.
Scroll bars: You can use the scroll bars to move pages around. The scroll bars are located below and to the right of the pasteboard. Click a scroll bar handle and drag it left and right or up and down.
![]() Zoom: Zoom in or out from the document to increase or decrease the display of your document. Select the Zoom tool (the magnifying glass icon) from the Tools panel and click anywhere on the page to zoom in. Press the Alt (Windows) or Option (Mac) key and click to zoom out.
Zoom: Zoom in or out from the document to increase or decrease the display of your document. Select the Zoom tool (the magnifying glass icon) from the Tools panel and click anywhere on the page to zoom in. Press the Alt (Windows) or Option (Mac) key and click to zoom out.
![]() Hand tool: Use the Hand tool to move the page around. This tool is perhaps the best and quickest way to move pages around and navigate documents. Select the Hand tool by pressing the spacebar (when using any tool other than the Type tool), and then click and drag to move around the pasteboard.
Hand tool: Use the Hand tool to move the page around. This tool is perhaps the best and quickest way to move pages around and navigate documents. Select the Hand tool by pressing the spacebar (when using any tool other than the Type tool), and then click and drag to move around the pasteboard.
![]() Keyboard: Press Ctrl++ (plus sign) (Windows) or
Keyboard: Press Ctrl++ (plus sign) (Windows) or ![]() ++ (plus sign) (Mac) to zoom in using the keyboard; replace the plus sign with the minus sign to zoom out.
++ (plus sign) (Mac) to zoom in using the keyboard; replace the plus sign with the minus sign to zoom out.
Saving your publication
Even the best computers and applications fail from time to time, so you don’t want to lose your hard work unnecessarily. Saving a publication often is important so that you don’t lose any work if your computer or software crashes or the power goes out.
To save a file, choose File⇒Save or press Ctrl+S (Windows) or ![]() +S (Mac).
+S (Mac).
You may also want to save different versions of your files. You may want to do this if you’re experimenting with different design options, for example, and you want to retain earlier versions of your files. To do this, use the Save As command, which makes creating different versions of documents easy.
 Choose File⇒Save before proceeding if you want the current document to save the revisions you’ve made since you last saved the file. All new additions to the document are made in the new version of the file.
To save a new version of the current document and then continue working on the new document, follow these steps:
1. Choose File⇒Save As.
The Save As dialog box opens.
2. Choose the directory you want to save the file in.
3. In the File Name text field, enter a new name for the document.
This step saves a new version of the file. Consider a naming scheme at this point. If your file is myLayout.indd, you might call it myLayout02.indd to signify the second version of the file. Future files can then increase the number for each new version.
4. Click the Save button when you’re finished.
This step saves the document in the chosen directory with a new name.
The File⇒Save As command is also used for other means. You may want to save your design as a template. After you create the template, choose File⇒Save As, and then choose InDesign CC Template from the Save As Type (Windows) or Format (Mac) drop-down list.
You can also choose File⇒Save a Copy. This command saves with a new name a copy of the current state of the document you’re working on, but you then continue working on the original document. Both commands are useful for saving incremental versions of a project you’re working on.
To find out more about working with files, go to Chapter 7 of this minibook.
All materials on the site are licensed Creative Commons Attribution-Sharealike 3.0 Unported CC BY-SA 3.0 & GNU Free Documentation License (GFDL)
If you are the copyright holder of any material contained on our site and intend to remove it, please contact our site administrator for approval.
© 2016-2026 All site design rights belong to S.Y.A.