Adobe Creative Suite 6 Design and Web Premium All-in-One For Dummies (2012)
Book I
Adobe Creative Suite 6 Basics
Chapter 5: Importing and Exporting
In This Chapter
![]() Integrating Adobe Bridge into your workflow
Integrating Adobe Bridge into your workflow
![]() Importing content
Importing content
![]() Moving files from one CS6 application to another
Moving files from one CS6 application to another
![]() Exporting content out of your documents
Exporting content out of your documents
![]() Exporting content from CS6 programs
Exporting content from CS6 programs
Because the Creative Suite is such an integrated tool, you’ll almost always be in the process of cutting, pasting, importing and exporting content from one application to another.
Content that you might import and export include images, text, word files, 3D objects, and more. You may find that you need to go through the process of exporting files in order for them to be recognized by other applications. Non-Adobe applications will even recognize your files from the Creative Suite applications if you save them in the right format. In this chapter, you find out how to get your files in and out of your various applications, starting with a separate application that comes with the Creative Suite, named Adobe Bridge.
Discovering the Adobe Bridge Application
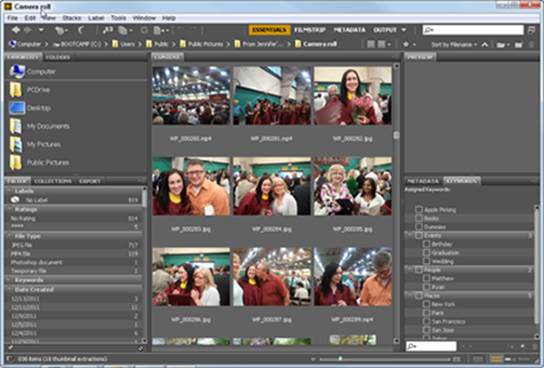
The Adobe Bridge application helps you organize and manage your assets, such as pictures, text, and movie and audio files, as well as non-Adobe applications such as Word or Excel files. Adobe Bridge acts like a hub for the Creative Suite; for example, by choosing to open files using the Bridge interface, you can browse directories quickly and see thumbnail previews of files, as shown in Figure 5-1. You can even use the Filter panel to help find files and view metadata to your file, including important information such as keywords and copyright details.
Figure 5-1: The Adobe Bridge workspace.
Bridge not only makes a great deal of information accessible, but it can also be used as a central resource for all your Help needs.
 If you installed the Adobe programs separately (not using the Creative Suite installer), the program on your machine may be lacking some features. If you notice that you don’t have access to features mentioned in this chapter, check to see whether all the CS6 applications are installed or run the CS6 installer again.
Accessing the Bridge software
Knowing where to locate the Adobe Bridge application is helpful. Bridge should already be in your system if you completed a standard installation of any product in the entire suite. If you don’t find Adobe Bridge installed, go back and choose to install it using your original installation media. After you install the Bridge software, you can open it in one of three ways:
![]() Access the Bridge software with the directory system of your computer. Navigate to C:\Program Files\Adobe\Adobe Bridge CS6\Adobe Bridge CS6 (Windows) or Hard Drive\Applications\Adobe Bridge CS6\Adobe Bridge CS6 (Mac).
Access the Bridge software with the directory system of your computer. Navigate to C:\Program Files\Adobe\Adobe Bridge CS6\Adobe Bridge CS6 (Windows) or Hard Drive\Applications\Adobe Bridge CS6\Adobe Bridge CS6 (Mac).
![]() Depending upon the application, you can click the Go to Bridge button on the Application bar. (The Application bar in InDesign is shown in Figure 5-2.)
Depending upon the application, you can click the Go to Bridge button on the Application bar. (The Application bar in InDesign is shown in Figure 5-2.)
Figure 5-2: To open Bridge, click the Go to Bridge button.

![]() If you don’t see the Go to Bridge icon, you can choose File⇒Browse in Bridge. Launch into Bridge from any of the applications included in the Creative Suite.
If you don’t see the Go to Bridge icon, you can choose File⇒Browse in Bridge. Launch into Bridge from any of the applications included in the Creative Suite.
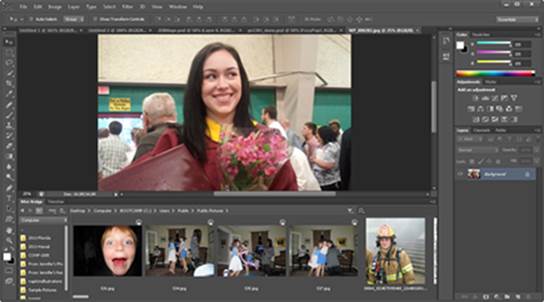
![]() In Photoshop, you can choose Window⇒Extensions⇒Mini Bridge to open the Mini Bridge panel across the bottom of the default Essentials workspace. Mini Bridge is essentially a miniature version of Adobe Bridge, as shown in Figure 5-3.
In Photoshop, you can choose Window⇒Extensions⇒Mini Bridge to open the Mini Bridge panel across the bottom of the default Essentials workspace. Mini Bridge is essentially a miniature version of Adobe Bridge, as shown in Figure 5-3.
Figure 5-3:Open the Mini Bridge application in Photoshop CS6.
Navigating in Adobe Bridge
To navigate Bridge, simply click on the Folders panel in the upper-left corner to choose the folder you want to view. Watch as previews are created and automatically replace the standard file format icon.
 Adobe Bridge may take a fair amount of time to build the preview the first time you use it, so be patient. Either choose Tools⇒Cache⇒Build and Export Cache to save this data or choose Tools⇒Cache⇒Purge Cache to free up file space.
Select an individual file by clicking it once (twice opens it) or select multiple files by Ctrl-clicking (Windows) or ![]() -clicking (Mac).
-clicking (Mac).
With one or more files selected, you can
![]() Relocate the files to another location by dragging them to a folder in the Folders panel in the upper-left corner. Use Bridge as a central filing system. Using the commands on the File menu, you can create new folders and delete or move files or groups of files.
Relocate the files to another location by dragging them to a folder in the Folders panel in the upper-left corner. Use Bridge as a central filing system. Using the commands on the File menu, you can create new folders and delete or move files or groups of files.
![]() Read metadata in the Metadata panel in the lower-right corner. The metadata includes important Camera Data (EXIF) information such as Camera, Flash, and F-stop. See Figure 5-4.
Read metadata in the Metadata panel in the lower-right corner. The metadata includes important Camera Data (EXIF) information such as Camera, Flash, and F-stop. See Figure 5-4.
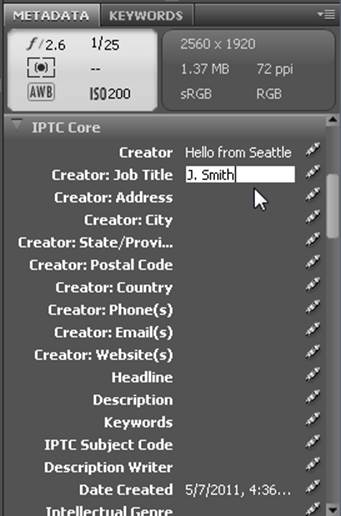
![]() Enter your own metadata for any item listed by clicking the pencil icon, shown in Figure 5-5.
Enter your own metadata for any item listed by clicking the pencil icon, shown in Figure 5-5.
Figure 5-4:Use the Metadata panel to find important information about your selected image.
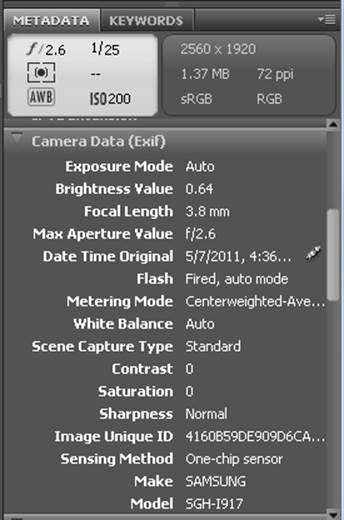
Figure 5-5:Look for the pencil icon to determine which metadata you can edit yourself.
![]() Use the Keywords panel, shown in Figure 5-6, to enter your own keywords, which can help you find your images later.
Use the Keywords panel, shown in Figure 5-6, to enter your own keywords, which can help you find your images later.
![]() Choose Edit⇒Find or use the Filter panel to locate your files within Bridge by entering criteria, such as Keywords, Description, Date Created, and more.
Choose Edit⇒Find or use the Filter panel to locate your files within Bridge by entering criteria, such as Keywords, Description, Date Created, and more.
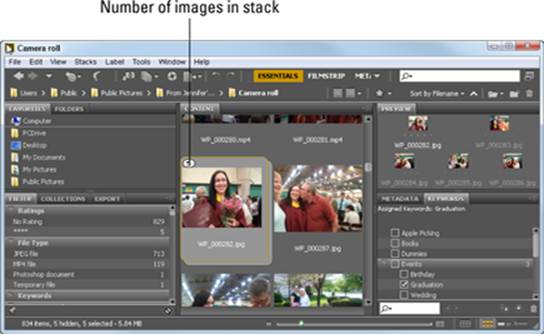
![]() Create image stacks. You can select many files in Bridge by holding down the Ctrl key (Windows) or
Create image stacks. You can select many files in Bridge by holding down the Ctrl key (Windows) or ![]() key (Mac) and clicking multiple files. You can then choose Stacks⇒Group as Stack or use the keyboard shortcut Ctrl+G (Windows) or
key (Mac) and clicking multiple files. You can then choose Stacks⇒Group as Stack or use the keyboard shortcut Ctrl+G (Windows) or ![]() +G (Mac). It stacks the images into one compact thumbnail, as shown in Figure 5-7.
+G (Mac). It stacks the images into one compact thumbnail, as shown in Figure 5-7.
The number of images in the stack is shown in the upper-left corner of the image stack. To reopen the stack, click the stack number; to close the stack, click the stack number again. If you no longer want the stack, you can choose Stacks⇒Ungroup from Stack or use the keyboard shortcut Ctrl+Shift+G (Windows) or ![]() +Shift+G (Mac).
+Shift+G (Mac).
![]() Check under the Tools menu for application-specific tools, such as Photomerge (merging panoramic images), Live Trace (tracing images as vector images), and PDF Presentation.
Check under the Tools menu for application-specific tools, such as Photomerge (merging panoramic images), Live Trace (tracing images as vector images), and PDF Presentation.
Figure 5-6: The Keywords panel can help you locate images.
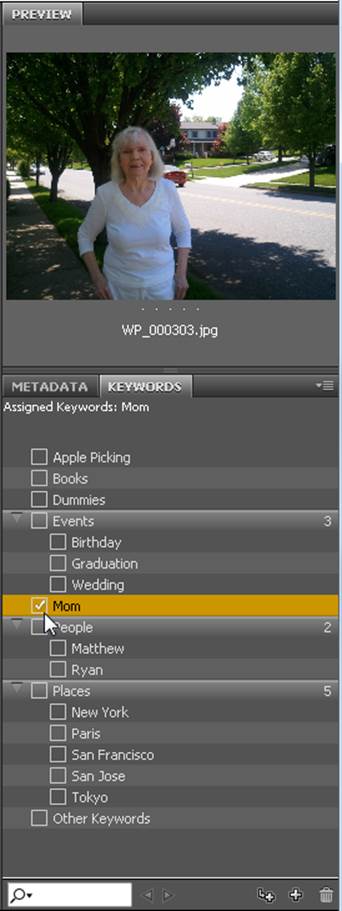
Figure 5-7:Stack similar images to help keep files organized.
Managing color
Using Bridge for color management is a timesaver and a production boost! You can adjust color settings across the board in all Creative Suite applications right in Adobe Bridge. Create consistent color choices in all Creative Suite applications by using the synchronized color-management controls that Adobe Bridge offers.
Choose Edit⇒Creative Suite Color Settings to choose a color management setting that remains consistent throughout all Creative Suite applications, as shown in Figure 5-8. Read more about color correction in Book IV, Chapter 7.
Figure 5-8:Use color settings to synchronize color management policies in Adobe Bridge.
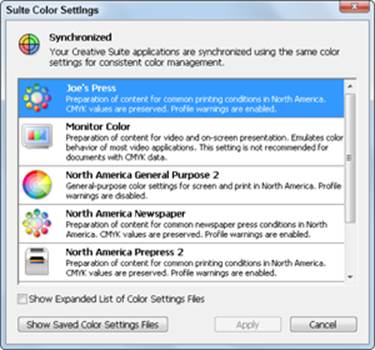
The setting for Joe’s Press, shown in Figure 5-7, was created in Adobe Photoshop. If your printer can send you the Joe’s Press color settings, you can load them using the Suite Color Settings dialog box in Photoshop and then make them accessible to all your CS5 applications by selecting the settings in Adobe Bridge.
Importing Files into a Document
Importing files works similarly, no matter which program you’re working with. Importing content is more important in some programs than others. A program such as InDesign relies on importing content into a document that’s then incorporated into a page layout. However, in programs such as Photoshop, importing content is much less important because you frequently start out editing an image you open in Photoshop. In the following sections, we take a look at importing content into each program.
Placing content in InDesign
When working in InDesign, you need to import images and text for many of your design layouts. When you choose File⇒Place, you can select text or image files from your hard drive or network. You can also choose sound and video files that you can use when you’re creating PDF documents for electronic distribution. After you choose a file to import, a new cursor icon appears, with a thumbnail preview of your image. This preview shows up when you place the cursor over the page or pasteboard. Place the imported content by clicking on the page where you want the upper-left corner of the image to be positioned.
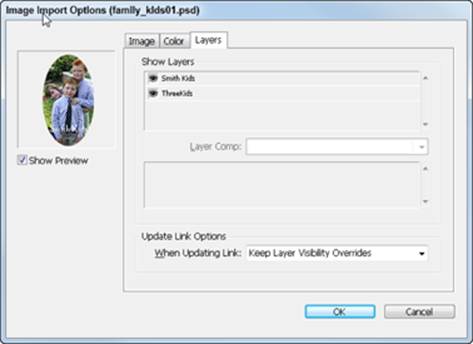
When you import different kinds of images, you see the Place dialog box, in which you can select a variety of options for importing selected content. However, to access additional settings, you must select the Show Import Options check box in the Place dialog box. In Figure 5-9, you see the additional options that appear when an image is placed.
Choose File⇒Place and select a file to import. Select the Show Import Options check box and click the Open button. The Image Import Options dialog box appears with options specific to the type of file you’re importing. For example, if you’re importing a bitmap image (say, a JPEG), you can choose how you want the bitmap to appear, whether it contains a background or color management information, and other, similar options.
When you import text information, you may lose some text formatting that was made in the original file. Anything that InDesign doesn’t understand isn’t imported into the document. Column and margin information also typically aren’t retained when you import text. However, some plug-ins that are available help remedy the situation to some extent.
Figure 5-9:When importing text and graphics, you can see additional options.
You can use the Launch Bridge button in the center of the Application bar in InDesign to open Adobe Bridge. Then simply drag and drop the images you want to use directly from Bridge.
Adding content to a Photoshop file
In Photoshop, you can choose to open an image to work with or import content into a document that’s open already. Choose File⇒Place to import AI, EPS, PDP, or PDF files. These files import into a new layer in the document, and you can then use tools to manipulate the imported content, as shown in Figure 5-10.
Figure 5-10:Imported content is placed on a new layer.

Your placed Illustrator file is embedded, by default, into the Photoshop file. (You can read about the Smart Object feature in Book IV, Chapter 9.) Double-click the placed artwork layer to open and edit the embedded Illustrator file. After you save the file, the changes are immediately reflected in Photoshop. Note that your original file isn’t changed.
If you want to import images from your digital camera directly into Adobe Bridge, choose File⇒Get Photos from Camera.
Placing files into Illustrator
Illustrator lets you place images and other forms of data in a new document. You can import Photoshop, PDF, image, and vector files by choosing File⇒Place. The Place dialog box opens, and you can choose a file to import. Click Place to import the file. An Import dialog box may appear at this point, depending on the type of file you’re importing. This dialog box offers several options for choosing a way to import the content into Illustrator. For example, you can sometimes choose between flattening layers or retaining layers when you import a file containing layers.
Encapsulated PostScript (EPS) is a commonly used file format for saving vector drawings (although it can be used for other file types as well). Because this file format is used in many programs, you may find other people giving you these files to work with. To import an EPS document, you also choose File⇒Place; after you import an EPS document into Illustrator, the file is converted to Illustrator objects but isn’t editable. To edit the EPS object, choose File⇒Open to open the file, or click the Edit Original button in the Links panel.
You can also import text files into Illustrator. Microsoft Word, TXT (text only), RTF (Rich Text Format), and Unicode, among other text documents, are all supported by Illustrator, and you can import them by choosing File⇒Place. When you import the text file, you may be prompted to choose the character set used for the text.
You can not only use the Place command for importing files but also copy and paste from other programs. You can select part of an image in Photoshop and copy it to the Clipboard by pressing Ctrl+C (Windows) or ![]() +C (Mac) and then pasting it into the Illustrator document.
+C (Mac) and then pasting it into the Illustrator document.
Use the Place command whenever possible to avoid losing quality in the content you’re importing. Also, transparency isn’t supported from one application to another when you copy and paste, but it is when you use Place.
 When you have particular plug-ins installed, you can import additional file types, such as CAD files, into Illustrator.
Adding to Acrobat
Adobe Acrobat is primarily a tool for sharing completed documents — you’ll complete most document construction and editing in other programs, such as InDesign or Illustrator. However, you can import several kinds of data into PDF documents, and you can do some creative things when you place data into PDF files as well:
![]() Comments: The most useful and common items to import into an Adobe PDF file are comments made using the review and markup tools provided by Adobe Acrobat. By importing comments into a PDF file, you can consolidate suggestions and input from several reviewers(people editing a document) into a single document. This feature makes the reviewing process easier when many people are working on a single document. To import someone’s comments into a PDF, select the Comments button, and then from the Comments List section click on the panel menu in the upper-right corner and select Import Data File. When the Import Comments dialog box appears, locate the comments file that you want to Import and click Open.
Comments: The most useful and common items to import into an Adobe PDF file are comments made using the review and markup tools provided by Adobe Acrobat. By importing comments into a PDF file, you can consolidate suggestions and input from several reviewers(people editing a document) into a single document. This feature makes the reviewing process easier when many people are working on a single document. To import someone’s comments into a PDF, select the Comments button, and then from the Comments List section click on the panel menu in the upper-right corner and select Import Data File. When the Import Comments dialog box appears, locate the comments file that you want to Import and click Open.
If you’re reviewing a document, you can also export select Export All to Data File from the Comments panel menu to export only the comments rather than send the document owner the entire PDF file.
![]() Form data: You can import form data into a PDF document by clicking on the Tools button, selecting Forms, and then selecting More Form Options⇒Manage Form Data⇒Import Data. The data you import can be generated by exporting the form data from another PDF form, or it can come from a delimited text file. You can then share form data between forms or from a database.
Form data: You can import form data into a PDF document by clicking on the Tools button, selecting Forms, and then selecting More Form Options⇒Manage Form Data⇒Import Data. The data you import can be generated by exporting the form data from another PDF form, or it can come from a delimited text file. You can then share form data between forms or from a database.
![]() Trusted identities: If you share digitally signed files or secured files with another Acrobat user, you can import the public version of that person’s signature file into your list of trusted users with whom you share files. To import the identity of a user, choose Tools⇒Sign & Certify⇒More Sign & Certify⇒Manage Trusted Identities, and in the Manage Trusted Identities dialog box that appears, click the Add Contacts button.
Trusted identities: If you share digitally signed files or secured files with another Acrobat user, you can import the public version of that person’s signature file into your list of trusted users with whom you share files. To import the identity of a user, choose Tools⇒Sign & Certify⇒More Sign & Certify⇒Manage Trusted Identities, and in the Manage Trusted Identities dialog box that appears, click the Add Contacts button.
![]() Multimedia files: If you’ve ever had the urge to add a movie or sound file to your PDF documents, you’re in luck. By selecting Tools⇒Content⇒Add or Edit Interactive Object⇒Multimedia, you can identify the location on the page where you want the file to appear and then choose whether to embed the multimedia file (compatible with Acrobat 6 or later) or create a link to the file (compatible with Acrobat 5 and earlier).
Multimedia files: If you’ve ever had the urge to add a movie or sound file to your PDF documents, you’re in luck. By selecting Tools⇒Content⇒Add or Edit Interactive Object⇒Multimedia, you can identify the location on the page where you want the file to appear and then choose whether to embed the multimedia file (compatible with Acrobat 6 or later) or create a link to the file (compatible with Acrobat 5 and earlier).
![]() Buttons: Creating buttons to turn pages, print a document, or go to a website makes your PDF files easier to use. Adding custom button images, such as pictures of arrows or a printer icon, makes your document unique. Use the Button tool, located by clicking on Tools⇒Content⇒Button to create the location of the button and then select the graphic file to be used as the image on the button. The image file you use must first be converted to a PDF graphic.
Buttons: Creating buttons to turn pages, print a document, or go to a website makes your PDF files easier to use. Adding custom button images, such as pictures of arrows or a printer icon, makes your document unique. Use the Button tool, located by clicking on Tools⇒Content⇒Button to create the location of the button and then select the graphic file to be used as the image on the button. The image file you use must first be converted to a PDF graphic.
![]() Preflight information: If you’re creating a PDF file to be sent to a commercial printer for reproduction, you may want to preflight the file to ensure that it meets the specifications and needs of the printer and has all the necessary assets (such as fonts and images) that it needs to print correctly. If your printer has supplied a preflight profile for Acrobat, you can import the profile to ensure that Acrobat checks for the elements your printer has requested, such as certain font types or color specifications. Import a preflight profile by choosing Tools⇒Print Production⇒In the Preflight window that opens, choose Options⇒Import Preflight Profile. If you do not see the Production Tools panel, choose View⇒Tools⇒Print Production, and select Preflight from the list of production tools.
Preflight information: If you’re creating a PDF file to be sent to a commercial printer for reproduction, you may want to preflight the file to ensure that it meets the specifications and needs of the printer and has all the necessary assets (such as fonts and images) that it needs to print correctly. If your printer has supplied a preflight profile for Acrobat, you can import the profile to ensure that Acrobat checks for the elements your printer has requested, such as certain font types or color specifications. Import a preflight profile by choosing Tools⇒Print Production⇒In the Preflight window that opens, choose Options⇒Import Preflight Profile. If you do not see the Production Tools panel, choose View⇒Tools⇒Print Production, and select Preflight from the list of production tools.
Importing into Dreamweaver
In Dreamweaver, you can import several different kinds of files into a site you’re creating:
![]() Insert images and other media such as Flash, FlashPaper, and Flash Video by using the Insert menu item.
Insert images and other media such as Flash, FlashPaper, and Flash Video by using the Insert menu item.
![]() Import XML files and XHTML documents exported from InDesign.
Import XML files and XHTML documents exported from InDesign.
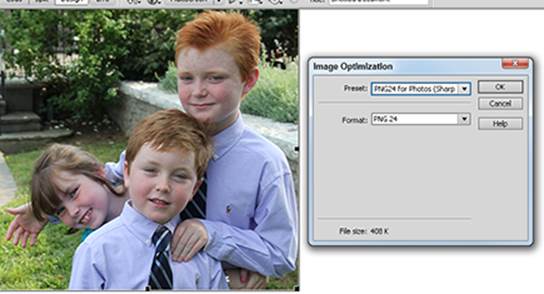
![]() Cut and paste a layered file in Photoshop. Simply choose Edit⇒Copy Merged and paste the file directly into Dreamweaver. An Image Preview window opens (see Figure 5-11), and you can then optimize the image for the web. Choose your settings and click OK. (You can read about the best settings for web imagery in Book IV, Chapter 10.)
Cut and paste a layered file in Photoshop. Simply choose Edit⇒Copy Merged and paste the file directly into Dreamweaver. An Image Preview window opens (see Figure 5-11), and you can then optimize the image for the web. Choose your settings and click OK. (You can read about the best settings for web imagery in Book IV, Chapter 10.)
Figure 5-11:The Image Preview window opens when a native PSD file is pasted into a Dream-weaver page.
Exporting Your Documents
Exporting content from Adobe Creative Suite documents is important if you’re transferring content into other programs, placing the document where it’s publicly available and where it needs to be opened on other computers. Adobe Creative Suite offers you the flexibility of allowing you to export a document as many different file formats.
Other programs sometimes accept native Adobe documents as files you can import. For example, Adobe Flash CS6 can import Illustrator AI files, Photoshop PSD files, and PDF documents.
Exporting from InDesign
In InDesign, you can export pages or a book as several file types. Most notably, you can export layouts as PDF documents, which anyone who has the free Adobe Reader installed can view. InDesign can also export to other image and vector formats, such as EPS and JPEG. An InDesign document can also export to SVG (Scalable Vector Graphics) and XML (Extensible Markup Language), which is useful when you export documents for the web. InDesign has a handy feature to package your work for Dreamweaver: By choosing File⇒Export for Dreamweaver, you can export a project you’re working on and have it ready for page creation in Dreamweaver.
If you select File⇒Export and take a look at the Save as Type drop-down list, you’ll see a large amount of export selections available, including EPub and HTML5 options. Check out Chapter 8 of Book II to find out more about these features.
Exporting content from Photoshop
If you’re working in the creative field, you’ll export many files from Adobe Photoshop, from simple .png or .jpg files to more complex sliced images that are exported with HTML and CSS content. If you’re interested in 3D and video, you’ll be happy to know that you can export to a wide range of video and 3D formats as well. In this brief overview, we discuss a few such formats. However, make sure that you refer to Book IV for more complete instructions.
Keep in mind that if you’re working within the Creative Suite applications then you’ll most likely not need to export any content, because most of the applications recognize the native .psd format. For instance, paths and masks in a Photoshop Document can be read in both InDesign and Illustrator.
Here’s another interesting export option, one that takes advantage of Flash in a browser: Export your Photoshop file by using the Zoomify feature. This useful feature can export a large file to a smaller, more compact SWF file. This file can be easily sent by e-mail and opened using the free Flash Player, which almost everyone already has installed.
To use Zoomify, follow these steps:
1. Choose File⇒Export⇒Zoomify.
2. Click Folder in the Output Location section of the Zoomify dialog box and choose a folder location for your SWF file.
3. Choose the quality and size and then click OK.
The Zoomify Preview window appears. (See Figure 5-12.) Use this window to zoom in to see detail.
You can then retrieve the files that were created in your destination folder and post them online or attach them to an e-mail message.
Figure 5-12:The image before it rebuilds after zooming in, and the image after it rebuilds.

Exporting Illustrator files
Illustrator supports exporting to many different file formats. You can export files in a long list of image formats. Choose File⇒Export, and the Export dialog box opens. Click the Save As Type (Windows) or Format (Mac) drop-down list to view the exportable file formats.
After you choose a file type to export to, a second dialog box may appear, allowing you to enter a bunch of settings for the exported file.
Try choosing the Flash SWF file format when you export a file. A second dialog box opens that includes many settings, such as options to generate an HTML page, save each layer as a separate SWF document, and preserve editability (when possible). The options that are available when you export a document depend on the type of file format to which you’re exporting.
Exporting Acrobat content
Acrobat lets you export certain parts of a PDF document you’re working on. For example, you may be using form data — the data that’s filled into a form made of text fields and so on — in one of your files. You can export this data from Acrobat and then send it online, which is helpful because PDF documents tend to be rather large for the web. Therefore, only a small amount of formatted data is sent online, not a huge PDF file.
You can also export parts of an Acrobat document to use in other programs. You can export comments in a PDF to a Microsoft Word file that was used to create the PDF by selecting the Comments button, clicking on the Comments panel menu, and then selecting Export to Word. You can also export comments to an AutoCAD file (assuming that it was used to create the PDF). In both cases, you need the original document that was used to generate the PDF file in order to successfully import the comments.
Exporting Dreamweaver content
In Dreamweaver, you can export your sites so that they’re prepared for publishing and ready to be placed on a live website. The site you’re working on in Dreamweaver is exported to your hard drive before you put it somewhere on a server. The HTML styles used in a site you’re working on can be exported and saved as an XML document, which in turn can be reused if necessary. These files can then be imported into another Dreamweaver project you’re working on. You can also take advantage of File⇒Convert, which provides options so that you can convert your Dreamweaver file into other versions of HTML. Find out more about Dreamweaver in the Book 6.
All materials on the site are licensed Creative Commons Attribution-Sharealike 3.0 Unported CC BY-SA 3.0 & GNU Free Documentation License (GFDL)
If you are the copyright holder of any material contained on our site and intend to remove it, please contact our site administrator for approval.
© 2016-2026 All site design rights belong to S.Y.A.