Adobe Edge Animate CC For Dummies (2013)
Part III
Formatting and Animating
 Visit www.dummies.com/extras/adobeedgeanimatecc for great Dummies content online.
In this part . . .
![]() Applying Transform
Applying Transform
![]() Managing appearance
Managing appearance
![]() Operating graphic effects
Operating graphic effects
![]() Visit www.dummies.com/extras/adobeedgeanimatecc for great Dummies content online.
Visit www.dummies.com/extras/adobeedgeanimatecc for great Dummies content online.
Chapter 7
Animating with the Transform Tool and Properties Panel
In This Chapter
![]() Animating powerfully with the Transform tool
Animating powerfully with the Transform tool
![]() Applying Transform attributes by clicking and dragging or entering numbers
Applying Transform attributes by clicking and dragging or entering numbers
![]() Centering on the center point
Centering on the center point
![]() Animating border radius, spinning, skewing, scaling, and rotating with the Transform tool
Animating border radius, spinning, skewing, scaling, and rotating with the Transform tool
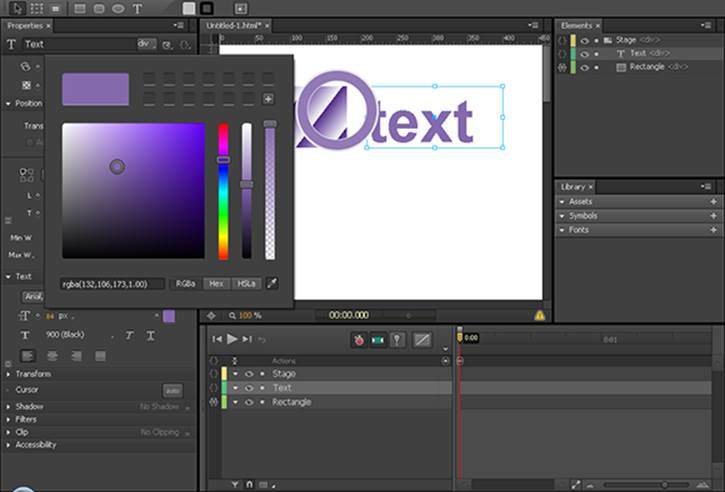
The Transform tool allows you to animate the Skew, Scale, Rotation, Border Radius, and Location of an element simply by clicking and dragging. The Transform tool is located directly to the right of the Select tool, as shown in Figure 7-1.
You can also use the Transform tool to spin elements, which is different from rotating elements (also described in this chapter).

Figure 7-1: The Transform tool.
Transforming with the Transform Tool and Properties Panel
Here’s a handy feature of Edge Animate: Much of what you can do with the Transform tool, you can also do from the Properties panel. While you’re making your animation, you may want to switch back and forth between the Transform tool and the Properties panel. The difference is that the Transform tool allows more fluidity while the Property panel provides more accuracy and precision by using numbers.
Turning a selected element into a transform selection
If you right-click an element on the Stage, a menu appears from which you can choose Transform (along with several other options), as shown in Figure 7-2. When you click Transform, elements you select appear as a transform selection.
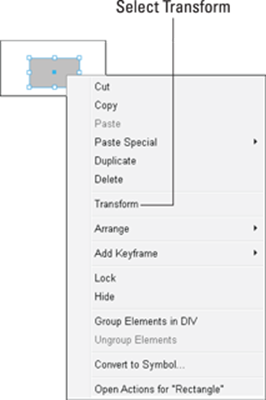
Figure 7-2: Right-click an element for several options.
You can also click the Transform tool icon, as shown in Figure 7-1. When you click the Transform tool, the element changes from a blue border to a black border with several selection points, as shown in Figure 7-3.

Figure 7-3: Regular boxes and transform boxes.
Transform elements have their own properties
When you have the Transform tool selected on an element, new items appear in the Properties panel, as shown in Figure 7-4.
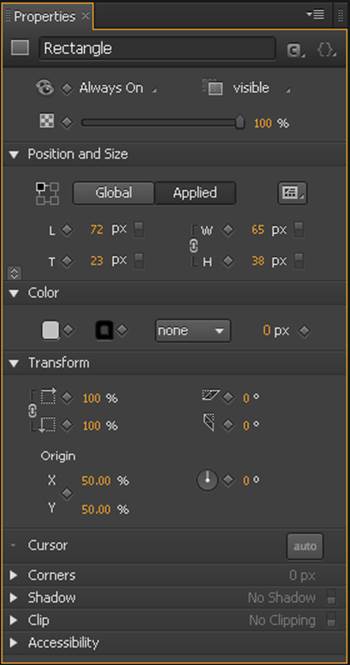
Figure 7-4: The Transform Origin feature.
When you have a Transform box onscreen, you can animate it several different ways, as described in the rest of this chapter. I highly encourage you to be creative with the Transform tool to create unique animations.
Understanding the Center Transform Origin
The center point, indicated in Figure 7-5, determines where the center of an element is located. Where you place the center point has an effect on the animation.
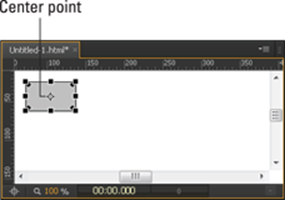
Figure 7-5: The little blue dot known as the center point.
Positioning the center point
You can move the center point around, and thus affect how an animation plays out, by using either of two features:
![]() The Transform tool: All elements have a center point when you click the Transform tool. You can move that center point by clicking and dragging it with your mouse. You can even drag the center point outside of the element for an exaggerated animation.
The Transform tool: All elements have a center point when you click the Transform tool. You can move that center point by clicking and dragging it with your mouse. You can even drag the center point outside of the element for an exaggerated animation.
![]() The Properties panel: You can position the center point through the Properties panel from the Transform section, as shown in Figure 7-6. Note that this feature has X and Y coordinates; these determine where the center point appears in the box. X and Y coordinates of 50% represent the center of the element.
The Properties panel: You can position the center point through the Properties panel from the Transform section, as shown in Figure 7-6. Note that this feature has X and Y coordinates; these determine where the center point appears in the box. X and Y coordinates of 50% represent the center of the element.
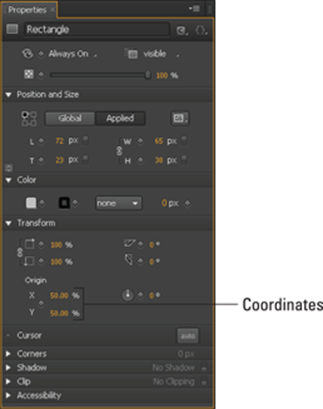
Figure 7-6: Moving the center point by changing the Origin Properties.
Animating with the center point
You can experiment by placing the center point in different parts of the element and seeing how that affects the animation. Here’s a step-by-step explanation of how to create an animation sequence with the center point on a text box:
1. Draw a text box on the Stage and type in something like Text Box.
2. Select the Transform tool (refer to Figure 7-1).
3. Click and drag the center point so it’s over the top-left part of the first letter, as shown in Figure 7-7.

Figure 7-7: Moving the center point off-center to see how it affects the animation.
4. Set the Pin and the Playhead in the Timeline.
 Toggle the Pin, and then drag the Playhead down the Timeline so that you see the chevron arrows (as shown in Figure 7-8).

Figure 7-8: Setting up the Timeline to create an animation sequence.
5. On the Stage, place your cursor over the bottom-right corner of the text box so that the cursor turns into a semicircle-with-arrow, as shown in Figure 7-9.
6. Click, hold down the mouse button, and swing the mouse around in a circular motion.
You should see the text box rotate as you move the mouse. The box swings around as if a pin was stuck in the top-left corner.
7. When you’re done swinging the box, release the mouse button.
Edge Animate creates an animation sequence, which you can then preview.
To experiment, move the center point back to the center and then try rotating the box again. You should see a very different animation in that the center of the box is now actually in the center instead in the top left of the box. The difference is that the box is now rotating from the center of the box instead of from the top left.
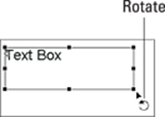
Figure 7-9: Grab the corner of the box to rotate.
Here’s something to try for fun:
1. Create a long animation sequence so that you can slowly see how the point of origin affects the rotation of the text box.
2. At the beginning of the sequence, set the center point in the top-left corner.
3. At the end of the sequence, position the center point in the lower-right corner.
4. Preview the animation to see how the center point gives the appearance of the text not only rotating, but also moving across the Stage as well.
You can also scrub the Playhead up and down the Timeline to see the origin point move across the box.
Creating Animations with the Transform Tool
The Transform tool enables you to create many different types of animation sequences. In this section, I cover:
![]() Border radius
Border radius
![]() Moving an element across the Stage
Moving an element across the Stage
![]() Spinning elements
Spinning elements
Animating the border radius
You can animate the border radius of an element with the Transform tool so that you can change square corners to rounded corners. Figure 7-10 shows where to click and drag to change the radius of the corner. This allows you to take an element with square edges and animate it so that it transitions to having rounded corners.
To animate the transition of square corners to rounded corners, with the Transform tool selected, place the mouse pointer near one of the squares in the corner of the element.
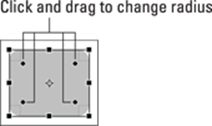
Figure 7-10: Using the Transform tool to animate rounded corners.
Click and drag one of the corner squares inward toward the center point. The farther you click and drag, the more the square corners round off (Figure 7-11).
 If you want to animate the corners rounding off, remember to set the Timeline so that Edge Animate creates keyframes and an animation sequence: Toggle the Pin, make sure the Stopwatch is red, and separate the Pin and the Playhead on the Timeline as shown in Figure 7-8.
Figure 7-11: Rounding corners by using the Transform tool.
If you click and drag one of the corners, then all four corners round off in synch, but they won’t stay to scale if you start dragging to the left or right (as compared to evenly dragging inward). If you want to ensure that all the corners stay in scale relative to each other, then press Shift on the keyboard while you click and drag.
If you want to round off only one of the corners, then press Ctrl on the keyboard (or for the Mac use Cmd) while you click and drag. You can also use the Corners section of the Properties panel to set specific configurations.
Animating the location of an element
You have several different ways you can animate an element from one location to another (having it move across the Stage). One way is to use the Transform tool by following these steps:
1. Set the Playhead and Pin in the Timeline to designate when the animation will start and how long you want the animation to last.
2. Click the Transform tool from the toolbar (as shown in Figure 7-1) and then select an element from the Stage.
The pointer changes to a four-way cursor (as shown in Figure 7-12).
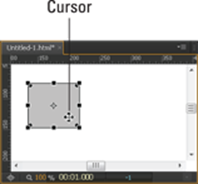
Figure 7-12: Using the Transform Tool to animate the location of an element.
3. Click, hold, and drag the element across the Stage to where you want it to appear, and then release the mouse button.
The element is now animated to move across the screen.
4. To test your new animation, you can run the animation on the Stage or you can preview it in a browser.
5. To save your animation, you can press Ctrl+S or, from the main menu, choose File→Save.
Spinning elements
In this section, I show how to make an object spin using the Transform tool, which is different from rotating.
Here’s how to make an element spin.
1. Create an element on the Stage.
In this example, I use a text box with the word Spin in it.
2. Set up the Playhead and Pin in the Timeline to designate how long you want the animation to last.
3. With the element selected, click the Transform tool (refer to Figure 7-1).
4. Place the cursor over the left-middle selector on the box so that you see the double arrow (as shown in Figure 7-13).

Figure 7-13: Click and drag the middle-left selector to start spinning.
5. Click, hold, and drag the mouse to the right.
The element transforms as you drag.
 Use the pink guideline to help you determine when the element is completely flipped over. The guideline automatically appears as you click and drag.
6. When the element appears reversed — that is, appears as its mirror image — stop dragging and release the mouse button (see Figure 7-14).
Releasing the mouse button generates an animated keyframe automatically. This is the first half of your spin animation; the remaining steps complete it.
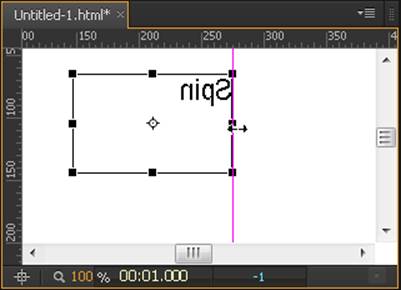
Figure 7-14: The mirror image.
7. Adjust the Playhead and Pin in the Timeline as shown in Figure 7-15.
To do so, move the Pin to the end of the first animation sequence, and the Playhead farther along from there.
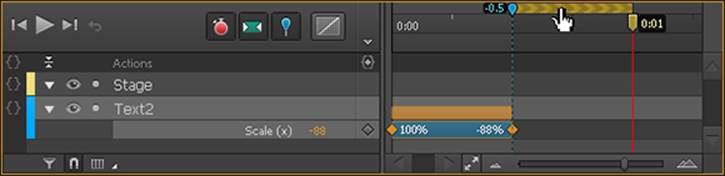
Figure 7-15: Adjust the Playhead and Pin in the Timeline to create the second half of the spin.
 You can move the Pin and Playhead together by placing the mouse over the onscreen chevron. When you see the pointer change to a hand, you can click and drag the Playhead and Pin together down the Timeline.
8. With the Playhead and Pin in position, place the cursor on the rightmost middle selector, and then click and drag to the left until the element appears the same as when the first half of the animation started.
You should now have two animation sequences. If you want the element to spin continuously, you can add a loop (as described in Chapter 5).
Adobe Edge Animate CC has several Paste Special options, shown in Figure 7-16. They include a Paste Inverted option, which comes in handy if you want to replicate the opposite of a keyframe. In this example on how to make an element spin, you can use the Paste Inverted option to create the second keyframe. After creating the first keyframe, copy it and then paste it using the Paste Inverted option.
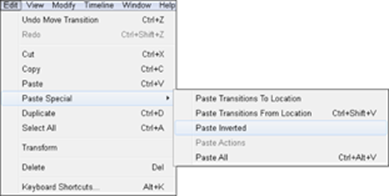
Figure 7-16: The Paste Special options from the Edit menu.
Animating with the Transform Tool or the Properties Panel
You can also use the Properties panel to create three of the same animation effects that you create with the Transform tool:
![]() Skewing
Skewing
![]() Scaling
Scaling
![]() Rotating
Rotating
Using the Transform tool gives you more fluid control over the animation. When you use the Properties panel, you set specific numbers — which provides greater precision in creating the animation.
Skewing elements
Skewing your elements is a very cool effect. In Adobe Edge Animate CC, to skew your element means to animate your element through a transition of oblique angles or to change its direction or position suddenly. The best way to figure out what skew does is to experiment with it.
One example of skewing is to bring text onto the Stage. You can use skewing as an alternative approach to fading text in or scrolling it. Skewing gives the effect of the text shrinking in size as the different angles twist the words around.
Transform tool
With the Transform tool and element selected, place the cursor directly along an edge as shown in Figure 7-17 so that you see the double lines with half-arrows. You can now click and drag to skew the element.
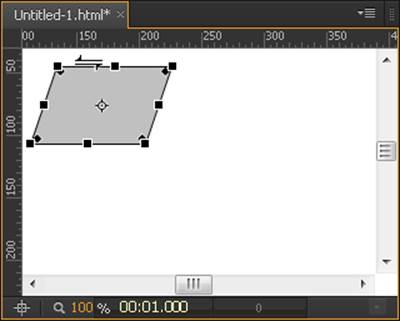
Figure 7-17: Skewing with the Transform tool.
If you don’t want to animate the skew effect, be sure you disable the Auto Keyframe mode when you use the Transform tool.
If you do want to animate the skew, then set the Pin and Playhead at different points in the Timeline when you use the Transform tool and make sure the Stopwatch is red.
Properties panel
To use Skew via the Properties panel, follow these steps:
1. Import an image or create an element.
2. Adjust the Timeline Playhead and Pin to where you want the skewing to happen.
3. From the Properties panel, adjust the number of Skew degrees (see Figure 7-18).
 You can specify both horizontal and vertical Skew values for the object. These values affect the object on its X and Y axis (respectively). To find the best effect, try using both values at varying degrees; also adjust the length of the animation.
After you set the Skew values, you can test the effect as follows: Move the Pin in the Timeline forward or backward to allow at least a 5-second duration (to provide enough time that you can really see the effect in action), and then reset the Skew values back to 0 to display the object without any Skew at all.
Adjusting the length of the animation for Skew has a dramatic effect on how the animation plays out. With a longer animation, the Skew effect has more time to show the different angles the object is twisted through before settling back to 0 (or whatever final value you set for the object).
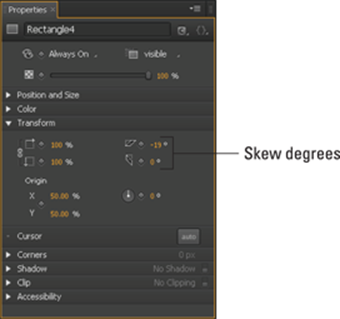
Figure 7-18: The Skew feature in the Properties panel.
The most you can skew an element is 89 degrees. If you use a value higher than 89, Edge Animate reverts the value to 89. You’ll probably want to use a skew value much lower than 89 for your final composition. A value of 89 twists and transforms the element greatly and may be a bit much.
Scaling elements
Scaling means essentially that you can change the size of an element while keeping its proportions consistent if you want. You can:
![]() Scale elements with the Transform tool
Scale elements with the Transform tool
![]() Scale elements from the Properties panel
Scale elements from the Properties panel
Scaling with the Transform tool
If you prefer to use a click-and-drag method for scaling elements, you can use the Transform tool to do just that by following these steps:
1. Click the Transform tool (refer to Figure 7-1) to select it.
2. Place the cursor over one of the corner selectors on an element.
As shown in Figure 7-19, you see a diagonal cursor with an arrow at each end.
3. Click, hold, and drag the corner selector.
If you drag outward, you make the element larger; if you drag inward, you make the element smaller.

Figure 7-19: Using the Transform tool for scaling.
To keep the element’s proportions the same, hold down Shift while clicking and dragging.
Scaling with the Properties panel
You can shrink and grow objects through a Scale feature on the Properties panel. You can Scale objects both horizontally and vertically.
The Scale feature has a Link Scale attribute that enables you to synch the proportions (see Figure 7-20). When the Link Scale attribute is on, the horizontal and vertical sizes remain in synch — but only when you’re modifying the values from the Properties panel. With the Link Scale attribute turned off, you can set two different values for horizontal and vertical.
Scaling your text is different from animating the font size. To animate the font size, see Chapter 9.
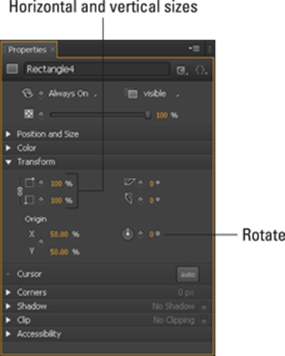
Figure 7-20: Scaling has a Link Scale attribute.
Shrinking elements
To make an element shrink, go to the Properties panel and click the diamonds next to Scale with the percentages at 100% (see Figure 7-20). Clicking the diamonds creates keyframes.
Next, toggle the Pin and slide out the Playhead in the Timeline to the point where you want the shrinking to stop. Last, adjust the percentages in the Scale feature to a value lesser than 100%. This should create an animated keyframe for you in the Timeline.
Scaling an element can create a neat trick by making your object appear to flip over. To see this in action, create an animated keyframe where the object starts at 100% and ends at -100%. The animation shrinks the element down to nothing, and then makes it reappear flipped upside down. The negative percentage is what flips the object over.
Growing elements
To make your element grow larger, start the keyframe with the object at a value lesser than or equal to 100%. Then slide out the Playhead in the Timeline to the point where you want the growing to stop (making sure to keep the Pin at the point where you want the animation to start). Then go back to the Properties panel and increase the percentage to the size desired. Provided the Stopwatch is still red, Edge Animate creates a new animated keyframe for you.
Rotating elements
You can rotate elements in your composition, like the wheels of a car, which is different from making an element spin (as discussed earlier in this chapter).
In this section, I show you how to:
![]() Use the Rotate feature from the Properties panel to make your text appear to rotate.
Use the Rotate feature from the Properties panel to make your text appear to rotate.
![]() Make a rotation animation appear as if it’s happening very quickly or very slowly.
Make a rotation animation appear as if it’s happening very quickly or very slowly.
For information on how to rotate an element with the Transform tool, look in the beginning of this chapter, in the section, Animating with the center point.
This technique to make elements rotate also works on imported images.
Determining how fast to make the element rotate
After you have a text box or an image ready to rotate, you need to determine how long you want the animation to last.
![]() If you want the rotating to happen quickly, separate the Playhead from the Pin in the Timeline for about a half-second or so.
If you want the rotating to happen quickly, separate the Playhead from the Pin in the Timeline for about a half-second or so.
![]() If you want the text or image to rotate more slowly, then move the Playhead further down the Timeline away from the Pin.
If you want the text or image to rotate more slowly, then move the Playhead further down the Timeline away from the Pin.
The shorter the duration of the animation, the quicker it happens. The longer the animation lasts, the slower it plays out. For a quick animation, create a very short keyframe. For a slow animation, create a long keyframe.
Using the rotate feature
Go to the Properties panel and find the Rotate feature as shown in Figure 7-21. Click the diamond next to Rotate to set the position of your object at the start of the animation sequence. Then set up your Timeline to make an animation sequence.
There are two ways to change the rotation of an object from the Properties panel:
![]() Click and drag the thin white line on the Rotate circle in a circular fashion
Click and drag the thin white line on the Rotate circle in a circular fashion
![]() Input a degree value by clicking the orange 0 and typing in the number of degrees you want the object to rotate.
Input a degree value by clicking the orange 0 and typing in the number of degrees you want the object to rotate.
If you type in the degrees manually and press Enter, the thin white line on the circle rotates to the degree value you indicated. This provides a helpful visual clue to the angle created by the number of the degrees you entered.
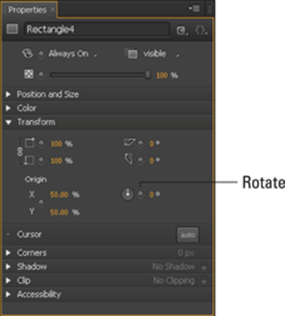
Figure 7-21: The Rotate feature in the Properties panel.
For the keyframe to appear, the Stopwatch icon in the Timeline must be red.
After you create the animation sequence, you can press the spacebar to play the rotating animation.
If you want to change the speed of the rotating effect, place the cursor at the end of the keyframe in the Timeline so that you see the double-arrow cursor. Then click and drag to create either of the following effects:
![]() Slow down the rotation by increasing the length of the keyframe.
Slow down the rotation by increasing the length of the keyframe.
![]() Speed up the rotation by decreasing the length of the keyframe.
Speed up the rotation by decreasing the length of the keyframe.
All materials on the site are licensed Creative Commons Attribution-Sharealike 3.0 Unported CC BY-SA 3.0 & GNU Free Documentation License (GFDL)
If you are the copyright holder of any material contained on our site and intend to remove it, please contact our site administrator for approval.
© 2016-2026 All site design rights belong to S.Y.A.