Take Control of Apple TV (1.0) (2014)
Present with Apple TV
With AirPlay and the Apple TV, it has never been easier to put what you want on the big screen, making the Apple TV fantastic for presentations.
In this chapter, I show you how to connect an Apple TV to a projector or SMART Board (an interactive whiteboard and projector commonly used in schools), as well as suggest what a traveling presenter should assemble to Make an Apple TV Presentation Kit.
I also give you some ideas about how you can use an Apple TV to display presentations, project paper documents, Run a Conference Room Display, engage in video conferences, and even keep a rowdy class in line.
Connect the Apple TV to a Projector
If your projector or SMART Board has an HDMI input, you’re all set! But chances are good that you’ll need an adapter to connect from the HDMI port on your Apple TV to a VGA or DVI port on the projector or SMART Board.
It’s easy to see the difference between a VGA and a DVI port. A VGA port has 15 pins arranged in a trapezoid (Figure 92), while a DVI connector has 24 pins in a rectangular array, with an extra 4 pins on the side (Figure 93).

Figure 92: The older, more common VGA connector has 15 pins, arranged in a trapezoid.

Figure 93: The more recent DVI connector features 24 pins in a distinctive rectangular pattern, with an extra four pins on the side.
VGA is strictly analog, whereas DVI is digital (technically speaking, it can support analog VGA signals, but for our purposes it’s digital), like the Apple TV’s HDMI port in the Apple TV. To connect the Apple TV to a VGA port, you need a box that can convert the Apple TV’s digital signal into old-fashioned analog.
Fortunately, Kanex makes a converter for this: the ATV Pro. It plugs directly into your Apple TV, outputting video to your projector as VGA and audio through a 3.5mm (headphone) audio jack. Of course, you will require a VGA cable and 3.5mm audio cable to make the connection.
If your projector takes only DVI input, there’s good news and bad news. The good news is that the Apple TV HDMI port is compatible with DVI signals, so a simple HDMI to DVI converter will do the trick. The bad news is that it won’t carry the audio signal, so you need an optical audio-to-analog adapter like the Orei DA21, which connects to the optical audio output on your Apple TV and converts audio to RCA and headphone minijack outputs. Don’t forget to get an RCA or 3.5mm male-to-male audio cable as well.
Note: To review the ports on the Apple TV, go back to Make the Connections.
About HDCP
You buy the equipment to connect your Apple TV to a non-HDMI display, you hook it up and try to play a DVD, and you get a nasty message: “This content requires HDCP for playback.” Ouch.
HDCP, or High-bandwidth Digital Content Protection, is a form of digital rights management (DRM) that’s built into the HDMI protocol. HDCP is about the content owner’s rights, not your rights as hardware owner and content purchaser. HDCP is designed to prevent viewing or recording content on unauthorized devices.
I’m all for paying content creators and discouraging piracy, but HDCP is a severe hindrance to legitimate users. Fortunately, like most forms of DRM, HDCP is easy to work around. You simply need a device that sits between the Apple TV and the display that routes around HDCP, like this Sewell HDMI Splitter.
Please use this knowledge for good and not evil. Don’t steal from the people who work hard to bring you the content you enjoy.
Make an Apple TV Presentation Kit
If you frequently travel to give presentations, the Apple TV is a great device to take along. With AirPlay, you can throw any content you like on the screen from an iPhone or iPad and be free to walk about the room, unencumbered by wires. Although you should add or exclude items to suit your needs, here’s a checklist of what I suggest you bring when presenting in unknown environments:
· Apple TV: Whatever you do, don’t forget this!
· Apple Remote: Ditto! And since it’s so easy to lose or forget, a spare might not be a terrible idea—they’re only $19. Or at least make sure you have the Remote app installed on your iOS device—see Run the Remote App.
· Two HDMI cables: Why two? First, it’s always good to have a spare. Second, if you have to use an HDMI splitter to make your Apple TV work with a display or projector that isn’t HDCP compliant, then you’ll need one cable to connect the Apple TV to the splitter and a second to connect the splitter to the display. (For the best places to buy HDMI cables, see Where to Buy an HDMI or Optical Audio Cable.)
· Two optical audio cables: You need an optical audio cable in case the display doesn’t support HDMI, or doesn’t have an audio port that can work with the ATV Pro. I advise buying two of these low-cost cables so you have a spare.
· Ethernet cable: An Ethernet cable may be necessary to connect your Apple TV to the Internet in a room where Wi-Fi is not available. (Monoprice and Amazon are good places to buy one.)
· Kanex ATV Pro: This converter connects your Apple TV to a VGA port on an older projector.
· HDMI Female to DVI Male Video Adapter: This adapter makes the connection to a DVI port on newer projectors.
· Optical Audio to Analog Audio Converter: The HDMI to DVI adapter won’t transmit audio, but this device connects the optical audio port on your Apple TV to any display.
· 3.5mm male-to-male audio cable: You need one of these to send audio from the ATV Pro or optical audio converter to your display or projector.
· RCA audio cables: You may need one of these cables if the display or projector you’re using doesn’t have a 3.5mm input.
· Sewell HDMI Splitter: This device will save the day if HDCP rears its ugly head.
· Speakers: What if the projector has no audio inputs? Bring either powered speakers you can plug into the Apple TV’s optical audio port or a battery-powered AirPlay speaker.
· AirPort Express: Whoa, why bring a wireless gateway? Chances are you won’t need it, but having your own portable Wi-Fi gateway is always a good idea, in case you can’t place your Apple TV near an Ethernet jack and the Wi-Fi in the room is spotty.
These tiny items don’t cost much and will have you more prepared than a Boy Scout. Before you give your big talk, visit the room, hook up your equipment, and do a run-through to check for technical glitches.
Present with Keynote
For better or worse, Microsoft PowerPoint has become the linchpin of modern presentations. If you’re using a Mac with AirPlay Mirroring to show your slide deck, then you can use PowerPoint or any app you like. Unfortunately, Microsoft has yet to create an iOS version of PowerPoint.
I’ve tested a number of iOS presentation apps, and found that Apple’s Keynote is by far the best. It does a great job of importing PowerPoint presentations; is smart enough to hide the device’s status bar on the TV when you turn on AirPlay Mirroring; and best of all, it’s free with new devices ($9.99 otherwise).
If you didn’t create your presentation in Keynote for iOS, here are some ideas for copying it to your iOS device:
· iCloud.com: Working in a Web browser on your computer, go to http://www.icloud.com/ and sign in. Open the Keynote Web app to view its document manager window. Drag a Keynote—or PowerPoint—file from the Finder and drop it in the document manager window. This makes a copy of the file in iCloud. You can now access that copy from Keynote in iOS, if your iOS device is signed in to the same iCloud account and you’ve turned on Documents & Data, as described for iOS in the next bullet point.
· iCloud Documents & Data: If you’re running 10.9 Mavericks with Keynote 6, open the iCloud pane of System Preferences on your Mac, sign in to iCloud, select the Documents & Data checkbox, click Options, select Keynote, and click Done. On your iOS 7 device, repeat the approximate procedure; tap Settings > iCloud, sign in with the same Apple ID that you used on the Mac, tap Documents & Data, and turn on the Keynote switch. Now, on the Mac, when you save the file, choose iCloud as the save location. You can edit the same Keynote document on the Mac and on your iOS device.
Note: If iCloud documents don’t appear in Keynote for iOS, open the Settings app, tap Keynote, and be sure Use iCloud is enabled.
Note: To more fully understand iCloud’s Documents & Data, read Joe Kissell’s Take Control of iCloud.
· Email: Send the Keynote file as an attachment in an email message to yourself. Open the message on your iOS device, tap the attachment icon, and then tap Open in Keynote.
· Dropbox: If you use the free Dropbox cloud-based file storage service, copy the presentation to your Dropbox folder; then use the free Dropbox app on your iOS device to tap the filename of the presentation and tap Open in Keynote.
Of course, it goes without saying that you should move your Keynote file to your iOS device well in advance of your presentation, just in case, and review the entire deck to make sure it looks acceptable.
Once the presentation is open in Keynote, turn on AirPlay Mirroring (see AirPlay from iOS) to show it on your TV. Keynote displays a big clock on the device screen (but not the Apple TV) to help you keep track of time, and you can swipe through the slides to advance through the presentation.
Put Dead Trees on Big Screens
Despite all the talk about going paperless, there are still lots of documents that we have to keep on…paper. And sometimes, it’s handy to show that paper to an entire room. The standard method for projecting paper is to use a document camera produced by ELMO, which run several hundred dollars. But if you already own an iOS device with a camera and an Apple TV, you can project and annotate documents for less than a buck.
The CamDraw app ($0.99) shows the camera’s input (or a stored picture) on the screen and lets you draw on it. Combine it with AirPlay Mirroring, and you can show an entire class a paper and draw over it in real time to illustrate your point.
Ah, but how to steady the image? One solution would be to snap a photo of the document, load it into CamDraw, and work from there. Or, you could put your iPad on a tall stack of books and aim it down at the document, but for something more professional, check out the PUREX Technology iPad arms, one for the iPad mini and a larger one for full-size iPads (if the larger one isn’t available, check out the LapWorks model for full-size iPads, but it’s more expensive). They both clamp to your desk and allow you to swivel the iPad into any position you need. Best of all, they’re both well under $30.
Run a Conference Room Display
What if you’re running a session where you want the participants to display stuff on the Apple TV, or you want to set up an Apple TV in a conference room so different groups can freely use it for AirPlay?
For situations like these, Apple has implemented an Apple TV feature called Conference Room Display. With Conference Room Display enabled, the Apple TV shows instructions on which Wi-Fi network to join and which Apple TV to connect to.
To turn on Conference Room Display, open Settings from the main menu, then choose AirPlay > Conference Room Display and select Conference Room Display (Figure 94).
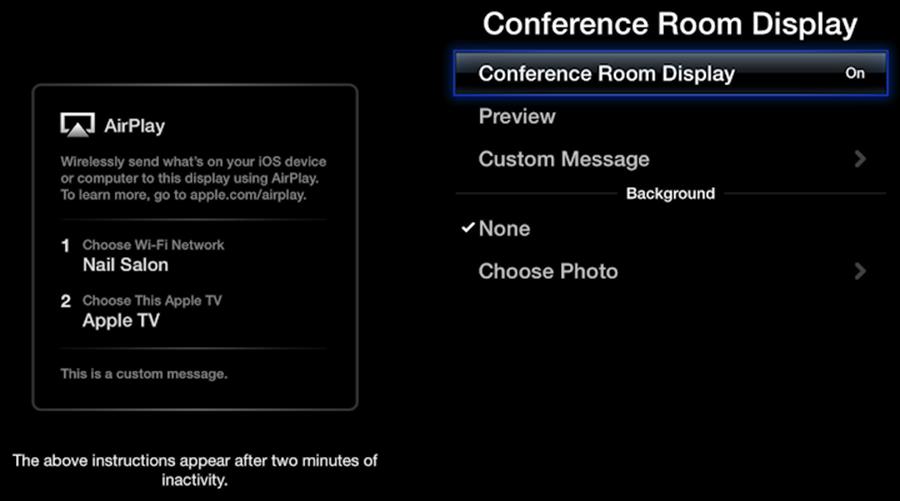
Figure 94: To enable Conference Room Display, open Settings from the main menu, choose AirPlay > Conference Room Display, and select Conference Room Display.
The Apple TV switches into Conference Room Display mode after 2 minutes of inactivity, but to switch immediately, choose Preview.
You can add a custom message or background image to your Conference Room Display using the settings that appear below the Preview button. Here are my suggestions for making the Conference Room Display instructions as clear and legible as possible:
· Take advantage of the Custom Message option to add helpful information, such as the guest password for the Wi-Fi network or a reminder of what the presentation will be about.
· When you select Choose Photo and pick an image, Conference Room Display uses that image as a background photo, pushing the instructions to the side of the screen (Figure 95). Keep the background photo disabled, or, if you must, make it a simple logo.

Figure 95: Notice how distracting the background photo is in this Conference Room Display. Either leave this feature off, or stick to a simple logo—preferably left-aligned so as to not distract from the instructional text.
· If the Apple TV’s screen saver kicks on with Conference Room Display enabled, it shows the AirPlay instructions intermittently in a small panel (Figure 96). If that’s not desirable, disable the screen saver by going to Settings > Screen Saver, and then, in Start After, select Never.
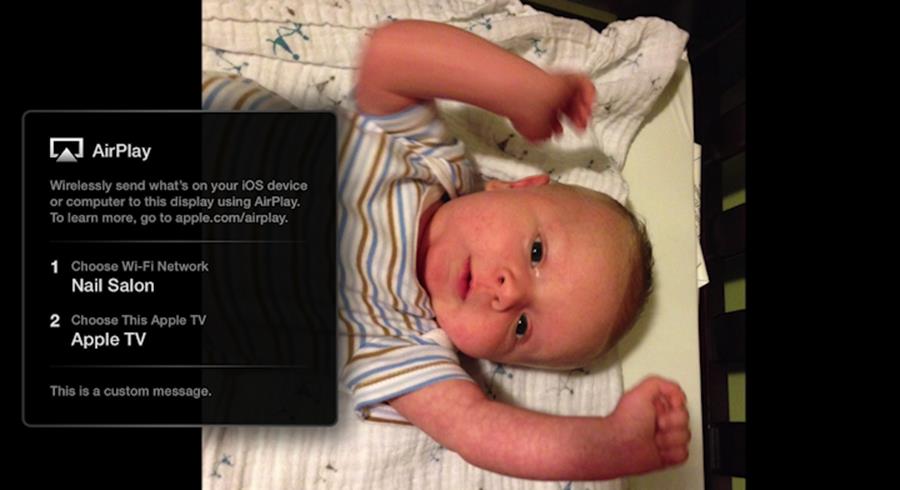
Figure 96: When the screen saver kicks on in Conference Room Display mode, the Apple TV squishes the instructions into a small panel, which occasionally disappears from the screen.
Now that you’ve taken these steps, the AirPlay instructions fill the entire screen when displayed, making it easier for everyone to see them (Figure 97).
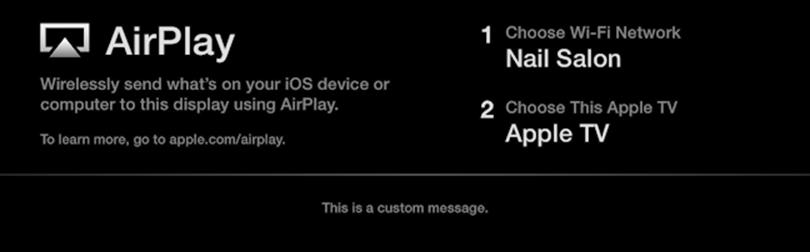
Figure 97: With no background photos or other distractions, Conference Room Display mode clearly communicates to users how to AirPlay their content to the Apple TV.
Talk the Big Talk
What if you could have anyone in the world speak to your audience face to face? With AirPlay mirroring and a free app, you can! Your two best bets for a free app are FaceTime, which is built into every recent Mac and iOS device, and Skype, which is the gold standard for video conferencing and is available for free as Skype for iOS, Skype for Mac, and Skype for Windows for person-to-person use.
To put more people—up to ten—onto your screen, check out Google Hangouts instead.
A couple of quick tips:
· If your virtual attendee is presenting to a boisterous classroom, it’s a good idea to mute the sound on your end if the talk isn’t meant to be interactive.
· Connect the Apple TV to the Internet via Ethernet, in order to minimize latency.
Browse the Web on Apple TV
What if you’re giving a presentation from your iPhone or iPad and suddenly decide that you’d like to show the audience a Web page? The AirWeb app ($1.99) makes it easy to browse the Web on the Apple TV.
Enable AirPlay Mirroring (see AirPlay from iOS) and launch AirWeb. A Web browser appears on your TV with an onscreen cursor. Control the cursor with the gray area in the app, which acts as a trackpad. The app accepts a number of gestures which are listed on screen. You can use two fingers to scroll, pinch to zoom, and press the screen and tilt the device to scroll.
Manage the Class with Silent Light
Silent Light ($2.99) is an iOS app developed by teachers to help manage quiet independent study in the classroom (Figure 98).
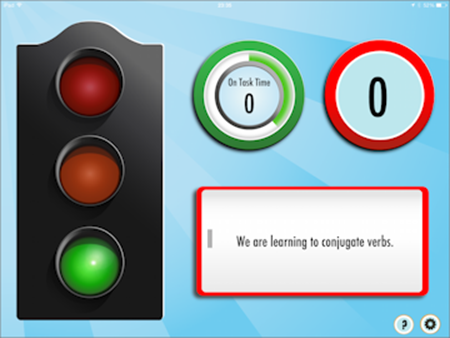
Figure 98: The Silent Light app for iOS can remind students of their current task and monitor background noise levels to make sure that they stick with it.
Here’s how it works. You enter a learning intention on the screen and set an acceptable noise level. The app has two timers: one for on-task time and another for off-task time. Silent Light uses the iOS device’s microphone to determine if the class is on or off task, and adds to the timers accordingly. For every few minutes of on-task time, the class gains a point. By default, Silent Light gives a point every 5 minutes, but that can be changed in the settings.
AirPlay the app to the big screen, and the class can be reminded of what it’s supposed to be doing quietly, and the app tells you how well the class is meeting your sonic goal.
There are creative ways you can use Silent Light in your classroom. An obvious example is to offer the class a reward if it scores a certain number of points.
All materials on the site are licensed Creative Commons Attribution-Sharealike 3.0 Unported CC BY-SA 3.0 & GNU Free Documentation License (GFDL)
If you are the copyright holder of any material contained on our site and intend to remove it, please contact our site administrator for approval.
© 2016-2026 All site design rights belong to S.Y.A.