Barcodes with iOS: Bringing together the digital and physical worlds (2015)
Chapter 3. Scanning barcodes
This chapter covers
· How to scan barcodes with AV Foundation’s metadata detector
· Optimizing scanning performance and user experience
· UI considerations for different kinds of barcode-scanning scenarios
· Navigating around common barcode-scanning pitfalls
The previous chapter introduced you to capturing media with AV Foundation. You learned about the components of AV Foundation that allow you to take a video stream from the device’s cameras and display it in a preview layer and capture media to files.
In this chapter you’ll learn how to add the AV Foundation metadata detector to this video stream, and have it report back about barcodes it has detected.
3.1. Metadata detection in AV Foundation
In chapter 2 you built a camera app and encountered one kind of AV capture output, AVCaptureStillImageOutput. Other outputs allow you to write to audio or video files, and they’re set up the same way as the still image output.
For scanning barcodes, you’ll use the AVCaptureMetadataOutput component. As you can infer from the name, this is also part of AV media capture, it’s an output, and it has something to do with metadata. This isn’t data that describes actual pixels or audio samples. Rather it’s metadataabout the picture, describing things that you can see in the video image.
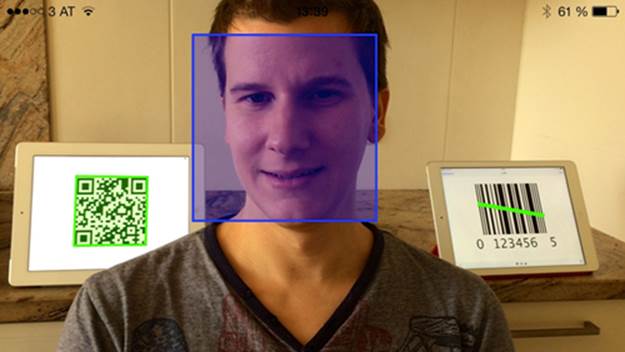
iOS 6 was the first iOS version supporting such metadata, and the first kind of metadata to be delivered by AV Foundation was information about human faces found on video frames. iOS 7 added the ability to read barcodes via the same mechanism. You can configure one metadata output to simultaneously detect barcodes and faces, although I have yet to see a sensible use case for that, apart from producing illustrations for this book (see figure 3.1).
Figure 3.1. One face and two barcodes (2D on left and 1D on right) detected and marked
Next you’ll add a barcode detector to the camera app from the previous chapter.
3.2. Building a QR Code scanner
Your project for this chapter is to build a scanner app for deciphering 2D barcodes. If the decoded code contains a web address, the app will switch to Mobile Safari to show the web page. This will teach you how to set up and configure a metadata output to plug into the media capture stack from the previous chapter.
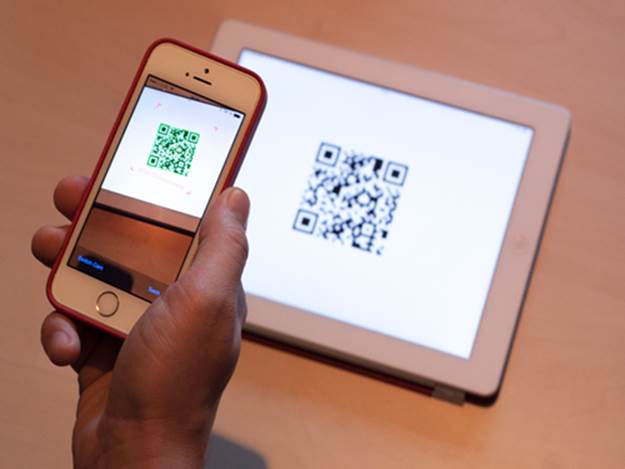
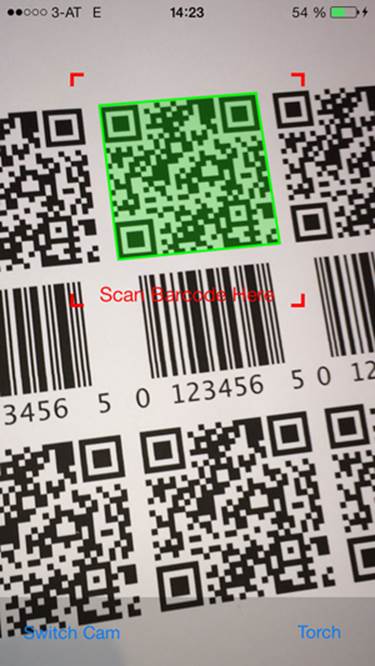
Your QR Scanner app (see figure 3.2) will have the following features:
Figure 3.2. The finished QR Scanner app
· Functions from the camera app: switch cameras, toggle the torch, live preview, tap-to-focus
· Detect and decode PDF417, Aztec, and QR Codes
· Visually mark boundaries of detected codes
· Limit the active scanning area with a viewfinder
· Find URLs in the decoded barcode data and open them with Mobile Safari
· Optimize the video stream for better detection performance
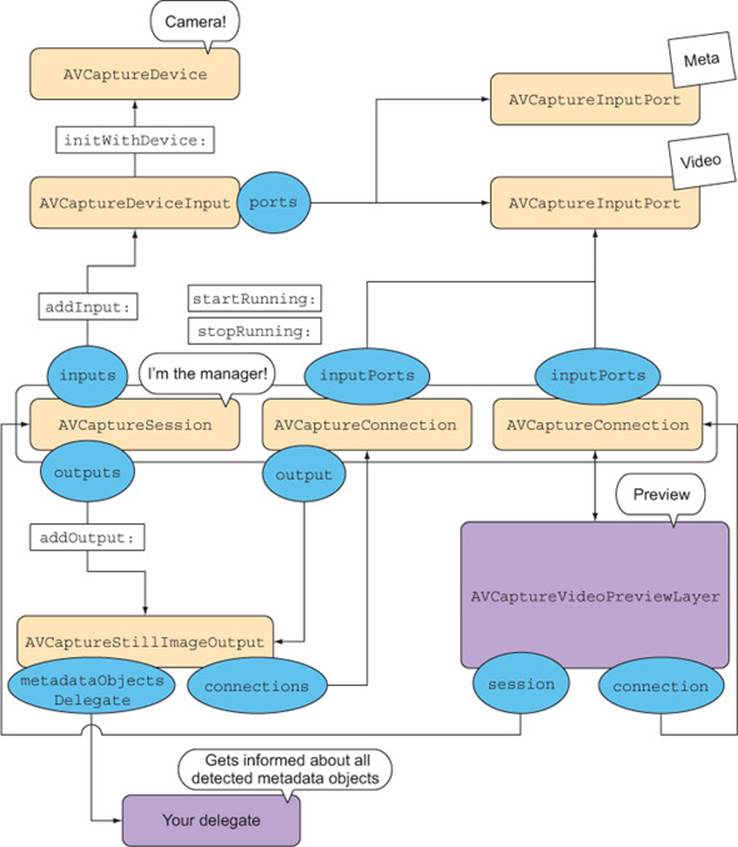
Figure 3.3 should remind you of figure 2.3, with a couple of differences: In the lower-left corner of this figure, AVCaptureStillImageOutput has been replaced with AVCaptureMetadataOutput. Additionally, you specify a metadataObjectsDelegate to receive callbacks whenever metadata objects (such as barcodes) are detected.
Figure 3.3. AV Foundation components involved in barcode scanning
3.2.1. Reusing camera code
Almost all the code you wrote in chapter 2 for the camera app can be reused as a starting point for this project. Start a new project—again a single-view application—and copy the following files to it:
· DTAVFoundationFunctions.h and .m
· DTCameraPreviewController.h and .m
· DTVideoPreviewView.h and .m
You’ll use DTCameraPreviewController as the root view controller of your app. You can delete the ViewController generated by the template because you won’t be using it. To set up AV Foundation, add the AVFoundation.h import to the PCH file, and add AVFoundation.framework to the Link Binary with Libraries build phase.
In the storyboard, change the root view controller’s class name to DTCameraPreviewController and the root view’s class name to DTVideoPreviewView. The app will be a full-screen video preview. Add buttons for toggling the torch and switching the camera, as in the previous chapter, and make the appropriate connections to the view controller header’s outlets and actions (see figure 3.4). A couple of constraints will keep the buttons in place if the device is rotated.
Figure 3.4. QR Scanner storyboard setup

After these setup steps, the app should build and run showing a full-screen preview of the camera video. You should be able to switch cameras and toggle the torch if you hooked up the buttons correctly. Tap-to-focus should work as before: tap to focus on a point on the preview, and move the device to unlock the focus and switch back to continuous autofocus.
3.2.2. Creating and configuring the metadata output
The next thing you need to do is add a setup method for the metadata output to DTCameraPreviewController.m. This setup method will create a barcode scanner and configure it to look for specific types of barcodes. This method will ensure that all the barcode types you’re looking for are also reported by availableMetadataObjectTypes as being supported:
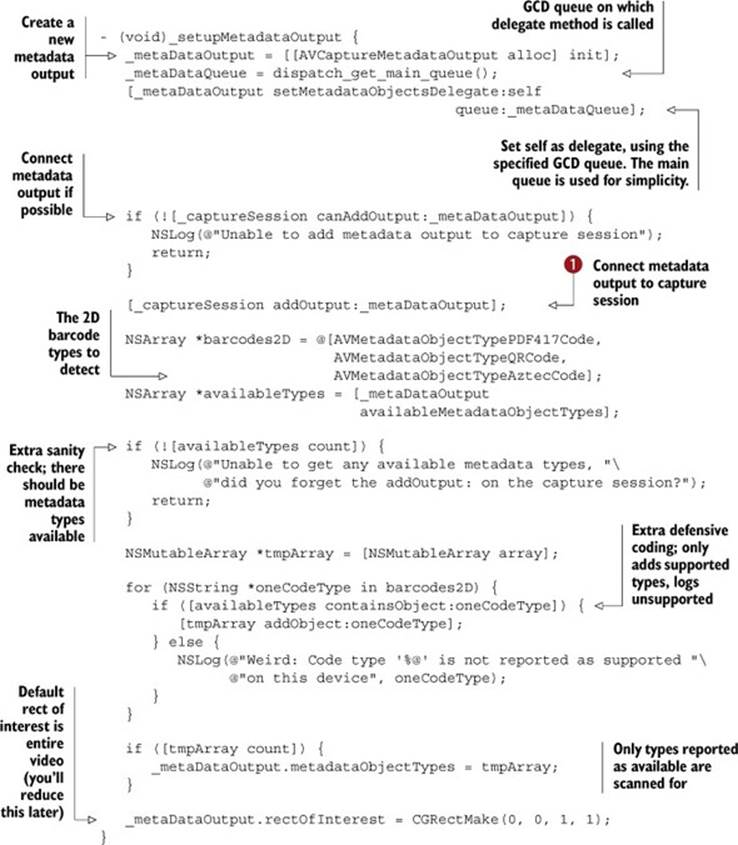
You can call this _setupMetadataOutput method as the last statement in your _setupCamera method, which you’ve copied as part of DTCameraPreviewController.m from the camera project. This ensures that the entire AV Foundation media capture stack is set up before you add the metadata output to it. You don’t need to do anything about the AVCaptureStillImageOutput that’s also set up there; it doesn’t hurt to have both outputs active.
Note
While I was writing this book, I forgot to call -addOutput: on the newly created metadata output ![]() , so -availableTypes was nil. The available types depend on what kind of content is available on the capture device’s input ports. It’s better to have too much sanity-checking code in your apps than too little.
, so -availableTypes was nil. The available types depend on what kind of content is available on the capture device’s input ports. It’s better to have too much sanity-checking code in your apps than too little.
3.2.3. Wiring up the metadata objects’ delegate
You already specified that self should be acting as the metadata objects’ delegate and also set the GCD queue on which the delegate method will be executed on. The delegate method will be called multiple times per second to deliver recognized metadata objects. To simplify this example, the GCD queue is set to be the main queue.
Pro Tip
If you plan to do more extensive work inside the delegate method, you should create and use a private background queue for delegate messages to be delivered on. Don’t forget to dispatch_async back to the main queue for all interactions with UIKit and code that’s synced via the main thread. Proper thread behavior is critical for a well-behaved app.
The AVCaptureMetadataOutputObjectsDelegate protocol contains only a single method. As of iOS 7, two kinds of metadata object classes are supported, both subclasses of AVMetadataObject:
· AVMetadataFaceObject represents a human face.
· AVMetadataMachineReadableCodeObject represents a “machine-readable code”: a barcode.
For scanning barcodes, you’ll deal with only the latter subclass.
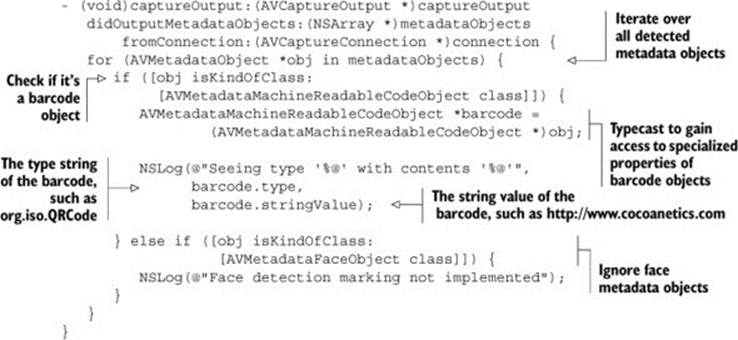
Both subclasses derive common properties from AVMetadataObject, such as bounds, which describes a perpendicular box around the metadata object. For the most part, you’ll want to get at the properties that are added in the AVMetadataMachine-ReadableCodeObjectimplementation, which necessitates a typecast.
The following snippet demonstrates iterating over the metadata objects and logging-encountered barcode objects. Here you can see object polymorphism in action—all metadata objects derive from AVMetadataObject, but individual instances can be either of the concrete subclasses of that:
Detecting faces and barcodes simultaneously
To detect faces and barcodes simultaneously, you add AVMetadataObjectTypeFace to the metadataObjectTypes array.
iOS delivers both kinds of metadata objects on separate calls to the delegate method. This means the calling class has to determine which of these calls it’s dealing with each time: faces or barcodes. Otherwise it would wrongfully assume that no longer having a face object in the passed array meant that the face had disappeared. If you were marking the metadata objects on screen, you’d see those shapes flicker as the markings switched repeatedly between faces and barcodes.
iOS is able to detect up to four QR or Aztec codes in parallel. PDF417 is considered to be a stacked linear code and is grouped with the other 1D codes in the detection engine. Even if there are multiple 1D barcodes visible to the scanner, you only get one delivered to the delegate method.
You can configure the metadata output to detect 1D and 2D barcodes at the same time, but the preceding limits are unaffected by this. In this case, you get 0 or 1 1D barcodes, plus 0–4 2D barcodes in the passed array.
In practical use, you won’t be interested in getting the entire list of all detected barcodes multiple times per second. Rather, you’ll want to be able to set a scan delegate and have this be notified when a new barcode appears in view for the first time.
3.2.4. Creating a barcode scan delegate
To ensure that the scanner view controller is reusable in subsequent chapters, as well as in your own apps, you need to avoid putting any app-specific logic into it. Rather, you want to create a delegate protocol that defines the methods that will notify the object you designate as the delegate. This protocol definition goes above the @implementation in DTCameraPreviewController.h:
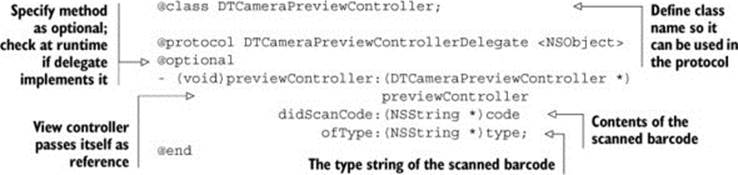
A delegate property goes with the protocol definition; it can be any NSObject as long as it’s tagged as implementing the protocol mentioned in the angle brackets:
@property (nonatomic, weak) IBOutlet
id <DTCameraPreviewControllerDelegate> delegate;
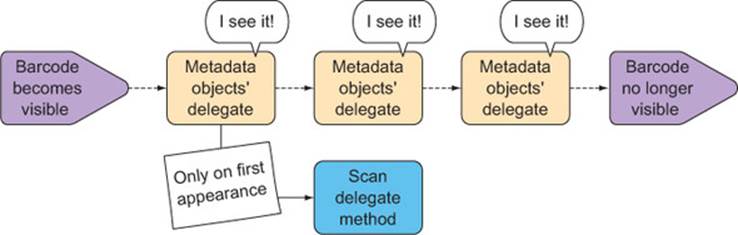
iOS doesn’t keep track of individual barcodes, like it does for faces. Instead, each time the metadata objects’ delegate method is called, each visible barcode is represented by a new instance of AVMetadataMachineReadableCodeObject. To keep track of individual barcodes, you’ll have to create identifiers for them. Otherwise, you might end up calling your delegate every time a particular barcode is encountered, whereas you really only want to know about the very first time (see figure 3.5).
Figure 3.5. The scan delegate should be called only once.
You can use the following items to create an identifier:
· The type property—The type string of the barcode
· The stringValue property—The decoded contents of the barcode in string form
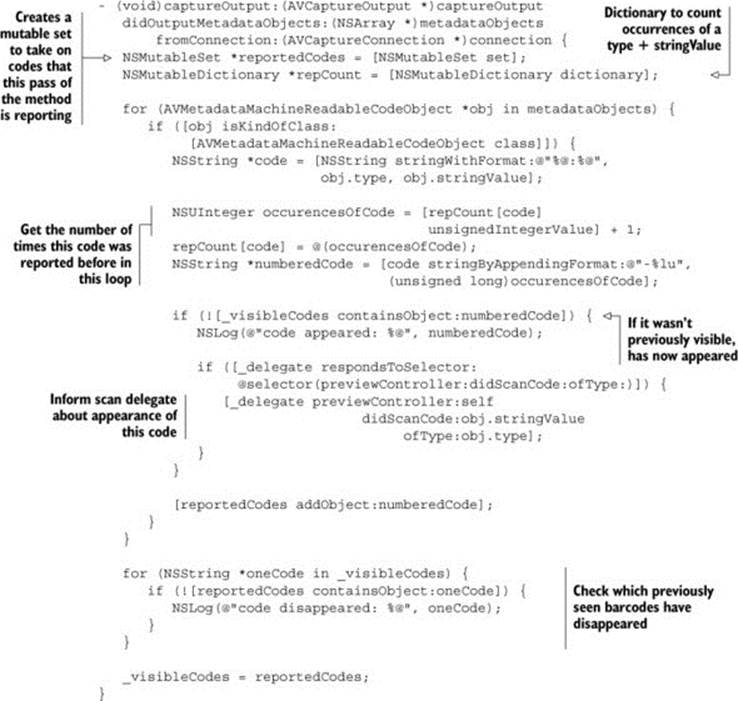
· A sequential number— To keep track of multiple barcodes with the same type and contents
The following snippet shows a variant of the metadata objects’ delegate method that’s able to keep track of multiple barcodes and report when they appear and disappear. _visibleCodes is a new private instance variable that preserves the reported barcodes from one call of the delegate method to the next:
Barcode identifier overkill?
Assigning identities for all barcodes—even if you only ever plan to support scanning 1D barcodes—might feel like overkill. But Apple has been known to enhance existing APIs, and you shouldn’t assume current limits to be set in stone.
In the future, Apple might enhance its barcode detector to scan multiple 1D barcodes, or new barcode types might be printed next to GTINs (such as EAN-2 or EAN-5). Then you’ll be glad that your code is smart enough to deal with multiple 1D barcodes being reported to you.
3.2.5. Marking detected barcodes on preview
Enabling your scanner to detect and mark multiple barcodes on the video preview is a nice trick. As you tilt the device and the preview video changes, the detected barcodes should be marked with a shape that hugs the barcode outline.
All metadata objects report a bounds rectangle, which is perpendicular and has edges parallel to the preview view. Metadata objects for 2D barcodes also report the detected corners of the barcode (see figure 3.6). The detector for 1D barcodes works with multiple scan lines and is therefore only able to report the corners of the successful scan line.
Figure 3.6. Bounds versus corners
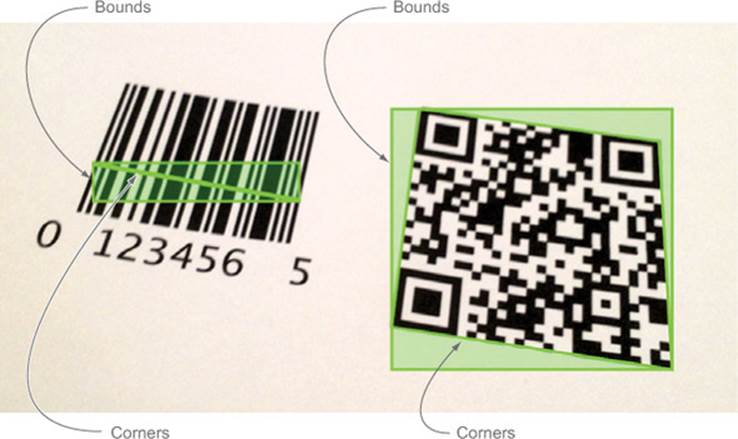
It would have been nice if Apple provided the corners for 1D barcodes as well as for 2D barcodes. But since they don’t, you can only show off the marker tracking with the currently supported 2D barcode types: PDF417, QR, Data Matrix, and Aztec.
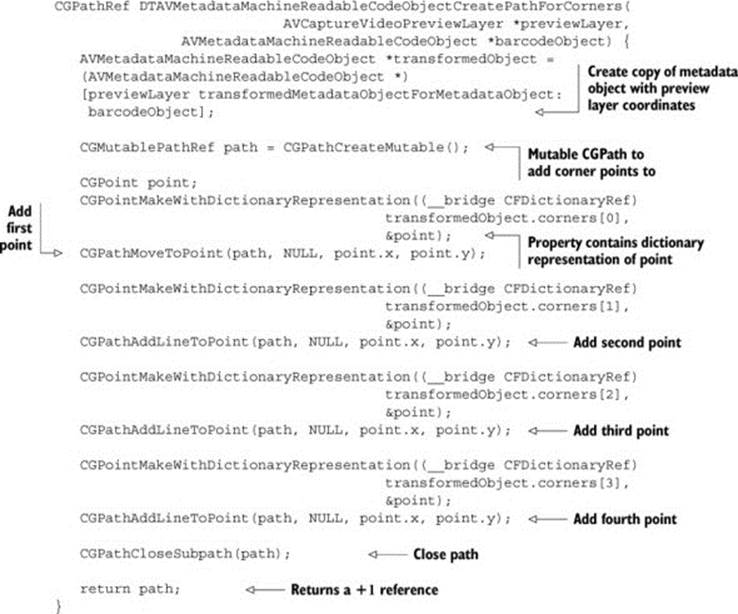
Coordinates in metadata objects always use the video coordinate system, which has values between 0 and 1 (a percent value). Also, depending on the device, the origin might differ. To convert from video to view coordinates, you can employ therectForMetadataOutputRectOfInterest: method found on the preview layer. This creates a copy of the barcode metadata object, but with bounds and corners in the coordinate system of the preview layer, which is ideally suited for creating shapes to display on top of the preview.
The following helper function gives you a Quartz CGPath that hugs the corners of the barcode. Put this into DTAVFoundationFunctions.m. Note that because CGPath is a Core Foundation object, this method will return a +1 reference that you’ll have to release after use:
To show these paths, you’ll use one CAShapeLayer per barcode. To keep track of these shapes, you can add a mutable dictionary instance variable, _visibleShapes, to the list of private instance variables.
When a new barcode appears, you check this visible shapes lookup dictionary to see if you already have a shape layer for it. If you do, you just update the path shown by this layer. If not, you’ll have to create one and configure the drawing parameters. When a barcode is no longer visible, you’ll also need to remove the appropriate marking shape:
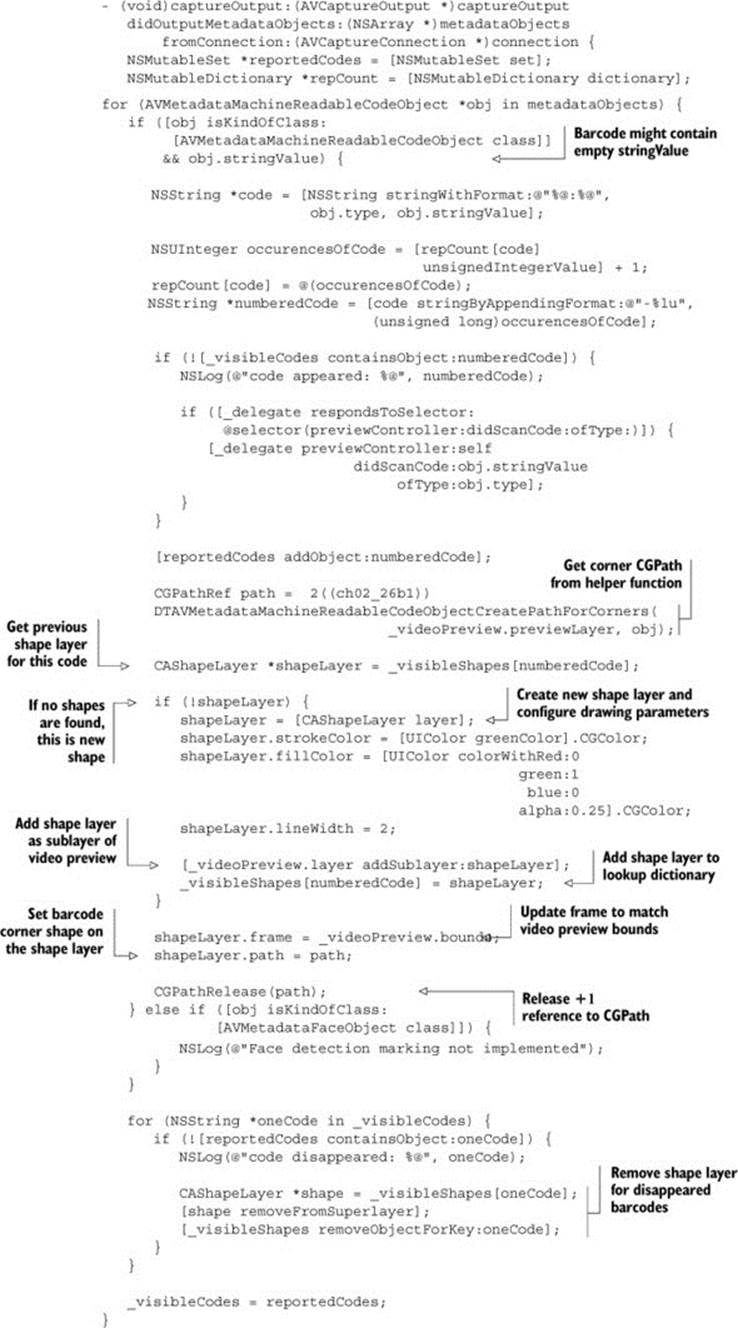
This completes your code for the metadata object delegate.
Apple exposes the decoded barcode data as a stringValue; there’s no access to the raw decoded data. So it might happen that you get a detected barcode, but the string value is nil. This might occur if somebody encoded arbitrary bytes into a QR Code, and on decoding it, iOS is unable to convert it into an NSString. Such metadata objects are quite useless as there’s no way to retrieve the original data. You can safely ignore these as you loop through the detected barcodes.
3.2.6. Building an optimal scanning UI
At this point in the creation of your QR Scanner app, you have the scanning basics working. Now it’s time to optimize the user interface. You should ask yourself four questions:
· Which types of barcodes do I want to detect?
· What situations will my users be in when they scan a barcode?
· Will there be many barcodes next to each other?
· What cues will inform the user that they should scan a barcode?
Asking these questions is necessary, because different answers will result in different optimal user interfaces for scanning.
QR Codes are most often encountered on large posters. Standard QR Codes are so ugly (in the eyes of creatives) that you’ll rarely find more than one on an advertisement. A typical scanning situation would be a user scanning a code from across the subway tracks while waiting for a train.
In contrast, users will typically scan 1D barcodes off a product that’s right in front of them. There might be multiple 1D codes in close proximity, like a GTIN, a product model code, and a serial number if it’s a box for a consumer electronics device.
Your users should be getting UI cues to inform them that they’re expected to point the active camera at a code for scanning.
For scenarios involving many codes next to each other, you’ll want to reduce the active scanning area and show a box to inform the user that only inside this box will a code be recognized. There are also some capture device settings that are beneficial only for particular scenarios. We’ll cover these in the next section.
Let’s assume that your QR Scanner app is meant for scanning codes close by, like from the pages of this book, and you expect multiple codes in close proximity. This means that you don’t want the entire preview to be active for scanning, but rather a much smaller part of it so that you can precisely target one code among several.
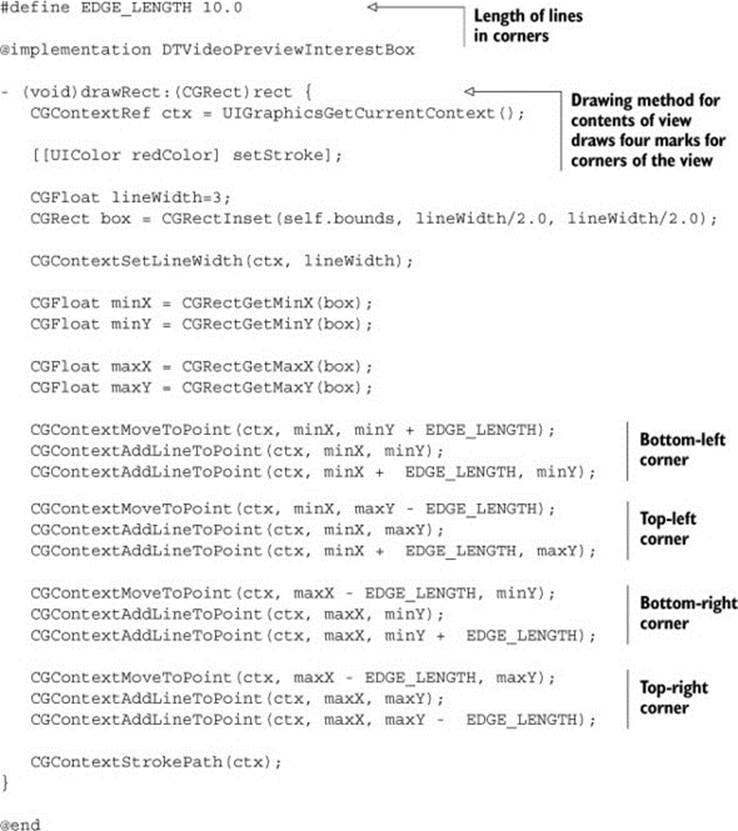
The UI in figure 3.7 consists of a custom UIView that draws four corners, and a UILabel that you place on top of the overlay and anchor in place with autolayout constraints.
Figure 3.7. Reduced scan area for better targeting
To build this UI, create a new UIView subclass to represent the interest box—the marked area where barcodes will be scanned in. Name it DTVideo-PreviewInterestBox. This code overwrites the -drawRect: method to draw the four corner marks:
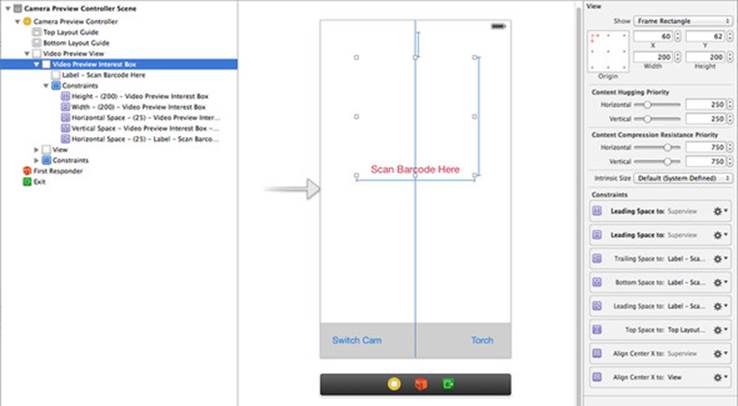
In Interface Builder, you add a new view of this class on top of your preview view, as shown in figure 3.8. Add a label on top of that, and anchor everything in place with autolayout constraints so that when the device is rotated, all views are still centered. Limit the width and height of the interest box to 200 points. (You’ll get the current size and location of this view in the next code snippet to configure the active scan area.)
Figure 3.8. Adding a scan finder
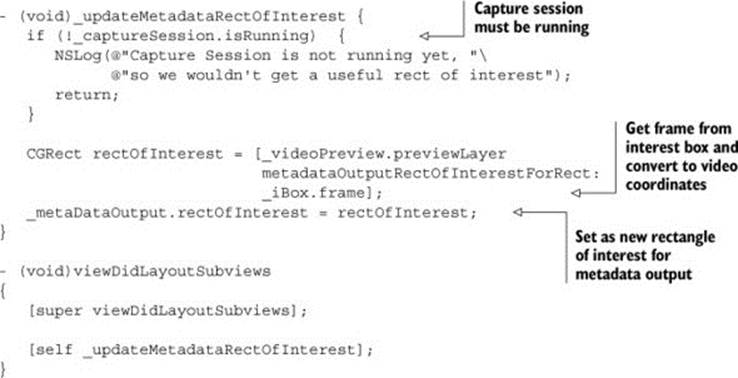
The ideal place to retrieve the interest box view’s coordinates in DTCameraPreview-Controller is in the viewDidLayoutSubviews method, which is called whenever the view hierarchy has been laid out: after the initial display and after each rotation. A helper method retrieves the current view coordinates of the interest box in relation to the preview, converts them to video coordinates, and sets these coordinates as the new rectOfInterest on the metadata output:
Scanning 1D barcodes
For detecting 1D barcodes, iOS employs scan lines. If one such scan line intersects with all the bars of a barcode, then it detects the code.
Depending on your device, there will be at least two scan lines in the horizontal and vertical centers of the rectangle of interest. Depending on the CPU power of the device your app is running on, there may be additional scan lines. On the iPhone 4—the oldest iPhone supported by iOS 7—only the center scan lines are used.
Apple’s Technical Note TN2325 (https://developer.apple.com/library/ios/technotes/tn2325/) mentions that the additional scanning lines are also disabled if you enable 2D barcode scanning together with 1D barcodes. This is another reason why it might be better to optimize the UI for scanning either 1D or 2D barcodes.
If you don’t reduce the rectangle of interest for detection, the user might be confused if a barcode isn’t detected near the edges of the preview window. This could occur if a barcode is fully visible in the preview but is too far to the side to be crossed by one of the scan lines. On consumer electronics labels, you’ll often find multiple 1D barcodes in close proximity to each other. If this is your usage scenario, you might want to adjust the shape of the rectangle of interest for scanning 1D barcodes to be as wide as the preview but not very tall, and then display a red line along the horizontal center. This informs the user that 1D barcodes are scanned with this “laser,” and they’re able to precisely target individual barcodes.
In any case, you should test the scanning user experience with an iPhone 4 (if you support iOS 7), because it’s generally lacking the additional scan lines.
3.2.7. Tweaking capture device settings
There are several configuration options on iOS device cameras that help with barcode scanning performance and user experience. These are the most useful:
· Capture session preset— Determines the video quality and format delivered to the session by the capture device
· Active video format— Impacts the number of pixels in each video frame that the system has to work with
· Video zoom factor— Sends extra pixels to the detector that the CCD picks up but that are “zoomed out” by default
· Smooth autofocus— Prevents the nervous bobbing of the autofocus; focus is smoothly adjusted as you’d want it for recording video
· Autofocus range restriction— Restricts the range over which AF is adjusted, for scanning close up
Let’s look at some of these in more detail.
The capture session preset determines the active video format flowing from the capture device, via the input, through the session’s connection to the metadata output. The higher the quality preset, the more pixels are available for the barcode detector. If you don’t set a session preset, the default is AVCaptureSessionPresetHigh, which is one level below AVCaptureSessionPresetPhoto. Using the photo preset instead of the default preset dramatically increases the number of pixels in the video stream, causing the detector to do much more work. The scanning results of using the photo preset are indistinguishable from using the default setting, but the drain on the battery is much greater due to higher CPU usage.
Barcode guru tip
If you have a special use case in which you’re displaying the scanner UI for a long continuous time, you should experiment with even lower-quality presets to reduce battery drain. For most scenarios, the default high setting is the sweet spot for barcode scanning.
The capture session preset and the capture device’s active video format go hand in hand. If you set a preset, iOS knows which video format works best for the device. If you don’t set a preset or format, the default preset of the capture session is used. The session then sets the active format when you add the capture device input. If you set the active format directly, this causes the session preset to change to AVCaptureSession-PresetInputPriority.
Fairly recent iOS devices have CCDs that can capture more pixels than are actually used by the media capture pipeline. Instead of passing on the original pixels, the video image is slightly shrunken, and this reduced-size version is sent to the capture device class. The scale factor used can be queried via the videoZoomFactorUpscaleThreshold property of the active video format.
For scanning barcodes close to the device, you can set the camera’s video zoom factor to a value between 1 and the upscale threshold. This results in a zoomed-in part of the video being used, sort of like using a magnifying glass. But you don’t want to overdo it—with video that’s too zoomed-in, it becomes difficult to target an individual barcode on a page. If the upscale threshold is greater than 1, you can increase the zoom factor, but no further than 125%. For older devices that don’t scale the video, this has no effect because the upscale threshold is 1.
The default mode for autofocus is to quickly change the focus several times until the picture is sharp. If the user is concentrating on targeting a barcode, this wild “bobbing” motion might cause discomfort. Newer iOS devices support smooth autofocus, where the focus is adjusted gradually. This was introduced by Apple as being beneficial for recording video, where the focus bobbing would be detrimental when moving from near focus to far focus or vice versa. For barcode scanning, smooth autofocus is a welcome feature because it removes an unnecessary form of visual noise.
Finally, if you know that your users are going to scan only nearby barcodes, you can restrict the autofocus range. This makes finding the focus much quicker, because iOS doesn’t have to go through the entire focus range to determine the point where the image is in focus.
The following code snippet contains all the configuration optimizations for scanning nearby barcodes:

3.2.8. Opening a scanned web address in Mobile Safari
Your scanning app so far marks 2D barcodes when they appear within the interest box. You’ve also optimized the scanning experience for nearby 2D barcodes. To wrap up this example, you need to do something with the decoded QR Codes.
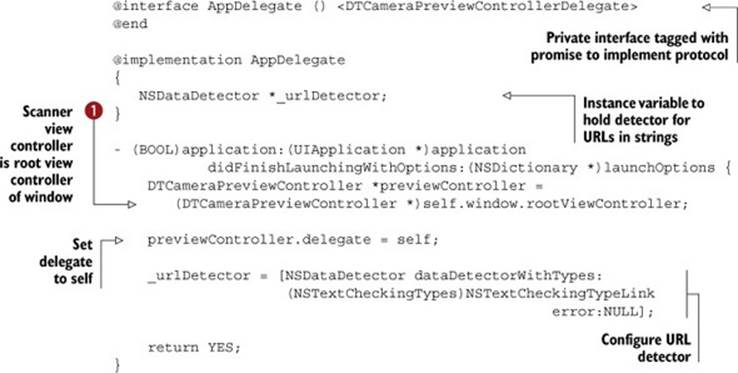
In the app, the scanner view controller is the root of the storyboard. Storyboards unfortunately have no facility to connect an outlet defined in the app delegate, but the NIB loader will set the window’s rootViewController property to the root view controller defined by the storyboard. Then you can grab a reference and set the scan delegate, as shown in the following code ![]() .
.
To get the web address from the detected code’s stringValue, you can employ an NSDataDetector. If you configure it for NSTextCheckingTypeLink, it will detect many kinds of URLs, including email addresses:
Whenever the scanner controller detects a new barcode, you want to hear about it. You need to implement the previewController:didScanCode:ofType: method from your scanner delegate protocol:
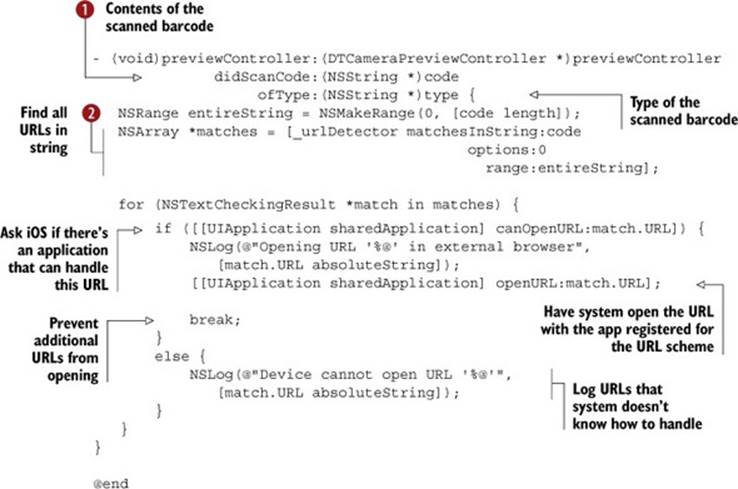
In the code parameter ![]() , you receive the entire string contents of a scanned barcode. The URL detector
, you receive the entire string contents of a scanned barcode. The URL detector ![]() is tasked with finding contained URLs, and if one is found, you call openURL: to have iOS open it in Mobile Safari.
is tasked with finding contained URLs, and if one is found, you call openURL: to have iOS open it in Mobile Safari.
Congratulations! You’ve now built your own QR Scanner app. Any HTTP or HTTPS URLs will be opened by Mobile Safari, because it’s the system-provided handler for these URL schemes.
Other QR Code contents
This example demonstrates only the most basic use case for scanning QR Codes: URLs. Any URL with a scheme supported by the iOS device will work. For example, http:// URLs are opened by Mobile Safari.
There are many different kinds of barcode content that can be represented with text-based QR Codes. Many kinds of content have become de facto standards because of their use by Japan’s NTT DOCOMO and the open source Zebra Crossing project. All of these types use text tags followed by the field values:
· Calendar event
· Contact information
· Email address
· Geolocation
· Phone number
· Text message (SMS)
· URL bookmark with title
· WiFi network access setup
Documentation is scarce, but you can infer the structure of the tags by generating some codes with the Zebra Crossing QR Code generator (http://zxing.appspot.com/generator/).
3.3. Summary
Building a QR Code scanner taught you how to plug a metadata output into your AV Foundation video pipeline. All this knowledge is applicable to both 2D and 1D barcodes, with slight variations. Depending on your intended usage scenario, there are a few adjustment screws you’ll want to turn to make the experience for your users delightful.
You’ve seen how the metadata objects’ delegate works, how to filter the events, and how to mark the corners of 2D barcodes. (Because of the different ways that 1D barcode detection is implemented, you can’t get nice corners for 1D barcodes.) You also restricted the rectangle of interest to facilitate easier targeting of one barcode among several. Finally, you optimized the camera settings for better scanning results.
These are the key takeaways of this chapter:
· AVCaptureMetadataOutput plugs into your AVCaptureSession for detecting faces and 1D and/or 2D barcodes.
· The delegate object implementing the AVCaptureMetadataOutputObjectsDelegate’s method receives an array of all detected barcodes multiple times per second.
· You can mark detected 2D barcodes via the reported corners. This won’t work for 1D barcodes because 1D detection uses scan lines.
· You can specify a rectOfInterest to limit the area of the video frame where barcodes are detected.
· You can optimize the UI and camera settings for the scanning usage scenario so that the user will know what to do with the video preview. Some camera settings can enhance the scanning performance and user experience.
In the next chapter, you’ll explore creating Passbook passes and reuse the barcode scanning code developed in chapters 2 and 3 to build a pass-verification app.
All materials on the site are licensed Creative Commons Attribution-Sharealike 3.0 Unported CC BY-SA 3.0 & GNU Free Documentation License (GFDL)
If you are the copyright holder of any material contained on our site and intend to remove it, please contact our site administrator for approval.
© 2016-2026 All site design rights belong to S.Y.A.