Swift Development with Cocoa (2015)
Chapter 16. EventKit
The user’s life isn’t confined to the use of computers and phones, and many people even use technology to manage real-life interactions with other human beings. One capability of Apple devices is calendaring and scheduling, which is usually managed through built-in applications (the Calendar app on iOS and OS X).
However, it can be very useful for third-party applications to be able to access the calendar, either to create new appointments or to view what the user has lined up for the day. This information is exposed via EventKit, the calendar data store API.
In this chapter, you’ll learn how to work with EventKit to access the user’s calendar. The same API applies to both OS X and iOS; in this chapter, the sample code will be written for OS X.
Understanding Events
All of the information that relates to the user’s calendars comes from the EventKit event store. This is the database of the user’s calendars, which themselves contain calendar events. The event store is represented by the EKEventStore class, and you create an instance of this class to begin working with the calendar.
The event store contains multiple calendars, which are EKCalendar objects. Each calendar has information like its name, whether it’s editable, whether it’s a subscribed calendar, and so on.
An “event” is an entry in the user’s calendar, and is represented as an EKEvent object. Events contain several key pieces of information, including:
§ A text label describing what the event is
§ The date and times that the event begins and ends
§ The location of the event
§ When the event was created and last modified
EKEvent is actually a subclass of the EKCalendarItem class, because EKCalendars can contain not only events, but also reminders, which are scheduled alerts.
NOTE
Reminders are available only on OS X and iOS 6 and later.
Events can also be set to repeat, and the rules for this repetition can be complex. For example, you can have an event that repeats every day, every second day, on the second Tuesday of every month, and so on.
In addition to this repeating behavior, it’s possible to detach a specific instance of a repeating event. For example, imagine you have an event on the calendar that repeats every week on Monday morning, and one week you need to push it back. However, you only want to move this one instance, not the entire repeating set. When you move the event, your calendaring application asks if you want to move all future events, or just the specific one you just moved. Your answer indicates to the system whether you want to create a detached event or modify the entire repeating event.
Accessing the Event Store
To get access to the calendar system, you create an instance of EKEventStore, indicating what kinds of calendar items you want to get from the store (either events or reminders).
To connect to the store, you create an EKEventStore object:
var store = EKEventStore()
Once you create the EKEventStore, you must ask the user for permission to access the calendars by using the requestAccessToEntityType(entityType:completion:) method. If the user hasn’t already granted permission to access calendar events of that type, an alert box will pop up asking the user if it’s OK for your application to access the calendar. Until the user grants permission, any requests for data will return nil.
The second parameter of the requestAccessToEntityType(entityType:completion:) method is a closure, which takes two parameters of its own: a Bool that indicates whether the user granted permission or not, and an optional NSError that, if the Bool is false, describes why permission wasn’t granted. This could be for a variety of reasons, including the user having parental permissions that disallow calendar access, or the user simply saying no:
store.requestAccessToEntityType(EKEntityTypeEvent) {
(success: Bool, error: NSError!) in
println("Got permission = \(success); error = \(error)")
}
NOTE
The alert box is only shown once. When you run the app for a second time, the system will remember the user’s decision. When you call requestAccessToEntityType(entityType:completion:), the completion handler will be called immediately.
On the first launch, the event store might not have permission at the moment you create the EKEventStore object, but it might gain permission later. When the user grants (or revokes) permission, an EKEventStoreChangedNotification is broadcast by the object. This notification is also sent when the contents of the event store changes; in both cases, it’s a signal to refresh whatever views you have that are displaying the contents of the calendar.
NOTE
The alert box is only presented once. If the user revokes access later, the next time requestAccessToEntityType is called, it will immediately fail.
The alert box will only be displayed again if the user deletes and then reinstalls the app. The idea behind this is that the app should never pester the user for permission through the alert box—if your app really, really needs access to the calendar, then tell them that through your app’s interface.
Accessing Calendars
To get the list of calendars available to the user, simply ask the event store. Because a calendar can support only events, or only reminders, you need to specify what you want the calendars that you get back to support.
To get the calendars that support storing events, you use the calendarsForEntityType method, and pass in the EKEntityTypeEvent value as the type parameter:
var eventCalendars =
store.calendarsForEntityType(EKEntityTypeEvent) as [EKCalendar]
This returns an array of EKCalendars, which you can get events out of.
Getting the array of calendars that support reminders is just as easy—you just pass in the EKEntityTypeReminder parameter:
var reminderCalendars =
store.calendarsForEntityType(EKEntityTypeReminder) as [EKCalendar]
Once you have a calendar, you can start working with events inside it.
Accessing Events
A calendar is a potentially infinitely large collection of data. If a calendar contains any repeating events that don’t have an end date, such as a weekly meeting or someone’s birthday, then it’s not possible to ask for “all events,” as that collection is of an infinite size. Instead, you need to specify the date range that you’re interested in receiving events for.
While you’re filtering based on date range, it’s also useful to filter based on other properties as well, including time of day, event name, and so on. The standard filtering tool in Cocoa and Cocoa Touch is NSPredicate, which allows you to specify parameters for finding events in a data set.
NOTE
NSPredicate is also useful outside of EventKit. For example, you can use an NSPredicate to filter an array to only contain objects that match certain parameters. For more information on this useful class, check out its Xcode documentation.
To construct an event-finding predicate, ask your EKEventStore to provide you with a predicate that finds events between a start date and an end date, as well as the calendars that the events should be in. This is done with the predicateForEventsWithStartDate method:
var startDate : NSDate = ...
var endDate : NSDate = ...
var predicate = self.store.predicateForEventsWithStartDate(self.date,
endDate: endDate,
calendars: eventCalendars)
NOTE
The startDate and endDate variables in the preceding code are placeholders. We’ll be working with dates in Building an Events Application.
Once you have this NSPredicate, you can give it back to the EKEventStore and it will retrieve all matching calendar items:
var events = store.eventsMatchingPredicate(predicate) as [EKEvent]
This array contains all matching events, from which you can extract information.
Working with Events
Modifying an event or reminder is as simple as modifying its properties. For example, to modify an event’s title, you just change its title property:
var event : EKEvent = events[0]
event.title = "Party Times"
NOTE
title is actually a property on EKCalendarItem, the superclass of EKEvent. This means that it exists in both EKEvent and EKReminder.
However, changing properties on an event or reminder does not update the shared calendar system immediately. When the calendar item has finished being modified, it must be explicitly saved back to the event store. You do this by using the method saveEvent, which takes as its parameters the event that you’re saving, the span of time that the changes should apply for, and a reference to an NSError variable that the method will store error information in if anything goes wrong.
The span of time is represented as an EKSpan, which is simply an enumeration with two options: this event or future events. When you modify a repeating event and choose to make those changes apply only to one specific instance, the instance will become detached:
var theEvent = EKEvent()
var error : NSError? = nil
store.saveEvent(theEvent, span: EKSpanThisEvent, commit: true, error: &error)
WARNING
The EKEventStore that you use to save the event needs to be the same as the one you got the event from. If you get an EKEvent from one EKEventStore and try to save it in a different one, your app will throw an exception.
If you want to copy an event from one place to another, you need to create your own new EKEvent, provide it with the information you want (from another EKEvent), and then save it into the destination event store.
It’s possible that an EKEvent that you’re working with might have changed while your code was modifying it. Whenever the calendar changes, the EKEventStore that you’re working with posts an EKEventStoreChangedNotification to let you know that the contents of the event store have been modified. To ensure that an EKEvent is up to date with the most recent information inside the calendar, use the refresh method:
var event : EKEvent = ...
event.refresh()
Refreshing an event means that properties that have changed since you got the event from the event store will be updated to match the most recent version. Note that any properties that you have changed will not.
For example, say you get an EKEvent and change its title to “Excellent Party Times,” but don’t save it. You then modify the title of that same event using the Calendar application, and then save your modified EKEvent object. In this case, it will be your version that is written to the event store.
NOTE
This means that if you want to revert any changes that you’ve made to an EKEvent, all you have to do is not save them.
You can also call the reset method on your EKEventStore to reset the entire event store to its last saved state.
You can also delete events. Removing an event is straightforward: all you need to do is call the removeEvent method on your EKEventStore. This behaves much like the method used for saving events—you simply provide the event to be removed, indicate whether you want to remove a single event or all future events (if the event is a repeating one), and provide a reference to a variable for an NSError to be placed in if something goes wrong:
var theEvent : EKEvent = ...
var error : NSError? = nil
store.removeEvent(theEvent, span: EKSpanFutureEvents,
commit: true, error: &error)
Building an Events Application
To wrap things up, we’re going to build an app that displays events for the user, depending on which day they’ve selected.
This app presents a date picker and a list of events. When the date picker’s selected date changes, the list updates to show the user’s events for that day:
1. Create a new Cocoa application called Events.
To work with EventKit, we need to add the EventKit framework.
2. Add EventKit.framework to the project. Open AppDelegate.swift, and add the following code at the top:
import EventKit
First, we’ll write the code that will expose the calendar information. We’re going to create several properties, some of which will be backed by instance variables and some of which will not.
Specifically, the application will keep track of the following information:
§ The currently selected date
§ The event store used to access the calendar
§ The available calendars
§ The events for the currently selected date
The event store and date properties will be backed by an instance variable, while the available calendars and events properties will be dynamically computed when needed (based on the selected date and event store).
When the user selects a date, the app will query the calendar and ask for all events that fall between that date and one day following that. This means that the time of that first date should be midnight, in order to catch all events that happen within one day after that.
We’ll first set up the event store, and then add the properties for the date, the list of events, and the list of calendars that contain those events:
1. Set up the EKEventStore. The next step is to set up the event store, which is kept in the store property, which will be lazily loaded. That is, the first time the property is accessed, an EKEventStore object will be created and assigned to the property. This keeps us from having to do any deliberate setup in the application’s init or awakeFromNib methods.
This can be done through Swift’s support for lazy properties. By declaring a property as lazy, the object will only be created when the property is accessed for the first time by your code:
lazy var store : EKEventStore = EKEventStore()
func applicationDidFinishLaunching(notification: NSNotification!) {
self.store.requestAccessToEntityType(EKEntityTypeEvent) {
(success: Bool, error: NSError!) in
println("Got permission = \(success); error = \(error)")
}
}
2. Add the date property, by adding the following code to AppDelegate:
3. var date : NSDate = NSDate() {
4. willSet {
5. // Convert the provided date to one at midnight on the same day
6. var dateComponents =
7. NSCalendar.currentCalendar().components(NSCalendarUnit.DayCalendarUnit |
8. NSCalendarUnit.MonthCalendarUnit |
9. NSCalendarUnit.YearCalendarUnit, fromDate: newValue)
10.
11. if let dateResult =
12. NSCalendar.currentCalendar().dateFromComponents(dateComponents) {
13. self.date = dateResult
14. }
15.
16. }
}
NSDateComponents is a class that can perform calculations on dates, given a calendar. In this case, we’re asking the class to get the day, month, and year from a date, and then create a date from that—thereby creating an NSDate object on the same date as the provided one, but with a time value set to midnight on that day.
Additionally, we want to disregard the time information from the date; when you ask NSDate for the current date, it returns an NSDate corresponding to the current date and time. We don’t want that, so we need to do some calendar calculation to make the time value correspond to midnight on the provided day, thus ensuring that the time value is consistent no matter which date we select.
We can now add the calendars and events properties. These don’t have any instance variables, because all they’ll do is retrieve information from the event store.
3. First, to add the calendars property, add the following code to AppDelegate:
4. var calendars : [EKCalendar] {
5. get {
6. return self.store.calendarsForEntityType(EKEntityTypeEvent)
7. as [EKCalendar];
8. }
}
Next, add the following code to add the events property:
var events : [EKEvent] {
get {
var endDate = date.dateByAddingTimeInterval(24 * 60 * 60)
var predicate =
self.store.predicateForEventsWithStartDate(self.date,
endDate: endDate, calendars: self.calendars)
return self.store.eventsMatchingPredicate(predicate) as [EKEvent]
}
}
The calendars method simply returns the array of calendars that support events.
The events method is a little more complex. Because a request to the event store requires that we provide a start date and an end date for our query, we need to create an end date that’s one day after our start date (which we’ll set up in a moment).
Because there are 24 hours in a day, 60 minutes in an hour, and 60 seconds in a minute, we can create an NSDate that’s one day after the start date with the dateByAddingTimeInterval method on NSDate. This method takes as its sole parameter the number of seconds in the future that the new date should be; thus, we want a date that’s 86,400 seconds in the future, which is 24 times 60 times 60.
Given these two dates, we call predicateForEventsWithStartDate and provide the start date, end date, and the calendars to check. We then get the array of events that matched that predicate, and return it.
There’s one last method to create: one that will be used to indicate to the system that when the date changes, the list of events will also change.
4. Add the keyPathsForValuesAffectingEvents method to AppDelegate:
5. class func keyPathsForValuesAffectingEvents() -> NSSet! {
6. return NSSet(object: "date")
}
This method returns an NSSet containing the list of properties that, when modified, cause the events property to change. This method is checked by the Cocoa bindings system whenever a property changes on the AppDelegate object, and helps us bind the code to the view with minimal additional work.
With all of that out of the way, it’s finally time to create the interface. Fortunately, because of the work we’ve done in the code, it’s very simple to set up.
1. Open MainMenu.xib. Drag an array controller into the outline. Bind its content array to the app delegate, with the model key path self.events. Open the Identity Inspector, and change its label to Events.
Drag in a date picker and a table view. Select the date picker, and change its style to Graphical. This creates a nice calendar control.
When you’re done, the finished interface should look something like Figure 16-1.
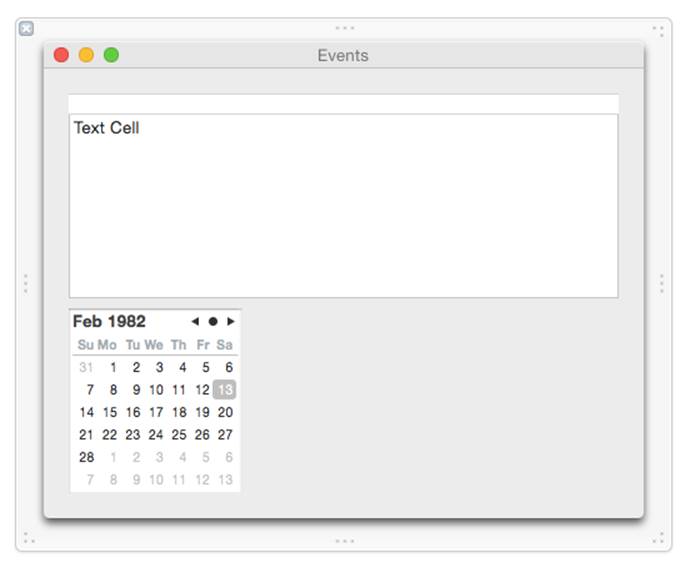
Figure 16-1. The finished interface
2. Bind the date picker. The date picker needs to control the date property on the app delegate. To make this happen, select the date picker, open the Bindings Inspector, and bind the Value property to the app delegate, with the model key path self.date.
All we need to do now is bind the table view to the list of events for the selected date. Because this is exposed as the events property on the app delegate, and this property will automatically update its contents as the date is changed, the table view will always show the events for the selected date, even as the user changes it.
3. Bind the table view. Select the table view in the outline (it’s inside the scroll view), and bind its content to the Events array controller that you set up earlier. Set the controller key to arrangedObjects.
Select the table column (inside the table view in the outline), and bind its Value to the Events array controller. Set the controller key to arrangedObjects and the model key path to self.title.
You’re done! Run the app, and try selecting different dates in the date picker.
NOTE
If nothing is appearing in the table view, you should double-check to make sure that there is actually an event on the date you’re trying to look at. One of the authors, who shall remain nameless (although it was Jon), spent more than 10 minutes trying to debug the app before realizing his mistake.
User Privacy
Just like a user’s location (see Working with Location) and contacts, the events on the user’s calendar are considered private and sensitive information. Apps aren’t allowed to access the calendar unless the user explicitly grants them permission, and they are expected to behave properly when they don’t receive this permission—if your app can’t access the calendar, it should handle this gracefully. Additionally, the user can revoke access to the calendar (or any of the other private data stores) at any time.
This means that you can’t write code and assume that you’ll get access to the information your application needs. Instead, your code needs to gracefully fail—if your app can get any useful work done without access to the calendar, it should go ahead and do so, and if it is rendered inoperable by not having access, it should tell the user in a friendly manner (don’t pop up a scary “error!” dialog box).
If you’re writing an application to be submitted to the App Store, you can expect that whoever reviews your application will disallow calendar access to determine how the app behaves without it. If your application doesn’t cope, expect it to be rejected.
All materials on the site are licensed Creative Commons Attribution-Sharealike 3.0 Unported CC BY-SA 3.0 & GNU Free Documentation License (GFDL)
If you are the copyright holder of any material contained on our site and intend to remove it, please contact our site administrator for approval.
© 2016-2026 All site design rights belong to S.Y.A.