Swift Development with Cocoa (2015)
Chapter 6. Drawing Graphics in Views
The fundamental class for showing any kind of graphical image to the user is the view. Graphical images are things like buttons, photos, and text—anything that the user can see.
Cocoa and UIKit provide a wide variety of controls that suit almost all needs—you can display text, images, buttons, and more. However, some data needs to be drawn in a specific way: you might want to draw a chart for data, or create a custom button class that displays exactly the way you want it to. If you’re making a graphics app, you’ll need to be able to display any kind of graphical content, which means that your code will need to know how to draw it.
In this chapter, you’ll learn how to create custom view objects that display any kind of image to the user. You’ll learn how to use the high-level APIs for drawing, and create a custom view class that will scale up to any size at all without losing quality. Finally, you’ll learn how to design your graphics to take advantage of the Retina display on iOS and OS X hardware.
How Drawing Works
Before we start writing code that draws content for the user to see, it’s helpful to review how graphics work in OS X and iOS. Note that the same terminology and techniques apply for both OS X and iOS, but the specific API is different.
When an application draws graphics, it does so by first creating a canvas for drawing in. Cocoa calls this the graphics context. The context defines, among other things, the size of the canvas and how color information is used (e.g., you can have a black-and-white canvas, a grayscale canvas, a 16-bit color canvas, etc.).
Once you have a graphics context to draw in, you start asking Cocoa to begin drawing content.
The fundamental drawing unit is the path. A path is just the name for any kind of shape: circles, squares, polygons, curves, and anything else you can imagine.
Paths can be stroked or filled. Stroking a path means drawing a line around its edge (Figure 6-1). Filling a path means filling it with a color (Figure 6-2).
Figure 6-1. A stroked path

Figure 6-2. A filled path
When you stroke or fill a path, you tell the drawing system which color you want to use. You can also use gradients to stroke and fill paths. The color that you use to stroke and fill can be partially transparent, which means that you can build up a complex graphic by combining different paths and colors (Figure 6-3).
Figure 6-3. A stroked and filled path
The Pixel Grid
Every display system in iOS and OS X is based on the idea of a grid of pixels. The specific number of pixels on the display varies from device to device, as does the physical size of each pixel. The trend is toward larger numbers of smaller pixels, because the smaller the pixels get, the smoother the image looks.
When you create a graphics context, you indicate what size that context should be. So, for example, if you create a context that is 300 pixels wide by 400 pixels high, the canvas is set to that size. Any drawing that takes place outside the canvas is ignored, and doesn’t appear on the canvas (Figure 6-4).
Creating a context defines a coordinate space where the drawing happens. This coordinate space puts the coordinate (0,0) in either the upper-left corner (on iOS) or the lower-left corner (on OS X). When you build a path, you specify the points that define it. So, for example, a line that goes from the upper-left corner (on iOS) to 10 pixels below and to the right looks like Figure 6-5.
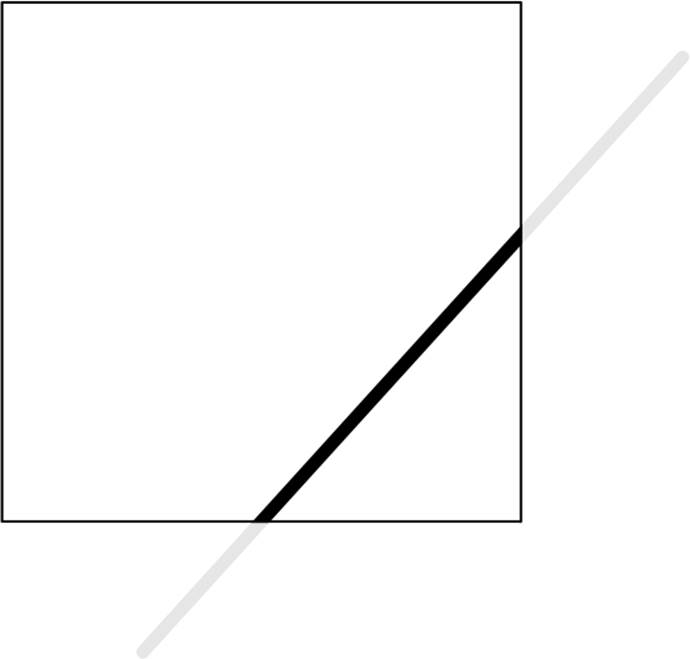
Figure 6-4. Content that is drawn outside of the context’s canvas doesn’t appear
Retina Displays
The newest devices sold by Apple feature a Retina display. A Retina display, according to Apple, is a screen where the pixels are so small that you can’t make out the individual dots. This means that curves and text appear much smoother, and the end result is a better visual experience for the user.
Retina displays are available on the MacBook Pro with Retina display, iPod touch 4th generation and later, iPhone 4 and later, Retina iPad Mini and later, and iPad third-generation and later.
Retina displays are so named because, according to Apple, a 300 dpi (dots per inch) display held at a distance of about 12 inches from the eye is the maximum amount of detail that the human retina can perceive.
Apple achieves this resolution by using displays that are the same physical size as more common displays, but double or triple the resolution. For example, the screen on the iPhone 3GS (and all previous iPhone and iPod touch models) measures 3.5 inches diagonally and features a resolution of 320 pixels wide by 480 pixels high. When this resolution is doubled in the iPhone 4’s Retina display, the resolution is 640 by 960.
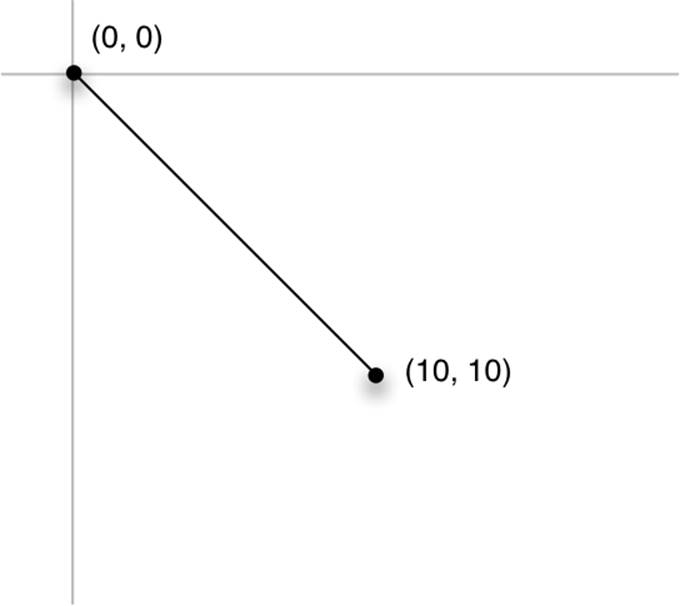
Figure 6-5. Drawing a line from (0,0) to (10,10) on iOS
This increase in resolution can potentially lead to additional complexities for application developers. In all other cases where the resolution of a display has increased, everything on the screen appears smaller (because the drawing code only cares about pixel distances, not physical display size). However, on a double-resolution Retina display, everything remains the same size, because even though the pixels are twice as small, everything on the screen is drawn twice as large. The net result is that the graphics on the screen look the same size, but much smoother.
Pixels and Screen Points
Of course, we application developers don’t want to write code for both Retina and non-Retina displays. Writing a chunk of code twice for the two resolutions would lead to twice the potential bugs!
To solve this problem, don’t think about pixels when you’re writing your graphics code and thinking about the positions of the points your paths are constructed with. Instead, think in terms of screen points.
A pixel is likely to change between different devices, but a screen point does not. When you construct a path, you specify the position of each screen point that defines the path. On a non-Retina display, one screen point is equal to one pixel. On a double-resolution Retina display, one screen point is equal to four pixels—a square, two pixels wide and two high. On a triple-resolution Retina display, one screen point is nine pixels—a three-by-three box. This scaling is done for you automatically by the operating system.
The end result is that you end up with drawing code that doesn’t need to be changed for different resolutions.
Drawing in Views
As discussed earlier, objects that display graphics to the user are called views. Before we talk about how to make your own view objects that display your pixels before the user’s very eyes, let’s take a closer look at how views work.
A view is defined by a rectangle inside its content window. If a view isn’t inside a window, the user can’t see it.
NOTE
Even though only one app is displayed at a time on iOS, all views shown on the screen are technically inside a window. The difference is that only one window is shown on the screen at a time, and it fills the screen.
Frame Rectangles
The rectangle that defines the view’s size and position is called its frame rectangle.
Views can contain multiple subviews. When a view is inside another view (its superview), it moves when the superview moves. Its frame rectangle is defined relative to its superview (Figure 6-6).
On OS X, all views are instances of NSView (or one of NSView ’s subclasses). On iOS, they’re instances of UIView. There are some minor differences in how they work, but nothing that affects what we’re talking about here. For now, we’ll talk about NSView, but everything applies equally to UIView.
When the system needs to display a view, it sends the drawRect(rect:) message to the view. The drawRect method looks like the following:
override func drawRect(rect: NSRect) {
}
(This method is the same on iOS, but CGRect is used instead of NSRect.)
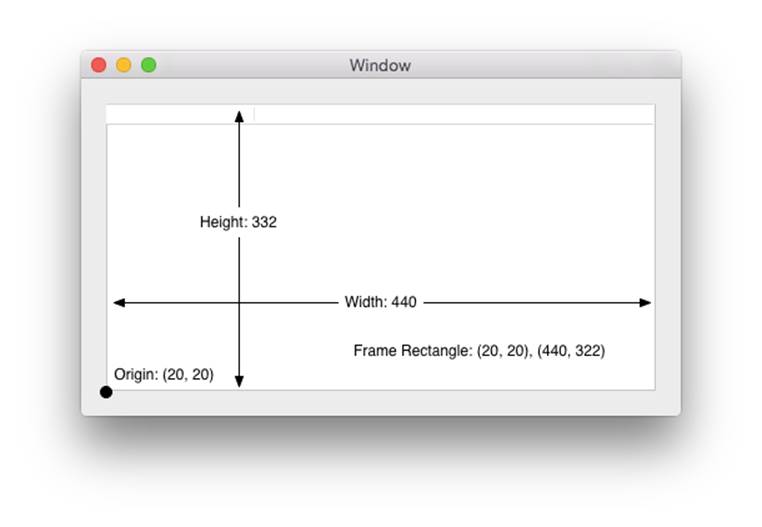
Figure 6-6. The frame rectangle for the view defines its position and size relative to its superview
When this method is called, a graphics context has already been prepared by the OS, leaving the method ready to start drawing. When the method returns, the OS takes the contents of the graphics context and shows it in the view.
The single parameter that drawRect receives is the dirty rectangle. This eyebrow-raising term is actually a lot more tame than it sounds—“dirty” is simply the term for “something that needs updating.” The dirty rectangle is the region of the view that actually needs updating. This concept becomes useful in cases where you have a view that was previously covered up by another view—there’s no need to redraw content that was previously visible, and so the dirty rectangle that’s passed to drawRect will be a reduced size.
Bounds Rectangles
The frame rectangle defines the size and position of its view, but it’s also helpful for a view to know about its size and position relative to itself. To support this, view objects also provide a bounds rectangle. While the frame rectangle is the view’s size and position relative to its superview’s coordinate space, the bounds rectangle is the view’s position and size relative to its own coordinate space. This means that the (0,0) coordinate always refers to the upper-left corner on iOS (the lower-left on OS X).
NOTE
While the bounds rectangle is usually the same size as the frame rectangle, it doesn’t have to be. For example, if the view is rotated, the frame rectangle will change size and position, but the bounds will remain the same.
Building a Custom View
We’ll now create a custom view that displays a solid color inside its bounds. This will be a Mac playground, so we’ll be using NSView. Later in the chapter, we’ll see how the same techniques apply to iOS and the UIView class. Here are the steps you’ll need to take:
1. Create the view class. To follow along with the code shown in this chapter, create a new playground for OS X. Next, add the following code to it:
2. class MyView : NSView {
3. override func drawRect(rect: NSRect) {
4.
5. }
}
6. Once you’ve defined the class, create an instance of it:
7. let viewRect = NSRect(x: 0, y: 0, width: 100, height: 100)
let myEmptyView = MyView(frame: viewRect)
8. Create an instance of the class. At this point, you can preview the view. In the righthand pane of the playground, you’ll see the result of creating that instance (it will appear as the text “MyView”).
To the right of that, you’ll see a circle. Click on that, and a new pane will open on the right, showing a preview (Figure 6-7). Now, when you make changes to your class, you’ll see the view update live. It’s blank for now, but you’ll be changing that very shortly.

Figure 6-7. Previewing a view
Filling with a Solid Color
Let’s start by making the view fill itself with the color green. Afterward, we’ll start making the view show more complex stuff.
Replace the drawRect method of MyClass with the following code:
override func drawRect(rect: NSRect) {
NSColor.greenColor().setFill()
let path = NSBezierPath(rect: self.bounds)
path.fill()
}
This view code creates an NSBezierPath object, which represents the path that you’ll be drawing. In this code, we create the Bézier path with the bezierPath(rect:) method, which creates a rectangular path. We use the view’s bounds to create a rectangle that fills the entire view.
Once the path is created, we can fill it. Before we do that, however, we tell the graphics system to use green as the fill color. Colors in Cocoa are represented by the NSColor class, which is capable of representing almost any color you can think of.[2] NSColor provides a number of convenience methods that return simple colors, like green, red, and blue, which we use here.
So, we create the path, set the color, and then fill the path. The end result is a giant green rectangle.
NOTE
The exact same code works on iOS, with two changes: NSBezierPath becomes UIBezierPath, and NSColor becomes UIColor:
override func drawRect(rect: CGRect) {
UIColor.greenColor().setFill()
let path = UIBezierPath(rect: self.bounds)
path.fill()
}
Now run the application. The view you added will display as green, as shown in Figure 6-8.
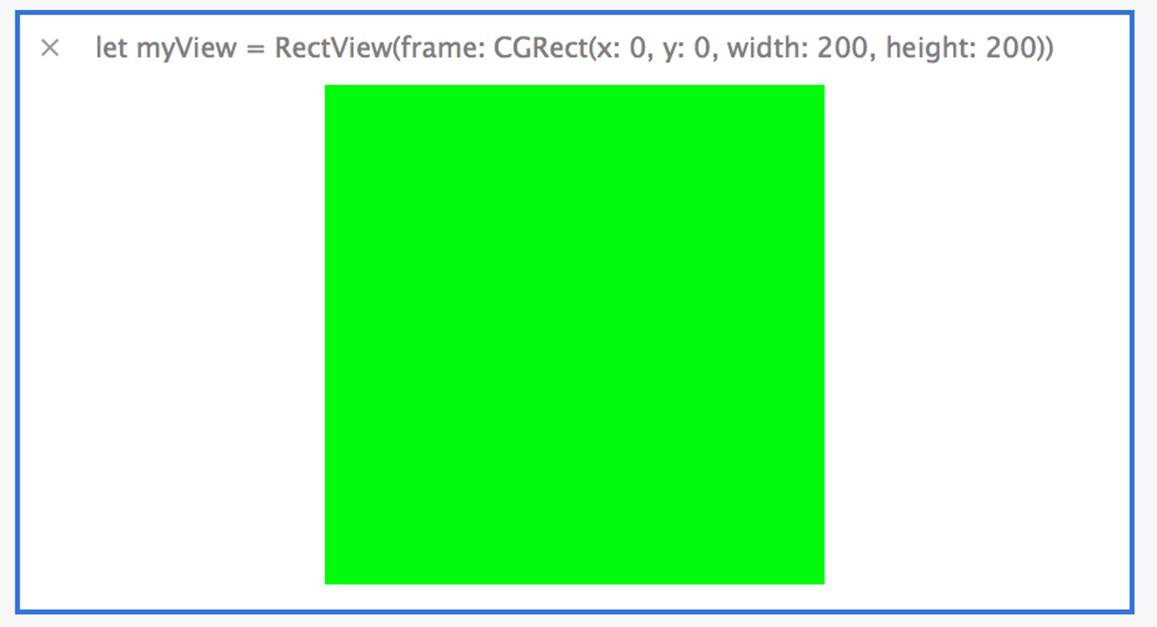
Figure 6-8. A green view
Working with Paths
Let’s now update this code and create a slightly more complex path: a rounded rectangle. We’ll also stroke the path, drawing an outline around it.
Replace the drawRect method with the following code:
override func drawRect(rect: NSRect) {
var pathRect = NSInsetRect(self.bounds, 1, 1);
var path = NSBezierPath(roundedRect:pathRect, xRadius:10, yRadius:10);
path.lineWidth = 4
NSColor.greenColor().setFill();
NSColor.blackColor().setStroke();
path.fill()
path.stroke()
}
The first change you’ll notice is a call to the NSInsetRect function. This function takes an NSRect and shrinks it while preserving its center point. In this case, we’re insetting the rectangle by one point on the x-axis and one point on the y-axis. This causes the rectangle to be pushed in by one point from the left and one point from the right, as well as one pixel from the top and bottom.
We do this because when a path is stroked, the line is drawn around the outside—and because the bounds are the size of the view, some parts of the line are trimmed away. This can look ugly, so we shrink the rectangle a bit to prevent the problem.
We then create another NSBezierPath, this time using the newly shrunk rectangle. This path is created by calling the bezierPath(roundedRect:xRadius:yRadius:) method, which lets you specify how the corners of the rounded rectangle are shaped.
The final change to the code is setting black as the stroke color, and then stroking the path after it’s been filled.
Now run the application. You’ll see a green rounded rectangle with a black line around it (Figure 6-9).
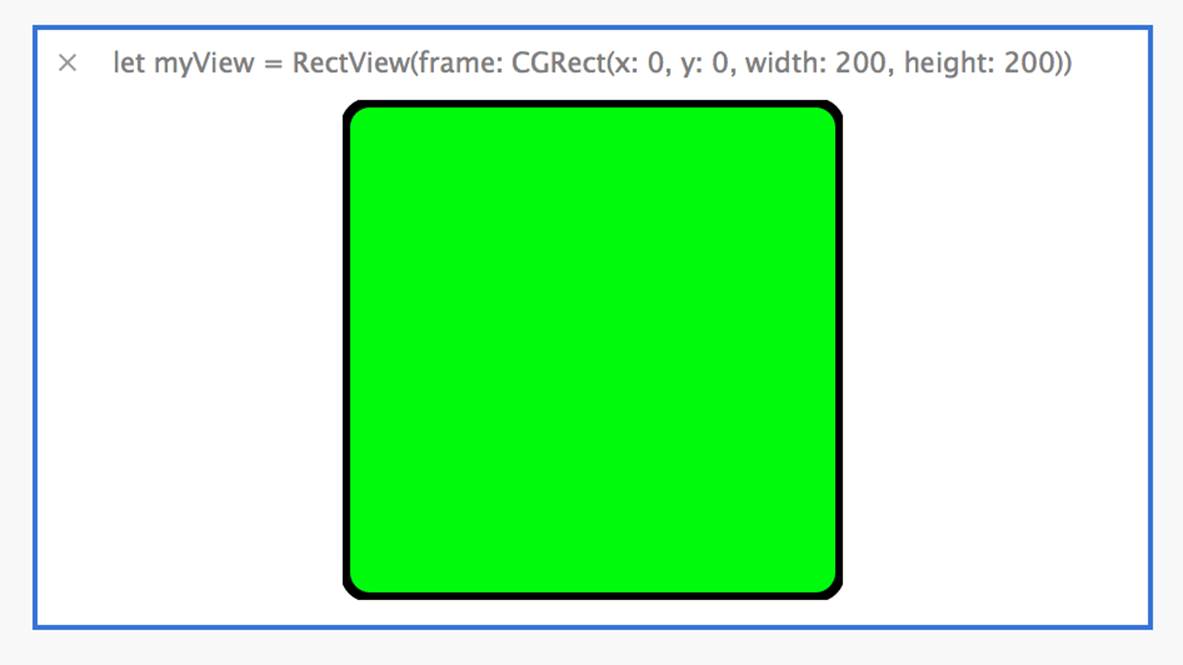
Figure 6-9. A stroked rounded rectangle
NOTE
All drawing operations take place in the order in which you call them. In this code, we stroke the rectangle after filling it. If we instead swapped the order of the calls to path.fill() and path.stroke(), we’d get a slightly different effect, with the green fill overlapping the black stroke slightly.
Creating Custom Paths
Creating paths using rectangles or rounded rectangles is useful, but you often want to create a shape that’s entirely your own—a polygon, perhaps, or an outline of a character.
The NSBezierPath class is capable of representing any shape that can be defined using Bézier curves. You can create your own custom curves by creating a blank curve and then adding the control points that define the curve. Once you’re done, you can use the finished NSBezierPathobject to fill and stroke, just like any other path.
To create a custom path, you first create an empty path, and then start issuing commands to build it. As you build the path, you can imagine a virtual pen that you move around the canvas. You can:
§ Move the pen to a point
§ Draw a line from where the pen currently is to another point
§ Draw a curve from where the pen currently is to another point, using two additional control points that define how the curve bends
§ Close the path by drawing a line from where the pen currently is to the first point
We’ll now update our drawing code to draw a custom shape by replacing the drawRect method with the code below. This code works out how to draw the path by calculating the points that lines should be drawn between by first calculating a rectangle to draw with, and then asking that rectangle about where to find its leftmost edge, rightmost edge, and so on:
override func drawRect(rect: NSRect) {
var bezierPath = NSBezierPath()
// Create a rectangle that's inset by 5% on all sides
var drawingRect = CGRectInset(self.bounds,
self.bounds.size.width * 0.05,
self.bounds.size.height * 0.05);
// Define the points that make up the drawing
var topLeft = CGPointMake(CGRectGetMinX(drawingRect),
CGRectGetMaxY(drawingRect));
var topRight = CGPointMake(CGRectGetMaxX(drawingRect),
CGRectGetMaxY(drawingRect));
var bottomRight = CGPointMake(CGRectGetMaxX(drawingRect),
CGRectGetMinY(drawingRect));
var bottomLeft = CGPointMake(CGRectGetMinX(drawingRect),
CGRectGetMinY(drawingRect));
var center = CGPointMake(CGRectGetMidX(drawingRect),
CGRectGetMidY(drawingRect))
// Start drawing
bezierPath.moveToPoint(topLeft)
bezierPath.lineToPoint(topRight)
bezierPath.lineToPoint(bottomLeft)
bezierPath.curveToPoint(bottomRight,
controlPoint1: center,
controlPoint2: center)
// Finish drawing by closing the path
bezierPath.closePath()
// Set the colors and draw them
NSColor.redColor().setFill()
NSColor.blackColor().setStroke()
bezierPath.fill()
bezierPath.stroke()
}
Now run the application. The window will show a red shape (Figure 6-10).

Figure 6-10. A filled custom path, showing a shape
Multiple Subpaths
So far, the paths that we’ve been drawing have contained only one subpath. A subpath is a connected series of points in a Bézier path. This means that you can have a path that contains two circles—every time you issued a stroke or fill command, you would be drawing those two circles.
Using subpaths is also a great way to create complex shapes. In this next example, we’ll create a circle that combines a rounded rectangle with a circle. We’ll do this by first creating a rounded rectangle path, and then adding a circular path to it. Replace the drawRect method with the following code:
override func drawRect(rect: NSRect) {
// Create an empty Bézier path
let bezierPath = NSBezierPath()
// Define the rectangles for the two components
let squareRect = CGRectInset(rect,
rect.size.width * 0.45,
rect.size.height * 0.05)
let circleRect = CGRectInset(rect,
rect.size.width * 0.3,
rect.size.height * 0.3)
let cornerRadius : CGFloat = 20
// Create the paths
var circlePath = NSBezierPath(ovalInRect: circleRect);
var squarePath = NSBezierPath(roundedRect: squareRect,
xRadius: cornerRadius,
yRadius: cornerRadius)
// Add them to the main path
squarePath.appendBezierPath(circlePath)
bezierPath.appendBezierPath(squarePath)
// Set the color and draw them
NSColor.redColor().setFill()
// Draw the path
bezierPath.fill()
}
In this code, we’re creating a new empty Bézier path. We then create an additional Bézier path that defines a circle, and append it to the first path. Next, we create a rounded rectangle path, and append it as well. This combined path is then drawn, as shown in Figure 6-11.
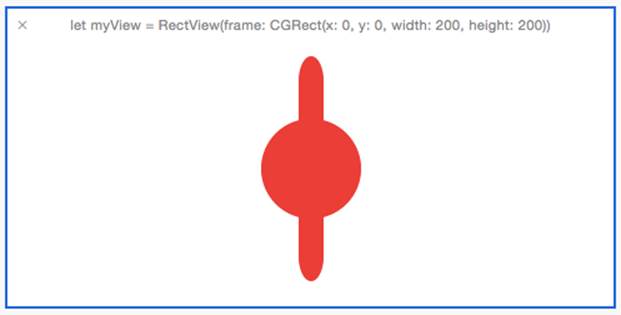
Figure 6-11. Multiple subpaths
Shadows
Shadows are a great way to imply depth in your graphics. If a shape casts a shadow, it appears “closer” than one that does not.
On OS X, shadows are drawn using the NSShadow class (on iOS, the technique is similar but not identical; see Drawing shadows on iOS). An NSShadow object stores all of the information needed to draw a shadow. Three pieces of information are needed:
§ The color to use for the shadow (an NSColor)
§ How many points the shadow should be offset by (an NSSize struct)
§ How blurry the shadow should be (a CGFloat)
To draw a shadow, you create an NSShadow object, provide it with the drawing settings you want to use, and then send it the set message:
let shadow = NSShadow() ![]()
shadow.shadowColor = NSColor.blackColor() ![]()
shadow.shadowOffset = NSSize(width: 3, height: -3) ![]()
shadow.shadowBlurRadius = 10 ![]()
shadow.set() ![]()
This code does the following things:
![]()
Creates the shadow object.
![]()
Sets the color to black.
![]()
Sets the shadow offset to be drawn three pixels to the right, and three pixels down from what’s drawn.
![]()
Sets the blur radius to be 10 points.
![]()
Sets the shadow. Anything drawn after this call will cast a shadow.
Saving and restoring graphics contexts
The set method causes the shadow to be applied to anything that you ask Cocoa to draw. This lasts until another shadow is set or the context is closed by the graphics system (which is what happens after the drawRect call returns). This means that once you set a shadow, it could stay around forever.
However, you might want to draw an object with a shadow followed by an object that doesn’t have one. To support this, and to help deal with similar cases where the graphics context itself is changed (such as when you set the stroke and fill color, or change the current transformation matrix or CTM—more on that in the section Transforms), the drawing system allows you to save the state of the context and restore it later.
In order to save the graphics context, you send the saveGraphicsState message to the NSGraphicsContext class. This saves all of your drawing settings and pushes the context state onto a stack for you to retrieve later. It doesn’t affect the pixels you’ve drawn, though:
NSGraphicsContext.saveGraphicsState()
When you’re done, you can retrieve the saved context state by sending the NSGraphicsContext class the restoreGraphicsState message. This pops the most recently saved state from the stack, and restores its settings (such as the shadow and colors):
NSGraphicsContext.restoreGraphicsState()
WARNING
Always make sure to balance every call to saveGraphicsState with a call to restoreGraphicsState, or unusual behavior such as crashes may occur.
Drawing a shadow
We’ll now update the drawing code to draw a rectangle with a shadow. Replace the drawRect(rect:) method with the following code:
override func drawRect(rect: NSRect) {
let drawingRect = CGRectInset(rect,
rect.size.width * 0.1,
rect.size.height * 0.1);
let cornerRadius : CGFloat = 20
let bezierPath = NSBezierPath(roundedRect: drawingRect,
xRadius: cornerRadius,
yRadius: cornerRadius)
NSGraphicsContext.saveGraphicsState()
let shadow = NSShadow()
shadow.shadowColor = NSColor.blackColor()
shadow.shadowOffset = NSSize(width: 3, height: -3)
shadow.shadowBlurRadius = 10
shadow.set()
NSColor.redColor().setFill()
bezierPath.fill()
NSGraphicsContext.restoreGraphicsState()
}
This code starts by creating the NSShadow object and prepares it much like we saw previously. A rounded rectangle NSBezierPath object is also created. The code then saves the graphics state, sets the shadow, and fills the rectangle path. Once the drawing is done, the graphics state is restored. Any further drawing that’s done won’t include a shadow.
Now run the application. You’ll see a box with a shadow (Figure 6-12).
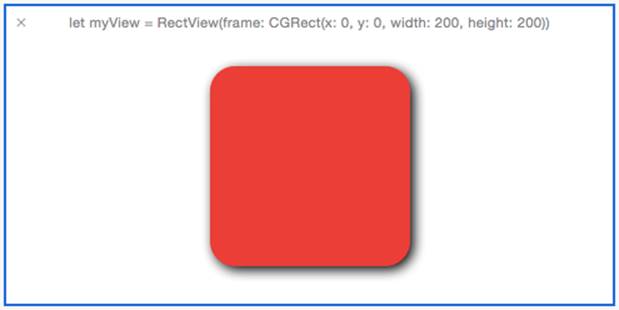
Figure 6-12. Drawing a shadow
Drawing shadows on iOS
The NSShadow class exists only in OS X. The techniques for drawing shadows on iOS are similar, but instead of using Objective-C classes to draw the shadows, you use some C functions that belong to Core Graphics, the C-based drawing API that Cocoa wraps.
Here’s the equivalent drawing code for drawing a shadow on iOS:
// Get the drawing context
var context = UIGraphicsGetCurrentContext()
// Work out a rectangle to draw in
var pathRect = CGRectInset(self.bounds,
self.bounds.size.width * 0.1,
self.bounds.size.height * 0.1)
// Create a rounded rect path
var rectanglePath = UIBezierPath(roundedRect: pathRect, cornerRadius: 20)
// Equivalent to NSGraphicsContext.saveGraphicsState()
CGContextSaveGState(context)
// Prepare the shadow
var shadow = UIColor.blackColor().CGColor
var shadowOffset = CGSize(width: 3, height: 3)
var shadowBlurRadius : CGFloat = 5.0
// This function creates and applies the shadow
CGContextSetShadowWithColor(context,
shadowOffset,
shadowBlurRadius,
shadow)
// Draw the path; it will have a shadow
UIColor.redColor().setFill()
rectanglePath.fill()
// Equivalent to NSGraphicsContext.restoreGraphicsState()
CGContextRestoreGState(context)
You’ll note that instead of creating an Objective-C object, we instead store the settings in separate variables and then call the CGContextSetShadowWithColor function. Also, instead of calling saveGraphicsState and restoreGraphicsState like we do on OS X, we callCGContextSaveGState and CGContextRestoreGState. Otherwise, it’s almost exactly the same.
NOTE
The shadow offset used on iOS is (3, 3) while on OS X it’s (3, -3). That’s because the coordinate system on iOS is flipped from that of OS X: on iOS, (0, 0) is the upper-left corner and positive y-values advance down the screen, while on OS X, (0, 0) is the lower-left corner and positive y-values advance up the screen.
Gradients
So far, we’ve worked entirely with solid colors when filling our shapes. However, the human eye quickly tires of seeing large blocks of solid color, and adding a gradient between two colors is a great way to add visual interest.
Drawing a gradient on OS X is similar to drawing a shadow—that is, you create an NSGradient object, and then set it up. However, instead of setting the gradient as a color, you instruct the gradient object to fill itself into a path object you provide. This is necessary because the gradient needs to know precisely where to start blending.
A gradient has at least two colors; when the gradient is drawn into an area, the area is filled with a smooth shade that blends between the gradient’s colors. Each color also has a location, which controls how the blending is performed.
When you draw the gradient, you also specify the angle at which you want the gradient to be drawn. If you provide an angle of zero, the gradient draws from left to right, using each color you provide in sequence. If you provide an angle of 90 degrees, the gradient draws from bottom to top.
Drawing gradients on iOS is different, because you use Core Graphics C functions instead of using the NSGradient class. See Drawing gradients on iOS.
When constructing the gradient, the only information you need to provide is the colors. You do this with the NSGradient(startingColor: endingColor:) method, which takes a pair of NSColor objects:
let startColor = NSColor.blackColor()
let endColor = NSColor.whiteColor()
let gradient = NSGradient(startingColor:startColor, endingColor:endColor)
WARNING
Do not actually use these colors in a real app. Black-to-white gradients look terrible on screens.
Then, when you want to draw the gradient, give it the shape you want it to fill (you can also stroke shapes with gradients):
gradient.drawInBezierPath(bezierPath, angle: 90)
We’ll now update the code to draw a gradient inside the custom view. Replace the drawRect method with the following code:
override func drawRect(rect: NSRect) {
// Defining the shape
let drawingRect = CGRectInset(rect,
rect.size.width * 0.1,
rect.size.height * 0.1);
let cornerRadius : CGFloat = 20
let bezierPath = NSBezierPath(roundedRect: drawingRect,
xRadius: cornerRadius,
yRadius: cornerRadius)
// Define the gradient
let startColor = NSColor.blackColor()
let endColor = NSColor.whiteColor()
let gradient = NSGradient(startingColor:startColor, endingColor:endColor)
// Draw the gradient in the path
gradient.drawInBezierPath(bezierPath, angle: 90)
}
Now run the application. You’ll see a black-to-white gradient (Figure 6-13).
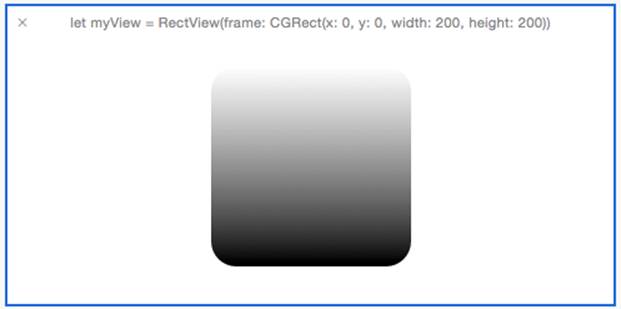
Figure 6-13. Drawing a gradient
Drawing gradients on iOS
On iOS, the process of drawing gradients is a little more verbose but conceptually the same. You still create an object, but it’s done via the Core Graphics C function calls.
Instead of providing a path object to a gradient and asking the gradient to draw itself, you instead clip the current graphics context, and then draw the gradient from one point on the screen to another. Clipping means to restrict the drawing to a shape, which prevents the view from being completely filled with the gradient.
In addition, instead of providing an angle at which the gradient should be drawn, you pass in the coordinates converted into the coordinate space of the view that the gradient should be drawn from and to.
Here’s the equivalent drawing code for iOS:
override func drawRect(rect: CGRect) {
let colorSpace = CGColorSpaceCreateDeviceRGB()
let context = UIGraphicsGetCurrentContext()
let gradientStartColor = UIColor(red: 0.1, green: 0.1, blue: 0.8,
alpha: 1)
let gradientEndColor = UIColor(red: 1, green: 0.6, blue: 0.8, alpha: 1)
let gradientColors : CFArray = [gradientStartColor.CGColor,
gradientEndColor.CGColor]
let gradientLocations : [CGFloat] = [0.0, 1.0]
let gradient = CGGradientCreateWithColors(colorSpace,
gradientColors, gradientLocations)
let pathRect = CGRectInset(self.bounds, 20, 20)
let topPoint = CGPointMake(self.bounds.size.width / 2, 20)
let bottomPoint = CGPointMake(self.bounds.size.width / 2,
self.bounds.size.height - 20)
let roundedRectanglePath = UIBezierPath(roundedRect: pathRect,
cornerRadius: 4)
CGContextSaveGState(context)
roundedRectanglePath.addClip()
CGContextDrawLinearGradient(context, gradient, bottomPoint, topPoint, 0)
CGContextRestoreGState(context)
}
Transforms
Drawing shapes is fine, but sometimes you want to be able to handle something slightly more complex, like rotating or stretching a shape. It’s certainly possible to simply create a new path by providing a different set of coordinates, but it’s often better to just ask the OS to do the rotation for you.
To do this, you use transforms, which are representations of transformation matrices. We won’t go into the math of them in this book, but they’re tools that can be used to translate, rotate, scale, skew, and generally perform any kind of distortion or manipulation of content.
All drawing that’s done by your code is affected by the current transform matrix (CTM), which transforms every path and drawing operation that’s performed. By default, the transform matrix is the identity matrix —that is, it doesn’t do anything at all. However, the CTM can be modified to affect your drawing.
To modify the CTM, you first need a reference to the low-level drawing context. This context, which is set up for you by Cocoa before your drawRect(rect:) method is called, is of type CGContextRef. On OS X, you get the context with the following code:
var context = NSGraphicsContext.currentContext()?.CGContext
On iOS, you get the context with this code:
var context = UIGraphicsGetCurrentContext()
Once you have the context, you can change the CTM. In the following example, we’ll change the CTM so that everything that gets drawn is rotated around the origin (the lower-left corner on OS X) by a few degrees.
NOTE
If you change the CTM, that change will stick around until the context’s state is restored. If you only want to rotate part of your drawing, save the context’s state before changing the CTM, and restore the state when you’re done. See Saving and restoring graphics contexts.
Replace the drawRect method with the following code:
override func drawRect(rect: NSRect) {
var pathRect = CGRectInset(self.bounds,
self.bounds.size.width * 0.1,
self.bounds.size.height * 0.1)
let cornerRadius : CGFloat = 20.0
var rotationTransform =
CGAffineTransformMakeRotation(CGFloat(M_PI) / 4.0)
var rectanglePath = NSBezierPath(roundedRect:pathRect,
xRadius:cornerRadius,
yRadius:cornerRadius)
var context = NSGraphicsContext.currentContext()!.CGContext
CGContextSaveGState(context)
CGContextConcatCTM(context, rotationTransform)
NSColor.redColor().setFill()
rectanglePath.fill()
CGContextRestoreGState(context)
}
Now run the application. You’ll see a rectangle that’s been rotated slightly (Figure 6-14).
Figure 6-14. A rotated rounded rectangle
[2] Almost any color, that is. All displays have physical limits that restrict their range of colors, and no displays currently on the market are capable of displaying impossible colors.