iOS Components and Frameworks: Understanding the Advanced Features of the iOS SDK (2014)
Chapter 2. Core Location, MapKit, and Geofencing
Maps and location information are some of the most useful features of iOS. They give apps the capability to help users find their way with relevant, local information. Apps exist today to help users find locations for very specific needs, find roads and directions, and use specialized transportation services, and even to bring an element of fun to visiting the same locations over and over. With the addition of Apple’s new maps, some powerful new features have been added that developers can take advantage of to take their apps to the next level.
iOS offers two frameworks to assist with locations and maps. The Core Location framework provides classes that help the device determine its location and heading, and work with location-based information. The MapKit framework provides the user interface aspect of location awareness. It includes Apple Maps, which provides map views, satellite views, and hybrid views in normal 2D and a new 3D view. MapKit offers the capability to manage map annotations like pins, and map overlays for highlighting locations, routes, or other features on a map.
The Sample App
The sample app for this chapter is called FavoritePlaces. It allows users to collect favorite places and view them on a map, along with the device’s current location. Users can use Core Location to geocode, or find the latitude and longitude, for an address. In addition, it can notify users when they go within a radius that they set around a favorite location. The app also provides a special location (signified with a green arrow) that can be dragged around the map to pinpoint a desired next destination; when that arrow is dropped at a location it will automatically reverse-geocode the location to display the name and address of the location.
Obtaining User Location
To use Core Location to obtain the current location, several steps need to take place. The app must obtain permission from the user to access the current location. In addition, the app needs to ensure that location services are enabled for the device before attempting to acquire a location. Once those requirements have been met, the app can start a location request and parse the result for usage once it is provided by Core Location. This section will describe all these steps in detail.
Requirements and Permissions
To use Core Location in an app, add the CoreLocation framework to the project target, and import the CoreLocation header as needed:
#import <CoreLocation/CoreLocation.h>
To use MapKit in an app, add the MapKit framework to the project target and import the MapKit header in any classes that need it:
#import <MapKit/MapKit.h>
Core Location respects the privacy of the user, and requires the user to provide permission to have access to the current location of the device. Location Services can be turned on or off for all apps on the device in the Settings app under the Privacy section, and can be turned on or off for each app individually, as shown in Figure 2.1.
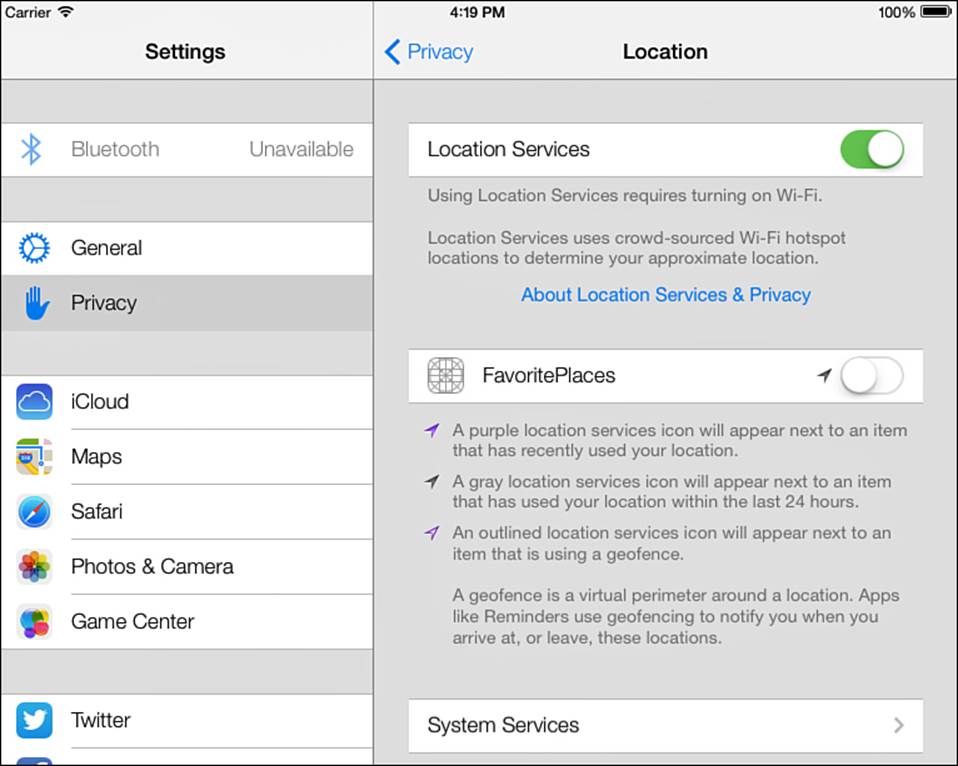
Figure 2.1 Settings.app, Location Services privacy settings.
To request permission to use Location Services, the app needs to ask CLLocationManager to start updating the current location, or the app needs to enable the Shows User Location setting on an instance of MKMapView. If Location Services are turned off for the device, Core Location will prompt the user to turn on Location Services in Settings.app to allow the app to access the current location, as shown in Figure 2.2.
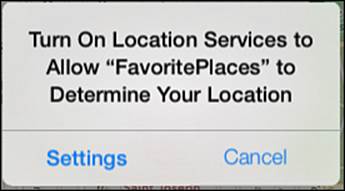
Figure 2.2 FavoritePlaces sample app location services disabled alert.
If the location manager has not requested permission previously to get the device’s location, it will present an alert view to ask the user’s permission, as shown in Figure 2.3.
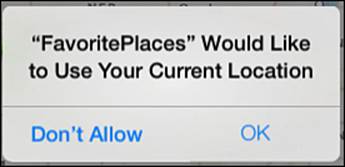
Figure 2.3 FavoritePlaces sample app location permission request alert.
If the user taps OK, permission will be granted and the location manager will acquire the current location. If the user taps Don’t Allow, permission for the current location will be denied, and the CLLocationManager’s delegate method for authorization status changes will be called inICFLocationManager.
- (void)locationManager:(CLLocationManager *)manager
didChangeAuthorizationStatus:(CLAuthorizationStatus)status
{
if (status == kCLAuthorizationStatusDenied)
{
[self.locationManager stopUpdatingLocation];
NSString *errorMessage =
@"Location Services Permission Denied for this app.";
NSDictionary *errorInfo =
@{NSLocalizedDescriptionKey : errorMessage};
NSError *deniedError =
[NSError errorWithDomain:@"ICFLocationErrorDomain"
code:1
userInfo:errorInfo];
[self setLocationError:deniedError];
[self getLocationWithCompletionBlock:nil];
}
if (status == kCLAuthorizationStatusAuthorized)
{
[self.locationManager startUpdatingLocation];
[self setLocationError:nil];
}
}
The sample app’s ICFLocationManager class uses completion blocks for location requests from the rest of the app to be able to easily handle multiple requests for the current location. The getLocationWithCompletionBlock: method will process any completion blocks after a location is available or an error has occurred so that the calling logic can use the location or handle the error as appropriate in the local context. In this case, the caller will present an alert view to display the location permission-denied error, as shown in Figure 2.4.
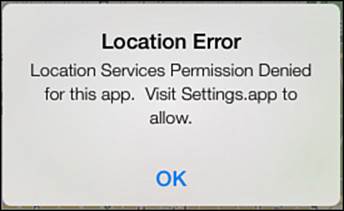
Figure 2.4 FavoritePlaces sample app location permission denied alert.
If the user changes the authorization status for location services, either for the app specifically or for the device overall (as shown in Figure 2.1), a delegate method can be implemented to respond appropriately.
- (void)locationManager:(CLLocationManager *)manager
didChangeAuthorizationStatus:(CLAuthorizationStatus)status
{
if (status == kCLAuthorizationStatusDenied)
{
[self.locationManager stopUpdatingLocation];
NSString *errorMessage =
@"Location Services Permission Denied for this app.
Visit Settings.app to allow.";
NSDictionary *errorInfo =
@{NSLocalizedDescriptionKey : errorMessage};
NSError *deniedError =
[NSError errorWithDomain:@"ICFLocationErrorDomain"
code:1
userInfo:errorInfo];
[self setLocationError:deniedError];
[self getLocationWithCompletionBlock:nil];
}
if (status == kCLAuthorizationStatusAuthorized)
{
[self.locationManager startUpdatingLocation];
[self setLocationError:nil];
}
}
In ICFLocationManager the method is implemented to display an error alert if the permission is denied, or to restart updating the current location and clear the last error if permission is granted.
Checking for Services
To directly determine whether location services are enabled for the device, there is a class method available on the CLLocationManager called locationServicesEnabled.
if ([CLLocationManager locationServicesEnabled])
{
ICFLocationManager *appLocationManager =
[ICFLocationManager sharedLocationManager];
[appLocationManager.locationManager startUpdatingLocation];
}
else
{
NSLog(@"Location Services disabled.");
}
This can be used to customize how the app deals with having or not having the current location available. An app that deals with locations should gracefully handle when the user does not grant access to the current location, and give the user clear instructions for enabling access to the current location if desired.
Starting Location Request
When permission for location services has been granted, an instance of CLLocationManager can be used to find the current location. In the sample app, ICFLocationManager provides a central class to manage location functionality, so it manages an instance ofCLLocationManager for the app. In the init method of ICFLocationManager, a CLLocationManager is created and customized for the desired location-searching approach.
[self setLocationManager:[[CLLocationManager alloc] init]];
[self.locationManager
setDesiredAccuracy:kCLLocationAccuracyBest];
[self.locationManager setDistanceFilter:100.0f];
[self.locationManager setDelegate:self];
A CLLocationManager has several parameters that can be set to dictate how it manages the current location. By specifying the desired accuracy parameter, the app can tell the CLLocationManager whether it is worthwhile to achieve the best accuracy possible at the expense of the battery, or whether a lower-level accuracy is preferred to preserve battery life. Using lower accuracy also reduces the amount of time necessary to acquire a location. Setting the distance filter indicates to the CLLocationManager how much distance must be traveled before new location events are generated; this is useful to fine-tune functionality based on changing locations. Lastly, setting the delegate for the CLLocationManager provides a place for custom functionality in response to location events and permission changes. When the app is ready to get a location, it asks the location manager to start updating the location.
ICFLocationManager *appLocationManager =
[ICFLocationManager sharedLocationManager];
[appLocationManager.locationManager startUpdatingLocation];
The CLLocationManager will engage the GPS and/or Wi-Fi as needed to determine the current location according to the parameters specified. There are two delegate methods that should be implemented to handle when the location manager has updated the current location or has failed to update the current location. When a location is acquired, the locationManager:didUpdateLocations: method will be called.
- (void)locationManager:(CLLocationManager *)manager
didUpdateLocations:(NSArray *)locations
{
//Filter out inaccurate points
CLLocation *lastLocation = [locations lastObject];
if(lastLocation.horizontalAccuracy < 0)
{
return;
}
[self setLocation:lastLocation];
[self setHasLocation:YES];
[self setLocationError:nil];
[self getLocationWithCompletionBlock:nil];
}
The location manager can deliver multiple locations in the array of locations provided. The last object in the array is the most recently updated location. The location manager can also return the last location the GPS was aware of very quickly before actually starting to acquire a location; in that case, if the GPS has been off and the device has moved, the location might be very inaccurate. The method will check the accuracy of the location and ignore it if the value is negative. If a reasonably accurate location has been found, the method will store it and execute completion blocks. Note that the location manager might call this method multiple times as the location is refined, and any logic here should work with that in mind.
- (void)locationManager:(CLLocationManager *)manager
didFailWithError:(NSError *)error
{
[self.locationManager stopUpdatingLocation];
[self setLocationError:error];
[self getLocationWithCompletionBlock:nil];
}
If the location manager failed to acquire a location, it will call the locationManager:didFailWithError: method. The error might be due to lack of authorization, or might be due to GPS or Wi-Fi not being available (in Airplane Mode, for example). The sample app implementation will tell the location manager to stop updating the current location if an error is encountered, will capture the location error, and will execute the completion blocks so that the code requesting the current location can handle the error appropriately.
A location manager delegate can monitor for course changes. This could be useful, for example, to update a map indicator to display what direction the user is going relative to the direction of the map. To receive course or heading information, the location manager needs to start monitoring for it. A filter can optionally be set to prevent getting updates when changes are smaller than the number of degrees provided.
CLLocationDegrees degreesFilter = 2.0;
if ([CLLocationManager headingAvailable])
{
[self.locationManager setHeadingFilter:degreesFilter];
[self.locationManager startUpdatingHeading];
}
Heading change events are then delivered to the locationManager:didUpdateHeading: delegate method.
- (void)locationManager:(CLLocationManager *)manager
didUpdateHeading:(CLHeading *)newHeading
{
NSLog(@"New heading, magnetic: %f",
newHeading.magneticHeading);
NSLog(@"New heading, true: %f",newHeading.trueHeading);
NSLog(@"Accuracy: %f",newHeading.headingAccuracy);
NSLog(@"Timestamp: %@",newHeading.timestamp);
}
The new heading provides several pieces of useful information. It includes both a magnetic and a true heading, expressed in degrees from north. It provides an accuracy reading, expressed as the number of degrees by which the magnetic heading might be off. A lower, positive value indicates a more accurate heading, and a negative number means that the heading is invalid and there might be magnetic interference preventing a reading. The time stamp reflects when the reading was taken, and should be checked to prevent using an old heading.
Parsing and Understanding Location Data
When the location manager returns a location, it will be an instance of CLLocation. The CLLocation contains several pieces of useful information about the location. First is the latitude and longitude, expressed as a CLLocationCoordinate2D.
CLLocationCoordinate2D coord = lastLocation.coordinate;
NSLog(@"Location lat/long: %f,%f",coord.latitude, coord.longitude);
Latitude is represented as a number of degrees north or south of the equator, where the equator is zero degrees, the north pole is 90 degrees, and south pole is –90 degrees. Longitude is represented as a number of degrees east or west of the prime meridian, which is an imaginary line (or meridian) running from the north pole to the south pole, going through the Royal Observatory in Greenwich, England. Going west from the prime meridian gives negative longitude values to –180 degrees, whereas going east gives positive longitude values up to 180 degrees.
Complementary to the coordinate is a horizontal accuracy. The accuracy is expressed as a CLLocationDistance, or meters. The horizontal accuracy means that the actual location is within the number of meters specified from the coordinate.
CLLocationAccuracy horizontalAccuracy =
lastLocation.horizontalAccuracy;
NSLog(@"Horizontal accuracy: %f meters",horizontalAccuracy);
The location also provides the altitude of the current location and vertical accuracy in meters, if the device has a GPS capability. If the device does not have GPS, then the altitude is returned as the value zero and the accuracy will be –1.
CLLocationDistance altitude = lastLocation.altitude;
NSLog(@"Location altitude: %f meters",altitude);
CLLocationAccuracy verticalAccuracy =
lastLocation.verticalAccuracy;
NSLog(@"Vertical accuracy: %f meters",verticalAccuracy);
The location contains a time stamp that indicates when the location was determined by the location manager. This can be useful to determine whether the location is old and should be ignored, or for comparing time stamps between location checks.
NSDate *timestamp = lastLocation.timestamp;
NSLog(@"Timestamp: %@",timestamp);
Lastly, the location provides the speed, expressed in meters per second, and course, expressed in degrees from true north.
CLLocationSpeed speed = lastLocation.speed;
NSLog(@"Speed: %f meters per second",speed);
CLLocationDirection direction = lastLocation.course;
NSLog(@"Course: %f degrees from true north",direction);
Significant Change Notifications
After a location has been acquired by the app, Apple strongly recommends stopping location updates to preserve battery life. If the app does not require a constant, accurate location, then monitoring for significant location changes can provide an efficient way of informing the app when the device has moved without consuming a lot of power to keep the GPS and Wi-Fi monitoring the current location.
[self.locationManager startMonitoringSignificantLocationChanges];
Typically, a notification is generated when the device has moved at least 500 meters, or has changed cell towers. Notifications are not sent unless at least five minutes has elapsed since the last notification. Location update events are delivered to thelocationManager:didUpdateLocations: delegate method.
Using GPX Files to Test Specific Locations
Testing location-based apps can be daunting, especially when specific locations need to be tested that are not convenient to test from. Fortunately, there is robust support for testing locations provided by Xcode using GPX files. A GPX file is a GPS Exchange Format document, which can be used to communicate GPS information between devices using XML. In debugging mode, Xcode can use a “waypoint” defined in a GPX file to set the current location for the iOS Simulator or device.
In the sample app, the current location is set with the file DMNS.gpx, or the location of the Denver Museum of Nature and Science.
<?xml version="1.0"?>
<gpx version="1.1" creator="Xcode">
<wpt lat="39.748039" lon="-104.94000">
<name>Denver Museum of Nature and Science</name>
</wpt>
</gpx>
To tell Xcode to use a GPX file in debugging, select Edit Scheme from the Scheme selection drop-down in the upper-left corner of a project window, select the Options tab, and check the Allow Location Simulation check box, as shown in Figure 2.5. When this is checked, a location can be selected from the drop-down next to Default Location. This drop-down includes some built-in locations, and any GPX files that have been added to the project.
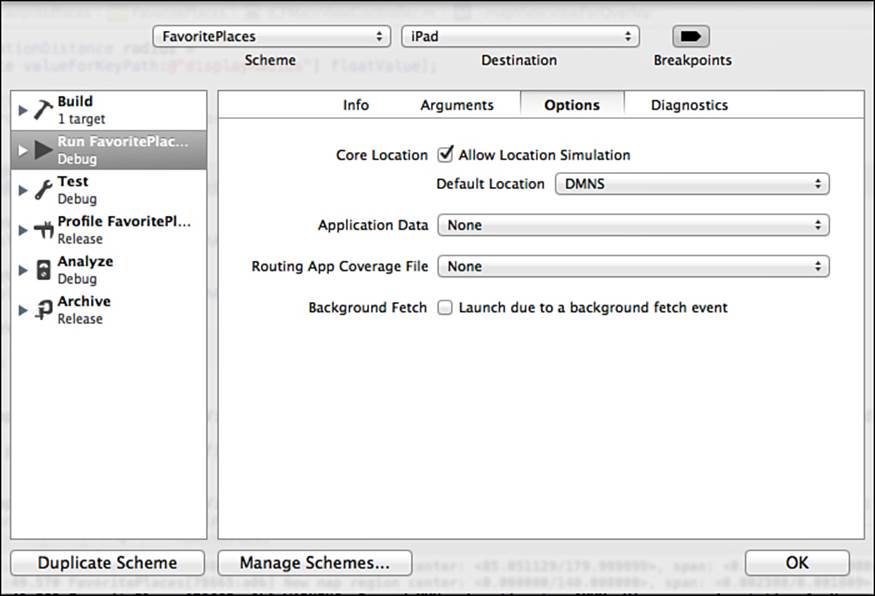
Figure 2.5 Xcode FavoritePlaces scheme.
When the app is run in debug mode, Core Location will return the location specified in the GPX file as the current location of the device or simulator. To change the location while debugging, select Debug, Simulate Location from the menu in Xcode and select a location (as shown in Figure 2.6). Core Location will change the location to the selected location, and will fire the locationManager:didUpdateLocations: delegate method.
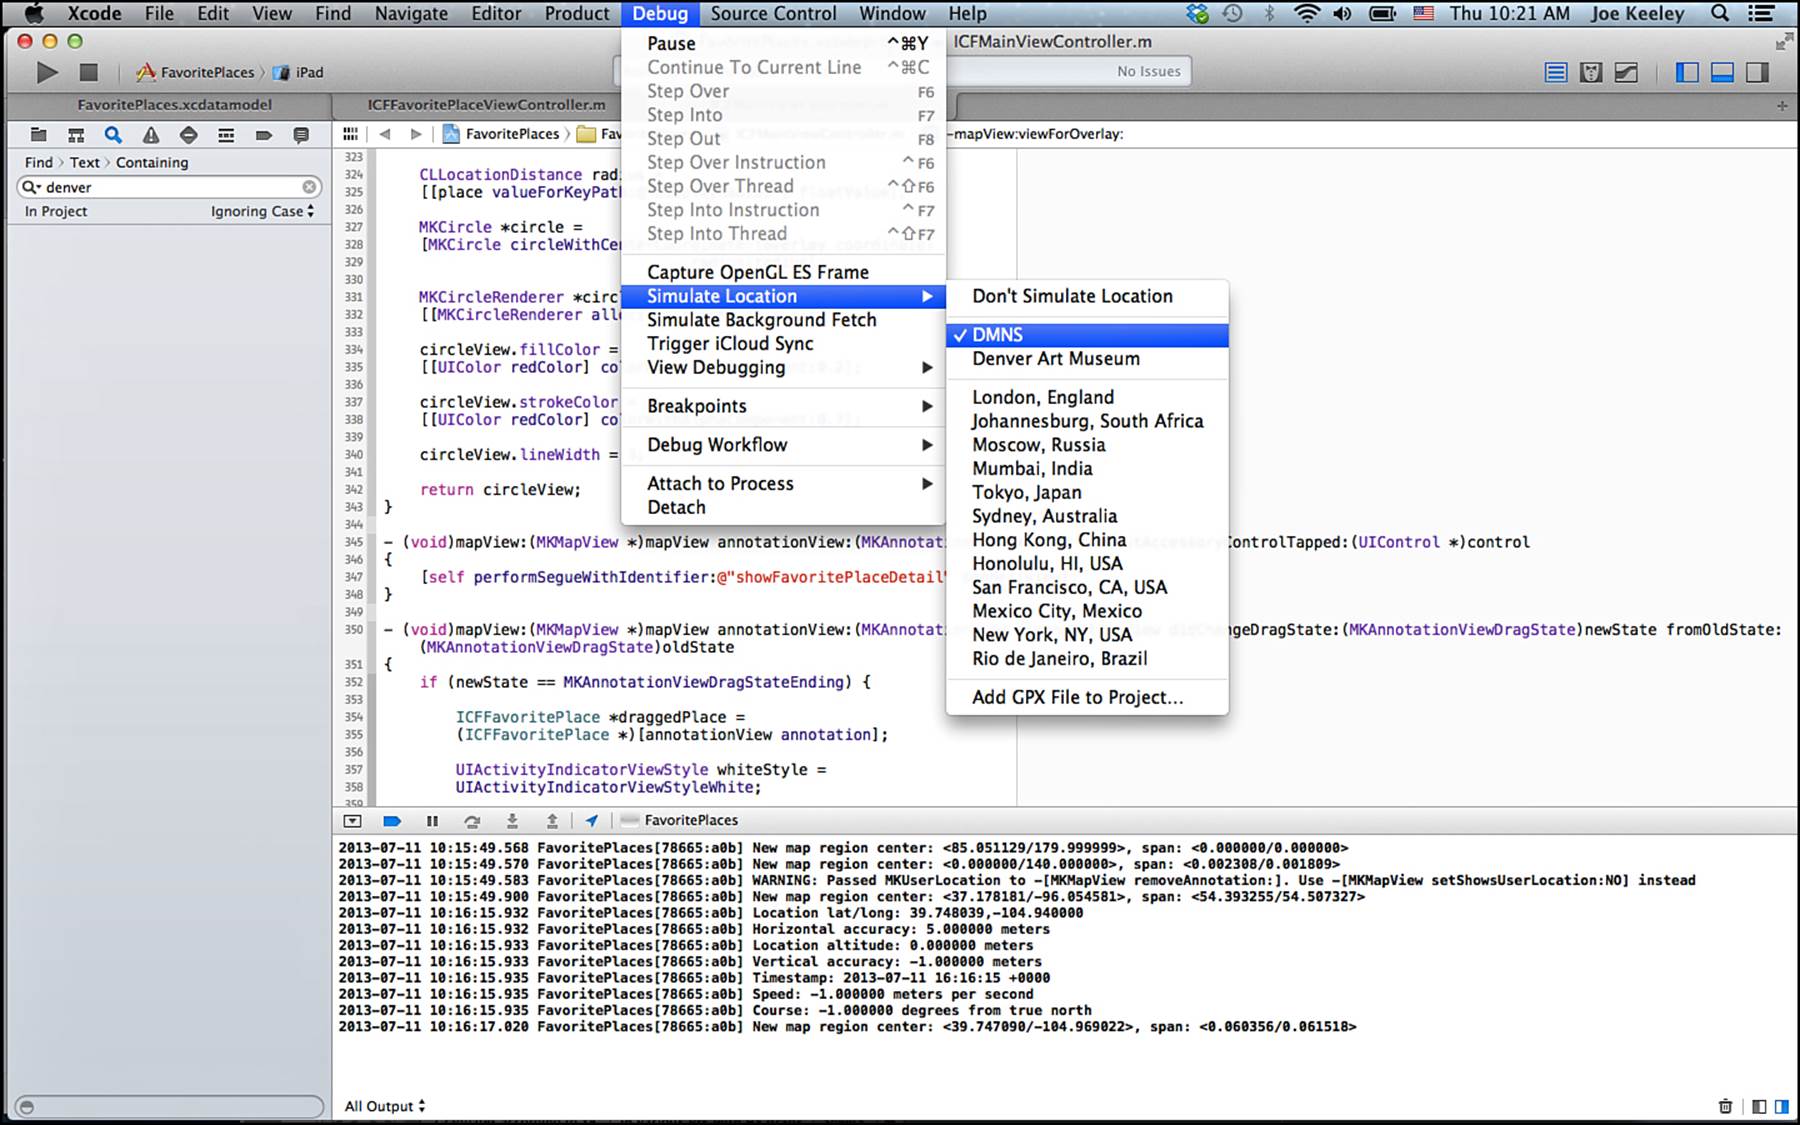
Figure 2.6 Xcode Product, Debug, Simulate Location.
Displaying Maps
MapKit provides mapping user-interface capabilities for iOS. The base class used is an MKMapView, which displays a map, handles user interactions with the map, and manages annotations (like pins) and overlays (like routing graphics or region highlights). To better understand how maps in iOS work, it is important to understand the coordinate systems at work.
Understanding the Coordinate Systems
There are two coordinate systems at work in MapKit: the coordinate system for the map, and the coordinate system for the view. The map uses a Mercator Projection, which takes the 3D map of the world and flattens it into a 2D coordinate system. Coordinates can be specified using latitude and longitude. The map view represents the portion of the map displayed on the screen using standard UIKit view coordinates. The map view then determines where in the view to display points determined by map coordinates.
MKMapKit Configuration and Customization
In ICFMainViewController in the sample app, the map view is configured in Interface Builder to default to the standard map type, to display the user location on the map, and to allow scrolling and zooming. ICFMainViewController has a segmented control to allow the user to adjust the type of map displayed.
- (IBAction)mapTypeSelectionChanged:(id)sender
{
UISegmentedControl *mapSelection =
(UISegmentedControl *)sender;
switch (mapSelection.selectedSegmentIndex)
{
case 0:
[self.mapView setMapType:MKMapTypeStandard];
break;
case 1:
[self.mapView setMapType:MKMapTypeSatellite];
break;
case 2:
[self.mapView setMapType:MKMapTypeHybrid];
break;
default:
break;
}
}
Beyond setting the map type, another common customization is to set the region displayed by the map. In ICFMainViewController, a method called zoomMapToFitAnnotations will examine the current favorite places, and will size and center the map to fit them all. The method starts by setting default maximum and minimum coordinates.
CLLocationCoordinate2D maxCoordinate =
CLLocationCoordinate2DMake(-90.0, -180.0);
CLLocationCoordinate2D minCoordinate =
CLLocationCoordinate2DMake(90.0, 180.0);
Looking at the existing annotations on the map (described in more detail in the next main section, “Map Annotations and Overlays”), the method calculates the maximum and minimum latitude and longitude values for all the coordinates represented in the annotations.
NSArray *currentPlaces = [self.mapView annotations];
maxCoordinate.latitude =
[[currentPlaces valueForKeyPath:@"@max.latitude"] doubleValue];
minCoordinate.latitude =
[[currentPlaces valueForKeyPath:@"@min.latitude"] doubleValue];
maxCoordinate.longitude =
[[currentPlaces valueForKeyPath:@"@max.longitude"] doubleValue];
minCoordinate.longitude =
[[currentPlaces valueForKeyPath:@"@min.longitude"] doubleValue];
The method then calculates the center coordinate from the maximum and minimum latitude and longitude coordinates.
CLLocationCoordinate2D centerCoordinate;
centerCoordinate.longitude =
(minCoordinate.longitude + maxCoordinate.longitude) / 2.0;
centerCoordinate.latitude =
(minCoordinate.latitude + maxCoordinate.latitude) / 2.0;
Next, the method calculates the span needed to display all the coordinates from the calculated center coordinate. The calculated span for each dimension is multiplied by 1.2 to create a margin between the farthest-out points and the edge of the view.
MKCoordinateSpan span;
span.longitudeDelta =
(maxCoordinate.longitude - minCoordinate.longitude) * 1.2;
span.latitudeDelta =
(maxCoordinate.latitude - minCoordinate.latitude) * 1.2;
After the center point and span have been calculated, a map region can be created and used to set the map view’s displayed region.
MKCoordinateRegion newRegion =
MKCoordinateRegionMake(centerCoordinate, span);
[self.mapView setRegion:newRegion
animated:YES];
Setting animated: to YES will zoom the map in as if the user had zoomed to it; setting it to NO will instantaneously change the region with no animation.
Responding to User Interactions
An MKMapViewDelegate can be specified to react to user interactions with the map. Typical user interactions with a map include responding to panning and zooming, handling draggable annotations, and responding when the user taps a callout.
When the map is being panned and zoomed, the mapView:regionWillChangeAnimated: and mapView:regionDidChangeAnimated: delegate methods are called. In the sample app no additional action is required for the map to resize and adjust the annotations; however, in an app with a large number of potential items to display on the map or an app that shows different information at different zoom levels, these delegate methods are useful for removing map annotations that are no longer visible and for adding annotations that are newly visible. The delegate method in the sample app demonstrates how one would get the newly displayed map region, which could be used to query items for display on the map.
- (void)mapView:(MKMapView *)mapView
regionDidChangeAnimated:(BOOL)animated
{
MKCoordinateRegion newRegion = [mapView region];
CLLocationCoordinate2D center = newRegion.center;
MKCoordinateSpan span = newRegion.span;
NSLog(@"New map region center: <%f/%f>, span: <%f/%f>",
center.latitude,center.longitude,span.latitudeDelta,
span.longitudeDelta);
}
Handling draggable annotations and callout taps is described in the next section.
Map Annotations and Overlays
A map view (MKMapView) is a scroll view that behaves specially; adding a subview to it in the standard way will not add the subview to the scrollable part of the map view, but rather the subview will remain static relative to the frame of the map view. Although that might be a feature for items like hovering buttons or labels, being able to identify and mark points and details on the map is a key feature. Map annotations and overlays are a way to mark items or areas of interest in a map view. Annotations and overlays maintain their position on a map as the map is scrolled and zoomed. Map annotations are defined by a single coordinate point on the map, and map overlays can be lines, polygons, or complex shapes. MapKit draws a distinction between the logical annotation or overlay and the associated view. Annotations and overlays are data that represent where on the map they should be displayed, and are added to the map view directly. The map view will then request a view for an annotation or overlay when it needs to be displayed, much like a table view will request cells for index paths as needed.
Adding Annotations
Any object can be an annotation in a map view. To become an annotation, the object needs to implement the MKAnnotation protocol. Apple recommends that the annotation objects should be lightweight, since the map view will keep a reference to all the annotations added to it, and map scrolling and zooming performance can suffer if there are too many annotations. If the requirements for the annotation are very simple and basic, an MKPointAnnotation can be used. In the sample app the ICFFavoritePlace class, which implements the MKAnnotation protocol, is a subclass of NSManagedObject so that it can be persisted using Core Data. Refer to Chapter 13, “Getting Up and Running with Core Data,” for more information on using Core Data and NSManagedObject subclasses.
To implement the MKAnnotation protocol, a class must implement the coordinate property. This is used by the map view to determine where the annotation should be placed on the map. The coordinate needs to be returned as a CLLocationCoordinate2D.
- (CLLocationCoordinate2D)coordinate
{
CLLocationDegrees lat =
[[self valueForKeyPath:@"latitude"] doubleValue];
CLLocationDegrees lon =
[[self valueForKeyPath:@"longitude"] doubleValue];
CLLocationCoordinate2D coord =
CLLocationCoordinate2DMake(lat, lon);
return coord;
}
Because the ICFFavoritePlace class stores the latitude and longitude for the place individually, the coordinate property method creates a CLLocationCoordinate2D from the latitude and longitude using the CLLocationCoordinate2DMake function provided by Core Location. ICFFavoritePlace will break apart a CLLocationCoordinate2D in the setter method for the coordinate property to store the latitude and longitude.
- (void)setCoordinate:(CLLocationCoordinate2D)newCoordinate
{
[self setValue:@(newCoordinate.latitude)
forKeyPath:@"latitude"];
[self setValue:@(newCoordinate.longitude)
forKeyPath:@"longitude"];
}
Two other properties for the MKAnnotation protocol can optionally be implemented: title and subtitle. These are used by the map view to display the callout when the user taps an annotation view, as shown in Figure 2.7.
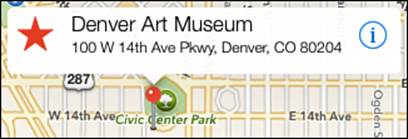
Figure 2.7 FavoritePlaces sample app: displaying map annotation view callout.
The title property is used for the top line of the callout, and the subtitle property is used for the bottom line of the callout.
- (NSString *)title
{
return [self valueForKeyPath:@"placeName"];
}
- (NSString *)subtitle
{
NSString *subtitleString = @"";
NSString *addressString =
[self valueForKeyPath:@"placeStreetAddress"];
if ([addressString length] > 0)
{
NSString *addr =
[self valueForKeyPath:@"placeStreetAddress"];
NSString *city = [self valueForKeyPath:@"placeCity"];
NSString *state = [self valueForKeyPath:@"placeState"];
NSString *zip = [self valueForKeyPath:@"placePostal"];
subtitleString =
[NSString stringWithFormat:@"%@, %@, %@ %@",
addr,city,state,zip];
}
return subtitleString;
}
In ICFMainViewController, the updateMapAnnotations method is called from viewDidLoad: to populate the map annotations initially, and again after the favorite place detail editing view is dismissed. The method starts by removing all the annotations from the map view. Although this approach works fine for a small number of annotations, with more annotations a more intelligent approach should be developed to efficiently remove unneeded annotations and add new ones.
[self.mapView removeAnnotations:self.mapView.annotations];
Next, the method performs a Core Data fetch request to get an NSArray of the stored favorite places, and adds that array to the map view’s annotations.
NSFetchRequest *placesRequest =
[[NSFetchRequest alloc] initWithEntityName:@"FavoritePlace"];
NSManagedObjectContext *moc = kAppDelegate.managedObjectContext;
NSError *error = nil;
NSArray *places = [moc executeFetchRequest:placesRequest
error:&error];
if (error)
{
NSLog(@"Core Data fetch error %@, %@", error,
[error userInfo]);
}
[self.mapView addAnnotations:places];
The map view will then manage displaying the added annotations on the map.
Displaying Standard and Custom Annotation Views
An annotation view is the representation of the annotation on the map. Two types of standard annotation views are provided with MapKit, the pin for searched locations and the pulsing blue dot for the current location. Annotation views can be customized with a static image, or can be completely customized with a subclass of MKAnnotationView. The sample app uses standard pins for favorite places, the standard blue dot for the current location, and a green arrow for a draggable annotation example, as shown in Figure 2.8.
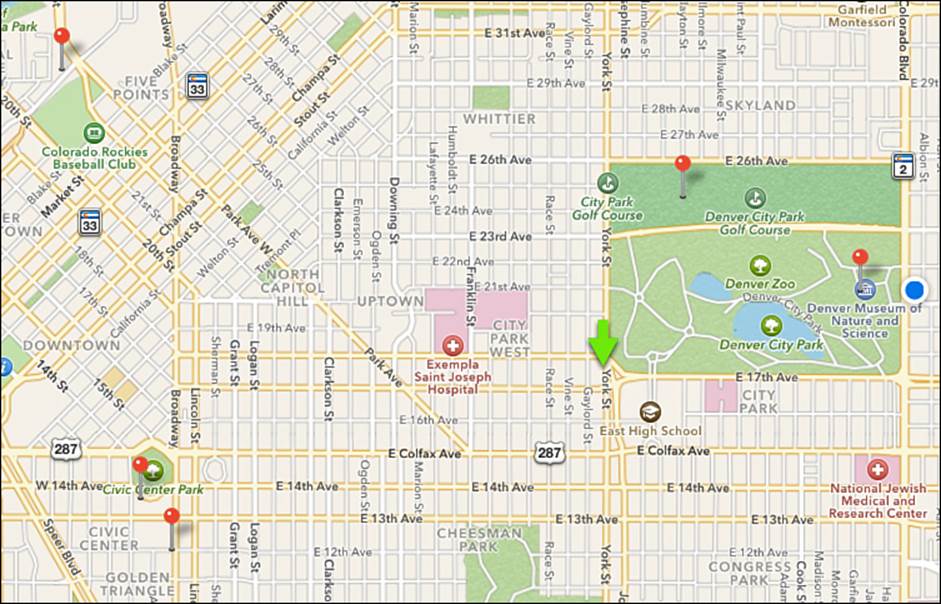
Figure 2.8 FavoritePlaces sample app: displaying map annotation views.
To allow a map view to display annotation views for annotations, the map view delegate needs to implement the mapView:viewForAnnotation method. In the sample app, the mapView:viewForAnnotation method is implemented in the ICFMainViewController. The method first checks whether the annotation is the current location.
if (annotation == mapView.userLocation)
{
return nil;
}
For the current location, returning nil for an annotation view will tell the map view to use the standard blue dot. The method then examines the ICFFavoritePlace annotation to determine what type of annotation it is. If the annotation represents the “going next” location, then a custom annotation view will be returned; otherwise, a standard pin annotation view will be returned.
MKAnnotationView *view = nil;
ICFFavoritePlace *place = (ICFFavoritePlace *)annotation;
if ([[place valueForKeyPath:@"goingNext"] boolValue])
{
...
}
else
{
...
}
return view;
To return a standard pin annotation view, the method first attempts to dequeue an existing, but no longer used, annotation view. If one is not available, the method will create an instance of MKPinAnnotationView.
MKPinAnnotationView *pinView = (MKPinAnnotationView *)
[mapView dequeueReusableAnnotationViewWithIdentifier:@"pin"];
if (pinView == nil)
{
pinView = [[MKPinAnnotationView alloc]
initWithAnnotation:annotation reuseIdentifier:@"pin"];
}
After the pin annotation is created, it can be customized by setting the pin color (choices are red, green, and purple), indicating whether the callout can be displayed when the user taps the annotation view, and indicating whether the annotation view can be dragged.
[pinView setPinColor:MKPinAnnotationColorRed];
[pinView setCanShowCallout:YES];
[pinView setDraggable:NO];
The callout view that appears when the annotation view is tapped has left and right accessory views that can be customized. The left accessory view is set to a custom image, and the right accessory view is set to a standard detail disclosure button. If the left or right accessory views are customized with objects that descend from UIControl, the delegate method mapView:annotationView:calloutAccessoryControlTapped: will be called when they are tapped. Otherwise, the objects should be configured by the developer to handle the tap as desired. Note that Apple states that the maximum height for the accessory views is 32 pixels.
UIImageView *leftView = [[UIImageView alloc]
initWithImage:[UIImage imageNamed:@"annotation_view_star"]];
[pinView setLeftCalloutAccessoryView:leftView];
UIButton* rightButton = [UIButton buttonWithType:
UIButtonTypeDetailDisclosure];
[pinView setRightCalloutAccessoryView:rightButton];
view = pinView;
To return a custom pin annotation view, the method will attempt to dequeue an existing but no longer used annotation view by a string identifier. If one is not available, the method will create an instance of MKAnnotationView.
view = (MKAnnotationView *)
[mapView dequeueReusableAnnotationViewWithIdentifier:@"arrow"];
if (view == nil)
{
view = [[MKAnnotationView alloc]
initWithAnnotation:annotation reuseIdentifier:@"arrow"];
}
The annotation can be customized much like a standard pin annotation, indicating whether the callout can be displayed when the user taps the annotation view, and indicating whether the annotation view can be dragged. The main difference is that the image for the annotation can be set directly using the setImage: method.
[view setCanShowCallout:YES];
[view setDraggable:YES];
[view setImage:[UIImage imageNamed:@"next_arrow"]];
UIImageView *leftView = [[UIImageView alloc]
initWithImage:[UIImage imageNamed:@"annotation_view_arrow"]];
[view setLeftCalloutAccessoryView:leftView];
[view setRightCalloutAccessoryView:nil];
The annotation view will display with a green arrow instead of a standard pin, as shown previously in Figure 2.8.
Draggable Annotation Views
Draggable annotation views can be useful to allow the user to mark a place on a map. In the sample app, there is one special favorite place to indicate where the user is going next, represented by a green arrow. An annotation view can be made draggable by setting the draggable property when the annotation view is being configured for presentation.
[view setDraggable:YES];
The user can then drag the annotation view anywhere on the map. To get more information about the dragging performed on an annotation view, the map view delegate implements the mapView:annotationView:didChangeDragState:fromOldState: method. That method will fire anytime the dragging state changes for a draggable annotation view, and indicates whether the dragging state is none, starting, dragging, canceling, or ending. By examining the new dragging state and old dragging state, custom logic can handle a number of different use cases presented by dragging.
When the user stops dragging the arrow in the sample app, it will reverse-geocode the new location indicated by the arrow (described in more detail in the later section “Geocoding and Reverse-Geocoding”) to get the name and address of the new location. To do this, the method needs to check whether dragging is completed.
if (newState == MKAnnotationViewDragStateEnding)
{
....
}
If dragging is complete, the method will get the annotation associated with the annotation view to figure out the new coordinates that need to be reverse-geocoded.
ICFFavoritePlace *draggedPlace =
(ICFFavoritePlace *)[annotationView annotation];
The method adds a standard spinner to the callout view so that the user knows it is being updated, and then calls the method to reverse-geocode the new place, described later in the chapter in the geocoding section.
UIActivityIndicatorViewStyle whiteStyle =
UIActivityIndicatorViewStyleWhite;
UIActivityIndicatorView *activityView =
[[UIActivityIndicatorView alloc]
initWithActivityIndicatorStyle:whiteStyle];
[activityView startAnimating];
[annotationView setLeftCalloutAccessoryView:activityView];
[self reverseGeocodeDraggedAnnotation:draggedPlace
forAnnotationView:annotationView];
Working with Map Overlays
Map overlays are similar to map annotations, in that any object can implement the MKOverlay protocol, and the map view delegate is asked to provide the associated view for a map overlay. Map overlays are different from annotations in that they can represent more than just a point. They can represent lines and shapes, so they are very useful for representing routes or areas of interest on a map. To demonstrate map overlays, the sample app provides a feature to add a geofence (described in more detail later in the section “Geofencing”) with a user-defined radius for a favorite place. When a geofence is added for a favorite place, the user’s selected radius will be displayed on the map with a circle around the place’s coordinate, as shown in Figure 2.9.
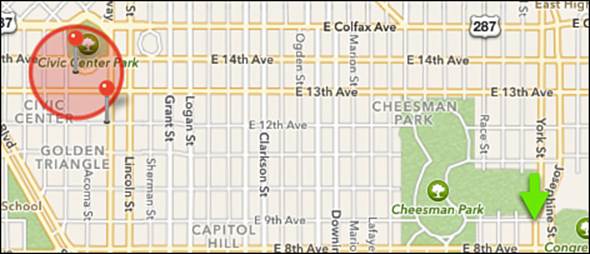
Figure 2.9 FavoritePlaces sample app: displaying map overlay view.
As mentioned previously in the “Adding Annotations” section, the updateMapAnnotations method adds annotations to the map. This method also adds overlays to the map at the same time. The method starts by clearing all existing overlays from the map view.
[self.mapView removeOverlays:self.mapView.overlays];
Since overlays are displayed only for places that have the geofence feature enabled, the method iterates over the places, and adds an overlay to the map only for those places.
for (ICFFavoritePlace *favPlace in places)
{
BOOL displayOverlay =
[[favPlace valueForKeyPath:@"displayProximity"] boolValue];
if (displayOverlay)
{
[self.mapView addOverlay:favPlace];
...
}
}
When the map needs to display a map overlay, the map view will call the delegate method mapView:viewForOverlay. This method will create an overlay view for the map to display. There are three options provided by MapKit: circle, polygon, or polyline; custom shapes and overlays can also be created if the MapKit options are insufficient. The sample app creates a circle around the location, using the radius and map coordinate from the favorite place.
ICFFavoritePlace *place = (ICFFavoritePlace *)overlay;
CLLocationDistance radius =
[[place valueForKeyPath:@"displayRadius"] floatValue];
MKCircle *circle =
[MKCircle circleWithCenterCoordinate:[overlay coordinate]
radius:radius];
After the map kit circle is ready, the method creates a map kit circle view, and customizes the stroke and fill colors and the line width. This circle view is then returned, and the map will display it.
MKCircleRenderer *circleView =
[[MKCircleRenderer alloc] initWithCircle:circle];
circleView.fillColor =
[[UIColor redColor] colorWithAlphaComponent:0.2];
circleView.strokeColor =
[[UIColor redColor] colorWithAlphaComponent:0.7];
circleView.lineWidth = 3;
return circleView;
Geocoding and Reverse-Geocoding
Geocoding is the process of finding latitude and longitude coordinates from a human-readable address. Reverse-geocoding is the process of finding a human readable address from coordinates. As of iOS 5.0, Core Location supports both, with no special terms or limitations (as with MapKit in iOS 5.1 and earlier).
Geocoding an Address
The sample app enables the user to add a new favorite place by entering an address in ICFFavoritePlaceViewController. The user can tap Geocode Location Now to get the latitude and longitude, as shown in Figure 2.10.
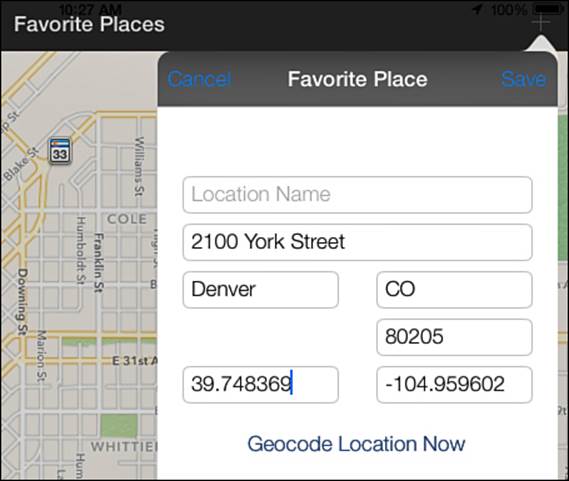
Figure 2.10 FavoritePlaces sample app: adding a new favorite place.
When the user taps the Geocode Location Now button, the geocodeLocationTouched: method is called. That method begins by concatenating the address information provided by the user into a single string, like “2100 York St, Denver, CO 80205,” to provide to the geocoder.
NSString *geocodeString = @"";
if ([self.addressTextField.text length] > 0)
{
geocodeString = self.addressTextField.text;
}
if ([self.cityTextField.text length] > 0)
{
if ([geocodeString length] > 0)
{
geocodeString =
[geocodeString stringByAppendingFormat:@", %@",
self.cityTextField.text];
}
else
{
geocodeString = self.cityTextField.text;
}
}
if ([self.stateTextField.text length] > 0)
{
if ([geocodeString length] > 0)
{
geocodeString =
[geocodeString stringByAppendingFormat:@", %@",
self.stateTextField.text];
}
else
{
geocodeString = self.stateTextField.text;
}
}
if ([self.postalTextField.text length] > 0)
{
if ([geocodeString length] > 0)
{
geocodeString =
[geocodeString stringByAppendingFormat:@" %@",
self.postalTextField.text];
}
else
{
geocodeString = self.postalTextField.text;
}
}
The method will then disable the Geocode Location Now button to prevent additional requests from getting started by multiple taps. Apple explicitly states that the geocoder should process only one request at a time. The method also updates the fields and button to indicate that geocoding is in process.
[self.latitudeTextField setText:@"Geocoding..."];
[self.longitudeTextField setText:@"Geocoding..."];
[self.geocodeNowButton setTitle:@"Geocoding now..."
forState:UIControlStateDisabled];
[self.geocodeNowButton setEnabled:NO];
The method gets a reference to an instance of CLGeocoder.
CLGeocoder *geocoder =
[[ICFLocationManager sharedLocationManager] geocoder];
The geocoder is then asked to geocode the address string, with a completion handler block, which is called on the main queue. The completion handler will first reenable the button so that it can be tapped again, and will then check to see whether an error was encountered withgeocoding or whether the geocoder completed successfully.
[geocoder geocodeAddressString:geocodeString
completionHandler:^(NSArray *placemarks, NSError *error) {
[self.geocodeNowButton setEnabled:YES];
if (error)
{
...
}
else
{
...
}
}];
If the geocoder encountered an error, the latitude and longitude fields are populated with “Not found” and an alert view is presented with the localized description of the error. The geocoder will fail without an Internet connection, or if the address is not well formed or cannot be found.
[self.latitudeTextField setText:@"Not found"];
[self.longitudeTextField setText:@"Not found"];
UIAlertView *alert =
[[UIAlertView alloc] initWithTitle:@"Geocoding Error"
message:error.localizedDescription
delegate:nil
cancelButtonTitle:@"OK"
otherButtonTitles: nil];
[alert show];
If geocoding succeeded, an array called placemarks will be provided to the completion handler. This array will contain instances of CLPlacemark, which each contain information about a potential match. A placemark has a latitude/longitude coordinate, and address information.
if ([placemarks count] > 0)
{
CLPlacemark *placemark = [placemarks lastObject];
NSString *latString =
[NSString stringWithFormat:@"%f",
placemark.location.coordinate.latitude];
[self.latitudeTextField setText:latString];
NSString *longString =
[NSString stringWithFormat:@"%f",
placemark.location.coordinate.longitude];
[self.longitudeTextField setText:longString];
}
If more than one placemark is returned, the user interface could allow the user to select the one that most closely matches his intention (Maps.app uses this approach). For simplicity the sample app selects the last placemark in the array and updates the user interface with the coordinate information.
Reverse-Geocoding a Location
The sample app allows users to drag the green arrow to indicate where they would like to go next, as shown in Figure 2.11.
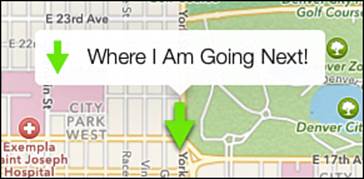
Figure 2.11 FavoritePlaces sample app: Where I Am Going Next.
When the user drags the green arrow, the map view delegate method mapView:annotationView:didChangeDragState:fromOldState: in ICFMainViewController gets called. That method checks the drag state as described earlier in the chapter in the “Draggable Annotation Views” section, and if the green arrow has stopped being dragged, updates the callout view with a spinner and starts the reverse-geocoding.
ICFFavoritePlace *draggedPlace =
(ICFFavoritePlace *)[annotationView annotation];
UIActivityIndicatorViewStyle whiteStyle =
UIActivityIndicatorViewStyleWhite;
UIActivityIndicatorView *activityView =
[[UIActivityIndicatorView alloc]
initWithActivityIndicatorStyle:whiteStyle];
[activityView startAnimating];
[annotationView setLeftCalloutAccessoryView:activityView];
[self reverseGeocodeDraggedAnnotation:draggedPlace
forAnnotationView:annotationView];
The reverseGeocodeDraggedAnnotation:forAnnotationView: method gets a reference to an instance of CLGeocoder.
CLGeocoder *geocoder =
[[ICFLocationManager sharedLocationManager] geocoder];
An instance of CLLocation is created for use by the geocoder from the coordinate of the moved arrow.
CLLocationCoordinate2D draggedCoord = [place coordinate];
CLLocation *draggedLocation =
[[CLLocation alloc] initWithLatitude:draggedCoord.latitude
longitude:draggedCoord.longitude];
The geocoder is then asked to reverse-geocode the location from where the annotation has been dragged with a completion handler block, which is called on the main queue. The completion handler will replace the spinner in the callout with the green arrow, and will then check to see whether an error was encountered with geocoding or whether the geocoder completed successfully.
[geocoder reverseGeocodeLocation:draggedLocation
completionHandler:^(NSArray *placemarks, NSError *error) {
UIImage *arrowImage =
[UIImage imageNamed:@"annotation_view_arrow"];
UIImageView *leftView =
[[UIImageView alloc] initWithImage:arrowImage];
[annotationView setLeftCalloutAccessoryView:leftView];
if (error)
{
...
}
else
{
...
}
}];
If the geocoder encountered an error, an alert view is presented with the localized description of the error. The geocoder will fail without an Internet connection.
UIAlertView *alert =
[[UIAlertView alloc] initWithTitle:@"Geocoding Error"
message:error.localizedDescription
delegate:nil
cancelButtonTitle:@"OK"
otherButtonTitles: nil];
[alert show];
If the reverse-geocoding process completes successfully, an array of CLPlacemark instances will be passed to the completion handler. The sample app will use the last placemark to update the name and address of the next place.
if ([placemarks count] > 0)
{
CLPlacemark *placemark = [placemarks lastObject];
[self updateFavoritePlace:place withPlacemark:placemark];
}
The placemark contains detailed location information with internationalized terms. For example, a street address is represented by the number (or subThoroughfare) and a street (or thoroughfare), and the city and state are subAdministrativeArea andadministrativeArea.
[kAppDelegate.managedObjectContext performBlock:^{
NSString *newName =
[NSString stringWithFormat:@"Next: %@",placemark.name];
[place setValue:newName forKey:@"placeName"];
NSString *newStreetAddress =
[NSString stringWithFormat:@"%@ %@",
placemark.subThoroughfare, placemark.thoroughfare];
[place setValue:newStreetAddress
forKey:@"placeStreetAddress"];
[place setValue:placemark.subAdministrativeArea
forKey:@"placeCity"];
[place setValue:placemark.postalCode
forKey:@"placePostal"];
[place setValue:placemark.administrativeArea
forKey:@"placeState"];
NSError *saveError = nil;
[kAppDelegate.managedObjectContext save:&saveError];
if (saveError) {
NSLog(@"Save Error: %@",saveError.localizedDescription);
}
}];
Tip
CLPlacemark instances provided by the geocoder include an addressDictionary property, which is formatted for easy insertion into the Address Book (see Chapter 5, “Getting Started with Address Book,” for more information).
The place is then saved using Core Data so that it will survive app restarts. Now when the user taps the green arrow annotation view, it will reflect the name and address of the location it was dragged to, as shown in Figure 2.12.
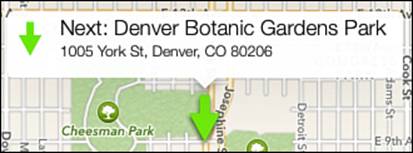
Figure 2.12 FavoritePlaces sample app: Where I Am Going Next after reverse-geocode.
Geofencing
Geofencing, also called regional monitoring, is the capability to track when a device enters or exits a specified map region. iOS uses this to great effect with Siri to accomplish things like, “Remind me to pick up bread when I leave the office,” or, “Remind me to put the roast in the oven when I get home.” iOS also uses geofencing in Passbook, to help users see the passes that are relevant to them on the home screen (see Chapter 24, “Passbook and PassKit,” for more details).
Checking for Regional Monitoring Capability
The Core Location location manager has a class method that indicates whether regional monitoring is available for the device. This can be used to customize whether an app performs regional monitoring tasks. For example, the sample app will conditionally display a switch to enable geofencing for a favorite location in the ICFFavoritePlaceViewController.
BOOL hideGeofence =
![CLLocationManager regionMonitoringAvailable];
[self.displayProximitySwitch setHidden:hideGeofence];
if (hideGeofence)
{
[self.geofenceLabel setText:@"Geofence N/A"];
}
Defining Boundaries
Core Location’s location manager (CLLocationManager) keeps a set of regions being monitored for an app. In ICFMainViewController, the updateMapAnnotations: method clears out the set of monitored regions when a change has been made.
CLLocationManager *locManager =
[[ICFLocationManager sharedLocationManager] locationManager];
NSSet *monitoredRegions = [locManager monitoredRegions];
for (CLRegion *region in monitoredRegions)
{
[locManager stopMonitoringForRegion:region];
}
Next, the method iterates over the user’s list of favorite places to determine which places the user has set to geofence. For each place that the user has set to geofence, the method will add the overlay view as described in the previous section, and will then tell the location manager to start monitoring that region. A region to be monitored needs a center coordinate, a radius, and an identifier so that the region can be tracked in the app. The sample app uses the Core Data universal resource ID representation as an identifier for the region, so that the same place can be quickly retrieved when a regional monitoring event is generated for the region.
NSString *placeObjectID =
[[[favPlace objectID] URIRepresentation] absoluteString];
CLLocationDistance monitorRadius =
[[favPlace valueForKeyPath:@"displayRadius"] floatValue];
CLRegion *region = [[CLRegion alloc]
initCircularRegionWithCenter:[favPlace coordinate]
radius:monitorRadius
identifier:placeObjectID];
[locManager startMonitoringForRegion:region];
Note that currently only circular regions are supported for regional monitoring.
Monitoring Changes
When the device either enters or exits a monitored region, the location manager will inform its delegate of the event by calling either the locationManager:didEnterRegion: or the locationManager:didExitRegion: method.
In locationManager:didEnterRegion:, the method first gets the identifier associated with the monitored region. This identifier was assigned when telling the location manager to monitor the region, and is the Core Data URI of the saved favorite place. This URI is used to get the managed object ID, which is used to retrieve the favorite place from the managed object context.
NSString *placeIdentifier = [region identifier];
NSURL *placeIDURL = [NSURL URLWithString:placeIdentifier];
NSManagedObjectID *placeObjectID =
[kAppDelegate.persistentStoreCoordinator
managedObjectIDForURIRepresentation:placeIDURL];
The method gets details from the favorite place and presents them in an alert to the user.
[kAppDelegate.managedObjectContext performBlock:^{
ICFFavoritePlace *place =
(ICFFavoritePlace *)[kAppDelegate.managedObjectContext
objectWithID:placeObjectID];
NSNumber *distance = [place valueForKey:@"displayRadius"];
NSString *placeName = [place valueForKey:@"placeName"];
NSString *baseMessage =
@"Favorite Place %@ nearby - within %@ meters.";
NSString *proximityMessage =
[NSString stringWithFormat:baseMessage,placeName,distance];
UIAlertView *alert =
[[UIAlertView alloc] initWithTitle:@"Favorite Nearby!"
message:proximityMessage
delegate:nil
cancelButtonTitle:@"OK"
otherButtonTitles: nil];
[alert show];
}];
To test this using the sample app, start the app in debug mode using the included GPX file for the Denver Museum of Nature and Science (DMNS), as described previously in the chapter in the section “Using GPX Files to Test Specific Locations.” Ensure that the Denver Art Museum is set to Geofence, as shown in Figure 2.9 in the section “Working with Map Overlays.” After the app is running, use Xcode to change the location using the debug location menu from DMNS (as shown in Figure 2.6) to the Denver Art Museum. This should trigger the geofence and display the alert as shown in Figure 2.13.

Figure 2.13 FavoritePlaces sample app: favorite place nearby alert.
The locationManager:didExitRegion: method also gets the Core Data identifier from the region, uses Core Data to get the managed object ID, looks up the favorite place, and presents an alert when the user exits the region. To test this using the sample app, start from the Favorite Nearby alert just shown in Figure 2.13. Tap the OK button, and then select Debug, Location, Apple from the iOS Simulator menu. After a few seconds, the simulator will change locations and present the user with an alert, as shown in Figure 2.14.
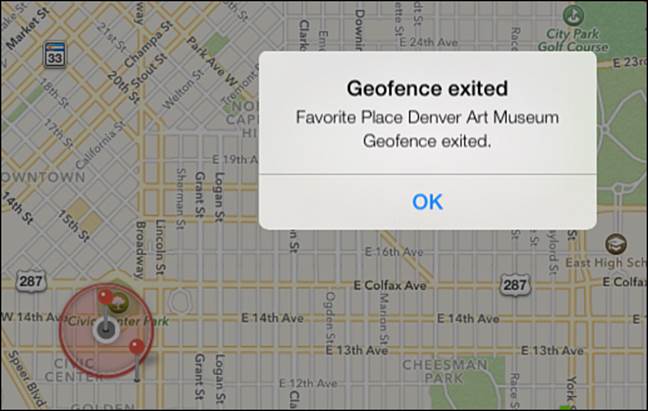
Figure 2.14 FavoritePlaces sample app: favorite place geofence exited alert.
The location manager intentionally delays calling the delegate methods until a cushion distance has been crossed for at least 20 seconds to prevent spurious messages when the device is close to the boundary of a region.
Getting Directions
As of iOS 6, the standard Maps.app was enhanced to provide turn-by-turn navigation in addition to directions. Maps.app was also enhanced to allow other apps to open it with specific instructions on what to display. Apps can request that Maps.app display an array of map items, provide directions between two locations, or provide directions from the current location. Maps.app can be configured with a center point and span, and a type of map (standard, satellite, or hybrid). As of iOS 7, MapKit offers a directions request, which can provide directions to be used directly in an app. The directions request can return an array of polylines representing route options, with accompanying route steps that can be presented in a table view. Both approaches are demonstrated in the sample app.
To open Maps.app, the class method openMapsWithItems:launchOptions: on the MKMapItem class can be used, or the instance method openInMapsWithlaunchOptions:. In the sample app, there is a button on ICFFavoritePlaceViewController to get directions to a favorite place. When that button is tapped, the getDirectionsButtonTouched: method is called. In that method, an instance of MKMapItem is created for the favorite place.
CLLocationCoordinate2D destination =
[self.favoritePlace coordinate];
MKPlacemark *destinationPlacemark =
[[MKPlacemark alloc] initWithCoordinate:destination
addressDictionary:nil];
MKMapItem *destinationItem =
[[MKMapItem alloc] initWithPlacemark:destinationPlacemark];
destinationItem.name =
[self.favoritePlace valueForKey:@"placeName"];
A dictionary of launch options is set up to instruct Maps.app how to configure itself when opened.
NSDictionary *launchOptions = @{
MKLaunchOptionsDirectionsModeKey :
MKLaunchOptionsDirectionsModeDriving,
MKLaunchOptionsMapTypeKey :
[NSNumber numberWithInt:MKMapTypeStandard]
};
Then, an array of map items is created with the favorite place to pass to Maps.app with the dictionary of launch options. If two map items are passed in the array with a directions launch option, the map will provide directions from the first item to the second item.
NSArray *mapItems = @[destinationItem];
BOOL success = [MKMapItem openMapsWithItems:mapItems
launchOptions:launchOptions];
if (!success)
{
NSLog(@"Failed to open Maps.app.");
}
Maps.app will be opened and will provide directions to the favorite place. If an error is encountered, the openMapsWithItems:launchOptions: will return NO.
To request directions to be displayed in the app, instantiate an MKDirections object with an MKDirectionsRequest instance, specifying a source (or starting point) and destination map item expressed as MKMapItem instances.
CLLocationCoordinate2D destination =
[self.favoritePlace coordinate];
MKPlacemark *destinationPlacemark =
[[MKPlacemark alloc] initWithCoordinate:destination
addressDictionary:nil];
MKMapItem *destinationItem =
[[MKMapItem alloc] initWithPlacemark:destinationPlacemark];
MKMapItem *currentMapItem =
[self.delegate currentLocationMapItem];
MKDirectionsRequest *directionsRequest =
[[MKDirectionsRequest alloc] init];
[directionsRequest setDestination:destinationItem];
[directionsRequest setSource:currentMapItem];
MKDirections *directions =
[[MKDirections alloc] initWithRequest:directionsRequest];
Then call the calculateDirectionsWithCompletionHandler: method, specifying a completion block. The completion block should handle any errors, and inspect the MKDirectionsResponse provided. For this example the method ensures that at least one route (which is an instance of MKRoute) was returned, and then performs actions with the first route. The method iterates over the steps property of the first route, which contains instances of MKRouteStep, and logs strings to display the distance and instructions for each route step. Then the method calls the delegate to add the route to the map.
[directions calculateDirectionsWithCompletionHandler:
^(MKDirectionsResponse *response, NSError *error){
if (error) {
NSString *dirMessage =
[NSString stringWithFormat:@"Failed to get directions: %@",
error.localizedDescription];
UIAlertView *dirAlert =
[[UIAlertView alloc] initWithTitle:@"Directions Error"
message:dirMessage
delegate:nil
cancelButtonTitle:@"OK"
otherButtonTitles: nil];
[dirAlert show];
}
else
{
if ([response.routes count] > 0) {
MKRoute *firstRoute = response.routes[0];
NSLog(@"Directions received. Steps for route 1 are: ");
NSInteger stepNumber = 1;
for (MKRouteStep *step in firstRoute.steps) {
NSLog(@"Step %d, %f meters: %@",stepNumber,
step.distance,step.instructions);
stepNumber++;
}
[self.delegate displayDirectionsForRoute:firstRoute];
}
else
{
NSString *dirMessage = @"No directions available";
UIAlertView *dirAlert =
[[UIAlertView alloc] initWithTitle:@"No Directions"
message:dirMessage
delegate:nil
cancelButtonTitle:@"OK"
otherButtonTitles: nil];
[dirAlert show];
}
}
}];
In the delegate method, the polyline for the route is added to the map’s overlays, and the dialog is dismissed.
- (void)displayDirectionsForRoute:(MKRoute *)route
{
[self.mapView addOverlay:route.polyline];
if (self.favoritePlacePopoverController)
{
[self.favoritePlacePopoverController
dismissPopoverAnimated:YES];
self.favoritePlacePopoverController = nil;
} else
{
[self dismissViewControllerAnimated:YES
completion:nil];
}
}
Since the polyline has been added as an overlay, the map delegate method to return overlay views must now handle polylines instead of just the custom geofence radius overlays.
- (MKOverlayRenderer *)mapView:(MKMapView *)mapView
viewForOverlay:(id < MKOverlay >)overlay
{
MKOverlayRenderer *returnView = nil;
if ([overlay isKindOfClass:[ICFFavoritePlace class]]) {
...
}
if ([overlay isKindOfClass:[MKPolyline class]]) {
MKPolyline *line = (MKPolyline *)overlay;
MKPolylineRenderer *polylineRenderer =
[[MKPolylineRenderer alloc] initWithPolyline:line];
[polylineRenderer setLineWidth:3.0];
[polylineRenderer setFillColor:[UIColor blueColor]];
[polylineRenderer setStrokeColor:[UIColor blueColor]];
returnView = polylineRenderer;
}
return returnView;
}
The mapView:viewForOverlay: method will now check which class the overlay belongs to, and build the correct type of view for it. For the polyline, the method will create an instance of MKPolylineRenderer using the polyline from the overlay, and customize it with a line width and blue fill and stroke color, which will show a directions line on the map between the starting location and the destination location, as shown in Figure 2.15.
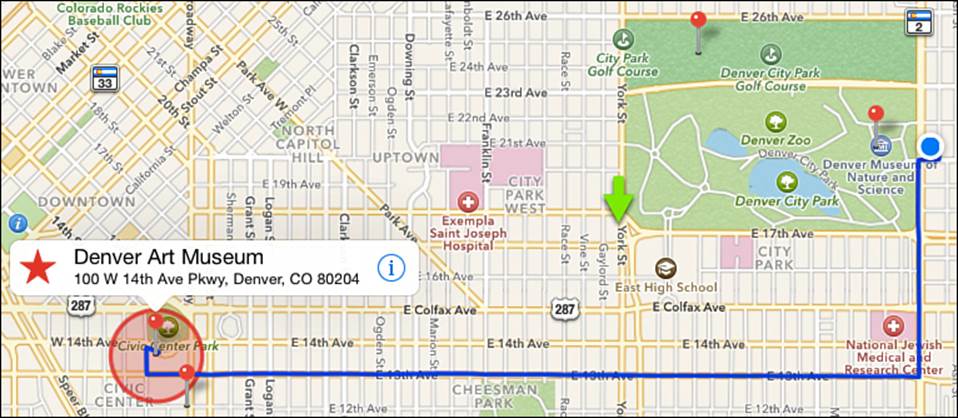
Figure 2.15 FavoritePlaces sample app: displaying a direction polyline on the map.
Summary
This chapter covered Core Location and MapKit. It described how to set up Core Location, how to check for available services, how to deal with user permissions, and how to acquire the device’s current location.
Next, this chapter explained how to use MapKit to display locations on a map using standard and custom annotations. The chapter covered how to display more detail about an annotation in a callout, and how to respond to the user tapping the callout or dragging the annotation on the map. It also explained how to add overlays to a map to highlight map features.
This chapter then described how to use the geocoder to get latitude and longitude information from a street address, or to get address information from a latitude and longitude coordinate.
Geofencing, or regional monitoring, was demonstrated. The sample app showed how to specify and monitor when the user enters or exits map regions.
Lastly, this chapter demonstrated two techniques for providing directions to a favorite place: using Maps.app to provide directions and using a directions request to get information to display directly in the user interface.
Exercises
1. Geofence events can occur while the app is in the background, but the app cannot display an alert while it is in the background. Enhance the sample app to send a local notification when a geofence event is received in the background, and an alert while the app is active. Hint: Refer toChapter 16, “Working with Background Tasks,” and Chapter 9, “Notifications,” for more info on those topics.
2. Currently in the sample app, when a user taps a pin for a favorite place to display the callout, and then taps the right detail disclosure button, a view to edit the details of the favorite place is presented modally. Modify this to present the detailed view in a popover, using the pin as an anchor point. While the popup is being presented, have the associated pin display green instead of red.
All materials on the site are licensed Creative Commons Attribution-Sharealike 3.0 Unported CC BY-SA 3.0 & GNU Free Documentation License (GFDL)
If you are the copyright holder of any material contained on our site and intend to remove it, please contact our site administrator for approval.
© 2016-2026 All site design rights belong to S.Y.A.