Learning Core Data for iOS (2014)
4. Managed Object Model Expansion
Black holes are where God divided by zero.
Albert Einstein
In Chapter 3, “Managed Object Model Migration,” you learned how to manage a changing model with versioning, mappings, and migration techniques. This chapter will exercise your newfound migration knowledge as it introduces further changes to the model. The topics will cover expanding beyond one or two entities with the introduction of relationships, and at the end of the chapter, entity inheritance. The implications of delete rules will be discussed, along with the impact some of them can have on data validation. Following that, you’ll be shown how to handle data validation errors and, worst case, how to terminate gracefully and give users an error code to report back to you.
Relationships
Relationships link entities. Using relationships in the managed object model introduces a powerful means to connect logical areas of data represented by entities. Using relationships can significantly reduce the capacity requirements of a database. Instead of duplicating the same data in multiple entities, a relationship can be put in place as a pointer to a piece of data so it only needs to be stored once. Although de-duplication is one advantage, the true power of relationships is their ability to allow connections between complex data types.
Consider the existing Item and Unit entities found in Grocery Dude’s model. Instances of the Item entity will represent things you can put on a shopping list, such as the following:
![]() Chocolate
Chocolate
![]() Potatoes
Potatoes
![]() Milk
Milk
Instances of the Unit entity will represent units of measurement (g, Kg, and ml), appended to an item quantity. For example:
![]() 250g chocolate
250g chocolate
![]() 4Kg potatoes
4Kg potatoes
![]() 500ml milk
500ml milk
If you really wanted to, you could simply have a string attribute in the Item entity called unit. For each item object, you could then populate the string representing the unit with something like g, Kg, or ml. The problem with that approach is that you’re wasting space in the database because you repeatedly duplicate the data for every Item’s unit. In addition to wasting all that space, you’re also going to have a hard time updating a unit for all items. If you wanted to use kilogram instead of Kg, you would have to iterate through all items with the string Kg and rename it tokilogram, item by item. This is highly inefficient and would make for a very slow application. The solution is to instead use a relationship to a Unit entity, thereby just using a pointer to a single Kg object. This not only reduces the amount of storage space required, it also means you only have to update the unit name in one place to change a unit’s name.
Note
To continue building the sample application, you’ll need to have added the previous chapter’s code to Grocery Dude. Alternatively, you may download, unzip, and use the project up to this point from http://www.timroadley.com/LearningCoreData/GroceryDude-AfterChapter03.zip. It is recommended that you use the iOS Simulator when following this chapter so you can inspect the contents of the SQLite database files easily.
Update Grocery Dude as follows to prepare for this chapter:
1. Delete the application from the iOS Simulator.
2. Click Product > Clean to ensure there’s no residual cache from previous incarnations of the project.
3. Run the application once on the iOS Simulator to generate an empty persistent store.
Update Grocery Dude as follows to create a relationship:
1. Optionally take a snapshot or back up the project.
2. Add a model version named Model 5 based on Model 4 using the techniques from Chapter 3.
3. Set Model 5 as the Current Model.
4. Select Model 5.xcdatamodel.
5. Change the Editor Style to Graph, as shown in Figure 4.1.
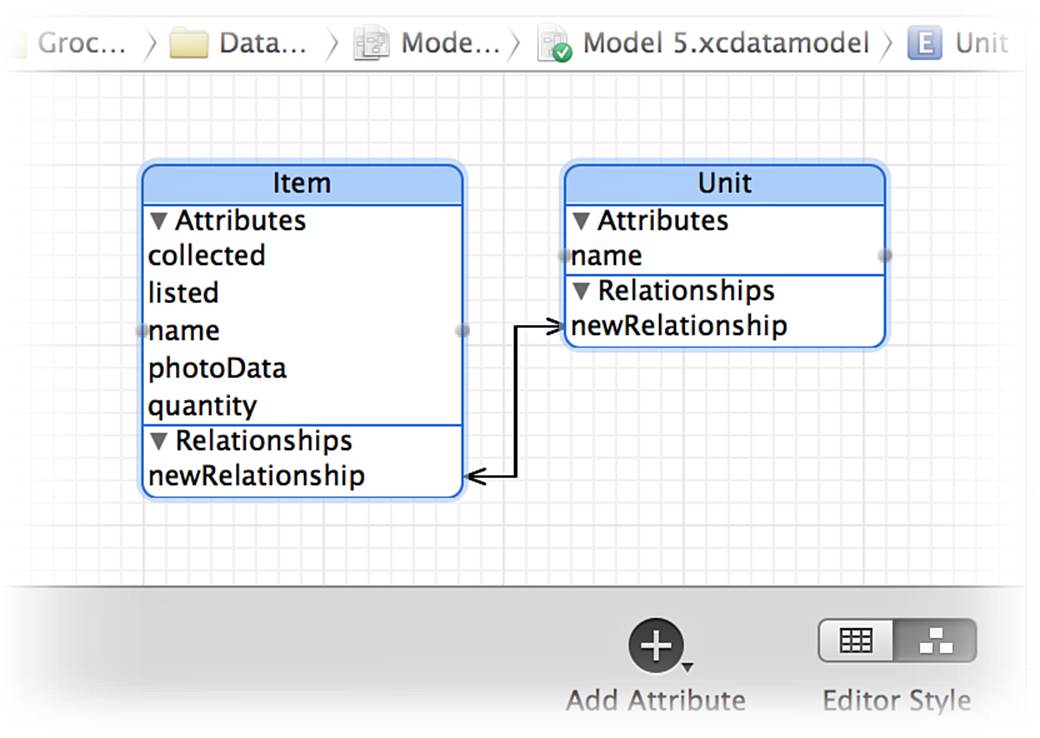
Figure 4.1 A new relationship
6. If the Item and Unit entities are sitting on top of each other, drag them apart.
7. Hold down Control and drag a line from the Item entity to the Unit entity. The expected result is shown in Figure 4.1.
By creating a relationship between two entities using the Graph Editor Style, you’ve created an inverse relationship, which is two relationships in opposite directions between two entities. In this case, one relationship is from Item to Unit and the other is from Unit to Item. If instead you created a relationship using the Table Editor Style, the result would only be a one-way relationship. You need to manually add inverse relationships when using the Table Editor Style, provided that is what you want.
With an inverse relationship in place, you can now do the following:
![]() Associate Item managed objects to Unit managed objects.
Associate Item managed objects to Unit managed objects.
![]() Associate Unit managed objects to Item managed objects.
Associate Unit managed objects to Item managed objects.
This newfound association allows access to the attributes of the related entity through the relationship (for example, item.newRelationship.name). You next need to consider whether each direction of the relationship is To-Many or To-One. The answer to this question should also help you rename the relationship appropriately. A To-Many relationship allows a potentially unlimited number of destination objects, whereas the alternative limits the allowable number of destination objects to one.
Consider the Item-to-Unit relationship:
![]() Configuring a To-Many relationship from the Item entity to the Unit entity would allow an item to have potentially unlimited units of measurement. This is not ideal because items on a shopping list only need one unit of measurement (such as Kg or pound). Note also that it is possible to configure a maximum number of related objects allowable through a To-Many relationship.
Configuring a To-Many relationship from the Item entity to the Unit entity would allow an item to have potentially unlimited units of measurement. This is not ideal because items on a shopping list only need one unit of measurement (such as Kg or pound). Note also that it is possible to configure a maximum number of related objects allowable through a To-Many relationship.
![]() Configuring a To-One relationship from the Item entity to the Unit entity would mean only one unit of measurement can be assigned to an item. This is ideal because items on a shopping list only need one unit of measurement. A good name for the relationship in this direction would therefore be unit. With this new relationship name, you could then use item.unit.name to reference the related unit’s name through the item object.
Configuring a To-One relationship from the Item entity to the Unit entity would mean only one unit of measurement can be assigned to an item. This is ideal because items on a shopping list only need one unit of measurement. A good name for the relationship in this direction would therefore be unit. With this new relationship name, you could then use item.unit.name to reference the related unit’s name through the item object.
When you create an inverse relationship, you need to think about both directions.
Consider the Unit-to-Item relationship:
![]() Configuring a To-One relationship from the Unit entity to the Item entity will prevent a unit from being used by more than one item. This is not ideal because many items on a shopping list should be able to use the same unit of measurement (such as 2Kg of onions and 1Kg of corn).
Configuring a To-One relationship from the Unit entity to the Item entity will prevent a unit from being used by more than one item. This is not ideal because many items on a shopping list should be able to use the same unit of measurement (such as 2Kg of onions and 1Kg of corn).
![]() Configuring a To-Many relationship from the Unit entity to the Item entity will allow a unit to be used by potentially unlimited items. This is ideal because many items on a shopping list will need to use the same unit of measurement. A good name for the relationship in this direction would therefore be items. If you wanted to list all objects related to a particular unit, it’s as easy as fetching unit.items to retrieve an NSSet with pointers them all!
Configuring a To-Many relationship from the Unit entity to the Item entity will allow a unit to be used by potentially unlimited items. This is ideal because many items on a shopping list will need to use the same unit of measurement. A good name for the relationship in this direction would therefore be items. If you wanted to list all objects related to a particular unit, it’s as easy as fetching unit.items to retrieve an NSSet with pointers them all!
Update Grocery Dude as follows to configure the relationships:
1. Rename the newRelationship in the Item entity to unit.
2. Rename the newRelationship in the Unit entity to items.
3. Change the items relationship Type to To-Many, as shown in Figure 4.2.
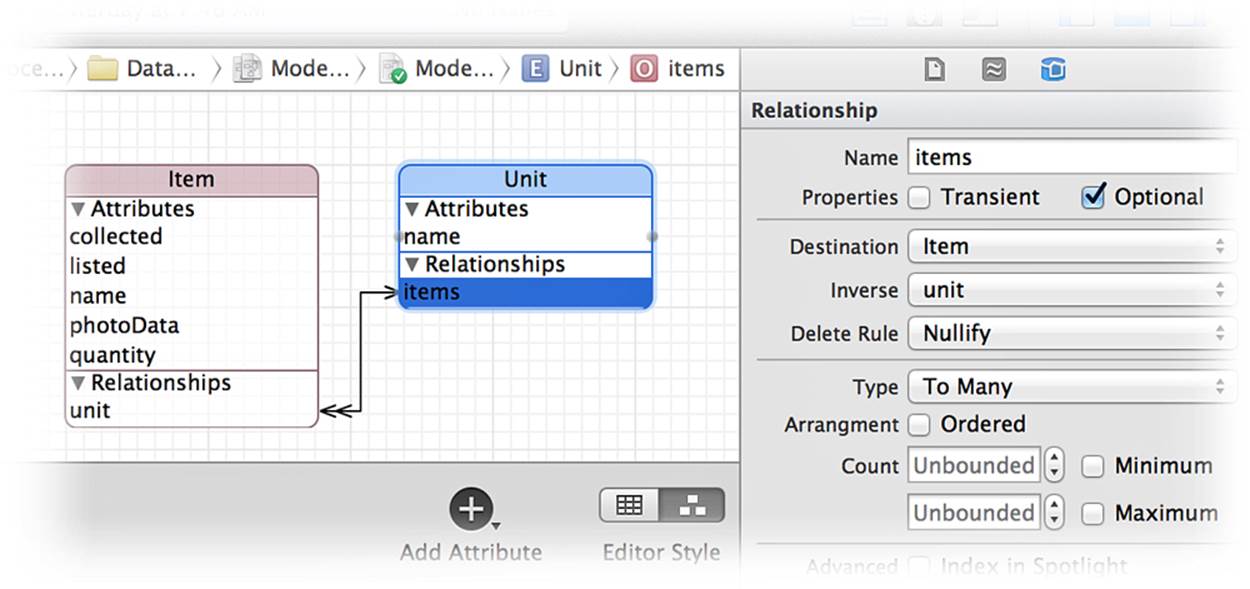
Figure 4.2 The unit and items relationships
As you’ve now been shown, the name of a relationship should reflect something in line with what it provides access to. With the unit and items relationships now configured, you can access relationship destination properties in code via item.unit and unit.items. That said, you first need newNSManagedObject subclasses of these entities before you can use this dot notation.
Update Grocery Dude as follows to refresh the existing NSManagedObect subclasses:
1. Ensure Model 5.xcdatamodel is selected.
2. Create an NSManagedObect subclass of the Item and Unit entities using techniques discussed in the previous chapters. On the Select the entities you would like to manage page, ensure both the Item and Unit entities are ticked. When it comes time to save the class file, don’t forget to tick the Grocery Dude target. Replace the existing files when prompted.
Examine Unit.h and look for the new NSSet items property. The items property represents a To-Many relationship, so the “many” is provided as an NSSet that also comes with associated helper methods for adding and removing objects. The thing to know about an NSSet is that the objects within are not ordered, as opposed to an NSOrderedSet or NSArray. The ordering of fetched objects is usually done with a sort descriptor passed to a fetch request, which, in contrast, returns an NSArray. If you tick the “Ordered” relationship setting available with a To-Many relationship, the resulting NSManagedObject property type is an NSOrderedSet. Another difference between an NSSet and NSArray to keep in mind is that an NSSet cannot contain duplicate objects.
Examine Item.h, and you should notice a new unit property of type Unit. The unit property represents a To-One relationship, so the “one” is simply the class type of the target entity.
Inserting a couple of items and setting both their unit attributes to the same thing is now a clear-cut exercise, as shown in Listing 4.1.
Listing 4.1 AppDelegate.m: demo (Relationship Creation)
if (debug==1) {
NSLog(@"Running %@ '%@'", self.class, NSStringFromSelector(_cmd));
}
Unit *kg =
[NSEntityDescription insertNewObjectForEntityForName:@"Unit"
inManagedObjectContext:[[self cdh] context]];
Item *oranges =
[NSEntityDescription insertNewObjectForEntityForName:@"Item"
inManagedObjectContext:[[self cdh] context]];
Item *bananas =
[NSEntityDescription insertNewObjectForEntityForName:@"Item"
inManagedObjectContext:[[self cdh] context]];
kg.name = @"Kg";
oranges.name = @"Oranges";
bananas.name = @"Bananas";
oranges.quantity = [NSNumber numberWithInt:1];
bananas.quantity = [NSNumber numberWithInt:4];
oranges.listed = [NSNumber numberWithBool:YES];
bananas.listed = [NSNumber numberWithBool:YES];
oranges.unit = kg;
bananas.unit = kg;
NSLog(@"Inserted %@%@ %@",
oranges.quantity, oranges.unit.name, oranges.name);
NSLog(@"Inserted %@%@ %@",
bananas.quantity, bananas.unit.name, bananas.name);
[[self cdh] saveContext];
Update Grocery Dude as follows to insert new items with a common unit:
1. Populate the demo method of AppDelegate.m with the code from Listing 4.1.
2. Run the application once. The expected console log results are shown in Figure 4.3.
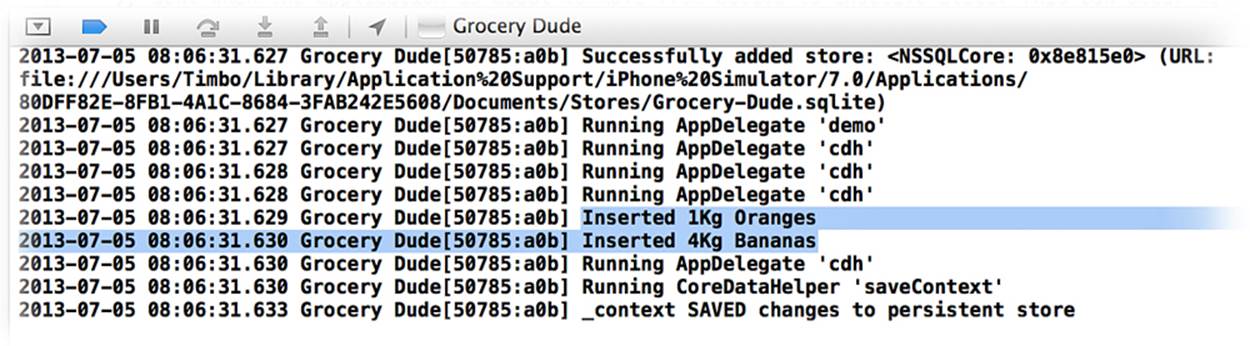
Figure 4.3 Successful insertion of items with a relationship to the same unit
3. Delete all code from the demo method of AppDelegate.m.
To prove there is only one row in the database representing the Kg object, examine the contents of the Grocery-Dude.sqlite file using the techniques discussed in Chapter 2, “Managed Object Model Basics.” The expected result is shown in Figure 4.4.
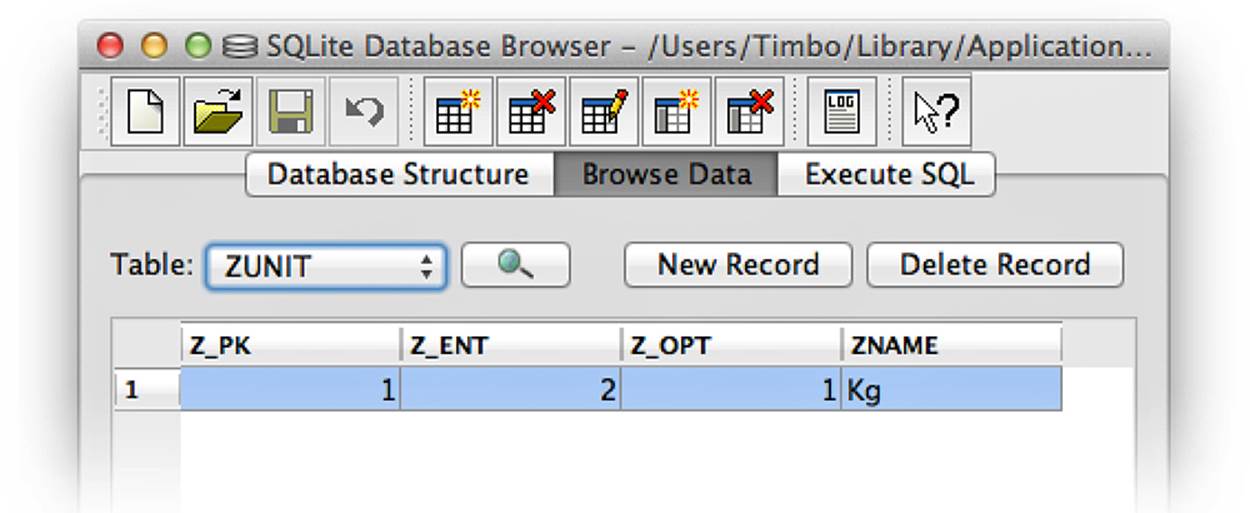
Figure 4.4 The Unit entity in the SQLite database as ZUNIT
Ensure you close SQLite Database Browser before continuing.
Delete Rules
An important relationship setting to be aware of is Delete Rule. When an object is deleted, this setting determines what happens to related objects, as detailed here:
![]() The Nullify delete rule is a good default for most situations. When an object is deleted and this rule is in place, related objects nil out their relationship to the deleted object. For example, assume a unit object named Kg is related to some item objects. If a Nullify delete rule was set on the items relationship and the Kg unit object was deleted, the related item objects would set their unit property to nil.
The Nullify delete rule is a good default for most situations. When an object is deleted and this rule is in place, related objects nil out their relationship to the deleted object. For example, assume a unit object named Kg is related to some item objects. If a Nullify delete rule was set on the items relationship and the Kg unit object was deleted, the related item objects would set their unit property to nil.
![]() The Cascade delete rule propagates deletions through the relationship. For example, assume a unit object named Kg is related to some item objects. If a Cascade delete rule was set on the items relationship and the Kg unit object was deleted, all the related item objects would be deleted, too.
The Cascade delete rule propagates deletions through the relationship. For example, assume a unit object named Kg is related to some item objects. If a Cascade delete rule was set on the items relationship and the Kg unit object was deleted, all the related item objects would be deleted, too.
![]() The Deny delete rule prevents the deletion of an object if it still has related objects. For example, assume a unit object named Kg is related to some item objects. If a Deny delete rule was set on the items relationship and the Kg unit object was deleted, the existence of related itemobjects would cause a validation error when the context was saved. When you use a Deny delete rule, you need to ensure that there are no related objects at the relationship destination before deleting the source object.
The Deny delete rule prevents the deletion of an object if it still has related objects. For example, assume a unit object named Kg is related to some item objects. If a Deny delete rule was set on the items relationship and the Kg unit object was deleted, the existence of related itemobjects would cause a validation error when the context was saved. When you use a Deny delete rule, you need to ensure that there are no related objects at the relationship destination before deleting the source object.
![]() The No Action delete rule is a strange one that will actually leave your object graph in an inconsistent state. If you use this delete rule, it is up to you to manually set the inverse relationship to something valid. Only corner-case situations call for this delete rule.
The No Action delete rule is a strange one that will actually leave your object graph in an inconsistent state. If you use this delete rule, it is up to you to manually set the inverse relationship to something valid. Only corner-case situations call for this delete rule.
In order to test the results of object deletion, a new method is required that displays a count of unit and item objects in the persistent store. Listing 4.2 shows the code involved.
Listing 4.2 AppDelegate.m: showUnitAndItemCount
- (void)showUnitAndItemCount {
// List how many items there are in the database
NSFetchRequest *items =
[NSFetchRequest fetchRequestWithEntityName:@"Item"];
NSError *itemsError = nil;
NSArray *fetchedItems =
[[[self cdh] context] executeFetchRequest:items error:&itemsError];
if (!fetchedItems) {NSLog(@"%@", itemsError);}
else {NSLog(@"Found %lu item(s) ",(unsigned long)[fetchedItems count]);}
// List how many units there are in the database
NSFetchRequest *units =
[NSFetchRequest fetchRequestWithEntityName:@"Unit"];
NSError *unitsError = nil;
NSArray *fetchedUnits =
[[[self cdh] context] executeFetchRequest:units error:&unitsError];
if (!fetchedUnits) {NSLog(@"%@", unitsError);}
else {NSLog(@"Found %lu unit(s) ",(unsigned long)[fetchedUnits count]);}
}
Update Grocery Dude as follows to prepare for delete rule testing:
1. Add the showUnitAndItemCount method from Listing 4.2 to AppDelegate.m, just above the existing demo method.
2. Replace all code in the demo method of AppDelegate.m. with [self showUnitAndItemCount];.
3. Run the application. The expected console log results are shown in Figure 4.5.

Figure 4.5 A count of item(s) and unit(s) in the persistent store
The expected result shows there are two item objects and one unit object in the persistent store. The two item objects are oranges and bananas, which were inserted as a part of implementing Listing 4.1. The only unit object is Kg, which both items are related to. It’s time to see what happens when the Kg unit is deleted when a Deny delete rule is in play.
Update Grocery Dude as follows to configure a Deny delete rule:
1. Select the items relationship in the Unit entity of Model 5.
2. Set the items relationship Delete Rule to Deny using Data Model Inspector (Option+![]() +3).
+3).
The code to delete a unit object named Kg is shown in Listing 4.3.
Listing 4.3 AppDelegate.m: demo (Unit Deletion)
NSLog(@"Before deletion of the unit entity:");
[self showUnitAndItemCount];
NSFetchRequest *request =
[NSFetchRequest fetchRequestWithEntityName:@"Unit"];
NSPredicate *filter =
[NSPredicate predicateWithFormat:@"name == %@", @"Kg"];
[request setPredicate:filter];
NSArray *kgUnit =
[[[self cdh] context] executeFetchRequest:request error:nil];
for (Unit *unit in kgUnit) {
[_coreDataHelper.context deleteObject:unit];
NSLog(@"A Kg unit object was deleted");
}
NSLog(@"After deletion of the unit entity:");
[self showUnitAndItemCount];
Update Grocery Dude as follows to implement the code to delete a Kg unit object:
1. Replace the existing code in the demo method of AppDelegate.m with the code from Listing 4.3.
2. Run the application. The expected console log results are shown in Figure 4.6.
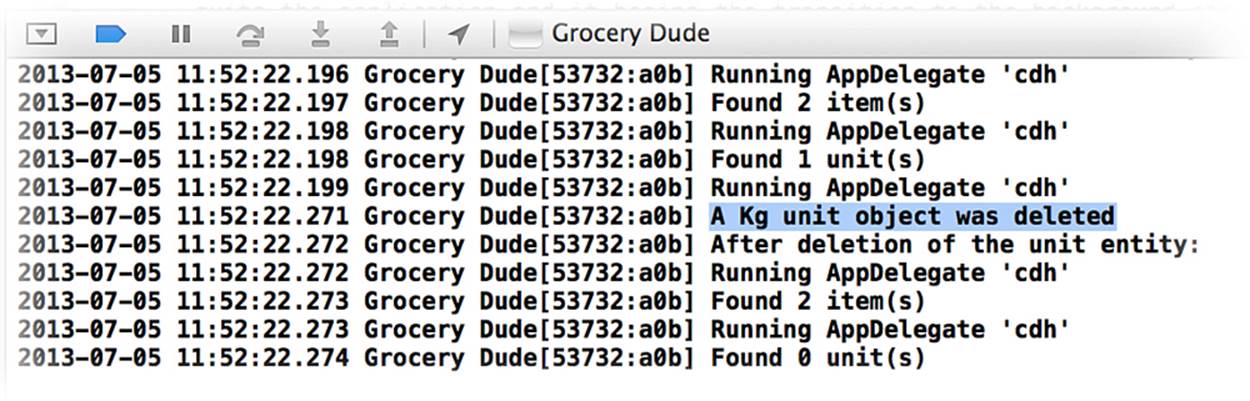
Figure 4.6 The Deny delete rule doesn’t work?
Upon examining the console log, it appears that the Deny delete rule hasn’t worked. What’s going on here? Why are there no units anymore? Shouldn’t the Deny rule have prevented the Kg unit object from being deleted because oranges and bananas are related to it? They’re all good questions; however, the key point here is that the delete rule is only enforced when it comes time to save the context.
Update Grocery Dude as follows to save the context after the deletion:
1. Add [[self cdh] saveContext]; to the bottom of the demo method of AppDelegate.m.
2. Re-run the application, which will fail to save the context as shown in Figure 4.7.
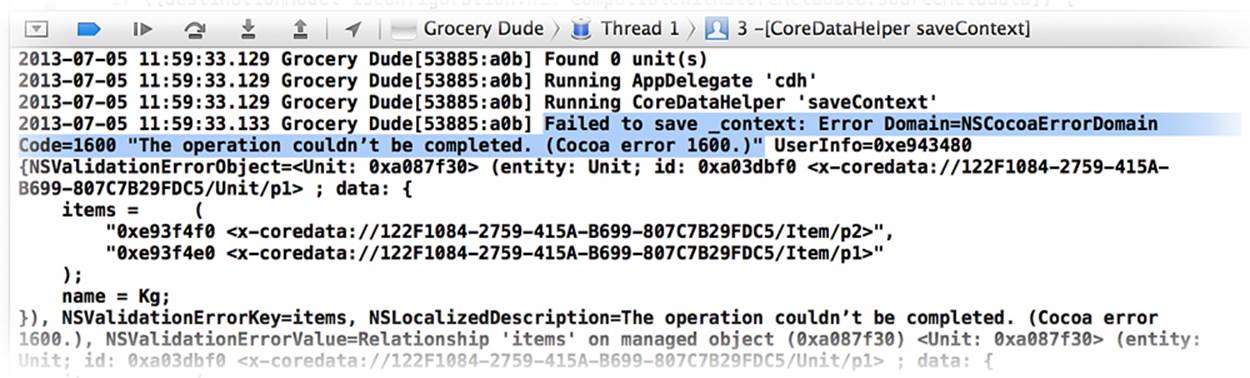
Figure 4.7 The Deny delete rule works.
The delete rule only comes into effect when a context save is attempted. Any breach of the delete rule will generate an NSCocoaErrorDomain error 1600. To get around this error, you’ll need to check that the unit object can be safely deleted before deleting it.
If it is not safe to delete the object, you could do either of the following:
![]() Tell the user the deletion is denied and skip deletion.
Tell the user the deletion is denied and skip deletion.
![]() Nil out all unit.items first and then delete the unit object.
Nil out all unit.items first and then delete the unit object.
In reality, this type of issue would probably come up after a user swipes to delete a unit from a table view. When a Deny delete rule is in place, you should use a method available from the super class NSManagedObject called validateForDelete. This method returns YES if it’s safe to delete the object in question. Listing 4.4 shows this method in some sample code.
Listing 4.4 AppDelegate.m: demo (Validate for Delete)
NSError *error;
if ([unit validateForDelete:&error]) {
NSLog(@"Deleting '%@'", unit.name);
[_coreDataHelper.context deleteObject:unit];
} else {
NSLog(@"Failed to delete %@, Error: %@",
unit.name, error.localizedDescription);
}
Update Grocery Dude as follows to perform validation prior to deletion:
1. Replace all code within the existing for loop of the demo method of AppDelegate.m with the code from Listing 4.4.
2. Run the application again. The expected result is that the Kg unit is not deleted, which is shown in Figure 4.8.
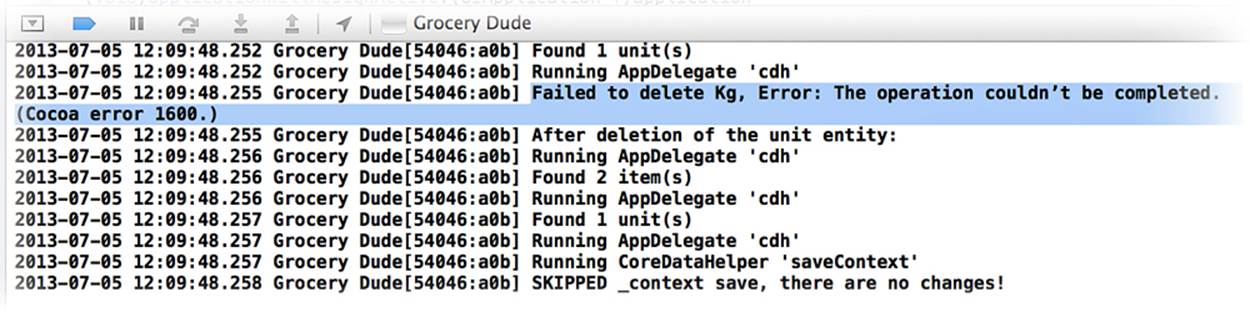
Figure 4.8 Validate that objects are safe to delete before deleting them.
The next step is to make validation errors visible to the user, even though this is a last resort that they should never have to experience.
Validation Errors
Before objects can be saved to a persistent store, they must pass validation. If an object fails validation, an NSError from the NSCocoaErrorDomain will be thrown. There are just over a dozen types of validation errors, which you can see by jumping to the definition ofNSManagedObjectValidationError in Xcode. This jump will take you to CoreDataErrors.h, which defines the validation errors that are also shown in Table 4.1.
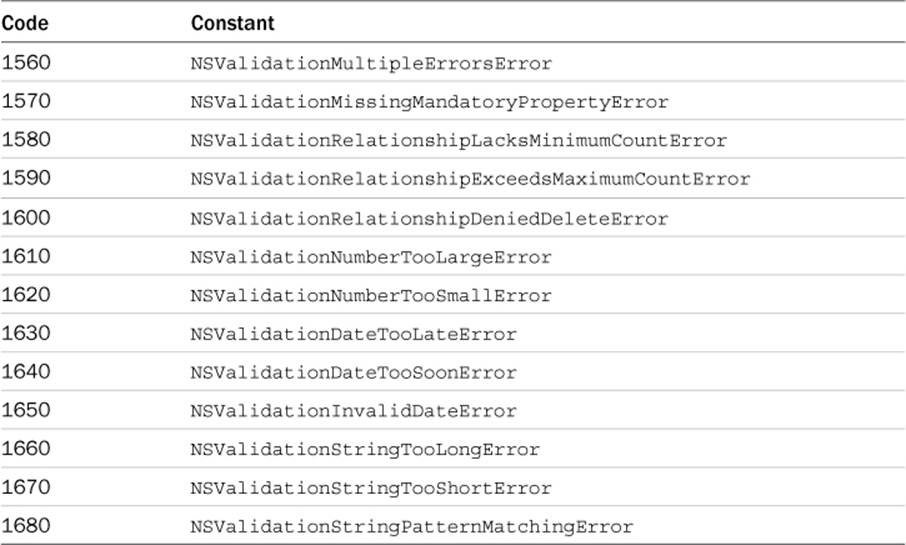
Table 4.1 Possible Validation Errors
The application currently can’t save due to error 1600. A validateForDelete was put in place to at least ensure the save isn’t attempted. Because it’s likely this type of validation logic could be forgotten in other areas of the application, it’s good to put in some graceful “last-resort” error alerting. This way, an end user could contact the developer to pass on the error code received. Listing 4.5 shows the code required to cause a validation error.
Listing 4.5 CoreDataHelper.m: demo (Unit Deletion)
NSLog(@"Before deletion of the unit entity:");
[self showUnitAndItemCount];
NSFetchRequest *request =
[NSFetchRequest fetchRequestWithEntityName:@"Unit"];
NSPredicate *filter =
[NSPredicate predicateWithFormat:@"name == %@", @"Kg"];
[request setPredicate:filter];
NSArray *kgUnit =
[[[self cdh] context] executeFetchRequest:request error:nil];
for (Unit *unit in kgUnit) {
[[[self cdh] context] deleteObject:unit];
NSLog(@"A Kg unit object was deleted");
}
NSLog(@"After deletion of the unit entity:");
[self showUnitAndItemCount];
[[self cdh] saveContext];
Update Grocery Dude as follows to ensure the application fails to save again:
1. Replace all code in the demo method of AppDelegate.m with the code from Listing 4.5.
2. Run the application again, which should fail to save with error 1600.
To show the validation error to the user, a new showValidationError method will intercept validation errors and present an appropriate alert. To begin with, the new method will only have increased information regarding error code 1600. As per Table 4.1, error code 1600 means anNSValidationRelationshipDeniedDeleteError occurred. Listing 4.6 shows the showValidationError method that will catch and alert on this error.
Listing 4.6 CoreDataHelper.m: showValidationError
#pragma mark - VALIDATION ERROR HANDLING
- (void)showValidationError:(NSError *)anError {
if (anError && [anError.domain isEqualToString:@"NSCocoaErrorDomain"]) {
NSArray *errors = nil; // holds all errors
NSString *txt = @""; // the error message text of the alert
// Populate array with error(s)
if (anError.code == NSValidationMultipleErrorsError) {
errors = [anError.userInfo objectForKey:NSDetailedErrorsKey];
} else {
errors = [NSArray arrayWithObject:anError];
}
// Display the error(s)
if (errors && errors.count > 0) {
// Build error message text based on errors
for (NSError * error in errors) {
NSString *entity =
[[[error.userInfo objectForKey:@"NSValidationErrorObject"]entity]name];
NSString *property =
[error.userInfo objectForKey:@"NSValidationErrorKey"];
switch (error.code) {
case NSValidationRelationshipDeniedDeleteError:
txt = [txt stringByAppendingFormat:
@"%@ delete was denied because there are associated %@\n(Error Code %li)\n\n"
, entity, property, (long)error.code];
break;
default:
txt = [txt stringByAppendingFormat:
@"Unhandled error code %li in showValidationError method"
, (long)error.code];
break;
}
}
// display error message txt message
UIAlertView *alertView =
[[UIAlertView alloc] initWithTitle:@"Validation Error"
message:[NSString stringWithFormat:@"%@Please double-tap the home button and close this application by swiping the application screenshot upwards",txt]
delegate:nil
cancelButtonTitle:nil
otherButtonTitles:nil];
[alertView show];
}
}
}
The showValidationError method starts by breaking apart the detailed contents of an NSError and then putting single errors into an errors array. Provided the resulting array isn’t empty, the method then iterates through the array and builds an error message string. Once the string is created, it is passed to a UIAlertView that is shown to the user.
Update Grocery Dude as follows to warn the user of the validation error:
1. Add the code from Listing 4.6 to the bottom of CoreDataHelper.m, just before @end.
2. Add [self showValidationError:error]; to the saveContext method of CoreDataHelper.m on the line after Failed to save.
3. Run the application. The expected result is shown in Figure 4.9.
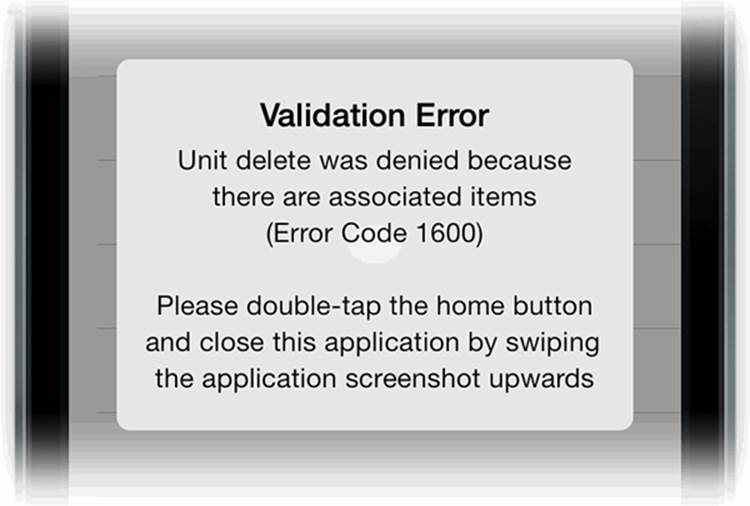
Figure 4.9 An alert view is more user friendly than an outright crash.
From now on, when a context is saved and data validation fails, at least there’s a nice error displaying what happened. Adding descriptions for the other validation failures is as easy as updating the switch-case statement in the showValidationError method, as shown in Listing 4.7.
Listing 4.7 CoreDataHelper.m: showValidationError (Additional Cases)
case NSValidationRelationshipLacksMinimumCountError:
txt = [txt stringByAppendingFormat:
@"the '%@' relationship count is too small (Code %li)."
, property, (long)error.code];
break;
case NSValidationRelationshipExceedsMaximumCountError:
txt = [txt stringByAppendingFormat:
@"the '%@' relationship count is too large (Code %li)."
, property, (long)error.code];
break;
case NSValidationMissingMandatoryPropertyError:
txt = [txt stringByAppendingFormat:
@"the '%@' property is missing (Code %li).", property, (long)error.code];
break;
case NSValidationNumberTooSmallError:
txt = [txt stringByAppendingFormat:
@"the '%@' number is too small (Code %li).", property, (long)error.code];
break;
case NSValidationNumberTooLargeError:
txt = [txt stringByAppendingFormat:
@"the '%@' number is too large (Code %li).", property, (long)error.code];
break;
case NSValidationDateTooSoonError:
txt = [txt stringByAppendingFormat:
@"the '%@' date is too soon (Code %li).", property, (long)error.code];
break;
case NSValidationDateTooLateError:
txt = [txt stringByAppendingFormat:
@"the '%@' date is too late (Code %li).", property, (long)error.code];
break;
case NSValidationInvalidDateError:
txt = [txt stringByAppendingFormat:
@"the '%@' date is invalid (Code %li).", property, (long)error.code];
break;
case NSValidationStringTooLongError:
txt = [txt stringByAppendingFormat:
@"the '%@' text is too long (Code %li).", property, (long)error.code];
break;
case NSValidationStringTooShortError:
txt = [txt stringByAppendingFormat:
@"the '%@' text is too short (Code %li).", property, (long)error.code];
break;
case NSValidationStringPatternMatchingError:
txt = [txt stringByAppendingFormat:
@"the '%@' text doesn't match the specified pattern (Code %li)."
, property, (long)error.code];
break;
case NSManagedObjectValidationError:
txt = [txt stringByAppendingFormat:
@"generated validation error (Code %li)", (long)error.code];
break;
Update Grocery Dude to enhance the validation error alert descriptions:
1. Add the additional cases from Listing 4.7 to the existing switch-case statement found in the showValidationErrors method of CoreDataHelper.m on the line before default.
2. Remove all code from the demo method of AppDelegate.m.
3. Run the application again, which should not display a validation error alert view.
Entity Inheritance
Similar to classes, entities have the ability to inherit from a parent. This useful feature allows you to simplify the data model. Child entities automatically inherit the attributes of their parent entity. In an underlying SQLite store, all entities involved in a parent-child hierarchy reside in the same table.
The sample application is centered on the understanding that grocery items could live in one of two locations: the shop or your house. This means entity inheritance could be leveraged to allow attributes common to a shop location and home location to be inherited from a parent location. For example, let’s say an entity called Location has an attribute called summary. If another entity such as LocationAtHome or LocationAtShop inherits from Location, it will automatically have the summary attribute. This behavior is similar to class inheritance.
To prevent the Location entity from ever being instantiated, you have the option of making it abstract. You would do this only if it doesn’t make sense to have instances of the Location entity in your code.
Update Grocery Dude as follows to configure entities with inheritance:
1. Add a new model version named Model 6 based on Model 5.
2. Set Model 6 as the Current Model.
3. Ensure Model 6.xcdatamodel is selected.
4. Add a new entity called Location with a String attribute called summary.
5. Select the Location entity and open up the Data Model Inspector in the Utilities pane, as shown in Figure 4.10.
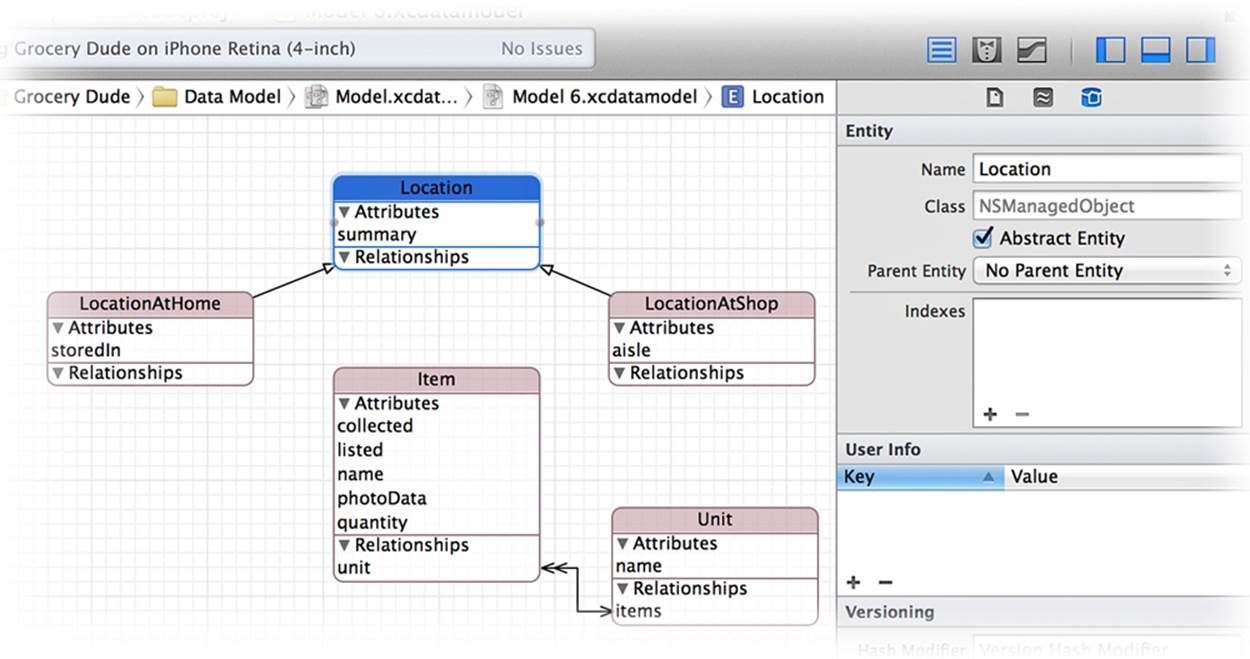
Figure 4.10 Location as an abstract, parent entity
6. Tick Abstract Entity, which triggers a warning that the Location entity has no children.
7. Create a new entity called LocationAtHome with a String attribute called storedIn.
8. Create a new entity called LocationAtShop with a String attribute called aisle.
9. Click the LocationAtHome entity and then set its parent entity to Location using Data Model Inspector (Option+![]() +3).
+3).
10. Click the LocationAtShop entity and then set its parent entity to Location.
11. Change the Editor Style to Graph (if it isn’t already) and then arrange the entities as shown in Figure 4.10. If you can’t see all the entities, you might need to scroll to them.
With the new parent and child entities in place, it’s time to link them to the Item entity so items can be related to a home or shop location.
Update Grocery Dude as follows to configure the “location at home” relationships:
1. Hold down Control while dragging a line from the LocationAtHome entity to the Item entity.
2. Rename newRelationship in the LocationAtHome entity to items.
3. Set the items relationship in the LocationAtHome entity to To-Many.
4. Rename newRelationship in the Item entity to locationAtHome.
Update Grocery Dude as follows to configure the “location at shop” relationships:
1. Hold down Control while dragging a line from the LocationAtShop entity to the Item entity.
2. Rename newRelationship in the LocationAtShop entity to items.
3. Set the items relationship in the LocationAtShop entity to To-Many.
4. Rename newRelationship in the Item entity to locationAtShop.
The model should now match the one shown in Figure 4.11. Notice how the double-headed arrows indicate a To-Many relationship.
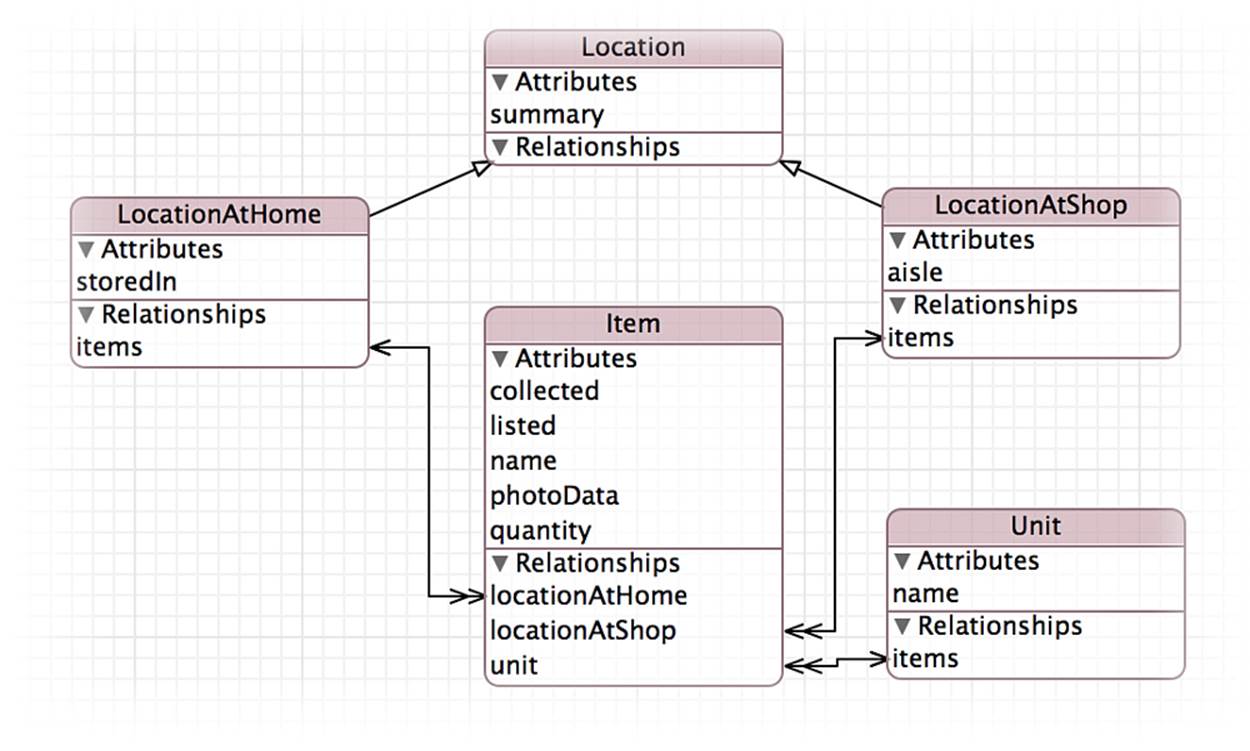
Figure 4.11 The new model adds support for item locations
Update Grocery Dude as follows to ensure dot notation can be used with the new entities in code:
1. Create an NSManagedObject subclass of all entities in Model 6, replacing any existing files. Remember to select the Grocery Dude target when you save.
When generating subclass files, you may come across a chicken-and-egg situation. This situation causes a To-One relationship to be generated as an NSManagedObject property, instead of a property named after the target instance. Figure 4.12 shows an incorrectly generated subclass Item.h.
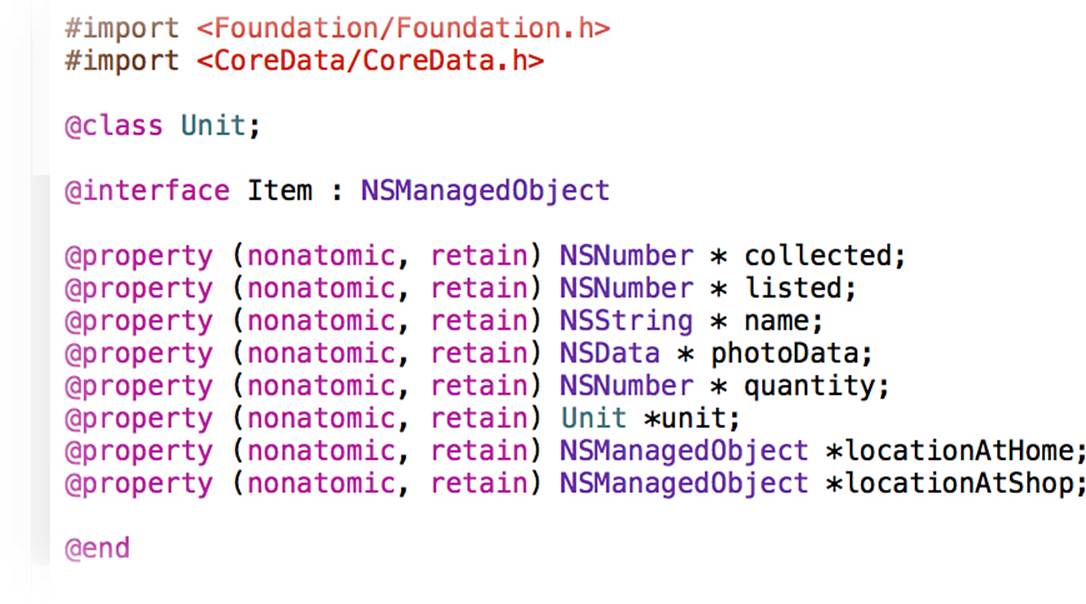
Figure 4.12 An incorrectly generated NSManagedObject subclass
Just which files have these base-level properties may vary depending on the order of subclass generation. To fix this issue, all you have to do is generate the subclass files again the same way you did previously. Figure 4.13 shows a correctly generated subclass, Item.h. You may want to get into the habit of generating NSManagedObject subclasses twice to avoid this issue so you don’t have to check whether or not it happened.

Figure 4.13 A correctly generated NSManagedObject subclass
Update Grocery Dude as follows to ensure the correct subclass files exist:
1. Again, create an NSManagedObject subclass of all entities in Model 6, overwriting any existing files.
Summary
You’ve now been shown how to create and configure relationships between entities. As the benefits of using relationships were discussed, the key relationship settings such as To-Many, To-One, and Delete Rules were covered, too. As the model was expanded, new location-centric entities were introduced that demonstrated abstract entities as parents in a new entity inheritance hierarchy. This hierarchy was related back to the items entity, which now enables items to have a shop location and home location.
Any issues due to data validation errors will now display what went wrong before the user is told to close the application. This should put you on a resolution path faster than the alternative. To prevent validation issues in the first place, the validation methods existing in all NSManagedObjectfiles were brought to light.
The foundation has now been laid, so it’s time to bring the application to life with the introduction of table views, which are discussed in the next chapter.
Exercises
Why not build on what you’ve learned by experimenting?
1. Insert a new Item, ShopLocation, and HomeLocation.
2. Set the new item.shopLocation and item.homeLocation to be the ShopLocation and HomeLocation objects. (Hint: Use Listing 4.1 as a cheat sheet.)
3. Set the delete rule on the items relationship of the Unit entity to Cascade instead of Deny. Delete a unit. What happens to the related items after you save the context?
4. Examine the contents of the location table in Grocery-Dude.sqlite to see how the location entities translate to database tables. Notice how the storedIn and aisle attributes from the Location child entities are all in the ZLOCATION table.
Change the delete rule on the items relationship of the Unit entity to Nullify once you finish testing.
All materials on the site are licensed Creative Commons Attribution-Sharealike 3.0 Unported CC BY-SA 3.0 & GNU Free Documentation License (GFDL)
If you are the copyright holder of any material contained on our site and intend to remove it, please contact our site administrator for approval.
© 2016-2026 All site design rights belong to S.Y.A.