Learning Core Data for iOS (2014)
9. Deep Copy
The only sure way to avoid making mistakes is to have no new ideas.
Albert Einstein
In Chapter 8, “Preloading Data,” importing default data from an XML file was demonstrated. This import method is suitable only when the XML source file is small enough to fit into memory. Another option is to use a prepopulated persistent store as the initial persistent store. If customers already have existing data and you want to add a lot more to it, this option isn’t suitable either. When you find yourself in this position, you may need to perform a “deep copy” of managed objects from a source persistent store to an existing persistent store. This option provides de-duplication and more granularity than the migratePersistentStore instance method of NSPersistentStore, although it isn’t as fast.
Overview
A deep copy involves copying managed objects and their relationships from one persistent store to another. Once an object has been copied, the relationships from its source object are walked to find related source objects. Those related source objects are then copied to the target store as required. Relationships in the source store are then replicated in the target store between the copied objects. As this cycle continues for each object, every relationship in all directions is eventually copied into the target persistent store. Needless to say, this is a CPU-intensive task and should only be run in the background.
Depending on an application’s data model, it may be more efficient to copy all objects in one pass and then reestablish the relationships later. In fact, this should be the preference. Unfortunately for Grocery Dude, this approach cannot be used. This is due to the items shown in the Prepare and Shop tabs having a reliance on a related object. If items are imported without a relationship to a home or shop location, the tables won’t be divided into sections properly during the import process. This wouldn’t look right to the user, who may get the impression that there is a bug in the application.
Deep copy will only work when the source and target stores have the same managed object model. That said, a separate coordinator and context is needed for the source and target stores, too. The contexts used for the source and target stores should also be separate from the main queue context. Figure 9.1 shows a high-level overview of the Core Data components that deep copy requires.
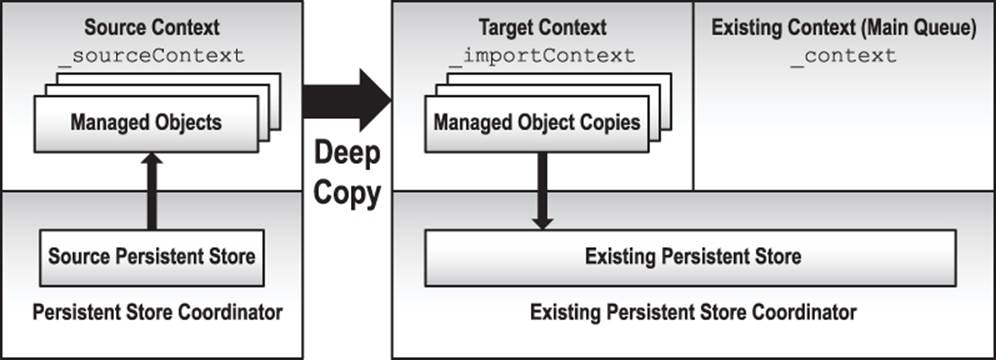
Figure 9.1 Deep copy
The existing _importContext will be reused as the target context for the deep copy demonstration. Copying an object to another context isn’t as straightforward as a copy-and-paste command. To copy an object, you actually need to create a new object in the target context and then copy all the attribute values from a source object to the new object. That leaves the relationships, which can’t be copied in the same way. If you were to copy a relationship the same way you copied an attribute value, you would end up with an illegal cross-store relationship between the copied object and object(s) in the source store. Instead of copying a relationship, a deep copy needs to identify related copied objects in the target context and then establish a relationship to them from the copied object. Figure 9.2 illustrates a To-One relationship copy.
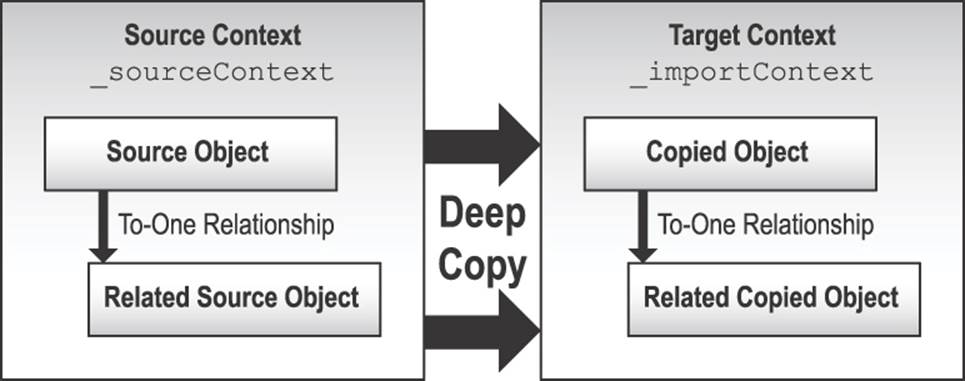
Figure 9.2 Copying a To-One relationship
Before a relationship can be copied, checks are needed to ensure that objects required as a part of a copied relationship already exist in the target context. Objects that are missing in the target context will be created on demand based on their equivalent source object.
To-Many relationships present an interesting challenge and are a big part of the reason that a deep copy is a CPU-intensive task. A deep copy needs to iteratively check every object and all of its relationships, so this process can take a long time. The other factor to account for is ordered and unordered relationships. An ordered relationship is, under the covers, an NSMutableOrderedSet of related objects. An unordered relationship is an NSMutableSet of related objects, so the deep copy code needs to reflect this. Figure 9.3 illustrates this more complicated relationship copy.
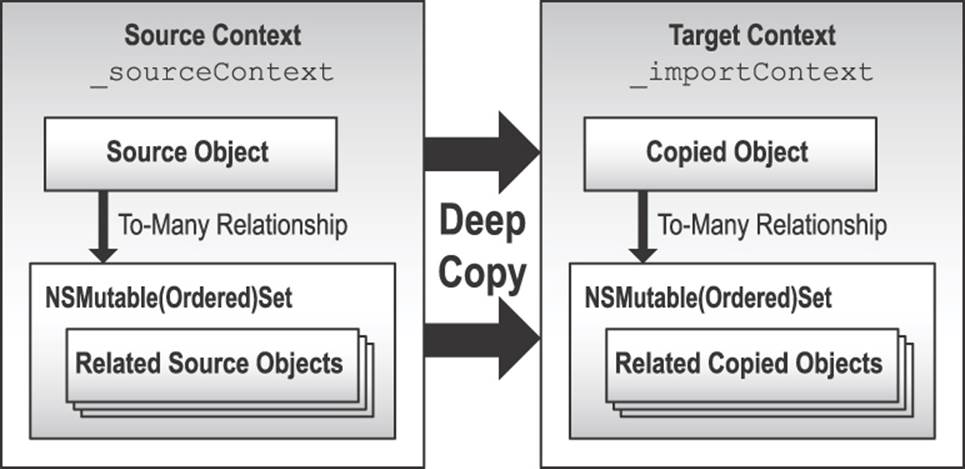
Figure 9.3 Copying a To-Many relationship
To deep copy objects, several methods from the previous chapter will be used. The deep copy process will rely on a unique attribute name being chosen for each entity upfront. This allows a uniqueness check to take place prior to an object being copied, which prevents duplicated data. The following shows the high-level process for performing a deep copy:
![]() An instance of CoreDataImporter is created with an NSDictionary of entity names mapped to a unique attribute per entity.
An instance of CoreDataImporter is created with an NSDictionary of entity names mapped to a unique attribute per entity.
![]() An NSArray of entity names to copy is given to the CoreDataImporter instance, which it iterates through one by one, copying all objects for each entity as required. You only need to specify the entities you want copied. Related objects of entities earmarked for copy will be copied regardless, however.
An NSArray of entity names to copy is given to the CoreDataImporter instance, which it iterates through one by one, copying all objects for each entity as required. You only need to specify the entities you want copied. Related objects of entities earmarked for copy will be copied regardless, however.
![]() If equivalent objects from the source context don’t already exist in the target context, new managed objects are inserted. New objects are given the attribute values of the source object.
If equivalent objects from the source context don’t already exist in the target context, new managed objects are inserted. New objects are given the attribute values of the source object.
![]() If a source object has a relationship, it is walked to find the related object(s). Related object(s) are copied to the target context as required.
If a source object has a relationship, it is walked to find the related object(s). Related object(s) are copied to the target context as required.
![]() Once all objects involved in a relationship exist in the target context, the relationship itself is reformed from the copied object to the related copied object(s) as previously illustrated in Figure 9.2 and Figure 9.3.
Once all objects involved in a relationship exist in the target context, the relationship itself is reformed from the copied object to the related copied object(s) as previously illustrated in Figure 9.2 and Figure 9.3.
Note
To continue building the sample application, you’ll need to have added the previous chapter’s code to Grocery Dude. Alternatively, you may download, unzip, and use the project up to this point from http://www.timroadley.com/LearningCoreData/GroceryDude-AfterChapter08.zip. Any time you start using an Xcode project from a ZIP file, it’s good practice to click Product > Clean. This practice ensures there’s no residual cache from previous projects using the same name.
The deep copy process will be demonstrated as another approach to importing default data, as opposed to an approach to adding data to an existing persistent store. At present, the Grocery Dude application checks to see if a persistent store exists at launch. If it doesn’t, a default data persistent store is configured as the initial store. This behavior needs to be disabled so that deep copy may be demonstrated.
Update Grocery Dude as follows to prevent the default store from replacing the initial store:
1. Comment out [self setDefaultDataStoreAsInitialStore]; in the setupCoreData method of CoreDataHelper.m.
2. Delete Grocery Dude from your device or the iOS simulator, whichever you’re using.
3. Click Product > Clean.
Configuring a Source Stack
Core Data stack is a term referring to the combination of persistent store, persistent store coordinator, managed object model, and managed object context. To perform a deep copy from a source store, you’ll need a separate Core Data stack from the one that already exists for the target store. This has the effect of providing a source and target context, which is where the copies will be performed. The only commonality between the two stacks is that they will use the same managed object model. Listing 9.1 shows new code required in the header of CoreDataHelper for this new stack.
Listing 9.1 CoreDataHelper.h
@property (nonatomic, readonly) NSManagedObjectContext *sourceContext;
@property (nonatomic, readonly) NSPersistentStoreCoordinator
*sourceCoordinator;
@property (nonatomic, readonly) NSPersistentStore *sourceStore;
Update Grocery Dude as follows to introduce a new stack for the source data:
1. Add the code from Listing 9.1 to CoreDataHelper.h after the existing declaration of store.
The next step is to use these new properties to initialize the new Core Data stack, ready for the source data. As well as initializing the _sourceContext the same way the _importContext has been, the _sourceCoordinator is also configured to use the same model as the existing _coordinator. The code involved is shown in Listing 9.2.
Listing 9.2 CoreDataHelper.m: init
_sourceCoordinator =
[[NSPersistentStoreCoordinator alloc] initWithManagedObjectModel:_model];
_sourceContext =
[[NSManagedObjectContext alloc]
initWithConcurrencyType:NSPrivateQueueConcurrencyType];
[_sourceContext performBlockAndWait:^{
[_sourceContext setPersistentStoreCoordinator:_sourceCoordinator];
[_sourceContext setUndoManager:nil]; // the default on iOS
}];
Update Grocery Dude as follows to include source stack support:
1. Add the code from Listing 9.2 to the bottom of the init method of CoreDataHelper.m, before return self;.
Configuring the Source Store
The same approach used to configure the existing store will be used to configure the source store. This means specifying the source store filename and a new method that returns the NSURL of the source store. Both of these will be used by a new loadSourceStore method, which will ultimately be responsible for loading the source store prior to a deep copy. Listing 9.3 shows the new line of code to be added to the FILES section, which specifies the source store filename. The existing DefaultData.sqlite store will be reused for this demonstration of deep copy.
Listing 9.3 CoreDataHelper.m: FILES
NSString *sourceStoreFilename = @"DefaultData.sqlite";
Update Grocery Dude as follows to configure the source store filename:
1. Add the code from Listing 9.3 to the bottom of the FILES section at the top of CoreDataHelper.m.
Just as the existing storeURL method returns the existing store URL, so too will a new sourceStoreURL return the source store URL. Listing 9.4 shows the code involved.
Listing 9.4 CoreDataHelper.m: PATHS
- (NSURL *)sourceStoreURL {
if (debug==1) {
NSLog(@"Running %@ '%@'", self.class, NSStringFromSelector(_cmd));
}
return [NSURL fileURLWithPath:[[NSBundle mainBundle]
pathForResource:[sourceStoreFilename stringByDeletingPathExtension]
ofType:[sourceStoreFilename pathExtension]]];
}
Update Grocery Dude as follows to configure the sourceStoreURL method:
1. Add the code from Listing 9.4 to the bottom of the PATHS section of CoreDataHelper.m.
The next step is to implement the loadSourceStore method. This method is responsible for adding the source store to the source coordinator. Because the source store lives in the application bundle, it must be loaded as read-only. Note that this means that if the model is upgraded in the future, you’ll need to ship a pre-upgraded version of DefaultData.sqlite with it. Listing 9.5 shows the code involved, which is similar to the existing code found in the loadStore method.
Listing 9.5 CoreDataHelper.m: loadSourceStore
- (void)loadSourceStore {
if (debug==1) {
NSLog(@"Running %@ '%@'", self.class, NSStringFromSelector(_cmd));
}
if (_sourceStore) {return;} // Don't load source store if it's already loaded
NSDictionary *options =
@{
NSReadOnlyPersistentStoreOption:@YES
};
NSError *error = nil;
_sourceStore =
[_sourceCoordinator addPersistentStoreWithType:NSSQLiteStoreType
configuration:nil
URL:[self sourceStoreURL]
options:options
error:&error];
if (!_sourceStore) {
NSLog(@"Failed to add source store. Error: %@",
error);abort();
} else {
NSLog(@"Successfully added source store: %@", _sourceStore);
}
}
Update Grocery Dude as follows to complete the configuration of the Core Data stack initialization code:
1. Add the loadSourceStore method from Listing 9.5 to the SETUP section of CoreDataHelper.m beneath the existing loadStore method.
If you ran the application now, it would still import default data from XML. The call to import from XML needs to be replaced with a call to import from a persistent store instead. Before that change can be made, the CoreDataImporter class needs updating to support deep copy from a persistent store.
Enhancing CoreDataImporter
To enable deep copy, the CoreDataImporter class will be enhanced to allow the complicated procedure of copying a managed object. There will be eight new methods, ranging from a few lines to around 20 lines each. The complexity comes from relationship copies, as each relationship must be walked to find related objects. The three relationship types (To-One, To-Many, and Ordered To-Many) must also be supported. As complicated as this process can be, by breaking it down into understandable chunks, it should become easier to understand. This breakdown is the reason there are so many methods required to perform a deep copy.
Object Info
The first of the eight methods required is the most simple. A new objectInfo method will be used to cut down repetitive code otherwise required in most of the other deep copy methods. By passing a managed object to this method, you get back an NSString containing the object’s entity name, unique attribute, and unique attribute value information. Listing 9.6 shows the code involved.
Listing 9.6 CoreDataImporter.m: objectInfo
#pragma mark – DEEP COPY
- (NSString*)objectInfo:(NSManagedObject*)object {
if (!object) {return nil;}
NSString *entity = object.entity.name;
NSString *uniqueAttribute = [self uniqueAttributeForEntity:entity];
NSString *uniqueAttributeValue = [object valueForKey:uniqueAttribute];
return [NSString stringWithFormat:@"%@ '%@'",
entity, uniqueAttributeValue];
}
Update Grocery Dude to implement the objectInfo method:
1. Add the code from Listing 9.6 to the bottom of CoreDataImporter.m before @end.
Array For Entity
The next method required is arrayForEntity. This method is responsible for returning an array of managed objects for the specified entity, with respect to the given context and predicate. This is another helper method that exists to reduce the amount of code required for a deep copy. Listing 9.7 shows the code involved, which should look familiar from previous chapters.
Listing 9.7 CoreDataImporter.m: arrayForEntity
- (NSArray*)arrayForEntity:(NSString*)entity
inContext:(NSManagedObjectContext*)context
withPredicate:(NSPredicate*)predicate {
if (debug==1) {
NSLog(@"Running %@ '%@'", self.class, NSStringFromSelector(_cmd));
}
NSFetchRequest *request =
[NSFetchRequest fetchRequestWithEntityName:entity];
[request setFetchBatchSize:50];
[request setPredicate:predicate];
NSError *error;
NSArray *array = [context executeFetchRequest:request error:&error];
if (error) {
NSLog(@"ERROR fetching objects: %@", error.localizedDescription);
}
return array;
}
Update Grocery Dude as follows to implement the arrayForEntity method:
1. Add the code from Listing 9.7 to the bottom of CoreDataImporter.m before @end.
Copy Unique Object
The next method required is copyUniqueObject. This method is responsible for ensuring a unique copy of an object exists in the specified context. If a nil object or context is given to this method, it will return nil. Technically, this method does not copy a managed object. Instead, it creates a new object in the target context and then copies the attribute values from the source object to the new object. As discussed in the previous chapter, the method insertUniqueObjectInTargetEntity is used to ensure only unique objects are inserted. If the object already exists, this method just returns the existing object. Note that relationships are not copied in this method because they need to be copied in another way. Listing 9.8 shows the code involved.
Listing 9.8 CoreDataImporter.m: copyUniqueObject
- (NSManagedObject*)copyUniqueObject:(NSManagedObject*)object
toContext:(NSManagedObjectContext*)targetContext {
if (debug==1) {
NSLog(@"Running %@ '%@'", self.class, NSStringFromSelector(_cmd));
}
// SKIP copying object with missing info
if (!object || !targetContext) {
NSLog(@"FAILED to copy %@ to context %@",
[self objectInfo:object], targetContext);
return nil;
}
// PREPARE variables
NSString *entity = object.entity.name;
NSString *uniqueAttribute = [self uniqueAttributeForEntity:entity];
NSString *uniqueAttributeValue = [object valueForKey:uniqueAttribute];
if (uniqueAttributeValue.length > 0) {
// PREPARE attributes to copy
NSMutableDictionary *attributeValuesToCopy =
[NSMutableDictionary new];
for (NSString *attribute in object.entity.attributesByName) {
[attributeValuesToCopy setValue:[[object valueForKey:attribute] copy]
forKey:attribute];
}
// COPY object
NSManagedObject *copiedObject =
[self insertUniqueObjectInTargetEntity:entity
uniqueAttributeValue:uniqueAttributeValue
attributeValues:attributeValuesToCopy
inContext:targetContext];
return copiedObject;
}
return nil;
}
Update Grocery Dude as follows to implement the copyUniqueObject method:
1. Add the code from Listing 9.8 to the bottom of CoreDataImporter.m before @end.
Establish To-One Relationship
The next method required is establishToOneRelationship. This method is responsible for establishing a To-One relationship by name, from one object to another. The majority of this method exists to validate the proposed relationship. The relationship creation is skipped whenever the following are true:
![]() The given source object, target object, or the relationship name is nil.
The given source object, target object, or the relationship name is nil.
![]() The relationship already exists.
The relationship already exists.
![]() The object that would be related is of the wrong entity type for the specified relationship name.
The object that would be related is of the wrong entity type for the specified relationship name.
Establishing a To-One relationship is a single line of code. It is established by setting the value of the relationship’s key-value pair on an object. The relationship name is the key and the related object is the value.
The final part of the establishToOneRelationship method is the important cleanup task that removes references to the specified objects from each context. By calling refreshObject for each object after a context save, the managed objects are faulted. This removes the objects from memory, thus breaking strong reference cycles that would otherwise keep unneeded objects around wasting resources. Without this step, importing from a persistent store would be no better than importing from XML, as all of the source data would be loaded in memory. Although it can be expensive to call save so frequently, it keeps the memory overhead low. In addition, the process occurs in the background, so it won’t impact the user interface. The general overview of this concept was shown previously in Figure 9.2, and is demonstrated in code in Listing 9.9.
Listing 9.9 CoreDataImporter.m: establishToOneRelationship
- (void)establishToOneRelationship:(NSString*)relationshipName
fromObject:(NSManagedObject*)object
toObject:(NSManagedObject*)relatedObject {
if (debug==1) {
NSLog(@"Running %@ '%@'", self.class, NSStringFromSelector(_cmd));
}
// SKIP establishing a relationship with missing info
if (!relationshipName || !object || !relatedObject) {
NSLog(@"SKIPPED establishing To-One relationship '%@' between %@ and %@",
relationshipName,
[self objectInfo:object],
[self objectInfo:relatedObject]);
NSLog(@"Due to missing Info!");
return;
}
// SKIP establishing an existing relationship
NSManagedObject *existingRelatedObject =
[object valueForKey:relationshipName];
if (existingRelatedObject) {
return;
}
// SKIP establishing a relationship to the wrong entity
NSDictionary *relationships = [object.entity relationshipsByName];
NSRelationshipDescription *relationship =
[relationships objectForKey:relationshipName];
if (![relatedObject.entity isEqual:relationship.destinationEntity]) {
NSLog(@"%@ is the of wrong entity type to relate to %@",
[self objectInfo:object], [self objectInfo:relatedObject]);
return;
}
// ESTABLISH the relationship
[object setValue:relatedObject forKey:relationshipName];
NSLog(@"ESTABLISHED %@ relationship from %@ to %@",
relationshipName,
[self objectInfo:object],
[self objectInfo:relatedObject]);
// REMOVE the relationship from memory after it is committed to disk
[CoreDataImporter saveContext:relatedObject.managedObjectContext];
[CoreDataImporter saveContext:object.managedObjectContext];
[object.managedObjectContext refreshObject:object mergeChanges:NO];
[relatedObject.managedObjectContext refreshObject:relatedObject
mergeChanges:NO];
}
Update Grocery Dude as follows to implement the establishToOneRelationship method:
1. Add the code from Listing 9.9 to the bottom of CoreDataImporter.m before @end.
Establish To-Many Relationship
The next method required is establishToManyRelationship, which is responsible for establishing a To-Many relationship from an object. It is expected that the object passed to this method will be from the deep copy target context. The given NSMutableSet should contain objects from the source context. The method will create missing objects required as a part of the new relationship in the target context.
A To-Many relationship is established by adding an object to another object’s NSMutableSet that represents a particular relationship. The NSMutableSet is accessed through the object’s key-value pair. The relationship name is the key, and the NSMutableSet is the value. An NSMutableSet can only contain distinct objects, so there is no chance of accidentally duplicating a relationship from the same object. The general overview of this concept was shown previously in Figure 9.3, and is demonstrated in code in Listing 9.10.
Listing 9.10 CoreDataImporter.m: establishToManyRelationship
- (void)establishToManyRelationship:(NSString*)relationshipName
fromObject:(NSManagedObject*)object
withSourceSet:(NSMutableSet*)sourceSet {
if (!object || !sourceSet || !relationshipName) {
NSLog(@"SKIPPED establishing a To-Many relationship from %@",
[self objectInfo:object]);
NSLog(@"Due to missing Info!");
return;
}
NSMutableSet *copiedSet =
[object mutableSetValueForKey:relationshipName];
for (NSManagedObject *relatedObject in sourceSet) {
NSManagedObject *copiedRelatedObject =
[self copyUniqueObject:relatedObject
toContext:object.managedObjectContext];
if (copiedRelatedObject) {
[copiedSet addObject:copiedRelatedObject];
NSLog(@"A copy of %@ is now related via To-Many '%@' relationship to %@",
[self objectInfo:object],
relationshipName,
[self objectInfo:copiedRelatedObject]);
}
}
// REMOVE the relationship from memory after it is committed to disk
[CoreDataImporter saveContext:object.managedObjectContext];
[object.managedObjectContext refreshObject:object mergeChanges:NO];
}
Update Grocery Dude as follows to implement the establishToManyRelationship method:
1. Add the code from Listing 9.10 to the bottom of CoreDataImporter.m before @end.
Establish Ordered To-Many Relationship
The next method required is establishOrderedToManyRelationship, which is responsible for establishing an Ordered To-Many relationship from an object. It is expected that the object passed to this method will be from the deep copy target context. The given NSMutableOrderedSet should contain objects from the source context. The method will create missing objects required as a part of the new relationship in the target context.
An Ordered To-Many relationship is established by adding one object to another object’s NSMutableOrderedSet that represents a particular relationship. The NSMutableOrderedSet is accessed through the object’s key-value pair. The relationship name is the key, and the NSMutableOrderedSet is the value. An NSMutableOrderedSet can only contain distinct objects, so there is no chance of accidentally duplicating a relationship from the same object. The order of the set in the target context needs to match the order of the set from the source context. The order of the source set is maintained as the equivalent objects are added to the target object’s ordered set in the order they are found. The general overview of this concept was shown previously in Figure 9.3, and is demonstrated in code in Listing 9.11.
Listing 9.11 CoreDataImporter.m: establishOrderedToManyRelationship
- (void)establishOrderedToManyRelationship:(NSString*)relationshipName
fromObject:(NSManagedObject*)object
withSourceSet:(NSMutableOrderedSet*)sourceSet {
if (!object || !sourceSet || !relationshipName) {
NSLog(@"SKIPPED establishment of an Ordered To-Many relationship from %@",
[self objectInfo:object]);
NSLog(@"Due to missing Info!");
return;
}
NSMutableOrderedSet *copiedSet =
[object mutableOrderedSetValueForKey:relationshipName];
for (NSManagedObject *relatedObject in sourceSet) {
NSManagedObject *copiedRelatedObject =
[self copyUniqueObject:relatedObject
toContext:object.managedObjectContext];
if (copiedRelatedObject) {
[copiedSet addObject:copiedRelatedObject];
NSLog(@"A copy of %@ is related via Ordered To-Many '%@' relationship to %@",
[self objectInfo:object],
relationshipName,
[self objectInfo:copiedRelatedObject]);
}
}
// REMOVE the relationship from memory after it is committed to disk
[CoreDataImporter saveContext:object.managedObjectContext];
[object.managedObjectContext refreshObject:object mergeChanges:NO];
}
Update Grocery Dude as follows to implement the establishOrderedToManyRelationship method:
1. Add the code from Listing 9.11 to the bottom of CoreDataImporter.m before @end.
There are no ordered relationships in Grocery Dude; however, this method is included in case you would like to use CoreDataImporter in your own projects.
Copy Relationships
The next method required is copyRelationshipsFromObject, which is responsible for copying all relationships from an object in the source context to an equivalent object in the target context. This method is what the other methods implemented so far have been building up to.
The first task this method performs, after ensuring the given object and context aren’t nil, is to ensure there is an equivalent object in the target context. Referred to as the copiedObject, this object is created as required using the previously implemented copyUniqueObject method. If it still doesn’t exist after a copy is attempted, this method returns prematurely.
To copy relationships, the method works out what relationships exist on the source object using [sourceObject.entity relationshipsByName]. This dictionary is then iterated through to find valid relationships. Provided the relationship exists, the equivalent relationship is re-created from thecopiedObject. Before copying a relationship, its type is first determined. For To-Many or Ordered To-Many relationships, the appropriate source set is passed to the appropriate “copy To-Many” method. For a To-One relationship, the object to be related is copied to the target context before the appropriate method is called to establish the relationship. Listing 9.12 shows the code involved.
Listing 9.12 CoreDataImporter.m: copyRelationshipsFromObject
- (void)copyRelationshipsFromObject:(NSManagedObject*)sourceObject
toContext:(NSManagedObjectContext*)targetContext {
if (debug==1) {
NSLog(@"Running %@ '%@'", self.class, NSStringFromSelector(_cmd));
}
// SKIP establishing relationships with missing info
if (!sourceObject || !targetContext) {
NSLog(@"FAILED to copy relationships from '%@' to context '%@'",
[self objectInfo:sourceObject], targetContext);
return;
}
// SKIP establishing relationships from nil objects
NSManagedObject *copiedObject =
[self copyUniqueObject:sourceObject toContext:targetContext];
if (!copiedObject) {
return;
}
// COPY relationships
NSDictionary *relationships = [sourceObject.entity relationshipsByName];
for (NSString *relationshipName in relationships) {
NSRelationshipDescription *relationship =
[relationships objectForKey:relationshipName];
if ([sourceObject valueForKey:relationshipName]) {
if (relationship.isToMany && relationship.isOrdered) {
// COPY To-Many Ordered
NSMutableOrderedSet *sourceSet =
[sourceObject mutableOrderedSetValueForKey:relationshipName];
[self establishOrderedToManyRelationship:relationshipName
fromObject:copiedObject
withSourceSet:sourceSet];
} else if (relationship.isToMany && !relationship.isOrdered) {
// COPY To-Many
NSMutableSet *sourceSet =
[sourceObject mutableSetValueForKey:relationshipName];
[self establishToManyRelationship:relationshipName
fromObject:copiedObject
withSourceSet:sourceSet];
} else {
// COPY To-One
NSManagedObject *relatedSourceObject =
[sourceObject valueForKey:relationshipName];
NSManagedObject *relatedCopiedObject =
[self copyUniqueObject:relatedSourceObject
toContext:targetContext];
[self establishToOneRelationship:relationshipName
fromObject:copiedObject
toObject:relatedCopiedObject];
}
}
}
}
Update Grocery Dude as follows to implement the copyRelationshipsFromObject method:
1. Add the code from Listing 9.12 to the bottom of CoreDataImporter.m before @end.
Deep Copy Entities
The final method required is deepCopyEntities, which is responsible for copying all objects from the specified entities in one context to another context. There are several ways this method could have been implemented, and the user experience would have differed with each option. If you search the Internet for core data programming guide: efficiently importing data, you should find an Apple guide that discusses techniques for importing data. It says that when possible it is more efficient to copy all the objects in a single pass and then fix up relationships later. Depending on the application, this may not be feasible. An import can take a long time, and if the relationships are missing even for a few seconds, the user might assume the application has a bug. The options open to you to combat this issue are as follows (your selection will vary depending on the nature of your application):
![]() Prevent the user from using the application, partially or wholly. During the import, you could display a progress indicator, such as MBProgressHUD. If the import takes a long time, this may annoy the user. Depending on the application, you may instead only be able to disable partial functionality, until the data is ready.
Prevent the user from using the application, partially or wholly. During the import, you could display a progress indicator, such as MBProgressHUD. If the import takes a long time, this may annoy the user. Depending on the application, you may instead only be able to disable partial functionality, until the data is ready.
![]() Import all objects first and then establish relationships. The user might see half-imported data with little or no established relationships. Depending on the data model, this may or may not be acceptable.
Import all objects first and then establish relationships. The user might see half-imported data with little or no established relationships. Depending on the data model, this may or may not be acceptable.
![]() Import objects and relationships together. Although this is certainly not as efficient as the other options, the entire deep copy process is run in the background so the user impact is minimal to non-existent. You will use more battery power than the alternative; however, the application will remain usable.
Import objects and relationships together. Although this is certainly not as efficient as the other options, the entire deep copy process is run in the background so the user impact is minimal to non-existent. You will use more battery power than the alternative; however, the application will remain usable.
CoreDataImporter will be configured to import objects and relationships together. The deep copy of each object will be wrapped in an autorelease pool so that memory is freed up regularly during the import process. Listing 9.13 shows the code involved.
Listing 9.13 CoreDataImporter.m: deepCopyEntities
- (void)deepCopyEntities:(NSArray*)entities
fromContext:(NSManagedObjectContext*)sourceContext
toContext:(NSManagedObjectContext*)targetContext {
if (debug==1) {
NSLog(@"Running %@ '%@'", self.class, NSStringFromSelector(_cmd));
}
for (NSString *entity in entities) {
NSLog(@"COPYING %@ objects to target context...", entity);
NSArray *sourceObjects =
[self arrayForEntity:entity
inContext:sourceContext
withPredicate:nil];
for (NSManagedObject *sourceObject in sourceObjects) {
if (sourceObject) {
@autoreleasepool {
[self copyUniqueObject:sourceObject
toContext:targetContext];
[self copyRelationshipsFromObject:sourceObject
toContext:targetContext];
}
}
}
}
}
Update Grocery Dude as follows to implement the deepCopyEntities method:
1. Add the code from Listing 9.13 to the bottom of CoreDataImporter.m before @end.
The required code is now in place to support a deep copy. The only thing left to do is to trigger it from CoreDataHelper.m. For that to happen, the deepCopyEntities method header needs to be in CoreDataImporter.h. Listing 9.14 shows the code involved.
Listing 9.14 CoreDataHelper.h: deepCopyEntities
- (void)deepCopyEntities:(NSArray*)entities
fromContext:(NSManagedObjectContext*)sourceContext
toContext:(NSManagedObjectContext*)targetContext;
Update Grocery Dude as follows to add deepCopyEntities to the CoreDataImporter header:
1. Add the code from Listing 9.14 to the bottom of CoreDataImporter.h before @end.
Triggering a Deep Copy
As mentioned at the beginning of this chapter, a deep copy will be demonstrated using the existing default data store. The default data store DefaultData.sqlite was previously configured as the initial store during setupCoreData via setDefaultDataStoreAsInitialStore. This method call has since been commented out, so on new installations an import from XML would be triggered instead. This is due to the call to checkIfDefaultDataNeedsImporting in the setupCoreData method that triggers an alert view giving the option to importFromXML. To trigger a deep copy from a persistent store instead, a new method called deepCopyFromPersistentStore is required in CoreDataHelper.m. Once an instance of CoreDataImporter has been created, the deep copy will be triggered using the new deepCopyEntities method of CoreDataImporter. Once the copy process has finished, the interface will perform a final refresh in response to a SomethingChanged notification. Listing 9.15 shows the code involved.
Listing 9.15 CoreDataHelper.m: deepCopyFromPersistentStore
- (void)deepCopyFromPersistentStore:(NSURL*)url {
if (debug==1) {
NSLog(@"Running %@ '%@' %@", self.class,
NSStringFromSelector(_cmd),url.path);
}
[_sourceContext performBlock:^{
NSLog(@"*** STARTED DEEP COPY FROM DEFAULT DATA PERSISTENT STORE ***");
NSArray *entitiesToCopy = [NSArray arrayWithObjects:
@"LocationAtHome",@"LocationAtShop",@"Unit",@"Item", nil];
CoreDataImporter *importer = [[CoreDataImporter alloc]
initWithUniqueAttributes:[self selectedUniqueAttributes]];
[importer deepCopyEntities:entitiesToCopy
fromContext:_sourceContext
toContext:_importContext];
[_context performBlock:^{
// Tell the interface to refresh once import completes
[[NSNotificationCenter defaultCenter]
postNotificationName:@"SomethingChanged" object:nil];
}];
NSLog(@"*** FINISHED DEEP COPY FROM DEFAULT DATA PERSISTENT STORE ***");
}];
}
Update Grocery Dude as follows to implement the deepCopyFromPersistentStore method:
1. Add the code from Listing 9.15 to the bottom of the DATA IMPORT section of CoreDataHelper.m.
Finally, the deepCopyFromPersistentStore method needs to be called in response to user interaction, instead of importFromXML. This means the UIAlertView delegate method needs updating, as shown in Listing 9.16.
Listing 9.16 CoreDataHelper.m: alertView:clickedButtonAtIndex
- (void)alertView:(UIAlertView *)alertView
clickedButtonAtIndex:(NSInteger)buttonIndex {
if (debug==1) {
NSLog(@"Running %@ '%@'", self.class, NSStringFromSelector(_cmd));
}
if (alertView == self.importAlertView) {
if (buttonIndex == 1) { // The 'Import' button on the importAlertView
NSLog(@"Default Data Import Approved by User");
/*
// XML Import
[_importContext performBlock:^{
[self importFromXML:[[NSBundle mainBundle]
URLForResource:@"DefaultData"
withExtension:@"xml"]];
}];
*/
// Deep Copy Import From Persistent Store
[self loadSourceStore];
[self deepCopyFromPersistentStore:[self sourceStoreURL]];
} else {
NSLog(@"Default Data Import Cancelled by User");
}
// Set the data as imported regardless of the user's decision
[self setDefaultDataAsImportedForStore:_store];
}
}
Update Grocery Dude as follows to revise the UIAlertView delegate method:
1. Replace the existing alertView:clickedButtonAtIndex method found in CoreDataHelper.m with the method from Listing 9.16.
2. Delete Grocery Dude from your device or the iOS Simulator and click Product > Clean.
3. Run the application and tap Import to import default data.
As the import occurs, notice that you can still use the application. Figure 9.4 shows the expected result after the import has completed.
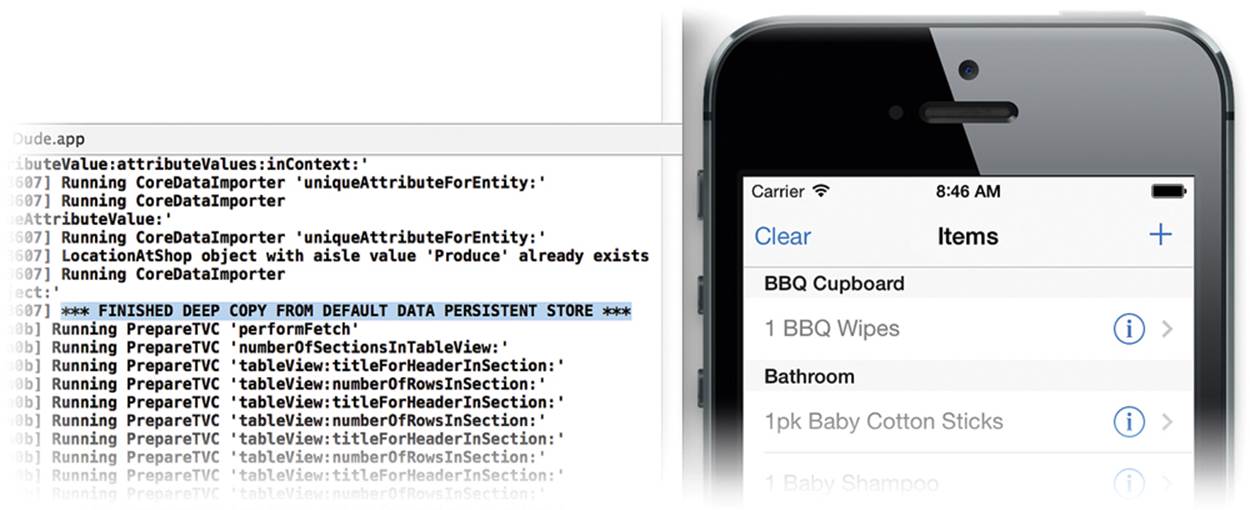
Figure 9.4 Data imported from a persistent store via deep copy
The import process can take a while, particularly on older phones. It’s a nice touch to update the user interface periodically during the import process, to show new data as it is imported. In preparation, a new method will be added to CoreDataHelper.m that sends a SomethingChangednotification. Listing 9.17 shows the code involved.
Listing 9.17 CoreDataHelper.m: somethingChanged
#pragma mark – UNDERLYING DATA CHANGE NOTIFICATION
- (void)somethingChanged {
if (debug==1) {
NSLog(@"Running %@ '%@'", self.class, NSStringFromSelector(_cmd));
}
// Send a notification that tells observing interfaces to refresh their data
[[NSNotificationCenter defaultCenter]
postNotificationName:@"SomethingChanged" object:nil];
}
Update Grocery Dude as follows to implement a change notification method:
1. Add the code from Listing 9.17 to the bottom of CoreDataHelper.m before @end.
An NSTimer will be used to trigger periodic calls to the somethingChanged method during an import. Listing 9.18 shows the code involved in an updated deepCopyFromPersistentStore method in bold.
Listing 9.18 CoreDataHelper.m: deepCopyFromPersistentStore
- (void)deepCopyFromPersistentStore:(NSURL*)url {
if (debug==1) {
NSLog(@"Running %@ '%@' %@", self.class,
NSStringFromSelector(_cmd),url.path);
}
// Periodically refresh the interface during the import
_importTimer =
[NSTimer scheduledTimerWithTimeInterval:2.0
target:self
selector:@selector(somethingChanged)
userInfo:nil
repeats:YES];
[_sourceContext performBlock:^{
NSLog(@"*** STARTED DEEP COPY FROM DEFAULT DATA PERSISTENT STORE ***");
NSArray *entitiesToCopy = [NSArray arrayWithObjects:
@"LocationAtHome",@"LocationAtShop",@"Unit",@"Item", nil];
CoreDataImporter *importer = [[CoreDataImporter alloc]
initWithUniqueAttributes:[self selectedUniqueAttributes]];
[importer deepCopyEntities:entitiesToCopy
fromContext:_sourceContext
toContext:_importContext];
[_context performBlock:^{
// Stop periodically refreshing the interface
[_importTimer invalidate];
// Tell the interface to refresh once import completes
[self somethingChanged];
}];
NSLog(@"*** FINISHED DEEP COPY FROM DEFAULT DATA PERSISTENT STORE ***");
}];
}
Update Grocery Dude as follows so the import process periodically updates the user interface:
1. Add the following property to CoreDataHelper.h beneath the existing properties:
@property (nonatomic, strong) NSTimer *importTimer;
2. Replace the existing deepCopyFromPersistentStore method in CoreDataHelper.m with the code from Listing 9.18.
3. Delete Grocery Dude from your device or the iOS Simulator.
4. Click Product > Clean.
5. Run Grocery Dude and then tap Import to import the default data.
The interface should be updated with imported data seconds after it is imported, without noticeable impact to the user experience.
Summary
You’ve now experienced the complicated topic of deep copy. If you do find yourself in a position where you need to populate unique data into an existing persistent store, then this option is now open to you. The CoreDataImporter classes are model agnostic, so you may use them freely in your own applications. Remember that to prevent unnecessary imports, you will need to set a metadata key-value on the existing persistent store. This technique was demonstrated in the previous chapter, so there was no need to repeat it here.
When deciding on how you’ll migrate data from one store to another, ensure you evaluate the migratePersistentStore method of NSPersistentStoreCoordinator. This method allows you to migrate the entire contents of a persistent store into another persistent store. Unfortunately, there are no de-duplication options, nor is there the ability to be selective about what entities you migrate. That said, migratePersistentStore is much faster than deep copy.
Exercises
Why not build on what you’ve learned by experimenting?
1. Set #define debug 0 in the following implementation files and then trigger the import process again. You should notice an increased import speed without the heavy logging.
![]() CoreDataImporter.m
CoreDataImporter.m
![]() CoreDataTVC.m
CoreDataTVC.m
![]() LocationsAtHomeTVC.m
LocationsAtHomeTVC.m
![]() LocationsAtShopTVC.m
LocationsAtShopTVC.m
![]() PrepareTVC.m
PrepareTVC.m
![]() ShopTVC.m
ShopTVC.m
![]() UnitsTVC.m
UnitsTVC.m
2. Delete the Grocery Dude from the device and then quickly press the home button (Shift+![]() +H) during another import. Notice how the import process is paused and restarts when you return to the application. If the application is terminated, the import process will not be triggered again and the imported data may not be complete.
+H) during another import. Notice how the import process is paused and restarts when you return to the application. If the application is terminated, the import process will not be triggered again and the imported data may not be complete.
3. Test the migratePersistentStore method of NSPersistentStoreCoordinator by adding the code shown in Listing 9.19 to the bottom of the setupCoreData method of CoreDataHelper.m. Run the application again, and you will notice that duplicate data is inserted.
Uncomment [self setDefaultDataStoreAsInitialStore]; in the setupCoreData method of CoreDataHelper.m before continuing on to the next chapter. Also comment out the code added in Exercise 3.
Listing 9.19 CoreDataHelper.m: setupCoreData
// The code below demonstrates how to migrate one persistent store to another.
[self loadSourceStore];
[_sourceContext performBlock:^{
NSLog(@"*** Attempting to migrate '%@' into '%@' .. Please Wait ***",
sourceStoreFilename, storeFilename);
NSError *error = nil;
if (![_sourceCoordinator migratePersistentStore:_sourceStore
toURL:[self storeURL]
options:nil
withType:NSSQLiteStoreType
error:&error]) {
NSLog(@"FAILED to migrate: %@", error);
} else {
NSLog(@"The source store '%@' has been migrated to the target store '%@'",
sourceStoreFilename, storeFilename);
[_context performBlock:^{
// Tell the interface to refresh once import completes
[self somethingChanged];
}];
}
}];
All materials on the site are licensed Creative Commons Attribution-Sharealike 3.0 Unported CC BY-SA 3.0 & GNU Free Documentation License (GFDL)
If you are the copyright holder of any material contained on our site and intend to remove it, please contact our site administrator for approval.
© 2016-2026 All site design rights belong to S.Y.A.