iOS 6 Application Development For Dummies (2013)
Part IV. The Model and Application Structure
Chapter 14. Finishing the Basic Application Structure
In This Chapter
![]() Laying out the basic application structure in the storyboard
Laying out the basic application structure in the storyboard
![]() Adding and formatting the rest of the view controllers for the RoadTrip app
Adding and formatting the rest of the view controllers for the RoadTrip app
![]() Creating the segues
Creating the segues
![]() Adding a gesture recognizer to the Content controller
Adding a gesture recognizer to the Content controller
In earlier chapters, I’ve waxed poetic about storyboards but I haven’t really (completely) shown you why I find them so appealing. Now it’s time for you to experience the reason yourself.
As I say earlier in the book, the storyboard is basically about working with view controllers. Normally, I would lay out the basic application flow at the very beginning of a project, but I deferred doing it until now when you have enough background so that it makes sense.
In this chapter, I show you how to extend your storyboard to lay out the flow, or the user experience architecture, of most of your application — or at least the big pieces of the app, such as the structure for the user to find out the weather forecast for the destination, find events that are happening at the destination, bring up a map, and find a location on a map.
I’ll start by explaining the Weather view controller and then have you move on to complete most of the rest of the view controllers.
I’ll also have you replace the Detail View controller that’s now displayed at application launch with the Weather controller.
Extending the iPad Storyboard to Add More Functionality to Your App
 You start the day’s work by selecting MainStoryboard_iPad in the Project navigator and showing the Utility area by selecting its icon in the Xcode toolbar’s View selector. Next, hide the Project navigator by deselecting it in the Xcode toolbar’s View selector (remember, as I explain in Chapter 2, it’s a toggle). Doing so gives you a little more real estate onscreen. (If you have an extra-large monitor, though, you can keep the Project navigator open.)
 Continuing with your prep work, go ahead and select the Attributes inspector in the Inspector selector bar in the Utility area. Close all the disclosure triangles in the Document Outline to give you a little more room to work in.
Adding the Weather view controller
Here’s where the rubber meets the road. To add the Weather view controller — complete with a web view for displaying the weather — you need to do the following:
1. Select Objects in the Utility area’s Library pane and then select a view controller from the pane and drag it onto your storyboard (see Figure 14-1).
A new scene is created. (If you’re a bit hazy on how storyboards work, check out Chapter 5.)
2. Select the new view controller on the storyboard.
Doing so reveals its attributes in the (already opened) Attributes inspector.
3. In the View Controller section of the Attributes inspector, enter Weather in the Title field, as shown in Figure 14-2. Also enter Weather in the Storyboard ID field in the Identity inspector.
Be sure to press Return when entering text in a text field in the Attributes inspector.
 The field in the storyboard isn’t updated until you press Return, or sometimes until you click in another field in that inspector.
Adding an identifier isn’t a requirement, but it’s a good habit to get into. For example, you used an identifier in the handleSwipeGesture: method in Chapter 13, and you’ll need the Weather identifier in prepareForSegue later in this book to pass some data to the Destination Controller. As for the Title field, giving anything a title always makes it easier to figure out what’s what in the storyboard.
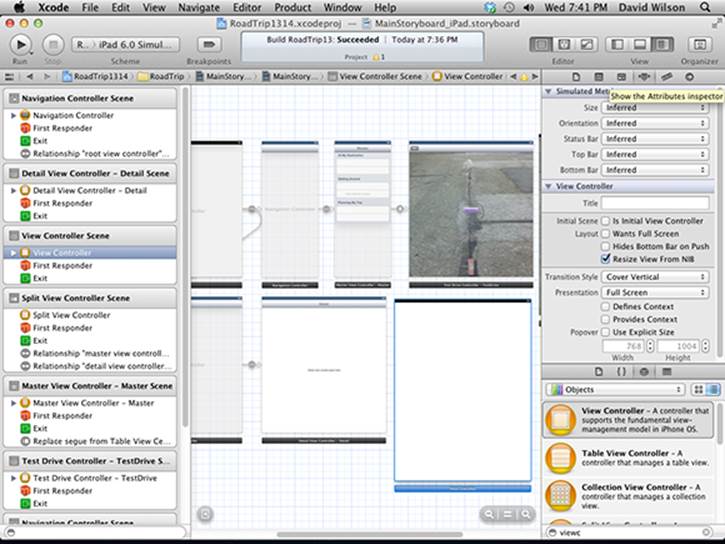
Figure 14-1: Drag in a view controller.
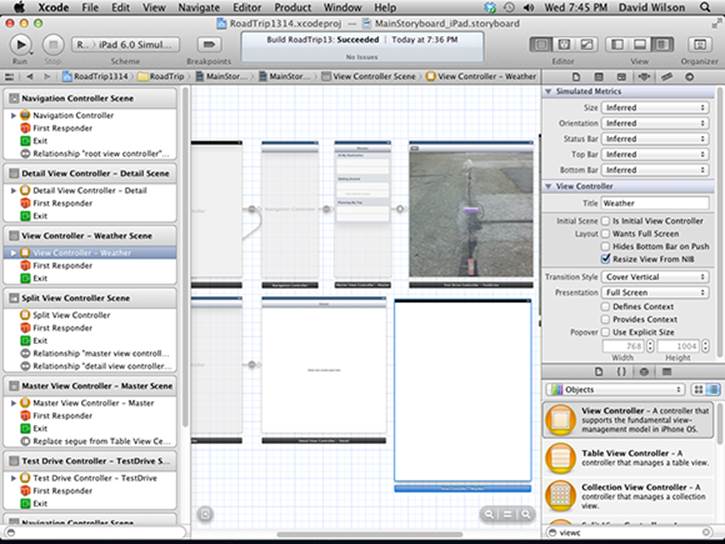
Figure 14-2: Set the title and identifier.
4. Drag a toolbar from the Utility area’s Library pane and position it at the top of the view.
 5. Delete the Item button (the button that comes by default with the toolbar when you drag it in from the Library) and, after opening the Size inspector by clicking its icon in the Inspector selector, set Autosizing to be a fixed indent from the top and variable from the bottom by selecting (the top strut) and deselecting (the bottom strut) the appropriate struts, as shown in Figure 14-3.
You did the very same thing for the toolbar you added to the TestDriveController in Chapter 13.
6. Select the Weather cell in the Master View controller (it’s there under the Table View heading) and Control-drag from there to View Controller – Weather, as shown in Figure 14-4.
I find doing this from the Document Outline is easier.
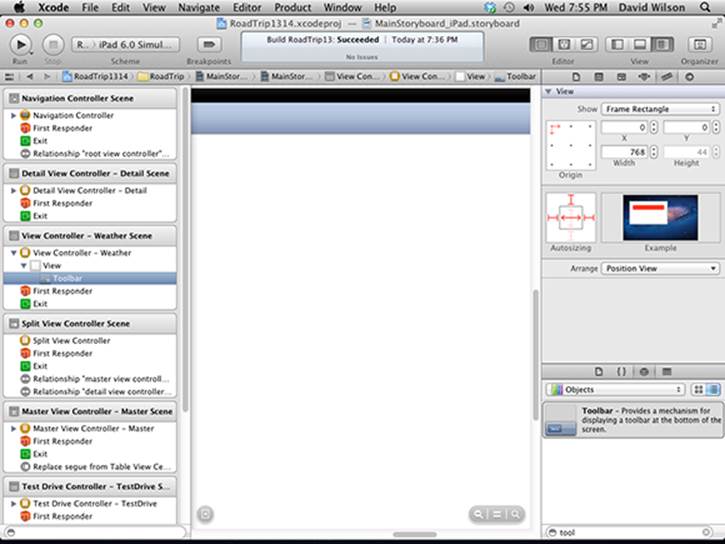
Figure 14-3: The Autoresizing settings.

Figure 14-4: Drag from the Weather cell to the view controller in the Document Outline.
7. Select Replace from the Selection Segue pop-up menu that appears, as shown in Figure 14-5.
As I explain in Chapter 5, you use a segue whenever you want to create a transition from one view controller to another. A segue performs the visual transition between two view controllers and supports push (navigation), modal, and custom transitions. All you have to do (as you just saw) is Control-drag from a button or Table View cell to the view controller you want to be displayed.
A push segue causes the new view controller (with a Back button) to slide into place when the user taps a button; the Navigation bar items are updated appropriately. (See Chapter 5 for more about adding a Navigation controller.)
In contrast to a push segue, a modal segue presents the view controller modally, with the transition style you specify, and requires the user to do something (tap Save or Cancel, for example) to get back to the previous view controller. (This requirement that the user do something is the modal part of a modal segue.) Segues support the standard visual transition styles, such as Cover Vertical, Flip Horizontal, Cross Dissolve, and Partial Curl.
In addition, segue objects are used to prepare for the transition from one view controller to another. Segue objects contain information about the view controllers involved in a transition. When a segue is triggered, but before the visual transition occurs, the storyboard runtime calls the current view controller’s prepareForSegue:sender: method so that it can pass any needed data to the view controller that’s about to be displayed.
A Replace segue causes the existing view controller to be replaced by a new one.
You’ll notice that the view resizes itself. It defaults to a Destination that’s the same as the originating view. You’ll need to fix that. (The Destination here is the Master view.)
8. Select the segue on the storyboard Canvas or in the Document Outline and, back in the Attributes inspector, make sure that Replace appears in the Style menu in the Attribute inspector; then enter Weather in the Identifier field and press Return.
Again, you won’t always use the identifier, but it’s good practice to name it so that you can identify it, as shown in Figure 14-6.
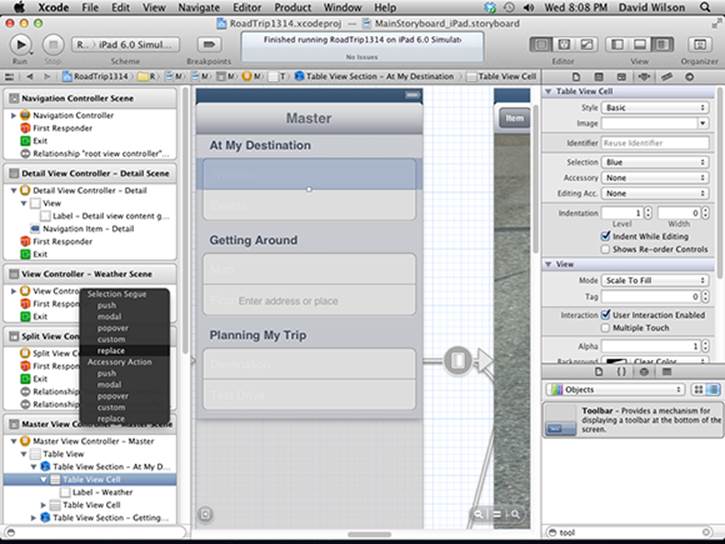
Figure 14-5: Creating a Replace segue.
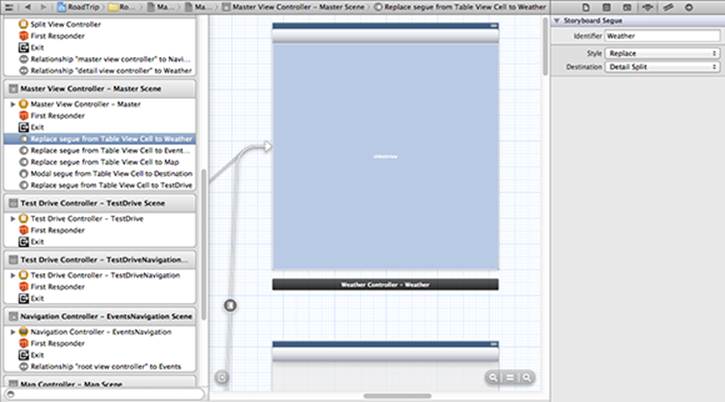
Figure 14-6: Setting the Replace style for the Weather storyboard segue.
9. Still in the Attributes inspector, choose Detail Split from the Destination drop-down menu, as I have in Figure 14-7.
Notice that the segue is selected in the Document Outline as well as on the Canvas (it turns from grey to white), and the view controller has resized its view.
10. Select the Table View cell containing the Weather label in either the Canvas or the Document Outline and, in the Attributes inspector’s Accessory field, make sure that the Disclosure Indicator has been set to None.
In the rest of this section, I show you how to add the rest of the scenes you need in your storyboard for the RoadTrip app. Some other view controllers in the storyboard aren’t launched by segues, and you’ll add those as needed.
Adding the Events controller
The next view controller I have you add is the Events controller, which will display events that you might be interested in at your destination. Interestingly enough, as you’ll find in Chapter 16, for the Events controller to work properly, you’ll need to have it embedded in a Navigation controller. Fortunately, you have that covered because the work you did in Chapter 13 enables you to handle either a Navigation controller or a toolbar in the Detail View controller’s UISplitViewControllerDelegate delegate methods.
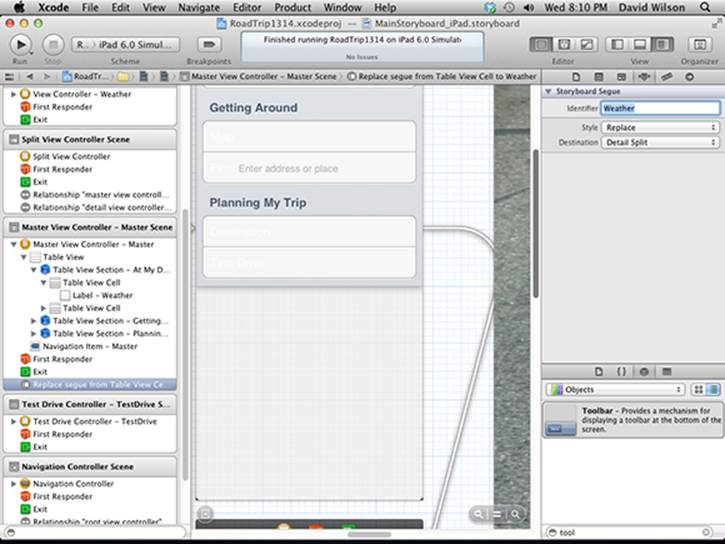
Figure 14-7: Setting the destination.
To add an Events controller, do the following:
1. Select a new view controller from the Objects section of the Library pane and drag it onto your storyboard.
2. In the Attributes inspector, enter Events in the view controller’s Title field, as well as in the Identity inspector’s Storyboard ID field.
3. Choose Editor⇒Embed In⇒Navigation Controller from the main menu, as shown in Figure 14-8.
A navigation controller scene is added to your storyboard, along with something called a Relationship from UINavigationController to View Controller.
4. Select the Navigation controller in the canvas, and in the Attributes inspector, enter EventsNavigation in the Title field as well as in the Identity inspector’s Storyboard ID field for the Navigation controller so you can find it for the next step.
You can see in Figure 14-9 that, in the Document Outline and on the Canvas, the Navigation controller is now identified as EventsNavigation.
Now you’ll want to create a segue from the Events cell to the Navigation controller.
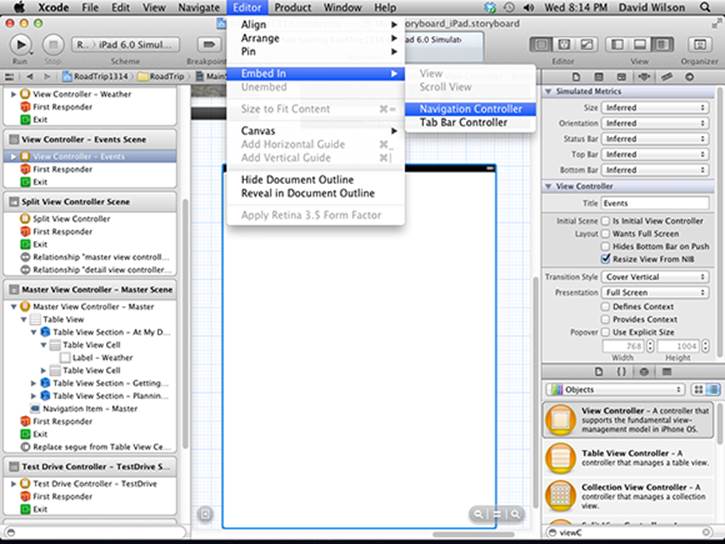
Figure 14-8: Embedding the Events controller in a Navigation controller.
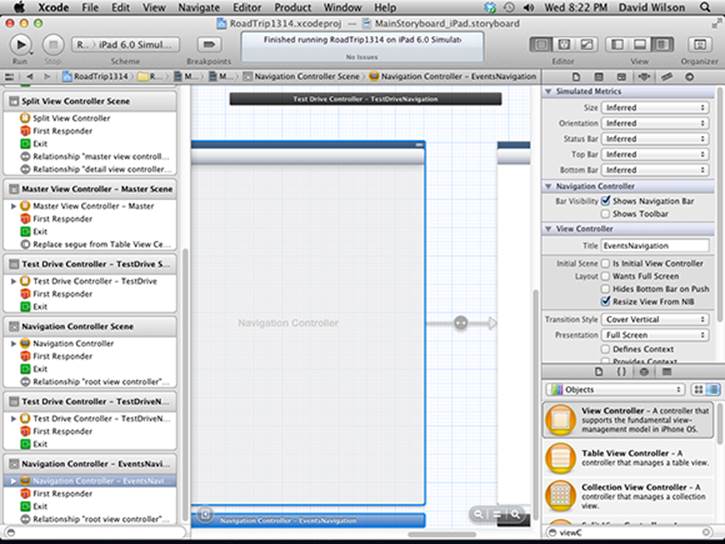
Figure 14-9: Naming the Navigation controller.
5. In the Document Outline, select the Events cell in the Master View controller (it’s there under the TableView Section – At My Destination under the Table View heading) and Control-drag to the Navigation controller you just added — the one in which you embedded the Events controller and named in Step 4.
You can see all the action in Figure 14-10.
I find it is easier to do this from the Document Outline.
6. Select Replace from the Storyboard Segues pop-up menu that appears.
7. Select the segue on the Canvas and, in the Attributes inspector, enter Events in the Identifier field and choose Detail Split from the Destination drop-down menu.
Your storyboard should look like Figure 14-11 when you’re done. Figure 14-11 also shows the segue you created in the Attributes inspector.
8. Select the Events Table View cell, and in the Attributes inspector’s Accessory field, make sure the Disclosure Indicator has been set to None (just because I like it better without one, as I explain in Chapter 5).
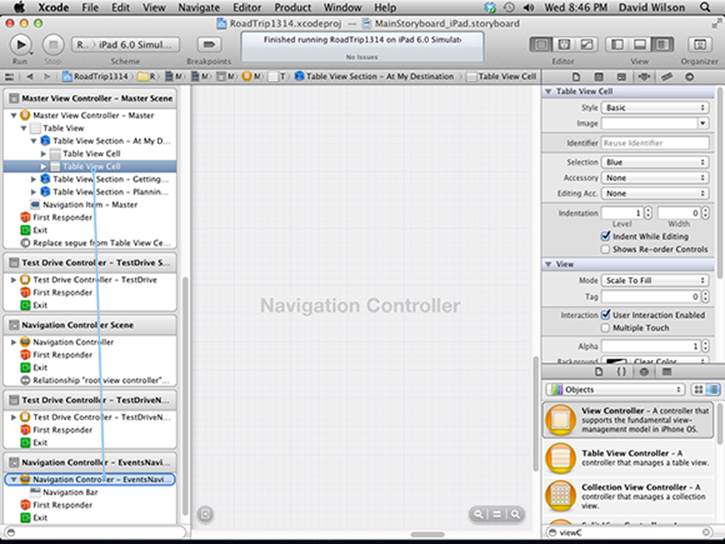
Figure 14-10: Drag from the Events cell to the Navigation controller within which the Events controller is embedded.
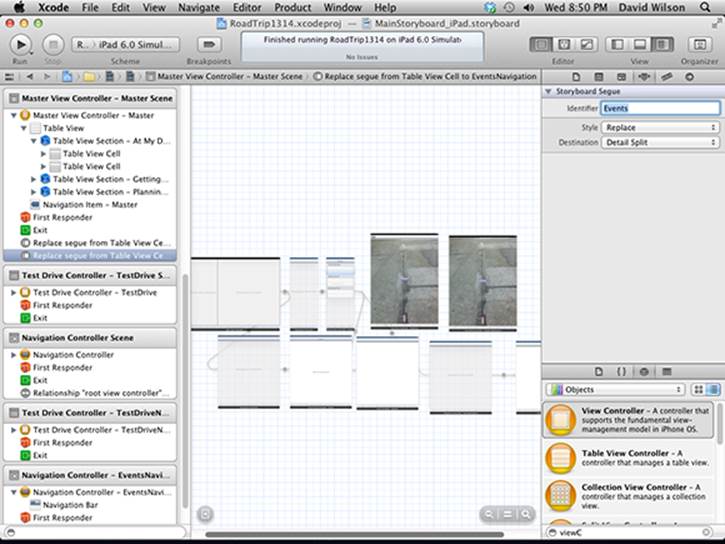
Figure 14-11: The storyboard thus far with a Weather controller, an Events controller, and a Navigation controller.
Adding the remaining controllers
The remaining controllers will be added in pretty much the same way, with a little twist when it comes to the Destination controller.
1. Repeat the steps that you went through when you added the Weather controller to the storyboard in the earlier section “Adding the Weather view controller” to add the Map controller. Be sure to enter Map in the view controller’s Title and Identifier fields. Enter Map in the segue Identifier as well.
2. Add the Find controller by repeating Steps 1–5 you followed to add the Weather controller to the storyboard in the earlier section “Adding the Weather view controller.” Enter Find in the view controller’s Title and Identifier fields, respectively.
You won’t be using a segue for the Find controller. I’ll show you a different way to launch a view controller in Chapter 20.
3. Add the Destination controller by repeating Steps 1, 2, 3, 6, 7, 8, 9, and 10 (don’t add a toolbar) that you followed when adding the Weather controller to the storyboard in the earlier section “Adding the Weather view controller.” Enter Destination in the view controller’s Title and Identifier fields, respectively.
4. For the Destination controller, in Step 7, create a segue but make it modal. Select the segue and, in the Attributes inspector, enter Destination in the Identifier field and choose Presentation Form Sheet from the Presentation pop-up menu.
I explain this bit of business in Chapter 20.
Changing the Split View Controller to a Detail View Controller Relationship
At this point, because it really doesn’t do anything, you can delete the Detail View controller object from the iPad storyboard (but be sure not to delete the RTDetailView controller class files in the Project navigator). You’ll replace the relationship between the Split View controller and the Detail View controller with one to the Weather controller. I chose Weather controller arbitrarily here — you could just as easily have replaced it with any of the other view controllers. This is the Detail view the user will see when the application is launched.
The following steps show you how to replace the Detail View controller.
1. In the Document Outline, select the Navigation controller associated with the Detail View controller (see Figure 14-12) and press Delete.
2. Select the Detail View controller in the Document Outline (see Figure 14-13) and press Delete as well.
You’ll need to create a new relationship between the Split View controller and the Weather controller.
3. Select the Split View controller on the storyboard, Control-drag to the Weather controller and then select Relationship – Detail View Controller from the pop-up menu that appears (as I have in Figure 14-14).
The final result of what has been added to the storyboard so far should look like Figure 14-15. I’ve rearranged things a bit for the sake of clarity.
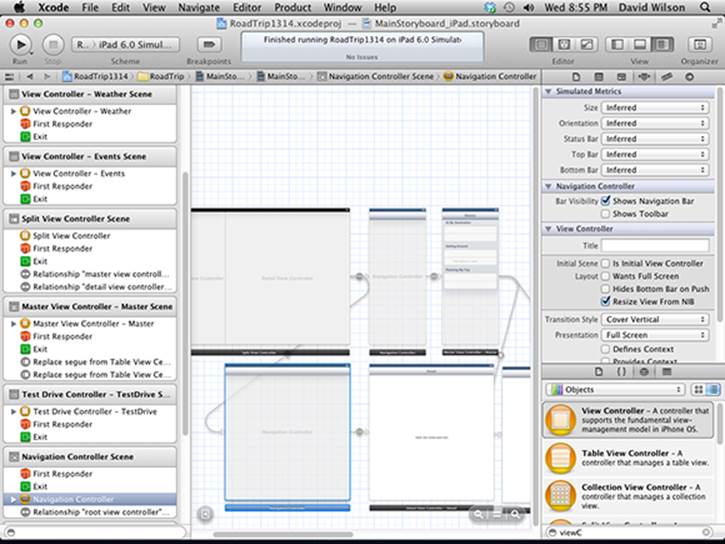
Figure 14-12: Select the Navigation controller in the Document Outline.
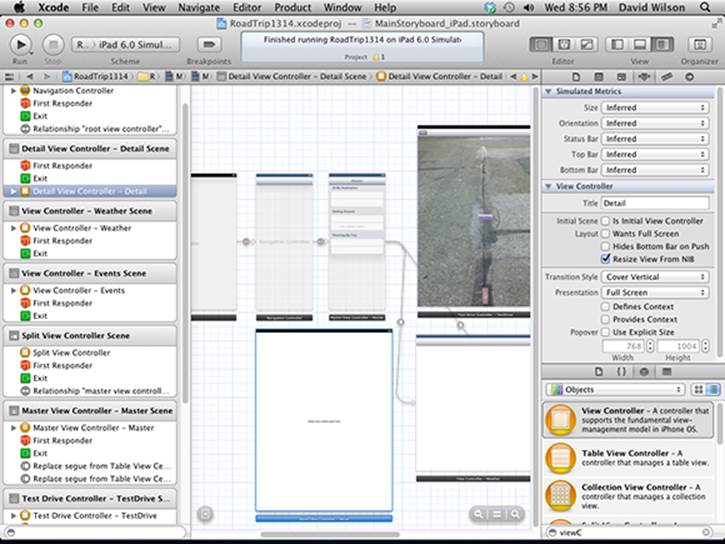
Figure 14-13: Select the Detail View controller in the Document Outline.
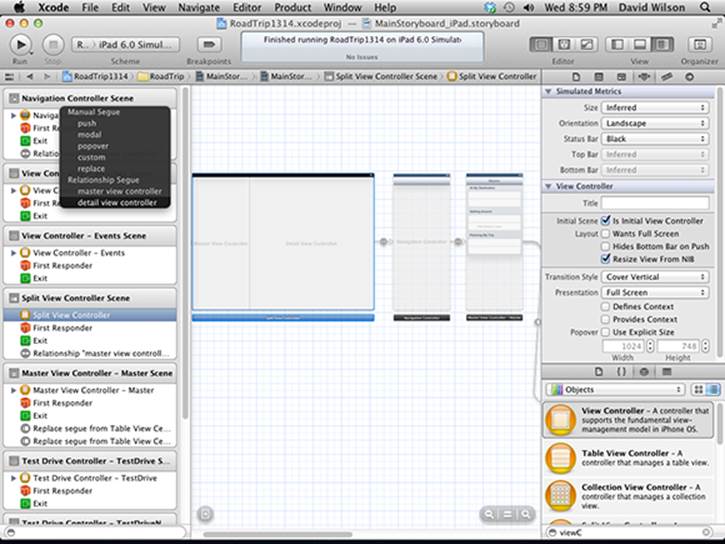
Figure 14-14: A new Detail View controller relationship.
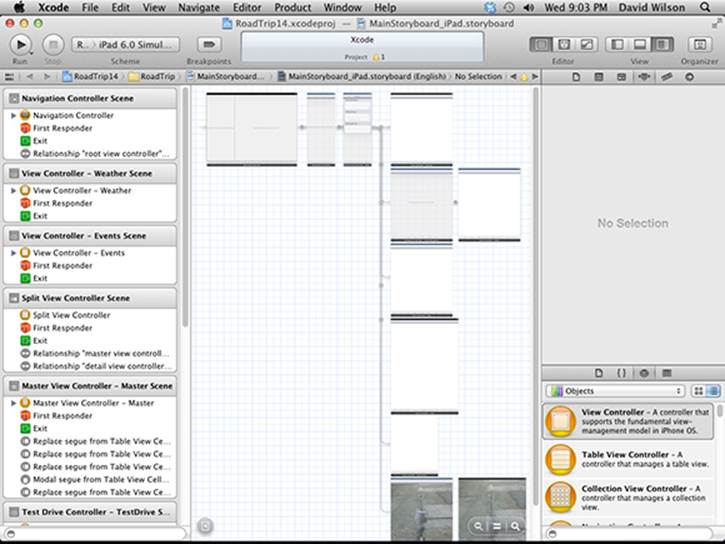
Figure 14-15: The nearly complete storyboard.
You’re also going to have to make some changes in application:didFinishLaunchingWithOptions:. Add the code in bold shown in Listing 14-1 to that method in RTAppDelegate.m.
Listing 14-1: Updating application:didFinishLaunchingWithOptions:
- (BOOL)application:(UIApplication *)application
didFinishLaunchingWithOptions:
(NSDictionary *)launchOptions
{
UINavigationController *navigationController;
if ([[UIDevice currentDevice] userInterfaceIdiom] == UIUserInterfaceIdiomPad) {
UISplitViewController *splitViewController = (UISplitViewController *)self.window.rootViewController;
splitViewController.presentsWithGesture = NO;
if ([splitViewController.viewControllers[1]
isKindOfClass:[UINavigationController class]]) {
UINavigationController *detailNavigationController = [splitViewController.viewControllers
lastObject];
splitViewController.delegate =
(id)detailNavigationController.topViewController;
}
else
splitViewController.delegate =
[splitViewController.viewControllers lastObject];
navigationController =
splitViewController.viewControllers[0];
}
else {
navigationController = (UINavigationController *)
self.window.rootViewController;
}
… the rest of the method
}
The change you make here is in how you get the Detail View controller that you will assign as the Split View controller delegate.
As I mention earlier, the Split View controller manages two view controllers, with the last one in its list of controllers corresponding to what’s displayed in the Detail view. You check the last view controller to see whether it’s a Navigation controller (that contains the Detail View controller) by sending it the isKindOfClass: message. This method returns a Boolean indicating whether it is a UINavigationController.
if ([splitViewController.viewControllers[1]
isKindOfClass:[UINavigationController class]]) {
UINavigationController *detailNavigationController =
[splitViewController.viewControllers lastObject];
splitViewController.delegate =
(id)detailNavigationController.topViewController;
}
If it is a Navigation controller, you need to find its view controller (it’s the one that has adopted the SplitViewControllerDelegate protocol, implemented the protocol methods, and can become the Split View controller’s delegate), which you get by accessing the Navigation controller’stopViewController property. (It points to the first and only view controller on its stack.) Then you’ll assign it as the delegate.
If it’s a view controller, rather than a Navigation controller (which it will be because you just made the Weather controller the Detail View controller, and it has no Navigation controller), you just assign that view controller as the delegate.
else
splitViewController.delegate =
[splitViewController.viewControllers lastObject];
If you build and run your project now, it looks like you’ve taken a step backward; all you’ll see is a blank screen — in Portrait orientation no less (unless you’ve kept the Test Drive controller as the initial Detail View controller). You’ll fix that in the next chapter.
Repeat for iPhone
You now need to update the iPhone storyboard file with the same kind of view controllers you just added to the iPad storyboard file. They are as follows:
![]() WeatherController with a Push segue (instead of the iPad’s Replace segue)
WeatherController with a Push segue (instead of the iPad’s Replace segue)
![]() EventsController with a Push segue (instead of the iPad’s Replace segue)
EventsController with a Push segue (instead of the iPad’s Replace segue)
![]() MapController with a Push segue (instead of the iPad’s Replace segue)
MapController with a Push segue (instead of the iPad’s Replace segue)
![]() FindController
FindController
![]() DestinationController with a Modal segue
DestinationController with a Modal segue
The iPhone storyboard uses Push segues because you are pushing a new view controller onto the stack when the user touches a cell such as “Weather” in the tableView in iPhone’s Master View controller.