Macs All-in-One For Dummies, 4th Edition (2014)
Book IV. Your Mac as Multimedia Entertainment Center
 See how to enhance your viewing experience by reading the article “Connecting Your Mac to a Projection System” online at www.dummies.com/extras/macsaio.
Contents at a Glance
Chapter 1: Tuning In and Listening with iTunes
Chapter 2: Watching Videos and Movies on Your Mac
Chapter 3: Importing, Viewing, Organizing, and Sharing Photos
Chapter 4: Making Movies with iMovie
Chapter 5: Making Your Own Kind of Music with GarageBand
Chapter 6: Reading, Listening, and Learning on Your Mac
Chapter 1. Tuning In and Listening with iTunes
In This Chapter
![]() Looking at the iTunes window
Looking at the iTunes window
![]() Setting your iTunes preferences
Setting your iTunes preferences
![]() Listening to audio in iTunes
Listening to audio in iTunes
![]() Creating playlists
Creating playlists
![]() Tuning in to iTunes Radio
Tuning in to iTunes Radio
![]() Watching videos in iTunes
Watching videos in iTunes
![]() Browsing and buying from the iTunes Store
Browsing and buying from the iTunes Store
![]() Sharing media
Sharing media
Your Mac comes with the iTunes app, which you use to organize, play, and convert audio and video — and which also doubles as a disc-burning app. The most recent version of iTunes (at the time we wrote this), 11.1.3, contains iTunes Radio that lets you create custom stations based on music you feel like listening to — as long as you’re connected to the Internet.
In this chapter, we tell you how iTunes is set up and how to listen to your music or iTunes Radio or watch a movie on iTunes. We show you how to set up playlists on your own or let iTunes do it for you with Genius. We also give you a tour of the iTunes Store so you can find out how to add other media to your Mac — so have your Apple ID handy. Finally, we explain how to share media with other people.
Getting to Know the iTunes Window
You can use iTunes to play music on your Mac, but iTunes shows its real strength when you use it to organize your media files. If you tend to have CDs stacked in the cupboard under your stereo and others sliding around under the passenger seat of your car and still more CDs in a desk drawer at work, moving all your music into iTunes helps you manage your music in one place. Before we get into listening, watching, and learning, we want to explain how iTunes manages your media.
You have many ways to customize your view of content you keep in iTunes. Figure 1-1 shows one of them.
Figure 1-1: Manage your media from the iTunes window.
· Toolbar: Across the top, you find the playback and volume controls, the now-playing display, and the Search field.
· Library: Displayed to the far left, just under the toolbar, is the Library button, which opens a pop-up menu that shows the media categories Music (which includes music videos), Movies, TV Shows, Podcasts, iTunes U, Audiobooks, Apps, and Tones, if you add any to the library. If your Library isn’t divided by category, choose Files⇒Library⇒Organize Library. Select the Reorganize Files check box and then click OK. iTunes automatically divides your media by type. (If you select View⇒Show Sidebar this display changes and you see media categories listed in a sidebar instead of a pop-up menu.)
· View: The buttons in the center, just under the toolbar, change the display choices. If you choose Music from the Library pop-up menu (or sidebar), you see the choices (as in Figure 1-1) for Songs, Albums, Artists, and so on. Should you choose Movies from the Library pop-up menu, the view buttons change according to that category.
 To tweak the various views — for example, add or change the columns you see in Songs view — choose View⇒Show View Options, as shown in Figure 1-2, and select the things you want to see. Open the Sort By menu to change the order of the selections. Each view — Albums, Artists, Genres, Playlists, and Internet — has different view options except for Radio, which has no view options.
To narrow the choices the Songs or Playlists view displays, choose View⇒Column Browser⇒Show Column Browser and then click the columns you want to see. The selected columns appear above the list of songs, from which you then select specific genres, artists, albums, composers, or groupings.
Figure 1-2: Customize the information you see with View Options.
· Devices: When you connect a device (such as an iPhone or MP3 player) to your Mac, you see this button (or pop-up menu if more than one device is connected). Click that button or choose a device from the pop-up menu to open the options for syncing your device with iTunes; click the Eject button to remove the device from your computer safely.
· iTunes Store: Click this button to go to the iTunes Store, which we discus later in this chapter.
· Status bar: Choose View⇒Show Status Bar to see (across the bottom of the window) the number of items in a category, the playing time, and the amount of storage the media occupies.
If you’re familiar with an older version of iTunes and prefer to see the Source list sidebar on the left side of the window, choose View⇒Show Sidebar, and the pop-up menu under the toolbar is replaced with the Source List sidebar.
Adjusting iTunes Preferences
Choosing how iTunes should respond when you insert a CD, what type of audio file format it uses to import your CD audio tracks, and which Library categories you want to display in the left-hand column of the iTunes application window are all options you can adjust by accessing the iTunes Preferences dialog. We go through the General and Parental Control preferences in this section, and throughout the chapter, we direct you to Preferences to adjust other aspects of iTunes. To open the iTunes Preferences dialog and adjust the settings, follow these steps:
1. Choose iTunes⇒Preferences.
The iTunes Preferences window appears.
2. Click the General icon (if it isn’t already selected) to display the General settings pane, as shown in Figure 1-3.
3. (Optional) Click the Library Name field if you want to give your library a different name.
This is the name that will appear if you share your iTunes library through the iTunes Sharing preferences pane or Home Sharing, as explained later in this chapter.
4. Select the check boxes for the items you want to see in the Library pop-up menu or sidebar, depending on which view you use.
5. Select the check boxes for the choices you prefer in the Views section.
6. Select or deselect the check boxes in the Notifications section to indicate whether you want to see song changes in Notification Center.
Figure 1-3: Tailor iTunes to your liking.
7. To specify what you want to happen whenever you insert an audio CD into your Mac, open the When a CD Is Inserted pop-up menu and choose one of the following:
· Show CD: Displays a list of audio tracks
· Play CD: Displays a list of audio tracks and starts playing the first track
· Ask to Import CD: Displays a dialog, asking whether you want to import all audio tracks from the CD (this is the default setting)
· Import CD: Automatically converts all audio tracks into digital files
· Import CD and Eject: Automatically converts all audio tracks into digital files and ejects the CD when it finishes without playing any tracks
8. To specify the file format and audio quality of the audio files iTunes will create when importing CD audio tracks, click the Import Settings button.
The Import Settings preferences pane opens, as shown in Figure 1-4.
1. Open the Import Using pop-up menu and choose one of the following (see the nearby sidebar, “Understanding audio file compression formats” for more information):
AAC Encoder: Stores audio tracks as AAC files
AIFF Encoder: Stores audio tracks as AIFF files
Apple Lossless Encoder: Stores audio tracks as a lossless compressed .m4a file
MP3 Encoder: Stores audio tracks as MP3 files
WAV Encoder: Stores audio tracks as WAV files
2. Open the Setting pop-up menu and choose the audio quality for your files.
 The higher the audio quality, the larger the file size.
3. (Optional) Select the Use Error Correction When Reading Audio CDs check box to increase the chances that iTunes can retrieve and convert audio tracks from a damaged or scratched CD.
4. Click OK to close the Import Settings preferences pane and return to the General Preferences pane.
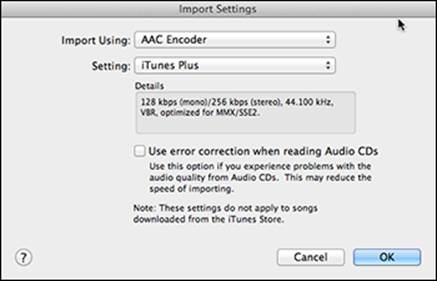
Figure 1-4: Choose the file format iTunes uses to convert audio tracks from your CD.
9. Select the Automatically Retrieve CD Track Names from Internet check box if you want iTunes to try to identify audio tracks by their song titles.
If this option isn’t selected, each audio track will have a generic name (such as Track 1).
10. (Optional) If you share your Mac with children, you may want to set up some Parental Control preferences which can limit the type of media that can be accessed in sharing or the iTunes Store. Click the Parental button at the top of the Preferences window, as shown in Figure 1-5, and do the following in the Parental Controls window that opens:
· Disable: Select the check boxes for Podcasts, Internet Radio, iTunes Store, and/or Shared Libraries to deny access to those categories.
· Ratings For: Use the pop-up menu to change the country you want to see ratings for.
· Restrict: Choose limits you want to place on specific media, such as music, movie ratings, age ranges for TV shows and apps, or books.
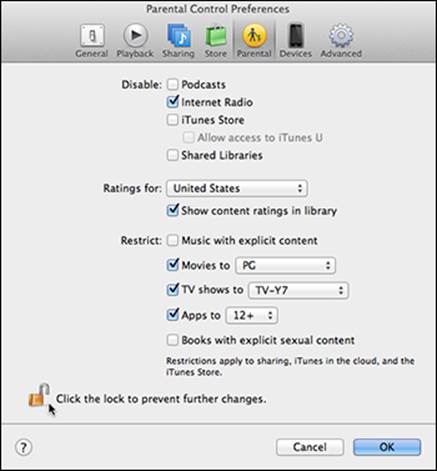
Figure 1-5: Limit what media can be accessed in iTunes.
Then click the lock icon so changes can be made to the Parental Control preferences only after you enter your user password.
11. Click OK to close the iTunes Preferences dialog.
You return to the main iTunes application window.
 Understanding audio file compression formats
Audio files offer tremendous advantages in storage and audio quality compared with previous forms of audio storage. However, dozens of different audio file compression types — the underlying conversion technology used to save audio as digital files — are out there. Therefore, to hear different audio files, you may need to use different applications. Think of having to buy two radios because one radio receives only AM stations, and the second radio receives only FM stations.
Different types of audio file compression formats exist because each file format offers certain advantages. The standard approaches to audio file compression are three schemes used for saving audio as digital files: lossless (no compression), lossless compression, and lossy compression.
Remember: Your Mac can play almost any audio file format as long as you install the right software.
· Lossless audio files: The highest-quality audio files are called lossless because they never lose any audio data. Lossless audio files offer the highest-quality sound, but they also create the largest file sizes. The two most popular lossless audio file formats are WAV (Waveform Audio File Format) and AIFF (Audio Interchange File Format). WAV files typically end with the .wav file extension, and AIFF files typically end with the .aiff or .aif file extension.
· Compressed lossless audio files: Lossless audio files take up large amounts of space, so compressed lossless audio files are designed to squeeze audio data into a smaller file size. Three popular compressed lossless audio file formats are FLAC (Free Lossless Audio Codec), Shorten, and Apple Lossless. FLAC files typically end with the .flac file extension, Shorten files typically end with the .shn file extension, and Apple Lossless files typically end with the .m4a file extension.
Remember: You can play Apple Lossless files in iTunes, but not FLAC or Shorten audio files. To play FLAC files, grab a free copy of flukeformac (https://code.google.com/p/flukeformac/) or VLC Media Player (www.videolan.org/vlc). To play Shorten files, use Audion (www.panic.com/audion), which is still available although not actively updated.
· Compressed lossy audio files: A lossy audio file compresses audio files by stripping certain audio data to shrink the file size. Think of pulling unnecessary clothing from a suitcase to lighten the load. The greater the audio quality, the more audio data the file needs to retain — and the bigger the file. The smaller the file, the less audio data the file can hold, but at a lower audio quality. As a result, most audio file formats strive for an optimal balance between audio quality and file size.
The amount of data an audio file format retains is measured in kilobits per second (Kbps). The higher the kilobits, the more data is stored and the higher the audio quality. The following table shows approximate kilobit values and the audio quality they produce.
|
Bit Rate (Kilobits per Second) |
Audio Quality |
|
32 Kbps |
AM radio quality. |
|
96 Kbps |
FM radio quality. |
|
128–160 Kbps |
Good quality, but differences from the original audio source can be noticeable. |
|
192 Kbps |
Medium quality; slight differences from the original audio source can be heard. |
|
224–320 Kbps |
High quality; little loss of audio quality from the original source. |
· The most popular compressed lossy audio file formats are MP3 (MPEG-1 Audio Layer 3), AAC (Advanced Audio Coding), and WMA (Windows Media Audio). You can recognize MP3 audio files by their .mp3 file extension.
· The iTunes alternative to MP3 files is the AAC audio file format. AAC audio files offer greater audio quality and smaller file compression than equivalent MP3 files. The AAC format offers a Digital Rights Management (DRM) feature that allows copy protection; however, music you download today from iTunes is DRM-free. AAC files typically end with the .aac or .m4a file extension (if it doesn’t have DRM) or the .m4p file extension (if it does have DRM).
Playing Audio with iTunes
iTunes turns your Mac into a stereo system and radio. You can play the most common audio files (MP3, WAV, AAC, and AIFF) on your Mac and connect headphones or external speakers to upgrade the playback quality and listening experience.
You don’t have to use iTunes to play audio CDs and digital audio files on your Mac. You can always use another audio player on your Mac (such as RealPlayer, which you can get free at www.real.com or VLC Media Player at www.videolan.org/vlc). These other audio players can be especially useful if you want to play oddball audio formats like Ogg Vorbis or FLAC, but in most cases, you’ll probably find that iTunes works just fine.
To launch iTunes, click the iTunes icon on the Dock or Launchpad.
Listening to CDs
You probably have audio CDs of your favorite albums, but rather than play them in a CD player, you can play them on your Mac — with an internal or external optical disc drive — by using iTunes. Much like a CD player, iTunes can play audio tracks on a CD in order or randomly. Even better, iTunes lets you choose which audio tracks you want to hear. To play an audio CD in iTunes, follow these steps:
1. With iTunes open, insert an audio CD into your Mac.
A dialog may appear (depending on the iTunes Preferences settings you choose), asking whether you want to import all audio tracks on the CD into iTunes. We discuss this process in the next section. For now, click No.
If you’re connected to the Internet, iTunes searches a website called Gracenote for information about the CD you inserted, based on multiple criteria, including the number, order, and length of tracks on the CD. If Gracenote finds a match for your CD, iTunes displays that information, which can include the album name and artist, track titles, and (if available in the iTunes Store), the album’s cover artwork.
2. Click the Play button or press the spacebar to start playing your selected audio tracks.
The Play button toggles to a Pause button (which you can click to pause the track you’re listening to).
3. When you finish listening to the CD, eject it by choosing Controls⇒ Eject Disc or by clicking the Eject Disc icon to the right of the CD icon.
If you have a stereo, iTunes playback controls in the toolbar across the top of the window will look familiar (refer to Figure 1-1). You have a few extra options, which you access from the iTunes menu and preferences:
· Volume slider: Drag the volume slider to adjust the sound.
· Adjust play: Click one of the following buttons:
· Pause: Temporarily stops playing audio. You can also press the spacebar to toggle the Play and Pause button.
· Previous: Starts playing the selected audio track from the beginning. Clicking the Previous button a second time starts playing the previous audio track from the beginning.
· Next: Skips the selected audio track and starts playing the next audio track.
· Selective play: Deselect the check boxes of any audio tracks you don’t want to hear.
· Random play: Click the Shuffle button or choose Controls⇒Shuffle⇒Turn On Shuffle to play your audio tracks in random order. Choosing the Shuffle command again toggles off random play.
· Repeat-selection play: Choose Controls⇒Repeat⇒All to play the selected audio tracks continuously on the CD or Repeat⇒One to repeat the same song. (Choose Controls⇒Repeat Off to toggle off the Repeat Play feature.)
· Equalizer: Choose Window⇒Equalizer and select one of the 22 preset frequency options closest to the type of media you’re listening to, such as R&B, Classical, Small Speakers, or Spoken Word. You can also adjust the equalizer settings manually (see Figure 1-6).
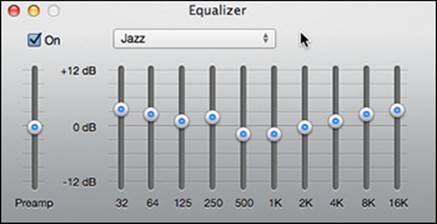
Figure 1-6: Select the type of music with the Equalizer.
· Preferences: Choose iTunes⇒Preferences⇒Playback to adjust a few of your playback options.
· Crossfade Songs: Move the slider to set the length of silence between songs.
· Sound Enhancer: Move the slider from low to high to boost the sound quality.
· Sound Check: Sometimes songs play at different volumes. Select the Sound Check option so all songs are played at the same volume.
Control-click the iTunes icon on the Dock to bring up a playback controls menu.
Importing a CD’s audio tracks into iTunes
If you have a CD that you often listen to, just import the music into iTunes. Converting audio tracks on a CD into digital audio files is ripping. After you adjust the iTunes import settings (see the earlier section, “Adjusting iTunes Preferences”), you’re ready to rip.
By default, iTunes saves songs imported from your CDs as high-quality iTunes Plus files in the 256 Kbps AAC format.
To convert an audio disc into digital files, open iTunes and follow these steps:
1. Insert an audio CD into your Mac’s optical disc drive, internal or external.
Depending on how you set the iTunes preferences, a dialog may appear, asking whether you want to import all audio tracks on the CD into iTunes. Click Yes if you want to convert every audio track into a digital audio file and import to iTunes. If you want to import only some of the songs, click No and continue with the following steps.
If, in the iTunes Preferences dialog, you chose Play CD or Import CD, that action will take place automatically. If you chose Show CD, you see the window shown in Figure 1-7.
If the tracks of the CD don’t appear in the central pane of iTunes, click the name of the CD in the Library pop-up menu.
2. To choose which songs to import, deselect the check boxes of the tracks you don’t want to import.
Check marks should appear in the check boxes of the audio tracks you want to import.
If you don’t see check boxes, choose iTunes⇒Preferences, click the General tab, and then select Show List Checkboxes in the Views section.
3. Click the Options button and choose Get Track Names if you didn’t select the automatic option in iTunes Preferences.
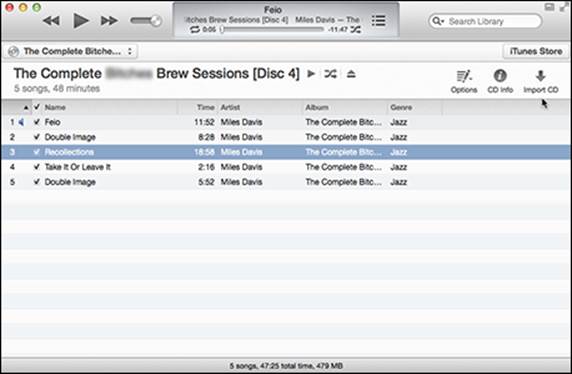
Figure 1-7: Import all or some of the songs from a CD when you insert it.
4. (Optional) Click the CD Info button to see information about the CD, such as the artist or year of publication.
5. Click the Import CD button in the upper-right corner of the iTunes window.
The Import Settings window opens (refer to Figure 1-7). AAC is the default encoding format; choose a different format from the pop-up menus if you prefer. Otherwise, click OK, and the iTunes app converts and copies all (or the selected) audio tracks into digital audio files and saves them to your Mac’s hard drive in your Music folder.
The now-playing display indicates which track is being copied and how long it will take to copy. It takes about ten minutes to import a full CD. A white check mark in a green circle appears next to tracks that have been successfully imported.
6. When iTunes finishes importing your CD’s audio tracks, eject the CD by choosing Controls⇒Eject Disc or by clicking the Eject Disc icon to the right of the CD name in the Library pop-up menu.
To download album cover artwork for CDs that you import to iTunes, choose File⇒Library⇒Get Album Artwork. You need an iTunes account or an Apple ID. If you have an iTunes account or Apple ID, choose Store⇒Sign In to sign in. To create an Apple ID, see Book I, Chapter 3. After you sign in, iTunes begins downloading album artwork. The now-playing display shows which album iTunes is working on and how much time remains.
Importing digital audio files
Besides ripping audio tracks from a CD and storing them on your Mac, you might also get digital audio files through the Internet or handed to you on a flash drive or an external hard drive. Before you can play any digital audio files in iTunes, you must first import those files, which essentially copies them into the iTunes folder inside your Music folder.
You can simply drag files into your iTunes library, or you can follow these steps:
1. In iTunes, choose File⇒Add to Library to open the Add to Library dialog.
2. Navigate to and select the folder, audio files, or files you want to import into iTunes, and then click Choose.
iTunes imports the folder, audio files, or files into your Music folder.
If you download music from an online source other than iTunes, select the Automatically Add to iTunes option when selecting the destination for saving a downloaded a file, and the file shows up in your iTunes library.
What’s more, if you have lower-quality audio files from various sources, consider subscribing to iTunes Match. For $24.99 per year (as of this writing), iTunes Match looks at your iTunes library and upgrades songs that you own and that are available in the iTunes Store to iTunes Plus quality. As an added bonus, with an iTunes Match subscription, iTunes Radio is ad-free. Choose Store⇒Turn On iTunes Match and follow the onscreen instructions to subscribe.
If you poke around in your Mac’s folders and files and see two Library files in iTunes, don’t delete one just because it looks like a duplicate. iTunes stores your media in two Library folders. One holds the actual media files, and the other makes media available to other apps, such as Keynote or iMovie.
Searching your iTunes library
After you copy music (and eventually other media) into iTunes, you may not be able to find what you’re looking for in your library. To find a song, podcast, TV show, or any other media you store on iTunes, you can search by typing some or all of a song, album, or show title, artist name, and so on. To search iTunes, follow these steps:
1. Click the library you want to search in — for example, Music or Podcasts.
2. Click the triangle next to the magnifying glass to choose which field you want to search, or select All to search all fields associated with the library you chose in Step 1.
3. Click the Search field in the upper-right corner of the iTunes window and then type part of the title, album, TV series, or other item that you want to find.
Each time you type a letter in the Search field, iTunes narrows the list of potential matches.
4. Click the media you want to play.
Read the next section to find out more about playback.
Playing digital audio files
After you import one or more audio files into iTunes, you can view your list of audio files, as outlined in the beginning of this chapter in the “Getting to Know the iTunes Window” section. Refer to the earlier section, “Listening to CDs,” for details on the playback controls. To play one or more audio files, follow these steps:
1. Choose a view for displaying your audio file collection, such as Songs, Albums, or Artists.
2. Select songs with one of the following methods.
As you select songs, they’re added to Up Next, which is a list of songs in the order in which they’ll play. Click the Up Next button in the now-playing display to see the list of upcoming songs.
· Checkboxes: If you use Checkboxes, select the check boxes of the audio tracks you want to hear and deselect the check boxes of audio tracks you don’t want to hear.
To deselect all audio tracks so you don’t have to listen to them, hold down the ![]() key and select a check box. To reselect all audio tracks, repeat the process.
key and select a check box. To reselect all audio tracks, repeat the process.
· Menu: If you don’t use Checkboxes, click the disclosure triangle next to a song and choose Play Next from the pop-up menu. Continue to choose other songs but select Add to Up Next in the pop-up menu.
Choose another view, such as Albums, Artists, or Genres, click the album, artist, or genre you want to hear, and then click the Play button. Click the disclosure triangle next to the album, artist, or genre name to add all the songs on the album, by the artist, or in the genre to Up Next, as shown in Figure 1-8. You can also select songs singly from any of these views by hovering the pointer over the song, clicking the disclosure triangle that appears, and selecting Add to Up Next.
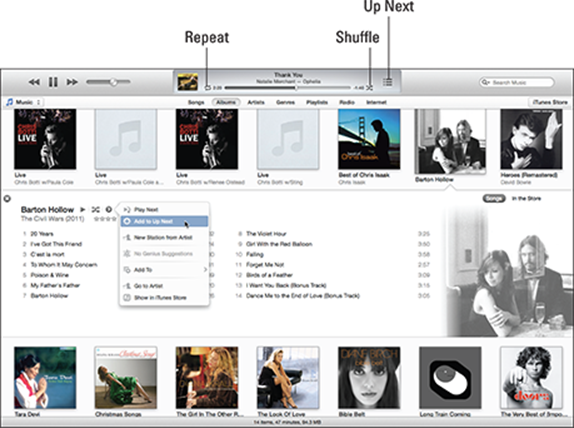
Figure 1-8: Add songs to Up Next to create a listening list.
3. Click the Play button or press the spacebar to start playing your selected audio tracks.
The Play button toggles to a Pause button.
4. Click the Repeat and/or Shuffle buttons in the now-playing display to use those options (see Figure 1-8).
5. To manage the Up Next list, click the Up Next button, and then choose what to do from the following:
· To delete all songs in the Up Next list: Click the Clear button.
· To show your listening history: Click the Clock icon. Click it again to see the Up Next list.
· To remove a song from Up Next: Hover the pointer over a song and then click the X that appears on the left side.
· To move a song to a new (higher or lower) position on the Up Next list: Click and drag the song to its new position in the Up Next list.
· To see more options: Hover the pointer over a song and click the disclosure triangle for more options, as shown in Figure 1-9. Go To choices take you to the artist, song, or album in your iTunes library. New Station choices relate to iTunes Radio, which we talk about later. The Add To choice is for Playlist, which we talk about next.
If you have an iPhone, iPad, or iPod touch and a Wi-Fi network, you can download the Remote app from the App Store and control iTunes with your device.
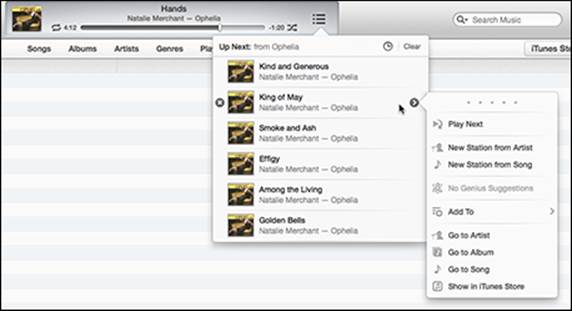
Figure 1-9: Manage the Up Next list.
To reduce the playback controls to a small window, choose View⇒Switch to Mini Player, or click the Mini Player button at the top right of the window. To reduce the Mini Player to an even smaller window (both shown in Figure 1-10) that you can leave on the Desktop so you can listen and control your music while you’re using your Mac to do other things, click the Up Next button.
For working with other media, see Book IV, Chapter 2, to learn about watching video and movies on your Mac and Book IV, Chapter 6, for information about reading e-books, listening to podcasts, and learning at iTunes U.
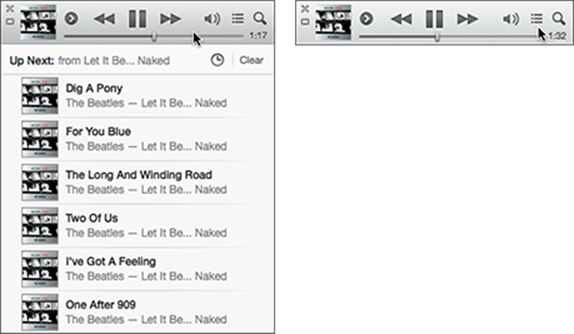
Figure 1-10: The Mini Player puts controls on your Desktop.
Burning an audio CD
Ubiquitous Wi-Fi, broadband cellular networks, and Apple’s iCloud service make accessing and sharing digital files between your Mac and other iOS devices (such as an iPod touch or iPhone) quick and easy. However, if you find that you still want your music on a CD, you can use the iTunes disc-burning feature to copy your favorite audio files to a CD that you can play whenever you don’t have the option of listening to music with iTunes on your Mac or iOS device.
CDs can hold approximately 70 to 80 minutes of audio. More stereos can recognize and play CD-Rs although newer stereos can recognize and play CD-RWs as well. (CD-Rs let you write to them only once, whereas CD-RWs allow you to erase and reuse them.)
To burn an audio CD, first create a playlist, and then instruct iTunes to copy all the songs in the playlist to an audio CD, as follows:
1. Click the playlist you want to burn to CD.
2. (Optional) Deselect the check boxes of any songs you don’t want to burn to the CD.
3. (Optional) Arrange the songs in the order you want them to play on the CD.
To arrange songs in a playlist, click in the first column (that displays the number of each song) and then drag a song up or down to a new position.
4. Choose File⇒Burn Playlist to Disc.
The Burn Settings dialog appears, offering different radio buttons for choosing the type of CD you want to burn, such as Audio CD, MP3 CD, or Data CD, as shown in Figure 1-11. Audio CD is your best choice because some players don’t recognize MP3 CDs, and Data CDs won’t be playable.

Figure 1-11: Choose the type of CD you want to burn.
5. Select a Disc Format radio button (Audio CD, MP3 CD, or Data CD).
If you choose Audio CD, consider these additional options:
· (Optional) Gap between Songs: From this menu, choose None or from 1 to 5 Seconds to specify the amount of silence between song tracks.
· (Optional) Use Sound Check: Select this check box to instruct iTunes to ensure that all the song tracks play from the CD at the same volume level.
· (Optional) Include CD Text: Select this check box to display information about the CD on CD player models that offer a CD text information feature.
6. (Optional) Open the Preferred Speed pop-up menu and choose a disc burning speed, such as Maximum Possible or 24x.
If the CDs you burn on your Mac don’t play correctly on other CD players, choose a slower burning speed. Otherwise, use the Maximum Possible option.
7. Click the Burn button.
8. When prompted, insert a blank CD-R or CD-RW into your Mac’s internal or external optical disc drive.
The now-playing display of the iTunes window displays the progress of your disc burning. If you’re burning more than one or two songs, you now have enough time to go get a cup of coffee, tea, or another beverage of your choosing.
Playing Around with Playlists
If you’re a professional disc jockey or an event planner, you know how the sequence and mix of songs can set the mood of a crowd. Some songs provide background music that unconsciously stimulates calm conversation, while other songs grab your attention or inspire you to set foot on the dance floor. Rather than go through the hassle of selecting the same group of songs over and over, you can use iTunes to select a group of songs once and store that list as a playlist. When you want to hear the group of songs, just select the playlist rather than each song. You might choose calming New Age instrumentals when you’re studying, a classic rock jam to keep you moving while housecleaning, and a jazz or blues mix to play in the background at a dinner party.
You create ordinary playlists or Smart Playlists, and iTunes creates Genius shuffles, playlists, and mixes — as long as you have an Internet connection.
· Ordinary playlist: A list of favorite songs you select to include in that playlist.
· Smart Playlist: You define rules for which songs to include, such as only songs recorded by a specific artist. As your audio file collection grows, a Smart Playlist can automatically include any new songs by that specific artist or by whatever other criteria you define for the particular Smart Playlist.
· Genius playlist, shuffle, and mix: iTunes creates Genius playlists based on a song you choose, but iTunes thinks for itself to create a Genius shuffle or Genius mix based on a genre that you choose.
All playlists are listed when you click the Playlist button. By default, iTunes already includes several Smart Playlists, including Recently Added, Recently Played, and Top 25 Most Played.
Creating an ordinary playlist
The simplest playlist to create is one that contains specific songs, such as a favorite album, a group of songs you want to listen to when you go for a run or workout, or perhaps every song by a particular artist. To create a playlist of particular songs you want to group, follow these steps:
1. In iTunes, click the Playlists button at the top of the window.
2. Click the Add (+) button in the bottom-left corner and then choose New Playlist from the pop-up menu.
Alternatively, choose File⇒New⇒Playlist.
An untitled playlist appears, highlighted, in a new pane on the right side of the window, as shown in Figure 1-12.
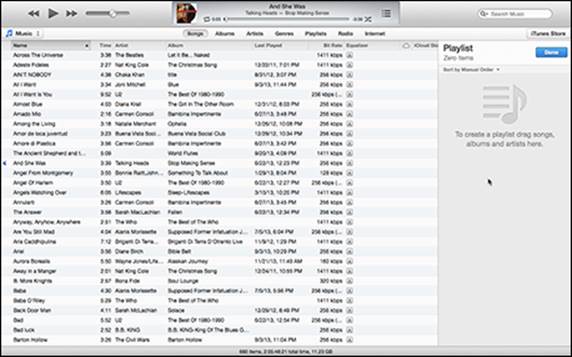
Figure 1-12: Click and drag songs to newly created playlists.
3. Type a name for your playlist and then press Return.
4. Click the view you want to work in at the top of the window.
5. Click and drag songs, albums, or artists from the list on the left to the playlist on the right.
6. Click the Done button.
To make a quick playlist, hold down the ![]() key, click the songs you want in the playlist, and then choose File⇒New⇒Playlist from Selection. Your new playlist appears in the right pane with the name highlighted where you can type a more-identifying name.
key, click the songs you want in the playlist, and then choose File⇒New⇒Playlist from Selection. Your new playlist appears in the right pane with the name highlighted where you can type a more-identifying name.
Adding songs to a playlist
After you create a playlist, you can edit it. To add a song to a playlist, click the song and then click the disclosure triangle that appears to the right of the song name. Click the disclosure triangle next to Add To, and then choose the playlist you want to add the song to from the list that appears. The song you added appears in the playlist.
Alternatively, click the Playlists button and then click the playlist you want to add songs to. The playlist opens, displaying a list of the songs it contains. Click the Add To button in the upper-right corner and then drag songs from the Songs list to the playlist, as you do when creating a new playlist.
Putting a song in a playlist doesn’t physically move the song from the folder. It’s stored on your Mac’s hard drive.
Deleting songs from a playlist
To delete a song from a playlist, follow these steps:
1. In iTunes, click the playlist that contains the songs you want to delete.
Your chosen playlist appears onscreen.
2. Click a song to delete and then press the Delete key.
A confirmation dialog appears, asking whether you really want to remove the song from your playlist.
3. Click Remove.
Deleting a song from a playlist doesn’t delete the song from your iTunes library.
To delete a song from your music collection, choose Music from the Library pop-up menu, click a song you want to delete, and then press the Delete key. When a confirmation dialog appears, click Move to Trash if you want to delete the song track from your Mac’s hard drive. Click Keep File if you want to keep the song track on your Mac’s hard drive but no longer display it in your iTunes music library.
Creating a Smart Playlist
Manually adding and removing songs from a playlist can get tedious, especially if you regularly add new songs to your iTunes audio collection. Instead of placing specific songs in a playlist, a Smart Playlist lets you define specific criteria for the types of songs to store in that playlist, such as songs recorded earlier than 1990, or songs under a particular genre, such as Blues, Country, Hard Rock, or Folk. To create and use a Smart Playlist, you tag songs, define rules to determine which songs to include, and finally, edit existing playlists.
Tagging songs
To sort your song collection accurately into Smart Playlists, you can tag individual songs with descriptive information. Most songs stored as digital audio files already have some information stored in specific tags, such as the artist or album name. However, you might still want to edit or add new tags to help Smart Playlists sort your song collection.
To edit or add tags to a song, follow these steps:
1. In iTunes, click a song that you want to tag and choose File⇒Get Info (or press ![]() +I) to display the song track’s information.
+I) to display the song track’s information.
2. Click the Info tab to display text boxes where you can type in or change the song track’s associated information, as shown in Figure 1-13.
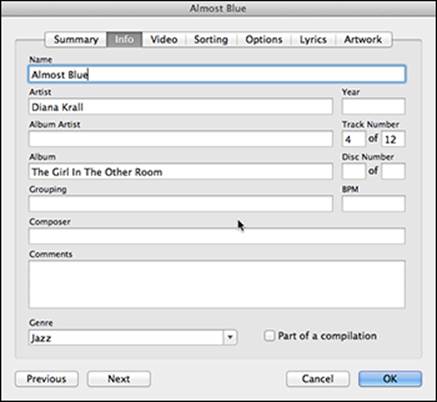
Figure 1-13: Edit or enter labels to identify a song.
3. Click a text field and edit or enter information.
4. In the same Info pane, open the Genre pop-up menu to add or change the song’s genre.
5. Click the song track’s other tabs, such as Sorting or Options, shown in Figure 1-14, to make additional adjustments to your selected audio file.
You can also set ratings by hovering over a song and clicking the disclosure triangle to the right of the name; click the dots at the top of the pop-up menu to rate the song to your liking.
6. When you finish tagging the song track, click OK to close the dialog and return to the main iTunes window.
Defining Smart Playlist rules
Smart Playlists use tags to sort and organize your song collection. You can use existing tags that are created for songs automatically (such as Artist and Album), as well as tags that you add to your songs to define the type of songs you want that Smart Playlist to store. A specific criterion for choosing a song is a rule.
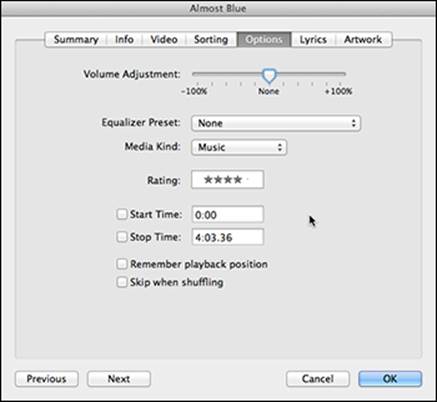
Figure 1-14: Adjust volume, choose an equalizer setting, and rate audio files here.
To create a Smart Playlist, follow these steps:
1. In iTunes, choose File⇒New⇒Smart Playlist. Or, in Playlists view, choose New Smart Playlist from the Add (+) pop-up menu.
A Smart Playlist dialog appears, prompting you to define a rule for specifying which songs to store in the playlist.
2. Open the first pop-up menu on the left and choose a category, such as Artist or Date Added, for deciding which songs the Smart Playlist will automatically choose.
3. Open the second pop-up menu in the middle and choose how to use your chosen category.
4. Click the text box and type a criterion, such as a specific date or an artist name.
5. (Optional) Click the Plus sign to add another rule to the Playlist, as shown in Figure 1-15.
After you add a second rule, the All or Any menu appears next to Match in the first line.
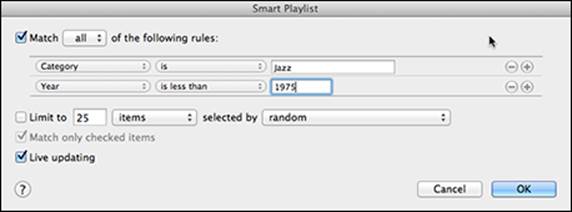
Figure 1-15: Define a rule for choosing songs.
6. (Optional) Make other selections in the Smart Playlist dialog:
· Limit To: Select this check box and enter a number to define the maximum number of (choose one) songs/file size/minutes/hours/items the Smart Playlist can hold; then choose an option that suits your desired Smart Playlist criteria from the Selected By pop-up menu.
· Match Only Checked Items: If you want to store only those songs that match your criteria and are selected with check marks in the iTunes window, select this check box.
· Live Updating: Select this check box if you want the Smart Playlist to update its list of songs automatically each time you add or remove a song from your iTunes song collection library or change a tag (on a song) that’s used in the rule.
7. Click OK.
Your Smart Playlist appears in the list of playlists in the Source List of the iTunes window. Smart Playlists have a gear icon to the left of the name.
To rename any playlist, double-click the name in the Playlist list to highlight the name, and then type in a new name to replace the existing name.
Editing a Smart Playlist
After you create a Smart Playlist, you can modify it, such as adding more rules or editing any existing rules. To edit a Smart Playlist, follow these steps:
1. In iTunes, select the Smart Playlist that you want to edit from the iTunes Source list.
2. Choose File⇒Edit Smart Playlist or click the Edit button to the right of the playlist name.
The Smart Playlist dialog appears (refer to Figure 1-15).
3. Make any changes to your Smart Playlist rule and then click OK.
If you have a lot of playlists, the Playlists list can get pretty crowded. You can streamline your playlist list by filing similar playlists in folders. Choose File⇒New Playlist Folder. Double-click the folder to rename it with a meaningful name, and then click and drag the playlists you want to file to the folder.
Letting your Genius free
If your guests are already ringing the doorbell and you don’t have time to create the background music for your party, you can let iTunes create a Genius shuffle, mix, or playlist for you with songs iTunes thinks go well together. iTunes automatically creates a Genius shuffle based on your existing collection, a Genius playlist is created based on a song you choose, and a Genius mix is based on a genre you choose. Genius also suggests new songs for you to purchase that it thinks you’ll like based on your purchase history.
To create a Genius shuffle, simply choose Controls⇒Genius Shuffle, and iTunes goes to work. Click the Up Next button to see the songs in the shuffle. If you don’t like the lineup, click Shuffle Again.
To listen to a Genius mix, click the Playlists button and then click Genius Mix in the list. Hover the pointer over the mix you want to hear and click the Play button that appears.
Here’s how to create a Genius playlist:
1. Choose Store⇒Turn On Genius.
iTunes asks you to sign in with your Apple ID if you haven’t yet.
You need an Internet connection for Genius to work.
iTunes accesses the iTunes Store so it can analyze your interests in music, movies, and TV shows, see what other users who have similar tastes have in their collections, and then make informed suggestions about media you may like.
2. Click a song you like in your music collection, click the disclosure triangle to the right of the song name, and then choose Create Genius Playlist.
A playlist is created from your music library with songs that iTunes thinks go well with the song you selected.
The Genius playlist is automatically named with the song it’s based on and saved in the playlist list.
3. Click the pull-down menu next to 25 Songs under the playlist name to change how many songs you want in your Genius playlist: 25, 50, 75, or 100.
4. Click the Refresh button to update your Genius playlist after you add more music to your iTunes Music library.
 Sometimes instead of Create Genius Playlist (as in Step 2), you see No Genius Suggestions. Genius seems somewhat limited if you have non-English, classical, or pre-1960 music. Tagging your songs, as we explain previously in the “Tagging songs” section, can help Genius create playlists because tagging gives iTunes more information to work with.
Deleting a playlist
You may want to delete a playlist or Smart Playlist you’ve created. To delete a playlist, follow these steps:
1. In iTunes, click a playlist that you want to delete in the Playlists list and press the Delete key.
A confirmation dialog appears, asking whether you really want to delete your playlist.
Deleting a playlist doesn’t physically delete the audio files from your iTunes library.
2. Click the Delete button.
If iTunes created a Genius mix that you don’t like, you can delete unwanted Genius mixes by using the same procedure.
Listening to the Radio
iTunes offers two types of radio listening:
· iTunes Radio: Creates a station based on a genre or song you choose
· Internet radio: Tunes in to radio stations through the Internet
We tell you about both here, but you have to be connected to the Internet to use either because the audio streams in real time.
Playing iTunes Radio
Although radio stations broadcast music and news programs within a category (such as country, classic rock, or conservative news), the playlists tend to be broad and flexible within the category. iTunes Radio, on the other hand, tends to offer more specific stations, and you can create your own stations based on songs, artists, and genres you want to hear. Follow these steps to use iTunes Radio:
1. With iTunes open, click the Radio button at the top of the iTunes window.
Across the top you see a row of pre-established station icons, such as iTunes Weekly Top 50 or Guest DJ stations, where an artist puts together a playlist of songs she likes, plus a few of her own recordings.
2. Click one of the icons.
The music begins, usually with a brief spoken introduction about the station.
Song information appears in the now-playing display, as in Figure 1-16. If you want to purchase the song from iTunes, click the price button. (Learn about purchasing from iTunes in the section, “Shopping at the iTunes Store,” later in this chapter.)
Just like broadcast radio, a 10- or 12-second advertisement plays between songs every now and then.
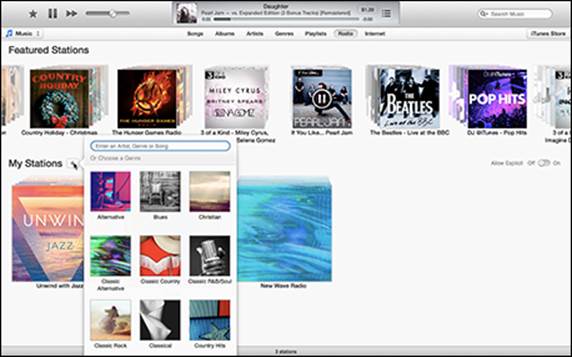
Figure 1-16: Choose an iTunes Radio station or create your own.
3. Click the add station button (+) to create your own iTunes Radio station (refer to Figure 1-16), and then do one of the following:
· Click a genre icon. From the subgenre list that appears, hover over one of the choices, click the Play button to the left to hear a sample, and then click the Add button to the right to add that station to your iTunes Radio selection. An icon appears in the My Stations section of iTunes Radio. Click another genre or subgenre to try a different music style.
· Type an artist, genre, or song in the Search field. Click one of the choices from the list of matches that appears. An icon appears in the My Stations section of iTunes Radio.
4. Click the Play button on one of the My Stations icons.
Songs begin to play from the same genre as the artist, song, or genre you selected.
5. Double-click one of the My Stations icons to tune the station and generate selections that better match your musical taste, as shown in Figure 1-17. Do the following:
· Drag the tuning slider. Choose the types of songs you want to hear related to your choice: Hits plays well-known songs similar to your base song, Variety plays some hits and some unknown songs, and Discovery plays songs you may not be familiar with but are similar to the base song.
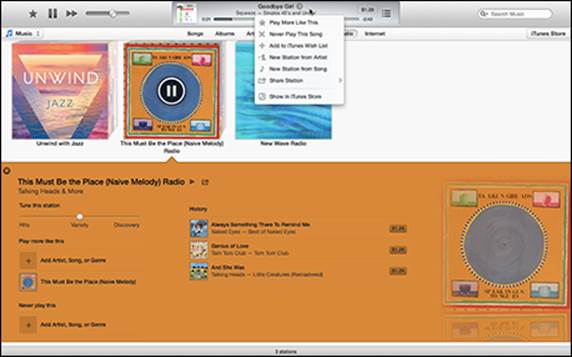
Figure 1-17: Fine-tune your stations.
· Click the Share button. Send your station to someone by e-mail or Messages or post to Twitter or Facebook.
· Add/block other base songs. Click the Add Artist, Song, or Genre button (+) to further define your station, or Click the Add button beneath Never Play This to block specific songs, artists, or genres from this station. The more artists, songs, or genres you add to or block from your station, the closer the iTunes choices will be to what you want to hear.
6. From the toolbar, you can do the following:
· Star button: Click this to choose Play More Like This to add to the base songs, or click Never Play This Song to block it from your station.
· Next button: Click to skip to a new song.
· Volume: Drag the slider to increase or decrease playback volume.
· Song-playing disclosure button: Hover by the song-playing name and then click the disclosure button (refer to Figure 1-16) to add the song to the base, block the song, or create a new station from that song.
· Up Next button: In iTunes Radio, clicking this button reveals a playing history.
· Price buttons: Click the price button next to any song in the song playing or history list to purchase the song and add it to your iTunes library.
· Mini Player button: Click the Mini Player button (next to the full-screen button in the upper-right corner) to reduce the window. In the Mini Player window, hover over the album cover to reveal two arrows; click to open to a larger album cover view, as shown in Figure 1-18. Hover over the album to reveal playback controls, and click the small album icon to reduce the window again.
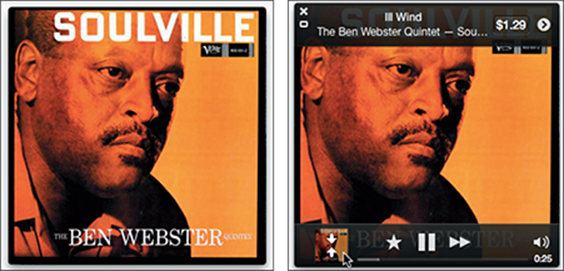
Figure 1-18: iTunes Radio Mini-Player window expands to an album view for the song that’s playing.
7. Control-click an icon in My Stations to delete the station from your selections, or Control-click a Featured Stations icon to add it to My Stations.
8. Click the Pause button to interrupt playback.
9. Choose iTunes⇒Quit iTunes (or press ![]() +Q) to leave the iTunes app altogether.
+Q) to leave the iTunes app altogether.
Streaming Internet radio
Internet radio plays many of the same stations you listen to on your traditional radio plus many more stations from afar. Internet radio isn’t limited to those stations within a broadcast range. For example, you can access the BBC or Radio Africa with far better reception than your short wave radio can provide.
Simply click the Internet button at the top of the iTunes window, and a list of categories appears. Click the disclosure button to the left of the category to see a list of all the stations within that category. To see a description of the station, choose View⇒Show View Options and select the Comments check box. When you see a station you want to listen to, double-click it, and the audio begins to play. Use the playback and volume controls as you would to listen to other content.
If you know a specific station’s call letters or name, type it in the Search field to see whether it’s available. And, if you have a favorite station that’s not listed, open Safari (or your favorite browser) and attempt to locate the station on the Internet to find out whether it provides an Internet stream. Open iTunes and choose File⇒Open Stream. Select and copy the URL from Safari, and then paste the URL for the station in the URL field of the Open Stream window. It’s now added to Internet radio.
Playing Digital Video Files
After you download movies, TV shows, lectures, or video podcasts, you want to watch them. To watch a video, follow these steps:
1. Open the Library pop-up menu and choose the media you want to watch — for example, TV Shows.
The list of videos you have in your library in that category appears in the iTunes window.
If you import media from non-iTunes sources, such as TV shows from Amazon, you find them in the Movies category. Click the item and then select File⇒Get Info. Click the Options button and choose the appropriate media type from the Media Kind pop-up menu, and then they’ll be in the right place.
2. Click one of the view tabs to sort the contents of the library.
For example, TV Shows can be sorted by Unwatched, Shows, Genres, or List, which shows everything.
3. Double-click the movie or episode you want to watch.
The video begins playing in the media pane.
4. Move the pointer over the bottom of the video to see the playback controls.
You can also use the playback controls on the toolbar.
Choose iTunes⇒Preferences⇒Playback, and select your Preferred Video Version in the pop-up menu: Standard or High Definition at 720p or 1080p.
Shopping at the iTunes Store
Despite its misleading name, the iTunes Store sells much more than music. You can also find music videos, movies, TV shows, audio and video podcasts, audio books, electronic books, iOS apps, and lectures from some of the best universities in the world. Think of it as a one-stop media megastore.
If you’re a true music enthusiast or your tastes aren’t exactly mainstream, picking through CDs — or long-playing vinyl records — in a music store is probably a thrilling and common activity. For the rest of us, digital downloads are where it’s at, and iTunes meets a fair amount of our music purchasing requirements.
In this section, we accompany you down the virtual aisles of the iTunes Store, but don’t stop at just music. The iTunes Store also offers movies, TV shows, audiobooks, podcasts, and lectures from some of the top universities in the country. And, while the iTunes Store has iOS apps, you find Mac apps in the App Store. The books you find in the iTunes Store, however, are the same you find in the iBooks Store.
Have your Apple ID on hand when you want to shop the iTunes Store because that’s what you use to sign in. To create an Apple ID, choose Store⇒Create Apple ID.
For many purchases, you have to authorize your computer. This helps with copyright issues. You can authorize up to five computers, and you can also de-authorize computers, so don’t worry about someone else using your Apple ID if you sell or give away your Mac. Other devices don’t count as computers, so your iPad or iPhone aren’t part of the five-computer limit. Choose Store⇒Authorize This Computer. That’s it.
To open the iTunes Store, click the iTunes Store button at the upper-right side of the iTunes window. To return to your iTunes Library, click the Library button that appears where the iTunes Store button used to be.
With literally millions of digital media files to choose from, the initial impact can be overwhelming, but the iTunes Store organization helps you narrow your choices. When you first open the iTunes Store, the window you see is divided into sections that give you suggestions for different types of media to download, rent, or purchase (see Figure 1-19).
At the top, you see rotating banner ads for songs, TV shows, and movies. Scrolling down reveals other sections, such as Music, Movies, TV Shows, Apps, Books, Special Offers, and Free on iTunes. You also find one or two dividing strips, which advertise special iTunes offers. Clicking any of the ads or icons takes you to an information screen about that item.

Figure 1-19: Browse the iTunes Store for music, movies, TV shows, and more.
In each section, you can use the scroll bar underneath the selection to scroll horizontally, or click See All to see the entire selection from that section.
Across the top of the window are tabs for each type of media: Music, Movies, TV Shows, App Store (see Book I, Chapter 5), Books, Podcasts, and iTunes U. To the left of the tabs, you see your Apple ID, which is a tab, too. (The Apple ID in Figure 1-19 is barbaradepaula.) When clicked, each tab opens a pull-down menu, as shown in Figure 1-20. The choices on the menus take you to selections of new releases, special offers, or specific categories or genres available in that type of media. The pull-down menu from your Apple ID tab gives you options for managing your account. The Home tab takes you back to the opening iTunes Store screen (refer to Figure 1-19).
Down the right side, you see two sections:
· Quick Links: This section is divided into two sections. The upper section is related to your Apple ID/iTunes account with buttons to access your account, your purchase history, redeem gift cards, or request support. The lower section lists options for searching, browsing, and buying.
· Top Charts: This section is divided into Singles, where you can view songs or music videos; and Albums, Movies, TV Shows, Apps, and Books. Click the chart title to see a full display of the list’s contents.
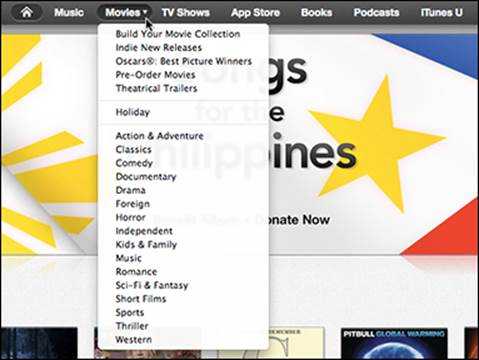
Figure 1-20: Click a media tab to open a pull-down menu with direct links to specific types of selections.
When you click an icon or name for any type of media from anywhere in the iTunes store, the information window opens. These are the parts of an information screen, as shown in Figure 1-21:
· Name
· Genre
· Release date
· Buy button: Click to download the media. Each option (for example, rent or buy, standard or high definition) has its own button. Songs can be purchased singly, or you can purchase the whole album. TV shows can be purchased singly or by season, and some movies have a rental option in addition to a buy option.
· Pop-up menu: Click the triangle next to the price for a pop-up menu that has options to gift the app to a friend, add it to your own wish list, tell a friend about it, copy the link, or share the app info via Facebook or Twitter.
· Ratings: For movies only. The ratings reflect the country where you’re purchasing the film.
· Details: The first few lines of the description are visible. If the description is longer, click More on the right side to expose the complete description.
· Ratings and Reviews: Click the tab to see what others have said about this item. Users can give a simple star rating, from zero to five, or write a review. Reviews help you decide whether the item is worth downloading or purchasing.
· Related: Click this tab to see other items similar to this one.
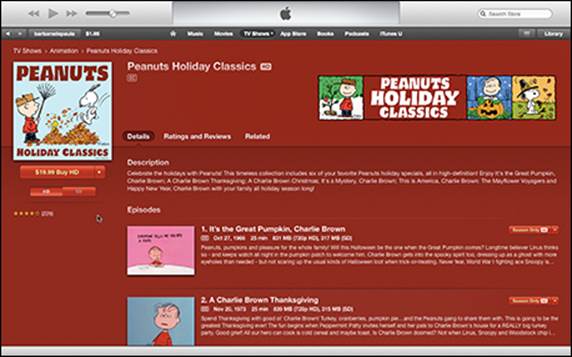
Figure 1-21: Information about the media item is displayed in iTunes.
When you know what you’re looking for
You might know exactly what you’re looking for. Maybe you heard an old favorite song on the radio or a new singer you want to hear more of. A quick search through iTunes offerings, and you’re one step closer to chilling with a great groove.
Type the name of the song or artist or a few key words — say, from a book title — in the Search Store field at the top right of the window. Press Return, and a list of matching results appears. The results are extracted from the entire iTunes Store but are divided by media category. If you click Music or Podcasts in the media type list on the right, you’ll see only that type of media. Or click See All next to the media title to see all the items found that meet your search criteria in that type of media.
Click the Lists button to the left of the Library button to view items in your Wish List, songs you listened to on the Radio, and Previews you’ve looked at, as shown in Figure 1-22.
Downloading media from iTunes
When you find something you like, click the Buy button (Subscribe for Podcasts and iTunes U), and it’s downloaded to iTunes on your Mac. If you have other Apple devices (such as an iPad or iPhone), you can automatically download your purchases to the other devices at the same time. Choose iTunes⇒Preferences⇒Store and choose the media you want to download simultaneously, as shown in Figure 1-23.
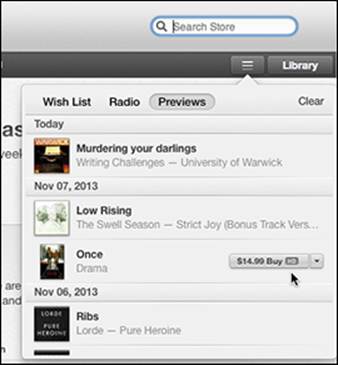
Figure 1-22: Look at your iTunes Radio history.
When you rent a movie, you must begin watching it within 30 days and finish watching it within 24 hours of when you began. After either of those two deadlines pass, it’s removed from your iTunes library.
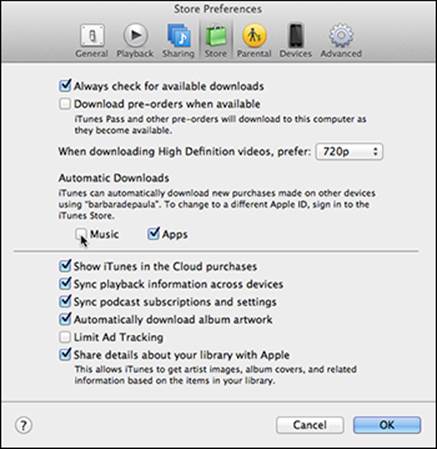
Figure 1-23: Automatic downloads puts your purchases on all your devices simultaneously.
From the choices in the lower half of the Store Preferences window, you can select how you want to sync downloads and play back across your devices. When selected, the following happens:
· Show iTunes in the Cloud Purchases: Items that are purchased but not yet downloaded to your Mac have an iCloud icon next to them in your iTunes library.
· Sync Playback Information Across Devices: If you begin watching a movie or listening to a podcast on your Mac or another device and then pause, the place you paused syncs to the other devices signed in to the same Apple ID account, and you can pick up where you left off on a different device.
· Sync Podcast Subscriptions and Settings: Choices that you make on one device or on your Mac sync to other devices signed in to the same Apple ID.
· Automatically Download Album Artwork: When you copy music from a CD or other source into iTunes, any associated album artwork available in the iTunes Store is downloaded to your iTunes library.
· Limit Ad Tracking: Apple developers can use a feature called iAd in their apps; ad tracking lets them send you targeted advertising based on your computer or device use. If you don’t want them to use this information to send you targeted ads, select this check box.
· Share Details about Your Library with Apple: When selected, this option allows iTunes to provide Apple with information about media in your library.
Don’t worry if you have to interrupt the download process or it’s interrupted unexpectedly. iTunes remembers the point it reached, and it will resume downloading when you open your iTunes account again and have an active Internet connection.
Of course, when you buy, you have to pay from your Apple ID account. This happens in either of two ways:
· Credit Card or PayPal: Enter your credit card information into your Apple ID account. If you didn’t enter credit card information when you created an Apple ID, you can do so by choosing Store⇒View Account and clicking Edit to the right of Payment Information. A window opens where you can choose the type of credit card you want to use and type in the necessary information: account number, expiration date, billing address, and so on. If you choose PayPal, click Continue. The PayPal website opens and by accessing your account, you confirm that you want to pay for iTunes Store purchases through PayPal.
· Redeem: You can redeem Apple or iTunes gift cards, gift certificates, or allowances (more on allowances shortly). Choose your Apple ID⇒Redeem. Type in the code from the card or certificate. The amount of the card or certificate is added to your account and appears to the left of the Apple ID account tab.
You can set up a monthly allowance for yourself or someone else. A set amount will be charged to your credit card or PayPal account and credited to the designated iTunes account. Choose your Apple ID⇒Account and type your password if requested. Scroll to the Settings section at the bottom of the window, and then click the Set Up an Allowance button. Follow the onscreen instructions to establish the recipient’s name and amount.
All songs on iTunes are currently in iTunes Plus format, which is 256 Kbps AAC without DRM limitations. Songs cost 69 cents, 99 cents, or $1.29, and album prices vary depending on the number of songs. If you buy a few songs from the same album and later decide you want the whole album, choose the Complete My Album option, and iTunes deducts the cost of songs you already own from the album price. After you purchase and download media from iTunes, it’s automatically downloaded to any other devices for which you set up the automatic downloads feature. Or you can sync and play it on any of your devices — your Mac, iPod, iPad, smartphone, or MP3 player.
Some albums on iTunes have an iTunes LP option. When you purchase an iTunes LP, you get liner notes, band photos, lyrics, and other bonus material along with the songs. You view everything in iTunes on your Mac.
If you want to build your video library, iTunes offers movies in both standard-definition (SD) and high-definition (HD) formats. If you’re a passionate movie buff, you may like iTunes Extra, which includes extra video, such as director’s comments or interviews with the actors along with the movie. Rentals have viewing time limits.
TV shows may be free — often to introduce a new series or season — or can be purchased singly or you can buy a season pass and download every episode. If not free, episodes start at $1.99, and you can choose standard or HD versions (HD begins at $2.99).
Like their paper and cloth counterparts, audiobooks and electronic books have a wide range of prices. You’ll find some are free as well. For example, podcasts and iTunes U lectures may be downloaded for free. See Book IV, Chapter 6, to learn about enjoying books, podcasts, and iTunes U media.
After you download the item, close the iTunes Store by clicking the Library button in the upper-right corner. You return to your iTunes library. To confirm your purchases, look in the section of the library related to the type of media you downloaded. For example, if you purchased and downloaded songs, click Music; if you downloaded podcasts, click Podcasts.
To consult your past purchases on your iTunes account, choose Store⇒View Account. Sign in to iTunes with your Apple ID and choose Purchase History. You can also download purchases again and again because when you buy something in iTunes, it’s yours forever.
If you ever have a problem with a purchase, choose Store⇒View Account. Click Purchase History and click the Report a Problem button next to the item that isn’t working.
Sharing the Wealth
You put together a terrific music and movie library on iTunes, and now you want your friends to know about the great new artist you heard or the quirky TV series you watch. You could just tell them or send them a link from the iTunes Store; however, iTunes gives you a few options for directly sharing the media with your friends or family.
Sharing over a network
If your Mac is connected to a network, you can let other computers on the same network stream media from your computer. Choose iTunes⇒Preferences⇒Sharing. In the Sharing pane, shown in Figure 1-24, specify sharing your entire library or specific media and playlists in your library. You can add a password if you want to restrict who has access. Protected DRM content, such as movies and TV shows, can be viewed only on other “authorized” computers. (See the earlier section “Shopping at the iTunes Store” to lean about authorizing computers.)
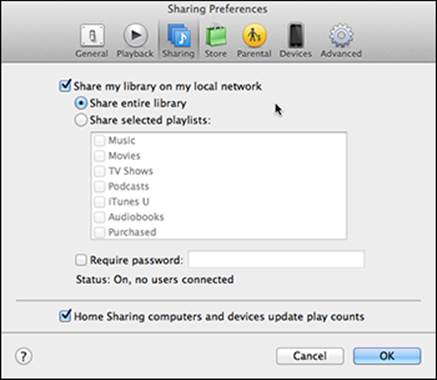
Figure 1-24: Set up sharing in iTunes Preferences.
Enabling Home Sharing
If your household is like many today, it probably has more than one computer. Home Sharing lets you share the media you keep on iTunes — music, TV shows, apps, and so on — among up to five computers in your house, and you can copy content from one computer to another. Choose File⇒Home Sharing⇒Turn On Home Sharing, and its dialog opens, as shown in Figure 1-25. Enter the Apple ID you want to use for Home Sharing, and then repeat the process on the other computers, making sure to use the same Apple ID.
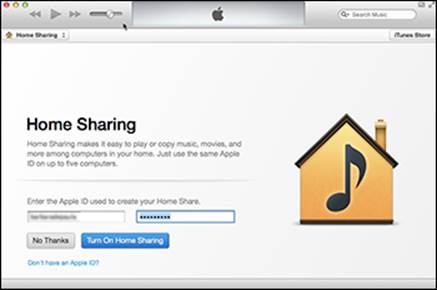
Figure 1-25: Use Home Sharing to share your media with up to five computers.
Media you add to one computer can then be shared with another computer over the network. Choose the computer and media category from the Home Sharing section of the Library pop-up menu, and then choose “Items Not in My Library” from the Show menu. Select the items you want to import, and click the Import button. If you want to automatically download iTunes Store purchases made on a different computer using Home Sharing, after choosing the computer and media category from the Library pop-up menu, click the Settings button, and choose Automatically Transfer New Purchases from Library Name. Click OK.
Sharing from the iTunes Store
When you click the Buy button on an item in the iTunes Store, a pop-up menu opens with sharing options in addition to the option to buy the item. You can choose one or more of the following: Tell a Friend, Share on Facebook, Share on Twitter, or even Gift This to purchase the item for another person. Think how surprised and happy your friend, colleague, or relative will be when the gifted item shows up in his or her e-mail inbox.
You can’t use store credit to gift an item; you must pay for the item with a credit card or PayPal.
All materials on the site are licensed Creative Commons Attribution-Sharealike 3.0 Unported CC BY-SA 3.0 & GNU Free Documentation License (GFDL)
If you are the copyright holder of any material contained on our site and intend to remove it, please contact our site administrator for approval.
© 2016-2026 All site design rights belong to S.Y.A.