Macs All-in-One For Dummies, 4th Edition (2014)
Book IV. Your Mac as Multimedia Entertainment Center
Chapter 2. Watching Videos and Movies on Your Mac
In This Chapter
![]() Understanding video disc formats
Understanding video disc formats
![]() Identifying digital video formats
Identifying digital video formats
![]() Playing digital video files
Playing digital video files
![]() Cozying up to QuickTime Player
Cozying up to QuickTime Player
![]() Playing a DVD on your Mac
Playing a DVD on your Mac
Looking to unwind after a busy day of work? Feel free to kick back, relax, and cozy up to a movie on your Mac. Want to watch your favorite scene again? Your Mac can bookmark and store your favorite scenes so you can easily watch your favorite parts of a movie. And, you can watch them in slow motion so you don’t miss one second of the action.
Although many full-length movies appear on DVD, with today’s greater storage capacity and Internet connection bandwidth, many movies and videos — commercial or homemade — are stored entirely as digital video files either on your internal or external drive or the Internet. Your Mac can play many of them at your convenience.
In this chapter, we begin by explaining video disc formats and digital movie formats. Then we lay out the options your Mac offers for playing those formats — namely, QuickTime and DVD Player. You can read about the third option, iTunes, in Book IV, Chapter 1, and keep in mind that you can watch videos you capture in iPhoto, which we discuss in Book IV, Chapter 3.
Making Sense of Video Disc Formats
The most common video disc format is Digital Video Disc (DVD). However, DVDs aren’t the only video disc format. An earlier video disc format is Video Compact Disc (VCD), which essentially stores video files on ordinary CDs. VCDs and SVCDs typically offer lower video quality than DVDs (comparable to videotape) and offer much less storage capability than DVDs. Other popular formats are DivX, xvid, and Matroska or mkv, which many DVD players can play.
Although DVD is the common video disc standard, Blu-ray is the dominant high-definition digital disc format. The main advantage of Blu-ray discs is that they can store much more data than standard DVDs (25GB for a Blu-ray disc versus 4.7GB for a DVD or 50GB versus 8.55GB for adual-layer — that is, two layers recorded on the same side yet accessed separately — DVD). However, Blu-ray discs are more expensive to produce and purchase.
Your Mac’s internal or external optical disc drive can play DVDs out of the box. If you want to watch Blu-ray discs, though, you need to buy a special Blu-ray disc drive and an application to use it or convert the file first by using an application like Pavtube (www.pavtube.com) to rip the Full Disc Copy and then HandBrake (http://handbrake.fr) to convert the file.
 Only one current Mac, the non-Retina MacBook Pro, comes with an internal optical disc drive. You need an external optical disc drive to play DVDs on other current Mac models.
Understanding Digital Video Formats
Video discs are popular for storing and distributing videos, but with high-speed Internet connections and lower flash drive storage costs, storing full-length movies as a single digital video file has become both popular and practical. The biggest problem with digital video is the wide variety of digital video formats available. To play a digital video file, you need a video player application that accepts the type of video file you have. The following is a list of digital video file types and the applications you can use to play them:
· QuickTime (.mov): Playable by the QuickTime Player that comes with every Mac.
· Audio/Video Interleaved (.avi): An older video file format introduced by Microsoft in 1992, although still commonly used today.
· Windows Media Video (.wmv): Playable on a Mac if you first install the Flip4Mac application (www.telestream.net), which allows the QuickTime Player to open and play DRM-free Windows Media Video files. (We explain DRM in Book IV, Chapter 1.)
· DivX (.divx): A high-quality video format known for storing DVD-quality video images in a digital video file format. DivX files can play on a Mac with the free DivX player (www.divx.com) or the free VLC media player (www.videolan.org).
· Flash video (.flv): A video file format commonly used on websites, such as news sites that offer video (CNN and Reuters) and YouTube, Myspace, and Yahoo! Video. You can play Flash videos with the free Adobe Flash Player (www.adobe.com).
· RealVideo (.rm): A video file format often used for streaming video. You can play RealVideo files by using the free RealPlayer application (www.real.com).
· Moving Picture Expert Group (MPEG; .mpg): A video file format that consists of different versions, including
· MPEG-1: Used for storing video on VCDs
· MPEG-2: Broadcast-quality video used for storing video on SVCDs, DVDs, HD TV, HD DVDs, and Blu-ray discs
· MPEG-3: Originally designed for HD TV but now rarely used
· MPEG-4: For storing video on HD DVD and Blu-ray discs
You can view most MPEG-4 videos with the QuickTime Player; however, the free VLC media player (www.videolan.org) is a better solution because it reads all MPEG files as well as other video formats.
 The QuickTime Player can’t play audio stored as AC3 (Dolby Digital) files with MPEG video files; you can still watch the video albeit in silent movie mode. You can, however, play these files with an application such as VLC.
Most video players are free because the companies developing and promoting a specific video file format want as many people as possible to use (and rely on) their particular video file format. Then these companies can make money by selling applications that create and store video in their specific file format.
Playing a Digital Video File
Playing a digital video file is as simple as double-clicking that file, which opens the appropriate video player on your Mac and displays your video file onscreen. For a video file on a website, you can usually click the video file directly on the web page to see it play within your browser.
Occasionally, you may find a video file format that you can’t play on your Mac. In this case, you have two choices:
· Download and install a video player for that particular video file format.
· Convert the video file into a format that your Mac can play.
In our opinion, it’s simpler just to download and install (yet another) free video player to watch video encoded in a different video file format. However, downloading and installing multiple video players can be annoying, so you may prefer to convert digital file formats instead. To convert digital video files, you need a special digital video file format conversion application.
To convert non–copy-protected (and most copy-protected) DVD videos to MPEG-4, you can use a free application called HandBrake (http://handbrake.fr) as long as you also have VLC media player (www.videolan.org) installed. In case you need to convert one digital video file format into another one (such as converting a DivX file into a QuickTime file), grab a copy of the oddly named ffmpegX (www.ffmpegx.com) or MPEG Streamclip (www.squared5.com).
We won’t go into how to use each application, but the gist is that you go to one of the aforementioned websites, download and install the conversion application, open the application, and then open the file you want to convert and choose something like Convert To and choose a file type for which you have a player.
Converting digital video files lets you store all your videos in a single file format, such as QuickTime, and avoid having to download and install half a dozen video players. It’s your call which tactic you prefer.
Using QuickTime Player
Your Mac comes with QuickTime Player, which plays video and offers video-recording and -editing functions. In addition to QuickTime Movie (.mov), QuickTime Player supports MPEG-4 (.mp4, .m4v), MPEG-2, MPEG-1, 3GPP, 3GPP2, some AVI, and DV files.
Follow these steps to use the playing part of QuickTime Player:
1. Open QuickTime Player by doing one of the following:
· Drag the movie file over the QuickTime Player icon on the Dock.
· Open QuickTime Player from the Dock or Launchpad and then choose File⇒Open File.
Choose the file you want to view from the Open dialog. You may have to sift through directories or folders to find the file you’re looking for. Or click the Movies button in the Media section of the Finder sidebar to see all the movie files stored on your Mac, divided by app of origin, as shown in Figure 2-1.
· Choose File⇒Open Location.
An Open Location dialog appears, in which you can type the URL where the movie is located.
· Choose File⇒Open Recent and then choose a file you recently viewed from the pop-up menu.
2. When your selected movie opens, choose View and select one of the following viewing options:
· Enter Full Screen: Only your movie is seen, as large as possible, on the entire screen. No other windows or menus are visible.
· Float on Top: Your movie plays on top of whatever else is on your desktop.
· Actual Size: Displays movie closest to the size it was recorded as possible.
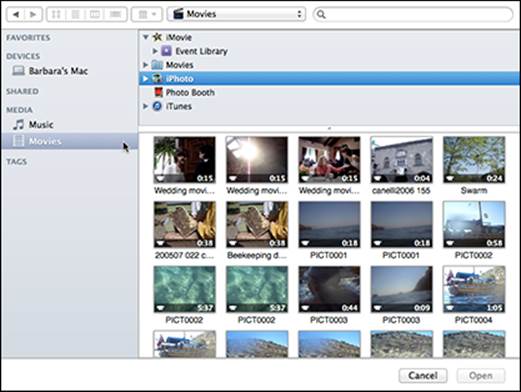
Figure 2-1: See all your movie files in one place from the Movies folder in the Finder sidebar.
· Fit to Screen: Your movie is adjusted to fit the screen while maintaining the height-to-width ratio. Other windows and the menu bar are visible.
· Fill Screen: Your movie is adjusted to fill the entire screen, without borders. Some of the image may be lost or distorted because the height-width ratio is ignored to fill the screen (only in full-screen mode).
· Panoramic: The movie is displayed with the outer horizontal edges compressed to avoid cropping (only in full-screen mode).
3. (Optional) Choose other options from the View menu that may be available with your movie.
· Languages lets you choose a different language for the audio of your movie.
· Subtitles displays a written translation in a language other than the spoken dialogue.
4. (Optional) If your movie has chapters, you can choose View⇒Next Chapter or Previous Chapter to go to a different part of your movie.
5. Click the Play/Pause button to view your movie.
6. Use the other playback controls, shown in Figure 2-2, to view your movie.
· Volume: Move the slider left or right to decrease or increase the audio.
· Rewind or Fast Forward: Click these buttons to go quickly ahead or back (respectively) in your movie. Clicking successively doubles the speed from 2 up to 32 times faster.
Alternatively, drag the playhead slider left or right to go to another part of your movie. The time to the left of the playhead is how long your movie has played; the time to the right of the playhead indicates how much is left to play.
· Play/Pause: Click this toggle button to play or stop your movie.
· If you capture video with a smartphone or in a vertical position, the playback may take up less room than the entire screen (refer to Figure 2-2, which was captured with an iPhone). Clicking the Full Screen button changes the ratio but may distort the image.
· Share: Click this button to send the video to someone via Mail or Messages or post it to a social network. (See Book II, Chapters 2 and 3, to learn about Mail and Messages, respectively.)
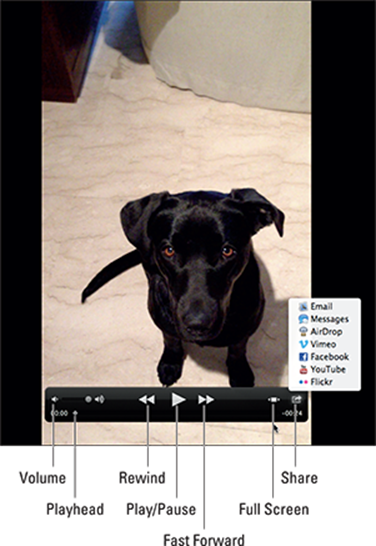
Figure 2-2: QuickTime Player lets you view movies from many file formats.
Playing a DVD
The most common video disc format is the DVD format. To play DVDs, just insert your DVD into your Mac’s internal or external optical disc drive. DVD Player loads and displays your DVD’s main menu, as shown in Figure 2-3.
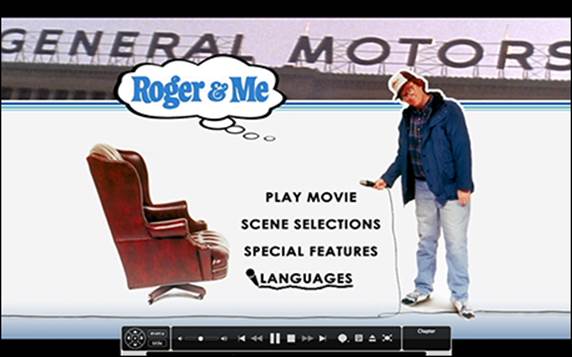
Figure 2-3: When DVD Player starts, it displays the inserted DVD’s main menu.
If you turn on Parental Controls by choosing Features⇒Enable Parental Controls, you see a dialog that prompts you to enter your user password to watch the video. Likewise, if you previously watched the video and interrupted playback before the end, a dialog asks whether you want to start playback from the beginning or from where you left off.
Click the menu options to select them (or use your Mac’s arrow keys to move through the DVD’s menu options and then press Return or the spacebar to select them), such as Play Movie, or Special Features.
If you just want to watch a DVD from start to finish, you don’t have to read the rest of this chapter. However, if you want to use some of the special features of DVD Player, keep reading.
Understanding full-screen mode and window mode
One of the simplest ways to enrich your viewing experience is to switch between full-screen mode and window mode. In full-screen mode, the video fills your entire computer screen. In window mode, the video fills only part of your computer screen while giving you access to the rest of your Mac Desktop, such as the Dock and other app windows, as shown in Figure 2-4.
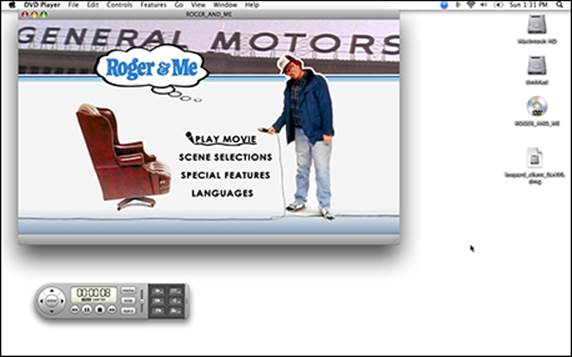
Figure 2-4: DVD Player can shrink a video inside a window on your Desktop.
Exiting and returning to full-screen mode
The first time you insert a DVD into your Mac, DVD Player displays your video in full-screen mode. To exit full-screen mode, choose one of the following:
· Press Esc.
· Hover the pointer over the top-right corner to reveal the menu bar and then click the full-screen toggle button.
· Press ![]() +F.
+F.
· Click the Exit Full Screen button on the Controller, as shown in Figure 2-5.
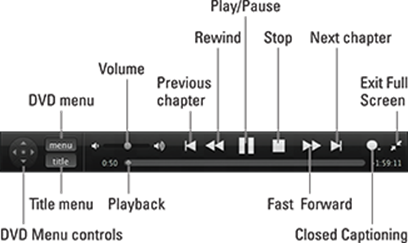
Figure 2-5: The Controller appears at the bottom of the screen in full-screen mode.
In full-screen mode, you can view the DVD Player menu bar by moving the pointer to the top of the screen. You can also view the DVD Controller in full-screen mode by moving the pointer to the bottom of the screen.
To return to full-screen mode, choose one of the following:
· Click the Full Screen button at the upper-right corner of the DVD Player window.
· Press ![]() +F.
+F.
· Choose View⇒Enter Full Screen.
Viewing a video in a window
When you exit full-screen mode, your video appears in a window with the Controller displayed underneath the DVD window (refer to Figure 2-3). Choose the View menu, and you have the following options for displaying a video:
· Half Size
· Actual Size
· Double Size
· Fit to Screen
· Enter Full Screen
When viewing a video in a window, the Controller takes on a different skin (the display appearance), as shown in Figure 2-6. To open the drawer on the window-mode Controller, click and drag the handle down or toward the right (depending on how you choose to view the controller) or choose Controls⇒Open Control Drawer.
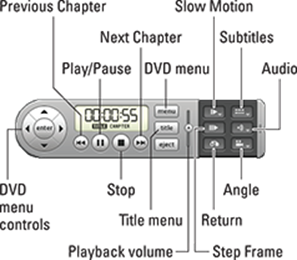
Figure 2-6: The Controller appears in new garb when underneath a video window.
Although the Controller in both full-screen and window mode allows you to control a DVD, each Controller offers slightly different features. You can access some features in both full-screen and window mode, but many features are available only in one mode or the other.
In either viewing mode, press Option+![]() +C to show or hide the Controller.
+C to show or hide the Controller.
 To avoid letting any other window cover up part of your video window, choose View⇒Viewer above Other Apps. To turn off this feature, choose the same command again.
Viewing the DVD and Title menus
Most DVDs include an initial menu that lets you choose what to watch, such as the feature presentation or extra content such as interviews with the director and actors. Some DVDs also offer a Title menu that lets you pick different episodes, such as a DVD containing multiple episodes from a single season of a TV show. DVDs may offer both an initial menu and a Title menu. To jump to the initial DVD or Title menu (and note that not all DVDs have one), try clicking the Menu button (DVD menu) or the Title button on the Controller.
If at any time you want to start the DVD from the very beginning, choose Go⇒Beginning of Disc. (In full-screen mode, move the pointer to the top of the screen to display the DVD Player menu bar.) Alternatively, click the Stop button twice.
Skipping through a video
Sometimes you may want to skip over or replay part of a video. To skip backward or forward through a video, follow these steps:
1. In full-screen mode, click one of the following buttons on the Controller:
· Rewind: Plays the video quickly in reverse
· Fast Forward: Plays the video quickly going forward
In DVD Player window mode, click and hold the Previous Chapter button to rewind, or the Next Chapter button to fast-forward.
2. Click Play or press the spacebar when you want to resume viewing the video.
Hold down the ![]() key and press the left- or right-arrow key to increase the rewind or fast-forward speed (respectively) incrementally by 2x, 4x, 8x, 16x, or 32x with each additional press of the arrow key. To stop rewinding/fast-forwarding and resume playing the video at normal speed, click the Play button or press the spacebar.
key and press the left- or right-arrow key to increase the rewind or fast-forward speed (respectively) incrementally by 2x, 4x, 8x, 16x, or 32x with each additional press of the arrow key. To stop rewinding/fast-forwarding and resume playing the video at normal speed, click the Play button or press the spacebar.
If you prefer menu commands, follow these steps:
1. Choose Controls⇒Scan Forward (or Scan Backwards).
Your video continuously rewinds or fast-forwards.
2. Change the scan rate by selecting Controls⇒Scan Rate⇒2/4/8/16/32x Speed.
3. Click the Play button or press the spacebar or choose Control⇒Play to resume playing the video at its normal speed.
You can also drag the slider at the bottom of the Controller (in full-screen mode) to rewind or fast-forward a video.
Viewing frames in steps and slow motion
If you want to study a particular part of a video, the DVD Player lets you view individual frames one at a time or view your video in slow motion.
To view individual frames in steps, go into window mode. Then click the Step Frame button on the Controller.
Each time you click the Step Frame button, the video advances one frame.
To play the video at normal speed, click the Play button on the Controller or press the spacebar.
Stepping through a video one frame at a time can be tedious, so an easier way to step through a video is in slow motion. To view your video in slow motion, again in window mode:
1. Choose Controls⇒Slow Motion or click the Slow Motion button on the Controller.
2. When the Slow Motion rate appears in the upper-left corner of the window, choose Controls⇒Slow Motion Rate⇒1/2, 1/4, 1/8 Speed to change how slow the video plays.
Clicking the Slow Motion button again changes the rate of slow motion.
Click the Play button on the Controller or press the spacebar to play the video at normal speed.
Skipping by chapters
Most DVD videos are divided into segments called chapters, which are usually listed somewhere on or inside the DVD case. If you want to view a favorite scene, just jump to the chapter that contains your favorite scene.
To move between chapters, choose one of the following:
· In full-screen mode, move your pointer to the top of the screen and then click the Chapters button (it looks like an open book) in the upper-left corner to open thumbnail images of the chapters. Click the chapter you want to skip to. Use the scroll bar to move forward and backward to other chapters.
· Click the Previous Chapter or Next Chapter button on the Controller.
· Press the left-arrow (previous) or right-arrow (next) key while the video is playing.
Placing bookmarks in a video
Sometimes your favorite parts of a movie don’t correlate exactly to chapter sections on a DVD. In case you want to be able to jump to a specific part of a video, you can create a bookmark.
DVD Player saves your bookmarks on your Mac’s hard drive, so if you pop the DVD out and back in again, your bookmarks are still preserved.
Creating a bookmark
To create a bookmark, follow these steps:
1. Click the Pause button (or press the spacebar) to pause the video at the spot where you want to place a bookmark.
2. Choose Controls⇒New Bookmark or press ![]() += to open a new bookmark dialog, as shown in Figure 2-7.
+= to open a new bookmark dialog, as shown in Figure 2-7.
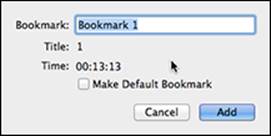
Figure 2-7: Enter a descriptive name for your bookmark.
3. Enter a descriptive name for your bookmark in the text field and then click Add.
If you select the Make Default Bookmark check box, you can jump to this bookmark in window mode by choosing Go⇒Default Bookmark.
Jumping to a bookmark
After you create at least one bookmark, you can jump to that bookmark by following these steps:
1. Choose Go⇒Bookmarks.
A pop-up menu appears, listing all your saved bookmarks.
2. Click the bookmark name you want to jump to.
In full-screen mode, you can also click the Bookmarks button in the upper-left corner (under the Chapters button) and then click the bookmark you want to jump to.
Deleting a bookmark
After you create at least one bookmark, you can delete a bookmark by following these steps:
1. Choose Window⇒Bookmarks.
A Bookmarks window appears.
2. Click to select the bookmark you want to delete and then click the Remove bookmark button (minus sign).
A confirmation dialog appears, asking whether you’re sure that you want to delete your chosen bookmark.
3. Click OK (or Cancel) and then click the Close button to close the Bookmarks window.
You can Control-click in the viewing screen to open a shortcut menu, as shown in Figure 2-8.
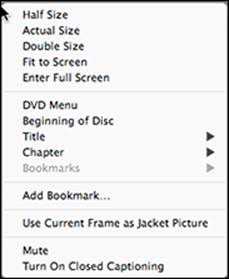
Figure 2-8: Control-click to open a shortcut menu.
Viewing closed captioning
Many DVDs (but not all) include closed captioning and subtitles. Closed captioning displays written dialog onscreen in the same language that’s being spoken — English, for example — whereas subtitles give you a choice of reading dialogue onscreen in a language other than what’s being spoken, such as French and Spanish.
To turn on closed captioning, do one of the following:
· Choose Features⇒Turn On Closed Captioning, and then choose Separate Window or Over Video to set where you want to see the captions.
· In full-screen mode, click the Closed Captioning button on the Controller and then choose Turn On Closed Captioning. To view subtitles in different languages, do one of the following:
· Choose Features⇒Subtitles and then choose a language, such as French or Spanish.
· In full-screen mode, click the Closed Captioning button on the Controller and choose a language under the Subtitles category.
Some DVDs have subtitle options in the DVD’s interactive menu, which you access by clicking the Menu button on the controller.
Viewing different camera angles
Some DVDs, such as those containing video of concerts, offer a choice of multiple camera angles. This gives you a chance to view a DVD and, at a certain spot, switch from looking at the drummer to looking at the lead guitarist.
To switch to a different camera angle, choose one of the following methods:
· Choose Features⇒Angle and then choose an angle.
· In window mode, click the Angle button on the Controller and then choose an angle. (If the DVD you’re watching doesn’t offer optional angles, the video will continue playing without changing the way it looks.)
· In full-screen mode, click the Streams/Closed Captioning button on the Controller and then choose an angle under the Angle category.
Choosing different audio tracks
Sometimes a DVD may offer multiple audio tracks, such as a default audio track and alternative audio tracks of foreign languages. To switch to different audio tracks, choose one of the following:
· Choose Features⇒Audio and then choose an audio track.
· In window mode, click the Audio button on the Controller and then choose an audio track. (If the DVD you’re watching has only one audio track, the audio will continue playing without changing how you’re hearing the audio.)
· In full-screen mode, click the Streams/Closed Captioning button on the Controller and then choose an audio track under the Audio Streams category.
To reveal DVD Player menus in full-screen mode, move the pointer to the top of the screen.
Enhancing your viewing experience
DVD Player has a few options to take full advantage of both your Mac’s capabilities and the DVD that you’re watching. You can adjust the video color quality, screen size, and audio to better suit your viewing needs. Follow these steps:
1. Choose Window⇒Video Zoom.
The Video Zoom inspector opens.
2. Select the On check box.
3. Open the pop-up menu next to Manual, as shown in Figure 2-9.
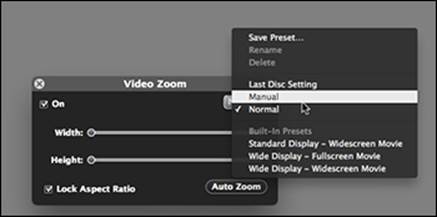
Figure 2-9: Change the display setup for watching your movie.
4. Choose the preset zoom setting that you want.
The width and height sliders move according to the type of display you choose.
To adjust the color of your video, follow these steps:
1. Choose Window⇒Video Color.
The Video Color inspector opens.
2. Select the On check box.
3. Open the pop-up menu next to Manual, as shown in Figure 2-10.

Figure 2-10: Use Video Color to brighten or enrich the color of your video.
4. Choose the preset setting that you want: Brighter, Deeper, or Richer.
The Brightness, Contrast, Color, and Tint sliders move according to the type of color you choose.
You adjust the volume in DVD Player with the volume sliders on the controllers or by choosing Controls⇒Volume Up/Volume Down/Mute. You can control more than just the volume of the audio, however. For example, if you’re watching a DVD on your Mac, you may want to set up the audio for small speakers. Follow these steps to adjust the audio:
1. Choose Window⇒Audio Equalizer.
The Audio Equalizer inspector opens.
2. Select the On check box.
3. Open the pop-up menu next to Normal, as shown in Figure 2-11.
4. Choose the preset setting that you want: Bass and Vocal Boost, Bass Boost, Small Speakers, Vocal Boost.
The equalizing sliders move according to the type of audio you choose.
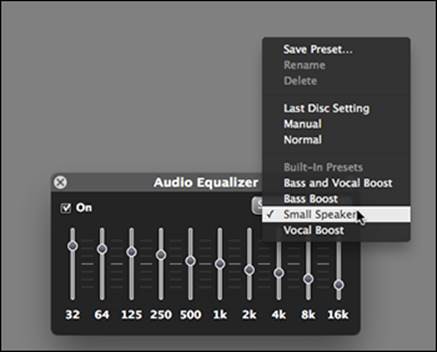
Figure 2-11: The Audio Equalizer enhances the sound quality of your video.
Using the DVD Player Timer
If you’re in the habit of falling asleep while watching a television show or film, you’ll like the DVD Player Timer control. Like the sleep function on a clock radio, you set a time for how long you want your DVD to play and what action you want to take place when the time’s up. Follow these steps:
1. Choose Controls⇒Timer⇒Set Timer.
Note: Your DVD can be playing or stopped.
The Timer Settings dialog opens, as shown in Figure 2-12.
2. Set the time limit you want to set (30 minutes is the default), or select the At End of Current Title radio button.
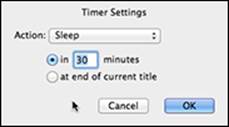
Figure 2-12: Use the Timer to turn off DVD Player after a set interval.
Use At End of Current Title if you want the action to take place when the DVD finishes playing (for example, so you don’t have to get out of bed to turn off your Mac when the DVD finishes).
3. Choose the action you want to happen when the time expires from the Action pop-up menu: Quit DVD Player, Sleep, Shut Down, or Log Out.
4. Click OK.
The Timer appears briefly in the upper-left corner of the window. The other Timer options are activated in the Controls menu: Display Time, Resume, or Cancel Timer.
Ejecting a DVD
When you finish watching your DVD, you probably want to eject it from your Mac. Some Macs have an Eject key on the keyboard, which you can press to eject your disc. Otherwise, there are three ways to eject your DVD:
· From DVD Player, choose Controls⇒Eject DVD.
· In window mode, click the Eject button on the Controller.
· From the Finder, choose File⇒Eject disc title.
You can connect your Mac to a television, monitor, or projector, and watch your DVD on a bigger screen. First, see what kind of port your television, monitor, or projector has, and then look through the Apple Online Store or visit your local Apple reseller to find the cable and adapter that matches your Mac. Attach the adapter to your Mac and then connect an HDMI or VGA cable from the adapter to your television, monitor, or projector. If your movie doesn’t appear automatically on the external device, choose ![]() ⇒System Preferences⇒Displays and click Detect Displays to sync your Mac and the television, monitor, or projector.
⇒System Preferences⇒Displays and click Detect Displays to sync your Mac and the television, monitor, or projector.
Customizing DVD Player
Normally, you can pop a DVD into your Mac and watch it play right away. However, you may want to take some time to customize DVD Player to change how it plays.
Parental Controls
If you don’t want your children watching certain DVDs, you can turn on DVD Player’s Parental Controls. These controls are designed either to block certain types of DVDs from playing or to prevent certain objectionable scenes from appearing, while allowing the rest of the movie to be seen.
 Because of the extra expense involved in adding Parental Control features to a DVD, many DVDs don’t support these controls. If you turn on Parental Controls, it’s entirely possible to watch an inappropriate DVD on your Mac if the DVD isn’t programmed to implement such control features.
To turn on (or off) Parental Controls, follow these steps:
1. Choose Features⇒Enable Parental Control.
A dialog appears, asking for your password.
2. Type your password and then click OK.
3. To see whether Parental Controls are enabled and set preferences, choose File⇒Get Disc Info⇒Parental Control.
The Parental Control pane appears, as shown in Figure 2-13.
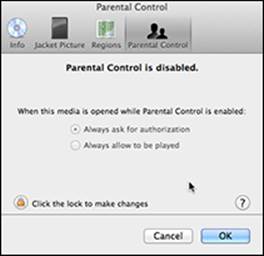
Figure 2-13: Choose which DVDs your children can watch.
4. If the DVD has Parental Controls enabled, the first time a DVD is inserted, you have to authorize it with the administrator password in order to play the DVD.
In the confirmation dialog that appears, as shown in Figure 2-14, click the Play Once button if you want to require the administrator name and password each time the DVD is inserted, or click the Always Allow button to play the DVD whenever it’s inserted.
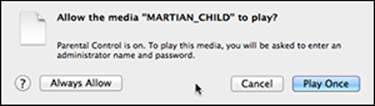
Figure 2-14: Adjust Pareental Controls.
If you want to change the authorization, when the DVD is playing, choose File⇒Get Disc Info and click Parental Control. Select Always Ask for Authorization if you want to require the administrator name and password to play the DVD or Always Allow to Be Played to let the DVD be played without being authorized again. You can also choose Features⇒Deauthorize Media. Enter the administrator name and password to immediately stop playback and eject the DVD.
To disable parental controls, choose Features⇒Disable Parental Controls.
Defining DVD Player preferences
Several things happen behind the scenes of the DVD Player app when you insert a DVD into your optical disc drive. You can select some options so DVD Player performs to your liking. Choose DVD Player⇒Preferences to open the window shown in Figure 2-15. Click through each tab at the top to do the following, and then click OK when you finish making adjustments:
· Player: Defines how DVD Player behaves when running, such as whether to start in full-screen mode and begin playing a disc as soon as it’s inserted in the drive. If you watch videos when your Mac isn’t connected to a power source, select the Put the DVD Drive to Sleep check box next to When Playing Using Battery.
· Disc Setup: Allows you to change the language used to display audio, subtitles, and DVD menus. If you connect external speakers to your Mac, select the preferred Audio Output here.
· Windows: Choose options for what you see onscreen.
· Previously Viewed: Defines how to handle a DVD that was ejected and inserted back into your Mac. For example, this option specifies whether to start playing the DVD at the beginning or at the last scene viewed before you ejected the DVD. You can also instruct the app to use the disc settings for the audio equalizer, video color, and video zoom.
· High Definition: Defines how to play high-definition DVDs.

Figure 2-15: Player preferences let you customize different features of DVD Player.
If you aren’t sure which DVD Player features your Mac supports, choose Help⇒Show Supported Features. A list appears on the screen; click the list to close it.
All materials on the site are licensed Creative Commons Attribution-Sharealike 3.0 Unported CC BY-SA 3.0 & GNU Free Documentation License (GFDL)
If you are the copyright holder of any material contained on our site and intend to remove it, please contact our site administrator for approval.
© 2016-2026 All site design rights belong to S.Y.A.