Macs All-in-One For Dummies, 4th Edition (2014)
Book I. Getting Started with Mac Basics
 Visit www.dummies.com for more great Dummies content online.
Contents at a Glance
Chapter 1: Starting to Use Your Mac
Chapter 2: Getting Acquainted with the Mac User Interface
Chapter 3: Making Your First Connections
Chapter 4: Working with Files and Folders
Chapter 5: Managing Apps on the Dock, Launchpad, and Desktop
Chapter 6: Changing How Your Mac Looks, Sounds, and Feels
Chapter 1. Starting to Use Your Mac
In This Chapter
![]() Identifying your Mac model
Identifying your Mac model
![]() Powering on
Powering on
![]() Conserving time and energy with Sleep mode
Conserving time and energy with Sleep mode
![]() Shutting down and restarting
Shutting down and restarting
![]() Getting to know your Mac
Getting to know your Mac
Apple offers several different kinds of Macs, and understanding how your Mac is different from the others can help you navigate this book more quickly, gathering the information you need and skipping the rest. Before you can use your Mac, you have to start it up — which makes perfect sense — so we tell you how to do that. Now, get ready for the counterintuitive part. After you have your Mac up and running, you can just leave it on.
In this chapter, we cover current Mac models and how they're different and alike, show you how to start and restart your Mac (and give you an idea of what goes on behind the scenes), and then tell you how to put it to sleep and shut it down completely. Sprinkled throughout this chapter is technical information about the various Mac models and what goes on inside that makes your Mac tick, but we make our explanations as clear and simple as possible. At the end of the chapter, we introduce you to Mac processors and show you how to find out precisely which features your Mac has.
Examining Different Macintosh Models
Apple’s Macintosh computer — Mac for short — enjoys the reputation of being the easiest computer to use in the world. Macs are so dependable, durable, and beautifully designed that they incite techno-lust in gadget geeks like us and ordinary Joes alike. For those doubly good reasons, you probably won’t buy a new Mac to replace your old one because you have to, but because you want to.
The Macintosh has been around since 1984, and since that time, Apple has produced a wide variety of Mac models. Although you can still find and use older Macs (although many are not compatible with the latest and greatest OS or applications), chances are good that if you buy a newer Mac, it will fall into one of three categories:
· Desktop: Mac mini or Mac Pro, which require a separate display (monitor), keyboard, and mouse or trackpad.
· All-in-one desktop: iMac, which houses the display and computer in one unit and requires a keyboard and mouse or trackpad.
· Notebook: MacBook Air or MacBook Pro, which have built-in keyboards, trackpads that work like a mouse at the touch of your fingertip, and bright displays. A clamshell design lets you close and tote them in your backpack, messenger bag, or briefcase.
All the newest Mac models have USB and Thunderbolt ports to connect peripheral hardware, such as external drives and displays. They are also engineered for Wi-Fi and Bluetooth connections, which are used for data transfer and peripheral connectivity. Because most data transfer and storage happens online or with flash drives, optical disc (CD and DVD) drives have become almost obsolete and have been removed from all but one of the Mac models sold today, although optional external DVD drives are available if you still use CDs, DVDs, or software apps on discs. You can also connect to another (ahem) older computer on a network and access its optical disc drive.
 The Thunderbolt port, standard on all newer Macs, is a data-transfer protocol used to connect peripheral devices, such as displays or hard drives. Thunderbolt transfers data faster than either USB or FireWire protocols.
Mac mini, Mac Pro, and iMac models use an external wireless or wired (usually USB) keyboard and a mouse or trackpad (sold separately from the mini and Pro). Apple’s Magic Trackpad lets you use the multitouch gestures — such as swipe, pinch, and flick — to control the cursor and windows on whichever Mac desktop model you choose. If you use a trackpad, you don’t need a mouse, but you can use both if you prefer.
By understanding the particular type of Mac that you have and its capabilities, you’ll have a better idea of what your Mac can do. We highlight those capabilities in the sections that follow. No matter what the capabilities of your Mac are, chances are good that it will work reliably for as long as you own it.
The Mac mini and Mac Pro
The biggest advantages desktop Macs (the Mac mini and the Mac Pro) offer are that you can choose the type of display to use and place it anywhere you want on your desk — as long as you have a cable that can reach. The Mac mini, however, is small enough to hide under your desk, or situate in a corner of your desktop.
The Mac mini is a lower-priced version designed for people who want an inexpensive Mac for ordinary uses, such as word processing and writing, sending e-mail, browsing the web, and playing video games. At the same time, it packs a fast Intel Core i5 or i7 processor, between 500 gigabytes (GB) and 1 terabyte (TB) of storage, and an assortment of the latest ports and slots for audio, video, and USB connections — nothing to sneeze at. Alternatively, it can function as a terrific, cost-effective server for home or small business networks.
The Mac Pro was completely remodeled and released in December 2013. This higher-priced professional version Mac boasts ports to connect multiple monitors and lots of expandability for up to 64GB of memory and up to 1TB of flash storage, as well as greater graphics and processing capabilities with the latest Intel Xeon processor and dual graphics processors.
The iMac
The all-in-one design of the iMac is an evolutionary result of the original — 1984-era — Mac design. The iMac combines the computer with a built-in LED-backlit display, speakers, and FaceTime camera. You can configure up to 3TB of storage or choose flash storage instead of a hard drive, depending on your need for speed or space. On iMac models, you can connect external speakers and a second external display.
The advantage of the iMac's all-in-one design is that you have everything you need in a single unit. The disadvantage is that if one part of your iMac fails (such as the display or speaker), you can’t easily replace the failed part, although our experience has been that Apple responds quickly and professionally to problems with their products.
The MacBook Air and MacBook Pro
MacBook Air and MacBook Pro are the notebook members of the Mac family. All the MacBook models run on rechargeable battery packs or external power. If you need to take your Mac everywhere you go, you can choose from the ultralight MacBook Air or one of the MacBook Pro models.
Although both MacBook Air and MacBook Pro models have full-size keyboards, neither includes the extra numeric keypad found on most external keyboards (but not on Apple’s standard wireless keyboard) or on larger Windows notebooks. Also, instead of a mouse, MacBooks use a built-in trackpad, which responds to all the multitouch gestures you can use to control the cursor and windows on your Mac.
 If you find the keyboard or trackpad of your notebook Mac too clumsy to use, you can always plug an external keyboard and mouse into your notebook.
The MacBook Air comes with an 11-inch or 13-inch LED-backlit screen, and the MacBook Pro models come in two screen sizes: 13-inch or 15-inch. The 13-inch LED-backlit MacBook Pro model comes with an internal optical disc (DVD) drive and an Ethernet port. The 13-inch and 15-inch LED-backlit Retina models don’t have an internal optical drive or an Ethernet port although they do have an HDMI port.
Apple’s Retina display uses an LCD (liquid crystal display) with a pixel density of about 220 pixels per inch (PPI). At this density, the human eye doesn’t distinguish the individual pixels at a normal distance. Different screen sizes have different PPIs. For example, the iPhone 4 and later models have 326 PPI. Except for the LED MacBook Pro model (the one that still has a DVD drive), all MacBook Pros have the Retina display, as do some iPad, iPod, and iPhone models. The MacBook Air and other desktop models sport an LED-backlit screen.
Starting Your Mac
Here’s the simple way to start your Mac — the way you’ll probably use 99 percent of the time: Press the Power button.
Depending on the type of Mac you have, the Power button might be in back (Mac mini and iMacs), front (Mac Pro), or above the keyboard (on notebook models MacBook Air and MacBook Pro). Some Apple displays have a Power button that commands the computer it’s connected to.
A few seconds after you press the Power button, your Mac chimes to let you know that it’s starting. (Techie types say booting up, a term derived from the phrase “to lift yourself up by the bootstraps.”)
The moment electricity courses through, your Mac’s electronic brain immediately looks for instructions embedded inside a special read-only memory (or ROM) chip. While your computer is reading these instructions (also known as firmware), it displays the Apple logo on the screen to let you know that the computer is working and hasn’t forgotten about you.
The firmware instructions tell the computer to make sure that all of its components are working; most often, they are. However, if some part of your computer (say, a memory chip) is defective, your computer will stop at this point.
 Unless you know something about repairing the physical parts of a Mac, this is the time to haul your Mac to the nearest Apple Store or authorized repair shop, or to call Apple Support to arrange shipping your bummed-out Mac directly to Apple for repair (800-275-2273 in the United States).
 Sometimes a Mac might refuse to start correctly because of software problems. To fix software problems, check out Book III, Chapter 6, which explains how to perform basic troubleshooting on a Mac.
After your computer determines that all components are working, the last set of instructions on the chip tells the computer, “Now that you know all your parts are working, load an operating system.”
When you unpack your Mac and turn it on for the very first time, it asks you to type your name and make up a password to create an account for using your Mac. You use this name and password in the following situations:
· When you wake or restart your Mac, if you activate those types of privacy settings (see Book III, Chapter 2).
· When you install new apps or update the system software.
· When you change some settings in System Preferences.
· When you switch from one user to another, if you set up your Mac to work with multiple users (see Book III, Chapter 2).
This username and password is different than your Apple ID, which you use for iCloud and making iTunes, App, and iBooks Store purchases. You can learn about creating an Apple ID in Book I, Chapter 3.
To guide you through the process of setting up a Mac for the first time, a special application called Setup Assistant runs, which asks for your time zone, the date, and whether you want to transfer files and applications from another Mac to your newer one.
Normally, you need to run through this initial procedure only once, but you also have to perform it if you reinstall your operating system, which we refer to as OS throughout this book. We explain reinstalling the OS in Book III, Chapter 6. The most important part of this initial procedure is remembering the password you choose because you’ll need it to log in to your account, change some of the settings in System Preferences, or install new software.
An operating system is the program that controls your computer and is almost always stored on your computer’s built-in hard drive (rather than on an external drive). On the Mac, the operating system is named Mac OS X (pronounced as Mac O S ten) and is followed by a version number, such as 10.9.
 Apple code-names each version of OS X. The current version is OS X Mavericks, version 10.9, which is the first of a new nomenclature that uses the name of surfing destinations in California. Before Mavericks, each operating system was named after a big cat, such as Mountain Lion, Snow Leopard, and Jaguar.
After the operating system loads and you log in, you can start using your computer to run other applications to do things: design a poster or send an e-mail, browse the web, calculate your yearly budget, or play a game — you know, all the cool things you bought your Mac for in the first place.
Turning Your Mac Off
You can choose one of three different ways — Sleep, Shut Down, or Restart — to turn your Mac off (or let it rest a bit). In this section, we explain when and why you would want to use each option and, of course, how.
Putting a Mac in Sleep mode
If you’re taking a short break from working on your Mac, you don’t have to always turn it off and back on again when you want to use it. To do the “green” thing by conserving energy, put your Mac into Sleep mode instead of leaving it running while you're away. When you put your Mac to sleep, it shuts down almost every power-draining component of your Mac and draws only a teensy trickle of power. The great part, though, is that you can instantly wake it up with a touch of the keyboard, click of the mouse, or opening the lid if you use a MacBook Pro or MacBook Air. Presto change-o! Your Mac immediately returns to the same state you left it in, without making you wait to power on as if it were completely shut down.
To put your Mac to sleep, you can go manual or automatic.
· Manual: If someone walks into your office and you want to hide that secret project you’re working on, you might want to put your Mac to sleep manually.
· Automatic: So you don’t have to remember to put your Mac to sleep when you stop using it (to take a phone call or go out to lunch) you can adjust your Mac's settings so that it automatically falls asleep after a certain amount of time.
 If your Mac is doing a task, such as sending an e-mail or downloading a file, let it finish the task before putting it to sleep.
To put your Mac to sleep manually, choose one of the following actions:
· Choose ![]() ⇒Sleep. The
⇒Sleep. The ![]() menu is in the upper left of the screen.
menu is in the upper left of the screen.
· Press the Power button or press Control+Eject. (If you're having trouble finding your way around the keyboard, see Book I, Chapter 2.) Then, when a dialog appears, as shown in Figure 1-1, click the Sleep button (or press the S key on your Mac’s keyboard).
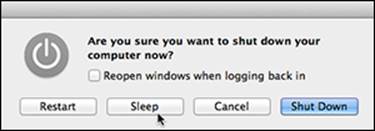
Figure 1-1: Put your computer in Sleep mode.
· Press ![]() +Option+Eject. If you have a MacBook Air or Retina MacBook Pro, your Mac doesn’t have an Eject key because it doesn’t have a disc drive.
+Option+Eject. If you have a MacBook Air or Retina MacBook Pro, your Mac doesn’t have an Eject key because it doesn’t have a disc drive.
· If you have a MacBook, just close its lid. When a MacBook is sleeping, you can safely move it without worrying about jarring the built-in hard drive that spins most of the time your MacBook is “awake” and in use.
To put your Mac to sleep automatically, you set the amount of time your Mac sits idle before it goes to sleep. Which Sleep mode options you see depend on what type of Mac you're using.
· Desktops: On desktop Macs, you can adjust when your Mac puts the display to sleep and when it puts the computer to sleep.
· Notebooks: Your Mac knows whether it's using battery power or the power adapter, and you can adjust when the display and computer sleep in both instances.
Follow these steps to adjust how your computer sleeps automatically:
1. Choose ![]() ⇒System Preferences, and then click the Energy Saver icon.
⇒System Preferences, and then click the Energy Saver icon.
The Energy Saver window appears, as shown in Figure 1-2. If you have an iMac, a Mac mini, or a Mac Pro, you won’t see the Battery and Power Adapter tabs, which appear on MacBook models.
If you're using a notebook, notice which tab (Battery or Power Adapter) you're on before you proceed with the next steps. When powered by the battery, you may want your Mac to go to sleep after a short time (say, 5 minutes) to make the battery charge last longer. Then when your Mac is connected to a power source, you could set it longer: say, after 15 minutes.
2. Drag the Computer Sleep timer to the amount of time you want your Mac to sit idle before it goes to sleep.
The exact time is shown above the timescale (on the right) as you move the slider.
 This setting puts the hard drive to sleep. You may want to set a longer time interval for Computer Sleep than for Display Sleep (the following step) because it takes your Mac slightly longer to wake from Computer Sleep than Display Sleep.
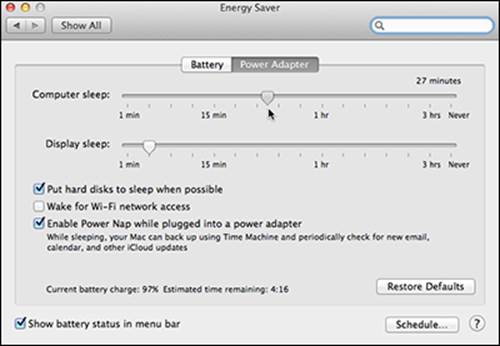
Figure 1-2: Use the Energy Saver System Preferences to put your Mac on a sleep schedule.
3. Drag the Display Sleep timer to the amount of time you want your Mac to sit idle before the screen saver plays.
This setting puts the display to sleep. A screen saver is an image that appears when your Mac is inactive after the time interval you set here. It hides whatever you were working on from peering eyes when you’re away from your Mac. You can find out how to choose a special image for your screen saver and set a password for it in Book I, Chapter 6.
If your computer is doing a task, such as downloading a sizeable file, set Computer Sleep to Never and set only Display Sleep with a time interval. This way, your Mac continues to do the task at hand even though the display is sleeping.
4. (For MacBook models) Select the Show Battery Status in Menu Bar check box (in the bottom-left corner).
This displays an icon at the top of your Mac’s screen indicating how much charge is left on your battery.
5. (Optional) Select the check boxes next to the other options to set when your Mac goes to sleep or wakes.
For instance, if you access your Mac remotely, you want to select the Wake for Wi-Fi Network Access check box so your Mac will wake when you attempt to retrieve files and data from your Mac.
Select Enable Power Nap so your Mac continues to perform some functions while it’s sleeping. When Power Nap is on, your Mac receives incoming e-mail, automatically updates any apps you share with other devices such as Contacts, Calendar, and Notes, and performs Time Machine backups.
MacBooks have two Power Nap settings: one for Battery and one for Power Adapter. By default Power Nap is on when your Mac is connected to a power source but off when running on the battery. To change either, click the Battery or Power Adapter tab and select, or deselect, the Power Nap checkbox. When you use Power Nap in Battery mode, the activities are limited to receiving e-mail and updating shared data.
To see if your Mac model supports Power Nap, visit http://support.apple.com and search about power nap.
6. (Optional) Click the Schedule button and adjust those settings as desired.
A pane opens that lets you schedule the days and times you want your Mac to start or wake up and go to sleep. This is convenient if you don’t want to accidently leave your Mac on when you leave your home or office or you do want to find it awake and waiting for you when you arrive.
7. Save your setting by choosing System Preferences⇒Quit System Preferences or clicking the Close (red) button in the upper-left corner.
To wake a sleeping desktop or all-in-one Mac or a MacBook with the lid open, click the mouse button or tap any key. To keep from accidentally typing any characters into a currently running application, press a noncharacter key, such as Shift or an arrow key. To wake your closed and sleeping MacBook, just open its lid.
Depending on which Mac model you own, you may notice a built-in combination power/sleep indicator light that softly pulses like a firefly when your Mac is in Sleep mode. On the MacBook Pro, the power/sleep indicator light is on the front edge below the right wrist rest. On the Mac mini, the indicator light is in the lower-right corner. No such light is anywhere on the iMac or the latest MacBook Air, which appear to be totally in the dark when they’re asleep.
Shutting down your Mac
When you shut down your Mac, open applications are automatically closed, Internet and network connections are disconnected, and logged-in users are logged out. It may take a few minutes for your Mac to shut down. You know your Mac is shut down completely when the screen is black, the hard drive and fan are silent, and there are no blinking lights anywhere. Here are a few circumstances when you’d want to shut down your Mac:
· Taking an extended break: When you won’t be using it for an extended length of time. Turning your Mac completely off can extend its useful life, waste less energy, and save you a few bucks on your yearly energy expense.
· Traveling: When you’re traveling with your Mac and putting your MacBook Air, MacBook Pro, or Mac mini in your wheeled carry-on trolley. (Sleep mode is fine if you’re carrying your Mac in a laptop bag or backpack.)
· Repairing hardware: If you want to open your Mac to install a new battery, additional memory, or a video graphics card.
· Rebooting: To resolve weird situations, such as unresponsive or slow-running applications, because your Mac runs a number of behind-the-scenes file system housekeeping chores every time you start it. (See the next section for instructions.)
Here are the ways to shut down your Mac:
· Choose ![]() ⇒Shut Down. A confirmation dialog appears (as shown in Figure 1-3) asking whether you’re sure you want to shut down.
⇒Shut Down. A confirmation dialog appears (as shown in Figure 1-3) asking whether you’re sure you want to shut down.
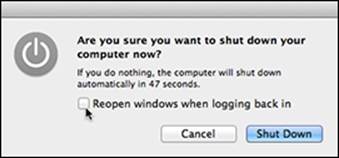
Figure 1-3: Use the menu to turn off your computer.
Select the Reopen Windows When Logging Back In check box if you want everything you’re working on to open when you turn your Mac on the next time.
Click the Shut Down button (or Cancel if you change your mind). If you don’t click either option, your Mac will shut down automatically after 1 minute.
· Press Control+Eject or press and hold the Power button. When a dialog appears (refer to Figure 1-3), click the Shut Down button or press the Return key.
Make sure that your MacBook Air or MacBook Pro is completely shut down before closing the lid, or it may not shut down properly. Even more problematic, it may not start up properly when you next try to turn it on.
To shut down without seeing those bothersome dialogs, do this: Hold the Option key and then choose ![]() ⇒Shut Down. This bypasses the confirmation prompt asking whether you’re sure that you want to shut down.
⇒Shut Down. This bypasses the confirmation prompt asking whether you’re sure that you want to shut down.
You have one more option for shutting down your Mac, but proceed with caution.
Press and hold ![]() +Control and then press the Power button to perform a force shutdown, which forces all running applications to shut down right away. However, this route should never be your first choice when shutting down. Use a force shutdown as your last resort only if your Mac — your Mac, not just a stubborn application —is unresponsive and appears to have frozen. If a single application is freezing or acting flaky, force-quit (close) that single application instead of shutting down your entire computer. (See Book III, Chapter 6 for information about how to force-quit a single application.) Performing a force shutdown can cause you to lose any changes you’ve made since the last time you saved them, so use force shutdown only as a last resort.
+Control and then press the Power button to perform a force shutdown, which forces all running applications to shut down right away. However, this route should never be your first choice when shutting down. Use a force shutdown as your last resort only if your Mac — your Mac, not just a stubborn application —is unresponsive and appears to have frozen. If a single application is freezing or acting flaky, force-quit (close) that single application instead of shutting down your entire computer. (See Book III, Chapter 6 for information about how to force-quit a single application.) Performing a force shutdown can cause you to lose any changes you’ve made since the last time you saved them, so use force shutdown only as a last resort.
Restarting a Mac
Sometimes your Mac can act sluggish, or applications might fail to run. If that happens, you can shut down and immediately restart your Mac, which essentially clears your computer’s memory and starts it fresh.
To restart your computer, you have three choices:
· Press the Power button or press Control+Eject. Then, when a dialog appears, click the Restart button (refer to Figure 1-1) or press the R key.
· Choose ![]() ⇒Restart.
⇒Restart.
· Press Control+![]() +Eject.
+Eject.
When you restart your computer, your Mac closes all running applications; you will have the chance, though, to save any files you’re working on. After you choose to save any files, those applications are closed, and then your Mac will shut down and boot up again.
Understanding Mac Processors
The processor acts as the brain of your Mac. A computer is only as powerful as the processor inside. Generally, the newer your computer, the newer its processor and the faster it will run.
 The type of processor in your Mac can determine the applications (also known as apps or software) your Mac can run. Before you buy any software, make sure that it can run on your computer.
To identify the type of processor used in your Mac, click the Apple menu in the upper-left corner of the screen and choose About This Mac. An About This Mac window appears, listing your processor as Intel Core 2 Duo, Core i3, Core i5, Core i7, or Xeon.
If your Mac doesn’t have one of the previously mentioned processors, you won’t be able to run Mac OS X Mavericks, version 10.9. This means that Core Solo and Core Duo models can’t run Mavericks. What’s more, to use Mavericks, you also need at least 2GB RAM (random access memory).
The Intel family of processors includes (from slowest to fastest) the Core Solo, Core Duo, Core 2 Duo, dual-core i3, dual-core i5, quad-core i7, and quad- and six-core Xeon. Every processor runs at a specific speed, so for example a 2.0 gigahertz (GHz) Core 2 Duo processor is slower than a 2.4 GHz Core 2 Duo processor. If understanding processor types and gigahertz confuses you, just remember that the most expensive computer within a product line is usually the fastest.
Talk to your friendly, neighborhood Apple reseller when deciding which Mac model is best for you. The tasks you plan to do with your Mac determine the processor speed that will meet your needs. For example, if you plan to mostly write books, surf the Internet, and use productivity apps like Calendar and Contacts, a low-end processor is probably sufficient. If, instead, you’re a video editor or game developer, you want the fastest processor you can afford.
In the About This Mac window, move the cursor over the More Info button and click to open the System Information utility and see an expanded window of information about your Mac, as shown in Figure 1-4.
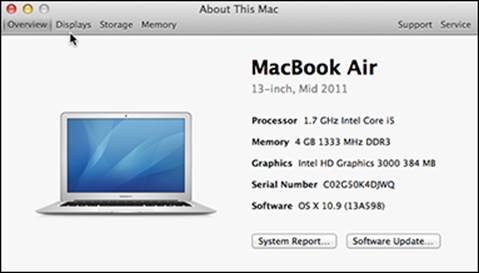
Figure 1-4: The About This Mac window identifies the processor used in your Mac.
Click each tab at the top of the window to open panes that show more information about your Mac: Overview, Displays, Storage (shown in Figure 1-5), and Memory. Click Support (top right) for links to the Help Center and user manuals. Click Service (also top right) to access links to information about your Mac’s warranty and AppleCare Protection.
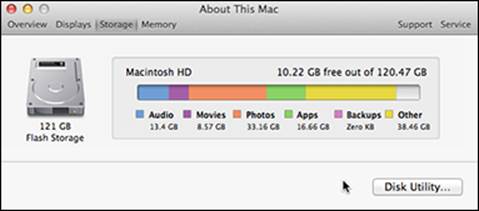
Figure 1-5: About This Mac panes tell you how your Mac’s storage is used.
What Macs and PCs share
In Spring 2006, Macs started shipping with Intel processors, which are the same type of processors used in many Windows PCs. Intel processors are less expensive than earlier Macs’ PowerPC processors and more powerful. Intel processors also give the Mac the capability to run the Microsoft Windows operating system (although dyed-in-the-wool Mac loyalists would wryly consider that a drawback — if not outright blasphemy!).
Exploring Your Mac’s Inner Workings
By looking at your Mac, you can tell whether it’s an all-in-one design (iMac), a notebook (MacBook Air or MacBook Pro), or a desktop unit that lacks a built-in screen (Mac mini or Mac Pro). However, looking at the outside of your Mac can’t tell you the parts used on the inside or the details regarding what your Mac is capable of. You might need to look at the hardware information in the System Report window when you want to know about the health of your MacBook’s battery or the type of graphics card in your Mac Pro. To identify the parts and capabilities of your Mac, follow these steps:
1. Click the Apple menu (![]() ) in the upper-left corner of the screen and then choose About This Mac.
) in the upper-left corner of the screen and then choose About This Mac.
An About This Mac window appears.
2. Click More Info, and then click System Report.
3. In the System Report window that opens, click the disclosure triangle to the left of the Hardware option in the category pane on the left (as shown in Figure 1-6) to view a list of hardware items.
If the list of hardware items (such as Bluetooth, Memory, and USB) already appears under the Hardware category, skip this step.
 Clicking a disclosure triangle toggles to open or close a list of options.
You can also click the disclosure triangle next to Network or Software in the category pane on the left to see information about networks you’re connected to or software installed on your Mac. (You can learn more about networking your Mac in Book III, Chapter 3; we tell you how to install software in Book I, Chapter 5; and we cover uninstalling software in Book I, Chapter 5.)
4. Click a hardware item, such as Audio, Memory, or Disc Burning.
The right pane of the System Report window displays the capabilities of your chosen hardware, as shown in the figure.
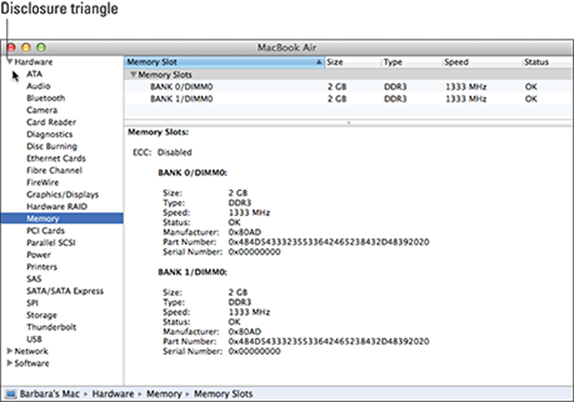
Figure 1-6: The System Report identifies the type and capabilities of the hardware in your Mac.
 Don’t worry if the information displayed in the System Report window doesn’t make much sense to you right now. The main idea here is to figure out a quick way to find out about the capabilities of your Mac, which can be especially helpful if you have a problem in the future and a technician asks for information about your Mac.
If you really want to know, pick through the technical details to find the parts that you understand, and do some research for more info on the items you don't understand. I cover many of these items throughout the book, so use its table of contents and index to guide you. If you don’t find it here, search the Internet to look up the details that you don’t understand.
5. When you finish scouting the contents of the System Report window, you can simply close it (click the red circle in the upper-left corner) to return to About This Mac.
To close both System Report and About This Mac, choose System Information⇒Quit System Information.
All materials on the site are licensed Creative Commons Attribution-Sharealike 3.0 Unported CC BY-SA 3.0 & GNU Free Documentation License (GFDL)
If you are the copyright holder of any material contained on our site and intend to remove it, please contact our site administrator for approval.
© 2016-2026 All site design rights belong to S.Y.A.