Macs All-in-One For Dummies, 4th Edition (2014)
Book IV. Your Mac as Multimedia Entertainment Center
Chapter 3. Importing, Viewing, Organizing, and Sharing Photos
In This Chapter
![]() Seeing how digital photography works
Seeing how digital photography works
![]() Getting your digital images onto your Mac
Getting your digital images onto your Mac
![]() Capturing digital images without a digital camera
Capturing digital images without a digital camera
![]() Using iPhoto to organize your digital images
Using iPhoto to organize your digital images
![]() Making your photos look better
Making your photos look better
![]() Sharing photos with your family and friends
Sharing photos with your family and friends
More people are taking photos than ever before with digital cameras and mobile phones, and then using websites like Facebook, Instagram, and Flickr to share every moment and morsel. Of course, before you share your immortalized antics, you may want to edit the evidence with an image-editing app to make the subject or scene look better than it did in real life.
You can use iPhoto, which is part of the iLife suite, not only for image editing but also for managing (an important part of digital photography because it’s so easy to accumulate hundreds, if not thousands, of photos in a short time) and sharing your photos. From start to finish, iPhoto can take care of organizing your photos so you can focus on taking even more photos. We explain all these tasks in this chapter, but first, we provide a brief introduction — or refresher — on digital photography.
Understanding Digital Photography
Instead of using film, digital photography captures images as a collection of tiny dots called pixels. A single photo can comprise millions of pixels. To help you understand the capabilities of different digital cameras and mobile phones with built-in digital cameras, manufacturers identify the gadgets by how many millions of pixels they can capture in each photo. This total number of pixels —the resolution — ranges from as little as less than 1 megapixel (MP; a megapixel equals one million pixels) to 16MP or more. Figure 3-1 shows how pixels create an image.
Figure 3-1: Every digital image consists of hundreds, thousands, or millions of pixels.
 When digital cameras were first introduced, the thought was, the greater the number of pixels used to create a photo, the sharper the overall image. In some cases, though, too many megapixels captured with a crummy lens can result in fuzzy images. What’s more, those high-megapixel photos take up a lot of memory and storage space, which means sharing them electronically takes more Internet bandwidth and/or time. The truth is that lens quality, manageability, and flash and zoom features also affect image quality. And, image preference is subjective. After all, the photos you love from your honeymoon in the Himalayas may be considered poor by a National Geographic photographer.
Flash memory cards
Every time you snap a digital photo, your camera or mobile phone needs to save that photo somewhere. Some digital cameras and many mobile phones and tablets (such as the iPhone and iPad) come with built-in memory, which can store any digital images that you capture. However, to store large numbers of photos, most digital cameras and some mobile phones can also store photos on removable storage devices called flash memory cards.
In no particular order, here are a few things to keep in mind about flash memory cards:
· Reuse: Flash memory cards can be erased and reused. You can take as many photos as the flash memory card can hold, copy your photos to your Mac’s hard drive or a remote storage site, and then erase the photos from the flash memory card so you can use it again.
· Resolution versus storage: The number of photos you can store on flash memory cards depends on the resolution of the photos you take. If you capture photos at a high resolution, you can store far fewer photos than if you capture those same photos at a lower resolution.
· Storage and speed measurement: Flash memory cards are often measured in terms of their storage size and speed. The amount of storage a flash memory card can hold is measured in megabytes (MB) and, most frequently today, gigabytes (GB), such as 512MB or 2GB. The greater the storage capability of a flash memory card, the higher the cost.
The speed of flash memory cards is often described as minimum read and write speeds, measured in megabytes per second (MB/sec) such as 10MB/sec. The higher the write speed of a flash memory card, the faster you can capture and store photos. Sometimes the speed of a flash memory card may also be described as a number — 60x, for example — which tells you the flash memory card is 60 times faster than the original flash memory cards.
·  Image recovery: If you ever accidentally erase a photo from a flash memory card, don’t panic (and don’t store any more photos on that flash memory card). If you buy a special file-recovery application, such as MediaRECOVER (http://freshcrop.com) or PhotoRecoveryPro (www.photorecoverypro.net), you can often retrieve deleted photos from any type of flash memory card. However, if you delete a photo and then store more photos on the flash memory card, the new photos will likely wipe out any traces of your deleted photos, making it impossible to retrieve the deleted photos ever again.
Many different types of flash memory cards exist because each design is meant to set the “standard” for flash memory cards. Unfortunately, every flash memory card has its limitations, so companies keep coming up with newer designs to overcome these limitations. Because so many “standards” exist, the result is that there is no standard. The following are the most popular flash memory cards:
· CompactFlash Type I (CFI) and CompactFlash Type II (CFII): Introduced in 1994, CompactFlash cards were one of the first flash memory cards available and one of the largest. CompactFlash cards are available with up to 256GB of storage. There are two types of CompactFlash cards: Type I (3.3 mm thick), or CFI; and Type II (5.0 mm thick), or CFII.
Because of the thickness differences, make sure that you use the right CompactFlash cards for your digital camera and card reader. A digital camera and card reader that can use a CFII card can also use a CFI card, but the reverse isn’t true.
· Secure Digital (SD) and Plus Secure Digital (Plus SD): SD cards are much smaller than CompactFlash cards and offer built-in encryption to prevent storing copyright-infringing materials, such as illegal songs, although this encryption feature is rarely used. Because of their small size, SD cards are slowly evolving into the standard for digital photography. Even smaller versions of SD cards include Mini and Micro SD cards, which are often the type of flash memory card used in mobile phones. Some formats of SD cards reach 2 terabytes of storage.
· Memory Stick (MS), Memory Stick Pro (MS Pro), Memory Stick Duo (MS Duo), Memory Stick Pro Duo (MS Pro Duo), and Memory Stick Micro (MS Micro): The Memory Stick format was developed by Sony, and, as of this writing, only Sony devices (digital cameras, video camcorders, and PlayStations) use Memory Sticks for storing digital images. The original Memory Stick stores up to 32GB of data, whereas the Memory Stick Pro purportedly can hold up to 2TB (that’s terabytes, as in “thousand gigabytes”) of data. The Memory Stick Duo and Memory Stick Pro Duo look like an original Memory Stick cut in half. Sony also makes the Memory Stick Micro, which holds up to 16GB.
Despite Sony’s backing, the Memory Stick format has never gained popularity with other manufacturers. If you buy a Sony camera, you’ll probably be stuck with using Memory Sticks although some of the latest Sony cameras now use SD cards instead.
· xD-Picture Cards (xD): Olympus and Fuji invented the xD-Picture Cards to provide yet another standard. Fewer cameras use them — with the exception, of course, of Olympus cameras and some Fuji cameras. An xD-Picture Card is often more expensive than other flash memory cards and has a 2GB storage limit, making them it attractive.
Digital image file formats
When you take photos, your digital camera stores those photos in a specific graphics file format. The four most common file formats for storing digital photographs are
· JPEG (Joint Photographic Experts Group): JPEG is the most common file format because it is recognized by most computers and offers the ability to compress images to shrink the overall file size. (Compressing a JPEG file means decreasing the number of colors used in an image, which shrinks the file size but lowers the visual quality.)
· PNG (Portable Network Graphics): PNG images are used primarily for the Internet, not for print. Because PNG uses lossless compression and supports transparent pixels, images are sharper than JPEG. However, the files are larger.
· TIFF (Tagged Image File Format): If photo quality is more important than file size, save your photos as TIFF files. You can still compress TIFF files slightly, and TIFF files retain all colors unless you use JPEG compression. As a result, a compressed TIFF file is usually larger than an equivalent compressed JPEG file.
· Raw (which doesn’t stand for anything!): Raw files offer greater visual quality, but there is no single Raw file format standard. As a result, every digital camera manufacturer offers its own Raw file format.
The biggest advantage is that Raw files allow for greater manipulation. As a result, professional photographers often use Raw files for greater control over manipulating their images. The biggest disadvantage is that Raw images take up a large amount of storage space, which means that you can’t store as many images as photos captured in other formats.
Ultimately, there is no single “best” file format. If a digital camera lets you save images in different file formats, experiment to see which one you like best. You may prefer one type of file format, such as JPEG, for ordinary use, or PNG for images you want to post on your website, but prefer Raw for capturing images in special situations that don’t require capturing images quickly, such as taking photos of a landscape.
Transferring Digital Images to the Mac
To transfer photos from a device — digital camera, mobile phone, or tablet — to your Mac, you have two choices:
· You can connect your device to your Mac by using a USB cable or wirelessly, if your device supports that option.
· You can pop the flash memory card out of your device and plug it into your Mac’s built-in SDxD card reader (if your Mac has one) or a third-party card reader that connects to your Mac’s USB port.
No matter which method you use, your Mac treats all the images stored on your device’s flash memory card as just another external drive from which you can copy photos to your Mac’s hard drive (such as into the Photos folder).
When you connect a device to your Mac, it can automatically load an app to retrieve those images. iPhoto and Image Capture, which both come preloaded on your Mac, can retrieve digital snapshots automatically.
If you organize photos in iPhoto, choose it as your default app to retrieve photos from a device. (You can specify another app as the external editor.) If you use a different app to organize your photos, such as Adobe Photoshop, you can make that app your default app. If you use more than one app to organize your photos, you can make Image Capture your default app and then use the Open With command to choose the app you want to use to edit your imported photos, deciding what to use on an image-by-image basis.
Defining a default app for retrieving photos
If you need to transfer digital images from a device to your Mac on a regular basis, you can define a default app to use for retrieving these images by following these steps:
1. Double-click the Image Capture icon in the Applications folder or from Launchpad.
The Image Capture window appears.
2. Connect your device to your Mac’s USB port with the appropriate cable.
Your connected camera, smartphone, or tablet will appear under the Devices group in the left pane, as shown in Figure 3-2.
 You can also define a default application by running iPhoto and choosing iPhoto⇒Preferences.
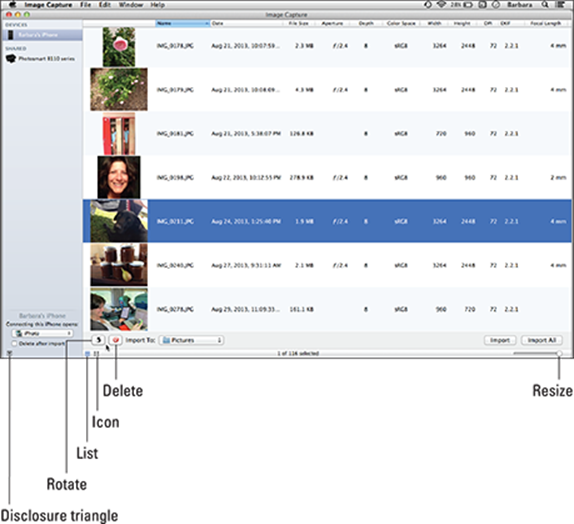
Figure 3-2: Your camera or smartphone appears in the left pane under the Devices group.
3. Click the Connecting This [your device name] Opens pop-up menu in the bottom-left corner and then choose iPhoto or Image Capture (refer to Figure 3-2). (Click the disclosure triangle in the bottom-left corner if you don’t see this pane.)
You can choose another application listed on the pop-up menu, or click Other to choose an application in your Mac’s Applications folder that isn’t listed in the pop-up menu so it can run automatically when you connect your camera to your Mac.
4. (Optional) Choose the following options:
· Delete after Import: Selecting this check box copies your photos from your connected device to your Mac’s hard drive, and then deletes the photos from your camera or smartphone, freeing memory on the device so you can take more photos.
· Import To: Open the pop-up menu to the right of Import To to choose where you want Image Capture to save your imported photos.
5. Choose File⇒Quit to exit the Image Capture application, or go to the next section to learn more about using Image Capture.
Retrieving photos using Image Capture
If you define Image Capture as the default application to run when you connect a digital camera to your Mac, follow these steps:
1. Connect your device to your Mac with the appropriate cable.
The Image Capture window appears, displaying your devices in the right pane (refer to Figure 3-2).
 You can also use the Image Capture application to capture and copy images from a scanner, which will appear under the Devices menu if it’s connected directly to your Mac or in the Shared menu (as in Figure 3-2), if it’s on the same network as your Mac.
2. (Optional) Before importing your photos, you can click the icons below the right pane of the Image Capture window (refer to Figure 3-2):
· Switch between List view (shows thumbnail images of your photos and information about each one) and Icon view (which shows a larger thumbnail image with just the file name).
· Rotate a selected photo.
· Delete a selected photo.
· Choose the location to which you want Image Capture to save your imported photos (open the Import To pop-up menu).
3. (Optional) Click and drag the resizing slider in the bottom-right corner of the Image Capture window left or right to increase or decrease the size of your photo icons.
4. Click a photo that you want to transfer and then click the Import button, or click the Import All button to retrieve all photos stored on your camera or smartphone.
To select multiple images, hold down the ![]() key and click each photo you want to import.
key and click each photo you want to import.
5. Image Capture marks each photo with a check mark after it copies that photo to the location selected in the pop-up menu to the left of the Import button (refer to Figure 3-2).
6. Choose Image Capture⇒Quit Image Capture.
If you didn’t select the Delete after Import check box, you have to erase the photos from your device or from the flash memory card after you import them to your Mac to open up space to store new snapshots.
Retrieving photos using iPhoto
iPhoto will import both photos and videos from your camera or phone to your Mac. If you want to use iPhoto as the default application to run when you connect a digital camera to your Mac, follow these steps:
1. Connect your device to your Mac with the appropriate cable (or plug your memory card into your memory card reader).
iPhoto launches automatically if you chose it as your default (as explained in the section “Defining a default app for retrieving photos”) and displays photos from your device in the right pane, as shown in Figure 3-3.
If you’re running iPhoto for the first time and didn’t choose a default application, two dialogs will appear, offering these options:
· Do you want to use iPhoto when you connect your digital camera?: Click Yes if you want iPhoto to open automatically whenever you plug in your digital camera or camera-enabled smartphone. Click No if you don’t want iPhoto to open automatically — or click Decide Later if you’d rather make this momentous decision another time.
· Look up Photo Locations: Click Yes if you want iPhoto to automatically add location information when it imports photos you snap with your GPS-capable camera or smartphone. Capturing the location is called geotagging and is much like the time-date stamp on traditional and digital photos.

Figure 3-3: iPhoto displays the photos stored on a camera, smartphone, or memory card plugged into your Mac.
2. (Optional) Before importing your photos, you can adjust or choose the following options in the upper area of the iPhoto window:
· Event Name: Click the text field and type a name for the batch of photos you’re importing, such as My Wedding Day or Summer Vacation. Events without a specific name are identified by the date. See the section “Naming an event” to learn how to add a name after you import photos. If you use Photo Stream, each month is an event titled month year Photo Stream.
· Split Events: Select this check box to make iPhoto automatically create separate event folders for photos you’re importing based on the date you snapped the photos.
· Show All (number of) Photos (not shown in Figure 3-3; appears with some devices): Click the arrow to the right to see all the photos that are still on your device but that you already imported to iPhoto.
3. (Optional) Click and drag the Zoom slider in the bottom-left corner of the iPhoto window left or right to increase or decrease the size of your photo thumbnails.
4. Click a photo that you want to transfer and click the Import Selected button.
If you click Import All, iPhoto retrieves all photos stored on your camera or smartphone.
To select multiple images, hold down the ![]() key and click each photo you want to import.
key and click each photo you want to import.
5. When iPhoto finishes importing your photos, a dialog appears asking whether you want to keep or delete the photos from your device.
· Delete Photos: If you want to delete the photos from your device to make room so you can take more photos, click the Delete Photos button.
· Keep Photos: Otherwise, click the Keep Photos button to leave the photos on your camera or smartphone.
6. Choose iPhoto⇒Quit iPhoto to exit iPhoto.
Moving photos from other folders into iPhoto
If you have photos or image files in other folders on your Mac or on an external hard drive or flash drive, follow these steps to bring the photos and images into iPhoto:
1. Click the iPhoto icon on the Dock or from Launchpad.
2. Choose File⇒Import to Library.
The Import Photos dialog appears, as shown in Figure 3-4.
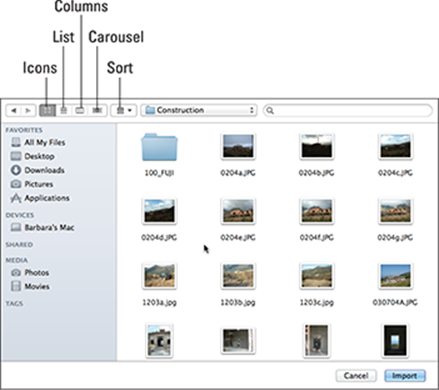
Figure 3-4: Choose the device and folder that contains photos.
3. Click the drive or folder in the Source list that contains the photos you want to import.
4. Choose one of the following:
· To import every photo file displayed on a drive or in a selected folder: Proceed to Step 5.
· To import individual files from a drive or folder: Click the photo file(s) that you want to import, or double-click a folder that contains the photos you want to import, and then click the photo files that you want to import.
To select multiple photos, hold down the ![]() key and click each photo you want to import. To select a range of photos, click the first photo you want to import, hold down the Shift key, and then click the last photo to include all the photos in between.
key and click each photo you want to import. To select a range of photos, click the first photo you want to import, hold down the Shift key, and then click the last photo to include all the photos in between.
To facilitate finding photos, click the view buttons at the top of the window to change how you see the folders and files: icons, list, columns, or carousel. Click the Sort button to arrange the contents by name, application, or date.
5. Click the Import button.
iPhoto imports your photos and organizes them into an event, or several events if the photo files you import are tagged with information such as the date or location, and/or if you import the contents of two or more separate folders. Learn about tagging in the section “Tagging photos” later in this chapter.
 Apple likes to use the term Event (note the capital), but we find that annoying after a bit. You can also create an event in Calendar/Reminders, so to save confusion and tedium, we just use event.
A fast way to import single photos into iPhoto is to drag and drop those photos to the iPhoto icon on the Dock, or to the Photos category under Library in the iPhoto Source list. Alternatively, Control-click a photo you see online or receive in an e-mail to open a contextual menu and then choose Add Image to iPhoto Library.
Retrieving photos by using the SDxD memory card reader
A second way to transfer digital images is to remove the memory card from your device and then plug it into the SDxD memory card reader port on your Mac, if your Mac has one. (You can also connect a card reader to a USB port and insert the card into the reader.) Your Mac displays the flash memory card icon on the Desktop and its contents in a Finder window the same way it displays an external hard drive.
 Never yank a flash memory card out of the card reader port; doing so may cause your Mac to scramble the data on the memory card. Before physically removing a flash memory card from the port, choose one of the following ways to eject a flash memory card safely from your Mac:
· Drag the flash memory card icon to the Eject icon (where you usually find the Trash) on the Dock to eject it.
· Click the flash memory icon and choose File⇒Eject.
· Click the flash memory icon and press ![]() +E.
+E.
· Control-click (right-click on a two-button mouse or two-finger click on a trackpad) the flash memory icon and choose Eject from the shortcut menu that appears.
· Click the Eject button that appears to the right of the flash memory icon in the Finder window Sidebar.
Capturing Photos from Other Sources
Maybe you don’t have a digital camera or a handheld device. But, if you have a MacBook Air, a MacBook Pro, or an iMac, you have a built-in FaceTime digital camera in your Mac. You can also find a built-in FaceTime camera on Apple’s Thunderbolt Display external monitor that can connect to your Mac desktop computer or act as a second display for your MacBook or iMac computer. To capture photos with this built-in camera, the simplest method is to use the Photo Booth app located in your Mac’s Applications folder.
If you’re the type who doesn’t like taking photos, you may prefer to save photos you like from websites you visit or from friends’ postings on social media networks such as Facebook, Pinterest, and Flickr. By copying photos from websites, you can find images that you wouldn’t normally capture yourself, such as images of fighting in the Middle East or photos of mountain climbers scaling Mount Everest, unless of course you’re a courageous-and-adventurous type.
Photos stored on websites are usually copyrighted, so you can’t legally copy and distribute those photos for free or reuse them for commercial purposes.
Capturing photos with Photo Booth
If your Mac has a built-in FaceTime camera, you can capture photos of yourself (or whoever or whatever is stationed in front of your Mac) by using the Photo Booth application. Photos you snap with Photo Booth save as JPEG files in a Photo Booth folder tucked inside your Photos folder.
You can plug in an optional external webcam, such as one of the models sold by Logitech (www.logitech.com) or Microsoft (www.microsoft.com/hardware), or plug in certain camcorders, to capture photos with Photo Booth. You can also use one of these optional external choices to conduct live, two-way video chats with friends and family, as we write about in Book II, Chapter 3.
To capture photos with Photo Booth, follow these steps:
1. Click the Photo Booth icon on the Dock or from Launchpad, or double-click the Photo Booth icon in the Applications folder.
The Photo Booth window appears, displaying the image seen through the FaceTime camera. Click the zoom widget in the upper-right corner to use Photo Booth in full-screen mode, as shown in Figure 3-5. That way you have those nice red theater curtains framing your image.
If you click the Effects button, you can capture a photo by using visual effects (such as fish-eye) or in front of a background (such as the Eiffel Tower).

Figure 3-5: Use Photo Booth to capture photos with your Mac’s built-in FaceTime camera.
2. Use the three buttons on the lower-left side to choose from three formats:
· Four-up photo: Click the left button to take four successive photos, just like an old-fashioned photo booth.
· Single photo: Click the middle button to take a single photo.
· Video: Click the right button to record video.
3. Click the camera button in the middle of the Photo Booth window (or press ![]() +T).
+T).
Photo Booth counts down from 3 (in seconds) before capturing your photo. If you choose Four-up, Photo Booth snaps four successive shots. If you chose Video, Photo Booth begins recording video. Click the camera button again to stop recording video.
Each captured photo or video appears at the bottom of the Photo Booth window. Click a photo to see it in the Photo Booth viewing pane. Swipe left and right on the trackpad or with the Magic Mouse to move from one photo to the next.
If you hold down the Option key when you click the camera icon (or press ![]() +T), Photo Booth snaps your photo right away without going through the three-second countdown.
+T), Photo Booth snaps your photo right away without going through the three-second countdown.
4. (Optional) Click a photo from the preview filmstrip, and then click one of the following choices from the Share pop-up menu:
· E-mail or Messages opens a new message in Mail or Messages (respectively) with your selected photo pasted in the message. Address and send the message as you normally would with either app.
· AirDrop makes your photo available to other AirDrop-capable Macs on the same network. See Book III, Chapter 4, to learn about AirDrop.
· Twitter, Facebook, or Flickr posts the photo to your account on those social networks.
· Add to iPhoto transfers the photo to your iPhoto library.
· Change Profile Picture opens a list of places where you can use the photo as your image on social networks, such as Facebook, Twitter, or LinkedIn, or as your Messages or Contacts image. Select the check boxes for where you want to use the photo, adjust the photo with the zoom slider, and then click the Set button, as shown in Figure 3-6.
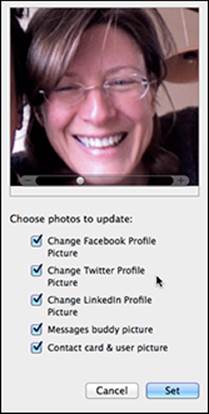
Figure 3-6: Change your profile image directly from a photo taken in PhotoBooth.
5. (Optional) Choose File⇒Export to export your photo to another folder, and then click the disclosure triangle next to the Save As field to see the Finder. Scroll through the directories and folders to choose the location to which you want to save the image.
6. (Optional) To print your photo, click the photo you want to print in the preview filmstrip and then choose File⇒Print. Adjust any necessary settings in the Print dialog that appears, and then click the Print button.
7. When you finish snapping and sharing photos, choose Photo Booth⇒Quit Photo Booth or press ![]() +Q to exit Photo Booth.
+Q to exit Photo Booth.
Photo Booth stores its photos in a Photo Booth Library inside the Photos folder.
You can delete photos you take with Photo Booth as follows:
· Single image: In the preview filmstrip, click a photo that you want to delete, and then press the Delete key or click the “X” in the upper-left corner of the preview image.
· All images: To delete all your Photo Booth photos at one time, choose Edit⇒Delete All Photos and click OK to confirm your choice.
When you choose the Delete All Photos command, you remove all photos stored in the Photo Booth folder inside the Photos folder.
Capturing photos from websites
By browsing through different websites, you can find a variety of images that you may want to use for personal use, such as adding them to an album in your iPhoto library of a movie star or public servant whose career you follow, or saving photos from the social network profiles of friends and relatives who live far away.
To save images from a web page, follow these steps:
1. Launch Safari by clicking the Safari icon on the Dock.
You can use a different web browser for these steps if you prefer.
2. Browse to a web page and Control-click a photo you want.
Doing so opens a shortcut menu, as shown in Figure 3-7.
Generally, because of copyright rules, don’t copy photos from websites for reuse on a commercial website.

Figure 3-7: Control-click a web page image for a variety of choices for saving the photo.
3. Choose one of the following commands from the shortcut menu:
· Save Image to “Downloads”: Saves the photo in the Downloads folder, stored inside your Home folder.
· Save Image As: Lets you choose a name for your photo and a folder where you want to save the photo.
· Add Image to iPhoto Library: Saves the image in your iPhoto photo library.
· Copy Image: Copies the image to the Mac’s invisible Clipboard so you can paste it into another document, such as an e-mail message or a letter to your mom.
The Save Image As option is the only one that lets you choose your own descriptive name for an image and specify the save location. All the other options save an image by using that image’s original filename, which may be something cryptic like wild_things_LJ-0187.jpg, although you can always rename the file later if you want.
Clicking and dragging a web image to your Mac’s Desktop, to the iPhoto icon on the Dock, to a Finder window, or directly to a document in apps such as Pages or Word is a quick way to capture photos from websites.
Organizing Photos with iPhoto
After importing your photos in one or more of the ways explained previously, you need to organize them so you can find the photos you want. Think of iPhoto as a place where you can dump all your digital photographs so you can browse them later. In iPhoto, your photos are sorted or grouped in different ways. The sorts or groups appear as follows in the Source list on the left side of the iPhoto window, as shown in Figure 3-8:
· Library: iPhoto comes with the following four libraries:
· Events typically contain photos captured on the same day, but you can also move photos from one event to another, split or merge events, and give events a name that means something to you.
· Photos holds all your photos in chronological order.
· Faces organizes your Library based on the faces of individuals you tag with a name. Over time, iPhoto tries to identify faces in new photos you import and automatically tag them with the name(s) of the person(s) in the photos.
· Places automatically tags and organizes your photos based on where you snapped them with your GPS-capable camera or mobile phone, like the Nikon Coolpix 6000 camera or the iPhone, both of which have built-in Global Positioning System (GPS) receivers. You can also manually tag photos with location information on an individual or group basis.
· Recent: Photos are grouped by those you most recently viewed, photos added in the last 12 months, photos added in the most recent import, flagged photos, and those you deleted. (When you delete a photo, it’s placed in the iPhoto Trash until you click the Trash icon and then click the Empty Trash button.)
· Shared: Photos you share with others online appear here. For example, photos shared on iCloud or albums you create to post to Facebook.
· Albums: Construct iPhoto albums just like you create an album of printed photos by putting the photos you want together in a specific order. Create folders to hold and organize multiple albums, such as creating a single album for each vacation and then placing all the vacation albums together in one folder.
· Projects: Create printed objects such as photo books, calendars, and cards in iPhoto, and then send them electronically to the printer. In a few days, the printed piece is delivered to your doorstep.
· Slideshows: Create simple slideshows of your photos — from a library, an album, or a project — and then view the show on your Mac’s screen or a larger monitor or projector.
Figure 3-8: The Source list shows the different ways photos are sorted and grouped.
If you work in full-screen view, the Source list items become buttons along the bottom of the screen. Click the full-screen button in the upper-right corner to switch to full-screen view, which is great for working in iPhoto because it takes advantage of all the real estate of your Mac screen — no matter how big or small.
Organizing the Events library
The iPhoto Library can store literally thousands of photos, which can soon become as disorganized as dumping a decade’s worth of photographs in a box and then wondering why you can never find a specific photo easily.
When you import photos, iPhoto automatically distributes the photos into the libraries based on the metadata — data bits such as the date, time, and location — electronically imprinted on each photo. All the photos go singly into the Photos library but are grouped by date in the Events library, which gives you a head start on organizing the photos. You can then move the photos from one event to another, merge or split events, rename events, and even create new events. For example, iPhoto will divide your vacation photos by date, but you can merge all the dates to create one vacation event.
Two other ways you can organize and view photos are by using the Faces feature, which sorts photos by the faces of people in your photos, and by using the Places feature, which sorts photos based on the location where you capture them. We cover both of these ways of organizing and viewing photos in your iPhoto Library in later sections of this chapter.
Browsing through an event
Click the Events button in the Source list to see the Events chooser. Think of each event as a stack of photos, and you see the one on top. When you position the pointer over an event, iPhoto displays the date of the event and the number of photos it contains, as shown in Figure 3-9.
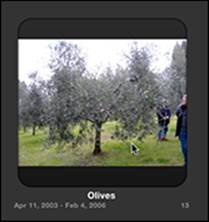
Figure 3-9: Hover over an event to reveal its date and number of photos.
An event can represent a single photo you capture on a particular day. More likely, though, an event represents several photos. To view thumbnail previews of all the photos stored in an Event, hover the pointer over the Event icon and then slowly move the pointer left or right (or press the left and right arrow keys) to step through a thumbnail preview of each photo contained in the event.
If you’d rather see individual thumbnails of all the photos stored in a single event, double-click the event to display them, shown in Figure 3-10.
Click the All Events button to return to the Events chooser.
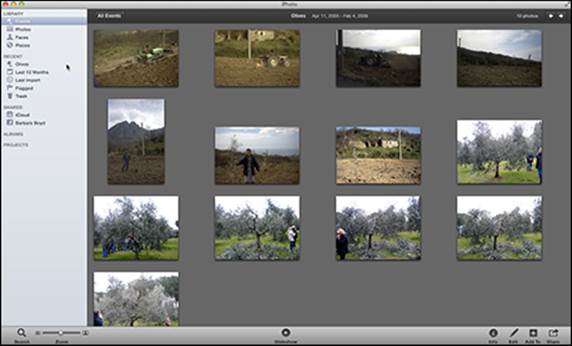
Figure 3-10: Double-clicking an event expands all the photos in the iPhoto window.
Naming an event
To make finding photos easier, you can give each event a descriptive name to jog your memory as to which photos are stored in each event without having to browse through them. To give your event a descriptive name, follow these steps:
1. Click the Events category under Library in the Source list of the iPhoto window or click the Events button at the bottom of the screen if you’re working in full-screen view.
iPhoto displays all your events. If you haven’t named your events, each event may display the date when you captured those photos as its name.
2. Click the event name, which appears directly under the event photo.
A yellow box highlights the event, and a text box appears along with the number of photos stored in that event.
3. Type a new descriptive name for your event and then press Return.
In addition to giving an event a meaningful, descriptive name, you can select a specific photo to represent the event in the Event chooser. Double-click an event to see all the photos contained within, click the photo you want to appear on the Event chooser for the open event, and then choose Events⇒Make Key Photo.
Merging events
Even if you have photos stored as separate events, you may decide that the photos in both events really should be grouped as a single event. In this case, you can merge two events into a single event by following these steps:
1. Click the Events category in the iPhoto Source list or on the toolbar along the bottom of the full-screen iPhoto window.
iPhoto displays all your events.
2. Move the pointer over an event you want to move or merge into another event.
3. Click and drag the event to the event you want to merge it with.
The pointer turns into an arrow with a green plus sign.
4. Release the mouse button when the pointer appears over an event.
Your two events now appear as a single event. If an event is untitled and referred to only as the date, then a date range (such as Jan. 28 – Feb. 15, 2014) appears under the event. If you merge two or more events with different names, the merged event will have the name of the event you dragged to. So if you drag an event named Baseball over an event named Summer Sports, the merged event will be named Summer Sports.
Splitting an event
Sometimes an event may contain too many, or unrelated, photos. In this case, you may want to store photos in separate events. To split an event, follow these steps:
1. Click the Events category in the iPhoto Source list or on the toolbar along the bottom of the full-screen iPhoto window.
iPhoto displays all your events in the right pane.
2. Double-click an event you want to split.
The photos in your event appear in the iPhoto window (refer to Figure 3-10).
3. Hold down the ![]() key and click each photo you want to add to your new separate event.
key and click each photo you want to add to your new separate event.
A yellow border highlights each chosen photo.
4. Choose Events⇒Split Event.
Your chosen photos now appear in a separate event.
5. Click the All Events button.
Your original and newly split events appear highlighted with a yellow border. Click the name to rename the new event as explained previously.
Moving photos from one event to another
If a photo appears in one event but you think it should appear in a different event, you can always move that photo. To move a photo from one event to another, follow these steps:
1. Click the Events category in the iPhoto Source list or on the toolbar along the bottom of the full-screen iPhoto window.
iPhoto displays all your photos in the right pane.
2. Click the event that contains the photos you want to move.
3. Hover the pointer over the photo(s) you want to move and click the Flag button in the upper-left corner of each one.
4. Click the All Events button to return to the Events chooser.
5. Click the event you want to move the flagged photos to.
6. Choose Events⇒All Flagged Photos to Selected Event.
Your chosen photo or group of photos now appears in the selected event.
7. (Optional) Instead of moving the photos, you can create a new event that contains those photos by choosing Events⇒Create Event from Flagged Photos.
Sorting events
The more events you create to store your photos, the harder it is to find what you need. To help keep you organized, iPhoto gives you five options for sorting your events. Choose View⇒Sort Events and then choose from
· Date: Sorts events chronologically.
· Keyword: If you add a keyword to the information about a photo, you can sort by that criterion. We explain keywords in the next section.
· Title: Lets you sort events by title.
· Rating: After you add ratings to photos, this sort option is active. Find out about ratings in the next section.
· Manually: Lets you sort events by clicking and dragging them to an order that you want.
Choose View⇒Sort Events again to choose Ascending or Descending. iPhoto sorts your events based on the sorting method that appears with a check mark in the Sort Events submenu.
Tagging photos
After you organize and name events, you can identify individual photos with a name, rating, or keyword, also known as a tag. These identifiers add information to photos that gives you another way to find or sort your photos and events. Click the Events button in the Source list and then double-click the event you want to work on.
To see all your photos in iPhoto, click the Photos button in the Library section of the Source list. Change how you view the Photos by choosing View⇒Event Titles to see all your photos sorted by event or View⇒Sort Photos and then choose Date, Keyword, Title, or Rating, and then Ascending or Descending, in the same way as we explain previously for events.
Naming photos
Devices that capture photos store them with generic filenames, such as DSC_846. Fortunately, you can replace these generic titles with more descriptive names. In iPhoto, you can give descriptive names to your events and descriptive names to individual photos. So an event may be named Spring Break, and photos stored in that event may be named Day 1: Arrival, Day 2: Imbibing, and Day 3: Recovering.
To name individual photos, do one of the following:
· Click Photos in the Source list to see all your photos.
· Click events in the Source list and then double-click an event to name the photos within that event. If you have a lot of photos, this may be the easier way to work with fewer photos at once.
Whether viewing all your photos or only those within one event, proceed as follows to name your photos:
1. Choose View⇒Titles.
Note: If a check mark already appears to the left of Titles, skip this step.
Titles appear underneath every photo.
2. Click the title that you want to change.
A text box appears, as shown in Figure 3-11.
3. Type a new name for your photo or use the arrow and Delete keys to edit the existing name.
4. Press Return.

Figure 3-11: Descriptive titles can help you find photos.
If you want to give a group (batch) of photos the same base name (for example, the same name as the event with a number following), add a description, or change the date or time of the photo, ![]() -click to select multiple photos, and then choose Photos⇒Batch Change. Use the pop-up menus in the window that opens, as shown in Figure 3-12, to set the photo Title, Date, or Description.
-click to select multiple photos, and then choose Photos⇒Batch Change. Use the pop-up menus in the window that opens, as shown in Figure 3-12, to set the photo Title, Date, or Description.
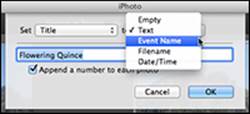
Figure 3-12: Change or add information to photos in batches.
Rating photos
Some photos are better than others, so another way to sort and organize photos is by rating them from zero to five stars. To rate photos, follow these steps:
1. From the Source list, select either Photos or Events and then double-click an event.
2. Choose View⇒Rating.
Note: If a check mark already appears to the left of Rating, skip this step.
3. Select the photo you want to rate or hover the pointer under it.
A row of five empty stars appears beneath your selected photo.
4. Click the first, second, third, fourth, or fifth star to rate the photo with that number of stars, as shown in Figure 3-13.

Figure 3-13: You can rate each photo with zero to five stars.
You can rate photos in the following ways, even without choosing View⇒Ratings:
· Click a photo — or ![]() -click several photos — and then choose Photos⇒My Rating and choose the number of stars you want to rate the photo(s) with from the submenu.
-click several photos — and then choose Photos⇒My Rating and choose the number of stars you want to rate the photo(s) with from the submenu.
· Control-click a photo or click the disclosure triangle in the lower-right corner, and click the number of stars that corresponds to your rating.
· Click a photo and press ![]() +0 through
+0 through ![]() +5 to rate a photo from zero to five stars, respectively.
+5 to rate a photo from zero to five stars, respectively.
Adding keywords to a photo
Keywords or tags help you organize photos based on categories, such as Cityscapes or Nature. By manually tagging photos by placing keywords on them, you can quickly find all your favorite outdoor photos or family photos.
To add a keyword to a photo, follow these steps:
1. From the Source list, select either Photos or Events and then double-click an event.
2. Click a photo that you want to label with a keyword.
If you hold down the ![]() key, you can click two or more photos to assign the same keyword to all of them.
key, you can click two or more photos to assign the same keyword to all of them.
3. Choose Window⇒Manage My Keywords.
The Keywords window appears, which displays several common keywords that iPhoto provides for you, as shown in Figure 3-14.
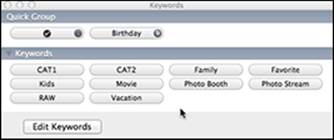
Figure 3-14: The Keywords window displays a list of keywords you can use.
4. (Optional) To add your own keywords to the Keywords window, click the Edit Keywords button. When the Edit Keywords dialog appears, click the plus sign button to type your own keywords into the Keywords window, and then click the OK button.
· There is no limit to how many keywords you can create.
· You can also click a keyword, and then click the minus sign button to remove a keyword from the Keyword window.
Drag a keyword from the bottom part of the Keywords window to the top part to assign a key to represent a keyword. When the Keywords window is open, you can select a photo or photos and then press the shortcut key to add a keyword to that photo, or photos, quickly.
5. Click a keyword.
Your chosen keyword appears briefly on the photo you select.
If you click the same keyword in the keyword window, iPhoto removes the keyword from your chosen photo.
6. (Optional) Click another keyword if you want to assign more than one to the photo.
7. (Optional) Click another photo and repeat Step 5.
8. Click the Close button on the Keywords window.
9. Choose View⇒Info and click the disclosure triangle next to Keywords to see the keyword(s) assigned to the photo.
After you name, rate, and/or add keywords to photos, you can sort them by choosing View⇒Sort Photos and then choosing your sorting preference from the submenu. Then choose View⇒Sort Photos⇒Ascending (or Descending) to reorder the sort from beginning to end or vice versa.
Storing photos in albums and folders
Sorting and organizing photos into events can be cumbersome. For example, you may have dozens of birthday photos stored in separate events. Although you can store all these birthday photos in the same event, you may also want to keep them grouped with other photos in separate events that represent different years.
To keep photos stored in separate events while grouping them at the same time, you can create an album to group related photos without removing them from the events they’re stored in. Essentially, a photo is in only one event, but that photo can be in as many albums as you want.
Creating albums and organizing photos manually
To create an album and store photos in it, follow these steps:
1. Open the event that has some photos you want to put in the album.
2. Choose File⇒New Album.
An Untitled Album item appears under the Albums category in the Source list; above the pane where you see your Event photos, you see the title Untitled Album, as shown in Figure 3-15.
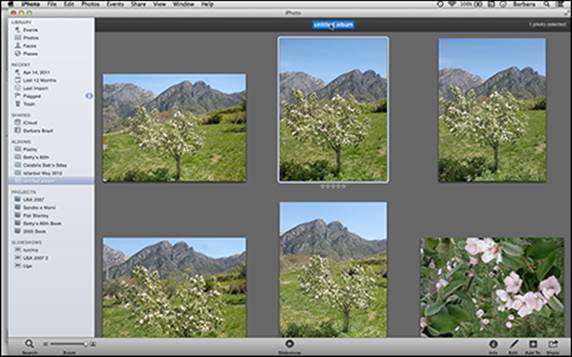
Figure 3-15: Name your album in the Albums category of the Source list or in the title above the photos.
3. Click the words Untitled Album in the Source list or above the photos to rename the album you just created.
Your album name appears under the Albums category in the iPhoto Source List and at the top of the viewing pane.
4. Click and drag photos you want to add to your album from other events to the album folder in the iPhoto Source list.
You can select multiple photos by holding down the ![]() key and clicking each photo you want to add to an album.
key and clicking each photo you want to add to an album.
5. Release the mouse button to copy your photo(s) to the album.
6. Repeat Steps 4 and 5 for each additional photo you want to copy to the album.
7. To remove a photo from the album (but not from iPhoto), click the photo and choose Edit⇒Cut.
Now, if you click the album name in the iPhoto Source list, you can see all the photos in that album.
To access the menus from full-screen view, hover the pointer over the top of the screen.
Creating albums and organizing photos automatically
If manually dragging photos in and out of albums is too tedious, you can set up a Smart Album from within iPhoto that will store photos automatically.
To create a Smart Album that can store photos automatically, follow these steps:
1. Choose File⇒New Smart Album.
A dialog appears, asking for a name for your Smart Album.
2. Type a descriptive name for your album in the Smart Album Name text box.
3. Open the first pop-up menu and choose a criterion, such as Face or Rating, or a camera setting like Aperture or Camera Model.
4. Open the second and third pop-up menus to refine the criterion you choose in Step 3, such as choosing only photos with a rating of four stars or with the Birthday keyword.
5. (Optional) Click the plus sign button to define another criterion and repeat Steps 3 and 4.
6. Click OK.
Your Smart Album now stores photos based on your chosen criteria.
If you create too many albums, you can organize them into folders by choosing File⇒New Folder and dragging related albums into that folder.
Deleting photos, albums, and folders
Many times, you’ll import photos into iPhoto and decide that the photo isn’t worth saving after all. To keep your iPhoto library from becoming too cluttered, you can delete the photos you don’t need.
Besides deleting individual photos, you can also delete albums and folders that contain photos you don’t want. When you delete an album or folder (which contains albums), you don’t physically delete the photos; you just delete the folder or album that contains the photos. The original photos are still stored in the iPhoto Photos library.
To delete a photo, album, or folder, click the photo (in Photos or Events) or the album or folder you want to delete and press the Delete key or drag it to the Trash icon in the iPhoto Source List. If you delete a photo from an album, it’s deleted only from that album, not from iPhoto.
Press ![]() +Z or choose Edit⇒Undo Delete right away if you want to recover your deleted items.
+Z or choose Edit⇒Undo Delete right away if you want to recover your deleted items.
If you don’t want to delete a photo but want it out of sight, hover the pointer over the lower-right corner of the photo you want to hide and click the disclosure triangle. Click the Hide button, and your photo is out of sight. To hide several photos at once, ![]() -click the photos you want to hide and then Control-click one of them. Click the Hide button, and all the selected photos are hidden.
-click the photos you want to hide and then Control-click one of them. Click the Hide button, and all the selected photos are hidden.
To bring your photos out of hiding, choose View⇒Hidden Photos. The hidden photos appear with an orange “X” in the upper-right corner. Choose View⇒Hidden Photos, again, and the photos disappear from view again. Or, click the disclosure triangle photos you want to see, and then click the Show button. The photo is back in its original spot.
Organizing photos with Faces and Places
Two more ways to organize and view photos in your iPhoto Library are the Faces and Places features.
· Faces: Lets you add names to the faces of people in your photos. Over time, iPhoto automatically recognizes and labels the faces of people in new photos you import into your iPhoto Library.
· Places: Automatically tags and sorts photos you import that contain GPS information that your GPS-capable smartphone or camera adds to photos when you snap the photos with the GPS-tagging feature (geotagging) turned on.
You can use the Places feature even if you don’t have a GPS-capable device by selecting and tagging individual photos, or a group of photos, with information that you type about the location where you captured the photos.
Using Faces to organize photos
You can organize photos in your iPhoto Library based on the faces of people in the photos.
To organize photos by using the Faces feature, follow these steps:
1. Click Faces in the Source list and then click the Find Faces button on the toolbar at the bottom of the iPhoto window.
A selection of faces to identify appears, as shown in Figure 3-16.
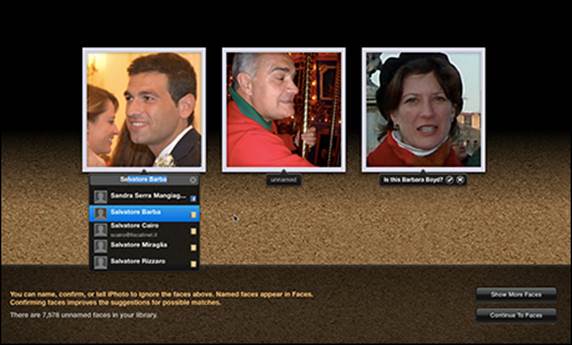
Figure 3-16: Find Faces shows you a selection of faces to identify.
2. Click in the field under the photo that reads unnamed and begin typing the name of the person.
iPhoto displays a list of matches from Contacts, including your Facebook contacts if you have them linked to Contacts. The more letters you type, the narrower the results. If the name of the person of the photo appears, click that. If not, continue typing the correct name.
3. Repeat Step 2 for the other photos.
4. Click Show More Faces to continue identifying people.
When iPhoto finds a face that it thinks it recognizes, the name field reads Is this that person? (“Barbara Boyd” in Figure 3-16). Click the check mark if the name is correct. Click the “X” if the name is wrong and then enter the correct name. Faces has difficulty identifying profile or three-quarter headshots.
When you name a person in Faces, it automatically tags that person in Facebook when you share photos from iPhoto to Facebook, as explained in the “Sharing options” section.
5. When you tire of playing the faces identification game, click Continue to Faces.
iPhoto displays a corkboard with the named faces of people you have identified so far. The more photos you identify for each person, the better iPhoto becomes at identifying faces correctly. Double-click the person’s group of photos to see all your photos of that person. Click the All Faces button in the upper-left corner to return to the Faces view.
After you identify a good selection of faces, you can instruct iPhoto to search for matches by clicking the Events library and then choosing Photos⇒Detect Missing Faces.
To view photos organized by Faces in your iPhoto library, click the Faces category under Library in the iPhoto Source list, and then double-click the snapshot of the person whose photos you want to look at.
Locating photos with Places
If your camera or smartphone has a GPS feature or geotagging turned on, photos you import into your iPhoto Library will automatically contain information about the location where you captured the photos. On iOS devices, you use Location Services to turn on geotagging. Check your camera or phone manual to find out how to activate geotagging. Otherwise, you can add location information to photos after importing them to iPhoto.
You view photos organized by the places where the photos were captured by clicking pushpins on a map of the world or by clicking a display listing photos by country, region, state, and city.
You must enable Places for iPhoto to assign locations to your photos. Choose iPhoto⇒Preferences and click the Advanced tab. Select Automatically in the Look Up Places pop-up menu.
To view photos organized by the Places feature in your iPhoto Library, follow these steps:
1. Click the Places category in the iPhoto Source list or click the Places button on the toolbar at the bottom of the window in full-screen view.
iPhoto displays a map of the world with red pushpins that indicate locations where your photos were captured. Moving the mouse pointer to a pushpin displays the name of the location where you captured the photos, as shown in Figure 3-17.
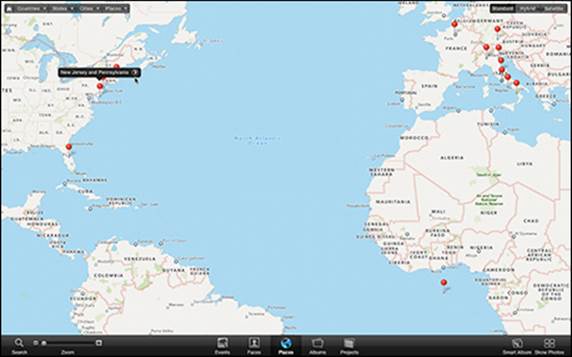
Figure 3-17: Pushpins represent the places where you captured your photos.
2. Drag the Zoom slider to the right to zoom in on a region.
As you zoom, more pushpins may appear. For example, in Figure 3-17, New Jersey and Pennsylvania photos are represented by one pushpin, but by zooming on the map, multiple push pins appear for photos taken in different cities in that region.
If you’re using a mouse with a scroll wheel, you can zoom in and out on the map by rolling the scroll wheel forward and backward. If you’re using a MacBook or a Magic Trackpad or Magic Mouse, you can zoom in and out on the map by pinching two fingertips together and apart on the trackpad.
3. To view the photos for a location, move the mouse pointer to a pushpin to display the location name and click the arrow to the right of the location name.
iPhoto displays the photos you captured (or manually tagged, as described in the next section) at the selected location.
4. (Optional) From the World Map view, you can do these additional things:
· Standard, Hybrid, Satellite view: Click one of these three buttons to change the World Map view. Standard shows roads and place names. Satellite displays an eye-in-the-sky view based on actual satellite imagery. Hybrid combines Standard and Satellite views into a single view.
· Countries, States, Cities, Places view: Click one of these four buttons, which becomes a pull-down menu, to narrow your view by location.
Manually adding information to photos
If your camera or smartphone doesn’t have a GPS feature that automatically adds a location to photos you capture, you can still add location information to photos in your iPhoto collection by selecting and typing location names for your photos. You can also add keywords, ratings, and other information about your photos. Follow these steps:
1. Click Photos in the Source list or Events and then a specific event to see the photo chooser.
2. Click a photo that you want to identify by location.
If you hold down the ![]() key, you can click two or more photos to assign the same location to all of them.
key, you can click two or more photos to assign the same location to all of them.
3. Click the Info button at the lower right of the window or choose View⇒Info to display an information pane for the selected photo(s), as shown in Figure 3-18.
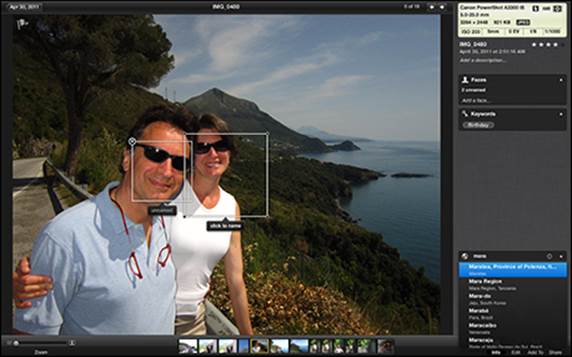
Figure 3-18: Add or change a photo’s location information.
4. Click Assign a Place, or the pre-filled location name (mara in Figure 3-18), to put the cursor in that field, type or edit the name of the location where the photo was captured, and press Return.
While you type, a list beneath the location name appears with suggestions of locations that may match the location you want to assign to the photo.
5. Edit other information for the photo(s) by clicking in the following fields:
· Title: Edit or type a title for the selected photo.
· Rating: Click the dots to choose the number of stars you want to give the photo (from one to five stars).
· Description: Edit or type a descriptive word or words to describe the photo so you can search for it when you want to find it again.
· Faces: The number of unnamed faces is indicated (refer to Figure 3-18). Click the “unnamed” text box in the photo and type the name of the person. If there are faces that haven’t been detected, click Add a Face. A white box appears on the photo, which you click and drag to surround an undetected face. Click the Click to Name text box beneath the box and type the name of the person. As you type a name, a list of matches from Contacts appears; the more letters you type; the narrower your choices. Click the name when you see it. Click Add a Face again to identify additional undetected faces in the photo.
· Keywords: Click the Add Keyword field and begin typing an established keyword. Click the word you want from the list that appears. If you want to add a new keyword, choose Window⇒Manage My Keywords, and add the new word as explained previously.
6. Click the Info button or choose View⇒Info to hide the Info pane.
Editing Photos with iPhoto
Besides organizing your photos, iPhoto lets you edit them. Such editing can be as simple as rotating or cropping a photo, or it can be as intricate as removing red-eye from a photograph or modifying colors. When your photos look perfect, you can print them on your printer or through a printing service (which can actually cost less than what you may spend on ink cartridges and glossy photo paper!). And, because the digital format is universally World Wide Web–friendly, you can share your photos in a Messages or Mail message, or on a social network like Facebook or Twitter, or create a shared photo stream on your iCloud account.
First, you want to make those photos as flawless as possible. To edit a photo, follow these steps:
1. Click Photos in the Source list or Events and then a specific event to see the photo chooser.
2. Click a photo and click the Edit button in the lower-right corner.
iPhoto displays your selected photo in the center pane, and an editing pane opens to the right of your photo, as shown in Figure 3-19.
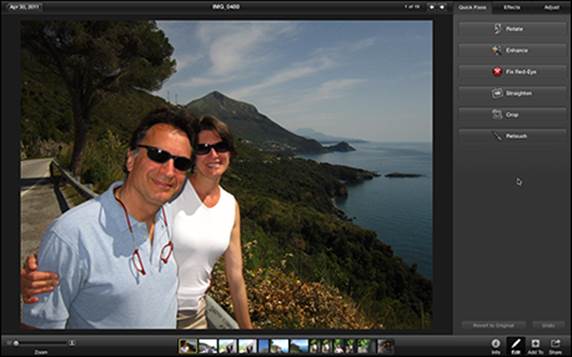
Figure 3-19: The editing tools appear in a pane to the right of your photo.
3. Click the Quick Fixes tab at the top of the editing pane and click the buttons to do the following:
· Rotate: Rotates your photo 180 degrees clockwise or counterclockwise.
· Enhance: Magically fixes brightness and contrast problems and improves your photo.
· Fix Red-Eye: Gets rid of those vampiric red pupils that show up when the flash is too strong. Click the red pupils and drag the slider bar in the Edit pane to match the size of the pupil. Click Done when the redness is blackened.
· Straighten: Changes the angle when you drag the slider. Perhaps you got a little too artistic or want to add an interesting angle to your photo. If you click the Decrease/Increase angle of photo icons that appear on opposite ends of the slider, you can adjust the angle of your photo by 0.1 degree increments. Click Done when the photo is in a position you like.
· Crop: Lets you select only the part of the photo you want to keep. Grabber corners let you shift the border of the photo to show only the part you want. Use the Constrain pop-up menu to choose the photo proportions you want — for example, 2 x 3 or 4 x 6 for a postcard — and move the frame around on the image to crop that best part to the selected size. Click Done when you’re satisfied.
· Retouch: Gives you a tool to correct minor blemishes, scars, and wrinkles. Click and drag the tool over the discolored area to create a blemish-free photo. Click Done when you’re pleased.
4. Click the Effects tab of the Edit pane and click the effect you want, such as cooler colors, sepia tones, or a matte finish, as shown in Figure 3-20.

Figure 3-20: The Effects tools let you choose a way to modify your picture.
5. Click the Adjust tab of the Edit pane to adjust the following, as shown in Figure 3-21:
· Exposure: Lightens or darkens a photo
· Contrast: Alters the differences between light and dark areas
· Saturation: Alters the intensity of colors in a photo
Select the Avoid Saturating Skin Tones check box if you want to try to make skin coloration look more natural.
· Definition: Reduces haze and improves clarity without adding too much contrast
· Highlights: Increases detail in a photo by lightening or darkening areas
· Shadows: Lightens or darkens shadow areas of a photo
· Sharpness: Adjusts the focus of a photo
· De-noise: Alters the graininess of a photo
· Temperature: Alters colors by making them dimmer (colder) or brighter (hotter)
· Tint: Adjusts the red/green colors in a photo
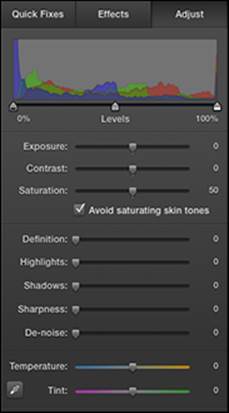
Figure 3-21: Improve your photo with the options on the Adjust tab.
Your image changes as you adjust any of these settings.
Click Undo to undo the last adjustment you made. And if you decide that your original photo looked better without any adjusted settings, click the Revert to Original button.
6. (Optional) Choose Edit⇒Copy Adjustments to copy your adjusted settings so you can use the same settings to adjust another photo, which you can open and then choose Edit⇒Paste Adjustments to apply the adjusted settings.
7. Click the Edit button to close the Edit pane.
Sharing Photos
For many people, there’s no point in taking photos if they don’t share them with others. If you fall in this camp, you can publicize your photos to the world by printing them; posting them on a web page; uploading them directly to Facebook, Twitter, or Flickr; sending them to others via Mail or Messages; or burning them to a CD/DVD. For an added fee, you can print your photos as books, calendars, or greeting cards. Here we give you the rundown for sharing in each and every way.
Printing photos
You can print individual photos or groups of photos on your home printer by following these steps:
1. Click Photos in the Source list or Events and then a specific event to see the photo chooser.
2. Hold down the ![]() key and click all the photos you want to print.
key and click all the photos you want to print.
3. Choose File⇒Print or click the Share button in the lower right of the window, and then click the Print button.
A Print dialog appears, as shown in Figure 3-22.
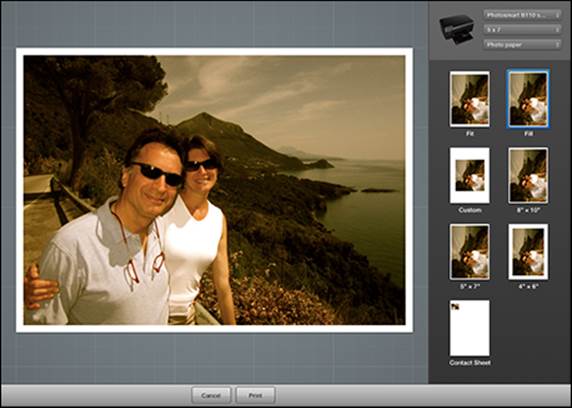
Figure 3-22: Choose from different ways to print your photos.
4. Click the print styles to the right.
The photo appears as it will be printed.
5. Choose the printer, paper size, and quality from the pop-up menus.
6. Click the Print button.
You can click the Order Prints button in the Share menu to have your photos sent to Apple for printing. The cost to print a 4-x-6 photo is less than what it would cost you in paper and ink on your printer, and the quality is as good as — usually better than — the top photo printers. You can also click the Book, Calendar, or Card button to create photo books, calendars, or greeting cards from your photos, which we briefly explain in the last section of this chapter.
Sending photos in a message
If you want to share photos with family members or friends who have an e-mail address or use Messages on a Mac, iPhone, iPad, or iPod touch, you can send photos by using the Mail or Messages app, which lets you send photos to people using AIM, Google, or other chat services even on non-Apple platforms. If you use a different e-mail app, such as Outlook, you can configure iPhoto to work with your e-mail app by following these steps:
1. Choose iPhoto⇒Preferences.
A Preferences window appears.
2. Click the General tab.
3. Open the Email Photos Using pop-up menu and choose your e-mail application or service.
4. Click the Close button of the Preferences window.
After you configure your e-mail application to work with iPhoto, you can send a photo by following these steps:
1. Click Photos in the Source list or Events and then a specific event to see the photo chooser.
2. Hold down the ![]() key and click the photo you want to send. You can click up to ten photos to send in one e-mail.
key and click the photo you want to send. You can click up to ten photos to send in one e-mail.
3. Click the Share button and choose Mail or choose Share⇒Email.
Your photo appears in an e-mail message, as shown in Figure 3-23.
You can apply one of the themes that appear in the chooser on the right side. Click the text placeholders to type in your own text. Choose Edit⇒Font to change the typeface.
At the bottom of the chooser pane, open the pop-up menu to select the size image you want to insert in the e-mail. Or, choose Optimize so the e-mail file isn’t too large to send.
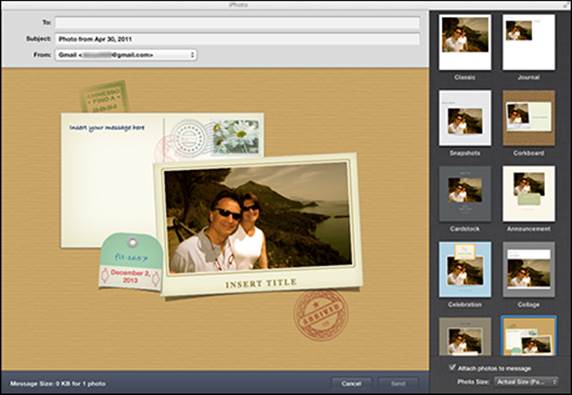
Figure 3-23: Sending a photo from iPhoto is as simple as sending an e-mail.
4. Enter an e-mail address or addresses in the To text box.
To add an e-mail address to iPhoto, choose iPhoto⇒Preferences and click the Accounts tab. Click the plus sign at the bottom of the pane, choose Email from the pop-up list, and click Add. Choose the type of e-mail service you use (such as Google Mail, iCloud, AOL, or Yahoo!), and click OK. Type in your account information in the appropriate fields, and click the Close button.
5. Use the pop-up menu to choose the outgoing e-mail address (if you have more than one) and then click Send.
To send a photo with Messages, open the photo you want to send. Click the Share button and then click the Messages button; a new message window appears with your photo attached to it. Address your message, type an accompanying note, and then click Send.
Posting your photos
You can upload your photos directly to iCloud, Flickr, Twitter, and Facebook from iPhoto by doing the following:
1. Click Photos in the Source list or Events and then a specific event to see the photo chooser.
2. Hold down the ![]() key and click the photo(s) you want to upload.
key and click the photo(s) you want to upload.
3. Click the Share button and choose Flickr, Twitter, or Facebook from the pop-up menu (or choose Share⇒Facebook/Flickr/Twitter).
4. Sign in to your account with your profile name and password.
Alternatively, choose iPhoto⇒Preferences and click the Accounts tab. Click the plus sign at the bottom of the pane, choose Facebook or Flickr from the pop-up list, and then click Add. Type in your profile name and password in the appropriate fields, and click Login.
5. If you choose Twitter, a window opens with your photo attached. Type your tweet and click Send.
For iCloud, Facebook, or Flickr, choose the location where you want to use the photo — for example, for your profile or in an existing album.
Figure 3-24 shows the locations for Facebook. See the next section to find out about creating shared photo streams on iCloud.
6. A dialog asks you to select viewing privileges from a pop-up menu. If you choose New Album, you can type in a name for the album.
7. Click Publish.
Your photo or photos are uploaded to Facebook, Twitter, or Flickr. Comments made about your photo on Facebook appear in the Info pane of the photo in iPhoto.
You can also share your photos with yourself. Open a photo you like, edit it, and then choose Share⇒Set Desktop. The photo becomes the image on your Mac’s Desktop.
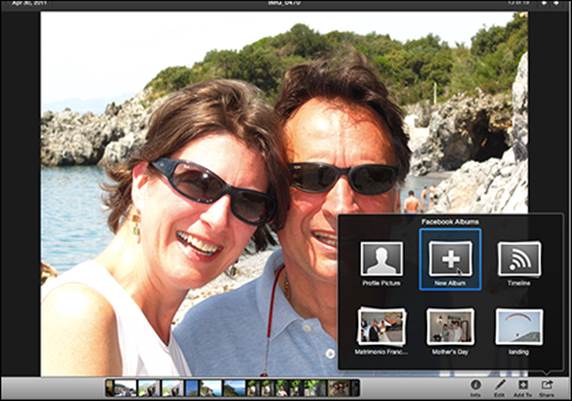
Figure 3-24: Upload your photos to Facebook or Flickr directly from iPhoto.
Using Photo Stream
Photo Stream is part of Apple’s iCloud service. If you activate Photo Stream, 1,000 of your most recent photos are uploaded to Photo Stream for 30 days. If you reach the 1,000 photo limit and add more photos in a 30-day period, the new ones are uploaded, and the same quantity of old ones are deleted. To activate Photo Stream in iPhoto, choose iPhoto⇒Preferences and click the iCloud tab. Select the My Photo Stream and the Photo Sharing check boxes, as shown in Figure 3-25.
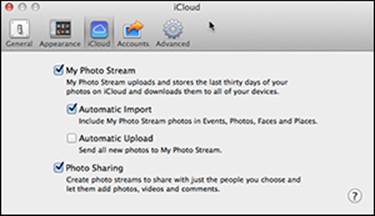
Figure 3-25: Keep up to 1,000 photos on Photo Stream and share streams with others.
All the photos are synced to the devices you have connected to iCloud, such as your iPhone, iPad, or iPod touch. See Book I, Chapter 3, to find out more about using iCloud.
To share photo streams with others, do the following:
1. Click Photos in the Source list or Events and then click a specific event to see the photo chooser.
2. Hold down the ![]() key and click the photo(s) you want to upload.
key and click the photo(s) you want to upload.
3. Click the Share button and choose iCloud or select Share⇒iCloud.
4. Click New Photo Stream from the choices that appear.
A window appears, as shown in Figure 3-26.
5. Type the names or e-mail addresses of the person(s) with whom you want to share your photos.
iPhoto accesses your Contacts. As you type a name, potential matches appear. If the address you want appears in the proposed list, click it. Type as many names as you like. Name the Photo Stream in the Name field and add any comments.
6. Select the Subscribers Can Post check box so that others can interact with your photo stream by adding their own photos and comments.
7. Select the Public Website check box to make your stream available to the general public.
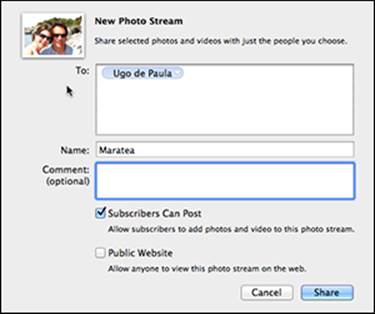
Figure 3-26: Share Photo Streams with others.
8. Click the Share button.
The selected photos are posted on iCloud as a photo stream, and a message is sent to the people you invited to view that stream.
9. After you create a shared photo stream, you can add more photos to it by clicking the Share button, then clicking the iCloud button, and finally, clicking the previously created photo stream.
Your selected photos will be added to the selected photo stream.
Despite the confusing nomenclature, the photo stream that syncs up to 1,000 photos between your Mac and other devices is not the same as the photo stream you share, which is a specific group of selected photos that are accessed by other people from their devices.
Ordering books, calendars, and cards
For a fee, you can have your favorite iPhoto photos printed as books, calendars, or greeting cards. You will need your Apple ID and password when you reach the checkout, so keep it handy. To choose to print your photos in a book or calendar, or as a greeting card, follow these steps:
1. Click Photos in the Source list or Events and then a specific event to see the photo chooser.
2. Hold down the ![]() key and click all the photos you want to use or click an event.
key and click all the photos you want to use or click an event.
3. Click the Share button at the bottom of the iPhoto window and choose Book, Calendar, or Card from the pop-up menu.
The Carousel view appears, which you can “spin” through to see the printing options. Use the tabs at the top to choose format options of the printed material, such as hard cover, soft cover, or wire-bound for books or folder or flat for cards. Click the buttons near the Carousel samples to choose options, such as colors and size. The Card choice offers holiday cards, invitations, announcements, and blanks. The estimated price appears on the lower left. Scroll through the different styles or themes (or use the pop-up menu at the top) and see how your photos will look with each theme applied (see Figure 3-27).
If you plan to print cards, keep in mind that some themes accommodate up to four photos (six for baby announcements), while others have space for only one photo.
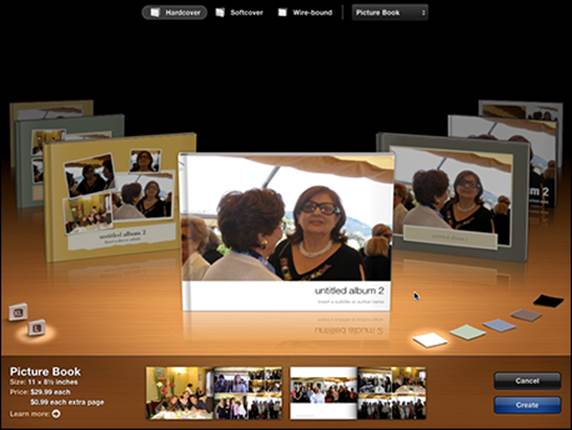
Figure 3-27: You can choose a specific style of book, calendar, or card to create.
4. Click a style and click the Create button.
iPhoto distributes the photos you chose in the book, card, or calendar, as shown in Figure 3-28. Double-click a page to edit the photos in a book or calendar, and click and drag the photos to move them from one page to another. Use the buttons at the bottom to add pages or change the layout of a page or card. Photos on pages with full bleed fill the entire page and have no borders around the photos.
iPhoto distributes the photos by using an Autoflow feature. iPhoto puts together photos that were taken on the same day and uses ratings to choose featured photos. iPhoto also detects faces and crops and frames the subject as it deems best.
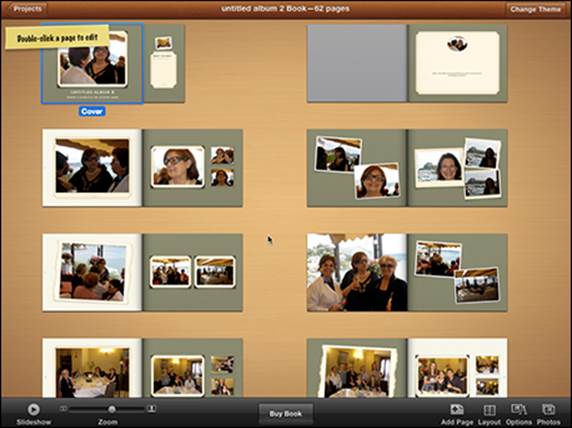
Figure 3-28: iPhoto can automatically enter photos from an event.
5. When you’re satisfied with the layout of your book or calendar, click the Buy button.
A summary of your order appears with the total. Prices for books and calendars typically cost $10 to $30, and greeting cards cost $2 each. Apple’s letter-pressed cards combine your digital photos with letterpress printing. Choose from 15 themes and order one card or a whole box of cards, which come with matching letter-pressed envelopes.
Photos that may not print well because of low resolution are marked with a warning that reads “Low resolution may result in poor print quality.” Go to http://support.apple.com/kb/HT1035?viewlocale=en_US&locale=en_US to review the minimum and recommended resolution for each type of product.
6. Click the Checkout button to proceed to pay online and enter your shipping information.
Your order goes directly to Apple, is dispatched to its service provider, and is delivered to your doorstep a few days later.
Even if you don’t plan to print books, creating a book is a nice way to organize and view your photos on your computer. In full-screen view, click the Projects button at the bottom of the window to see all your projects arranged as books on a bookshelf. Double-click a project to open it, or click it, and then click the Slideshow button to view the book as an automatic slideshow.
All materials on the site are licensed Creative Commons Attribution-Sharealike 3.0 Unported CC BY-SA 3.0 & GNU Free Documentation License (GFDL)
If you are the copyright holder of any material contained on our site and intend to remove it, please contact our site administrator for approval.
© 2016-2026 All site design rights belong to S.Y.A.