Macs All-in-One For Dummies, 4th Edition (2014)
Book I. Getting Started with Mac Basics
Chapter 4. Working with Files and Folders
In This Chapter
![]() Using the Finder
Using the Finder
![]() Organizing and viewing folders
Organizing and viewing folders
![]() Tagging files and folders
Tagging files and folders
![]() Searching with Spotlight
Searching with Spotlight
![]() Setting up Smart Folders
Setting up Smart Folders
![]() Deleting files and folders
Deleting files and folders
When you need to organize stuff scattered around the house, one strategy would be to toss everything in the middle of the floor. However, it’s probably easier to take a more organized approach by storing off-season clothes in one box, retired gadgets in another box (to be taken to the local recycling center), bills in one file folder, and new books you want to read — or your e-book reader — on your nightstand.
Computers work in a similar way. Although you could dump everything on the top level of your hard drive, it’s more helpful to divide your hard drive in a way that can help you sort and arrange your stuff in an orderly, easy-to-get-to fashion. Instead of boxes or shelves, the Mac usesfolders (which tech-types like Joe also refer to as directories). In a nutshell, a folder lets you store and organize related files.
This chapter is dense with information, but familiarizing yourself with the way your Mac organizes documents, applications, and files will make everything you do on your Mac a lot easier. We tell you several ways to do the same thing so you can choose the way that’s easiest for you to do and remember. We begin by explaining the Finder, which is the tool you use to organize your files and folders. Next, we show you how to create and manage folders. We also tell you about tags, a feature added in OS X Mavericks, which helps you quickly identify and find folders and files. At the end of the chapter, we shine a light on your Mac’s search tool, Spotlight Search. At the end of the chapter, we spell out the procedure for deleting files and folders.
Getting to Know the Finder
The Finder manages drives, devices, files, and folders on your Mac. To access the Finder, click the Finder icon (the smiley face icon on the far left or top) on the Dock. The Finder is divided into three parts, as shown in Figure 4-1:
· A toolbar that runs across the top of the window and contains buttons that you use to control and manage the files and folders in the Finder.
· A left pane showing the Sidebar, which is where you find a list of connected storage devices as well as commonly used folders.
· A right pane showing the contents of the selected drive or folder (or search results if one was performed). If you switch to List, Column, or Cover Flow view, which we explain in the section “Organizing and Viewing a Folder,” the right pane also shows a hierarchy of files — and even other folders — stored inside folders.
The right pane may be further divided into tabs, which are essentially panes within the pane that display different folders open simultaneously, although only the one in view on top is active.
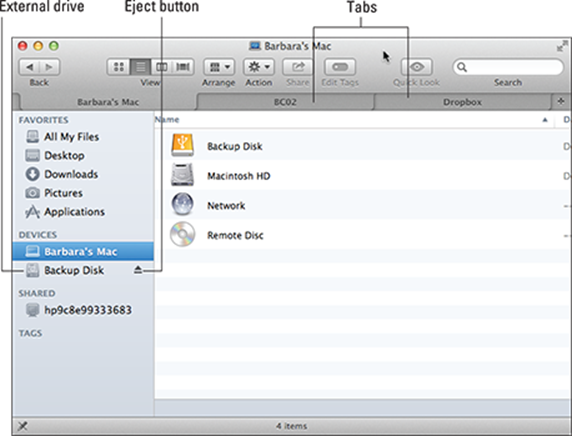
Figure 4-1: The Finder displays the files, folders, and devices connected to your Mac.
 You can choose to hide or show both the toolbar and Sidebar, or hide just the Sidebar from the Finder View menu. You can’t hide the toolbar alone, nor do you have that option if you have active tabs.
Handling devices
The Devices category of the Sidebar lists your Mac (Barbara’s Mac in Figure 4-1) and any devices, remote or cabled, connected to your Mac as well as any mounted disk images, which can appear when you download software updates or large files.
When you click your Mac in the Device category of the Sidebar, you see the internal hard disk drive (HDD) or solid state drive (SSD), which is named Macintosh HD by default. This is the drive that your Mac boots from. If your desktop Mac has a second hard drive installed, it appears in the Devices list.
The other devices listed here are those that you plug into your Mac, such as an external hard drive, a USB flash drive, or a digital camera. One external drive, Backup Disk, is connected in Figure 4-1. These removable devices can be connected and disconnected at any time.
To connect a removable device to your Mac, just plug it in with the appropriate FireWire, Thunderbolt, or USB cable. The icon for the device appears in the Devices list and on the Desktop.
You can eject a removable drive when you no longer need to access it or want to take it with you. Ejecting a removable hard drive or USB flash drive removes its icon from the Finder and Desktop and allows you to then safely disconnect it from your Mac.
 If you physically try to disconnect a removable drive before you eject it, your Mac might mess up the data on that drive. Always eject removable drives before physically disconnecting them.
To remove a removable device from a Mac, do one of the following:
· Click the Finder icon on the Dock to open the Finder window, and then click the Eject button next to the connected drive you want to remove in the Finder window Sidebar.
· Click the device icon on the Desktop and choose File⇒Eject.
· Click the device icon and press ![]() +E.
+E.
· Control-click the device icon and choose Eject from the shortcut menu that appears.
· Drag the device icon to Trash on the Dock (it turns into an Eject button); then let go of the mouse.
If the removable device is a CD/DVD, your Mac ejects it. If the removable device is plugged into a USB (Universal Serial Bus) port or a FireWire port on your Mac, you can then physically disconnect the device.
Understanding folders
All the data you create and save by using an application (such as a word-processing document or a photograph you copy from your digital camera to your Mac’s hard drive) is stored as a file. Although you can store files on any storage device, the more files you store on a device, the harder it is to find the one file you want at any given time. Much like you would place related paper documents in a manila folder rather than stack them willy-nilly on your desk, folders on your Mac help you organize and manage electronic files on a storage device in a logical way. You can even store folders inside other folders.
Initially, every Mac hard drive contains the following folders:
· Applications: Contains all the apps installed on your Mac. When you open Launchpad, you also see all the apps that are stored in the Applications folder.
· Library: Contains data and settings files used by applications installed on your Mac, fonts, and plug-ins used by applications such as Internet web browsers.
· System: Contains files used by the OS X operating system. You shouldn’t change this folder.
Never delete, rename, or move any files or folders stored in the Library or System folders, or else you might cause your Mac (or at least some apps on your Mac) to stop working. Files in the Library and System folders are used by your Mac to make your computer work. If you delete or rename files in either folder, your Mac might not operate the way it’s supposed to — or (worse) grind to a halt.
· Users: Contains any files that you — and anyone else who uses your Mac — create and save, including documents, pictures, music, and movies.
Home folders are kept in the Users folder; each account on your Mac is assigned a Home folder when the account is set up. (See Book III, Chapter 2 for more information about creating accounts.) The Home folder has the same name as the account and shouldn’t be renamed. The Home folder of the user who is logged in looks like a little house.
Each Home folder automatically contains the following folders when an account is set up. Notice that these folders have icons on them.
· Desktop: Contains any application and document icons that appear on your Mac’s Desktop.
· Documents: Contains any files you create and save by using different applications. (You’ll probably want to organize this folder by creating multiple folders inside it to keep all your files organized in a logical, easy-to-manage way.)
· Downloads: Contains any files you download from the Internet. After being downloaded, you’ll want to move them to an appropriate folder or, if you download apps, install them.
· Library: Contains folders and files used by any applications installed on your Mac. (Note: There are three Library folders: one stored on the top level of your hard drive, another inside that Library folder, and one hidden inside your Home folder, which you can see by holding the Option key and choosing Go⇒Library.)
· Movies: Contains video files created by iMovie and certain other applications for playing or editing video, such as Final Cut Pro X or QuickTime Player.
· Music: Contains audio files, such as music tracks stored in iTunes; or created by GarageBand or another audio application; such as Audacity.
· Pictures: Contains digital photographs, such as those you import into iPhoto.
· Public: Provides a folder that you can use to share files with other user accounts on the same Mac, or with other users on a local area network (LAN).
· Sites: Provides a folder for storing any web pages you use on a website you manage.
Every drive (such as your hard drive) can contain multiple folders, and each folder can contain multiple folders. A collection of folders stored inside folders stored inside other folders is a hierarchy. It’s important to know how to view and navigate through a folder hierarchy to find specific files, and we tell you how to do that in the “Navigating the Finder” section later in this chapter.
Setting Finder preferences
As you look at the figures in this book, you might say to yourself, “My Finder doesn’t look like that.” You probably have different Finder preferences than we do. You can choose the items you see in the Finder Sidebar and also how the Finder behaves in certain situations by setting the Finder preferences to your liking. Follow these steps, and remember you can always go back and change them later if you think of a better setup:
1. Click the Finder icon on the Dock.
A Finder window opens.
2. Choose Finder⇒Preferences.
The Finder Preferences window opens.
3. Click the General button at the top, if it isn’t selected.
4. Select the check boxes next to the items you want to see on your Desktop.
You can select any or all of the following: Hard Disks, External Disks, CDs, DVDs, and iPods, and/or Connected Servers.
5. From the New Finder Windows Show pop-up menu, choose which window you want to open when you open the finder.
6. (Optional) Select the Open Folders in Tabs Instead of New Windows check box if you want this option in the Action menu, which you find in the Finder Toolbar.
You can have more than one folder open simultaneously. They can be opened in separate windows, which tend to clutter the Desktop, or in separate tabs within one Finder window. See the section “Working with tabs” to learn about tabs.
7. Click the Sidebar button.
The Sidebar preferences pane opens, as shown in Figure 4-2.
8. Select the check boxes next to the items you want to see in the Finder Sidebar.
When the Finder is open, you can show and hide the items in each category by clicking the Show/Hide button that appears when you hover to the right of the category title in the Sidebar.
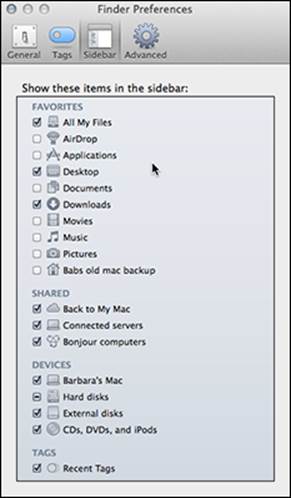
Figure 4-2: Choose the items you want to see listed in the Finder Sidebar.
9. Click the Advanced button to choose to activate one or more of the following options:
· Show All Filename Extensions displays the file extension on every filename on your Mac. File extensions are the two or more letters after a file name, such as .doc or .xls.
· Show Warning before Changing an Extension opens a dialog if you save a file as a different type, such as saving a .doc file as .txt.
· Show Warning before Emptying the Trash gives you time for second thoughts before you throw a document away.
· Empty Trash Securely overwrites files when you empty the trash so a savvy hacker can’t rebuild your documents. This is sort of like shredding your credit card bills before recycling the paper they’re printed on.
You can also set the search level for Spotlight search, which we discuss in the “Spotlight Preferences” section, later in this chapter.
10. Click the red Close button in the upper-left corner to close the window.
Navigating the Finder
To access files stored on your Mac, navigate the different folders and devices by using the Finder. First choose a connected drive or device, and then you can open and exit folders or jump between specific folders. We explain each method throughout these sections.
 To open the Finder, click the Finder icon on the Dock or click the background of your Desktop and choose File⇒New Finder Window. The Finder opens to the folder or device you specified in Finder preferences. The Finder opens when you double-click a folder, too, but it opens at the level of that specific folder, not at the highest point of the Finder hierarchy. See the section “Working with tabs” to learn about opening more than one Finder window or tab at a time.
Opening a folder
When you open the Finder and click a device, the Finder displays all the files and folders stored on that device. To open a folder (and move down the folder hierarchy), you have several choices:
· Double-click the folder.
· Click the folder and choose File⇒Open.
· Click the folder and press ![]() +O.
+O.
· Click the folder and press ![]() +↓.
+↓.
· Click the folder, and then click the Action button on the toolbar and choose Open in New Tab or Open in New Window (depending on whether you select the Open Folders in Tabs Instead of New Windows option from Finder⇒Preferences⇒General) or Open at the very bottom of the menu to open the folder in the existing tab or window.
· Control-click the folder and choose Open or Open in New Tab/Window from the shortcut menu that appears.
Each time you open a folder within a folder, you’re essentially moving down the hierarchy of folders stored on that device.
Working with tabs
Tabs are a way of having several folders open in one pane at the same time so you don’t have to close and open folders to switch between them or use the Back and Forward buttons. To open a folder in a new tab, click the folder, click the Action button, and choose Open in New Tab, as shown in Figure 4-3.
Hold down the Option key while clicking the Action button, and Open in New Tab becomes Open in New Window.
If you want to open a new tab as if it were a new Finder window, click the Add Tab button (the plus sign) on the far right end of the tabs. The Finder opens to the device or folder you specified from Finder⇒Preferences⇒General. You only see the Add Tab button when two or more tabs are open; if you don’t see it, choose File⇒New Tab or Open in New Tab from the Action menu.
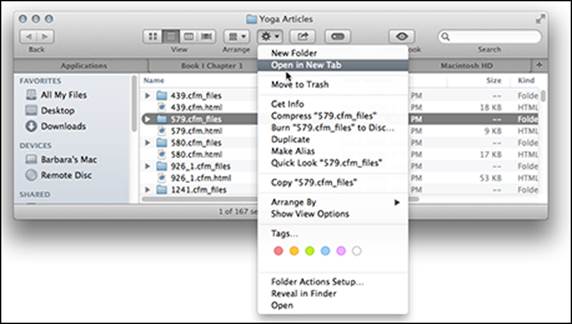
Figure 4-3: Tabs help you navigate through folders on the Finder.
To close a tab, hover over the left end until you see the “x” and then click it.
When you hide, close, or minimize the Finder window and reopen it from the Dock, your tabs are still in place. If, instead, you click the Desktop and choose File⇒New Finder Window, you won’t see your tabs, but you can still access them by clicking the Finder icon on the Dock.
Jumping to a specific folder
By moving up and down the folder hierarchy on a device, you can view the contents of every file stored on a device. However, you can also jump to a specific folder right away by choosing one of these options:
· Click the tab you opened for that folder.
· Choose a folder from the Go menu — for example, choose Go⇒Utilities — or press ![]() +Shift+U to open the Utilities folder. Other folders listed on the Go menu can also be accessed by pressing the appropriate shortcut keys, which appear next to the folder name on the menu.
+Shift+U to open the Utilities folder. Other folders listed on the Go menu can also be accessed by pressing the appropriate shortcut keys, which appear next to the folder name on the menu.
· Click a folder displayed in the Sidebar.
· Use the Go⇒Recent Folders command to jump to a recently opened folder. (Using this command sequence displays a submenu of the last ten folders you visited.)
If you display the contents of a folder in List, Column, or Cover Flow views, you can view folder hierarchies directly in the Finder. (You find out more about using the List, Column, and Cover Flow views later in the “Organizing and Viewing Folders” section.)
Jumping back and forth
While you navigate from one folder to the next, you might suddenly want to return to a folder for a second look. To view a previously viewed folder, you can choose the Back command in one of three ways:
· Click the Back arrow.
· Choose Go⇒Back.
· Press ![]() +[.
+[.
After you use the Back command at least once, you can choose the Forward command, which reverses each Back command you chose. To choose the Forward command, pick one of the following ways:
· Click the Forward arrow.
· Choose Go⇒Forward.
· Press ![]() +].
+].
Moving to a higher folder
After you open a folder, you might want to go back and view the contents of the folder that encloses the current folder. To view the enclosing folder (and move up the folder hierarchy), choose one of the following:
· Choose Go⇒Enclosing Folder.
· Press ![]() +↑.
+↑.
Each of these options changes the tab, if you’re using tabs.
· Hold down the ![]() key, click the name in the Finder window title bar to display the hierarchy of enclosing folders, and then click an enclosing folder.
key, click the name in the Finder window title bar to display the hierarchy of enclosing folders, and then click an enclosing folder.
Do the same on saved document titles in open app windows to see the folder heirarchy.
Following the folder path
Click the Finder icon on the Dock and then choose View⇒Show Path Bar. Displayed at the bottom of the Finder window is the series of folders that lead to the folder you’re currently viewing. Double-click any of the folders in the series to switch to that folder’s view. If you misplace or can’t find a file, click in the Search field of the Finder window, and then type the name of the file or a word or phrase it contains. Click the file you seek from the list of matches that appears, and then use the Path Bar to see where it’s hiding.
The Back command is not the same thing as the Enclosing Folder command. If you open an external drive and then switch to the Utilities folder on your hard drive, the Back command returns the Finder to the external drive, but the Go⇒Enclosing Folder command opens the Applications folder where Utilities resides.
Organizing and Viewing Folders
The Finder shows the contents stored on a device, such as a hard drive, which acts like a giant folder. To move, copy, or delete items within that folder or any of its subfolders, you first have to select the item(s), and we tell you how to do that. If your Mac’s hard drive contains a large number of files and folders, trying to find a particular file or folder can be frustrating so we show you how to search for and tag files and folders. To organize a folder’s contents, the Finder can display the contents of a folder in four views, which we discuss throughout this section. You can also preview files, and we tell you how to do that here as well.
To switch to a different view in the Finder, choose View and then choose As Icons, As Lists, As Columns, or As Cover Flow — or just click one of the view buttons on the toolbar shown in Figure 4-4.
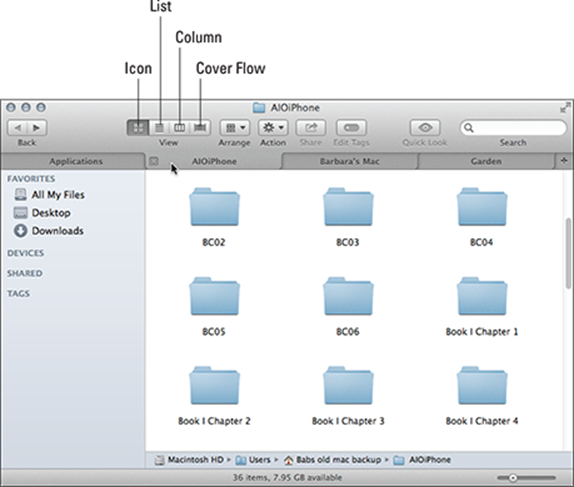
Figure 4-4: The Icon view displays files as descriptive graphics with a name.
Selecting items in the Finder
No matter how you view the contents of a folder, selecting items remains the same. You always have to select an item before you can do anything with it, such as copy or delete it. You can select items three ways:
· Select a single item (file or folder) by clicking it.
· Select multiple items by holding down the ![]() key and clicking each item.
key and clicking each item.
· Selecting a range of contiguous items by clicking and dragging the mouse. Or, in List, Column, or Cover Flow view, click the first item, holding the Shift key, and then click the last item; all items in between the first and last are selected.
Using Icon view
Icon view displays all files and folders as icons (refer to Figure 4-4). To organize files in Icon view, you can manually drag icons where you want, or you can have your Mac automatically arrange icons based on certain criteria, such as name or date modified.
To arrange icons within Icon view manually, follow these steps:
1. Move the pointer over an icon you want to move.
 You can select two or more icons by holding down the
 ![]() or Shift key and clicking multiple icons.
or Shift key and clicking multiple icons.
2. Click and drag the mouse.
Your selected icon(s) moves when you move the mouse.
3. Release the mouse button when you’re happy with the new location of your icon(s).
 When you arrange icons manually, they might not align with one another. To fix this problem, make sure that no items are selected and then choose View⇒Clean Up Selection to straighten them up.
Manually arranging icons can be cumbersome if you have dozens of icons you want to arrange. As a faster alternative, you can arrange icons automatically in Icon view by following these steps:
1. Click the Arrange button on the toolbar of the Finder window to open the pop-up menu, or choose View⇒Arrange By.
2. Choose one of the following options:
o Name: Arranges icons alphabetically.
All the following arrangements create sections to group like files and folders.
o Kind: Arranges items alphabetically by file extension, clustering together Microsoft Word files, JPG picture files, and music tracks, for instance.
o Application: Arranges items by application type.
o Date Last Opened: Puts files and folders you opened today in the Today section, those you opened yesterday in the Yesterday section, and so on for the Previous 7 Days, Previous 30 Days, and Earlier.
o Date Added: Same type of sorting as Date Last Opened but by when you added the file or folder. Added files may be ones that were copied or downloaded from another source as well as files or folders you created.
o Date Modified: Arranges the most recently modified items at the top of the window and divides the others in the time intervals as Date Last Opened.
o Date Created: Arranges the most recently created items at the top of the window and divides the others in the time intervals as with Date Last Opened.
o Size: Arranges the largest sized files and folders at the top of the window. Files are grouped by size divisions, such as 100MB to 10GB, 1MB to 100MB, and 10KB to 1MB.
o Label: Arranges icons alphabetically by color. Icons with no color appear near the top of the window, followed by icons colored blue, gray, green, orange, purple, red, and yellow.
If you don’t see the buttons we describe in the toolbar, choose View⇒Customize Toolbar. Click and drag the buttons you want to see from the bottom pane to the Finder toolbar. To delete those you don’t want to see, simply click and drag them down to the bottom pane, and they disappear in a puff of virtual smoke.
Using List view
By default, List view displays each item by name, size, date it was last modified, and the kind of item it is, such as a folder or a PDF (Portable Document Format) file. The biggest advantages of List view are that it always displays more items in the same amount of space than the Icon view, it displays hierarchies of folders as indented items (shown in Figure 4-5), and you can select items from multiple folders at the same time.
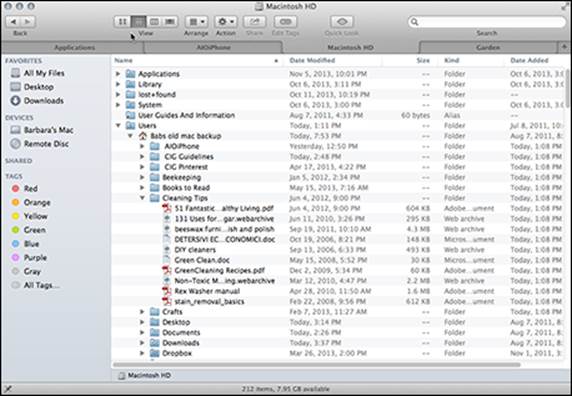
Figure 4-5: List view displays items in rows and folders as hierarchies.
You can change the width of the columns by hovering the cursor over the line between two headers until it becomes a vertical line crossed by a double-ended arrow. Click and drag left or right to make the columns wider or narrower. Rearrange the order of the columns by clicking and dragging the header title. Only the Name column must remain as the first column. Additionally, if you click a column heading in List view (such as Name or Date Modified), the Finder sorts your items by that column in ascending or descending order.
When you view your Macintosh HD in List view, user folders are identified by a folder icon and a triangle symbol (which Apple officially refers to as a disclosure triangle) pointing to it. Clicking that triangle symbol expands that folder to display its contents — files, more folders, whatever. Clicking the triangle again collapses that folder to hide its contents. If you click a folder with a disclosure triangle, and then select Option+→, the top level folder and all folders contained within it open. Choose Option+← to collapse and close all the folders.
When you expand more than one folder, List view makes it easy to move files and folders from one folder to another. Select multiple folders or files at one time by holding down the ![]() key and clicking each item you want to select. When you’re done selecting folders and/or files, you can then click and hold on one of the selected items and drag them all to wherever you want to move them — to another folder in that view, to the Desktop, or to the Trash on the Dock. If you have another folder, device, or drive open in a separate tab, drag the items to the tab. Then when the tab is highlighted, release the mouse or trackpad button, and the items will be moved to that folder, device, or drive.
key and clicking each item you want to select. When you’re done selecting folders and/or files, you can then click and hold on one of the selected items and drag them all to wherever you want to move them — to another folder in that view, to the Desktop, or to the Trash on the Dock. If you have another folder, device, or drive open in a separate tab, drag the items to the tab. Then when the tab is highlighted, release the mouse or trackpad button, and the items will be moved to that folder, device, or drive.
If you don’t have many files or folders (or you just like everything sort of thrown together), the Finder has an All My Files option, which displays documents from your user account on your Mac, in the view you choose, sorted by the criteria selected from the Arrange pop-up menu.
Using Column view
Column view initially displays files and folders in a single column. As with List view, all folders display a triangle next to the folder name. (Okay, okay, in List view, the triangle is just to the left of the folder name, and Column view has the triangle at the far right, but you get the idea.) Clicking a folder displays the contents of that folder in the column to the right, as shown in Figure 4-6.
When you reach an application or document file, the rightmost column shows a preview of the application or document.
You can adjust the width of the columns by clicking and dragging the short, vertical lines at the bottom of the column divider. You can rearrange the order of the columns by dragging the headers, as in List view.
In any view, click the Arrange button to change the sorting criteria.
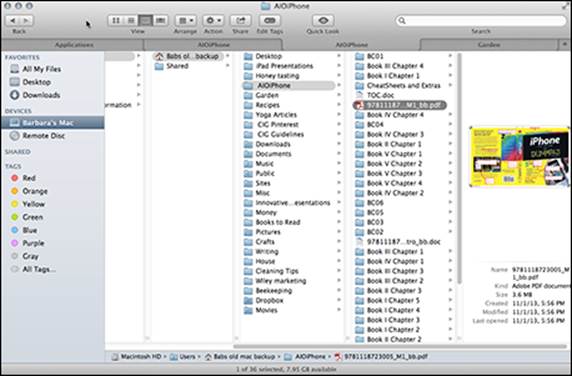
Figure 4-6: Column view displays the folder contents in adjacent columns.
Using Cover Flow view
Cover Flow view combines List view with the graphic elements of Icon view, as shown in Figure 4-7. Cover Flow originated from jukeboxes that let you pick songs by viewing and flipping through album covers. In the Finder, Cover Flow lets you choose files or folders by flipping through enlarged icons of those files or folders, which can make finding a particular file or folder easier.
Click and drag the resizing button just below the Cover Flow scroll bar up and down to zoom in and out of the image pane. To scroll through items in Cover Flow view, you have a number of choices:
· Drag the scroll box in the Cover Flow scroll bar.
· Click in the scroll area to the left or right of the scroll box on the Cover Flow scroll bar.
· Click an icon on either side of the icon preview image that appears in the middle of the Cover Flow view.
· Press the up- and down-arrow keys to select a different file or folder in the list portion of the Cover Flow view. Each time you select a different file or folder, the Cover Flow icon for that file or folder appears.
If you don’t see scroll bars, select ![]() ⇒System Preferences, and the click the General icon. Select the button next to Show Scroll Bars Always.
⇒System Preferences, and the click the General icon. Select the button next to Show Scroll Bars Always.
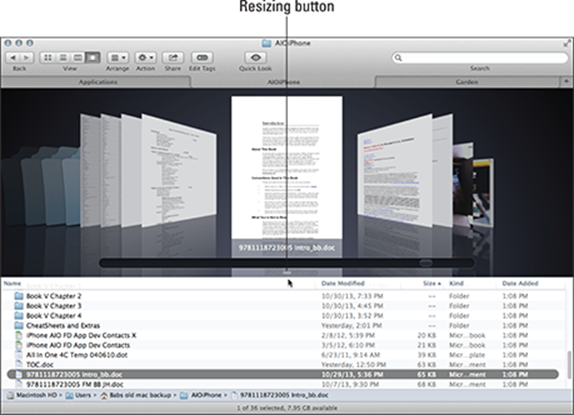
Figure 4-7: Cover Flow view displays both icons and item names.
Changing your view options
In any view of the Finder or any folder — Icon, List, Column, or Cover Flow — you can change the view options. You can also choose to make one style view the default for every folder you open in a Finder window or you can set different views for different folders. From any of the four views, choose View⇒Show View Options.
The View Options window opens, shown in Figure 4-8, displaying these choices from left to right:
· Icon view: Scale the size of the icons and the grid spacing, adjust the text size and position, and add color to the background.
· List/Cover Flow view: Set the same options. Choose small or large icons, the text size, and the columns you want to see displayed.
· Column view: Choose the text size and whether you want to see icons and the preview column.
In any of the View Options windows, you can choose how to arrange or sort the folders and files.
· Always Open in Icon/List/Column/Cover Flow View: Select this option if you want to see the selected folder in that view.
· Browse in Icon/List/Column/Cover Flow View: You want subfolders of this folder to open in the same view.
· Use as Defaults: You want the Finder and any folders to always open with this view.
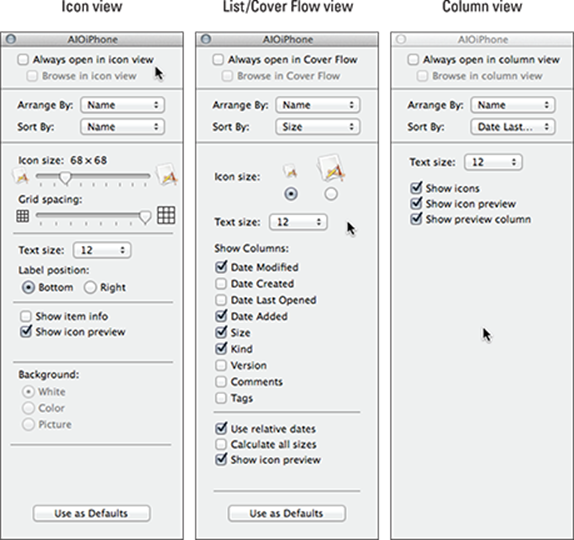
Figure 4-8: Use View Options to customize how you view the Finder and folders.
Using Quick Look to view file contents
Quick Look enables you to see the contents of a file for many file types without having to run the application you would normally use to create, view, and save it. Just select a file icon and then click the Quick Look view button (or press the spacebar) to display an enlarged preview icon of the selected file, as shown in Figure 4-9. You have four options to close the Quick Look display:
· Click the Close button in the upper-left corner.
· Press the spacebar.
· Press the Escape key.
· Click the app button to open the file. The Quick Look window offers many options for working with the image:
· Resize the window by clicking and dragging any edge or corner.
· Click the full-screen button in the upper-right corner to isolate the Quick Look window from everything on the Desktop. In full screen view, click the Exit Full Screen button to keep the window open but return to the Finder, or click the Close button to close the window and return to the Finder.
· If you use a trackpad, pinch and spread to zoom the contents of the Quick Look window.
· Scroll up and down and left and right on documents that are longer or wider than the window.
· Click the Share button to send the file to someone as an attachment to an e-mail in Mail, an instant message in Message, or to another computer on the same network with AirDrop. Some files can also be shared on Facebook, Twitter, or Flickr.
· (Available for some file types) Choose File⇒Print to immediately print the image.
Figure 4-9: Click a file icon and press the spacebar to preview the file’s contents with Quick Look.
The Quick Look view behaves differently, depending on the type of file you’re peeking into:
· A recognizable audio file plays in its entirety, so you can hear its contents.
· A full-size picture file appears in a window, so you can see what the picture looks like.
· A recognizable movie file plays in its entirety, so you can see and hear its contents.
· PDF files and HTML files (web pages) appear in a scrollable window that lets you read their contents.
· A document file (created by other applications, such as spreadsheets and word processors) is scrollable if in a format that QuickLook recognizes, or displays the first screen of its contents along with a listing of its name, size, and date of last modification.
· A folder appears as an icon listing its name, size, and last modified date.
· An application icon is displayed along with a name, size, and last modified date.
If you don’t have the app that a file was created in, chances are that you can view it as an image by using the Preview app. From Preview, you can search, copy, and print — but not edit — image and PDF documents. Click the Preview icon from Launchpad. Choose File⇒Open, and then click the file you want to view in the chooser, which looks and functions like the Finder.
You can also sign PDF documents, which we explain in the article “Signing on the Dotted Line in Preview” online at www.dummies.com/extras/macsaio.
Creating Folders
In addition to letting you navigate your way through different folders, the Finder also lets you create folders. The main purpose for creating a folder is to organize related files and folders together. You create a folder in the Finder or the Save As dialog. The next sections walk you through each method.
Creating a folder from the Finder menu
Although many Mac users consider the Documents folder as the repository for all folders and documents, we tend to create folders directly in the Home folder and keep the folders for active projects on the Desktop. Each folder relates to a project or category and often contains subfolders and files in the subfolders. For example, the folder for a book project could comprise folders for each chapter, which contain the word processing and image files for the respective chapter. You can create and organize your files and folders in a way that makes sense to you — and that’s the beauty of the modern, flexible computer interface called Mac. To create a folder from the Finder menu, follow these steps:
1. Click the Finder icon on the Dock.
The Finder appears.
2. In the Sidebar of the Finder, click the location (for example, Macintosh HD) or device (such as an external USB flash drive) where you want to create a folder.
3. Navigate to and open the folder where you want to store your new folder, such as the Documents or Home folder or Desktop.
4. Choose File⇒New Folder (or press Shift+![]() +N).
+N).
An untitled folder icon appears with its name selected.
5. Type a descriptive name for your folder and then press Return.
Your new folder is christened and ready for use.
Creating a folder from Save or Save As
The Finder isn’t the only way to create a new folder. When you save a file for the first time or save an existing file under a new name, you can also create a new folder to store your file at the same time. You use the Save As command, which is the Duplicate command in apps that support Versions, such as Pages or Numbers. (To find out more about Mac’s version control feature, see the nearby sidebar, “Saving multiple versions of documents.”) To create a folder from the Save or Save As dialog, follow these steps:
1. Create a new document in any application, such as Microsoft Word or Apple Pages.
2. Choose File⇒Save if this is the first time you’re saving the document.
If you’ve already saved the document, choose Save As or Duplicate; choosing Save at this point only saves changes to the current document without opening a dialog.
A Save As dialog appears, as shown in Figure 4-10.
3. Click the arrow button to the right of the Save As field.
The Save As dialog expands to display your Mac’s storage devices and common folders in a Finder-like presentation.
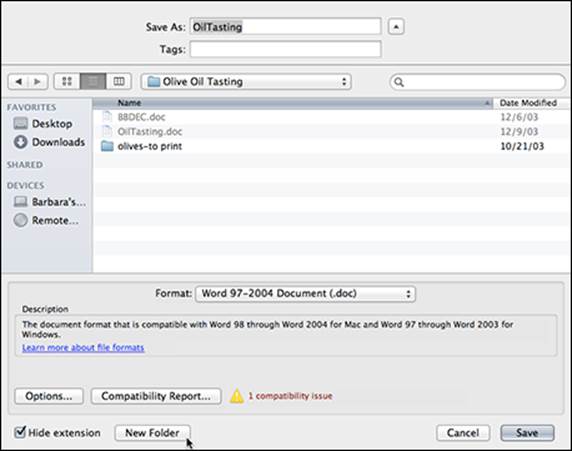
Figure 4-10: Create a new folder while you’re saving a file.
4. In the Sidebar of the dialog, click the device where you want to create a folder and open the folder where you want to create a new folder.
5. Click the New Folder button (or Shift+![]() +N).
+N).
A New Folder dialog appears, as shown in Figure 4-11.
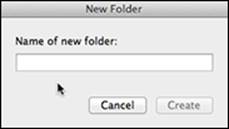
Figure 4-11: Name your folder.
6. Type a name for your folder in the dialog’s text box and then click Create.
A new folder is created in the location you specified.
This name can’t be identical to the name of any existing folder in that location.
7. In the main window of the Save As dialog, type a name for your document in the Save As text box and click Save.
Your new document is stored in your new folder.
Saving multiple versions of documents
If you’re using an app that supports Versions, such as Pages or Numbers, Versions keeps your current document, creates a snapshot of the changed document, and saves a version of the changed document once per hour. The new version doesn’t have a different name but a timestamp that shows when each was saved. Instead of opening several files, you access the different versions from within the app and restore an older version if you don’t like the changes you made to a more recent version.
To see the previous versions of a document, choose File⇒Revert To. The current document appears on the left and a stack of previous time-stamped versions appears on the right. Scroll through the stack to access a previous version, and click Restore when you find the version you want to use. Even when you close the document, the interim versions remain so you can always retrieve a version from older (better) times.
The first time you save a document you create, you see the Save option in the File menu, just as you always do. After you save the document for the first time, you see the Save a Version option in the File menu. Versions automatically saves a copy of an open file you’re working on once per hour. If you want to save a version in the interim, choose File⇒Save a Version.
If you want to save a copy of the document and create a new folder in which to place it, choose File⇒Duplicate, and then choose File⇒Save. Create a folder as explained previously and save the duplicated document in the newly created folder.
Playing Tag: Classify Files and Folders for Quick Access
You may have noticed the Tags button in the Finder preferences window. Added to OS X 10.9 Mavericks, tags provide a way to identify files, in addition to the name. Although every file should have a unique name (you can have duplicates if they’re stored in different folders but we don’t recommend this), you can apply the same tag to many files or folders and then search for or view files by tag. You can add tags to new files when you save them for the first time or add tags to existing files and folders — and then with a click, access everything attached to a single tag.
Initially, Mavericks offers seven colored tags. You can simply tag a file or folder by a color, but then you have to remember what each color means. Tags become more effective when you name the colors and add other named tags. You can also assign a color to the named tags, but your choices are limited to those seven predetermined colors.
Setting tag preferences
To give more meaningful names to the colored tags, click the Desktop outside a window and then choose Finder⇒Preferences⇒Tags. Click the color name of one of the tags to select it, and then type a new name. For example, Green could become Garden Ideas. Do two other tasks in the Tags preferences:
· Display tags in the Sidebar. Select the check box next to the tags you want to appear in the Finder Sidebar. When you click the tag in the Sidebar, all files with that tag will appear in the right pane of the Finder window.
· Access tags from the Finder menu. Drag tags from the list to the box at the bottom of the window to designate favorite tags that you want to see in the Finder’s File menu.
· Change tag colors. Click the colored circle next to a tag name and choose a different color or no color from the list.
Tagging existing files and folders
If you have thousands of files on your Mac, you probably won’t go through and tag them all, but you may want to tag those files that you access frequently or are related to a project. To tag an existing file or folder
1. Click the Finder icon on the Dock to open a Finder window.
2. Click and scroll through the folders and files to find the one you want to tag.
3. Click the file or folder once to select it (double-clicking would open it).
4. Click the File menu and then do one of the following:
· Click a color from the tags at the bottom of the menu. The tag is added to your folder or file.
· Click Tags to see more tag options or create a new tag name. The Tags window opens, as shown in Figure 4-12. Type a new tag name or click Show All (at the bottom of the Tags list) to see all the tags you use and click one from that selection. When you type a new tag name, it appears in the Tags list.
Or, click the Edit Tags button in the Finder window toolbar and click the tag you want to add to the file or folder (click Show All if you don’t see all your existing tags) or type a name to create a new tag.
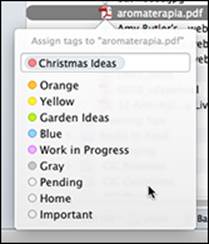
Figure 4-12: Descriptive tags help you find files and folders fast.
5. Click or create other tags you wish to add to the file or folder.
You can add as many text tags as you want. You are limited to the seven preset colors, although you can use the same color for more than one tab. Go to Finder⇒Preferences⇒Tags and click the colored circle next to a tag to change a tag’s color.
6. (Optional) To delete tags from a file or folder, click the file or folder once, and then click the Edit Tags button in the Finder window toolbar. Click to place the pointer to the right of the tag you want to delete and then press the Delete key.
Tagging new files
When you create a new file of any kind, you save it at some point with a name and location. The Save and Save As dialogs have Tag fields where you tag the new file with an existing tag or tags, or create a new tag that you can then use for other files as well. From the app, choose File⇒Save or Save As and then click the Tags field. The list of colored tags appears, and the Show All option is at the bottom. Click the tag you want to use from the list or type a new tag to add it to the Show All list.
Finding your tagged files
To find files with the same tag, click Finder on the Dock and then click the tag in the Sidebar (or click All Tags and then click the tag you want). All files and folders with that tag appear in the contents pane on the right side of the Finder window.
If you don’t see Tags in the Sidebar, choose Finder⇒Preferences⇒Sidebar, and make sure the check box next to Tags is selected. Then, click the Tags button, and click the check box next to the Tags you want to see listed in the Sidebar — although clicking All Tags will open a list that shows all your tags, including those you choose not to see in the Sidebar.
Manipulating Files and Folders
After you create a file (by using an application such as a word processor) or a folder (by using the Finder or a Save As dialog from an application), you might need to change or edit the name of that file or folder to correct a misspelling or to change the name altogether. Additionally, you might need to move or copy that file or folder to a new location or delete it altogether.
To make sure that you’re copying, moving, or changing the correct file, you may want to open it first. However, this can take time, and a faster way to view the contents of a file is to click that file in the Finder window and then click the Quick Look icon (or press the spacebar) to take a peek into the file’s contents (refer to Figure 4-9).
Renaming files and folders
Keep these rules in mind when naming and renaming files and folders.
· Number of characters: File and folder names can’t be longer than 255 characters.
· Character restrictions: You can’t use certain characters when naming files or folders, such as the colon (:). Additionally, some applications might not let you use the period (.) or slash (/) characters in a filename.
· Duplicate folder names: One folder can’t have the same name as another folder in that same location. For example, you can’t store two folders named Tax Info in one folder (such as the Documents folder). You can, however, store two folders with the same name in two different locations — and if you try to move one of them to the same place as the other, your Mac asks whether you want to merge the two folders into one folder with the same name or replace one with the other.
· Duplicate filenames: You can store two identically named files in different folders. If you try to move a file into a folder that already contains a file with the same name, a confirmation dialog asks whether you want to replace the older file with the new one or keep the new one with a numeric suffix appended to the name.
· File extensions: You can also store identically named files in the same location if (and only if) a different application created each file. That means you can have a word processor document named My Resume and a spreadsheet file also named My Resume stored in the same folder.
 A file’s complete name consists of two parts: a name and a file extension. The name is any arbitrary descriptive name you choose, but the file extension identifies the type of file. An application file actually consists of the .app file extension, a Microsoft Word file consists of the .doc or .docx file extension, a Pages file consists of the .pages file extension, and a Keynote file consists of the .key file extension.
Therefore, a My Resume file created by Microsoft Word is actually named My Resume.doc, and the identically named file created by Pages is actually named My Resume.pages.
To view a file’s extension, click that file and choose File⇒Get Info (or press ![]() +I). An Info window appears and displays the file extension in the Name & Extension text box, as shown in Figure 4-13. To view the file extensions for this file, deselect the Hide Extension check box. To view extensions for all files in the Finder, follow the instructions as explained in the earlier section, “Setting Finder preferences.” You can also add tags to a file in its Info window.
+I). An Info window appears and displays the file extension in the Name & Extension text box, as shown in Figure 4-13. To view the file extensions for this file, deselect the Hide Extension check box. To view extensions for all files in the Finder, follow the instructions as explained in the earlier section, “Setting Finder preferences.” You can also add tags to a file in its Info window.
Folders don’t need file extensions because file extensions identify the contents of a file, and folders can hold a variety of different types of files.
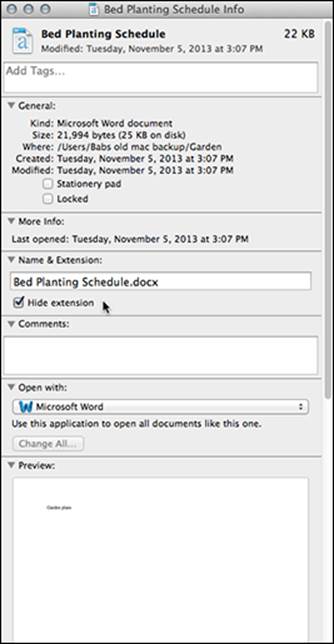
Figure 4-13: Display file extensions or not.
For a fast way to rename a file or folder, follow these steps:
1. Click a file or folder that you want to rename and then press Return.
The file or folder’s name appears highlighted.
 When editing or typing a new name for a file, changing the file extension can confuse your Mac and prevent it from properly opening the file because it can no longer identify which application can open the file. Don’t modify or remove the file extension.
2. Type a new name (or use the left- and right-arrow keys and the Delete key to edit the existing name) and then press Return.
Your selected file or folder appears with its new name.
Copying a file or folder
At any time, you can copy a file or folder and place that duplicate copy in another location. When you copy a folder, you also copy any files and folders stored inside. To copy a file or folder, you can use either menus or the mouse.
Using menus to copy a file or folder
To copy a file or folder by using menus, follow these steps:
1. Click the Finder icon on the Dock.
The Finder appears.
2. Navigate to (and open) the folder that contains the files or folders you want to copy.
Use the Sidebar and the various other navigation techniques we outline earlier in this chapter to find what you want.
3. Select one or more files or folders you want to copy and then choose Edit⇒Copy (or press ![]() +C).
+C).
4. Navigate to (and open) the folder where you want to store a copy of the file or folder.
5. Choose Edit⇒Paste (or press ![]() +V).
+V).
You have your own cloned file or folder right where you want it.
You can also create an alias of a file or folder, as we explain in Book I, Chapter 5. An alias — a shortcut — points to the actual file or folder, acting like a remote control for opening the file.
Using the mouse to copy a file or folder
Using the menus to copy a file or folder is simple, but some people find clicking and dragging items with the mouse to be more intuitive. You can drag between two separate devices (such as from a flash drive to a hard drive) or between different folders on the same device.
1. Click the Finder icon on the Dock.
The Finder shows its face.
2. Navigate to the folder where you want to store your copied files or folders.
3. Click the folder and choose File⇒New Tab.
A second tab opens for that folder.
4. Click the first tab and navigate to the folder containing the file or folder you want to copy.
5. Using your mouse, click to select one or ![]() -click to select multiple files or folders.
-click to select multiple files or folders.
6. Drag your selected file(s) and/or folder(s) to the second tab.
If you want to drag a file or folder to a new location on the same device, hold down the Option key while dragging the mouse; otherwise, you just move the file or folder to the new location rather than placing a copy there.
A green plus sign appears near the pointer while you drag the mouse.
7. Release the mouse button when the second tab is highlighted.
Your selected files and folders appear as copies in the folder you selected.
Dragging a file or folder to a new location on the same device (such as from one folder to another on the same hard drive) always moves that file or folder (unless you hold down the Option key, which ensures that the original stays where it is and a copy is created in the new location). On the other hand, dragging a file or folder from one device to another (such as from a USB flash drive to a hard drive) always copies a file or folder — unless you use the ![]() key, which creates a copy on the destination drive and deletes the original.
key, which creates a copy on the destination drive and deletes the original.
Moving a file or folder
Files and folders can be moved within the Finder following similar steps as for copying — just don’t hold down the Option key.
However, thanks to your Mac’s spring-loaded folders feature, you can also move files and folders without opening a second tab. Drag and hold the file or folder you want to move over the icon of the device or folder you want to copy to, and wait a moment or two until the folder springs open. (You can keep springing folders open this way until you reach the one you want.) Let go of the mouse button to move the file or folder. To adjust how long it takes for folders to spring open, click the Finder, choose Finder⇒Preferences, and click the General tab. Then drag the slider at the bottom of the window to adjust how quickly (or slowly) folders spring open when you hover over them with a selected file or folder.
Drag the file or folder out of the Finder to the Desktop for a moment to spring back to your starting point, and then release the mouse or trackpad to leave things where they were.
Grouping files
You can select several files from different locations and move them into a folder by holding the ![]() key and clicking each file, or by holding the Shift key while clicking the first and last file in a list to select all the files between the first and last file selected. Click and hold one of the selected files and begin to drag them toward the folder where you want to place them. They will be grouped together, and the number of files appears in a red circle on top of the group. Drag the group over the folder where you want to place them until the folder is highlighted, and then release them.
key and clicking each file, or by holding the Shift key while clicking the first and last file in a list to select all the files between the first and last file selected. Click and hold one of the selected files and begin to drag them toward the folder where you want to place them. They will be grouped together, and the number of files appears in a red circle on top of the group. Drag the group over the folder where you want to place them until the folder is highlighted, and then release them.
If you want to create a new folder for a group of files, select the files as we describe in the previous paragraph. From the Desktop, choose File⇒New Folder with Selection. A new folder is created called New Folder with Items, which you can rename as explained previously in the “Renaming files and folders” section.
Create a new folder, open that folder in a new tab, and then drag selected files and folders to the new tab. All the selected items are in the new folder.
Archiving Files and Folders
Files and folders take up space. If you have a bunch of files or folders that you don’t use, yet want or need to save (such as old tax information), you can archive those files. Archiving grabs a file or folder (or a bunch of files or folders) and compresses them into a single file that takes up less space on your hard drive than the original file(s), unless you’re archiving files that don’t compress, such as JPEG, videos, and some audio.
After you archive a group of files, you can delete the original files. If necessary, you can later “unpack” the archive file to retrieve all its files.
You have two common ways to archive files and folders:
· Creating ZIP files: ZIP files represent the standard archiving file format used on Windows computers. (By the way, ZIP isn’t an acronym. It just sounds speedy.)
· Creating DMG files: DMG files (DMG is shorthand for disk image) are meant for archiving files to be shared only with other Mac users. Generally, if you want to archive files that Windows and Mac users can use, store them in the ZIP file format. If you want to archive files just for other Mac users, you can use the ZIP or DMG file format. If you want to share the disk image with computers that use a different operating system, use the Disk Utility found on your Mac to create a Hybrid disk image, as explained in the section “Creating a DMG file.”
The ZIP file format is faster and creates smaller archives than the DMG file format. However, the DMG file format offers more flexibility by allowing you to access individual files in the archive without having to unzip everything the way you must with a ZIP file. Most people use ZIP archives to store data. The most popular way to use DMG files is for storing and distributing software.
Creating a ZIP file
A ZIP file can contain just a single file or folder, or dozens of separate files or folders. To create a ZIP file, follow these steps:
1. Click the Finder icon on the Dock.
The Finder comes to the fore.
2. Navigate to (and open) the folder that contains the file or folder you want to archive.
3. Select one or more items you want to archive.
4. Choose File⇒Compress.
If, for instance, you select three items in Step 3, the Compress command displays Compress 3 items.
An archive file named Archive.zip appears in the folder that contains the items you selected to compress. If you compress a named folder, the ZIP file has the same name as the folder with the .zip extension. You can see both in Figure 4-14. You can rename this file to give it a more descriptive name.

Figure 4-14: ZIP files appear with a zipper icon.
To open a ZIP file, just double-click it. Doing so creates a folder inside the same folder where the ZIP file is stored. Now you can double-click this newly created folder to view the contents that were stored in the ZIP file.
Creating a DMG file
Although ZIP files are handy for storing files, DMG files more often are used to compress and store large items, such as the contents of an entire folder, CD, or hard drive. To create a DMG file, follow these steps:
1. Click the Finder icon on the Dock.
The Finder appears.
2. Move or copy the files you want to store in the DMG file into a single folder.
3. Choose Go⇒Utilities and double-click the Disk Utility application icon.
The Disk Utility application loads and displays its window.
4. Choose File⇒New⇒Disc Image from Folder.
The Select Folder to Image dialog appears.
5. Using the Select Folder to Image dialog, navigate to and select the folder containing the files you chose in Step 2.
6. Click Image.
The New Image from Folder dialog appears, as shown in Figure 4-15.
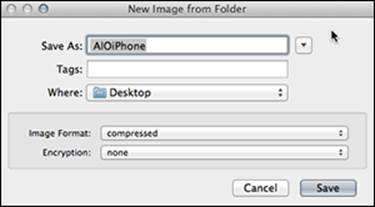
Figure 4-15: Name and define the location of your disk image file.
7. In the Save As text box, enter a name for your disk image file.
8. (Optional) Add any tags that might help you find the file later.
9. (Optional) From the Where pop-up menu, choose a folder or device to store your disk image.
The disk image will be saved to the Desktop by default.
10. Open the Image Format pop-up menu and choose one of the following:
· Read-Only: Saves files in the DMG file, but you can never add more files to this DMG file later.
· Compressed: Same as the Read-Only option except that it squeezes the size of your DMG file to make it as small as possible.
· Read-Write: Saves files in a DMG file with the option of adding more files to this DMG file later.
· DVD/CD Master: Saves files for burning to an audio CD or a video DVD.
· Hybrid Image (HFS + ISO/UDF): Saves files in a DMG file designed to be burned to a CD/DVD for use in computers that can recognize Hierarchical File Structure (HFS), ISO 9660 (International Organization for Standardization), or Universal Disk Format (UDF) for storing data on optical media. (Most modern computers can recognize HFS and UDF discs, but older computers might not.) Also saves files in a DMG file designed for transfer over the Internet.
11. (Optional) From the Encryption pop-up menu, choose None, 128-bit AES, or 256-bit AES encryption.
If you choose encryption, you have to define a password that can open the DMG file.
AES stands for Advanced Encryption Standard, the American government’s latest standard for algorithms that scramble data. Choose one of these options if you want to prevent prying eyes from viewing your disk image file’s contents (unless you share the password with those you trust).
12. Click Save.
Disk Utility displays a progress message while it compresses and stores the files in your chosen folder as a DMG file.
13. When the disk imaging is complete, choose Disk Utility⇒Quit Disk Utility to exit the application.
Figure 4-16 shows the DMG file (with the .dmg extension). Double-clicking a DMG file unpacks it and displays a hard drive icon (also in Figure 4-16) on the Desktop and in the Devices section of the Finder. It functions like any other drive: Double-click to open and see the contents; open, copy, edit (read-write files), and print files contained within; use the Eject command to remove the drive. If you want to share the DMG file, you should share the file — not the drive.
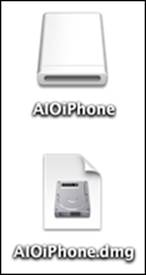
Figure 4-16: Creating a disk image from a folder creates a DMG file.
Deleting files and folders
Like garages, basements, and attics, after a while your Mac probably has stuff that you can throw away, get rid of, or just plain delete. You can delete single files, single folders that contain multiple files, or multiple files and folders together with these steps:
1. In a Finder window or on the desktop, select the single or multiple files or folders you want to delete in one of the following ways:
· Click the single file or folder.
· Click and drag to select a group of contiguous files or folders in a window or on the desktop.
· Shift-click the first and last of a group of contiguous files or folders.
· ![]() -click multiple non-contiguous files or folders.
-click multiple non-contiguous files or folders.
2. Click File⇒Move to Trash and drag the selected files to the Trash icon on the Dock or press ![]() +Delete.
+Delete.
The files and folders are moved to the Trash file. From here, you can still retrieve your files and folders.
3. When you’re sure you want to eliminate the files and folders from your Mac’s memory, click the Desktop, and do one of the following:
· Choose Finder⇒Empty Trash, and then confirm by clicking the Empty Trash button
· Choose Finder⇒Secure Empty Trash, and then confirm by clicking the Secure Empty Trash button
While recovery utilities may be able to restore items deleted with the Empty Trash command, those deleted with the Secure Empty Trash button are irretrievable.
Searching Files
No matter how organized you try to be, there’s a good chance you might forget where you stored a file. To find your wayward files quickly, you can use the Spotlight feature.
In Spotlight, just type a word or phrase to identify the name of the file you want or a word or phrase stored inside that file. Then Spotlight displays a list of files that matches what you typed. Say you want to find all the files related to your baseball collection. Type baseball, and Spotlight would find all files that contain baseball in the filename — or in the file itself, if it’s one your Mac can peer into (such as a Word document or an Excel spreadsheet). If you type image:baseball, Spotlight will show you only the image files that have baseball in the name.
Using Spotlight
Spotlight searches for text that matches all or part of a filename and data stored inside of a file. Hint: When using Spotlight, search for distinct words. For example, searching for A will be relatively useless because so many files use A as part of the filename and in the content. However, searching for ebola will narrow your search to the files you most likely want.
Spotlight searches your entire computer. To restrict a search to a specific folder, be sure to check out the next section.
To use Spotlight, follow these steps:
1. Click the Spotlight icon, which looks like a magnifying glass in the upper-right corner of the menu bar.
Alternatively, press ![]() +spacebar.
+spacebar.
If your application is open in full-screen mode, move the pointer up to the upper-right corner of your screen so the menulets appear, where you can click the Spotlight icon.
2. Type a word or phrase.
While you type, Spotlight displays the files that match your text, dividing by file type. If you click one of the matching files, a quick view window opens, as shown in Figure 4-17.
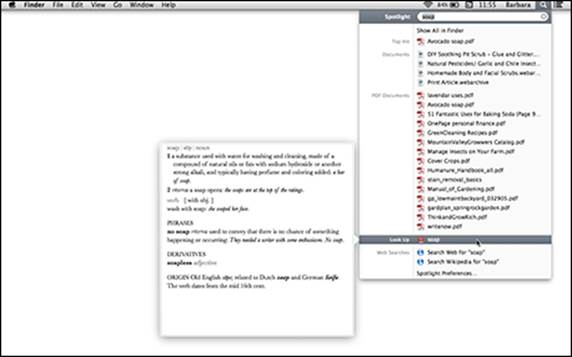
Figure 4-17: Click a matching file in the Spotlight list to see a preview.
3. Click a file to open it or click Show All in Finder at the top of the list to see the entire list of matches in a Finder window.
Narrow your search by setting more limited criteria in the Show All in Finder window.
4. Click the device you want to search.
5. Click the plus button next to Save on the right side to open two criteria fields, as shown in Figure 4-18.
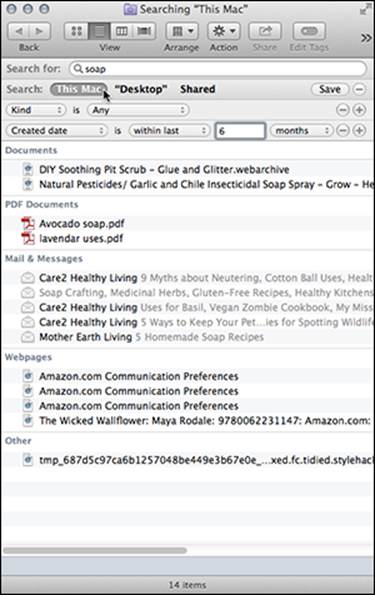
Figure 4-18: Use specific criteria to narrow your search.
6. In the first field, choose from Kind, Name, Contents, Visibility, and Creation and Modification Dates. Click Other to open a window that lets you choose more specific attributes to search by.
7. Enter information in the successive field (or fields) or pop-up menus to complete the search criteria, and then type the word or words in the file(s) you’re seeking.
For example, if you choose Name in the first field, the second field enables you to select Matches, Contains, Begins With, and so on.
8. Repeat Steps 4–6 to add another rule for the search criteria.
9. (Optional) Click Save to save this search criteria to use again in the future.
A button named after the search word appears next to the other searchable device names.
10. When you find the file you’re looking for, click the item to open it or drag and drop it to a new location.
You can even drop the files in an AirDrop box on a different Mac. Read about AirDrop in Book III, Chapter 4.
Spotlight Preferences
From Finder⇒Preferences⇒Advanced, you can specify whether you want Spotlight to perform searches by looking through your entire Mac or only in the active folder.
You can also set preferences for the types of results Spotlight gives you. Choose ![]() ⇒System Preferences and click Spotlight or click Spotlight Preferences at the bottom of the Spotlight results window. Select the check boxes next to the types of files you want Spotlight to include when searching, as shown in Figure 4-19. Deselect check boxes next to types of files you want Spotlight to ignore. Then click and drag the names to put them in order of priority. For example, you may want documents listed before folders, and you may not want applications to be included in your search results.
⇒System Preferences and click Spotlight or click Spotlight Preferences at the bottom of the Spotlight results window. Select the check boxes next to the types of files you want Spotlight to include when searching, as shown in Figure 4-19. Deselect check boxes next to types of files you want Spotlight to ignore. Then click and drag the names to put them in order of priority. For example, you may want documents listed before folders, and you may not want applications to be included in your search results.
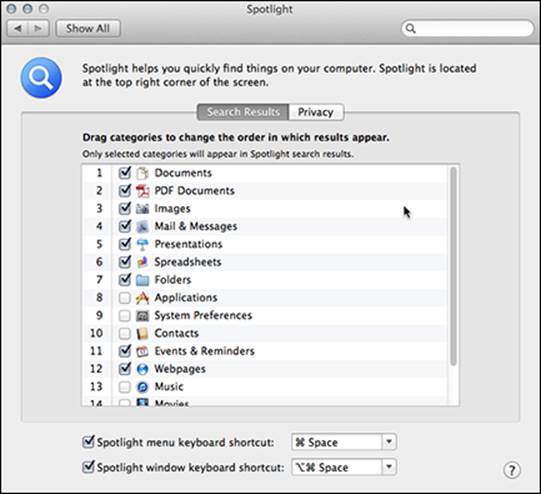
Figure 4-19: Set Spotlight Preferences to obtain better search results.
Using Smart Folders
Spotlight can make finding files and folders fast and easy. However, if you find yourself searching for the same types of files repeatedly, you can create a Smart Folder, which essentially works behind the scenes with Spotlight to keep track of a bunch of files that share one or more common characteristics. For example, you can tell a Smart Folder to store info about only those files that contain rose in the filename or the file; and from now on, you can look in that Smart Folder to access all files and folders that match rose without having to type the words in the Spotlight text box.
Think of Smart Folders as a way to organize your files automatically. Rather than take the time to physically move and organize the files, you can have Smart Folders do the work for you.
 A Smart Folder doesn’t physically contain any files or folders. Instead, it contains only links to files or folders. This saves space by not duplicating files.
Creating a Smart Folder with Spotlight
To create a Smart Folder, follow these steps:
1. Click the Finder icon on the Dock or click the Desktop to make the Finder active.
2. Choose File⇒New Smart Folder.
3. Click in the Spotlight text box and type a word or phrase.
4. Click the plus button next to Save on the right side to open two criteria fields. (Refer to Figure 4-18.)
5. In the first field, choose from Kind, Name, Contents, Visibility, and Creation and Modification Dates.
Click Other to open a window that lets you choose more specific attributes to search by.
6. Enter information in the successive field (or fields) or pop-up menus to complete the search criteria, and then type the word or words in the file(s) you’re seeking.
7. Repeat Steps 4–6 to add more criteria, which leads to more specific results.
8. Click the Save button that appears underneath the Spotlight text box.
A Save As dialog appears, as shown in Figure 4-20.
9. Click in the Save As text box and type a descriptive name for your Smart Folder.
10. Choose a location to store your Smart Folder from the Where pop-up menu (or click the down arrow and navigate to the location where you want to save your Smart Folder).
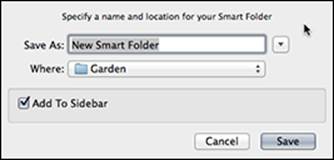
Figure 4-20: Name your Smart Folder and define where to store it.
11. (Optional) Select or deselect the Add to Sidebar check box.
Select the check box if you want the Smart Folder to appear in the Sidebar in the Favorites section. Deselect the check box if you don’t want to see your Smart Folder in the Sidebar.
12. Click Save.
Your Smart Folder appears in your chosen location. Instead of displaying an ordinary folder icon, Smart Folder icons always show a gear inside a folder.
 After you create a Smart Folder, it automatically keeps your list of files and folders up to date at all times. If you create new files or folders that match the criteria used to define a Smart Folder, that new file or folder name will appear in the Smart Folder automatically. Delete a file, and the Smart Folder deletes its link to that file as well.
Deleting a File or Folder
To delete a file or folder, you first have to place that item in the Trash. But putting an item in the Trash doesn’t immediately delete it. In fact, you can retrieve any number of files or folders you’ve “thrown away.” Nothing is really gone — that is, permanently deleted — until you empty the Trash.
 Deleting a folder deletes any files or folders stored inside. Therefore, if you delete a single folder, you might really be deleting 200 other folders containing files you might not have meant to get rid of, so always check the contents of a folder before you delete it, just to make sure it doesn’t contain anything important.
To delete a file or folder, follow these steps:
1. Click the Finder icon in the Dock, and then navigate to (and open) the folder that contains the file or folder you want to delete.
2. Select the file or folder (or files and folders) that you want to delete.
3. Choose one of the following:
· Choose File⇒Move to Trash.
· Drag the selected items onto the Trash icon in the Dock.
· Press ![]() +Delete.
+Delete.
· Control-click a selected item and choose Move to Trash from the shortcut menu that appears.
Retrieving a file or folder from the Trash
When you move items to the Trash, you can retrieve them again as long as you haven’t emptied the Trash since you threw them out. If the Trash icon in the Dock appears filled with a pile of crumbled up paper, you can still retrieve items from the Trash. If the Trash icon appears empty, there are no files or folders there that you can retrieve.
To retrieve a file or folder from the Trash, follow these steps:
1. Click the Trash icon in the Dock.
A Finder window appears, showing all the files and folders you deleted since the last time you emptied the Trash.
2. Select the item (or items) you want to retrieve, drag them onto a device or folder in which you want to store your retrieved items, and then release the mouse button.
Emptying the Trash
Every deleted file or folder gets stored in the Trash, where it eats up space on your hard drive until you empty the Trash. When you’re sure that you won’t need items you trashed any more, you can empty the Trash to permanently delete the files and free up additional space on your hard drive.
To empty the Trash, do one of the following:
· Click the Finder icon in the Dock (or click the Desktop) and choose Finder⇒Empty Trash.
· Control-click the Trash icon in the Dock and choose Empty Trash from the shortcut menu that appears.
· Click the Finder icon (or the Desktop) and press ![]() +Shift+Delete.
+Shift+Delete.
A dialog appears, asking whether you’re sure that you want to remove the items in the Trash permanently. Click OK (or Cancel).
Under Empty Trash, you see another option: Secure Empty Trash. Secure Empty Trash overwrites the deleted files with random data to foil any attempt to recover deleted files later with a special file recovery application. If you want to delete something sensitive that you don’t want to risk falling into the wrong hands, choose the Secure Empty Trash option.
 If you check Empty trash securely in Finder⇒Preferences⇒Advanced, you only have the Secure Empty Trash option.
All materials on the site are licensed Creative Commons Attribution-Sharealike 3.0 Unported CC BY-SA 3.0 & GNU Free Documentation License (GFDL)
If you are the copyright holder of any material contained on our site and intend to remove it, please contact our site administrator for approval.
© 2016-2026 All site design rights belong to S.Y.A.