Macs All-in-One For Dummies, 4th Edition (2014)
Book I. Getting Started with Mac Basics
Chapter 5. Managing Apps on the Dock, Launchpad, and Desktop
In This Chapter
![]() Running apps from the Dock and Launchpad
Running apps from the Dock and Launchpad
![]() Switching between apps
Switching between apps
![]() Opening documents and files
Opening documents and files
![]() Using aliases
Using aliases
![]() Organizing the Dock
Organizing the Dock
![]() Working with Mission Control
Working with Mission Control
![]() Shopping at the App Store
Shopping at the App Store
![]() Installing, updating, and uninstalling apps
Installing, updating, and uninstalling apps
After you power-on your Mac and have OS X up and running, you have to use apps (applications; or software or programs) to actually do anything with your Mac, such as write a report with a word processor, edit a video, play a video game, browse the web, or read and write e-mail. The number of apps you can load and run simultaneously is limited only by the amount of hard-drive space and memory installed inside your Mac.
This chapter explains how to run, install, and uninstall apps for your Mac. Most of the time, you start or launch an app from the Dock (which we introduce to you in Book I, Chapter 2) or Launchpad, which we show you in this chapter. We explain how to use and organize both in this chapter. We also show you three other ways to open apps. Although your Mac comes with many great pre-installed apps, we give you pointers for finding new apps and take you window-shopping in the App Store (purchasing is optional).
Launching an App
Running an app is also referred to as launching an app or starting up an app.
To start an app, you can choose any of the six most common methods. Don’t worry if some of the terms here are new to you; we show you how to do each throughout this chapter:
· Click an app or document icon on the Dock.
· Double-click an app or document icon in the Finder.
· Click an alias of the app or document in any of the locations just listed.
· Click Launchpad on the Dock (or open it with the F4 key on newer keyboard or Control+![]() +L on any keyboard) and click the app. The Launchpad icon looks like a rocket.
+L on any keyboard) and click the app. The Launchpad icon looks like a rocket.
· Choose an app name from the Apple (![]() ) menu’s Recent Items.
) menu’s Recent Items.
· Find the app with the Spotlight search feature and then select it to run.
 The Dock is the strip of animated icons that appears when you hover the pointer over the bottom of your Mac’s screen (on the left or right side if you changed the Dock’s position by choosing
 ![]() ⇒Dock⇒Position).
⇒Dock⇒Position).
Optionally, the Dock identifies running apps by displaying a glowing dash underneath the icon of each running app. The app menu — the menu to the right of the ![]() menu that shows the name of an app, such as Word or iTunes — identifies the active app. You can run multiple apps and display multiple windows showing active files created with those apps, but only one window is active, and therefore only one app is active. The active app is the one that is front and center on your screen, ready to accept any data or commands you give. The window of the active app may be on top of any other app windows that are open, or it could be next to other windows if you have a large screen or are working with multiple displays.
menu that shows the name of an app, such as Word or iTunes — identifies the active app. You can run multiple apps and display multiple windows showing active files created with those apps, but only one window is active, and therefore only one app is active. The active app is the one that is front and center on your screen, ready to accept any data or commands you give. The window of the active app may be on top of any other app windows that are open, or it could be next to other windows if you have a large screen or are working with multiple displays.
 When you attach a device, such as a digital camera or a mobile phone, an app such as iPhoto or iTunes may launch automatically, depending on the settings you choose. For those two specific examples, see Book IV, Chapters 3 and 1, respectively.
From the Dock
To run an app from the Dock, move the pointer over the app icon that you want to run and click. (What? Were you expecting something difficult?) The Dock contains icons that represent some (but not all) of the apps installed on your Mac. When you turn on your Mac for the first time, you see that the Dock already includes a variety of apps that Apple thinks you might want to use right away. However, you can always add or remove app icons to/from the Dock (that’s next in this section).
You can use the Dock in several ways:
· To gain one-click access to your favorite apps.
· To see which apps are running. You see a small white illuminated dash under, or next to, the app icon (see Figure 5-1) if you turn on the Dock indicator lights in Dock Preferences. (We tell you how to adjust Dock Preferences in Book I, Chapter 2.)
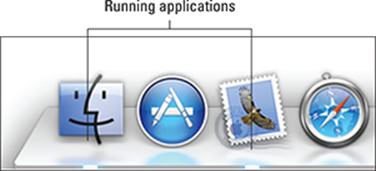
Figure 5-1: The Dock identifies running apps with a glowing dash.
· To switch between different apps quickly. Clicking a running app’s Dock icon makes it easy to switch among all the apps that are open at the same time. So, if you want to switch to the iTunes app from the Mail app, you just click the iTunes app icon. Doing so immediately displays the iTunes window(s) and displays the iTunes app name in the Application menu on the menu bar at the top of the screen. (Clicking the iTunes app icon brings iTunes to the forefront, but the Mail app doesn’t close or quit on you; it just moseys to the background, waiting for its turn to step into the limelight again.)
· To see which windows you have minimized. Minimized windows are tucked out of sight but are still open. By default, you see a miniature version of the minimized window on the right (or lower) end of the dock. Simply click it to bring it back to full size.
You won’t see minimized windows if the Minimize Windows into Application Icon option is selected in Dock Preferences; click the app icon to open the minimized windows of documents created in the app. (We tell you how to adjust Dock Preferences in Book I, Chapter 2.)
· To view a specific app window.
· To go to a specific window of a running app.
· To perform specific tasks of an app.
· To quit an app without switching to it.
· To show or hide all windows that belong to a specific app.
You can add or remove app icons to or from the Dock so it contains only the apps you use most often, and you can arrange the icons in the Dock to suit yourself and make starting apps even easier. The following sections give you all you need to know about the relationship between the Dock and its icons.
From Launchpad
If the app you want to open isn’t stored on the Dock, you can go to Launchpad, which shows all apps that are in the Applications folder. Click the Launchpad icon (which looks like a rocket) on the Dock.
If you removed the Launchpad icon like we did, press the shortcut key (F4 on newer Apple keyboards or Control+![]() +L), to open Launchpad, as shown in Figure 5-2. If you use a trackpad, with three fingers and your thumb slightly open, place your finger`s and thumb on the trackpad and bring them together as if you were to pick up a small object. Voilà! Launchpad launches. (Sorry, but there’s no default mouse equivalent although if you have a multibutton mouse, you can assign that function to one of the buttons.)
+L), to open Launchpad, as shown in Figure 5-2. If you use a trackpad, with three fingers and your thumb slightly open, place your finger`s and thumb on the trackpad and bring them together as if you were to pick up a small object. Voilà! Launchpad launches. (Sorry, but there’s no default mouse equivalent although if you have a multibutton mouse, you can assign that function to one of the buttons.)
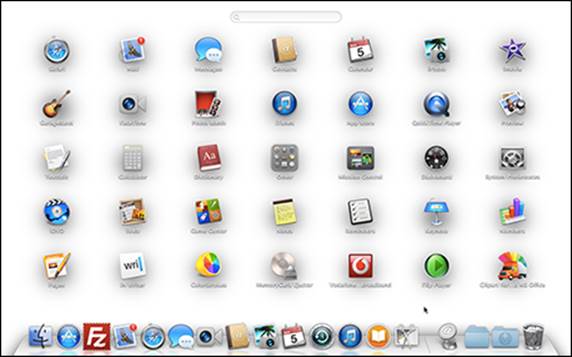
Figure 5-2: Apps stored in the Applications folder on your Mac appear on Launchpad.
Launchpad shows all the apps that are in the Applications folder, using multiple screens depending on how many apps are installed on your Mac. That means all the apps that came with your Mac and all apps you install have an icon on Launchpad.
Each Launchpad screen can hold between 35 and 40 apps or folders, depending on your Mac’s screen resolution. Each folder can hold up to 32 apps. You can have multiple Launchpad screens. To move from one Launchpad screen to another, hold the mouse button and move the mouse left or right, swipe left and right with two fingers on the trackpad, or use ![]() +→ or
+→ or ![]() +←.
+←.
To open an app, just click the app icon on Launchpad, and the app opens.
To leave the Launchpad without opening an app, simply click anywhere on the background or press Esc.
You can do the following to manage the appearance of Launchpad:
· Click and drag an icon to move it on Launchpad; drag it to the very right or left edge to move the icon to another screen. You can move only one icon at a time.
· Click and drag one icon over another to create a folder that holds both icons, and then drag other icons into the folder. Click the folder once to open it, and then double-click the name to highlight the name and type in a new name. To remove an icon from a folder, just drag it onto Launchpad.
You can drag an icon from Launchpad to the Dock to add the icon to the Dock.
From the Apple menu’s Recent Items
This one’s a no-brainer: Choose ![]() ⇒Recent Items and then choose the app you want to run from the list of recently run apps. You can also choose a recently created or viewed document or other file to automatically launch the associated app and load the document or file.
⇒Recent Items and then choose the app you want to run from the list of recently run apps. You can also choose a recently created or viewed document or other file to automatically launch the associated app and load the document or file.
From the Finder
Because an app’s icon might not appear on the Dock, you have to be able to access icons another way. The Launchpad shows apps stored in the Applications folder, but the Finder can help you find any applications that are stored in another folder.
You can store an app icon in any folder on your hard drive, but you should store apps in the Applications folder. That way, if you need to find that app again, you just have to look on Launchpad or in the Applications folder instead of trying to remember where else you stored it.
To run an app from the Finder, follow these steps:
1. Click the Finder icon on the Dock and then click the Applications folder in the Finder window’s Sidebar to display the apps installed on your Mac.
2. Scroll through the Applications folder window until you see the app icon you want and then double-click the icon to run the app.
(You might have to double-click a folder that contains an app icon and then double-click the app icon.) Alternatively, you can single click the app icon and then choose File⇒Open or press a keyboard shortcut, such as ![]() +O or
+O or ![]() +↓.
+↓.
Your chosen app appears, typically with a blank window, ready for you to do something application-y, such as typing text.
Typing the first letter of an app file or document you’re looking for in any Finder window will instantly jump to and select the first icon that matches the letter you type. For instance, to locate Safari in the Applications folder quickly, press S to jump to and select Safari (or another app icon whose name starts with S that might come before Safari, if one is present).
If you’re having trouble understanding how the Finder works, go to Book I, Chapter 2 to read a brief introductory overview and Book I, Chapter 4 to learn all the nitty-gritty Finder details.
With Spotlight
As an alternative to clicking an app’s Dock or Launchpad icon, or locating an app or document by clicking through folders, you can use your Mac’s handy Spotlight feature to quickly open apps or documents for you. We explain Spotlight in detail in Book I, Chapter 4. You can use Spotlight to run apps and open documents in two ways:
· Via Finder: Click the Finder icon on the Dock, click in the Search text box, type all or part of a document or app name (or the contents of a document you want to open), and then press Return. Double-click the document or app you want to open from the list of results.
· From the menu bar: Click the Spotlight icon in the far-right corner of your Mac’s menu bar (or press ![]() +spacebar) and begin typing the first few letters of the app or file name (or contents of a file) you’re looking for. Move the pointer to the app or document you want to open and click it.
+spacebar) and begin typing the first few letters of the app or file name (or contents of a file) you’re looking for. Move the pointer to the app or document you want to open and click it.
Opening documents
A file on the Mac appears as a graphically descriptive icon with a name. Icons can represent applications and documents or a link, known as an alias, to either of those.
· Application files actually do something, such as play a game of chess; or send, receive, and organize your e-mail.
· Document files hold data created by applications, such as a report created in a word processing app, a budget created in a spreadsheet app, or a movie created in a video-editing app.
· Application icons are often distinct enough to help you identify the type of app they represent. For example, the iTunes app icon appears as a musical note against a blue circular background, the iPhoto icon appears as a camera over a photograph, and the Mail application icon (for sending and receiving e-mail) appears as a postage stamp.
· Document icons often appear as a dog-eared page showing a thumbnail image of the content and the suffix of the file type stamped on the bottom, such as web, docx, or html, as shown in Figure 5-3. Folders look like folders, and image files such as jpg or tiff appear as thumbnails of the image.
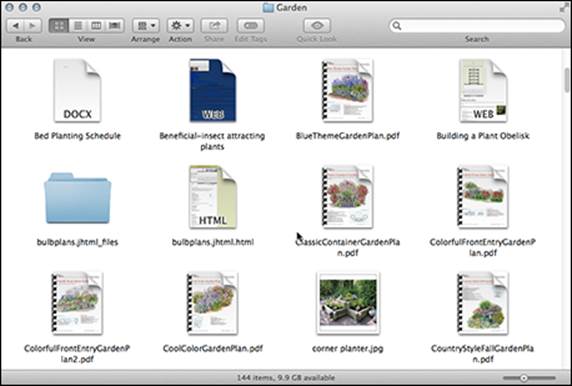
Figure 5-3: Document icons display thumbnails of their content.
· Alias icons represent links to app icons or document icons. You find out more about alias icons in the “Creating Alias Icons” section, later in this chapter.
When you double-click an app icon in the Finder, you start (that is, run or launch) that particular app. If you want to use your newly opened app to work on an existing file, you then have to search for and open that file by using the app’s File⇒Open command.
As an alternative to starting an app and then having to find and open the file you want to work with, the Mac gives you the option of double-clicking the document icon you want to open. This opens the app with your chosen document ready for action.
You have three ways to find and open a document stored in the Documents folder, which is stored in your Home folder but can be accessed from the Dock, the Finder sidebar, and the Desktop window as follows:
· Control-click the Documents icon on the Dock and then choose Open in Finder (or click and hold the Documents icon to see the folders and documents inside it, move the pointer to the one you want to open, and then let go of the mouse button).
· Click the Finder icon on the Dock and then click the Documents folder in the Sidebar to open the Documents window.
· Click the Desktop and press ![]() +Shift+D to open the Desktop window. Then click the Documents folder in the Sidebar.
+Shift+D to open the Desktop window. Then click the Documents folder in the Sidebar.
If you store your document files in other folders, such as a folder that’s specific to a project with all related files in that folder, you can find your document in three ways:
· Click the Finder icon on the Dock and then click All My Files from the Sidebar. You see all your documents on your Mac displayed — you won’t see documents of other users. You can choose how to sort them — by Size, Name, Kind, Date Last Opened, and so on, as shown in Figure 5-4.
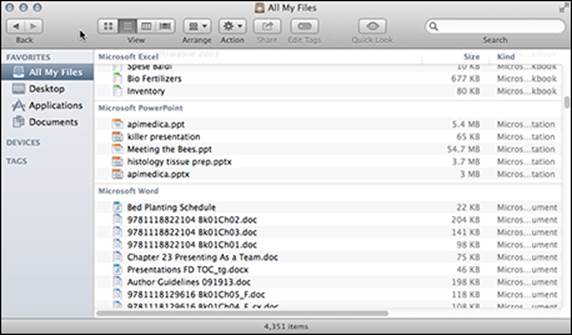
Figure 5-4: See all the files on your Mac with the Finder All My Files feature.
· Click the Finder icon on the Dock and then click the location of the folder that contains your document, such as Desktop or the Home icon. Double-click the folder to see the documents within.
· Type the document name or a word or phrase it contains in the Spotlight Search field in the Finder window or menu bar.
Scroll through the documents wherever you find them — Documents folder, All My Files, Spotlight Search results, or another folder — and double-click your document file when you find it to open it.
Your Mac loads the application that created the document (if it’s not already running) and displays your chosen document in a window. If your Mac can’t find the application that created the document, it might load another application, or it might ask you to choose an existing application on your Mac that can open the document.
Sometimes if you double-click a document icon, an entirely different application loads and displays your file. This can occur if you save your file in a different file format. For example, if you save an iMovie project as a QuickTime file, double-clicking the QuickTime file opens the QuickTime Player rather than iMovie.
Switching among Applications
When you run multiple applications, multiple windows from different apps clutter your screen, much like covering a clean tabletop with piles of different papers. To help keep your screen organized, you can switch between different apps (say, a word processor and a web browser) as well as switch to different windows displayed by the same app (such as a word processor displaying a window containing a letter of resignation and a second window containing a résumé).
Your Mac offers quite a few different ways to switch among different apps, including using the Dock, using the Application Switcher, clicking a window of a different app, using Mission Control, or by hiding apps or entire Desktops, which we explain in the section “Organizing Multiple Desktops with Spaces,” later in this chapter.
We discuss the first three ways of switching between running apps in the following list:
· Using the Dock: Refer to the section “From the Dock” earlier in this chapter to review this method.
· Using the Application Switcher: Press ![]() +Tab to open the Application Switcher, which displays icons of all active applications, even if the windows are closed or you hid the app with the app menu⇒Hide app command. Hold the
+Tab to open the Application Switcher, which displays icons of all active applications, even if the windows are closed or you hid the app with the app menu⇒Hide app command. Hold the ![]() key to keep the Application Switcher open and then press the Tab key to move left to right from one running application to the next, as shown in Figure 5-5. When you release the
key to keep the Application Switcher open and then press the Tab key to move left to right from one running application to the next, as shown in Figure 5-5. When you release the ![]() key, the chosen application moves to the front of your screen.
key, the chosen application moves to the front of your screen.
Pressing the Shift key while holding down ![]() and pressing Tab will move the selection from right to left. You can also press
and pressing Tab will move the selection from right to left. You can also press ![]() +Tab and then let go of the Tab key and use the arrow keys to navigate left and right.
+Tab and then let go of the Tab key and use the arrow keys to navigate left and right.
If an application has several files open in different windows, the Application Switcher just switches you to that application, but you still have to find the specific window to view.

Figure 5-5: The Application Switcher displays icons of running applications.
· Clicking different windows: A fast but somewhat clumsier way to switch between applications is to rearrange your windows so you can see two or more windows at one time. To switch to another window, click anywhere inside that window.
· Going to Mission Control: To see all the open windows on your Desktop, as well as the Dashboard and other Desktops Spaces (which we get to in just a bit), press F3, swipe up on the trackpad with three or four fingers, or press Control+Shift+↑ to open Mission Control, as shown in Figure 5-6. Then click the window you want to work in.
To choose how many fingers you need to open Mission Control, click System Preferences on the Dock and select Trackpad from the list (you have this choice only if you use a trackpad). Click the More Gestures tab, and then choose Swipe Up with Three Fingers or Swipe Up with Four Fingers from the pop-up menu, which you see when you click the disclosure triangle.
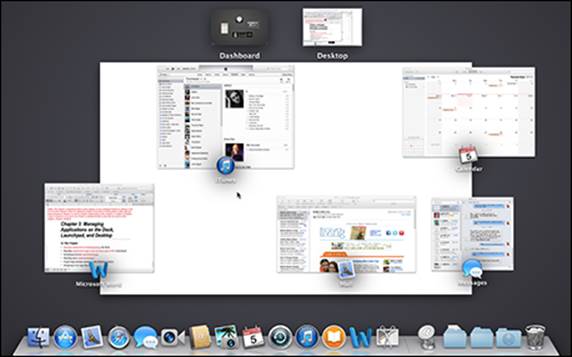
Figure 5-6: Mission Control shows everything that’s open on your Desktop.
If you want to switch between two or more open windows from the same app, press ![]() +` (that’s the accent grave character, which lives on the key to the left of numeral 1 on most keyboards). If you want to see all the windows from the same app, press fn+F10 or Control+Shift+↓ to open Exposé, as shown in Figure 5-7. Exposé shows you thumbnail versions of all the open windows from one running app. Then all you have to do is click the exact window you want to use.
+` (that’s the accent grave character, which lives on the key to the left of numeral 1 on most keyboards). If you want to see all the windows from the same app, press fn+F10 or Control+Shift+↓ to open Exposé, as shown in Figure 5-7. Exposé shows you thumbnail versions of all the open windows from one running app. Then all you have to do is click the exact window you want to use.
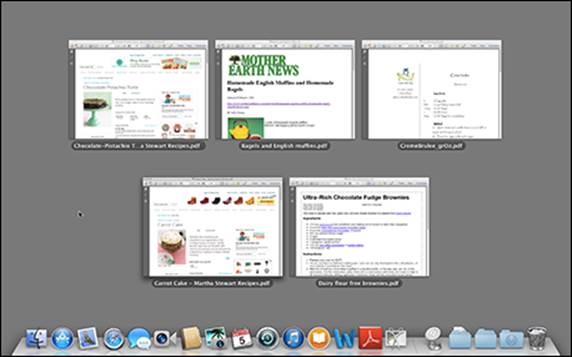
Figure 5-7: Exposé shows you all the open windows for one app.
Quitting Apps
When you shut down an app, you also shut down all document windows that app may have open. However, if you simply close a document in an open app, the app keeps running.
If you leave apps running when you shut down your Mac or log out of your account, in the dialog that appears you can choose to automatically reopen the running apps when you start your Mac the next time, letting you pick up where you left off.
Closing a document
If you want to stop working with or viewing a specific document but want to keep the application running, you can close just that particular document. You have three different ways to close a document window:
· Choose File⇒Close.
· Press ![]() +W.
+W.
· Click the red Close button of the document window.
If you click the yellow button, the window is hidden on the Dock but isn’t closed. Click the document or app icon on the Dock to quickly reopen it.
If you try to close a window before saving the file, a confirmation dialog appears, asking whether you want to save your file.
Shutting down an app
When you finish using an app, shut it down to free up your Mac’s memory to run other apps. The more apps you have running at the same time on your Mac, the slower your Mac can become, so always shut down apps if you don’t need them anymore.
To shut down an app, you have three choices:
· Click the application menu and choose Quit (such as iPhoto⇒Quit iPhoto to shut down the iPhoto application).
· Press ![]() +Q.
+Q.
· Control-click the app icon on the Dock and choose Quit from the contextual menu that appears.
If you try to shut down an application that displays a window containing a document that you haven’t saved yet, a confirmation dialog appears asking whether you want to save your file.
Force-quitting an app
Despite the Mac’s reputation for reliability, there’s always a chance that an app will crash, freeze, or hang, which are less-than-technical-terms for an app screwing up and not reacting when you click the mouse or press a key. When an app no longer responds to any attempts to work or shut down, you might have to resort to a last-resort procedure known as a force-quit.
 If you force-quit an app, you will lose any data you changed between the time of your last save and right before the app suddenly froze or crashed. For instance, say you’re typing a sentence and then perform a force-quit press before pressing
 ![]() +S to save it — that sentence would be missing the next time you reopen that document.
+S to save it — that sentence would be missing the next time you reopen that document.
As the name implies, force-quitting makes an app shut down whether it wants to or not. Here are the two easiest ways to force-quit an app:
· Choose ![]() ⇒Force Quit (or press
⇒Force Quit (or press ![]() +Option+Esc). The Force Quit Applications dialog appears, as shown in Figure 5-8. Frozen or crashed applications might appear in the Force Quit Applications dialog with the phrase Not Responding next to its name. Just click the application you want to force-quit and then click the Force Quit button. If you select Finder, the Force Quit button reads Relaunch.
+Option+Esc). The Force Quit Applications dialog appears, as shown in Figure 5-8. Frozen or crashed applications might appear in the Force Quit Applications dialog with the phrase Not Responding next to its name. Just click the application you want to force-quit and then click the Force Quit button. If you select Finder, the Force Quit button reads Relaunch.
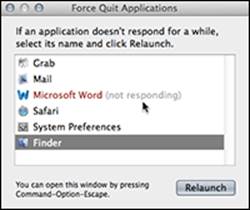
Figure 5-8: The Force Quit dialog shows you all running applications.
· Control-click an app icon on the Dock and choose Force Quit from the shortcut menu that appears. If the app hasn’t really crashed or if your Mac thinks the app hasn’t crashed, you won’t see a Force Quit option in this pop-up menu. In that case, you may want to wait a minute or so to give your Mac time to correct the seemingly hung-up app. If you wait awhile, and the app still appears stuck but you don’t see the Force Quit option, hold down the Option key, Control-click an app icon on the Dock, and then choose Force Quit.
Most apps present you with the original and a recovered version of the document you were working on before a force-quit. Look at both to determine which is the most recent or most correct version, and then proceed as follows, depending on which file is the better one:
· Original file: Save the file by choosing File⇒Save. Click the Close button (the red button in the upper-left corner) of the recovered file. When asked whether you want to save it, click Don’t Save.
· Recovered file: Close the original file, and then click the window of the recovered file to make it active. Choose File⇒Save and give the recovered file the same name as the original file. Click Replace when asked in the confirmation dialog.
Creating Alias Icons
An alias icon acts like a link to another icon. Double-clicking an alias icon works identically to double-clicking the actual app or document icon. The biggest advantage of using alias icons is that you can move and place alias icons anywhere you want without physically moving (and perhaps losing) an app or document.
One way to use alias icons is to create alias icons to your app icons, store those alias icons in a folder, and then store that folder to the right of the divider on the Dock. This gives you easy access to lots of apps without cluttering the Dock.
You can do the following things with alias icons:
· Create an alias icon. Click the Finder icon on the Dock, scroll through your folders and files, and then click the one you want to select. Choose File⇒Make Alias. (You can also Control-click it and choose Make Alias, or press ![]() +L.) A copy of your chosen icon appears in the window. Notice that the new icon has an arrow in the bottom corner and alias is added to its name, as shown in Figure 5-9.
+L.) A copy of your chosen icon appears in the window. Notice that the new icon has an arrow in the bottom corner and alias is added to its name, as shown in Figure 5-9.
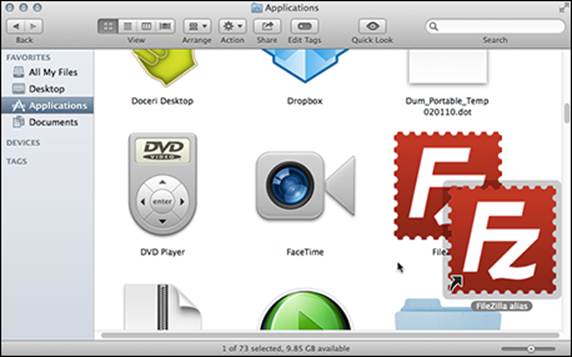
Figure 5-9: An arrow identifies an alias icon.
· Move an alias icon. Because it’s pointless to store the original icon and the alias icon in the same location, store the alias icon in a new location. To move an alias icon, click it to select it and then drag it to the Desktop, the Dock, or the folder you want to move it to.
· Create and move an alias icon in one step. Hold ![]() +Option when you click the icon you want to create an alias of and then drag it to the new position. The alias is created and positioned in the new location.
+Option when you click the icon you want to create an alias of and then drag it to the new position. The alias is created and positioned in the new location.
· Delete an alias icon. Simply Control-click it and choose Move to Trash, or move the pointer over the icon and press ![]() +Delete. Note that deleting an alias icon never deletes the original icon — meaning that if you delete an alias icon that represents an app, you never delete the actual application. The only way to delete an application or document is to delete the original application or document icon.
+Delete. Note that deleting an alias icon never deletes the original icon — meaning that if you delete an alias icon that represents an app, you never delete the actual application. The only way to delete an application or document is to delete the original application or document icon.
You can store alias icons on the Desktop for fast access or in specific folders to organize applications and documents without moving them to a new location. (Essentially, the Dock replaces the need to place alias icons on the Desktop, and Smart Folders duplicate the process of creating and storing alias icons in a folder. You can delve into Smart Folders in Book I, Chapter 4.)
Working with Dock Aliases
The Dock includes several apps already installed on your Mac, but if you install more apps, you might want to add their icons to the Dock as well. One way to add an app icon to the Dock is to click and drag the icon onto the Dock.
When you drag an app icon to the Dock, you aren’t physically moving the app from the Applications folder onto the Dock; you’re just creating a link, or alias, from the Dock to the actual app (which is still safely stashed in its folder). Here’s how that’s usually done:
1. Click the Finder icon (the Picasso-like faces icon) on the Dock and then click the Applications folder in the Finder window’s sidebar.
The Finder displays the contents of the Applications folder.
2. Drag the app to the Dock.
To drag an app, move the pointer over the icon of the app you want to move, click and hold the mouse button or trackpad, drag the pointer where you want to place the icon on the Dock, and then release the mouse button.
Make sure that you drag app icons on the Dock to the left of the divider, which appears as a gap near the Trash icon. To the left of the divider, you see app icons. To the right of the divider, you can store file or folder icons.
Your chosen app icon now has its own place on the Dock.
Be careful not to drag the application icon to the Trash bin unless you really want to delete it from your hard drive.
You can also add an app icon to the Dock when the app is open. Remember that the Dock displays the icons of all running apps at all times, but when you exit an app, that app’s icon — if it’s not a Dock resident — will disappear from the Dock. To give a running app Dock residency, Control-click the running app’s icon on the Dock — or click and hold down on the app icon — and choose Options⇒Keep in Dock from the shortcut menu, as shown in Figure 5-10. Now when you exit from this app, the app icon remains visible on the Dock.

Figure 5-10: Dock icons have shortcut menus.
Adding file and folder aliases to the Dock
You can always find the files and folders you want by using the Finder. However, you might find that switching to the Finder constantly just to access the contents of a particular folder can be tedious. As a faster alternative, you can store aliases to files and folders directly on the Dock.
Accessing files from the Dock
If you have a file that you access regularly, consider placing an icon for that file directly on the Dock. That way, the file icon remains visible at all times (whenever the Dock is visible), giving you one-click access to your frequently used files.
To place a file icon on the Dock, follow these steps:
1. Click the Finder icon on the Dock and navigate to the folder containing the file you use frequently.
2. Drag the file to the Dock into any space to the left of (or above) the Trash icon.
The icons on the Dock slide apart to make room for the icon. To open this file, just click its file icon, which looks like a thumbnail version of the original.
A file icon on the Dock is just an alias or link to your actual file. If you drag the file icon off the Dock to delete it from the Dock, your physical file remains untouched.
Creating Stacks on the Dock
Rather than clutter the Dock with multiple app or file icons, consider storing a folder on the Dock. A folder icon, when stored on the Dock, is a Stack. After you create a Stack on the Dock, you can view its contents by clicking the Stack.
To load the app or open the file, you can click the stack on the Dock and then click the app or file icon. The downsides include losing the shortcut menus for the items in the stack and not being able to open a document in an app other than the one in which it was created.
To store a Stack on the Dock, follow these steps:
1. Click the Finder icon on the Dock to open a new Finder window, and then navigate to a folder you use frequently.
2. Drag the folder to the Dock into any space to the right of (or above) the divider.
The Dock icons slide apart to make room for your Stack to give your folder a place all its own.
Opening files stored in a Stack
After you place a Stack on the Dock, you can view its contents — and open a file in that Stack — by following these steps:
1. Click a Stack folder on the Dock.
The files and folders in the stack appear in a window. If a file contained in the folder represented by the Stack is open, the icon shows a piece of paper emerging from the folder.
2. Click the file you want to open in the grid or list.
Your chosen file opens.
Or, click Open in Finder to see the folder in a Finder window.
Control-click (two-finger tap on a trackpad) a Stack icon to display a shortcut menu of options you can choose to customize the way a Stack folder appears on the Dock (as a Stack or Folder) and how its contents are displayed when you click it, as shown in Figure 5-11.
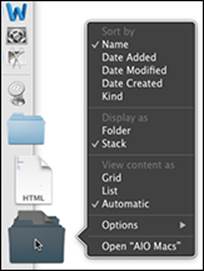
Figure 5-11: Control-click a Stack to display a shortcut menu.
Rearranging icons on the Dock
After you place app, file, and folder icons on the Dock, you may want to rearrange their order. How you rearrange your Dock is up to you! To rearrange icons on the Dock, click the icon that you want to move, drag the mouse (or your finger on the trackpad) sideways (or up and down) to move the icon to its new position, and then release the mouse or trackpad button.
You notice that while you move an icon, its neighbors move to the side to show you where the icon will appear when you let go of the mouse button. Neat effect, right?
You can rearrange icons on the Dock how you want, but one icon you can’t move or remove is the Finder icon, which won’t budge no matter how hard you try to drag it from its Number One position on the Dock.
Removing icons from the Dock
Right from the get-go, you might see icons on the Dock for apps that you rarely use. Or, you might think having the Launchpad icon on the Dock is redundant because opening the Launchpad is a quick operation. Rather than let those icons take up precious Dock real estate, get rid of them and make room for the icons of apps and files you use frequently. It’s like keeping salt and pepper on the counter and the mustard seed in the cupboard. You have two ways of removing an icon from the Dock:
· Click the icon that you want to remove from the Dock, drag it away from the Dock over to the edge of the screen, and then release the mouse button. Your unwanted application icon disappears in an animated puff of smoke.
· Control-click the app or file icon and choose Options⇒Remove from Dock from the shortcut menu. (This doesn’t work for folders or stacks.)
Note: Removing an icon from the Dock doesn’t remove or delete the actual file. To remove apps, see the “Uninstalling Applications” section, later in this chapter.
Here are two things you can’t do with icons on the Dock:
· You can never remove the Finder and Trash icons from the Dock.
· You can’t remove an app icon from the Dock if the app is still running.
Organizing Multiple Desktops with Spaces
Spaces multiplies your Mac’s single display into as many as 16 separate virtual screens, or Desktops. The main purpose of Spaces is to help organize multiple applications running at the same time. Rather than cram multiple application windows on a single screen (Desktop), Spaces lets you store multiple applications in separate Desktops. One Desktop might contain only Internet applications, such as Safari and Mail, whereas a second Desktop might contain only Microsoft Word and the Mac’s built-in Dictionary application. Each Desktop can have its own desktop picture and a customized Dock.
If one application has multiple windows open, you can store each application window on a separate Desktop. For example, if you have a word processor and open a personal letter and a business letter, you could store the personal letter’s window on one Desktop and the business letter’s window on a second Desktop.
You manage each Space individually, but you can see all of them and move windows from one Space to another in Mission Control.
Creating Desktops
Your Mac comes with one Desktop, also called a Desktop Space or Space, plus the Dashboard (see Book I, Chapter 2). You can see both by opening Mission Control, which is where you create additional Desktops. Apps in full-screen view, which you activate by clicking the full-screen button in the upper right corner, act as a Space, too. To create a Desktop, follow these steps:
1. Open Mission Control by using one of these methods:
· Press F3.
· Click the Mission Control icon on the Dock, which resides next to the Finder icon and looks like a miniature screen with three open windows.
· Press Control+Shift+↑.
· Swipe up on the trackpad with three or four fingers.
2. Move the pointer to the upper-right corner until you see a plus sign.
If you have the Dock on the right, the plus sign will be in the upper-left corner.
3. Click or tap the plus sign.
A new Desktop Space appears with the name Desktop 2. Subsequent desktops will be named Desktop 3, Desktop 4, and so on up to Desktop 16, as shown in Figure 5-12.
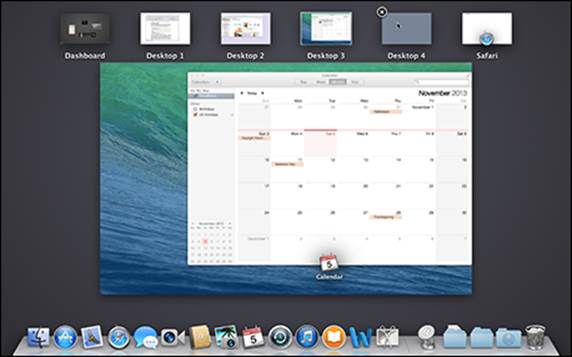
Figure 5-12: Create additional desktops from Mission Control.
You can give each Desktop Space a personal desktop image and Dock. Open Mission Control and click the Desktop you want to work in. Then do the following:
· Set the picture for that Desktop. Go to ![]() ⇒System Preferences⇒Desktop and Screensaver, as explained in Book I, Chapter 6.
⇒System Preferences⇒Desktop and Screensaver, as explained in Book I, Chapter 6.
· Choose which icons you want on the Dock for that Desktop. Click and hold an icon on the Dock and choose Options⇒This Desktop (to use the icon only on this Desktop), All Desktops (to use the icon on every Desktop), or None (to not use this icon on the Dock in any Space).
Switching Desktops
Apps used in full-screen mode are treated as Desktop Spaces. When you create multiple Desktops and/or use applications in full-screen mode, you want to be able to move from one Space to another. To move from one Desktop Space to another, you can do the following:
· Use the trackpad. Swipe left or right with three or four fingers to move from one Desktop to another.
· Use Mission Control. Enter Mission Control and click the Desktop you want.
· Switch between Desktops. Hold the Control key and press the left- or right-arrow keys.
· Switch to the first Desktop. Press Control+1.
Moving app windows to different Desktops
When you run an app, it appears on the Desktop you’re working in. For example, if you’re on Desktop 1 and you run the Safari web browser, Safari appears on Desktop 1. Unless you choose the All Desktops option from the Safari icon on the Dock or turn off the related option in Mission Control preferences (see the next section), when you try to open Safari on another Desktop, you are sent back to Desktop 1. You can choose the All Desktops option, or you can move an app’s window from one Desktop to another, so that the window appears where you want, by doing one of the following:
· Move the window via Mission Control. Go to Mission Control and click the Desktop that has the window you want to move. That Desktop is now active. Go to Mission Control again and drag the window from the active Desktop, which appears in the center of the screen, to the thumbnail (among those across the top of the screen) of the Desktop where you want to move the window.
· Control-click and choose the Desktop from the menu. Go to Mission Control and click the Desktop where you want the window to be. On the Dock, control-click the app that correlates to the app of the window you want to move, and then choose Options⇒Assign to This Desktop. The window moves. For example, say you have a Word document window open on Desktop 3, and you want to move it to Desktop 6. Click Desktop 6 and then control-click the Word icon on the Dock. Choose Options⇒Assign to This Desktop, as shown in Figure 5-13.
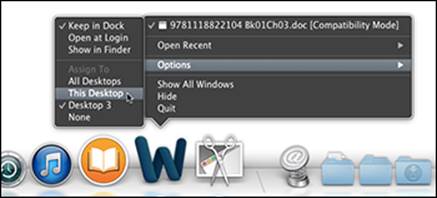
Figure 5-13: Use the Options for each app icon on the Dock to move windows from Desktop to Desktop.
· Drag the window to the desired Desktop. From the Desktop, click the title bar of the window you want to move and drag to the far left or right edge of the screen until it shifts to the neighboring Desktop. Release the mouse or trackpad button or keep going until you reach the Desktop you want to move the window to.
Setting Mission Control preferences
Mission Control lets you choose some of the ways you view and interact with it. Choose ![]() ⇒System Preferences and click the Mission Control icon, or Control-click System Preferences on the Dock and choose Mission Control (see Figure 5-14).
⇒System Preferences and click the Mission Control icon, or Control-click System Preferences on the Dock and choose Mission Control (see Figure 5-14).
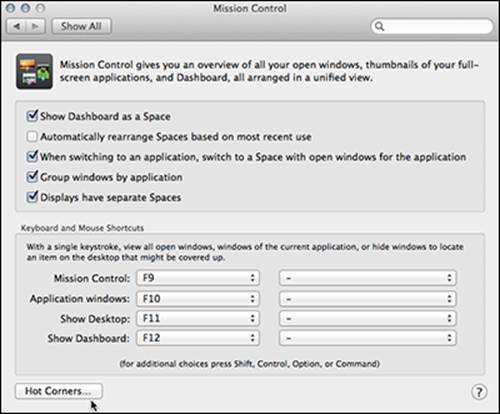
Figure 5-14: Set Mission Control preferences.
Select the check boxes next to the features you want to activate:
· Show Dashboard as a Space: Shows Dashboard in Mission Control. When de-selected the Dashboard widgets appear on the desktop. Refer to Book I, Chapter 2 to learn more about Dashboard.
· Automatically Rearrange Spaces Based on Most Recent Use: Moves your Desktop Spaces around so the most frequently used are first. If you’re a creature of habit and like to find things where you put them, leave this check box deselected.
· When Switching to an Application, Switch to a Space with Open Windows for the Application: When you open an app, your Desktop scrolls automatically to the Desktop that has a window open and uses that app. If this option is deselected, when you click an app on a Desktop, it opens on that Desktop even if the app is already open on another Desktop. And, just clicking the app icon on the Dock moves you from one window on a Desktop to another window of the same app on another Desktop.
· Group Windows by Application: When you have multiple windows of multiple apps open and go to Mission Control, the windows are grouped by app.
· Displays Have Separate Spaces: If you use multiple displays, this option lets you have different Spaces for each display.
In the Keyboard and Mouse Shortcuts section of the Mission Control preferences dialog, you can use the pop-up menus to set keyboard (left column) or mouse command (right column) shortcuts to access Mission Control, to see Application Windows, to Show Desktop, and to Show Dashboard.
Click the Hot Corners button to assign one of the screen’s four corners to Mission Control. Open the pop-up menu next to the corner you want to assign to Mission Control, and choose it from the menu. When you move the pointer to that corner, Mission Control opens. You can also assign other tasks to the remaining three corners.
Acquiring New Apps
As we mention in Book I, Chapter 1, optical disc drives are practically obsolete, which means you put files on your computer with different means, sometimes in the form of a flash drive — or, more often than not, by downloading. The same goes for apps, with Apple in the lead by offering the OS X 10.9 Mavericks software only online as a free download from the App Store. In addition to the OS software, you also find a huge selection of apps in the App Store, but the App Store isn’t the only game in town. Search the web to find other apps, which we break down into three types: commercial, shareware, and freeware/open source. The following list spells out how they differ:
· Commercial: These are the apps that you buy. You can still find some software applications in pretty boxes in an electronics superstore, but most companies sell the same commercial applications through the App Store or on their own websites — and if your Mac doesn’t have an optical disc drive and you didn’t buy an external one, that’s the way you’ll want to acquire software.
Many commercial applications downloaded from that company’s website offer a trial version that you can download and use for a limited time, such as 30 days. After your trial period is over, the application will either stop working or run with many features turned off. If you pay for the software, the publisher will send you a registration key that converts the trial application into a fully functional version. To find trial versions of applications, just visit the websites of different software publishers.
· Shareware: Usually, shareware applications have limited functionality, are time-limited trial versions, or are fully functional applications written by individuals or small companies. The idea is for you to try out the application. If you like it, you’re then supposed to pay for it.
· Freeware: Freeware applications, many of which you find in the App Store, are typically simple utilities or games although some commercial companies distribute freeware applications to promote their other products. Sometimes companies offer a freeware version of an application and then sell a more advanced version of that same application. As the name implies, freeware applications are available for you to copy and use at no cost. Donationware is a term for a freeware application whose creator welcomes donations to help the developer cover the cost of maintaining and developing new versions of the application.
 A variation of freeware applications is open source. Like freeware applications, open source applications can be copied and used without paying for them. The main difference is that open source applications let you modify the application yourself if you know the specific application programming language that the application is written in.
Table 5-1 lists some popular open source applications and their commercial equivalents.
Table 5-1 Popular Open Source Applications
|
Open Source Application |
Purpose |
Commercial Equivalent |
|
NeoOffice www.neooffice.org |
Office suite containing word processing, spreadsheet, presentation, drawing, and database applications |
Microsoft Office or iWork |
|
OpenOffice.org www.openoffice.org |
Office suite containing word processing, spreadsheet, presentation, drawing, and database applications |
Microsoft Office or iWork |
|
AbiWord www.abisource.com |
Word processor |
Microsoft Word or Pages |
|
Firefox www.mozilla.com |
Web browser |
Safari |
|
Thunderbird www.mozilla.com |
E-mail application |
|
|
Tux Paint www.tuxpaint.org |
Children’s painting application |
Broderbund Kid Pix |
|
ClamXav www.clamxav.com |
Antivirus scanner |
Norton AntiVirus |
|
Celtx www.celtx.com |
Screenplay word processor (online only) |
Final Draft |
Besides being free, many open source applications offer additional features that their commercial rivals lack.
For example, the Safari web browser comes free with every Mac, but many websites are designed to work only when viewed through Internet Explorer or Firefox. If you use Safari, you might not be able to view some websites correctly, so you might want to switch to Firefox (or at least keep Firefox on your hard drive) in case you run across a website that Safari can’t open.
To find an overwhelming number of shareware, freeware, and open source apps for your Mac, visit the following sites:
· Open Source Mac: www.opensourcemac.org
· CNET Download.com: http://download.cnet.com/mac/
· MacForge: www.macforge.net
· Tucows: www.tucows.com
· MacUpdate: (www.macupdate.com)
The following sections tell you how to acquire and install apps from the App Store. If you'd like to know more about acquiring and installing apps from other sources, see the upcoming "Installing Applications" section.
Shopping in the App Store
If you have a new Mac or upgraded to OS X 10.9 Mavericks, the App Store app is on your Mac, and you find the App Store icon on the Dock.
If you’ve exhausted the freeware, shareware, and open source sources or prefer a more traditional online shopping experience, the App Store is a great place to look for new apps to add to your Mac. In this section and the next section, we give you a quick rundown of how the store is organized and how to purchase and download applications from the App Store.
Like the iTunes Store, the App Store is an online service, so you need to have an active Internet connection to browse, purchase, and/or download applications.
Although you can browse the App Store as much as you want, and download free apps, you need an Apple ID. You can use your iTunes Apple ID or an iCloud Apple ID, or set up a new Apple ID by choosing Store⇒Create Account and following the onscreen instructions, which basically ask for an e-mail address and a password. You need a credit card or iTunes Store card to purchase apps.
When you first click the App Store from the Dock or Launchpad, a window opens similar to the one shown in Figure 5-15.
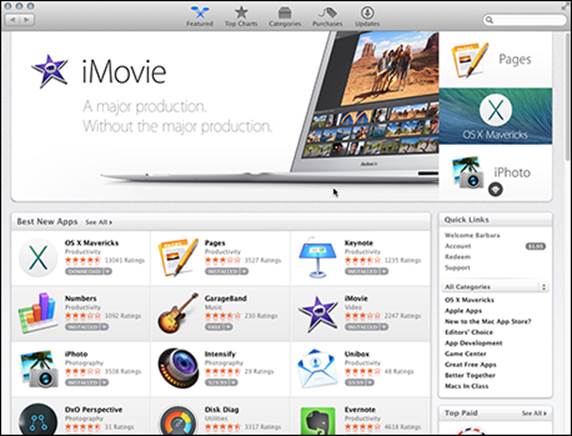
Figure 5-15: The App Store window.
The opening window of the App Store is updated (at least) weekly. Across the top, you see rotating banner ads. Below the banner ads, the left three-quarters of the window contains more app ads, divided in three sections (you have to scroll down the window to see the sections you don’t see in Figure 5-15):
· Best New Apps: These are a mix of the latest arrivals to the App Store and those that have generated user and shopper interest.
· Best New Games: These games are being downloaded a lot. This category could change occasionally to highlight another category, such as Best New Business Apps.
· Previous Editors’ Choices: These apps are the ones that Apple staff liked the most in recent weeks.
The column running down the right side of the window is divided into sections, too:
· Quick Links: Tap any of these items to Sign In, go to your Account (if you have credit, it appears to the right of this button), redeem iTunes or Apple gift cards, and go to the Support page.
· Categories: Next down the list is a pop-up menu that lets you choose the category of apps you want to view. This helps narrow your choices when you’re looking for a specific type of app. Choose from categories such as Business, Games, Medical, Lifestyle, and Utilities. The Categories pop-up menu is followed by apps or groups of apps that Apple thinks will be useful to get you started, such as OS X Mavericks, Apple Apps, Editors’ Choice, and Great Free Apps.
· Top Paid/Top Free: These two lists show the top ten most downloaded apps divided by paid apps and free apps. Click See All to view an expanded list of the top paid and free apps for the week.
· Top Grossing: These apps are the apps that made the most money, so you usually find higher-priced apps in this category unless there’s a low-priced app that’s sold thousands of copies or a free app that’s sold in-app purchases. Again, click See All to view an expanded list.
You can change the view of the opening window by clicking the tabs across the top. Featured is the opening that we described at the beginning. The others are
· Top Charts: Shows an expanded view of Top Paid, Top Free, and Top Grossing.
· Categories: Displays a grid with an icon for each category and the names of three apps in that category. This can help you choose which category best suits your shopping needs.
· Purchases: When you sign in to your account, you can see all the apps you purchased using this Apple ID in your App Store history.
You can consult your past purchases by clicking the Purchases tab at the top of the window or by choosing Store⇒Purchases. You can also download purchases again to another Mac or if you accidentally delete it — when you buy something in the App Store, it’s yours forever.
· Updates: Lets you know whether any apps you purchased in the App Store have updates available. If you do have updates, just click the Download Updates button, and the updates are downloaded immediately and applied to the apps on Launchpad. You also see a list of apps that were recently updated.
As you browse through top ten lists and ads, when you find an app that interests you, click the app name or icon to open the app information screen. You'll see the name and description for the current version of the app, and also these items, as shown in Figure 5-16:
· Buy/Free button: Click to download the application.
· Pop-up menu: Click the triangle next to the price/free button for a pop-up menu that has options to tell a friend about it or copy the link, which you can then paste somewhere else, such as an e-mail. You also have options to share on Twitter, on Facebook, or in Messages.
· Links to developers’ website and app-specific support website: Click either to go to those websites.
· Information box: Check here for the category, release date and version number, the language used, an age-appropriate rating, and system requirements.
· More By: Lists other apps by the same developer.
· Sample images: In the center of the window, you see several sample images that you can click through to see what the app looks like and get an idea of how it works.
· Reviews: (Not shown in the figure.) Users can give a simple star rating, from zero to five, or write a review. Reviews help you decide if the item is worth downloading or purchasing.

Figure 5-16: The information screen helps you decide whether to download an app.
At the bottom, lists show items by the same software developers and other items purchased by people who bought that particular item.
Downloading apps from the App Store
When you find something you like, click the price or the Free button, and it’s downloaded to the Applications folder and you find the icon on Launchpad on your Mac. Some apps have “in-app purchases,” which you buy while using the app. Examples of in-app purchases are additional functions or features, chips for online poker games, or music for instrument apps.
You can switch over to Launchpad to see the app downloading or updating and pause or resume the download if you want. Some app downloads and updates are so quick that you won’t have any reason to pause and resume. If, however, the power goes out or your Wi-Fi router dies in the middle of the download, when you’re back up and running, clicking the app on Launchpad will resume the download at the point it was interrupted. Choose Store⇒Check for Unfinished Downloads to prompt completion.
Of course, when you buy, you have to pay from your Apple ID account. This happens two ways:
· Credit Card: Enter your credit card information into your Apple ID account. If you didn’t enter credit card information when you created an Apple ID, you can do so by choosing Store⇒View My Account and clicking Edit to the right of Payment Information. A window opens where you can choose your preferred payment method, such as credit card or PayPal, and type in the necessary information: account number, expiration date, billing address, and so on.
· Redeem: You can redeem Apple or iTunes gift cards, gift certificates, or allowances. Click Redeem in the Quick Links section of the Featured, Top Charts, or Categories window. Type in the code from the card or certificate, or click Use Camera and follow the onscreen instructions to capture the code with your Mac’s FaceTime camera (if it has one). The amount of the card or certificate is added to your account and appears to the left of the Apple ID account tab.
However you choose to pay for your app purchases, a prompt asks for your password to confirm your intent before making the final purchase.
If you ever have a problem with a purchase, choose Store⇒View My Account. Click Purchase History and then click the Report a Problem button next to the item that isn’t working.
If you want to limit the types of downloads that others who use your Mac can make, you can set up separate user accounts and apply Parental Controls. If you apply Parental Controls to your account, those controls apply to you as well. See Book III, Chapter 2.
When your app cup runneth over
Because you have a physical limit on the amount of software and data you can install on your Mac, you have three choices when you're running out of room for your apps:
· More hard drive space: You can get another hard drive (an external drive or a larger internal drive) to store big byte-consuming files, such as videos or graphic-heavy documents, so you can keep installing more apps.
· Cloud storage: You can move things off your computer to a remote storage site such as iCloud, Dropbox, or SugarSync.
· Purging: You can delete some apps or files that you don’t want or need, which makes room for more apps that you do want and need.
Installing Applications
Although purchasing, downloading, and installing apps from the App Store is one-stop shopping, if you purchase a packaged application from a store or download an app from a website, you have to install it yourself, and we tell you how to do that here.
The most common place to install software is inside the Applications folder, so you should specify that folder when installing software. You can store an app icon in any folder on your hard drive, but you should store apps in the Applications folder. That way, if you need to find that app again, you just have to look on Launchpad or in the Applications folder instead of trying to remember where else you stored it. Some apps store their app icon inside the Applications folder plain as day, but others hide their application icons within another folder.
An application icon actually represents a folder containing multiple files. Hiding these details from you and letting you treat a folder of files as a single application icon ensures that you can’t accidentally delete or move a single crucial file that the entire application needs to work. For the technically curious, you can see the hidden files tucked inside an application by Control-clicking the application icon and choosing Show Package Contents from the shortcut menu. You’re free to look around, but we strongly advise that you don’t delete, move, modify, or rename any of the files you see because doing so might render the application inoperable.
Installing an app from the web
Although you can buy software in a box from your local computer store, it’s becoming far more common to buy software directly from the web. Not only does this save the publisher the time and expense of packaging an application in a fancy box and shipping it to a store, but it also gives you the latest version of the software to use right away.
When you download an application off the Internet, the application usually arrives as a DMG (disc image) file. Safari, the OS X default web browser, stores all downloaded files in a special Downloads folder in your Home folder (unless you direct it to your Mac’s Desktop or another folder of your choosing). A Downloads folder icon also appears right next to the Trash icon on the Dock. (If you’re using a different browser, such as Firefox, you might need to define where it stores downloaded files.)
Distributing software as a DMG file is the most common way to compress files for sending via the Internet. A DMG file essentially copies the contents of an entire folder and smashes it into a single file. You can always identify a DMG file because its icon appears with a hard drive icon, and the name includes the three-letter .dmg extension.
After you have a DMG file on your Mac, you’re set to install the software inside it. Just follow these steps:
1. Control-click the Downloads folder on the Dock to see the contents, and then click the app’s DMG file.
The DMG file displays a device icon on the Desktop and displays a Finder window that contains either an installer or the application icon and an alias for your Applications folder, as shown in Figure 5-17.
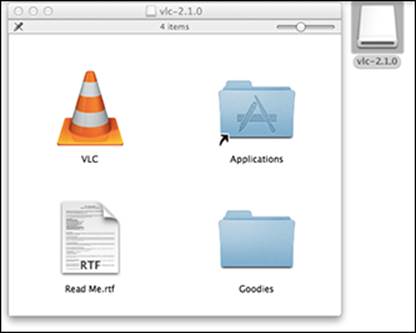
Figure 5-17: Expanding a DMG file displays an application icon or installer.
2. Drag the app icon to the Applications folder icon.
Doing so installs the application in your Applications folder.
If a dialog appears, enter your Mac administrator account name and password; this is the user name you created for your Mac, not your Apple ID.
3. Control-click the DMG device icon on the Desktop and choose Eject.
When you open a DMG file, it creates a device icon, a space that acts like a separate storage device — specifically, a temporary disk from which you can copy files. After you install an application from the DMG file, you eject the DMG device icon just to clear it out of the way. (Leaving it on your Desktop won’t hurt anything.)
After you install an application on your Mac, you can always find it again by looking in the folder where you stored it, which is usually the Applications folder. At this point, you might want to add the application icon to the Dock or place an alias icon on the Desktop (see the earlier section, “Working with Dock Aliases”). As long as it’s in the Applications folder, you find it on Launchpad, too.
The first time you run a newly installed application, a dialog like that in Figure 5-18 might pop up, reminding you to be sure the application came from a secure source, informing you that the application was downloaded from the Internet, and/or you are running the application for the first time. To run the application, click Open. These dialogs pop up as a way of trying to protect you from malicious applications that might try to install and run themselves automatically. If you didn’t try to run an application and see this dialog pop up, click Cancel.
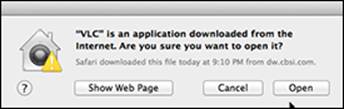
Figure 5-18: A dialog alerts you when you first run an app.
Installing an application from a CD/DVD
Software bought from a store will probably come on a CD/DVD, or there may be a code that you use to download the app from the developer’s website. When you insert the CD/DVD into an optical disc drive connected to your Mac, you might see nothing but a single app icon, along with several other files labeled Read Me or Documentation.
Other times, you might insert a CD/DVD and see an icon labeled Install. When you see an Install icon, you need to run this installation application to install the app on your hard drive.
When installing software, your Mac usually asks for your admin name and password — the one you set up when you created your user account the first time you set up your Mac, which is different than the password you created if you created an Apple ID. (For more on user accounts, see Book III, Chapter 2.)
Requiring your password to install an app keeps unauthorized people (such as your kids) from installing apps that you might not want on your Mac, or applications you want to approve of before allowing another user to install on your Mac. (We write about Parental Controls and password protection in Book III, Chapter 2.)
Dragging an application icon off the CD/DVD
If you insert an app’s installation CD/DVD into your computer and just see an app icon, you install the app by dragging the app icon into your Applications folder. To do this, follow these steps:
1. Insert the software CD/DVD into your Mac (or an external drive if you have a new Mac sans optical disc drive).
A window appears, showing the contents of the CD/DVD.
2. Click the Finder icon in the Dock and then choose File⇒New Finder Window (or press ![]() +N).
+N).
A second Finder window appears, ready to do your bidding.
3. Move the CD/DVD window and the Finder so they appear side by side.
4. Click and drag the app icon displayed in the CD/DVD window to the Applications folder in the Finder Sidebar.
Doing so copies the app icon from the CD/DVD to the Applications folder.
Running an installer application
Instead of displaying an app icon, a CD/DVD might display an Install icon. The installer is simply a special app designed to copy an app from the CD/DVD and place it in your Applications folder, as well as copying other companion files to the appropriate folders on your Mac.
To install software by using an installer app on a CD/DVD, follow these steps:
1. Insert the software CD/DVD into your Mac and look for an icon labeled Install in the window that appears showing the contents of the CD/DVD.
The Install icon typically looks like a cardboard box with its top opened up.
2. Double-click this Install icon and click Continue on the dialog that appears asking whether you really want to continue installing.
3. Follow the onscreen instructions.
If you have multiple hard drives, the installation app might ask where to install the app. (Generally, you should choose your Mac’s built-in hard drive unless you have a reason to store the app elsewhere.) Right before the app installs, you’re asked for your password.
Updating Applications and System Software
Developers are constantly working to improve and enhance their applications or fix bugs that have been pointed out by disgruntled customers. Likewise, when Apple offers an operating system upgrade, developers must update their apps to make them compatible with the new OS. You want to keep your applications up to date to take advantage of these improvements.
You see a badge on the App Store icon on the Dock to let you know when any applications you downloaded from the App Store have been updated. Simply click the Update button on the App Store, and the updates will be downloaded.
You can set up your Mac to automatically check for updates to OS X and apps downloaded from the App Store by choosing ![]() ⇒System Preferences, and then choosing App Store. As shown in Figure 5-19, select the Automatically Check for Updates check box, which tells your Mac to check for updates without any further instructions from you. You can also leave the box deselected and check manually by choosing
⇒System Preferences, and then choosing App Store. As shown in Figure 5-19, select the Automatically Check for Updates check box, which tells your Mac to check for updates without any further instructions from you. You can also leave the box deselected and check manually by choosing ![]() ⇒Software Update, but we suggest that you let your Mac worry about checking for updates for you. Select the other options that you want to activate:
⇒Software Update, but we suggest that you let your Mac worry about checking for updates for you. Select the other options that you want to activate:
· Download Newly Available Updates in the Background: Updates will be downloaded but not installed until you manually do so.
· Install App Updates: Updates will be automatically installed as soon as they are downloaded.
· Install System Data Files and Security Updates: These types of software will be downloaded and installed automatically.
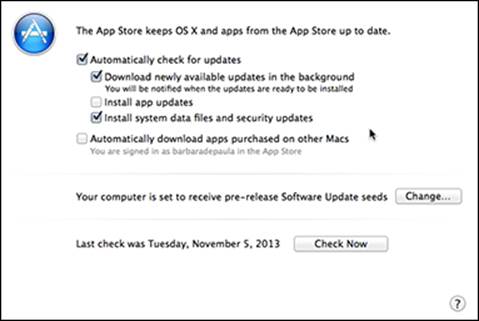
Figure 5-19: Let Software Update check automatically for system software updates.
If you have more than one Mac, you may want to select the last check box so that when you download purchases on one Mac, they are automatically downloaded on other Macs that are signed in to the same Apple ID account in the App Store.
When new software is available, a message arrives, as shown in Figure 5-20.
Figure 5-20: Your Mac tells you when updates are available.
Apps you download or install from other sources may also have automatic software updates available. You usually find them either under the Help menu or in the Application menu. If you’re having problems with a particular application, go to the developer’s website to check for an update. If you’re having a problem, others folks probably are, too, and an update can often be the remedy.
Uninstalling Applications
If you no longer use or need an app or if it’s an old version that is no longer compatible with your OS X version, you can always remove it from your hard drive. By uninstalling an app, you can free up space on your hard drive.
Apps downloaded from the App Store remain available in your purchase records even if you remove them from your hard drive. You can download them again in the future, as long they are still available.
Don’t uninstall an app from a non–App Store source unless you have the original disc or the website from which you downloaded it offers a lifetime download policy. Otherwise, you may have to purchase the app again.
Uninstalling an app can involve three parts, which we explain in detail:
· Uninstalling the app
· Deleting app icons/alias icons
· Deleting app settings
If an app you want to uninstall comes with an uninstaller application, double-click it to uninstall your app instead of dragging it to the Trash. However, the next few sections give you a more detailed look at what’s involved when you uninstall an app by dragging it to the Trash.
Uninstalling an app
Uninstalling a Mac app is typically as simple as dragging and dropping its app icon into the Trash. If you've purchased an app in the App Store, you can remove it via Launchpad, and we explain how later in this section. Apps that are pre-installed on your Mac are extremely difficult to remove; we suggest that you don’t try to remove them.
To uninstall an app, follow these steps:
1. Make sure that the application you want to uninstall isn’t running. If it is running, shut it down by choosing the Quit command (![]() +Q).
+Q).
2. Click the Finder icon on the Dock.
The Finder appears.
3. Click the Applications folder in the Finder Sidebar to display the apps installed on your Mac, and then click the app icon or folder that you want to uninstall.
4. Choose File⇒Move to Trash.
Alternatively, you can also drag the app icon or folder to the Trash icon on the Dock, or press ![]() +Delete to move the app icon or folder to the Trash.
+Delete to move the app icon or folder to the Trash.
In some cases, you might be prompted for your password when you move an application file to the Trash. If so, type in your password and then click OK or press Return.
The Trash icon displays an image showing the Trash filled with crumpled papers.
Before emptying the Trash, make sure that you want to permanently delete any other apps or documents you might have dragged into the Trash. After you empty the Trash, any files contained therein are deleted from your hard drive forever.
5. Choose Finder⇒Empty Trash.
Alternatively, you can Control-click the Trash icon and choose Empty Trash, or press ![]() +Shift+Delete to empty the Trash.
+Shift+Delete to empty the Trash.
Adiós, application!
From Launchpad, you can delete apps purchased in the App Store. Press the Option key, and all the icons begin to wiggle and jiggle. Those you can delete from the Launchpad have an “x” on the upper left of the icon. Click the “x.” A confirmation dialog asks whether you really want to delete the app. Click Delete if you do; click Cancel if you don’t.
Removing app alias icons from the Dock and Desktop
After you uninstall an app, it’s also wise to remove all Dock or alias icons because those icons will no longer work. To remove an app icon from the Dock, click the app icon that you want to remove, drag the icon up and away from the Dock, and then release the mouse button. Your chosen app disappears in a puff of animated smoke.
If you created multiple alias icons of an app, click the Finder icon to open a new Finder window, click in the Spotlight text box, and then type the name of the app you uninstalled followed by the word alias, such as PowerPoint alias or Stickies alias. The Finder will display the location of the specified alias icons. Hold down the ![]() key, click each alias icon you want to delete, and then press
key, click each alias icon you want to delete, and then press ![]() +Delete to move them to the Trash. Au revoir!
+Delete to move them to the Trash. Au revoir!
Deleting the alias is not the same as deleting the app because the alias is only a pointer to the app, not the app itself. Removing the alias is useful to eliminate clutter but won’t eliminate the app.
Removing user setting files
Almost every app creates special user setting files that contain custom settings and preferences for the app, such as the default font used to type text when you use the app or your choice of toolbar icons displayed by the app. When you uninstall an app by dragging it to the Trash, the app’s user setting files remain on your computer.
The more unnecessary files you have cluttering your hard drive, the slower your Mac might perform because it needs to keep track of these unused files even though it isn’t using them anymore. To keep your Mac in optimum condition, you should delete the user setting files of apps you uninstall from your computer. You can do that manually or you can buy an app to do it for you automatically. We explain both ways.
Manually removing user setting files
Manually removing user setting files requires deleting individual files or entire folders from your Mac’s hard drive. This process isn’t difficult although it can be tedious.
If you feel squeamish about deleting files that you don’t understand, don’t delete them without an expert’s help. If you delete the wrong files, you could mess up the way your Mac works.
Many apps store their user setting files in one or both of two folders: the Application Support folder and the Preferences folder. To find these two folders, click anywhere on the Desktop, then hold down the Option key, and choose Go⇒Library. Look inside the Application Support and Preferences folders and click any icons or folders bearing the name of the app you uninstalled; drag them to the Trash and choose File⇒Empty Trash (or press ![]() +Shift+Delete).
+Shift+Delete).
Automatically removing user setting files
Because manually deleting user setting and preference files might seem scary and intimidating, you may prefer to remove these files automatically. To do so, you have to buy and install a special uninstaller app. When you run an uninstaller app, you tell it which app you want to uninstall. Then the uninstaller app identifies all the files used by that application.
Popular uninstaller apps include
· AppZapper: www.appzapper.com
· Spring Cleaning: http://my.smithmicro.com/
· Uninstaller: http://macmagna.free.fr
All materials on the site are licensed Creative Commons Attribution-Sharealike 3.0 Unported CC BY-SA 3.0 & GNU Free Documentation License (GFDL)
If you are the copyright holder of any material contained on our site and intend to remove it, please contact our site administrator for approval.
© 2016-2026 All site design rights belong to S.Y.A.