iPad mini For Dummies, 3rd Edition (2015)
Part IV. The iPad mini at Work
 Find out what you can ask Siri at www.dummies.com/extras/ipad.
In this part …
· Learn how to shop ‘til you drop in the App Store, an emporium replete with a gaggle of neat little programs and applications. Best of all, unlike most of the stores you frequent, a good number of the items can be had for free.
· Get down to business and explore staying on top of your appointments and people with Calendar and Contacts.
· Discover utilities such as Reminders, Notes, and Clock.
· Take control of your iPad mini with Notification Center and Control Center.
· Get to know Siri, your (mostly) intelligent assistant. She responds to your voice and can do some amazing tasks, including sending messages, scheduling appointments and reminders, searching the web, and playing a specific song or artist.
![]()
Chapter 11. App-solutely!
In This Chapter
![]() Getting a handle on the different types of apps
Getting a handle on the different types of apps
![]() Searching for specific apps
Searching for specific apps
![]() Getting apps onto your iPad mini
Getting apps onto your iPad mini
![]() Managing iPad apps
Managing iPad apps
![]() Deleting and reviewing apps
Deleting and reviewing apps
One of the best things about the iPad mini is that you can download and install apps created by third parties, which is to say not created by Apple (the first party) or you (the second party). At the time of this writing, our best guess is that there are more than 1.2 million apps available and over 75 billion apps downloaded to date. Some apps are free, and other apps cost money; some apps are useful, and other apps are lame; some apps are perfectly well behaved, and other apps quit unexpectedly (or worse). The point is that of the many apps out there, some are better than others.
In this chapter, we take a broad look at apps that you can use with your iPad mini. You discover how to find apps on your computer or your iPad, and you find some basics for managing your apps. Don’t worry: We have plenty to say about specific third-party apps in Chapters 18 and 19.
Tapping the Magic of Apps
Apps enable you to use your iPad mini as a game console, a streaming Netflix player, a recipe finder, a sketchbook, and much, much more. You can run three categories of apps on your iPad:
· Apps made exclusively for the iPad: This is the rarest kind, so you find fewer of these than the other two types. These apps won’t run on an iPhone or iPod touch, so you can’t even install them on either device.
· Apps made to work properly on an iPad, iPhone, or iPod touch: These so-called universal apps can run on any of the three device types at full resolution. What is the full-screen resolution for each device? Glad you asked. It ranges from 960 x 640 pixels for older iPhones and iPod touches to a whopping 2048 x 1536 pixels on all currently available iPads but the first-generation iPad mini (which has but 1024 x 768 pixels).
· Apps made for the iPhone and iPod touch: These apps run on your iPad but only at iPhone/iPod touch resolution (960 x 640) rather than the full resolution of your iPad mini (1024 x 768 or 2048 x 1536).
 You can double the size of an iPhone/iPod touch app by tapping the little 2x button in the lower-right corner of the screen; to return it to its native size, tap the 1x button. Figure 11-1 shows you what an iPhone/iPod touch app looks like on an iPad screen.
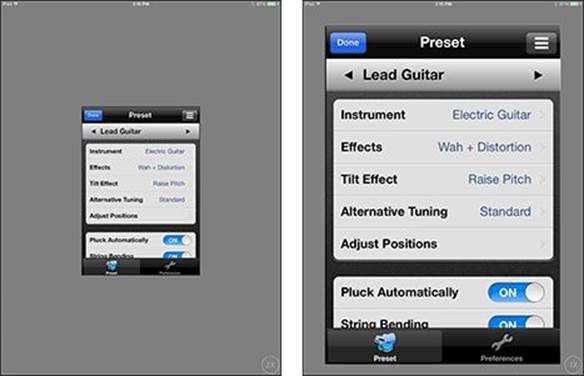
Figure 11-1: iPhone/iPod touch apps run at a smaller size (left), but can be increased to double size (right).
Frankly, most iPhone/iPod apps look pretty good at 2x size, but we’ve seen a few that have jagged graphics and don’t look as nice. Still, with 1.2 million (or more) apps to choose from, we’re sure that you can find a few that make you happy.
You can obtain and install apps for your iPad mini in three ways:
· On your computer
· On your iPad mini
· By automatic download
To switch on automatic downloads on the iPad mini, tap Settings⇒iTunes & App Store. Then tap the Automatic Downloads switch for Apps so that it turns green (on). After you do so, all apps you buy with iTunes on your computer or buy on other iOS devices will automagically appear on your iPad mini.
Consider also enabling automatic downloads for Music, Books, and Updates while you have iTunes & App Store settings on your screen.
To use the App Store on your iPad, it must be connected to the Internet. Also, if you obtain an app on your computer, it isn’t available on your iPad until you either sync the iPad with your computer or download the app from iCloud from the Purchased tab, covered later in this chapter. See Chapter 3 for details about syncing.
After you’ve obtained an app from the App Store on your computer or iPad, you can download it from iCloud to up to ten iOS devices.
But before you can use the App Store on your iPad or your computer, you first need an iTunes Store account. If you don’t already have one, we suggest that you launch iTunes on your computer or the App Store or iTunes Store app on your iPad. Here’s how:
· On your computer: Launch iTunes, click Sign In near the upper-left corner of the iTunes window, click Create Apple ID, and follow the on-screen instructions.
· On your iPad mini: Tap Settings⇒iTunes & App Store⇒Sign In⇒Create New Account and follow the on-screen instructions.
 If you don’t have an iTunes Store account, you can’t download a single cool app — not even the free ones — for your iPad mini. ’Nuff said.
Using Your Computer to Find Apps
Okay, start by finding cool iPad apps using iTunes on your computer. Follow these steps:
1. Launch iTunes.
2. Click the iTunes Store tab near the top-center of the iTunes window.
3. ![]() Click the Apps icon (shown in the margin) near the top-left of the iTunes window.
Click the Apps icon (shown in the margin) near the top-left of the iTunes window.
You’re looking at the landing page of the iTunes App Store.
4. Click the iPad tab near the top-center of the iTunes window.
The iPad section of the iTunes App Store appears, as shown in Figure 11-2.
The default is to display all categories, which is what you see on the landing page. To look at a specific category of the App Store, press and hold All Categories (near the top-right) and select a category from the drop-down menu.
Now you’re ready to browse, search, and download apps, as we explain in the following sections.
Browsing the App Store from your computer
After you have the iTunes App Store on your screen, you have a couple of options for exploring its virtual aisles. Allow us to introduce you to the various “departments” available from the main screen. The main departments are featured in the middle of the screen, and ancillary departments appear on either side of them. We start with the ones in the middle:
· Best New Apps: This department displays six icons (and part of a seventh) in Figure 11-2. These apps are — what else? — the best new apps according to Apple’s curators.
Only six and a half icons are visible, but the Best New Apps department has more than that. Find the See All link way over to the right of the words Best New Apps. Click that link to see all apps in this department at once. Or click and drag the scroll bar below the icons to see more.
· Best New Games: This department displays six and a half icons as well, representing the best new games available today. Again, you can see more of these icons by clicking the See All link or by dragging the scroll bar.
The Best New Apps and Games sections have appeared near the top of the iTunes App store for as long as we can remember. The other departments, such as Introducing Bundles and Halloween Apps & Games in Figure 11-2, are rotated regularly. In earlier editions of this book, the screen has displayed Previous Editors’ Choices and What’s Hot. Regardless of what the department is called or its contents, all departments work the same: To see more items, click See All or drag the scroll bar.
 Apple has a habit of redecorating (or even reconfiguring) the iTunes Store every so often, so allow us to apologize in advance if things aren’t exactly as described here when you visit.
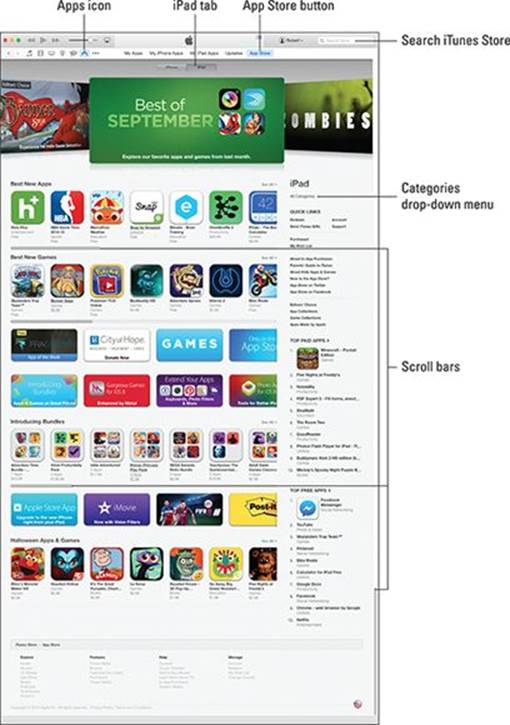
Figure 11-2: The iTunes App Store in all its glory (with the iPad tab selected).
Separating the Best New Apps and Best New Games departments from the Introducing Bundles and Halloween Apps & Games departments are two rows of advertisements (Fragment, City of Hope, Introducing Bundles, Gorgeous Games for iOS 8, and the like in Figure 11-2). Click an ad to learn more.
Two additional departments appear on the right side of the window: Top Paid Apps and one of our favorites, Top Free Apps. The number-one app in each department displays both its icon and its name; the next nine apps show text links only.
Using the search field in the iTunes Store
Browsing the screen is helpful, but if you know exactly what you’re looking for, searching is faster. Follow these steps to search for an app:
1. In the search field in the upper-right corner of the main iTunes window, type a word or phrase. Press Return or Enter to initiate the search.
In Figure 11-3, we searched for photo. You see results for the entire iTunes Store, which includes music, television shows, movies, and other stuff in addition to iPad apps.
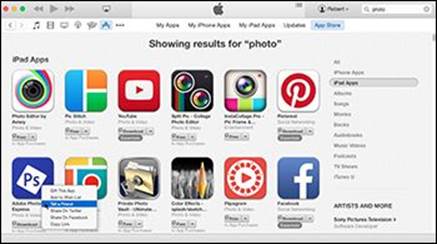
Figure 11-3: We want to do cool stuff with our iPad camera, so we searched for photo.
2. Click iPad Apps (as shown in Figure 11-3) to limit your results to only iPad apps.
One last thing: The little triangle to the right of each item’s price (or free, download, or downloaded) button is another drop-down menu, as shown for the Adobe Photoshop Express app in Figure 11-3. This drop-down menu lets you give this app to someone as a gift, add it to your wish list, send a link to it in an email to a friend (shown selected in Figure 11-3), share this item on Facebook or Twitter, or copy the product’s link to the Clipboard so that you can paste it elsewhere.
Getting more information about an app in the iTunes Store
Now that you know how to find apps in the App Store, this section delves a little deeper and shows you how to find out more about an app that interests you.
To find out more about an app, just click its icon or text link. A details screen like the one shown in Figure 11-4 appears.
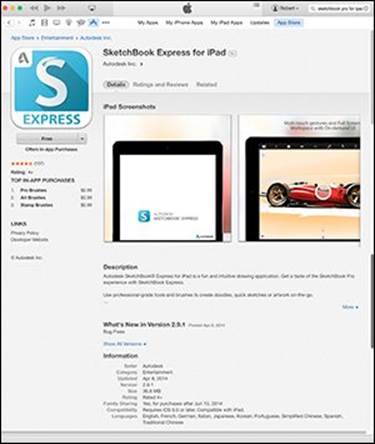
Figure 11-4: The details screen for SketchBook Express for iPad, a nifty drawing and painting app for your iPad.
This screen tells you most of what you need to know about the app, such as basic product information and a narrative description, what’s new in this version, the language it’s presented in, and its system requirements. In the following sections, you take a closer look at the various areas on the screen.
Finding the full app description
Note the blue More link in the lower-right corner of the Description section in Figure 11-4; click More to see a longer description of the app.
Bear in mind that the app description on this screen was written by the app’s developer and may be somewhat biased. Never fear, gentle reader: In an upcoming section, we show you how to find app reviews written by people who have used it (and, unfortunately, sometimes people who haven’t).
Understanding the app rating
The SketchBook Express app is rated 4+, as you can see below the Free button in the upper-left corner of the screen shown in Figure 11-4. The rating means that the app contains no objectionable material. Here are the other possible ratings:
· 9+: May contain mild or infrequent occurrences of cartoon, fantasy, or realistic violence; or infrequent or mild mature, suggestive, or horror-themed content that may not be suitable for children younger than the age of 9.
· 12+: May contain infrequent mildly offensive language; frequent or intense cartoon, fantasy, or realistic violence; mild or infrequent mature or suggestive themes; or simulated gambling that may not be suitable for children younger than the age of 12.
· 17+: May contain frequent and intense offensive language; frequent and intense cartoon, fantasy, or realistic violence; mature, frequent, and intense mature, suggestive, or horror-themed content; sexual content; nudity; or depictions of alcohol, tobacco, or drugs that may not be suitable for children younger than the age of 17. You must be at least 17 years old to purchase games with this rating.
Checking requirements and device support for the app
Last but not least, remember the three categories of apps we mention at the beginning of the chapter, in the “Tapping the Magic of Apps” section? If you look below the Information heading in Figure 11-4 (below the Description and What’s New sections), you can see the requirements for this particular app. It says Requires iOS 6 or later. Compatible with iPad. Note that it doesn’t mention the iPhone or iPod touch. That’s because this app is in the first category of apps, those made exclusively for the iPad. Another clue that it falls into the first category is that it says iPad Screenshotsabove the two pictures shown in Figure 11-4. Finally, the app’s name — SketchBook Express for iPad — should be a dead giveaway.
If the app belonged to the second or third category — apps made to work properly on an iPad, iPhone, or iPod touch, or apps made for the iPhone or iPod touch — the Information section would read Compatible with iPhone, iPod touch, and iPad rather than Compatible with iPad.
Now you’re probably wondering how you can tell whether an app falls into the second or third category. The first clue is the little gray + sign next to the price, which appears for many of the apps shown in Figure 11-3. Apps with this symbol are universal and run at full resolution on iPhones and iPads. Another clue is to look at the screen shots. If you see two tabs — iPhone and iPad — after Screenshots, the app will work at the full resolution of an iPad, iPhone, or iPod touch. Conversely, if you only see one tab that says iPhone Screenshots, the app will run at iPhone/iPod touch resolution on your iPad.
One way to ensure that you look only for apps that take advantage of your iPad’s big screen is to click the iPad tab on the front page of the App Store (shown earlier in Figure 11-2). All the apps displayed under the iPad tab are of the first or second type and are designed to take advantage of your iPad’s larger screen.
Reading reviews
If you tap Ratings and Reviews below the product’s name near the top of the screen, you’ll see reviews written by users of this app. Each review includes a star rating, from zero to five. If an app is rated four stars or higher, you’re safe to assume that most users are happy with this app.
In Figure 11-4, you can see that this app has an average rating for the current version of 4.5 stars based on 107 user ratings. You can tap Ratings and Reviews to see the average rating for all versions (4 stars based on 2,129 user ratings for SketchBook Express). That means it’s probably a pretty good app.
Finally, at the top of the Customer Reviews section and near the right side is a pop-up menu displaying Most Helpful (not shown in Figure 11-4). This menu lets you sort the customer reviews by your choice of Most Helpful, Most Favorable, Most Critical, or Most Recent.
Don’t believe everything you read in reviews. Some people buy an app without reading its description, or they try to use it without following the included instructions. Then, when the app doesn’t do what they expected, they give it a low rating. The point is, take the ratings and reviews with a grain of salt.
Downloading an app from the iTunes Store
When you find an app you want to try while browsing the App Store on your computer, just click the app’s Free or Buy button. When you do so, you have to log in to your iTunes Store account, even if the app is free.
After you log in, the app begins downloading. When it’s finished, it appears in the Apps section of your iTunes library, as shown in Figure 11-5.
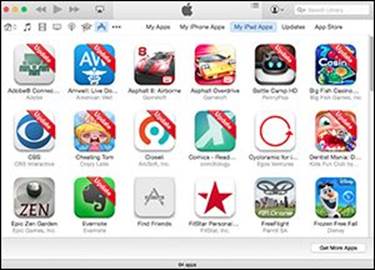
Figure 11-5: Apps that you download appear in the Apps section of your iTunes library.
If an app costs money, you’ll get a receipt for it via e-mail, usually within 24 hours.
Downloading an app to your iTunes library is only the first half of getting it onto your iPad mini. After you download an app, you can sync your iPad so the app will be available on it. Chapter 3 covers syncing in detail. You can also get the app via the App Store’s Purchased tab (described later in this chapter) or by enabling Automatic Downloads on the Settings app’s Store pane on your iPad or the iTunes Preferences Store tab on your computer.
If you want apps to download to your iPad mini automatically, regardless of which device you used to purchase the app, you can set that up:
· On a computer: Connect your iPad mini via either USB cable or Wi-Fi. Launch iTunes and click the iPad button near the upper-right corner of the iTunes window. Click the Apps tab, scroll to the bottom, and enable the Automatically Sync New Apps check box.
· On your iPad mini: Tap Settings⇒iTunes and App Store. Then turn on the switch for Apps in the Automatic Downloads section.
You can enable Automatic Downloads for Music and Books on your iPad (but not in iTunes).
Updating an app from the iTunes Store
Every so often, the developer of an iPad app releases an update. Sometimes these updates add new features to the app, sometimes they squash bugs, and sometimes they do both. In any event, updates are usually good things for you and your iPad mini, so it makes sense to check for them every so often.
To do this in iTunes: Click the Apps icon to select it, as shown in Figure 11-5. Click the Updates tab. Then, to update all the apps at once, click the Update All Apps button in the lower-right corner of the screen. To update apps one by one, click the individual Update button for each app you want to update.
Note that if you hover the pointer over the Apps icon when updates are available, you’ll see how many updates are waiting for you.
After you download an update this way, it replaces the older version in your iTunes library and on your iPad automatically the next time you sync. Or, if you’ve enabled automatic downloads for apps as described earlier in the chapter, the new app replaces the old app automatically the next time you’re connected to the Internet.
Using Your iPad mini to Find Apps
Finding apps with your iPad mini is almost as easy as finding them by using iTunes. The only requirement is that you have an Internet connection of some sort — Wi-Fi or wireless data network — so that you can access the iTunes App Store and browse, search, download, and install apps.
Browsing the App Store on your iPad mini
![]() To get started, tap the App Store icon (shown in the margin) on your iPad mini’s Home screen. After you launch the App Store, you see five icons at the bottom of the screen, representing five ways to interact with the store, as shown in Figure 11-6. The first four icons at the bottom of the screen — Featured, Top Charts, Explore, and Purchased — offer four ways to browse the virtual shelves of the App Store. (We cover the fifth icon, Updates, a little later, in the “Updating an app from the App Store” section.)
To get started, tap the App Store icon (shown in the margin) on your iPad mini’s Home screen. After you launch the App Store, you see five icons at the bottom of the screen, representing five ways to interact with the store, as shown in Figure 11-6. The first four icons at the bottom of the screen — Featured, Top Charts, Explore, and Purchased — offer four ways to browse the virtual shelves of the App Store. (We cover the fifth icon, Updates, a little later, in the “Updating an app from the App Store” section.)
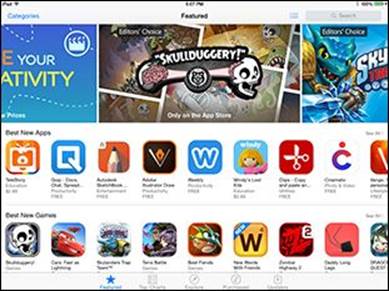
Figure 11-6: The icons across the bottom represent the five sections of the App Store.
Tap Categories in the top-left corner to browse apps in categories such as Books, Education, Games, Music, News, and Productivity, to name a few. Tap a category to see the apps it contains.
The Featured section is almost the same as the section of the same name on the landing page of the iTunes App Store (refer to Figure 11-2). Scroll down and you’ll find the same ads and departments you’d see in iTunes on your computer.
The Top Charts section offers lists of the top paid and free apps, which correlate with the Top Free and Top Paid lists, respectively, on the right side of the screen in iTunes (as shown in Figure 11-2).
 The Explore section is new in iOS 8 and kind of cool. After granting it permission to use your current location, you’ll find apps with local content, such as newspaper, television, and public transit apps. The feature is handy in your hometown but even more useful when you’re out of town. (Note that Location Services must be enabled in Settings⇒Privacy for this feature to work.)
Finally, the Purchased section displays all your iPad apps — the ones currently installed on this iPad mini and any that you’ve purchased that aren’t installed. To the right of each app, you see either Installed or iCloud. To install an uninstalled app, tap its iCloud button and then type your password.
Most pages in the App Store display more apps than can fit on the screen at once. For example, the Best New Apps section in Figure 11-6 contains more than the nine apps you can see. A few tools help you navigate the multiple pages of apps:
· Swipe from right to left to see more apps in a category.
· Swipe up the screen to see additional categories.
· Tap the See All link at the top-right of most sections to (what else?) see all the apps in that section on the same screen.
Using the search field in the App Store
If you know exactly what you’re looking for (or even approximately what you’re looking for), rather than simply browsing, you can tap the search field in the upper-right corner of the iPad screen and type a word or phrase; then tap the Search key on the keyboard to initiate the search.
Finding details about an app in the App Store
Now that you know how to find apps in the App Store, the following sections show you how to find out more about a particular app. After tapping an app icon as you browse the store or in a search result, your iPad displays a details screen like the one shown in Figure 11-7.
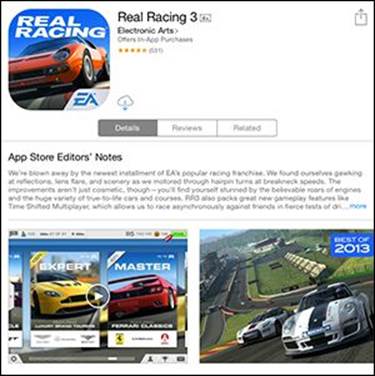
Figure 11-7: Real Racing 3 is a free car racing game with awesome graphics and realistic physics.
The app description on this screen was written by the developer and may be somewhat biased.
The information you find on the Details tab for an app on your iPad is similar to that info on the iTunes screen on your computer. The links, rating, and requirements simply appear in slightly different places on your iPad screen. (See the section “Getting more information about an app in the iTunes Store,” earlier in this chapter, for explanations of the main on-screen items.)
Downloading other content on your iPad mini
You may have noticed that the App Store app on your iPad offers nothing but apps. iTunes on your computer, on the other hand, includes sections for music, movies, TV shows, books, podcasts, and iTunes U.
On your iPad mini, you obtain music, movies, and TV shows with the iTunes Store app, magazines with the Newsstand app, books with the iBooks app, and podcasts with the Podcasts app. All these apps come with your iPad. For iTunes U content, however, you’ll need the iTunes U app, which (curiously) is not included with your iPad mini out of the box.
The good news is that all these apps are free in the App Store, so if you want to shop for books, podcasts, or iTunes U content on your iPad and you don’t already have the apps on your iPad mini, you should download them now.
All these apps work pretty much the same, so when you understand how to navigate the App Store app, you also know how to use all the store apps.
To read reviews from your iPad, tap the Reviews tab. If you scroll to the bottom of the page and see a More Reviews button (not visible in Figure 11-7), tap it to see (what else?) more reviews.
Downloading an app from the App Store
To download an app to your iPad mini (while using your iPad mini), follow these steps:
1. Tap the blue price button (or the word Free or the download from iCloud icon) near the top of the app’s details screen.
In Figure 11-7, you see the download from iCloud icon instead of a price because we purchased the game previously. Once tapped, the button transforms into a green Buy button.
2. Tap the Buy button.
3. When prompted, type your iTunes Store account password.
![]() After you do, the App Store closes, and you see the Home screen where the new app’s icon will reside. The new app’s icon is slightly dimmed and has the word Loading beneath it, with a blue progress bar to indicate how much of the app remains to be downloaded, as shown in the margin.
After you do, the App Store closes, and you see the Home screen where the new app’s icon will reside. The new app’s icon is slightly dimmed and has the word Loading beneath it, with a blue progress bar to indicate how much of the app remains to be downloaded, as shown in the margin.
4. If the app is rated 17+, click OK on the warning screen that appears after you type your password to confirm that you’re 17 or older before the app downloads.
The app is now on your iPad mini, but it isn’t copied to your iTunes library on your Mac or PC until your next sync unless you’ve enabled automatic downloads. If your iPad suddenly loses its memory (unlikely) or if you delete the app from your iPad before you sync (as we describe later in this chapter, in the section “Deleting an app”), that app is gone. That’s the bad news. The good news is that you can download it again from the Purchased tab as described earlier in the chapter. Or the app will reappear spontaneously on your iPad if you’ve enabled automatic downloads.
Updating an app from the App Store
As we mention earlier in this chapter, every so often the developer of an iPad app releases an update. If an update awaits you, a little number in a circle appears on the Updates icon at the bottom of the iPad screen. Follow these steps to update your apps from your iPad:
1. Tap the Updates icon if any of your apps needs updating.
If you tap the Updates icon and see (in the middle of the screen) a message that says All Apps Are Up to Date, none of the apps on your iPad requires an update at this time. If apps need updating, they appear with Update buttons next to them.
2. Tap the Update button that appears next to any app to update it.
If more than one app needs updating, you can update them all at once by tapping the Update All button in the upper-right corner of the screen.
If you try to update an app purchased from any iTunes Store account except your own, you’re prompted for that account’s ID and password. If you can’t provide them, you can’t download the update.
Working with Apps
Most of what you need to know about apps involves simply installing third-party apps on your iPad. However, you might find it helpful to know how to delete and review an app.
Deleting an app
The preinstalled apps that came on your iPad mini can’t be removed, but you have two ways to delete any other app: in iTunes on your computer or directly from your iPad.
You can, however, hide certain preinstalled apps by choosing Settings⇒General⇒Restrictions.
To delete an app in iTunes (that is, from your computer), click the Apps icon and then do one of the following:
· Click the app to select it and press the delete or backspace key on the keyboard.
· Click the app to select it and then choose Edit⇒Delete.
· Right-click the app and choose Delete.
After taking any of the actions in this list, you see a dialog that asks whether you’re sure that you want to remove the selected app. If you click the Remove button, the app is removed from your iTunes library as well as from any iPad that syncs with your iTunes library.
Here’s how to delete an app on your iPad mini:
1. Press and hold any icon until all the icons begin to wiggle.
2. Tap the little x in the upper-left corner of the app that you want to delete.
A dialog appears, informing you that deleting this app also deletes all its data, as shown in Figure 11-8.
3. Tap the Delete button.
You can’t delete any of the bundled apps that came with your iPad.
4. To stop the icons from wiggling, press the Home or sleep/wake button.
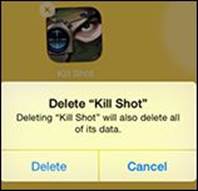
Figure 11-8: Tap an app’s little x and then tap Delete to remove the app from your iPad.
You also make icons wiggle to move them around on the screen or move them from page to page. To rearrange wiggling icons, press and drag them one at a time. If you drag an icon to the left or right edge of the screen, it moves to the next or previous Home screen. You can also drag two additional icons to the dock (where Safari, Mail, Photos, and Music live) and have a total of six apps available from every Home screen.
Friendly reminder: Rearranging your icons in iTunes is faster and easier than making them wiggle and move on the iPad. See Chapter 3 to find out how.
Writing an app review
Sometimes you love or hate an app so much that you want to tell the world about it. In that case, you should write a review. You can do this in two ways: in iTunes on your computer or directly from your iPad mini.
To write a review using iTunes on your computer, follow these steps:
1. Navigate to the details page for the app in the iTunes App Store.
2. Click the Ratings and Reviews tab and then click the Write a Review button.
You may or may not have to type your iTunes Store password.
3. Click the button for the star rating (1 to 5) you want to give the app.
4. In the Title field, type a title for your review, and in the Review field, type your review.
5. Click the Submit button when you’re finished.
The Preview screen appears. If the review looks good to you, you’re done. If you want to change something, click the Edit button.
To write a review from your iPad mini, follow these steps:
1. ![]() Tap the App Store icon to launch the App Store.
Tap the App Store icon to launch the App Store.
2. Navigate to the details screen for the app.
3. Scroll down the page and tap the Write a Review link.
You probably have to type your iTunes Store password.
4. Tap one to five of the stars at the top of the Write a Review screen to rate the app.
5. In the Title field, type a title for your review, and in the Review field, type your review.
6. Tap the Submit button in the upper-right corner of the screen.
Whichever way you submit your review, Apple reviews your submission. As long as the review doesn’t violate the (unpublished) rules of conduct for app reviews, it appears in a day or two in the App Store, in the Reviews section for the particular app.
![]()
All materials on the site are licensed Creative Commons Attribution-Sharealike 3.0 Unported CC BY-SA 3.0 & GNU Free Documentation License (GFDL)
If you are the copyright holder of any material contained on our site and intend to remove it, please contact our site administrator for approval.
© 2016-2025 All site design rights belong to S.Y.A.