iPad mini For Dummies, 3rd Edition (2015)
Part IV. The iPad mini at Work
Chapter 13. Indispensable iPad mini Utilities
In This Chapter
![]() Noting Notes
Noting Notes
![]() Remembering with Reminders
Remembering with Reminders
![]() Negotiating Notification Center
Negotiating Notification Center
![]() Punching the Clock app
Punching the Clock app
![]() Sizing up the social media
Sizing up the social media
![]() Using a hotspot
Using a hotspot
![]() Getting the drop on AirDrop
Getting the drop on AirDrop
We’d venture to say that no one bought an iPad mini because of Notes, Clock, Reminders, or Game Center. Still, these apps help make the iPad mini indispensable on a daily basis.
In addition to the indispensable apps described in this chapter, we also demonstrate how to create a Wi-Fi hotspot no matter where you are (all iPads minis with 4G features) and how to share with AirDrop.
Taking Note of Notes
Notes is an app that creates text notes that you can save or send through email. To create a note, follow these steps:
1. On the Home screen, tap the Notes icon.
2. ![]() Tap the new note icon (shown in the margin) in the upper-right corner to start a new note.
Tap the new note icon (shown in the margin) in the upper-right corner to start a new note.
The virtual keyboard appears.
3. Type a note, such as the one shown in Figure 13-1.
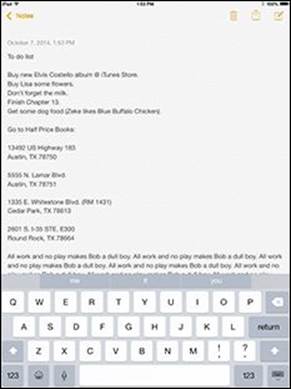
Figure 13-1: The Notes app revealed.
 You can use Siri to set up and dictate your note by speaking on all iPad mini models. (You hear more about Siri in Chapter 14.)
Other things you can do before you quit the Notes app include
· Tap the Notes or Folders button in the upper-left corner of the screen to see either a list of all your notes or, if you sync Notes with more than one account, such as iCloud, Google, or Yahoo!, folders for All Notes plus a separate folder for each service you use.
· When the list is on-screen, tap a folder to see its contents, or tap a note to open and view, edit, or modify it. (Hint: The list is always visible when you hold your iPad mini in landscape mode with the longer edges parallel to the ground.)
· ![]() Tap the share icon at the top-right corner (and shown in the margin) to send the note using the Mail or Messages app (see Chapter 5 for more about Mail and iMessage), copy the note to the Clipboard (see Chapter 2 for the scoop on copy and paste), or print the note (see Chapter 2 for more about printing).
Tap the share icon at the top-right corner (and shown in the margin) to send the note using the Mail or Messages app (see Chapter 5 for more about Mail and iMessage), copy the note to the Clipboard (see Chapter 2 for the scoop on copy and paste), or print the note (see Chapter 2 for more about printing).
· Tap the trash icon near the top-right corner of the screen to delete the note.
As with most iPad apps, your notes are saved automatically while you type them so that you can quit Notes at any time without losing a single character.
We’d be remiss if we didn’t remind you one last time that you can sync Notes with your Mac and other devices via iCloud. We’d be remiss also if we didn’t mention that unlike other sync functions, you don’t enable Notes syncing in iTunes. Instead, you enable it in Settings⇒iCloud on your iPad mini and System Preferences⇒iCloud on your Mac.
And that’s all she wrote. You now know what you need to know about creating and managing notes with Notes.
Remembering with Reminders
You can find lots of good to-do list apps in the App Store; if you don’t believe us, search for to-do list. You’ll find more than 100 offerings for the iPad. Many are free, but others sell (and sell briskly, we might add) at prices up to $30 or $40. Most of these third-party reminder apps have nothing to worry about from the Reminders app, although some people love it.
What you get for free is Reminders, a simple to-do list app for making and organizing lists, with optional reminders available for items in your lists.
Tap the Reminders icon on your Home screen, and you’ll see something that looks like Figure 13-2.
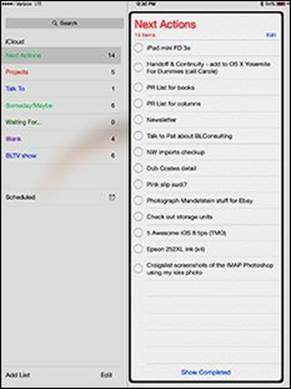
Figure 13-2: The Reminders app.
Reminders on the right side of the screen in Figure 13-2 belong to a list called Next Actions, as indicated by it being highlighted on the left side of the screen.
Working with lists
To create a list, tap Add List in the lower-left corner of the screen, type a name for the list on the virtual keyboard, and then tap Done. You can have as many or as few lists as you like.
To manage the lists you create, tap the Edit button at the bottom of the screen, shown in Figure 13-2. When you do, the left side of the screen goes into what we like to think of as edit mode, as shown in Figure 13-3.
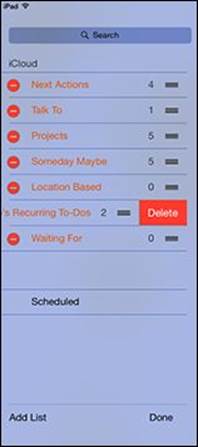
Figure 13-3: Tap the Edit button to create, delete, or reorder your lists.
From this screen, you can
· Delete a list: Tap the red minus sign for the list. The list’s name slides to the left and reveals a red Delete button (see Bob’s Recurring To-Do’s in Figure 13-3).
You can also delete a list without first tapping the Edit button by swiping the list’s name from right to left. The red Delete button appears on the right; tap it to delete the list or tap anywhere else to cancel.
· ![]() Reorder (move up or down) lists: Press and hold your finger on the three horizontal lines (shown in the margin) to the right of a list’s name in edit mode, and then drag the name up or down. When the list’s name is where you want it, lift your finger. Note that the number of items in the list appears to the left of the three horizontal lines.
Reorder (move up or down) lists: Press and hold your finger on the three horizontal lines (shown in the margin) to the right of a list’s name in edit mode, and then drag the name up or down. When the list’s name is where you want it, lift your finger. Note that the number of items in the list appears to the left of the three horizontal lines.
Setting up reminders
Reminders is a simple app, and the steps for managing reminders are equally simple. Here’s how to remind yourself of something:
1. On the Home screen, tap the Reminders app.
2. On the left side of the screen, tap the list to which you want to attach the reminder.
If you haven’t created your own lists, you’ll see the two default lists: Reminders and Scheduled. Otherwise, you’ll see a list of all the reminder lists you’ve created.
The virtual keyboard appears.
3. Type a title for the new reminder.
You can dictate your reminder instead of typing it if you’re using any iPad mini. You can find out more about dictation in Chapter 14.
The item appears in the current reminders list.
At this point, your reminder is bare-bones; its date, repeat, and priority options have not been activated.
4. Tap the reminder and then tap the little i-in-a-circle to set the following options in the details overlay, as shown in Figure 13-4:
· Remind Me on a Day: Tap if you want to specify a day and time for this reminder. If you have a 3G or 4G iPad mini, you can also set a location-based reminder. Just tap the At a Location switch (not shown in Figure 13-4 because this particular iPad mini is Wi-Fi–only) to enable it, specify the location, and then choose When I Arrive, or When I Leave.
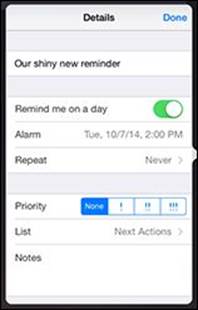
Figure 13-4: Details for Our Shiny New Reminder.
 Location-based reminders will suck your iPad battery dry faster than almost anything else. Remember to mark location-based reminders as completed by tapping their check boxes when you finish them. Otherwise, you will be reminded of something you’ve already done every time you pass that location and it will drain your iPad battery unnecessarily.
 If you set a location-based reminder with an iPhone or iPad with 3G or 4G, or with the Reminders app in OS X Mountain Lion or later, the reminder syncs with your Wi-Fi-only iPad but without the location. In fact, you won’t even see the At a Location switch if your iPad is Wi-Fi–only (as in Figure 13-4).
· Repeat: After you set a reminder, you’ll notice that a Repeat button appears. Tap it if you want to set a second reminder for a different day or time.
· Priority: Tap to specify a priority for this reminder. You can select None, Low, Medium, or High.
· List: Tap if you want this reminder to appear in a list other than the one it currently appears in. Then tap the list to which you want to move this reminder.
· Notes: If you have anything else to add, tap the Notes field and type away.
5. After you’ve set your options, tap the Done button in the upper-right corner of the details overlay.
 Choose the list you want your new reminder to appear on before you create it.
Viewing and checking off reminders
After you create reminders, the app helps you see what you have and haven’t done and enables you to do the following tasks:
· Check off reminders. You probably noticed that every reminder you create includes a hollow circle to its left. Tap the circle to indicate that a task has been completed. When you do, the words Hide (or Show) Completed appear at the bottom of the list. Tap these words to hide or show tasks you’ve completed in this list.
· Search reminders. To search for a word or phrase in all your reminders, completed or not, tap the search field at the upper left, type your word or phrase, and then tap the search icon (magnifying glass). Or swipe down from the middle of any Home screen to search for it with Spotlight.
· Keep reminders on your Mac or PC. You can create reminders on your Mac or PC with To Do items in iCal (Lion), Reminders (Mountain Lion or Mavericks), or Tasks in Outlook. And if you’re using iCloud, your reminders will always be up to date on all your devices.
That’s about it. The Reminders app isn’t a bad effort. If it lacks a feature or two that you desire, check out the myriad third-party to-do list apps in the App Store.
Negotiating Notification Center
Notification Center, shown in Figure 13-5, drops down over whatever you’re doing at the time so that you can easily see calendar entries, reminders, the weather forecast, and new email messages. Notification Center works regardless of which app you’re using.
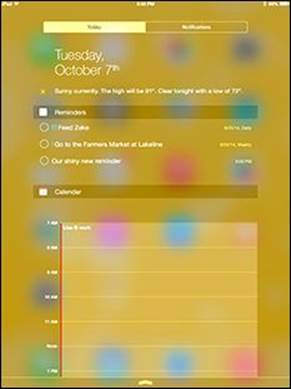
Figure 13-5: Notification Center in all its splendor.
To summon Notification Center to the forefront of your iPad mini screen, all you need is the magical incantation — that is, a swipe from the top of the screen downward. Go ahead and give it a try. We’ll wait.
Notifications also appear on the lock screen, as shown in Figure 13-6. Banner notifications are sweet, and we’re particularly fond of sliding our finger to view a particular item. But we digress. You find out how to enable or disable banner and alert notifications for individual apps, but not until Chapter 15.
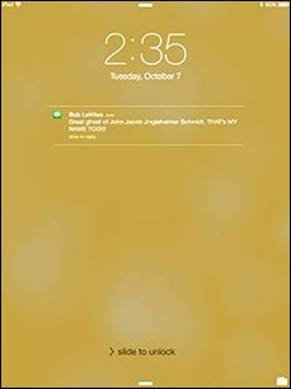
Figure 13-6: Notifications on the lock screen; slide your finger on one to open it.
Here’s what you need to know about navigating Notification Center:
· Close Notification Center. Swipe or flick upward the arrow that looks like a caret symbol (^) at the bottom of the list (refer to Figure 13-5).
· Open a notification. Tap the notification, and it opens in the appropriate program.
· Clear a single notification. Tap the little circle to the left of the notification and it disappears.
· The Today and Notification tabs at the top of the screen provide different filters for your notifications. Tap them to see the way each presents information. Note that some details, such as today’s weather and the Tomorrow section, appear only on the Today tab.
You can switch between the Today and Notifications screens also by swiping from left to right and right to left.
· Clear all notifications from a particular app. Tap the Notifications tab at the top of the screen. (You can’t use the Today tab to clear all notifications from a particular app.) Now tap the little x-in-a-circle to the right of the app’s name (Reminders, Calendar, Messages, and such). The xturns into a Clear button. Tap the Clear button and all notifications from that app are cleared and the app’s name disappears from Notification Center (but the name will reappear if the app needs to notify you again).
That’s how to summon and use Notification Center. There’s still a bit more to know — including how to change the notification settings for individual apps — but you have to wait until the chapter on settings (which happens to be Chapter 15).
Punching the Clock
Well, yes, most tablets do have a clock. But not every tablet has a world clock that lets you display the time in multiple cities on multiple continents. And not every device also has an alarm, a stopwatch, and a timer to boot.
So tap the Clock icon on your Home screen or in Control Center (new in iOS 8) and see what the Clock app is all about.
World clock
Want to know the time in Beijing or Bogota? Tapping World Clock (in the Clock app) lets you display the time in numerous cities around the globe, as shown in Figure 13-7. When the clock face is dark, it’s nighttime in the city you chose; if the face is white, it’s daytime outside.
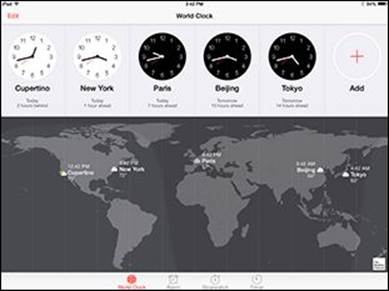
Figure 13-7: What time is it in Tokyo?
To add a city to the world clock, tap the + in the middle of the rightmost clock face (the one labeled Add), and then use the virtual keyboard to start typing a city name, as shown in Figure 13-8. (If you don’t see the + clock face, you probably have six or more clocks. To see the rest of the clocks and the clock with the +, swipe the clocks from right to left.)
The moment you press the first letter, the iPad displays a list of cities or countries that begin with that letter. So, as Figure 13-8 shows, typing v brings up Andorra la Vella, Andora; Bantam Village, Cocos (Keeling) Islands; and Boa Vista, Brazil, among myriad other possibilities. You can create clocks for as many cities as you like, though only six cities at a time appear on-screen.
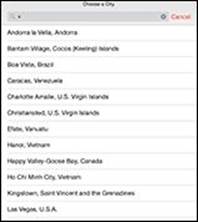
Figure 13-8: Clocking in around the world.
To remove a city from the list, tap Edit and then tap the red circle with the white horizontal line that appears to the left of the city you want to drop. Then tap Delete.
You can also rearrange the order of the cities displaying the time. Tap Edit, and then press your finger against the symbol with three horizontal lines to the right of the city you want to move up or down in the list. Then drag the city to its new spot.
Alarm
Ever try to set the alarm in a hotel room? It’s remarkable how complicated setting an alarm can be, on even the most inexpensive clock radio. Like almost everything else, the procedure is dirt-simple on the iPad mini:
1. Tap Clock on the Home screen or Control Center to display the Clock app.
2. Tap the Alarm icon at the bottom of the screen.
3. Tap the + button in the upper-right corner of the screen.
4. Choose the time of the alarm by rotating the wheel in the bottom half of the screen.
This step is similar to the action required to set the time that an event starts or ends on your calendar.
5. Tap Save when the alarm settings are to your liking.
That’s what you can do with a regular alarm clock. What’s the big deal, you say? Well, you can do even more with your iPad alarm:
· Set the alarm to go off on other days. Tap Repeat and then tell the iPad the days you want the alarm to be repeated, as in Every Monday, Every Tuesday, Every Wednesday, and so on.
· Choose your own sound. Tap Sound to choose the tone that will wake you up. You can even use songs from your Music library and any custom tones stored on your iPad.
Your choice is a matter of personal preference, but we can tell you that the ringtone for the appropriately named Alarm managed to wake Ed from a deep sleep.
· Set the snooze to sleep in. Tap Snooze on (showing green) to display a Snooze button along with the alarm. Tap the Snooze button to shut down the alarm for nine minutes.
· Name your alarm. If you want to call the alarm something other than, um, Alarm, tap the Label field and use the virtual keyboard to type another descriptor.
Simple stuff, really. But if you want really simple, you can ask Siri to set the alarm for you. See Chapter 14 for how to use Siri.
You know that an alarm has been set and activated because of the tiny status icon (surprise, surprise — it looks like a clock) that appears on the status bar in the upper-right corner of the screen.
An alarm takes precedence over any tracks you’re listening to on your iPad. Songs momentarily pause when an alarm goes off and resume when you turn off the alarm (or press the Snooze button).
When your ring/silent switch is set to Silent, your iPad mini still plays alarms from the Clock app. It stays silent for FaceTime calls, alert sounds, or audio from apps. But it will play alarms from the Clock app.
Although it seems obvious, if you want to actually hear an alarm, you have to make sure that the iPad volume is turned up loud enough for you to hear.
Stopwatch
If you’re helping a loved one train for a marathon, the iPad Stopwatch function can provide an assist. Open it by tapping Stopwatch in the Clock app.
Just tap Start to begin the count, and then tap Stop when your trainee arrives at the finish line. You can also tap the Lap button to monitor the times of individual laps.
Timer
Cooking a hard-boiled egg or Thanksgiving turkey? Again, the iPad comes to the rescue. Tap Timer (in the Clock app) and then rotate the hour and minute wheels until the length of time you desire is highlighted.
![]() Tap the sounds icon (shown in the margin) near the bottom of the screen to choose the ringtone that will signify time’s up.
Tap the sounds icon (shown in the margin) near the bottom of the screen to choose the ringtone that will signify time’s up.
After you set the length of the timer, tap Start when you’re ready to begin. You can watch the minutes and seconds wind down on the screen, if you have nothing better to do. Or tap Pause to pause the countdown temporarily.
If you’re doing anything else on the iPad — admiring photos, say — you hear the ringtone and see a Timer Done message on the screen at the appropriate moment. Tap OK to silence the ringtone.
Socializing with Social Media Apps
At first glance, the iPad appears light on social media support because Game Center is the only sign of social media on a new iPad. Still, iOS 8 is much more friendly to social media than it appears at first glance. Although your iPad doesn’t come with official Facebook or Twitter apps, support for the two most popular social networks is baked right into iOS.
You can find free apps for these social media networks (and many others) in the App Store, but iOS 8 lets you install the Facebook and Twitter apps without even having to visit the App Store. Just tap Settings⇒Facebook (or Twitter), and then tap the Install button to install the app you’ve chosen.
You don’t necessarily need an app to participate in social networking. The networks we talk about in this section can be fully utilized using Safari on your iPad. And frankly, unlike the iPhone, where the Safari experience is hampered by the tiny screen and keyboard, the websites are eminently usable on your iPad mini. So, if you want to check them out and don’t feel like downloading their apps, here are their URLs:
· Facebook: www.facebook.com
· Twitter: http://twitter.com
We’d be remiss if we didn’t at least point out some of the niceties you get when you access one of these social media networks by using an app instead of a browser, so the following sections offer a few of our insights.
If you use Facebook or Twitter, the first thing to do, regardless of whether you intend to use the apps, is to tap Settings⇒Facebook and Settings⇒Twitter and provide your usernames and passwords. This will let you share photos, maps and directions, videos, URLs, and much more by tapping the share icon and then tapping the icon for Facebook or Twitter.
The Facebook iPad app, as shown in Figure 13-9, makes it easy to access the most popular Facebook features with a single finger tap.
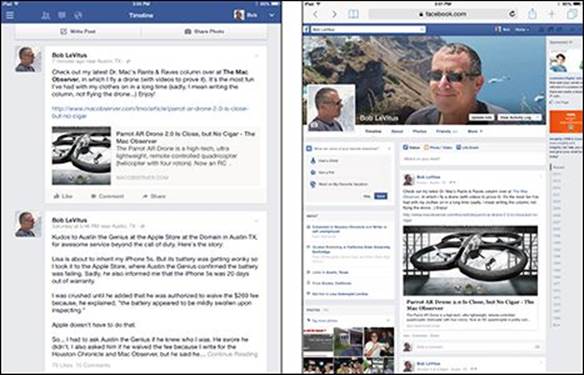
Figure 13-9: Bob’s Facebook news feed, as shown in the Facebook iPad app (left) and Safari (right); you can use either (or both) to get your Facebook fix.
Note that the Facebook iPad app has a slick interface with quick access to many popular Facebook features, as shown on the left in Figure 13-9.
The biggest difference between Facebook on Safari versus the app may be that Safari can’t provide push notifications for Facebook events such as messages, timeline posts, friend requests and confirmations, photo tags, events, or comments, whereas the iPad app does all that and more.
The bottom line is that there’s nothing to prevent having the best of both worlds. So if you’re a heavy Facebook user, consider using the Facebook iPad app for some things (such as push notifications and status updates) and Safari for others (such as reading your wall or news feeds).
Twitter puts a slightly different spin on social networking. Unlike Facebook, it doesn’t try to be all-encompassing or offer dozens of features, hoping that some of them will appeal to you. Instead, Twitter does one thing and does it well. That thing is letting its users post short messages, ortweets, quickly and easily from a variety of platforms, including web browsers, mobile phones, smartphones, and other devices.
Twitter users then have the option of following any other Twitter user’s tweets. The result is a stream of short messages like the ones shown in Figure 13-10.

Figure 13-10: The official Twitter iPad app through the eyes of Bob (@LeVitus).
A tweet is 140 characters or fewer (including spaces). This tip, for example, is precisely 140 characters. Bottom line: Omit needless words.
Game Center
Game Center is the odd duck of the bunch. Unlike the other apps we cover in this section, Game Center has no website; you have to use the Game Center app that came with your iPad mini. And unlike the others, which are broad-based and aimed at anyone and everyone, Game Center is designed for a specific segment of the iPad (and iPhone and iPod touch) universe — namely, users who have one or more games on their iPads (or other devices).
Mac users can get in on the fun, too, as long as they’re using Mountain Lion, Mavericks, or Yosemite, which include a Game Center app similar to the one on your iPad mini.
Game Center acts as a match-up service, letting you challenge your friends or use its Auto-Match Invite Friend button to challenge a stranger who is looking for someone to play against.
Game Center supports thousands upon thousands of games these days, some of which are shown in Figure 13-11.
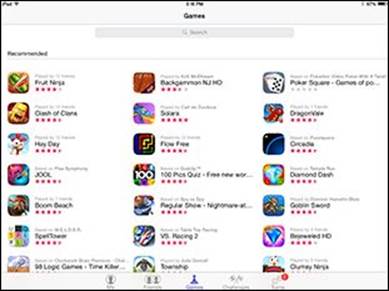
Figure 13-11: Some of the games with Game Center support.
The games include many top sellers, such as Angry Birds, Real Racing 2 HD, Fairway Solitaire, and Bob’s current game obsession, the stunning Real Racing 3.
Sharing Your Connection (Personal Hotspot)
The personal hotspot is a feature that lets any iPad mini with Wi-Fi + 4G share its cellular high-speed data connection with other devices, including computers, iPod touches, and other iPads.
If your iPad mini is Wi-Fi–only, feel free to skip this section — the Personal Hotspot option is available only on cellular iPads.
To enable your personal hotspot and share your cellular data connection with others, do the following:
1. On the Home screen, tap Settings.
2. Tap Personal Hotspot.
3. Tap the Personal Hotspot switch to enable it (it will turn green).
4. Tap Wi-Fi Password and create or change the password for the Wi-Fi network you create.
Now Wi-Fi, Bluetooth, or USB-enabled devices can join your hotspot network and share your iPad’s cellular data connection.
Your personal hotspot network adopts your iPad’s name, which is Bob L’s iPad 64 (3d-gen) in Figure 13-12.
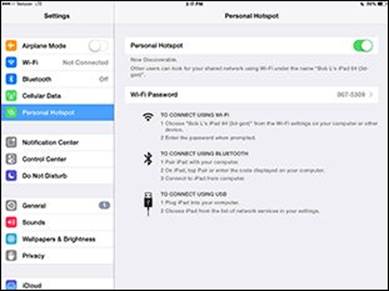
Figure 13-12: Devices can join this network via Wi-Fi, Bluetooth, or USB by following the appropriate connection instructions.
At the time we wrote this, most carriers offered support for personal hotspots in some or all of their data plans in the United States. Some don’t, so check with your carrier if you don’t see a Personal Hotspot option in the Settings app (and, of course, if your iPad has 4G).
Verizon doesn’t charge extra for this feature, but the data used by connected devices counts against your monthly data plan allotment.
To see how much data you’re using, tap Settings⇒General⇒Usage⇒Cellular Usage.
Dropping In on AirDrop
At various points when you’re using your iPad mini, you encounter AirDrop, a fast, safe, and secure (through encryption) wireless method of sharing photos, videos, contacts, documents, and more with people you are close to physically.
![]() You just tap the share icon (shown in the margin) in any app that offers one. AirDrop exploits both Wi-Fi and Bluetooth. No advanced setup is required.
You just tap the share icon (shown in the margin) in any app that offers one. AirDrop exploits both Wi-Fi and Bluetooth. No advanced setup is required.
To be part of an AirDrop exchange, you and the recipient must be using iOS 7 or later and have an iPhone 5 or later, a fourth-generation iPad or later, any iPad mini, a fifth-generation iPod touch, or a Mac running Yosemite or later.
Taking advantage of this clever feature involves three simple steps:
1. Turn on the AirDrop feature (if it’s not on already) in Control Center.
You have the option to make your phone visible to Everyone (within the vicinity) or just to your contacts.
2. Tap the share icon when it presents itself in an app and choose the file or files that you want to share.
3. Choose the recipients of those items by tapping the circle for the person, as shown in Figure 13-13.
Yes, you can choose more than one person. People in range who are eligible to receive the file are represented on your iPad by a circle. (The circles may even contain their pictures.)
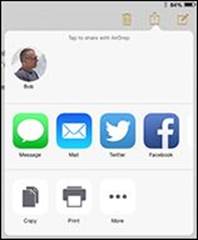
Figure 13-13: Tap Bob-in-a-circle to send the items to him.
The AirDrop process hath begun. The people on the receiving end will get a prompt asking them to accept the picture, video, or whatever it is you’re offering them, as shown in Figure 13-14.

Figure 13-14: Bob is about to receive a note via AirDrop.
Assuming they take kindly to your offer and grant permission (by tapping Accept rather than Decline), the file lands on their devices in short order, where it is routed to its proper location. That is, a picture or video ends up in the Photos app, a contact in the Contacts app, and the Passbook pass in the Passbook app.
![]()
All materials on the site are licensed Creative Commons Attribution-Sharealike 3.0 Unported CC BY-SA 3.0 & GNU Free Documentation License (GFDL)
If you are the copyright holder of any material contained on our site and intend to remove it, please contact our site administrator for approval.
© 2016-2025 All site design rights belong to S.Y.A.