iPad mini For Dummies, 3rd Edition (2015)
Part VI. The Part of Tens
Chapter 20. Ten Hints, Tips, and Shortcuts
In This Chapter
![]() Saving time and keystrokes
Saving time and keystrokes
![]() Autocorrecting
Autocorrecting
![]() Viewing the iPad mini’s capacity
Viewing the iPad mini’s capacity
![]() Scrubbing audio
Scrubbing audio
![]() Working with links and email addresses
Working with links and email addresses
![]() Sharing the love … and the links
Sharing the love … and the links
![]() Choosing a home page for Safari
Choosing a home page for Safari
![]() Storing files
Storing files
![]() Making phone calls
Making phone calls
![]() Snapping the screen
Snapping the screen
After spending a lot of quality time with our iPad minis, it’s only natural that we’ve discovered more than a few helpful hints, tips, and shortcuts. In this chapter, we share our faves.
Saving Time and Keystrokes
Keyboard shortcuts are a way to have your iPad mini automatically type a phrase when you type the shortcut. For example, when we type vty followed by the spacebar, our iPads type Very truly yours. We typed a 3-letter shortcut, and our iPads replaced it with a 14-letter phrase in the blink of an eye. Figure 20-1 shows some more examples.
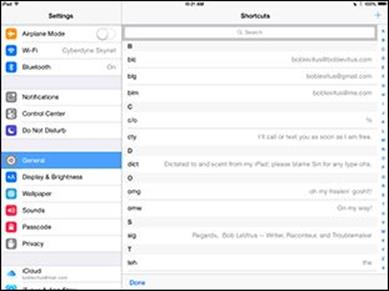
Figure 20-1: Here are some shortcuts and phrases we’ve created.
How long would it take you to type Dictated to and scent from my iPad; please blame Siri for any missed type ohs on your iPad mini’s on-screen keyboard? And would you type it without mistakes? It took a fraction of a second to type our shortcut for this phrase (dict), and another fraction of a second for the iPad to expand it (to Dictated to and scent from my iPad; please blame Siri for any missed type ohs).
So, shortcuts save you time and keystrokes.
Another advantage is that you’ll always spell things correctly (as long as you spell them correctly when you create the shortcut and phrase). You can even use shortcuts to automatically correct the spelling of words you commonly mistype. Say you often type taht when you mean to type that.Here’s how to create, edit, and enjoy your iPad mini’s convenient little keystroke savers. Start by creating a shortcut:
1. Tap Settings⇒General⇒Keyboard.
2. Tap Add New Shortcut.
3. Type the phrase and the shortcut you want to trigger it.
4. Tap Save.
After you create a shortcut, just tap its name to change (edit) it.
After you create and edit ’em, here’s how you use ’em:
To insert a phrase, type its keyboard shortcut. Say the shortcut is cty, which is one of the shortcuts shown in Figure 20-1. If you stop after you type y, the phrase appears in the middle of the QuickType suggestions, as shown in Figure 20-2. To insert the phrase, press Return or the space bar, type a punctuation mark after the y, or tap the QuickType suggestion; to ignore it, just continue typing.
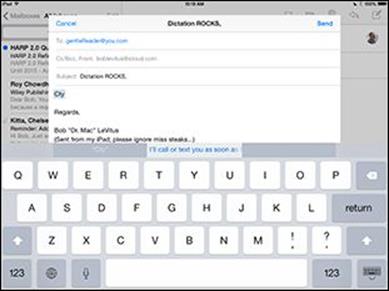
Figure 20-2: Type a space, a punctuation mark, or press Return to insert the phrase, “I’ll call or text you as soon as I am free.”
One last thing: You can use the same technique to create keyboard shortcuts like this on an iPhone or iPod touch. Although you can’t easily sync or share your shortcuts, you can create and use them on any device running iOS 5 or later.
Autocorrecting
Here are three related tips about autocorrection that can also help you type faster and more accurately.
Auto-apostrophes are good for you
First, know that you can type dont to get to don’t, and cant to get to can’t. We’ve told you to put some faith in the iPad’s autocorrection software, and that advice applies to contractions. In other words, save time by letting the iPad’s intelligent keyboard insert the apostrophes on your behalf for these and other common words.
 We’re aware of at least one exception. The iPad can’t distinguish between it’s and its. (It’s is the contraction of it is, and its is the possessive adjective and possessive pronoun.) So if you need emails to be grammatically correct, remember that autocorrection doesn’t get it (or it’s or its) right all the time.
In a similar vein, if you ever need to type an apostrophe (for example, when you want to type it’s), you don’t need to visit the punctuation and numeric keyboard. Instead, press down on the exclamation mark/comma key until a blue apostrophe appears on the key, and then lift your finger. Presto — you’ve typed an apostrophe without switching to the punctuation and numeric keyboard and back.
Make rejection work for you
If the autocorrection suggestion isn’t the word you want, instead of ignoring it, reject it. Finish typing the word and then tap the x to reject the suggestion before you type another word. Doing so makes your iPad more likely to accept your word the next time you type it and less likely to make the same incorrect suggestion again.
 If you’re using a physical keyboard (for example, Apple’s keyboard dock or any Bluetooth wireless one), you can reject an autosuggestion by pressing the Esc key.
Here you thought you were buying a tech book, and you get grammar and typing lessons thrown in at no extra charge. Just think of us as full-service authors.
If you hate autocorrect, turn it off
Some people don’t care for autocorrect and turn it off. If you hate it too, here’s how to get rid of it: Tap Settings⇒General⇒Keyboard and tap the Auto-Correction switch to off (green).
 Settings⇒General⇒Keyboard is also where you enable or disable other keyboard-related options, including Auto-Capitalization, Check Spelling, Enable Caps Lock, Predictive Typing, and the “double-tapping the space bar will insert a period followed by a space” shortcut. See Chapter 15, where we dive into settings.
Viewing the iPad mini’s Capacity
When your iPad mini is selected in iTunes, you see a colorful chart at the bottom of the screen that tells you how your media and other data use your iPad mini’s capacity.
By default, the chart shows the amount of free space on your iPad mini, along with colored bands that represent the audio, video, photo, apps, documents, books, and such on your iPad mini. What you may not know is that when you hover your pointer over the chart, an overlay appears with the number of items of that type that are stored on your iPad mini, and how much space those items consume in megabytes (MB) or gigabytes (GB), as shown in Figure 20-3 for books.
![]()
Figure 20-3: Hover over the colorful chart, and you’ll see the details in an overlay.
Assault on batteries
Because this is a chapter of tips and hints, we’d be remiss if we didn’t include some ways that you can extend your battery life. First and foremost: If you use a carrying case, charging the iPad while it’s in that case may generate more heat than is healthy for both battery capacity and battery life. So take the iPad out of the case before you charge it. The smart cover isn’t a case, so if you use one, you’re good to go.
If you’re not using power-thirsty 3G, 4G, or Wi-Fi networks or a Bluetooth device (such as a headset), consider turning off the features you don’t need in Settings. Doing so could mean the difference between running out of juice and seeing the end of a movie.
Activate auto-brightness so that the screen brightness adjusts based on current lighting conditions. Using this setting can be easier on your battery. Tap Settings⇒Brightness, and then tap the on/off switch, if necessary, to turn it on.
Turn off Location Services (tap Settings⇒Location Services) globally or for individual apps with the on/off switches. Figuring out your precise location takes its toll on your battery, so you may want to disable Location Services for apps you don’t use often.
Push notifications are notorious juice-suckers as well. Disable them (tap Settings⇒Mail, Contacts, Calendars⇒Fetch New Data⇒Push On/Off switch) and watch your battery life improve dramatically. You can disable push notifications for other apps via Settings⇒Notifications.
Scrubbing Audio
Here’s the situation: You’re listening to a podcast or an audiobook and trying to find the beginning of a specific segment by moving the scrubber bar — the little red line representing the playhead — left and right. The only problem is that the scrubber bar isn’t precise, and your fat finger keeps moving it too far one way or the other. Never fear — your iPad has a wonderful (albeit somewhat hidden) fix. Just press your finger on the scrubber, but instead of sliding your finger to the left or right, slide it downward toward the bottom of the screen, as shown in Figure 20-4.
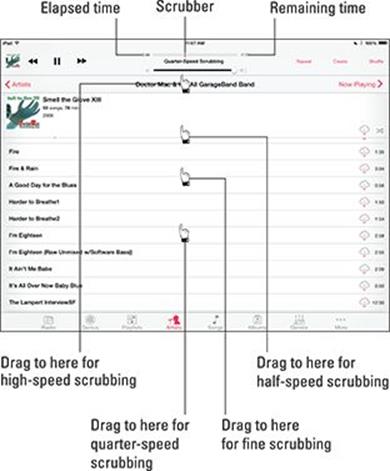
Figure 20-4: Press the scrubber bar, and slide your finger downward to change the scrubbing rate.
As you slide downward, the scrubbing speed changes like magic, and the scrubber bar moves in finer and finer increments. The speed is displayed below the scrubber bar (the figure displays quarter-speed scrubbing). Slide your finger downward an inch or until you see High-Speed Scrubbing,which is about 75 percent of the normal scrubbing speed. Continue dragging downward in 1-inch increments or so and the speed changes to half-speed, quarter-speed, and very fine scrubbing.
This scrub trick is easier to do than to explain, so give it a try.
Working with Links and Email Addresses
When the iPad encounters an email address (such as yourname@yourmailhost.com) or a URL (such as http://www.websitename.com or www.websitename.com) in an email message, it makes that text appear as a blue link on your screen. If you tap that link, the iPad launches Safari or Mail, and starts a new email message for an email address or takes you to the appropriate web page for a URL. So don’t bother with copy and paste if you don’t have to — tap those blue links, and the right thing will happen every time.
Here’s another cool Safari trick: If you press and hold down on a link rather than tapping it, a little floating text bubble appears and shows you the underlying URL. In addition, it offers the following options, as shown in Figure 20-5:
· Open: Opens the page.
· Open in New Tab: Opens the page while stashing the current page in one of the nine available tabs, as we describe in Chapter 4.
· Add to Reading List: Adds the page to your reading list, as we describe in Chapter 4.
· Copy: Copies the URL to the Clipboard (so that you can paste it in an email message, save it in Notes, or whatever).

Figure 20-5: Press down on a link to find additional actions you can take.
You see the underlying URL and open and copy options when you press and hold down on a URL in Mail as well. Having this information in Mail is even more useful because it enables you to spot bogus links without switching to Safari or visiting the URL.
Here’s one more Safari trick: If you press and hold down on most images, a Save Image option appears (see Figure 20-6). Tap Save Image, and the picture is saved to the camera roll on the Albums tab of the Photos app. Tap Copy, and the image is copied to the Clipboard so that you can paste it into an email message or document created in another app (such as Apple’s Pages or Keynote). Note that if the image is a link to another web page, you’ll see these options: Open, Open in New Tab, Add to Reading List, and Copy.

Figure 20-6: Save images you want to find easily later.
Sharing the Love … and the Links
![]() Ever stumble onto a web page that you just have to share with a buddy? The iPad makes sharing dead simple. From the site in question, tap the share icon (shown in the margin). Then tap the Message, Mail, Twitter, or Facebook option to share the link via email, share the link via iMessage, post it to your Twitter stream, or share it on Facebook, respectively, as shown in Figure 20-7. With iOS 8 and any iPad mini, you can also use AirDrop to share your link with other iOS 7, iOS 8, or Mac OS X Yosemite users, as described in Chapter 13.
Ever stumble onto a web page that you just have to share with a buddy? The iPad makes sharing dead simple. From the site in question, tap the share icon (shown in the margin). Then tap the Message, Mail, Twitter, or Facebook option to share the link via email, share the link via iMessage, post it to your Twitter stream, or share it on Facebook, respectively, as shown in Figure 20-7. With iOS 8 and any iPad mini, you can also use AirDrop to share your link with other iOS 7, iOS 8, or Mac OS X Yosemite users, as described in Chapter 13.
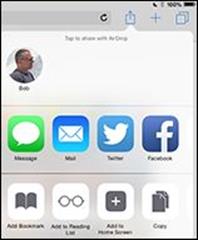
Figure 20-7: Share links with your friends.
Type a short message body (or don’t), supply your pal’s email or iMessage address if necessary, and then tap the Send or Post button.
Choosing a Home Page for Safari
You may have noticed that the iPad version of Safari, unlike the Mac and PC versions of Safari (as well as every other common web browser), doesn’t have an option to specify a home page. Instead, when you tap the Safari icon, you return to the last site you visited.
You can, however, create a web clip, or an icon for the page you want to use as your home page. Here’s how to do it:
1. Open the web page you want to use as your home page.
2. ![]() Tap the share icon (shown in the margin).
Tap the share icon (shown in the margin).
3. Tap Add to Home Screen.
An icon that will open this page appears on your Home screen (or one of your Home screens if you have more than one).
4. Tap the new web clip icon instead of the Safari icon.
Safari opens to your home page instead of the last page you visited.
You can even drag your home page icon to the dock, as shown in Figure 20-8.
![]()
Figure 20-8: The BobLeVitus.TV Show icon now appears to the left of Safari in the dock.
Consider moving the Safari icon from the dock to one of your Home screens so that you never tap it by accident. Finally, remember that the dock has room for six icons, even though it has only four by default.
Storing Files
A tiny Massachusetts software company — Ecamm Network — sells a piece of OS X software, PhoneView ($29.95), which lets you copy files from your Mac to your iPad mini and copy files from the iPad mini to a Mac, as shown in Figure 20-9. (No Windows version is available.) Better still, you can try the program for a week before deciding whether you want to buy it. Go to www.ecamm.com to fetch the free demo.
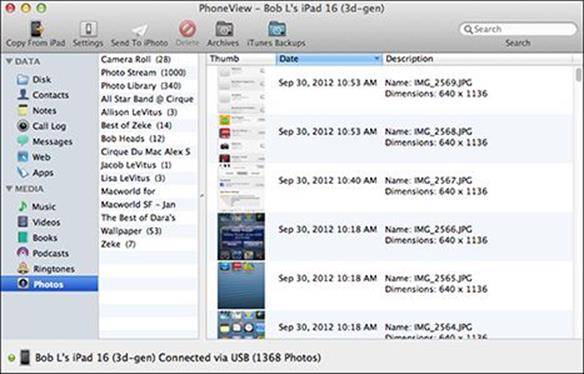
Figure 20-9: Store all your files with PhoneView.
The big deal here is that while automatic backups protect most of the files on your iPad mini, you can’t manipulate them. They’re backed up and restored, but heaven help you if you want to extract one or more individual iMessages, specific songs, videos, notes, or other types of data from your iPad mini. The bottom line is that there’s no easier way than PhoneView.
In a nutshell, here’s how PhoneView works. After downloading the software to your Mac, double-click the program’s icon to start it. Then do one of the following:
· To transfer files and folders to the iPad mini: Assuming that you have room on the device, click the Copy to iPad button on the toolbar and then select the files you want to copy. The files are copied into the appropriate folder on the iPad mini. Alternatively, you can drag files and folders from the Mac desktop or a folder into the PhoneView browser.
· To go the other way and copy files from your iPad mini to your computer: Highlight the files or folders you want to be copied and then click the Copy from iPad button on the toolbar. Select the destination on your Mac where you want to store the files, and then click Save. You can also drag files and folders from the PhoneView file browser to the Mac desktop or folder. Or you can double-click a file in the PhoneView browser to download it to your Mac’s Documents folder.
If you need access to the files on your iPad mini or if you want to use your iPad mini as a pseudo–hard drive, PhoneView is a bargain.
Bob says: “I use Printopia, also from Ecamm ($19.95), to print from my iPads to several of our non-AirPrint printers. It works great and costs a lot less than a new AirPrint-enabled printer.”
Making Phone Calls
Many people, including us, have compared the iPad to an iPhone on steroids. Only the iPad isn’t actually a phone. But don’t let that stop you from making or even receiving phone calls on the tablet.
Come again?
You read right. You can make and even receive phone calls on your iPad mini. After all, two of the key components to calling are built into the iPad: a speaker and a microphone.
If you have an iPhone 5 or newer and any iPad mini and both devices are running iOS 8 or later, you have everything you need. To make a phone call on your iPad, just tap a phone number in Contacts, Calendar, or Safari, or tap a recent contact in the multitasking screen.
If you meet the requirements and still can’t make calls, go to Settings⇒FaceTime and turn on iPhone Cellular Calls. Conversely, if you hate this feature and want to disable it, go to Settings⇒FaceTime and turn off iPhone Cellular Calls.
But wait! There’s more! You can make and receive calls even if your devices aren’t the latest and greatest. Just head to the App Store to fetch the third component: Instead of an iPhone, you’ll need an app that takes advantage of VOIP, or Voice over Internet Protocol. In plain-speak, that means turning the iPad into a giant iPhone. And yes, you can find more than one app to do the trick.
We’ve checked out Line2, Skype, and Truphone, all of which have a version designed to take advantage of the large iPad screen. The apps themselves are free, although you have to pay for calls to regular phones. Here are the details:
· Line2: We especially like Line2, although it costs $9.95 per month. It can receive calls through Wi-Fi or a cellular data network (if you have an iPad mini with 3G or 4G). It boasts such features as visual voicemail (like the iPhone) and conference calling. And it taps right into your iPad mini contacts list.
· Skype: Skype’s app permits free Skype-to-Skype calls, instant messages, and video chats; calls to regular phones around the world cost pennies per minute.
· Truphone: This app permits free Wi-Fi calls to Truphone and Google Talk users. Other rates are cheap.
Snapping the Screen
True confession: We threw in this final tip because, well, it helps people like us. Permit us to explain. We hope you’ve admired the pictures of the iPad mini screens that are sprinkled throughout this book. We also secretly hope that you’re thinking what marvelous photographers we must be.
Well, the fact is, we couldn’t take a blurry picture of the iPad using its built-in (and little-known) screen-grab feature if we wanted to.
Press the sleep/wake button at the same time you press the Home button, but just for an instant. The iPad mini grabs a snapshot of whatever is on the screen.
The picture lands in the camera roll of the Photos app. From there, you can synchronize it with your Mac or PC, along with all your other pictures, or email it to yourself or anyone else. And from there, the possibilities are endless. Why, your picture could wind up just about anywhere, including in a For Dummies book.
You can also use an HDTV to show what’s happening on your iPad mini’s screen in real time. To see on an HDTV the content on your iPad mini’s screen, you need a television that has at least one HDMI port and either Apple’s Digital AV adapter for iPads ($39 for 30-pin connector; $49 for Lightning connector), or an Apple TV ($99).
All materials on the site are licensed Creative Commons Attribution-Sharealike 3.0 Unported CC BY-SA 3.0 & GNU Free Documentation License (GFDL)
If you are the copyright holder of any material contained on our site and intend to remove it, please contact our site administrator for approval.
© 2016-2025 All site design rights belong to S.Y.A.