iPad mini For Dummies, 3rd Edition (2015)
Part I. Getting to Know Your iPad mini
Chapter 2. iPad mini Basic Training
In This Chapter
![]() Getting going
Getting going
![]() Setting up the iPad
Setting up the iPad
![]() Locking your iPad
Locking your iPad
![]() Mastering multitouch
Mastering multitouch
![]() Cutting, copying, and pasting
Cutting, copying, and pasting
![]() Multitasking with your iPad
Multitasking with your iPad
![]() Spotlighting search
Spotlighting search
![]() Typing on the virtual keyboard
Typing on the virtual keyboard
By now you know that the iPad mini you hold in your hands is very different from other computers.
You also know that these slate-style machines are rewriting the rule book for mainstream computing. How so? For starters, iPad minis don’t come with a mouse or any other kind of pointing device. They lack traditional computing ports or connectors, such as USB. And they have no physical or built-in keyboard.
iPads even differ from other so-called tablet PCs, some of which feature a pen or stylus and let you write in digital ink. As we point out (pun intended) in Chapter 1, the iPad relies on an input device that you always have with you: your finger.
Tablet computers of one form or another have actually been around since the last century. They just never captured the fancy of Main Street. Apple’s very own Newton, an ill-fated 1990s personal digital assistant, was among the machines that barely made a dent in the market.
What’s past is past, of course, and technology — not to mention Apple itself — has come a long way since Newton. And suffice it to say that in the future, tablets — led by the iPad brigade, of course — promise to enjoy a much rosier outlook. Indeed, since the iPad burst onto the scene, numerous tech titans (as well as smaller companies) have introduced their own smaller display touch-enabled tablets; many rely on the Google Android mobile operating system, some on versions of the Microsoft Windows operating system, and a few on other operating systems. Some solid machines are among them, but the iPad remains the market leader and a true pioneer in the space.
If you own one of the mini’s closest relatives, an iPhone or iPod touch, you already have a gigantic start in figuring out how to master the iPad multitouch method of navigating the interface with your fingers. If you’ve been using iOS 8 on those devices, you have an even bigger head start. You have our permission to skim the rest of this chapter, but we urge you to stick around anyway because some things on the mini work in subtly different ways than on the iPhone or iPod touch. If you’re a total novice, don’t fret. Nothing about multitouch is painful.
Getting Started on Getting Started
You don’t need a computer to use your iPad mini, but we think you’ll prefer using your mini with one rather than without one.
 In our experience, many tasks — such as iOS software updates and rearranging app icons — are faster and easier to do using iTunes on a Mac or PC than on the iPad.
Now, here are those four things you need to use your iPad:
· A computer: As we point out, you don’t need a computer, though it’s helpful to use your iPad with one just the same. The computer can be a Macintosh running Mac OS X version 10.5.8 or later, or a PC running Windows 8, Windows 7, Windows Vista, or Windows XP Home or Professional Edition with Service Pack 3 or later.
The iCloud service has higher requirements: Mac OS X Mountain Lion, Lion (10.7), Mavericks, Yosemite, or higher for Macs; or Windows Vista, Windows 7, or Windows 8 for PCs. Flip to Chapter 3 for details about iCloud.
· iTunes software: More specifically, you need version 10.7 or later of iTunes — emphasis on the later because by the time you read this, it will be later. After all, iTunes was up to version 12.0 by the time we were preparing this book.
Apple constantly tweaks iTunes to make it better. You can go to www.itunes.com/download to fetch a copy. Or launch your current version of iTunes and then choose iTunes (Help in Windows)⇒Check for Updates.
The uninitiated might want to know that iTunes is the nifty Apple jukebox software that owners of iPods and iPhones, not to mention PCs and Macs, use to manage music, videos, apps, and more. iTunes is at the core of the iPad as well, because an iPod is built into the iPad. You can use iTunes to synchronize a bunch of stuff from your Mac or PC to and from an iPad, including (but not limited to) apps, photos, movies, TV shows, podcasts, iTunes U lectures, and of course, music.
Syncing is such a vital part of this process that we devote an entire chapter (Chapter 3) to the topic.
· An Apple ID account: Read Chapter 7 for details on how to set up an account. Like most things Apple, the process isn’t difficult. You’ll want an account to download content from iTunes, the App Store, or to take advantage of iCloud.
· Internet access: Your iPad can connect to the Internet in either of two ways: Wi-Fi or cellular (if you bought an iPad with 3G or 4G capabilities). You can connect your iPad to cyberspace via Wi-Fi in your home, office, school, favorite coffeehouse, bookstore, or numerous other spots.
 At press time, 3G (third-generation) and 4G (fourth-generation) wireless data connections were available from many carriers in countries too numerous to mention; in the United States, you can choose among AT&T, Sprint, Verizon Wireless, and T-Mobile. Those wireless carriers are pretty far along building the zippier 4G (fourth-generation) networks across the United States, with Verizon in the lead rolling out the fastest variety, called LTE (Long Term Evolution). While the others play catch-up on LTE, the latest iPad on AT&T and T-Mobile makes nice with other pretty fast networks, including something known as HSPA+.
Unlike with the cellphone contract you may have with your cellular carrier, no long-term service commitment is required to connect your iPad to the network.
As this book goes to press, data rates (no contract required) are reasonably priced as long as you don’t stream or download a lot of movies or watch tons of videos while connected over 3G or 4G. For as little as $5 in some instances, you can purchase a day pass for data instead of opting for a monthly plan.
And T-Mobile, a latecomer as far as selling Apple tablets, is even dishing out 200 megabytes (MB) of monthly LTE data gratis for people using an iPad. That amount of data translates to about 800 Instagram photos, more than 2,500 emails, or 200 minutes of streaming music. If you need a bigger allotment, you can pay — $20 for 1GB per month, $30 for 3GB, or $40 for 5GB, among other options. The following are plan highlights from other carriers (keep in mind that all the rate plans cited are subject to change and sometimes tied to family plans that include smartphones):
· AT&T: $14.99 a month for 250MB, 3GB for $30, and 5GB for $50
· Sprint: $15 a month for 1GB, 3GB for $35, and 6GB for $50
· Verizon: $20 for 2GB, $30 a month for 4GB, 40 for 6GB, plus $10 for monthly access
A friendly warning pops up on your iPad when you get close to your limit. At that point, you can pay more to add to your data bucket or start from scratch next month. Keep in mind that with 4G, you’re likely to consume more data in a hurry. And prices of course are subject to change.
 Find a Wi-Fi network if you want to buy, rent, or watch movies.
Turning On and Setting Up the iPad
Unless your iPad is brand-spanking new and fresh out of the box, chances are good that you’ve already performed the steps that follow. We cover them here because if you choose to use your mini computer-free, these steps make up the entire setup process.
Apple has taken the time to partially charge your device, so you get some measure of instant gratification and can go ahead and set it up right away by following these steps:
1. After taking your iPad out of the box, press and hold down the sleep/wake button on the upper-right edge.
An arrow appears near the bottom of the screen, alongside flashing messages in many languages. We’re pretty sure they all say, “Slide to Set Up,” because that’s what the English rendition says.
2. Swipe the Slide to Set Up arrow to the right.
3. Tap to choose your language, followed by your country or region preferences.
4. Tap to choose a Wi-Fi network, provide a password (if necessary), and then tap the blue Join button or the blue Next button.
While you can skip this step by tapping the blue Next button without selecting a Wi-Fi network, we suggest that you select your network now if you can. (If you do wait to set up your Wi-Fi network, turn to Chapter 15 to find out how to do so via Settings.)
The Location Services screen appears.
5. Tap to enable or disable Location Services.
Location Services is your mini’s way of knowing where you are geographically. The Maps app, for example, relies on Location Services to determine where in the world you are.
Location Services can be turned on or off globally or for individual apps in Settings, as you discover in Chapter 15.
The Set Up iPad screen appears.
6. Tap Set Up as New iPad, Restore from iCloud Backup, or Restore from iTunes Backup.
See Chapter 16 for the scoop on restoring from iCloud or iTunes backups. For these steps, tap Set Up as New. The Apple ID screen appears.
7. Tap Sign In with an Apple ID, Create a Free Apple ID, or Skip This Step.
If you have an Apple ID, sign in with it here; if you don’t have one, tap the Create a Free Apple ID button. If you tap Skip This Step and proceed without supplying an Apple ID, you can’t take advantage of the myriad excellent and free features described in this and other chapters. Obtain an Apple ID if you don’t already have one because you need it to take advantage of iCloud. See the end of this chapter for an introduction to this service.
If you use a different Apple ID for iCloud than you do for iTunes, you can enter both at this stage.
Note that if you skip this step now, you can sign in later by tapping Settings⇒iCloud⇒Account.
The Terms and Conditions screen appears.
8. Tap the blue Agree button in the lower-right corner, and then tap the Agree button in the Terms and Conditions alert box that appears in the middle of the screen.
What happens if you disagree? You don’t want to know. And, of course, you won’t be able to use your mini.
Find more info about iCloud at the end of this chapter, or tap the About iCloud link on this screen for the party line from Apple.
The iCloud screen appears.
9. Do one of the following:
· If you want to use iCloud: Good choice! Tap Use iCloud.
· If you don’t want to use iCloud: Tap Don’t Use iCloud. Don’t worry: If you choose not to enable iCloud now, you can enable it at any time in the Settings app, as described in Chapter 15.
The Find My iPad screen appears.
10. Tap either Use Find My iPad or Don’t Use Find My iPad.
If you misplace your mini, you can use Find My iPad to display its current location on a map. You can also choose to display a message or play a sound, lock the screen, or erase contents on your missing iPad.
 Find My iPad won’t find your mini if the battery is drained, the iPad is turned off, or a network connection (Wi-Fi or cellular) is not available. However, if you have iOS 8 software on your iPad, the machine can automatically make note of your last location before the battery pooped out, raising the odds of getting back a lost iPad.
The iMessage and FaceTime screen appears.
11. Tap the email address(es) (or phone numbers) you want people to use to contact you via iMessage and FaceTime, and then tap the Next button in the upper-right corner.
If phone numbers and email addresses are already selected, tap any that you want to deselect.
The Create a Passcode screen appears.
12. Type a four-digit passcode to unlock this iPad.
The Re-enter Your Passcode screen appears.
If you choose a commonly used passcode (such as 1111, 1234, 0000, or the like) before the Re-enter Your Passcode screen appears, your iPad will warn you that the code you typed can be easily guessed. You can either change it or use it anyway — it’s your choice. However, we suggest that you change it if you’re at all concerned about keeping what’s on your iPad safe from prying eyes. If you have an iPad mini 3, read the sidebar on using the Touch ID fingerprint scanner.
13. Type the four-digit passcode again.
The iCloud Keychain screen appears.
14. Tap Approve from Other Device to Set Up iCloud Keychain, Use iCloud Security Code, or Don’t Restore Passwords.
iCloud Keychain is an iOS 7 (and later) feature that stores usernames, passwords, credit card numbers, and other web data in the cloud. When you’ve finished deciding what to do with iCloud Keychain, you see the screen for Siri, the loquacious digital assistant living inside your iPad.
15. Tap Use Siri or Don’t Use Siri.
Your mini offers the desirable option (at least in our humble opinion) of using your voice to control the device, as well as the capability to use dictation in any app that displays an on-screen keyboard.
You can find out more about using Siri and dictation in Chapter 14. For now, let us just say that we love this feature and use it when appropriate (which is often).
If you choose not to enable Siri at this time, you can switch on this feature later in the Settings app’s General pane.
The Diagnostics screen appears.
16. Tap either Automatically Send or Don’t Send to send or not send, respectively, anonymous diagnostic and usage data to Apple. Tap to respond to a similar request to share app analytics with app developers to help cut down on crashes.
The Welcome to iPad screen appears.
17. Tap Get Started and let the fun begin.
Your iPad’s Home screen appears in all its glory.
If you’re using mini without a computer, the setup story ends here. Instead of using iTunes on your Mac or PC as described in Chapter 3, you have to make do with the available options in specific apps and in the Settings app (covered extensively in Chapter 15).
 If you ever need to restore your iPad to factory condition, you’d follow the same steps, as described in Chapter 16.
Pointing a finger at Touch ID
Apple wants you to give the iPad mini 3 the finger. But only in a good way. Setting up passcode safeguards is a good idea, and it’s something we also touch on in Chapter 15 on Settings. Enter the mini 3 with Touch ID, a fingerprint scanner cleverly embedded in the Home button. With a gentle press of any designated finger, you bypass your passcode. What’s more, you can use your own digit (not the numerical kind) to authenticate iTunes and App Store purchases. (Go to Settings⇒Touch ID & Passcode and make sure that the iTunes & App Store switch is turned on.)
You get another benefit through Touch ID on the mini 3: the capability to purchase stuff online by using a payment technology known as Apple Pay. As of this writing, however, you can’t use an iPad with Apple Pay to complete a transaction in stores as you can with an iPhone 6 or 6 Plus. Apple Pay was just launching as this book went to press, but Apple had already forged partnerships with leading credit card companies, banks, and merchants.
To set up Touch ID, you must first let your compatible iPad get chummy with at least one of your fingers, though the system can handle up to five individual fingers, yours or anyone else’s with whom you share the tablet.
The mini instructs you to press and lift your finger against the Home button repeatedly and from different orientations. Red lines fill an animated drawing of a generic fingerprint on the screen, giving you a sense of how far along you are. The process doesn’t take long, and if all goes smoothly, the iPad will soon enough declare your efforts to be a success.
What could go wrong? Well, your designated digit must be dry. The iPad needs to see your entire fingerprint, so don’t try this with a bandaged finger or one that has open wounds.
To add fingers after the initial setup, tap Settings⇒Touch ID & Passcode. Type your passcode, and then tap Add a Fingerprint. Then repeat the setup drill we just described.
Whether you choose to set up fingerprint authentication now, later, or not at all, you should still establish an old-fashioned four-digit passcode as well. In fact, if you do opt to go with Touch ID, you must set up a passcode as a backup should the iPad fail to recognize your paw three times in a row. Hey, it happens. Maybe you’re sweating profusely, or you have a cut in the wrong place, or you’re wearing gloves.
Locking the iPad
We can think of several sound reasons for locking your mini:
· You won’t inadvertently turn it on.
· You keep prying eyes at bay.
· You spare the battery some juice.
Apple makes locking the iPad a cinch.
You don’t need to do anything to lock the iPad; it happens automatically as long as you don’t touch the screen for a minute or two. As you find out in Chapter 15, you can also set the amount of time your mini must be idle before it automatically locks.
Can’t wait? To lock the iPad immediately, press the sleep/wake button.
If you have a mini with a smart cover or smart case (or a third-party equivalent), opening and closing the cover locks and unlocks your iPad, but the smart cover has the advantage of awakening your iPad without making you drag the slider (though you may still have to enter a passcode).
Unlocking the mini is easy, too. Here’s how:
1. Press the sleep/wake button, or press the Home button on the front of the screen.
Either way, the on-screen slider appears.
2. Drag the slider to the right with your finger.
3. Enter a passcode, or press the Home button on a Touch ID-capable iPad if you need to.
See Chapter 15 to find out how to password-protect your iPad.
Mastering the Multitouch Interface
The iPad, like the iPhone, dispenses with a physical mouse and keyboard, in favor of a virtual keyboard — a step that seemed revolutionary just a few years ago. Nowadays, a virtual keyboard doesn’t seem as novel.
Neither does the fact that the designers of the iPad (and iPhone and iPod touch) removed the usual physical buttons in favor of a multitouch display. This beautiful and responsive finger-controlled screen is at the heart of the many things you do on the iPad.
In the following sections, you discover how to move around the multitouch interface with ease. Later, we home in on how to make the most of the keyboard.
Training your digits
Rice Krispies have Snap! Crackle! Pop! Apple’s response for the iPad is Tap! Flick! Pinch! Oh yeah, and Drag!
Fortunately, tapping, flicking, pinching, and dragging are not challenging gestures, so you can master many of the mini’s features in no time:
· Tap: Tapping serves multiple purposes. Tap an icon to open an app from the Home screen. Tap to start playing a song or to choose the photo album you want to look through. Sometimes, you double-tap (tapping twice in rapid succession), which has the effect of zooming in (or out) of web pages, maps, and emails.
· Flick: Flicking is just what it sounds like. A flick of the finger on the screen lets you quickly scroll through lists of songs, emails, and picture thumbnails. Tap the screen to stop scrolling, or merely wait for the scrolling list to stop.
· Pinch/spread: Place two fingers on a web page, map, or picture, and then spread your fingers apart to enlarge the images. Or pinch your fingers together to make the map or picture smaller. Pinching and spreading (or what we call unpinching) are cool gestures that are easy to master and sure to wow an audience.
· Drag: Here’s where you slowly press your finger against the touchscreen without lifting it. You might drag to move around a web page or map that’s too large for the mini’s display area.
· Drag downward from the top of the screen: This special gesture displays Notification Center (which you find out about in Chapter 13). Press your finger at the very top of the screen and drag downward.
· Drag downward from any Home screen without starting at the very top of the screen: This action summons Spotlight search, a discussion for later in this chapter.
· Drag upward from the bottom of the screen: This time, you’re calling up Control Center, a handy repository for music controls, airplane mode (see Chapter 15), Wi-Fi, Bluetooth, do not disturb, mute/volume, timer (Clocks app), camera, AirPlay, and brightness controls. Check out Figure 2-1 for one view of Control Center.
· Four- or five-finger swipes and pinches: To quickly multitask or switch among or view running apps (see the later section, “Multitasking”), use four or five fingers to swipe upward. Swipe left or right (only one finger required) to switch between recently used apps. Pinch using four or five fingers to jump to your Home screen. Swipe up (one finger will do the trick) on an app’s thumbnail to quit it. The four- or five-finger swipes and pinches require you to enable Multitasking Gestures in the Settings app’s General pane.

Figure 2-1: We think you’ll call on Control Center a lot.
Navigating beyond the Home screen
The Home screen, which we discuss in Chapter 1, is not the only screen of icons on your tablet. After you start adding apps from the iTunes App Store (which you discover in Chapter 11), you may see a row of two or more tiny dots just above the main apps parked at the bottom of the screen. Those dots denote additional Home screens each containing up to 20 additional icons, not counting the 4 to 6 separate icons docked at the bottom of each of these Home screens. You can have up to 15 Home screens. You can also have fewer docked icons at the bottom of the Home screen, but we can’t think of a decent reason why you’d want to ditch any of them. In any case, more on these in a moment.
Here’s what you need to know about navigating among the screens:
· To navigate between screens, flick your finger from right to left or left to right across the middle of the screen, or tap directly on the dots. The number of dots you see represents the current number of screens on your iPad. The all-white dot denotes the screen that you’re currently viewing.
You can also drag your finger in either horizontal direction to see a different screen. Unlike flicking — you may prefer the term swiping — dragging your finger means keeping it pressed against the screen until you reach your desired page.
· Make sure you swipe and not just tap, or you’ll probably open one of the app icons instead of switching screens.
· Press the Home button to jump back to the Home screen. Doing so the first time takes you back to whatever Home screen you were on last. Tapping Home a second time takes you to the first Home screen.
· The dock — which contains the Messages, Mail, Safari, and Music icons in the bottom row — stays put as you switch screens. In other words, only the first 20 icons on the screen change when you move from one screen to another.
You can add one or two more icons to the dock. Or move one of the four default icons into the main area of the Home screen to make space for additional app icons you may use more often, as described later in this chapter.
Select, cut, copy, and paste
Being able to select and then copy and paste from one place on a computer to another has seemingly been a divine right since Moses, and that’s the case on Apple’s smaller display tablet as well. You can copy and paste (and cut) with pizzazz.
On the mini, you might copy text or a URL from the web and paste it into an email or a note. Or you might copy a bunch of pictures or video into an email.
Suppose you’re in the Notes app, jotting down ideas that you’ll eventually copy to an email. Here’s how you would exploit the copy-and-paste feature:
1. Double-tap or press against a word to select it.
2. Tap Select All to grab everything.
You can also drag the blue grab points (handles) to select a larger block of text or to contract the text you’ve already selected, as shown in Figure 2-2. Dragging grab points may take a little practice.
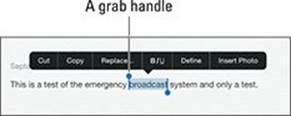
Figure 2-2: Drag the grab handles to select text.
3. After you select the text, tap Copy. If you want to delete the text block, tap Cut instead.
4. Open the Mail program (see Chapter 5) and start composing a message.
5. When you decide where to insert the text you just copied, tap the cursor.
Up pop the Select, Select All, Paste, Quote Level, and Insert Photo or Video commands, as shown in Figure 2-3. (We get to the last two options in Chapter 5.)
6. Tap Paste to paste the text into the message.
Here’s the pizzazz part. If you made a mistake when you were cutting, pasting, or typing, shake the mini. Doing so undoes the last edit (provided that you tap the Undo Paste or Undo option when it appears).
You also see these options:
· Auto-Correct: If you happen to select a word with a typo, the iPad might underline that word. If you tap the underlined work, the iPad might show you the word it thinks you meant to spell. Tap that suggested word to accept it.
·  Predict: New to the mini in iOS 8 is a predictive word feature that reveals up to three word or phrase options in buttons just above the keyboard. If one of these words or phrases is what you had in mind, tap the appropriate button.
· Replace: The iPad may show you possible replacement words. For example, replacement words for test might be fest, rest, or text. Tap the word to substitute it for the word you originally typed.
· Define: Tap your selected word for a definition, courtesy of the New Oxford American Dictionary, the Oxford Dictionary of English, an Apple dictionary, or a foreign language dictionary if you’ve downloaded any dictionaries onto your iPad.

Figure 2-3: Tap Paste and text will appear.
Multitasking
Through multitasking, you can run numerous apps in the background simultaneously and easily switch from one app to another. The following examples illustrate what multitasking enables you to do on your iPad:
· A third-party app, such as Slacker Personal Radio, continues to play music while you surf the web, peek at pictures, or check email. Without multitasking, Slacker would shut down the moment you opened another app.
· A navigation app can update your position while you’re listening to, say, Pandora Internet radio. From time to time, the navigation app will pipe in with turn-by-turn directions, lowering the volume of the music so that you can hear the instructions.
· If you’re uploading images to a photo website and the process is taking longer than you want, you can switch to another app, confident that the images will continue to upload behind the scenes.
· Leave voice notes in the Evernote app while checking out a web page.
Multitasking couldn’t be easier — and it’s become pretty smart through the various iOS upgrades. Now your iPad can anticipate your needs. For example, if it detects, over time, that you tend to turn to your social networking apps around the same time every morning, it will make sure the feeds are ready for you.
Double-press (not double-tap) the Home button. You see preview pages with icons just below them for any open apps, as shown in Figure 2-4. Scroll to the right or left to see more apps. Tap the icon or preview screen for the app you want to switch to: The app remembers where you left off. (Scroll all the way to the left, and you’ll also see a preview screen for the last Home screen you opened.) If you hold the tablet sideways in landscape mode, the previews for your apps appear sideways, too.
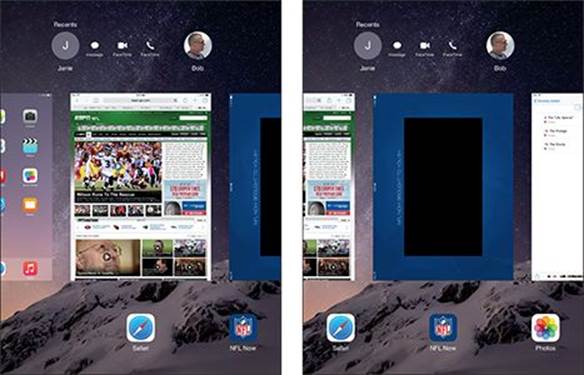
Figure 2-4: Scroll to see the apps you’ve recently used or are still running.
At the top of Figure 2-4, note a cool new iOS 8 shortcut: circular snapshots of the people with whom you most recently communicated. Tap the circular picture to call the person (via FaceTime) or to send him or her a message.
Apple insists that multitasking will not overly tax the battery or exhaust system resources. The iPad conserves power and resources by putting apps in a state of suspended animation. And your iPad will schedule updates only during power-efficient times, such as when your device is connected to Wi-Fi.
Still, we think it’s a good idea to shut down apps you’re not using because you’ll see a battery hit over time. To remove an app from the multitasking rotation, swipe up the app’s preview. Poof — it’s gone.
You can use the four- or five-finger gesture to swipe upward to reveal your multitasking options and to swipe left or right to switch between apps. From this multitasking view, you can pinch with four or five fingers to return to the Home screen. It’s a cool gesture.
Organizing icons into folders
Finding the single app that you want to use among apps spread out over 15 screens may seem like a daunting task. But Apple felt your pain and added a handy organizational tool: folders. The Folders feature lets you create folder icons, each containing apps that pertain to the name that Apple assigned or you gave to that folder.
To create a folder, follow these steps:
1. Press your finger against an icon until all the icons on the screen wiggle.
2. Decide which apps you want to move to a folder and then drag the icon for the first app on top of the second app.
The two apps now share living quarters inside a newly created folder. Apple names the folder according to the category of apps inside the folder.
3. (Optional) Change the folder name by tapping the X on the bar where the folder name appears and typing a new name.
To launch an app inside a folder, tap that folder’s icon and then tap the icon for the app that you want to open.
You have plenty of room for all your apps. Indeed, you can stash up to 9 apps per page in a folder and have as many as 15 pages. That’s a grand total of 126 (more, we suspect, than you’d possibly ever want to tuck away in a folder).
When you drag all the apps from a folder, the folder automatically disappears. You can also drag apps on or off the dock.
Printing
Through the feature known as AirPrint, you can print wirelessly from the mini to an AirPrint-capable printer. The first of these compatible features emerged on more than a dozen HP printers; now you have offerings from Epson, Canon, and others.
AirPrint works with Mail, Photos, Safari, and iBooks (PDF files). You can also print from apps in Apple’s iWork software suite, as well as third-party apps with built-in printing.
An AirPrint printer doesn’t need any special software, but it does have to be connected to the same Wi-Fi network as the iPad.
To print, follow these steps:
1. ![]() Tap the share icon, and then tap the Print command.
Tap the share icon, and then tap the Print command.
The icon is shown in the margin.
2. In the Printer Options bubble that appears, tap Select Printer to select a printer, which the iPad locates in short order.
3. Depending on the printer, specify the number of copies you want to print, the number of double-sided copies, and a range of pages to print.
4. When you’re happy with your settings, tap Print.
If you display the preview pages while a print job is underway, the Print Center icon appears with all your other recently used apps. A badge indicates how many documents are in the print queue, along with the currently printing document.
Searching for content on your iPad
Using the Safari browser (see Chapter 4), you can search the web via Google, Yahoo!, Bing, or DuckDuckGo. If you’ve added a foreign language keyboard, other options may present themselves. For example, with a Chinese keyboard enabled, you can summon the Baidu search engine.
You can search also for people and programs across your mini and within specific apps. We show you how to search within apps in the various chapters dedicated to Mail, Contacts, Calendar, and Music.
Searching across the iPad is based on the powerful Spotlight feature familiar to Mac owners. Spotlight became even more useful in iOS 8 by taking on an additional search load. You can now search for news and trending topics, local restaurants, movie times, and content in Apple’s own iTunes Store, App Store, and iBooks Store.
Here’s how the search feature works:
1. Swipe down from any Home screen to access Spotlight.
A bar slides into view at the top of the screen.
2. Tap the bar and use the virtual keyboard to enter your search query.
The iPad spits out results the moment you type a single character; the list narrows as you type additional characters.
The results are pretty darn thorough. Say that you entered Ring as your search term, as shown in Figure 2-5. Contacts whose last names have Ring in them show up, along with friends who might do a trapeze act in the Ringling Bros. circus. All the songs on your iPad by Ringo Starr show up too, as do such song titles as Tony Bennett’s “When Do the Bells Ring for Me,” if that happens to be in your library. The same goes for apps, videos, audiobooks, events, and notes with the word Ring.
3. Tap any listing to jump to the contact, ditty, or app you seek.

Figure 2-5: Putting the Spotlight on search.
In Settings (see Chapter 15), you can specify the order of search results so that apps come first, contacts second, songs third, and so on.
At the bottom of the Spotlight results list, you can tap to move your search query to the web (using your designated search engine) or to Wikipedia, the online encyclopedia.
The Incredible, Intelligent, and Virtual iPad Keyboard
As you know by now, instead of a physical keyboard, several soft, or virtual, English-language or (depending upon what you chose during setup) foreign-language keyboard layouts slide up from the bottom of the mini screen, including variations on the alphabetical keyboard, the numeric and punctuation keyboard, and the more punctuation and symbols keyboard.
Indeed, the beauty of a software keyboard is that you see only the keys that are pertinent to the task at hand. The layout you see depends on the app. The keyboards in Safari differ from the keyboards in Mail. For example, in Mail, you’ll see a Return key. The similarly placed key in Safari is labeled Go. Figure 2-6 displays the difference between the Mail (top) and Safari (bottom) keyboards.
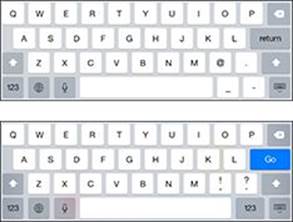
Figure 2-6: The keys on the Mail (top) and Safari (bottom) keyboards.
Before you consider how to actually use the keyboard, we want to share a bit of the philosophy behind its so-called intelligence. Knowing what makes this keyboard smart can help you make it even smarter when you use it. The keyboard
· Has a built-in English dictionary that even includes words from today’s popular culture. Dictionaries in other languages are automatically activated when you use a given international keyboard, as described in an article on the web at www.dummies.com/extras/ipad.
· Adds your contacts to its dictionary automatically.
· Uses complex analysis algorithms to predict the word you’re trying to type.
· Suggests corrections as you type. It then offers you the suggested word just below the misspelled word. When you decline a suggestion and the word you typed is not in the iPad dictionary, the iPad adds that word to its dictionary and offers it as a suggestion if you mistype a similar word in the future.
Decline incorrect suggestions (by tapping the characters you typed as opposed to the suggested words that appear below what you’ve typed). This extra step helps your intelligent keyboard become even smarter.
· Reduces the number of mistakes you make as you type by intelligently and dynamically resizing the touch zones for certain keys. The iPad increases the zones for keys it predicts might come next and decreases the zones for keys that are unlikely or impossible to come next, although you can’t see this behavior.
Anticipating what comes next
The keyboards on your mini became even more useful with the arrival of iOS 8. Now the keyboard takes an educated stab at the next word you mean to type and presents what it surmises to be the best possible word choices front and center. Say you’re in the Messages app and the last message you received was an invitation to lunch or dinner. Above the row of keys on the iPad keyboard, you’d see buttons with three word suggestions: Dinner, Lunch, and Not sure (as shown in Figure 2-7). If one of those were the appropriate response, you could tap the button to insert its text into your reply.
If you wanted to respond with something different than the three options presented by Apple, you’d just type your response with the regular QWERTY keys. As you type additional letters and words, the three suggested word choices above the keyboard change in real time. For instance, if you start by typing That is a in your message, the new trio of word choice buttons that show up might be good, great, and very.
Such QuickType keyboard predictions vary by app and even according to the person with whom you are communicating. So the predictive text choices that show up in Messages when you’re involved in an exchange with a friend are likely to be more casual than those in an email to your boss.
To exploit the predictive typing feature, make sure the Predictive setting is turned on (as it is by default). Go to Settings⇒General⇒Keyboard, and slide the Predictive switch to on.
Such suggestions don’t appear only in English. If you’re using an international keyboard, suggestions are presented in the appropriate language.
Discovering the special-use keys
The iPad keyboard contains several keys that don’t actually type a character. Here’s the scoop on each of these keys:
· ![]() Shift: If you’re using the alphabetical keyboard, the shift key switches between uppercase and lowercase letters. You can tap the key to change the case, or hold down shift and slide to the letter you want to be capitalized.
Shift: If you’re using the alphabetical keyboard, the shift key switches between uppercase and lowercase letters. You can tap the key to change the case, or hold down shift and slide to the letter you want to be capitalized.
· Caps lock: To turn on caps lock and type in all caps, you first need to enable the Caps Lock setting (if it’s not already enabled) by tapping Settings⇒General⇒Keyboard and then tapping the Enable Caps Lock item to turn it on. After the Caps Lock setting is enabled, double-tap the shift key to turn on caps lock. (The arrow will be white and the shift key itself will be a darker shade of gray.) Tap the shift key again to turn off caps lock. To disable caps lock, just reverse the process by turning off the Enable Caps Lock setting (tap Settings⇒General⇒Keyboard).
· ![]() Typewriter: Enable the Split Keyboard option (tap Settings⇒General⇒Keyboard), and you can split the keyboard in a thumb-typist-friendly manner, as shown in Figure 2-8. When you’re ready to split your keyboard, press and hold down the typewriter icon key, and tap Split on the menu. From that menu you can also dock the keyboard to the bottom of the screen. When you want to bring the keyboard back together, press and hold down the typewriter icon key again and choose either Merge or Dock and Merge from the menu.
Typewriter: Enable the Split Keyboard option (tap Settings⇒General⇒Keyboard), and you can split the keyboard in a thumb-typist-friendly manner, as shown in Figure 2-8. When you’re ready to split your keyboard, press and hold down the typewriter icon key, and tap Split on the menu. From that menu you can also dock the keyboard to the bottom of the screen. When you want to bring the keyboard back together, press and hold down the typewriter icon key again and choose either Merge or Dock and Merge from the menu.
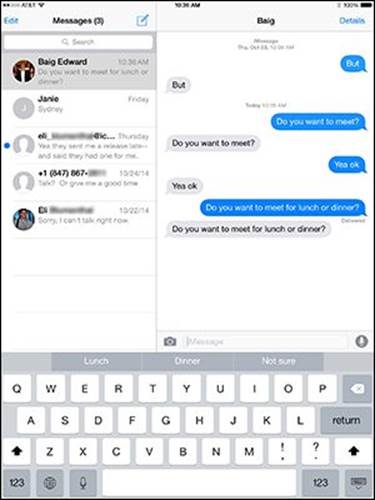
Figure 2-7: The iPad keyboard predicts what you might want to type next.
· ![]() #+= or 123: If you’re using a keyboard that shows only numbers and symbols, the traditional shift key is replaced by a key labeled #+= or 123 (sometimes shown as .?123). Pressing that key toggles between keyboards that just have symbols and numbers.
#+= or 123: If you’re using a keyboard that shows only numbers and symbols, the traditional shift key is replaced by a key labeled #+= or 123 (sometimes shown as .?123). Pressing that key toggles between keyboards that just have symbols and numbers.
· ![]() International keyboard: You see this key only if you’ve turned on an international (or third-party) keyboard, as explained on the web at www.dummies.com/extras/ipad. From this key, you can also pull up an emoji keyboard with numerous smiley faces and pictures.
International keyboard: You see this key only if you’ve turned on an international (or third-party) keyboard, as explained on the web at www.dummies.com/extras/ipad. From this key, you can also pull up an emoji keyboard with numerous smiley faces and pictures.
· ![]() Delete: Tapping this key (otherwise known as the backspace key) erases the character immediately to the left of the cursor.
Delete: Tapping this key (otherwise known as the backspace key) erases the character immediately to the left of the cursor.
· ![]() Return: This key moves the cursor to the beginning of the next line. You might find this key labeled Go or Search, depending on the app you’re using.
Return: This key moves the cursor to the beginning of the next line. You might find this key labeled Go or Search, depending on the app you’re using.
· ![]() Hide keyboard: Tap this key to hide the keyboard. Tap the screen in the appropriate app to bring back the keyboard.
Hide keyboard: Tap this key to hide the keyboard. Tap the screen in the appropriate app to bring back the keyboard.
· ![]() Dictation: Tap the microphone icon and start talking. The iPad listens to what you have to say. Tap the key again, and the mini attempts to convert your words into text. You can use this dictation feature in many of the instances in which you can summon the keyboard, including the built-in Notes and Mail apps, as well as many third-party apps. See Chapter 14 for more on dictation.
Dictation: Tap the microphone icon and start talking. The iPad listens to what you have to say. Tap the key again, and the mini attempts to convert your words into text. You can use this dictation feature in many of the instances in which you can summon the keyboard, including the built-in Notes and Mail apps, as well as many third-party apps. See Chapter 14 for more on dictation.
 When you use dictation, the things you say are recorded and sent to Apple, which converts your words into text. Just make sure to proofread what you’ve said because the process isn’t foolproof. Apple also collects other information, including your first name and nickname, the names and nicknames of folks in your Contacts list, song names in Music, and more. Apple says it does this to help the Dictation feature perform its duties. If any of this freaks you out, however, tap Settings⇒General⇒Keyboard and slide the Dictation switch to off. You can also restrict the use of dictation in Settings, as explained in Chapter 15.
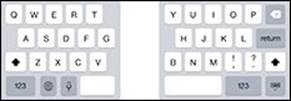
Figure 2-8: Press and hold down the typewriter icon key to split the keyboard.
Choosing an alternative keyboard
As part of iOS 8, Apple for the first time permits you to choose an alternative keyboard from a third-party app developer, a welcome change to the producers of SwiftKey, Swype, Ginger, and Fleksy keyboards, which debuted on the rival Android mobile operating system. You can fetch new keyboards in the App Store. Some are free; some require a modest sum.
After you’ve downloaded a keyboard, visit Settings⇒General⇒Keyboard⇒Keyboards⇒Add New Keyboard and select the keyboard of choice. Then press and hold down on the international keyboard key (globe icon) on the iPad’s own keyboard, and select your new keyboard from the list that appears. Alternatively, keep tapping the globe icon until the keyboard you want takes over.
Finger-typing on the virtual keyboards
The virtual keyboards in Apple’s multitouch interface just might be considered a stroke of genius. Or they just might drive you nuts.
If you’re patient and trusting, in a week or so, you’ll get the hang of finger-typing — which is vital to moving forward, of course, because you rely on a virtual keyboard to tap a text field, enter notes, type the names of new contacts, and so on.
As we note earlier in this chapter, Apple has built intelligence into its virtual keyboard, so it can correct typing mistakes on the fly or provide helpful word choices by predicting what you’re about to type next. The keyboard isn’t exactly Nostradamus, but it does an excellent job of coming up with the words you have in mind. We’ve found that tapping one of the predictive buttons appears to speed things up as well as bolster our typing accuracy.
As you start typing on the virtual keyboard, we think you’ll find the following additional tips helpful:
· See what letter you’re typing. As you press your finger against a letter or number on the screen, the individual key you press darkens until you lift your finger, as shown in Figure 2-9. That way, you know that you struck the correct letter or number.
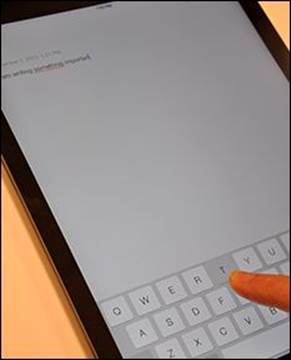
Figure 2-9: The ABCs of virtual typing.
· Slide to the correct letter if you tap the wrong one. No need to worry if you touched the wrong key. You can slide your finger to the correct key because the letter isn’t recorded until you release your finger.
· Tap and hold down to access special accent marks, alternative punctuation, or URL endings. Sending a message to an overseas pal? Keep your finger pressed against a letter, and a row of keys showing variations on the character for foreign alphabets pops up, as shown in Figure 2-10. This row lets you add the appropriate accent mark. Just slide your finger until you’re pressing the key with the relevant accent mark and then lift your finger.
Meanwhile, if you press and hold down the .? key in Safari, it offers you the choice of .us, .org, .edu, .com, or .net with additional options if you also use international keyboards. Pretty slick stuff, except we miss the dedicated .com key that was on the keyboard prior to iOS 7. You can bring the key back by holding down the period key and then releasing your finger when .com is highlighted.
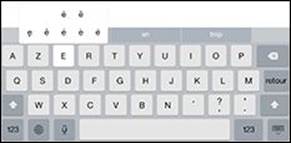
Figure 2-10: Accenting your letters.
· Tap the space bar to accept a suggested word, or tap the suggested word to decline the suggestion. Alas, mistakes are common at first. Say that you meant to type a sentence in the Notes app that reads, “I am typing an important …” But because of the way your fingers struck the virtual keys, you actually entered “I am typing an importsnt …” Fortunately, Apple knows that the a you meant to press is next to the s that showed up on the keyboard, just as t and y and e and r are side by side. So the software determines that important was indeed the word you had in mind and, as Figure 2-11 reveals, places it front and center among the three predictive text buttons. You’ll note that the suspect word is highlighted. To accept the suggested word, merely tap the space bar. And if for some reason you actually did mean to type importsnt, tap that word instead among the predictive buttons that appear.
If you don’t appreciate these features, you can turn off Auto-Correction and Predictive in Settings. See Chapter 15 for details. See Chapter 20 for autocorrection tricks.

Figure 2-11: Fixing an important mistake.
 Because Apple knows what you’re up to, the virtual keyboard is fine-tuned for the task at hand, especially when you need to enter numbers, punctuation, or symbols. The following tips help you find common special characters or special keys that we know you’ll want to use:
· Putting the @ in an email address: If you’re composing an email message (see Chapter 5), a dedicated @ key pops up on the main Mail keyboard when you’re in the To field choosing whom to send a message to. That key disappears from the first view when you tap the body of the message to compose your words. You can still get to the @ by tapping the .?123 (or 123) key.
· Switching from letters to numbers: When you’re typing notes or sending email and want to type a number, symbol, or punctuation mark, tap the .?123 (or 123) key to bring up an alternative virtual keyboard. Tap the ABC key to return to the first keyboard. This toggle isn’t hard to get used to, but some may find it irritating.
· Adding apostrophes and other punctuation shortcuts: If you press and hold down the exclamation mark/comma key, a pop-up offers the apostrophe. If you press and hold down the question mark/period key, you’ll see the option to type quotation marks.
We already mentioned that the mini, unlike some tablets from the past (and a few in the present), eschews a pen or stylus. But sometimes you might want to call upon a digital pen, and third-party companies fill the bill. For example, Wacom sells various Bamboo Stylus models, starting around $15. It’s a potentially useful tool for those with too broad, oily, or greasy fingers, or those who sketch, draw, or jot notes. You can find lower-priced styluses as well.
Editing mistakes
We think typing with abandon, without getting hung up over mistyped characters, is a good idea. The self-correcting keyboard can fix many errors (and occasionally introduce errors of its own). That said, plenty of typos are likely to turn up, especially in the beginning, and you have to correct them manually.
A neat trick for doing so is to hold your finger against the screen to bring up the magnifying glass. Use the magnifying glass to position the pointer on the spot where you need to make the correction. Then use the delete key (also called the backspace key) to delete the error and press whatever keys you need to type the correct text.
And with that, you are hereby notified that you’ve survived basic training. The real fun is about to begin.
![]()
All materials on the site are licensed Creative Commons Attribution-Sharealike 3.0 Unported CC BY-SA 3.0 & GNU Free Documentation License (GFDL)
If you are the copyright holder of any material contained on our site and intend to remove it, please contact our site administrator for approval.
© 2016-2026 All site design rights belong to S.Y.A.