iPad mini For Dummies, 3rd Edition (2015)
Part II. The Internet iPad mini
Chapter 5. The Email Must Get Through
In This Chapter
![]() Setting up your accounts
Setting up your accounts
![]() Reading and managing email messages
Reading and managing email messages
![]() Searching for email messages
Searching for email messages
![]() Sending email messages
Sending email messages
![]() Setting email preferences
Setting email preferences
![]() Using the Messages app
Using the Messages app
![]() Lending your voice to iMessages
Lending your voice to iMessages
On any computing device, emails come and go with a variety of emotions. Messages may be amusing or sad, frivolous or serious. Electronic missives on the iPad are almost always touching.
The reason, of course, is that you’re touching the display to compose and read messages. Okay, so we’re having a little fun with the language. But the truth is, the bundled Mail app on the iPad mini is a modern program designed not only to send and receive text email messages but also to handle rich HTML email messages — formatted with font and type styles and embedded graphics. If someone sends you mail with a picture, it’s quite likely that the picture is visible right in the body of the message. (That’s the default behavior, but your results may vary depending on the sender’s email capabilities and your iPad’s mail settings.)
Furthermore, your iPad mini can read several types of file attachments, including (but not limited to) PDFs, JPG images, Microsoft Word documents, PowerPoint slides, and Excel spreadsheets, as well as stuff produced through Apple’s own iWork software. Better still, all this sending and receiving of text, graphics, and documents can happen in the background, so you can surf the web or play a game while your iPad quietly and efficiently handles your email behind the scenes.
Apple even lets you grant VIP status to important senders so that there’s almost no chance you’ll miss mail from the people who matter most. Let’s see, there’s your spouse, your kids, your boss … are we missing anybody?
Prep Work: Setting Up Your Accounts
First things first. To use Mail, you need an email address. If you have broadband Internet access (that is, a cable modem, FiOS, or DSL), you probably received one or more email addresses when you signed up. If you’re one of the handful of readers who doesn’t already have an email account, you can get one for free from Yahoo! (http://mail.yahoo.com), Google (http://mail.google.com), AOL (www.aol.com), or numerous other service providers.
Or you can get a free premium email account (for example, yourname@iCloud.com) from Apple as part of iCloud. From your Home screen, just tap Settings⇒Mail, Contacts, Calendars⇒iCloud.
 Many free email providers add a bit of advertising at the end of your outgoing messages. If you’d rather not be a billboard for your email provider, either use the address(es) that came with your broadband Internet access (yourname@comcast.net or yourname@att.net, for example) or pay a few dollars a month for a premium email account that doesn’t tack advertising (or anything else) onto your messages.
Finally, while the rest of the chapter focuses on the Mail app, you can also use Safari to access most email systems, if that’s your preference.
Setting up your account the easy way
Chapter 3 explains the option of automatically syncing the email accounts on your Mac or Windows PC with your iPad mini. If you chose that option, your email accounts should be configured already on your iPad. And if you signed in with an iCloud account while setting up your iPad (read Chapter 2), you should already be good to go with your iCloud email account. You may proceed directly to the later section “See Me, Read Me, File Me, Delete Me: Working with Messages.”
If you haven’t yet chosen that option but want to set up your account the easy way now, go to Chapter 3, read about syncing email accounts, and then sync your iPad with your Mac or PC. Then you, too, can proceed directly to the section “See Me, Read Me, File Me, Delete Me: Working with Messages,” later in this chapter.
Remember that syncing email accounts doesn’t have any effect on your email messages; it merely synchronizes the settings for email accounts so you don’t have to set them up manually on your iPad.
Setting up your account the less-easy way
If you don’t want to sync the email accounts on your Mac or PC, you can set up an email account on your iPad manually. It’s not quite as easy as clicking a box and syncing your iPad, but it’s not rocket science either. Here’s how you get started:
· If you have no email accounts on your iPad: The first time you launch Mail, you see the Welcome to Mail screen. Your choices are iCloud, Microsoft Exchange (business email), Google (Gmail), Yahoo!, AOL, Microsoft Outlook.com, and Other.
Merely tap the account type you want to add to the iPad and follow the steps in the upcoming “Setting up an account with another provider” or “Setting up corporate email” section.
· If you have one or more email accounts on your iPad and want to add a new account manually: Tap Settings on the Home screen and then tap Mail, Contacts, Calendars⇒Add Account.
You see an Add Account screen shown in Figure 5-1, with the same account options that appear on the Welcome to Mail screen. Proceed to one of the next three sections, depending on the type of email account you selected.
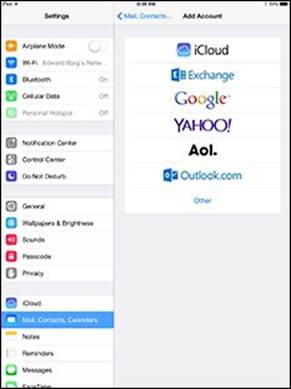
Figure 5-1: Tap a button to set up an account.
Setting up an email account with iCloud, Gmail, Yahoo!, AOL, or Microsoft Outlook
If your account is with iCloud, Gmail (Google), Yahoo!, AOL, or Outlook, follow these steps:
1. Tap the appropriate button on the Welcome to Mail screen (refer to Figure 5-1).
2. Enter your name, email address, password, and optional description, as shown in Figure 5-2.
If you don’t add a description (such as Work or Personal), the field usually fills in automatically with the contents of the address field.
3. Tap the Next button in the upper-right corner of the screen.
You’re finished. That’s all there is to setting up your account. You can now proceed to “See Me, Read Me, File Me, Delete Me: Working with Messages.”
 On June 30, 2012, Apple completed the transition from MobileMe to iCloud. Apple says that if you had an active MobileMe account when you signed up for iCloud, you can keep your me.com or mac.com email address and any email aliases you’ve created.
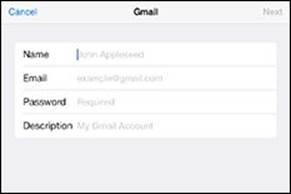
Figure 5-2: Just fill ’em in and tap Next, and you’re ready to rock.
Setting up an account with another provider
If your email account is with a provider other than iCloud, Gmail (Google), Yahoo!, AOL, or Microsoft Outlook, you have a bit more work ahead of you. You need a bunch of information about your email account that you may not know or have handy.
We suggest that you scan the following instructions, note the items you don’t know, and go find the answers before you continue. To find the answers, look at the documentation you received when you signed up for your email account or visit the account provider’s website and search there.
Here’s how you set up an account:
1. Starting at the Home screen, tap Settings⇒Mail, Contacts, Calendars⇒Add Account⇒Other.
2. Under Mail, tap Add Mail Account.
3. Fill in the name, address, password, and description in the appropriate fields, and then tap Next.
With any luck, that’s all you’ll have to do. The iPad will look up and retrieve your account credentials. If that doesn’t happen, continue with Step 4.
4. Tap the button at the top of the screen that denotes the type of email server this account uses, IMAP or POP, as shown in Figure 5-3.
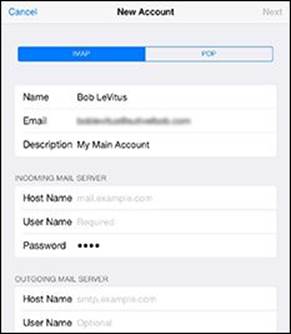
Figure 5-3: If you set up an IMAP or a POP email account, you may have a few more fields to fill in before you can rock.
5. Fill in the Internet hostname for your incoming mail server, which looks something like mail.providername.com.
6. Fill in your username and password.
7. Enter the Internet hostname for your outgoing mail server, which looks something like smtp.providername.com.
8. Enter your username and password in the appropriate fields.
9. Tap the Next (or Save) button in the upper-right corner to create the account.
You’re now ready to begin using your account. See the section “See Me, Read Me, File Me, Delete Me: Working with Messages.”
Some outgoing mail servers don’t need your username and password. The fields for these items on your iPad mini note that they’re optional. Still, we suggest that you fill them in anyway. Doing so saves you from having to add them later if your outgoing mail server does require an account name and a password, which almost all do these days.
Setting up corporate email
The mini makes nice with the Microsoft Exchange servers that are a staple in large enterprises, as well as many smaller businesses.
What’s more, if your company supports Microsoft Exchange ActiveSync, you can exploit push email so that messages arrive pronto on the iPad, just as they do on your other computers. (To keep everything up to date, the iPad also supports push calendars and push contacts.) For push to work with an Exchange Server, your company must be simpatico with one of the last several iterations of Microsoft Exchange ActiveSync. If you run into a problem, ask your company’s IT or tech department.
Setting up Exchange email isn’t particularly taxing, and the iPad connects to Exchange right out of the box. However, you might have to consult your employer’s techie-types for certain settings.
Start setting up your corporate email on your iPad by following these steps:
1. Tap the Exchange listing on the Welcome to Mail or Add Account screen. (Refer to Figure 5-1.)
2. Fill in what you can: your email address, domain, username (sometimes domain\user), and password. Or call on your IT staff for assistance. Tap Next when you’re done.
3. On the next screen, as shown in Figure 5-4, enter the Server email address, assuming that the Microsoft Autodiscover service didn’t already find it. Tap Next when you’re done.
That server address may begin with exchange.company.com.
4. Choose which information you want to synchronize through Exchange by tapping each item you want.
You can choose Mail, Contacts, Calendars, and Reminders. When one of these switches is turned on, it turns green, as in Figure 5-5; otherwise, what you see appears dimmed.
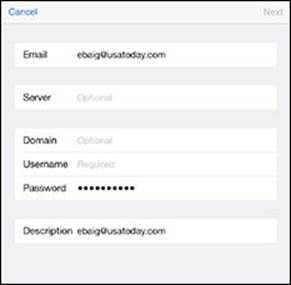
Figure 5-4: You’re on your way to a corporate email account.
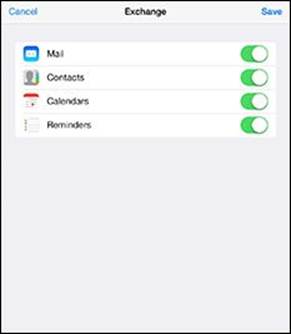
Figure 5-5: Keeping your mail, contacts, calendars, and reminders in sync.
5. Tap Save.
 The company you work for doesn’t want just anybody having access to your email — heaven forbid if your iPad mini is lost or stolen. So your bosses may insist that you change the passcode lock in Settings on your iPad. (The passcode lock is different than your email account password.) Skip over to Chapter 15 to find instructions for adding or changing a passcode. (We’ll wait for you.) Now if your mini ends up in the wrong hands, your company can remotely wipe the contents clean.
You can choose how long you want the iPad to keep email synchronized. Head to Settings; tap Mail, Contacts, Calendars; and then tap the email account that uses ActiveSync. Tap Mail Days to Sync, and tap No Limit or choose another time frame (1 day, 3 days, 1 week, 2 weeks, or 1 month).
 If you’re moonlighting at a second job, it’s good to know that you can configure more than one Exchange ActiveSync account on your iPad.
See Me, Read Me, File Me, Delete Me: Working with Messages
Now that your email accounts are all set up, it’s time to figure out how to receive and read the stuff. Fortunately, you’ve already done most of the heavy lifting when you set up your email accounts. Getting and reading your mail are a piece of cake.
You can tell when you have unread mail by looking at the Mail icon at the bottom of your Home screen. The cumulative number of unread messages across all your email inboxes appears in a little red badge in the upper-right area of the icon. If you have many unread messages, you may see the number appear as 4..6 (signifying, say, 46,376 messages — yes, we get lots of mail).
 The badge display is the default behavior. If you don’t care for it, you can turn it off in the Settings app’s Notifications pane.
In the following sections, you find out how to read messages and attached files and send messages to the trash or maybe a folder when you’ve read them. Or, if you can’t find a message, check out the section on searching your email messages. Reading email on an iPad mini versus a desktop or notebook computer is similar, except you have the advantage of the iPad’s touchscreen.
Reading messages
To read your mail, tap the Mail icon on the Home screen. Remember that what appears on-screen depends on whether you’re holding the mini in landscape or portrait mode as well as what was on the screen the last time you opened the Mail app:
· Landscape: With the iPad in landscape mode, you see All Inboxes at the top of the Mailboxes section (see Figure 5-6), which, as its name suggests, is a repository for all the messages across all your accounts. The number to the right of All Inboxes (50,852 in Figure 5-6) matches the number (or abbreviated shortcut) on the Mail icon on your home page. Again, it’s the cumulative tally of unread messages across all your accounts.
Below the All Inboxes listing are the inboxes for your individual accounts. The number to the right of them, as you’d expect, is the number of unread messages in those accounts (799 in iCloud and 50,053 in Gmail, in the example shown in Figure 5-6).
If you tap an account, you see the available subfolders for that account (Drafts, Sent Mail, Trash, and so on).
One of these accounts is the VIP mailbox. The VIP mailbox lists all the messages from senders you deem the most important. We tell you how to give someone VIP status in the later section, “More things you can do with messages.”
 Depending on the last time the Mail app was open, you may alternatively see previews of the messages in your inbox in the left panel. Previews show the name of the sender, the time the message arrived, the subject header, and the first two lines of the message. (In Settings, you can change the number of lines shown in the preview from one line to five or to no preview lines.)
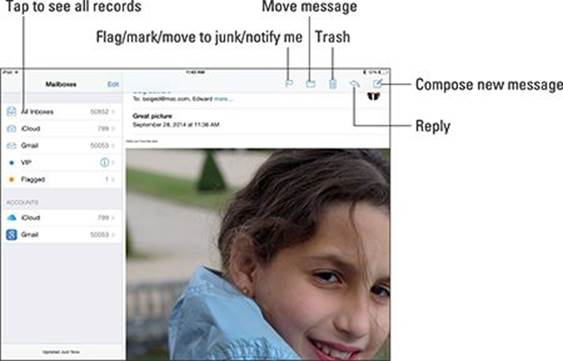
Figure 5-6: When you’re holding the mini sideways, Mail looks something like this.
· Portrait: When you hold the iPad in portrait mode, as shown in Figure 5-7, the last incoming message fills the entire screen. You have to tap the Inbox button (in the upper-left corner of the screen) to summon a panel that displays other accounts or message previews. You can summon the panel also by swiping from the left edge of the screen to the right. The panel overlays the message that otherwise fills the screen.

Figure 5-7: When you’re holding the mini in portrait mode, the message fills the screen.
Messages display in threads, or conversations, making them easy to follow. Of course, you can still view accounts individually. Follow these steps to read your email:
1. If the email mailbox you want to see isn’t front and center, tap the Mailboxes button in the upper-left corner of the screen to summon the appropriate one.
Again, this button may say All Inboxes, Mailboxes, or some other folder name, or it may say the name of the email account that is currently open. Within an email account, you can see the number of unread messages in each mailbox.
2. (Optional) To summon new messages, swipe down the left panel that lists your accounts or mailboxes and immediately release.
If you see a spinning gear, the iPad is searching for new mail.
3. Swipe down one of the inboxes or accounts to refresh that specific mailbox. To summon the unified inbox, tap All Inboxes instead.
If a blue dot appears next to a message, the message hasn’t been read.
4. Tap a message to read it.
5. When you’ve finished reading, tap the Mailboxes button in the upper-left corner of the message.
The button carries a different name, depending on which account you have open. For example, it may say Exchange, Inbox, or something else.
6. Read additional messages.
When a message is on-screen, the buttons for managing incoming messages appear at the top, most of which you’re already familiar with.
· In portrait mode: Tap the up/down arrow that corresponds to the next or previous message, respectively. (Refer to Figure 5-7.)
· In landscape mode (and from within an account): Tap a preview listing to the left of a message to read the next or previous message or any other visible message on the list. Scroll up or down to find other messages you may want to read.
Threading messages
Apple lets you thread messages, or have Mail automatically group related missives. The beauty of this arrangement is that you can easily trace an email conversation. When you organize messages by thread, the related messages appear as a single entry in the mailbox, with a double right-pointing arrow cluing you in that the message is indeed part of a larger ongoing exchange. If a message is not part of a thread, you just see the time, day, or date that that single message arrived. Figure 5-8 (left) shows that Bob and Melisa are hanging together by a thread — tapping the listing reveals underlying messages that make up the conversation. When you tap the message preview, you see previews of those underlying messages, as shown in Figure 5-8 (right).
When you look at a message that’s part of a thread, the numbers at the top of the screen (visible in portrait mode) tell you the message’s location in the conversation. For example, in Figure 5-8 (right), the message we chose to read is number 1 of 3 in this thread.
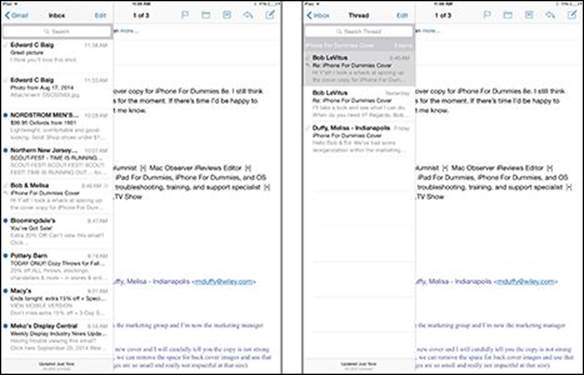
Figure 5-8: Your emails are hanging together by a thread.
To turn on threading, go to the Home screen and tap Settings⇒Mail, Contacts, Calendars, and then tap on Organize by Thread so that green is visible, as shown in Figure 5-9. You may have to scroll down to see the Organize by Thread setting.
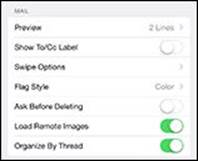
Figure 5-9: Organize by Thread keeps related messages together.
You can search for an item in the thread by scrolling to the top of the thread’s Mail listing and typing your query in the search thread box. Consider this a prelude to an upcoming section on searching email messages.
Managing messages
Managing messages typically involves either moving the messages to a folder or deleting them. To herd your messages into folders, you have the following options:
· To create a folder to organize messages you want to keep: Tap an account under the Accounts listings on the left side of the screen, and tap Edit. Tap New Mailbox, and type a name for the mailbox and location for it.
· To file a message in another folder: Tap the move message icon (labeled in Figure 5-6). When the list of mailboxes appears, tap the folder where you want to file the message. Watching the message fly and land in the designated new folder is cool.
· To read a message that you’ve filed: Tap the folder where the message now resides and then tap the header or preview for the message in question.
· To delete, move, or mark multiple messages: Tap Edit. In both portrait and landscape, Edit appears at the top of your inbox or another mailbox when those mail folders are selected. Tap Edit, and it becomes a Cancel button, and Mark All, Move, and Trash buttons appear at the bottom of the list. Tap each message you want to select so that a check mark appears at that point; Mark All becomes Mark, as shown in Figure 5-10.
· Tap Trash to delete all selected messages.
· Tap Move to move all selected messages to another folder in the same or another Mail account, and then tap the new folder or mailbox (or both) in which you want those messages to hang out.
· Tap Mark to mark all selected messages as Read (and Unread) and Flagged (and Unflagged).
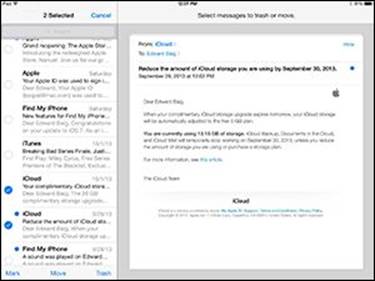
Figure 5-10: Wiping out, moving, or marking messages, en masse.
· To delete a single message: Tap the delete message (trash can) icon. In case you tap the delete message icon by mistake, you have a chance to cancel, provided the Ask before Deleting switch is turned on in Settings.
· To delete a single message without opening it: Swipe one finger to the left across the message in the mailbox list, and then tap the red Delete button that appears to the right of the message. (In some accounts, such as Gmail, you’ll see an Archive button instead.) You’ll also see a Flag option and a More button. Tapping More gives you, well, more options: reply to, forward, or flag the message (yes, flag is still an option here); mark it as unread, move it to junk or elsewhere, or have the iPad send a notification when someone replies to the message or thread.
As noted, in certain Mail accounts, Gmail being one, the Trash option may be replaced by an Archive option, depending on your preference. That means you’re not getting rid of a message but stashing it, or to be precise, saving the message in your All Mail folder. If the Archive message option does present itself, you can turn the feature on or off in Settings.
Searching emails
With Spotlight search, you can quickly and easily search through a bunch of messages to find the one you want to read — such as that can’t-miss stock tip from your broker. In the search box at the top of a mailbox preview pane, type stock or whichever search term seems relevant. All matching emails that have already been downloaded appear. And you can run a search to find words within the body of an email message from the Mail app. (For more on Spotlight search, see Chapter 2.)
Search within Mail is quite powerful. For example, you can search by time frame by typing something along the lines of March meetings. Those search terms will find all the appropriate messages having to do with meetings that month. You can also search to find just flagged messages from your VIPs (flag unread VIP).
Via the iPad, you can also search just the current mailbox or across all your mailboxes. Just scroll to the top of the mailbox previews pane and tap either the All Inboxes tab or the tab for a given mailbox account. Then enter your search query in the box at the top of the preview pane.
If you’re using Exchange, iCloud, or certain IMAP-type email accounts, you may even be able to search messages stored on the server.
Don’t grow too attached to attachments
Your iPad mini can even receive email messages with attachments in a wide variety of popular file formats. (See the nearby sidebar “Keeping files in order” if you’re not sure what file formats are.) Which file formats does the iPad support? Glad you asked:
· Images: .jpg, .tiff, .gif, .png
· Microsoft Word: .doc, .docx
· Microsoft PowerPoint: .ppt, .pptx
· Microsoft Excel: .xls, .xlsx
· Web pages: .htm, .html
· Apple Keynote: .key
· Apple Numbers: .numbers
· Apple Pages: .pages
· Preview and Adobe Acrobat: .pdf
· Rich Text: .rtf
· Text: .txt
· Contact information: .vcf
 If the attachment is a file format that the iPad mini doesn’t support (for example, an Adobe Photoshop .psd file), you see the name of the file, but you can’t open it on your iPad, at least without an assist from a third-party app that you may have installed.
Here’s how to read a supported attachment:
1. Open the email that contains the attachment, which you can identify by a little paper clip icon.
2. Tap the attachment.
The attachment typically appears at the bottom of the message, so you probably need to scroll down to see it.
In some cases, the attachment downloads to your iPad and opens automatically. In other instances, you may have to tap the button representing the attachment to download it.
3. Read or (in the case of a picture) eyeball the attachment.
4. Tap the attachment you’re reading (in the case of a document), and tap Done to return to the message text.
Or you can (again, for a document) open the Pages word processor if you’ve purchased it or downloaded it free if you bought a device with iOS 7 or iOS 8. You can also open the doc in certain other apps you may have. Incidentally, the documents you create in the Pages app are automatically saved to your iPad. With the latest version of Pages, you can also save a document to iCloud, where it can be made available automatically to the version of Pages for Mac computers. If you have a Windows PC, you can work with an iCloud version of Pages.
You can open an attachment from a different app than the one summoned to duty. Just touch and hold down on the attachment in the email, and then tap the app from the options that present themselves. You may also be able to tap Quick Look to peek at the attachment.
Keeping files in order
In simple terms, computers of any type, including tablets like the iPad — and the software that runs on them — must have some way to recognize the files that run on the system and to act appropriately upon them. Long ago, the bright minds in technology cooked up standard ways to organize the layout of data so files that serve a particular purpose adhere to a similar structure. You recognize such files by the filename extension, the suffix that is separated by a dot, or period, after its name. Many more file formats exist than most folks will ever need to become familiar with. But you — or, more precisely, the hardware and software you’re working with — will encounter some popular file types repeatedly. Such formats include .doc for Microsoft Word documents and .jpg for images. If any computer you’re using encounters files that don’t seem to open or respond, it’s likely because the machine doesn’t have the software to recognize such files. The good news is that the iPad supports most common file types it encounters.
More things you can do with messages
Wait! You can do even more with your incoming email messages:
· To see all recipients of a message: Tap More, which appears to the right of the recipients’ name, assuming you cannot already see all the names of the people receiving the message.
If all recipients are displayed, you’ll see Hide instead of More; tap Hide to hide all names except the sender’s.
· To add an email recipient or sender to your contacts: Tap the name or email address at the top of the message and then tap Create New Contact or Add to Existing Contact.
· To make a sender a VIP: Tap the name or email address at the top of the message and then tap Add to VIP. You may want to give VIP status to the important people in your life, such as your significant other, family members, boss, or doctor. A star appears next to any incoming messages from a VIP. You can summon mail from all your VIPs by tapping the VIP folder in the list of Mailboxes. To demote a VIP to an NVIP (not very important person), tap the name or email at the top of the message and then tap Remove from VIP.
· To mark a message as unread, flag it, move it to junk, or arrange to receive a notification when someone replies: Tap the flag icon at the top of a message. These options appear:
· Mark as Unread: Choose Mark as Unread for messages that you may want to revisit at some point but which don’t necessarily have special significance. The message is again included in the unread message count on the Mail icon on your Home screen, and its mailbox again has a blue dot next to it in the message list for that mailbox. You can tap Mark as Read if the message loses its significance. As an alternative, you can mark a message as unread by swiping from left to right in the preview pane.
· Flag: Choose Flag for those messages that deserve special status or that you want to find again in a hurry.
· Move to Junk: We all get crap email. This option moves those messages to your junk pile.
· Notify Me: Tap to receive notifications whenever anyone replies to this email thread.
· To zoom in on and out of a message: Use the pinch and unpinch gestures, at which we suspect you now excel. See Chapter 2 if you need help with your touchscreen moves.
· To follow a link in a message: Tap the link. Links are typically displayed in blue, but they sometimes appear in other colors, or underlined, or both. If the link is a URL, Safari opens and displays the web page. If the link is a phone number, the iPad gives you the chance to add it to your contacts, copy it, call it using FaceTime Audio or your iPhone (through a Handoff feature added with iOS 8), or send a message. If the link is a map, the Maps app opens and displays the location. If you tap a date, you can create an event on that date or show it in Calendar. And, last but not least, if the link is an email address, a new preaddressed blank email message is created.
· If the link opens Safari, Contacts, or Maps and you want to return to your email, press the Home button on the front of your iPad and then tap the Mail icon. Or double-press the Home button and select the Mail icon from the gallery of running apps.
Darling, You Send Me (Email)
Sending email on your iPad mini is a breeze. You’ll encounter several subspecies of messages: pure text, text with a photo, a partially finished message (a draft) that you want to save and complete later, or a reply to an incoming message. You can also forward an incoming message to someone else — and in some instances print messages. The following sections examine these message types one at a time.
Sending an all-text message
To compose a new email message, tap Mail on the Home screen. As before, what you see next depends on how you’re holding your mini. In landscape mode, your email accounts or email folders are listed in a panel along the left side of the screen, with the actual message filling the larger window on the right.
Now, to create a message, follow these steps:
1. Tap the compose new message icon (labeled in Figure 5-6).
The New Message screen appears, like the one shown in Figure 5-11 (except your new message won’t have text typed in the message body yet).
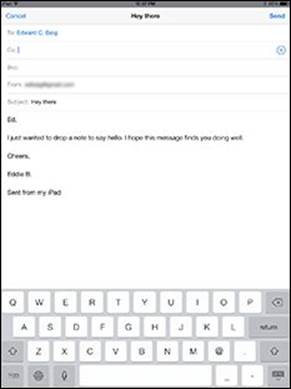
Figure 5-11: The New Message screen appears, ready for you to start typing the recipient’s name.
2. Type the names or email addresses of the recipients in the To field, or tap the + symbol to the right of the To field to choose a contact(s) from your iPad’s contacts list.
If you start typing an email address, email addresses that match what you typed appear in a list below the To or Cc field. If the correct one is in the list, tap it to use it.
3. (Optional) Tap the field labeled Cc/Bcc, From.
Doing so breaks the field into separate Cc, Bcc, and From fields (refer to Figure 5-11).
The Cc/Bcc label stands for carbon copy/blind carbon copy. Carbon copy (a throwback term from another era) is kind of an FYI to a recipient. It’s like saying, “We figure you’d appreciate knowing this, but you don’t need to respond.”
When using Bcc, you can include a recipient on the message, but other recipients can’t see that this recipient has been included. Bcc is great for those secret agent emails! Tap the respective Cc or Bcc field to type names. Or tap the + symbol that appears in those fields to add a contact.
4. (Optional) If you tap From, you can choose to send the message from any of your email accounts on the fly — assuming that you have more than one account set up on the iPad.
5. In the Subject field, type a subject.
The subject is optional, but it’s considered poor form to send an email message without one.
6. In the message area, type your message.
The message area is immediately below the Subject field. You have ample space to get your message across.
Apple includes a bunch of landscape-orientation keyboards in various apps, including Mail. When you rotate the mini to its side, you can compose a new message using a wider-format virtual keyboard. And with iOS 8, you can go with an optional third-party keyboard.
7. Tap the Send button in the upper-right corner of the screen.
Your message wings its way to its recipients almost immediately. If you aren’t in range of a Wi-Fi network or a cellular network when you tap Send, the message is sent the next time you’re in range of one of these networks.
Formatting text in an email
One of the goodies in Mail is the capability to format email text by underlining, bolding, or italicizing it. First you select the text by pressing your finger against the screen until you see the options to select some or all of the text. After making your selection, you’ll have various other options: Cut, Copy, Paste, BIU, Replace, Quote Level, or Insert Photo or Video. To format text, tap the BIU button. Then apply whichever style (bold, italics, underline) suits your fancy.
If you tap Quote Level — another option that appears when you tap the right-pointing arrow after selecting a word — you can quote a portion of a message you’re responding to. Note: Increase Quote Level must be turned on in Settings. You can also increase or decrease the indentation in your outgoing message.
If you tap Replace, you are provided with alternative word choices to the word that you selected. Tap one of the alternative options to select it.
Sending a photo with an email message
Sometimes a picture is worth a thousand words. When that’s the case, here’s how to send an email message with a photo attached:
1. Tap the Photos icon on the Home screen.
2. Find the photo you want to send.
3. ![]() Tap the share icon in the bottom-left corner of the screen (and shown in the margin).
Tap the share icon in the bottom-left corner of the screen (and shown in the margin).
4. Tap the Mail button.
An email message appears on-screen with the photo already attached. The image may appear to be embedded in the body of the message, but the recipient receives it as a regular email attachment.
On the Cc/Bcc line of your outgoing message, you see the size of the attached image. If you tap the size of the image shown, a new line appears, giving you the option to choose an alternative size among Small, Medium, Large, or Actual Size (in other words, keeping what you have). Your choice affects both the visible dimensions and file size of the photo (with the actual size of the file as measured in kilobytes or megabytes reported for each possible choice).
5. Choose what size photo you want to send.
6. Address the message and type whatever text you like, as you did for an all-text message previously, and then tap the Send button.
You have an alternative way of inserting pictures (or videos) into your outgoing mail messages. In the preceding “Formatting text in an email” section, we mention an Insert Photo or Video option that appears after you press your finger against the body of a message that you’re composing. Tap Insert Photo or Video, tap the album in which the photo (or video) you want to send exists, and then tap that photo or video. Tap Use to embed the image and proceed with composing.
Saving an email to send later
Sometimes you start an email message but don’t have time to finish it. When that happens, you can save it as a draft and finish it some other time. Here’s how:
1. Start an email message, as described in one of the previous sections.
2. When you’re ready to save the message as a draft, tap the Cancel button in the upper-left corner of the screen.
3. Tap the Save Draft button if you want to save this message as a draft and complete it another time.
If you tap the Delete Draft button, the message disappears immediately without a second chance. Don’t tap Delete Draft unless you mean it.
To work on the message again, tap the Drafts mailbox. A list of all messages you saved as drafts appears. Tap the draft you want to work on, and it reappears on the screen. When you’re finished, you can tap Send to send it or tap Cancel to save it as a draft again.
The number of drafts appears to the right of the Drafts folder, the same way that the number of unread messages appears to the right of other mail folders, such as your inbox.
Replying to, forwarding, or printing an email message
When you receive a message and want to reply to it, open the message and then tap the reply icon (the curved arrow at the upper-right corner of the screen, as shown in Figure 5-12). Then tap Reply, Reply All, Forward, or Print, as described next:
· Reply and Reply All: The Reply button creates an email message addressed to the sender of the original message, with the content of that original message embedded in your reply. The Reply All button creates an email message addressed to the sender and all other recipients of the original message, plus Ccs. (The Reply All option appears only if more than one recipient was on the original email.) In both cases, the subject is retained with a Re: prefix added. So if the original subject were iPad Tips, the reply’s subject would be Re: iPad Tips.
· Forward: Tapping the Forward button creates an unaddressed email message that contains the text of the original message. Add the email address(es) of the person or people you want to forward the message to, and then tap Send. In this case, rather than a Re: prefix, the subject is preceded by Fwd:. So this time, the subject would be Fwd: iPad Tips. If the email you’re forwarding has an attachment, you’ll be given the option to forward the attachment along with the message.
· Print: Tap Print if you want to print using an AirPrint-capable printer.
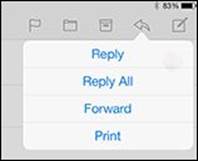
Figure 5-12: Reading and managing an email message.
It’s considered good form to leave the subject lines alone (with the Re: or Fwd: prefix intact), but you may want to change them sometimes. You can edit the subject line of a reply or a forwarded message or edit the body text of a forwarded message the same way you’d edit any other text. Worth noting: When the Re: is modified, a new email thread is created and the modified message won’t be included in the old thread listing.
To send your reply or forwarded message, tap the Send button as usual.
Settings for sending email
You can customize the mail you send and receive in lots of ways. In this section, we explore settings for sending email. Later in this chapter, we show you settings that affect the way you receive and read messages. In each instance, start by tapping Settings on the Home screen.
You can customize your mail in the following ways:
· To hear an alert when you successfully send a message: From the main Settings screen, tap Sounds. Make sure that the Sent Mail setting is turned on. You’ll know because you’ll see a sound type listed (among alert sounds and ringtones), Swoosh by default. If you tap Sent Mail in Settings, you can select another sound besides Swoosh or choose None if going silent is your preference.
If you want to change other settings, tap the Sounds button at the top of the screen. If you’re finished setting the settings, tap the Home button on the front of your iPad mini.
· No matter what setting you’ve just accessed, if you want to continue using Settings, tap whichever left-pointing button appears at the top of the right Settings pane — General, Mail, Contacts, or something else. After you return to the previous screen, you can change other settings. Similarly, you can tap the Home button on the front of your iPad when you’re finished setting any setting. That action always saves the changes you just made and returns to the Home screen.
· To add a signature line, phrase, or block of text to every email message you send: Tap Settings⇒Mail, Contacts, Calendars, and then tap Signature in the right pane. The default signature is Sent from my iPad. You can add text before or after it, or delete it and type something else. Your signature is affixed to the end of all your outgoing email. You can choose a signature that is the same across all your accounts or select different signatures for each account.
· To have your iPad mini send you a copy of every message you send: Tap Settings⇒Mail, Contacts, Calendars and then turn on the Always Bcc Myself setting.
· To set the default email account for initiating email from outside the Mail application: Tap the Settings icon on the Home screen and then tap Mail, Contacts, Calendars⇒Default Account. Tap the account you want to use as the default. This designated email account is the one that’s used when you want to email a picture directly from the Photos app, for example. Note that this setting applies only if you have more than one email account on your iPad.
Setting Your Message and Account Settings
This final discussion of Mail involves more settings that deal with your various email accounts.
Checking and viewing email settings
Several settings affect the way you can check and view email. You might want to modify one or more, so we describe what they do and where to find them:
· To specify how often the iPad mini checks for new messages: Tap the Settings icon on the Home screen; tap Mail, Contacts, Calendars⇒Fetch New Data. You’re entering the world of fetching or pushing. Check out Figure 5-13 to glance at your options. If your email program (or, more precisely, the email server behind it) supports push and the Push setting is enabled on your iPad, fresh messages are sent to your mini automatically as soon as they hit the server. If you turned off push or your email program doesn’t support it, the iPad fetches data instead. Choices for fetching are Every 15 Minutes, Every 30 Minutes, Hourly, and Manually. Tap the one you prefer. With push email, messages can show up on the lock screen and in Notification Center.
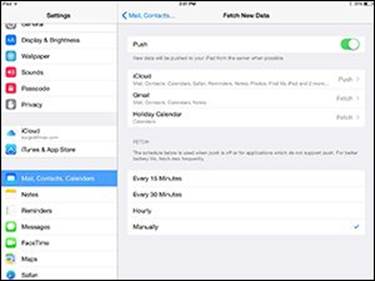
Figure 5-13: Fetch or push? It’s your call.
· To hear an alert sound when you receive a new message: Tap Sounds on the main Settings screen and then tap the New Mail setting. The Ding sound is there by default. Do nothing if you’re satisfied with the Ding you hear each time a new message arrives. If you aren’t satisfied, tap New Mail and select an alternative sound from the list, or tap None if you don’t want to hear any such alert.
· To set the number of lines of each message to be displayed in the message list: From the main Settings screen, tap Mail, Contacts, Calendars⇒Preview; then choose a number. Your choices are None, 1, 2, 3, 4, and 5 lines of text. The more lines of text you display in the list, the fewer messages you can see at a time without scrolling. Think before you choose 4 or 5.
· To specify whether the mini shows the To and Cc labels in message lists: From the main Settings screen, tap Mail, Contacts, Calendars and turn on or off the Show To/Cc Label setting.
· To turn on or off the Ask before Deleting warning: From the main Settings screen, tap Mail, Contacts, Calendars; then turn on or off the Ask before Deleting setting. If this setting is turned on, you need to tap the trash icon at the bottom of the screen and then tap the red Delete button to confirm the deletion. When the setting is turned off, tapping the trash icon deletes the message, and you never see a red Delete button.
· To change swipe options: From the main Settings screen, tap Mail, Contacts, Calendars and then tap Swipe Options. You can choose whether swiping left (on the preview pane) flags messages and whether swiping right marks messages as unread.
· To change the flag style from a color to a shape: Tap Settings⇒Flag Style and make your determination.
·  To mark email addresses that originate or are received from a designated mail server: Tap Settings⇒Mail, Contacts, Calendar⇒Mark Addresses and flip the switch on. Enter the email address from your company (or wherever) that you do not want marked. From then on, when you’re composing a message, all email addresses sent to or from that specified address will appear in blue, while all other mail addresses will be shaded red. Why do this? The idea is that you can more easily identify mail dispatched to addresses outside your organization, alerting you to a potential security risk if you’re exchanging, say, sensitive information.
· To specify whether the iPad will automatically display images that are embedded in an email: Tap Mail, Contacts, Calendars and then tap Load Remote Images in the right pane so that the switch is green (on). If it’s off, you can still manually load remote images. Certain security risks have been associated with loading remote images, and they can also hog bandwidth.
· To organize your mail by thread: Tap Organize by Thread so that the setting is on.
Altering account settings
The last group of email settings we explore in this chapter deals with your email accounts. You most likely will never need most of these settings, but we’d be remiss if we didn’t at least mention them briefly. So here they are, whether you need ’em or not:
· To stop using an email account: Tap the Settings icon on the Home screen; tap Mail, Contacts, Calendars⇒Account Name and flip the switch so that Mail is turned off. As a reminder, when Mail is on, you see green by the Mail switch. Otherwise, the switch is gray.
This setting doesn’t delete the account; it only hides it from view and stops it from sending or checking email until you turn it on again. (You can repeat this step to turn off calendars, contacts, reminders, and notes in a given account.)
· To delete an email account: Tap the Settings icon on the Home screen; tap Mail, Contacts, Calendars⇒Account Name⇒Delete Account⇒Delete. Tap Cancel if you change your mind and don’t want your account blown away, or tap Delete to proceed.
You can find still more advanced Mail settings, reached the same way: Tap the Settings icon on the Home screen; tap Mail, Contacts, Calendars; and then tap the name of the account with which you want to work.
The settings you see under Advanced (sometimes shown as Advanced Settings under a specific email account) and how they appear vary by account. This list describes some of the settings you might see:
· To specify how long until deleted messages are removed permanently from your iPad mini: Tap Advanced⇒Remove. In iCloud Mail, your choices are Never, After One Day, After One Week, and After One Month. Tap the choice you prefer.
· To choose whether drafts, sent messages, and deleted messages are stored on your iPad mini or on your mail server: Tap Advanced and then choose the setting under Mailbox Behaviors stored on My iPad or stored on the Server. You can decide for drafts, sent messages, and trash. If you choose to store any or all of them on the server, you can’t see them unless you have an Internet connection (Wi-Fi or cellular). If you choose to store them on your iPad, they’re always available, even if you don’t have Internet access. Under Mailbox Behaviors, in certain circumstances, you also get to determine whether to delete or archive discarded messages.
· We strongly recommend that you don’t change the next two items unless you know exactly what you’re doing and why. If you’re having problems with sending or receiving mail, start by contacting your ISP (Internet service provider), email provider, or corporate IT person or tech department. Then change these settings only if they tell you to. Again, these settings and exactly where and how they appear vary by account.
· To reconfigure mail server settings: In the Incoming Mail Server or Outgoing Mail Server section of the account settings screen, tap Host Name, User Name, or Password and make your changes.
· To adjust Use SSL, Authentication, IMAP Path Settings, or Server Port: Tap Advanced and then tap the appropriate item and make the necessary changes.
And that, as they say in baseball, retires the side. You’re now fully qualified to set up email accounts and send and receive email on your iPad. But, as the late Apple cofounder Steve Jobs was wont to say, there is one more thing …
Getting the iMessage
The Messages app lets you exchange iMessages, pictures, contacts, videos, audio recordings, and locations with anyone using an Apple iDevice with iOS 5 or higher or with a Mac running OS X Mountain Lion, OS X Mavericks, or OS X Yosemite.
In the following sections, find out how each of the iMessages features works.
Sending iMessages
To start a new message, tap the Messages icon on the Home screen to launch the Messages app and then tap the compose new message icon, the little pencil-and-paper icon in the left pane of the screen (on the Messages list).
At this point, with the To field active and awaiting your input, you can do three things:
· If the recipient is in your contacts list, type the first few letters of the name. A list of matching contacts appears. Scroll through it if necessary and tap the name of the contact.
The more letters you type, the shorter the list becomes. And after you’ve tapped the name of a contact, you can begin typing another name so that you can send this message to multiple recipients at once.
· Tap the blue circled + icon on the right side of the To field to select a name from your contacts list.
· If the recipient isn’t in your contacts list, type his or her phone number or email address.
You have a fourth option if you want to compose the message first and address it later. Tap inside the text-entry field (the narrow rectangular area just above the keyboard and to the left of the Send button or microphone icon) to activate the field and then type or dictate your message. When you’ve finished typing, tap the To field and use one of the preceding techniques to address your message.
You aren’t limited to sending an iMessage to a single person. To initiate a group message, type the names or phones numbers of everyone you want to include in the To field.
When you’ve finished addressing and composing, tap the Send button to send your message on its merry way. And that’s all there is to it.
 A cool new iOS 8 shortcut comes into play when you’re sending iMessages. If you double-press the Home button, you’ll see circular snapshots of the people with whom you most recently communicated (above thumbnails of your open apps). Tap the circular picture to send the person an iMessage or to call the person via FaceTime.
Group messages
The Messages app on your iPad mini is all-inclusive — that is, an iMessage need not be one to one. Instead, a group of folks can communicate. Start by preparing a message with a single recipient, and then tap the circled + in the To field to add people to the conversation from your contacts or manually.
By tapping the Details button, you can add people to an ongoing iMessage conversation. You can just as easily remove someone by tapping Details, swiping from left to right on the name of the person who is getting the heave-ho, and then tapping Delete. This works only if at least four folks are in the conversation.
You can give a name to your group conversation from within Details as well. In the Group Name field, type the name you have in mind.
Adding voice to an iMessage
With iOS 8, you can record an audio message and send it along to a recipient. Apple calls this Tap to Talk and here’s how to take advantage of it. Press and hold down the microphone icon to the right of the text-entry field (not the microphone icon on the iPad keyboard) and start speaking. Your voice appears as a waveform at the bottom of the screen, as shown in Figure 5-14. When you’ve finished speaking, keep your finger pressed down and swipe up to send the message. You can listen to the audio before sending it by tapping the play icon, which appears after you release the button you held down to record. If you’re not thrilled with what you’ve just recorded, swipe left instead to cancel.
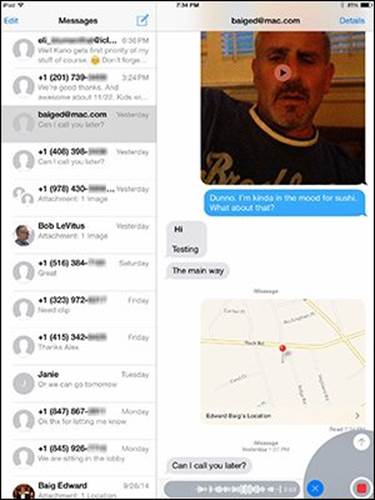
Figure 5-14: Lending your voice to an iMessage.
The recipient of your recorded iMessage will be able to tap a Play button to listen to what you had to say. But in some cases, he or she had best listen right away because you can set things (in Settings) so that audio messages expire after two minutes. Your only other option is for the message to never expire.
Keep in mind that the microphone icon that lets you record your voice will be enabled only if you’re sending an iMessage to a chat partner.
Being a golden receiver: Receiving iMessages
When determining your settings for receiving iMessages, first things first. Decide whether you want to hear an alert when you receive a message:
· If you want to hear an alert sound when you receive a message: Tap the Settings icon on your Home screen, tap Sounds⇒Text Tone, and then tap an available sound. You can audition the sounds by tapping them. (Ed, a film buff, prefers the Noir sound, which is found under Classic sounds.) If you have a Mac, you can create your own text tones in GarageBand.
You hear the sounds when you audition them in the Settings app, even if the ring/silent switch is set to Silent. After you exit the Settings app, however, you won’t hear a sound when a message arrives if the ring/silent switch is set to Silent.
· If you don’t want to hear an alert when a message arrives: Instead of tapping one of the listed sounds, tap None, which is the first item in the list of alert tones.
· If you don’t want any messages: Turn off iMessages. If you won’t want iMessages (or other interruptions) for a designated period, consider the Do Not Disturb feature. It lives up to its name. Turn on the feature in Settings, and you’ll see a moon icon in the status bar. Even easier, turn on Do Not Disturb in Control Center, and you won’t be inundated with messages. You can also tap Details in a given message thread to summon and turn on Do Not Disturb, which mutes notifications for this particular conversation. For more about the Do Not Disturb feature and other settings, head to Chapter 15.
The following pointers explain what you can do with iMessages that you receive:
· When your iPad mini is asleep: All or part of the text and the name of the sender appear on the unlock screen, as shown in Figure 5-15. Slide to the right to reply to a specific message (you’ll have to get past any passcodes first).
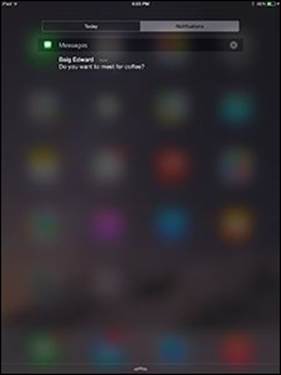
Figure 5-15: Message notifications look like this when your iPad mini is slumbering.
· When your iPad mini is awake and unlocked: All or part of the message and the name of the sender appear at the top of the screen in front of whatever’s already there. If what’s already there is your Home screen, as shown in Figure 5-16, the Messages icon displays the number of unread messages.
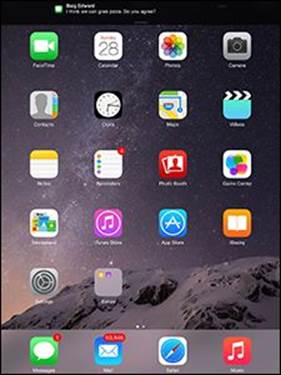
Figure 5-16: This is what a notification looks like when your iPad mini is awake.
These notifications are on by default; turn them off in the Settings app’s Notifications pane if you don’t care for them. You’ll also see any notifications for messages you’ve received in Notification Center.
· Reading or replying to a message: Tap the Messages icon on your Home screen, swipe downward from the top of the screen to display Notification Center, or tap the notification if you can be quick about it (the notification fades away in a few seconds).
· Following the conversation: Each conversation you have is saved as a series of text bubbles. Your messages appear on the right side of the screen in blue bubbles; the other person’s messages appear in gray ones. When your message has been delivered, that fact will be noted just below the last bubble in your exchange, as shown in Figure 5-17. If there was a problem delivering the message, you’ll see Not Delivered instead. If at first you don’t succeed, try again.
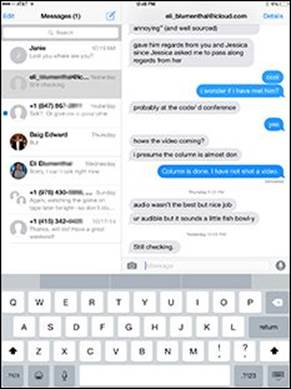
Figure 5-17: This is what an iMessage conversation looks like.
· Forwarding a conversation: If you want to forward all or part of a conversation to another iMessage user, press against a text bubble and tap the More button. Tap additional text, photo, or video bubbles that you want to forward (the one you pressed to summon the More button is already selected) so that a check mark appears in a circle to the left of each. Then tap the forward (curved arrow) icon at the lower right of the screen. The contents of the selected text bubbles are copied to a new text message; specify a recipient and then tap Send.
· Deleting part of a single conversation thread: Press against a text bubble and tap More. Tap each text bubble that you want to delete; a check mark appears in the circle next to each one. Then tap the delete (trash can) icon at the bottom of the pane, and tap Delete Message(s). Or, to delete the entire conversation in one fell swoop, tap the Delete All button at the top of the screen and then tap Delete Conversation.
· Deleting an entire conversation thread: Tap the Edit button at the upper left of the Messages list, tap the circle that appears to the left of the person’s name, and then tap the Delete button at the bottom of the pane. Or swipe from right to left on the message in the Messages pane and then tap the red Delete button.
Sending pix and vids in a message
To send a picture or video in a message, follow the instructions for sending a text message and then tap the camera icon to the left of the text-entry field at the bottom of the screen. You’ll then have the option of using an existing picture or video or taking a new one. You can also add text to photos or videos. When you’re finished, tap the Send button.
But just as you can send an audio message by using the Tap to Talk feature, you can record and send a video message through a similar shortcut. (And as with audio messages, go to Settings to make a video message go away after two minutes or to arrange so it doesn’t automatically expire.) To record a video message in this manner, press and hold down on the camera icon to the left of the text-entry box, and then slide your finger to the still camera icon or the video icon that appears to the left of the text. Slide your finger to the pop-up control circle and tap the video icon to shoot and record your video, and then swipe up to send the video as part of your message.
If you receive a picture or video in a message, it appears in a bubble just like text (refer to Figure 5-17). Tap the play icon to play it right in Messages. Tap again to have the video take over the full screen.
In full-screen mode, tap the share icon in the upper-right corner of a received video or picture for additional options, such as sharing the image on Facebook or Twitter, assigning it to a contact, or more. If you don’t see the icon, tap the picture or video once, and the icon will magically appear.
Smart messaging tricks
Here are some more things you can do with messages:
· Search your messages for a word or phrase. Type the word or phrase in the search field at the top of the Messages screen.
· Send Read Receipts to allow others to be notified when you have read their missives. Tap Settings⇒Messages, and slide the switch so that Send Read Receipts is on.
In iMessages, you can see when your own message has been delivered and read, and when the other person is readying a response.
· Use a Bluetooth keyboard for typing instead of the on-screen keyboard. Follow the instructions in Chapter 15 to pair your Bluetooth keyboard with your iPad mini.
The Apple Wireless Keyboard ($69) works with the iPad mini and the iPhone. Find out more in Chapter 17.
· Dictate a message. Tap the microphone key on your keyboard and start talking. Tap the microphone key again when you’re done. This method isn’t as quick or as much fun as Tap to Talk, but it works.
· Open a URL included in an iMessage. Tap the URL to open that web page in Safari.
· Send an email to an address included in an iMessage. Tap the email address in a message to open a preaddressed email message in Mail.
· See an address included in an iMessage. Tap the address to see it on a map in Maps.
· Choose how you can be reached via iMessage. Tap Settings⇒Messages⇒Send & Receive. Then add another email address or remove any existing addresses. You can also select the email address (or phone number) from which to start new conversations.
· Show the Subject field. Flip the switch to show a Subject field with your messages.
· Block a sender. Block someone who is harassing you or has left your good graces. Tap Settings⇒Messages⇒Blocked and select a name from your contacts. You will no longer receive messages or FaceTime calls from this person.
· Share your location. Meeting a recipient in an unfamiliar place? In the middle of your conversation, you can share your location on a map. Tap the Details button at the upper-right corner and then tap either Send My Current Location or Share My Location. Choosing the latter gives you the option to share your whereabouts indefinitely, until the end of the day or for one hour. In Details, you can monitor how much time is left before your location will no longer be shared.
· See all the message attachments at once. Tap Details and you can browse in one place all the photos and videos from your conversation.
· Keep Messages history. You can keep your entire Messages history on the iPad mini permanently, for one year, or for 30 days. Tap Settings⇒Messages⇒Keep Messages and make your choice.
And that’s all there is to it. You are now an official iMessage maven.
![]()
All materials on the site are licensed Creative Commons Attribution-Sharealike 3.0 Unported CC BY-SA 3.0 & GNU Free Documentation License (GFDL)
If you are the copyright holder of any material contained on our site and intend to remove it, please contact our site administrator for approval.
© 2016-2025 All site design rights belong to S.Y.A.