iPad mini For Dummies, 3rd Edition (2015)
Part II. The Internet iPad mini
Chapter 6. Maps Are Where It’s At
In This Chapter
![]() Finding out where you’re at
Finding out where you’re at
![]() Searching
Searching
![]() Navigating around by viewing, zooming, and panning
Navigating around by viewing, zooming, and panning
![]() Bookmarking favorites
Bookmarking favorites
![]() Getting to where you want to go fast: routes and real-time traffic
Getting to where you want to go fast: routes and real-time traffic
With Maps on the iPad mini, you can quickly and easily discover exactly where you are, find nearby restaurants and businesses, get turn-by-turn driving instructions from any address to any other address, and see real-time traffic information and a photographic street view of many locations as well.
The Maps app has improved a lot since Apple replaced Google Maps with its own homegrown version in iOS 6. Apple says it’s “beautifully designed from the ground up (and the sky down),” and we have to agree — it’s more beautiful than ever. But beyond its good looks, zooming in and out is faster than ever, and the spoken turn-by-turn navigation with real-time traffic updates actually works in most places. Plus it has a cool 3D flyover view.
 You can’t use the Maps app unless you’re connected to the Internet via Wi-Fi, 3G, or 4G. See Chapter 2 to find out how to connect.
Finding Your Current Location with Maps
We start with something supremely simple yet extremely useful — determining your current location. At the risk of sounding like self-help gurus, here’s how to find yourself:
1. Make sure Location Services is enabled by tapping Settings⇒Privacy⇒Location Services.
Tap the Location Services switch to on (green) if necessary.
2. In the list that appears below the switch, tap Maps.
3. Enable Location Services for the Maps app by tapping While Using the App.
A check mark appears on the right to show you that While Using the App is selected. The other option, Never, essentially cripples the Maps app, so if you select it the rest of the steps aren’t going to work.
4. Tap the Home button to return to the Home screen.
5. Tap the Maps icon on your Home screen.
6. ![]() Tap the Location Services icon in the lower-left corner of the screen.
Tap the Location Services icon in the lower-left corner of the screen.
The icon’s background turns blue, as shown in the margin, which assures you that Location Services is doing its thing. You’ll soon see a blue circle on the map (see Figure 6-1), which indicates your approximate location.
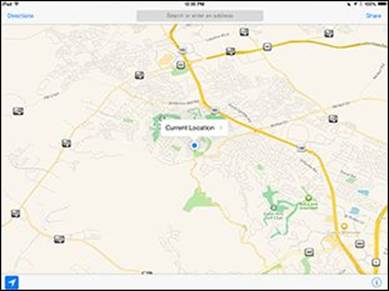
Figure 6-1: A blue marker shows your GPS location.
 If you tap, drag the map, or zoom in or out, your iPad continues to update your location, but it doesn’t continue to center the marker. That’s a good thing, but it also means that the location indicator can move off the screen. If that happens, or you move around and the location indicator moves away from the middle of the screen, just tap the arrow icon. Your iPad updates your location and adjusts the map so your location indicator is in the middle of the screen.
How does Maps do that?
Maps uses iPad’s Location Services to determine your approximate location using available information from your wireless data network. Wi-Fi–only models use local Wi-Fi networks; iPad Wi-Fi + 3G and 4G models use assisted GPS plus cellular data. If you’re not using Location Services, turning it off conserves the battery. (To turn it off, tap Settings⇒General⇒Location Services.) Don’t worry if Location Services is turned off when you tap the arrow icon — you’re prompted to turn Location Services on. Keep in mind that it may not be available in all areas at all times.
Searching
The Maps app wouldn’t be very useful if you couldn’t use it to find things. In the following sections, we show you how to search for places you want to go and people you want to see — including people stored as contacts.
Finding a person, place, or thing
To find a person, place, or thing with Maps, follow these steps:
1. Tap the search field at the top of the screen to make the keyboard appear, and then type what you’re looking for.
You can search for addresses, zip codes, intersections, towns, landmarks, and businesses by category and by name, or in combinations such as New York, NY 10022; pizza 60645; or even BBQ Lockhart TX.
2. If the letters you type match names in your contacts list, the matching contacts appear in a list below the search field; tap a name to see a map of that contact’s location.
Maps is smart about it, too; it displays only the names of contacts that have a street address. See the section “Connecting maps and contacts,” later in this chapter, for details.
3. When you finish typing, tap Search.
After a few seconds, a map appears. If you searched for a single location, it’s marked with a pushpin. If you searched for a category (BBQ Lockhart TX, for example), you see multiple pushpins, one for each matching location, as shown in Figure 6-2.
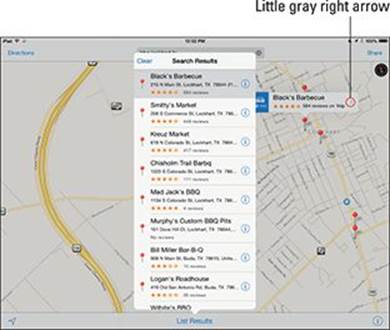
Figure 6-2: If you search for BBQ Lockhart TX, you see pushpins for all BBQ joints near Lockhart, Texas.
 When you tap the search field, a handy drop-down list shows the search terms you’ve used recently. Tap any item in the list to search for it again.
Connecting maps and contacts
Maps and contacts go together like peanut butter and jelly. In this section, you discover two helpful tasks that illustrate maps and contacts at work.
To see a map of a contact’s street address, follow these steps:
1. Tap in the search field.
2. Tap the Contacts button at the bottom of the overlay.
3. Tap the contact’s name whose address you want to see on the map.
Alternatively, type the first few letters of a contact’s name in the search field, and then tap the contact’s name in the Suggestions list that appears below the search field.
If you find a location by typing an address in the search field, you can add that location to one of your contacts or create a contact with a location you’ve found. To do either one, follow these steps:
1. Tap the location’s pushpin on the map.
2. Tap the little gray right arrow to the right of the location’s name (labeled in Figure 6-2).
That contact’s info overlay appears, as shown in Figure 6-3.
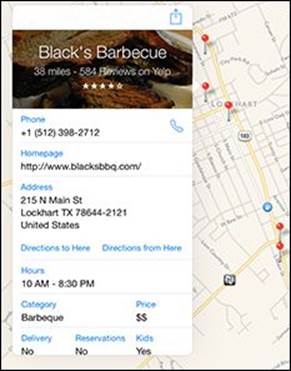
Figure 6-3: The info screen for Black’s Barbecue appears as an overlay.
3. Scroll to the bottom of the info overlay and tap Create New Contact or Add to Existing Contact, whichever is applicable.
4. Fill in the new contact information and tap Done. Or select an existing contact from the list that appears.
You work with your contacts by tapping the Contacts icon on your Home screen. Go to Chapter 12 to find out more about the Contacts app.
Don’t forget that you can swipe across your iPad mini screen with four or five fingers to switch apps. So if you’re in Contacts, a four- or five-finger swipe from right to left should bring you back to the Maps app. If you have a lot of open apps, you might need more than one swipe to find the Maps app.
And don’t forget that you can also use a four-finger swipe upward or double-press the Home button to reveal the multitasking screen and switch between Contacts and Maps (or any open apps, for that matter).
If nothing happens when you swipe with four or five fingers, tap Settings⇒General, scroll down to the Multitasking Gestures On/Off switch, and make sure it’s on.
You can also get driving or walking directions from most locations, including a contact’s address, to any other location, including another contact’s address. You see how to do that task in the “Smart Map Tricks” section, later in this chapter.
Viewing, Zooming, and Panning
The preceding section talks about how to find just about anything with Maps. Now here’s a look at some ways that you can use what you find. First, you need to know how to work with what you see on the screen. Three views are available at any time: standard, hybrid, and satellite. Select a view by tapping the little i-in-a-circle in the lower-right corner of the screen; an overlay appears with the view buttons and several other options, as shown in Figure 6-4.
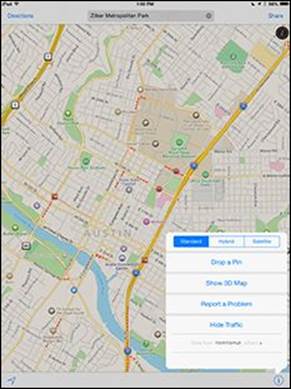
Figure 6-4: Tap the little i-in-a-circle to see these options.
In standard, hybrid, or satellite view, you can zoom to see either more or less of the map — or scroll (pan) to see what’s above, below, or to the left or right of the current screen, as follows:
· Zoom out: Pinch the map or tap using two fingers. To zoom out even more, pinch or tap using two fingers again.
The two-finger tap may be new to you. Simply tap with two fingers touching the screen simultaneously (rather than the usual one finger).
· Zoom in: Unpinch the map or double-tap (the usual way — with just one finger) the spot you want to zoom in on. Unpinch or double-tap with one finger again to zoom in even more. An unpinch (some people refer to this gesture as a spread) is the opposite of a pinch. Start with your thumb and a finger together and then spread them apart.
You can unpinch also with two hands (using two fingers or two thumbs), but you’ll probably find that a single-handed pinch and unpinch are handier.
· Scroll: Flick or drag up, down, left, or right to pan your view of the map.
Tap the little i-in-a-circle in the lower-right corner and then tap Show 3D Map to see the map from a three-dimensional bird’s-eye view.
Saving Time with Favorites, Recents, and Contacts
In Maps, three tools can save you from typing the same locations repeatedly: favorites, recents, and contacts. You see them on the overlay displayed when you tap in the search field at the top of the screen. The following sections give you the lowdown on these tools.
Favorites
Favorites in the Maps app work like bookmarks in Safari. When you have a location you want to save as a favorite so that you can reuse it later without typing a single character, follow these steps:
1. Tap the right arrow to the right of the location’s name or description.
The info overlay for that location appears. (Refer to Figure 6-3.)
2. Tap the share icon at the top-right of the info overlay or tap the Share button at the top-right of the screen.
3. Tap Add to Favorites.
After you add a favorite, you can recall it at any time. To do so, tap the text-entry field as though you were going to search for a location, and then tap Favorites at the top of the overlay that appears. You can then tap the favorite’s name to see it on the map.
The first things you should make favorites are your home and work addresses and their zip codes. You’ll use these all the time with Maps, so you might as well add them to Favorites now to avoid typing them over and over.
Use zip code favorites to find nearby businesses. Choose the zip code favorite, and then type what you’re looking for, such as 78729 pizza, 60645 gas station, or 90201 Starbucks.
To manage your favorites, tap the Edit button in the upper-left corner of the favorites overlay. Then:
· To move a favorite up or down in the list: Drag the little icon with three gray bars that appears to the right of the favorite. Drag upward to move the favorite higher in the list or downward to move the favorite lower in the list.
· To delete a favorite from the Favorites list: Tap the – sign in a red circle to the left of the favorite’s name and then tap the red Delete button.
When you’ve finished using Favorites, tap anywhere outside the overlay to return to the map.
By the way, you can drop a pushpin anywhere on a map even if you don’t know an exact address or zip code. Think of a pushpin as a temporary favorite.
Dropping a pushpin is simple: Press the location where you want the pin to appear, and hold down for two or three seconds until the pin appears with either Dropped Pin or the street address and a little right arrow. Tap the right arrow to see the info overlay, or press and drag the pin to a new location.
To save a dropped pin as a favorite, tap the share icon at the top-right of the info overlay or tap the Share button at the top-right of the screen. To remove a dropped pin, tap the little right arrow and then tap Remove Pin.
Recents
The Maps app automatically remembers locations you’ve searched for and directions you’ve viewed in its recents list. To see this list, tap in the search field and then tap the Recents button at the bottom of the overlay. To see a recent item on the map, tap the item’s name.
To clear the recents list, tap the Clear button in the upper-left corner of the overlay, and then tap the big red Clear All Recents button at the bottom of the overlay, or tap Cancel if you change your mind.
When you’re finished using the recents list, tap anywhere outside the overlay to return to the map.
Contacts
To see a list of your contacts, tap in the search field and then tap the Contacts button at the bottom of the overlay. To see a map of a contact’s location, tap the contact’s name in the list.
To limit the contacts list to specific groups (assuming that you have some groups in your contacts list), tap the Groups button in the upper-left corner of the overlay and then tap the name of the group. Now only contacts in this group are displayed in the list.
When you’ve finished using the contacts list, tap the Done button in the upper-right corner of the overlay to return to the map.
Smart Map Tricks
The Maps app has more tricks up its sleeve. Here are a few nifty features that you may find useful.
Getting route maps and driving directions
You can get route maps and driving directions to any location from any location (within reason; a former tech editor tried to get driving directions from 1600 Pennsylvania Ave. in Washington, DC, to 10 Downing Street in London, but that didn’t work). Just follow these steps:
1. Tell your iPad mini to get directions for you.
You can do so in a few ways:
· When you’re looking at a map screen: Tap the Directions button in the upper-left corner of the screen. The search field transforms into Start and End fields.
· If a pushpin is already on the screen: Tap the pushpin and then tap the little i-in-a-circle to the right of the name or description. This action displays the item’s info screen. Tap the Directions to Here or Directions from Here button to get directions to or from that location, respectively.
· Ask Siri for directions: Press and hold the Home button, and ask Siri, “How do I get to ____?” (See Chapter 14 for more on Siri.)
2. Tap in the Start or End field to designate the starting or ending point of your trip.
You can either type the start or end point or choose it from a list of your favorites, recent maps, or contacts.
3. (Optional) If you need to swap the starting and ending locations, tap the little swirly arrow button between the Start and End fields.
4. (Optional) Tap the car, walking person, or bus icon above the Start and End fields to choose driving, walking, or public transportation directions.
Public transportation directions require a third-party app. If you haven’t installed one, Maps so informs you and offers to whisk you to the App Store with an automated search for public transit apps.
5. When the start and end locations are correct, tap the Route button in the upper-right corner of the Directions overlay.
Suggested routes appear on the map, as shown in Figure 6-5.
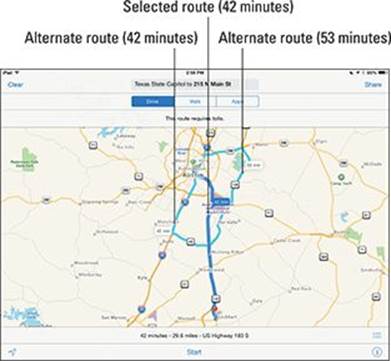
Figure 6-5: Three routing options for travel from the State Capitol in Austin, Texas, to Black’s Barbecue in Lockhart, Texas.
If multiple routes exist, Maps shows you up to three, as in Figure 6-5. To switch routes, just tap the route you want to switch to. Note that the text at the bottom of the screen updates to tell you the time and distance of the selected route (42 minutes; 29.6 miles via US Highway 183 S in Figure 6-5).
6. If Maps suggests several routes, select one by tapping its light blue line or balloon.
In Figure 6-5, one of the two 42-minute routes is selected.
Tap the little i-in-a-circle in the lower-right corner of the map you’re viewing and then tap the Show Traffic button to help you decide which route will be most expedient.
7. Tap the Start button at the bottom of the screen to begin your directions.
When you tap the Start button, a series of stark white road signs appear across the top of the map, one for each step in the directions, as shown in Figure 6-6.
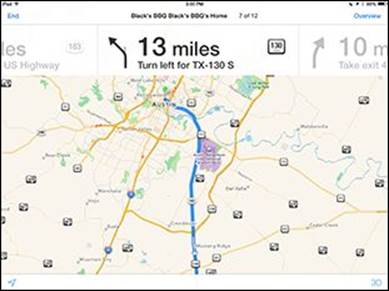
Figure 6-6: The road signs show you each step of your route.
8. Navigate your directions by swiping the road signs to the left or right or by choosing from a list:
· Road signs: Swipe right or left on the road signs to see the next or previous step in your route. The current step is highlighted and a blue circle appears on the map to indicate the location of that step. The other (next or previous) steps are dimmed (refer to Figure 6-6).
· List: If you prefer to see your driving directions displayed as a list, tap the Overview button near the top-right corner of the screen and then tap the List Steps button at the bottom of the screen, dead center. The steps appear in an overlay, as shown in Figure 6-7.
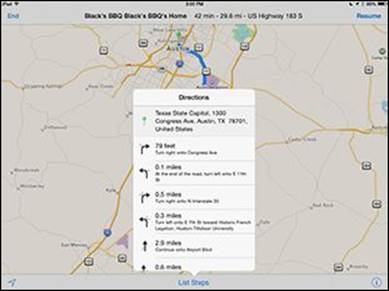
Figure 6-7: Step-by-step driving directions displayed as a list.
The List icon appears on the route screen (refer to Figure 6-5) but disappears when you tap Start (refer to Figure 6-6). Remember to tap the Overview button to make the list of steps appear.
Tap any step in the list to see that leg of the trip displayed on the map.
If you want to return to the road sign directions and map again, tap the Resume button in the upper-right corner of the screen or tap any step in the list overlay. The list disappears, and the road signs and map reappear.
Getting traffic info in real time
You can find out the traffic conditions for the map you’re viewing by tapping the little i-in-a-circle in the lower-right corner of the map and then tapping Show Traffic. If it says Hide Traffic, don’t tap — the option is already on.
Major roadways are color-coded to inform you of the current traffic speed, as shown in Figure 6-8. Here’s the key: Orange dots show slowdowns, and red dashes show stop-and-go traffic.
To report an incident, tap the little i-in-a-circle, then tap Report a Problem. To see an incident report, tap a marker on the map (none appear in Figure 6-8).
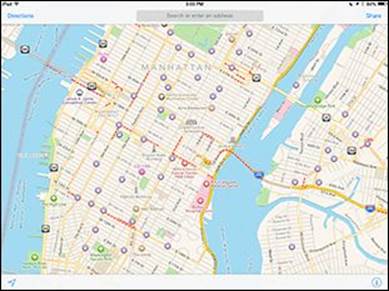
Figure 6-8: Lower Manhattan in midafternoon on a Saturday has more traffic than most other cities at rush hour.
Traffic info doesn’t work in every location. The only way to find out is to give it a try and see whether color codes appear.
Getting more info about a location
If a location has a little right arrow to the right of its name or description (refer to Figure 6-2), you can tap it to see additional information about that location.
As we explain earlier in this chapter, you can get directions to or from that location, add the location to your favorites or contacts, or create a contact from it. With some locations, you can do two more things from the location’s info screen:
· Tap the location’s email address to launch the Mail app and send an email to the location.
· Tap the location’s URL to launch Safari and view the location’s website.
All materials on the site are licensed Creative Commons Attribution-Sharealike 3.0 Unported CC BY-SA 3.0 & GNU Free Documentation License (GFDL)
If you are the copyright holder of any material contained on our site and intend to remove it, please contact our site administrator for approval.
© 2016-2025 All site design rights belong to S.Y.A.