Bleeding Edge Press Developing an iOS 7 Edge (2013)
8. Build Improvements and Continuous Integration

IN THIS CHAPTER
· Build Modules
· Continuous Integration with Xcode Service
· Build/Test Bots
· Troubleshooting
The introduction of iOS 7 has made a huge impact on the look and feel of this operating system. It has brought with it many new capabilities that will affect the usefulness of our apps both for our consumers and clients. However, that is not the only major upgrade that Apple has made. With the release of the new iOS 7 SDK there is also a brand XCode IDE with many features that will help iOS developers to simplify and streamline their development processes, as well as their Continuous Integration workflows. Ideally, the improvements will allow you to spend less time tinkering with build scripts, testing, and deployments, and more time focusing on delighting your users.
Improvements, you say? What Improvements?
First up, there is a major compiler improvement in this new version of Objective-C that will speed up your day-to-day developer builds and make the ever so monotonous cycle of "build->deploy->run->test->repeat" easier to handle and a little more speedy.
Before XCode 5 came along, in order to include another framework in your project, you had to add the framework and link against it as well as import the framework headers into your .h files. During compilation, the preprocessor resolves all of those included headers and adds them to your .m files. Your files then become much larger and contain all of the definitions from every other framework that you have included. This leads to several contentious issues but one of the worst is that the build ends up processing the same textual information over and over again and huge files to compile. As your project grows and you include more frameworks and as such more header files, the preprocessing and compilation steps grow exponentially longer and your entire build process seems to come to a grinding halt.
Precompiled headers were originally intended to try and solve this problem by allowing you to specify a subset of headers that you use often. They would then be precompiled once, and each .m file in your project would be able to leverage that improvement. When you have a framework that you use a lot, it often makes sense to put it into the .pch file, but what if you have a framework that you only use in 50 percent of your code? By adding that framework to the .pch file, you simplify the management of 50 percent of your headers, but you have also introduced a possible namespace issue for the other 50 percent of your code. In addition, .pch files help the most when they are actively maintained and pruned, and since many are not, they often do little to help build times.
Modules
To address both of these issues, Apple is introducing the concept of "Modules," which encapsulate a framework's API and implementation. By using modules, you can remove the overhead of the textual inclusion of framework headers in your header files and also sidestep the namespace collisions. By using the new modules feature to import the semantic definition of a framework, you can eliminate the need for the compiler to parse header files, as well as allow local macro definitions to not interfere with imported frameworks.
In order to use the new modules you must:
1. Enable the "Enable Modules (C and Objective-C)" option in your build settings -- CLANG_ENABLE_MODULES
2. Build your project using XCode5 on OSX 10.9 (Mavericks)
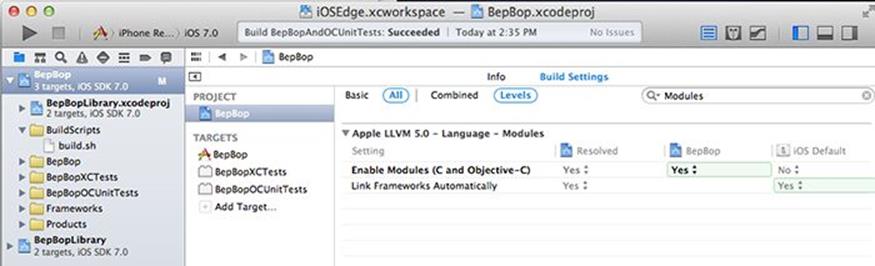
It's that simple. You do not need to make any source code changes in order to use the new modules. The compiler will automatically remap the #include statements in your code to @import statements. Whew! That would have taken forever! As another bonus, you also will no longer need to explicitly link to any frameworks in your build settings. The compiler will automatically figure those out for you as well.
Now, just in case you may be worried about the developers on your team that may not be on the latest and greatest, enabling modules on your project requires no source code changes so it won't affect building with older versions of Xcode.
If you would like some more detailed information about how Modules actually work (as well as to see some pretty graphs) you may want to spend some time watching Session 404 from the WWDC 2013 videos.
Continuous Integration
Next up in the exciting world of build improvements is Continuous Integration. Apple announced a new Xcode Service for OSX Server at the WWDC that promised to change the way you think about building, testing, and delivering artifacts.
So you may be asking yourself, why would I want to spend any time setting up yet another build system? You probably already have your own system. Maybe it's pretty sophisticated, or maybe it's been cobbled together from various open source projects, but it works right?
Well, there are a few additional questions you should be considering:
1. How fragile are your build scripts? Do they run consistently from developer machine to machine? Can you deliver a consistent build product to your QA testers, or even the App Store?
2. How many device configurations does your app currently deploy to in production? Of those combinations, how many of them do you build for and consistently run unit tests against? How many are your poor QA testers tapping their fingers raw on?
3. If you had to re-image your laptop and lost your keychain, would you be able to build and submit your app to the App Store?
These are just a few of the things that may keep you up at night. I am not saying that Apple has solved these problems, but they have started working on a pretty compelling option that is worth checking out. It may end up just supplementing your existing build process, or if you don't have a setup already, it may provide you with a pretty good start if you are willing to invest a bit of time.
Prerequisites
In order to try out the Xcode Service, you need to have a few very important things already:
1. Valid Apple Developer Account - Mac & iOS
2. Certificates and iOS Provisioning Profiles setup for your app
3. Xcode5 installed on an OSX 10.9 (Mavericks) machine
4. OSX Server installed and configured on the same machine
5. A workspace configured with suitable schemes
Installation
The first thing that you need to do is install OSX 10.9 (Mavericks) on the machine that you are going to be using for the Continous Integration processes. Apple does recommend that you back up your data before upgrading, so factor in some time for this as well.
Once you have Mavericks installed, you will then need to install Xcode 5 and the command line tools. In previous versions (and non-Mavericks versions of Xcode 5) the command line tools are bundled with Xcode, but on Mavericks you must download them separately. You will need the versions that are specifically built for Mavericks.
In addition, you will also need to install OSX Server for Mavericks, which will include the Xcode Service. All of these can be downloaded from the Mac Developer Portal with your valid Mac Developer Account.
Configuration - Xcode IDE
After you have installed all of the prerequisites, then you are ready to get started with the fun stuff! Well... after you configure it.
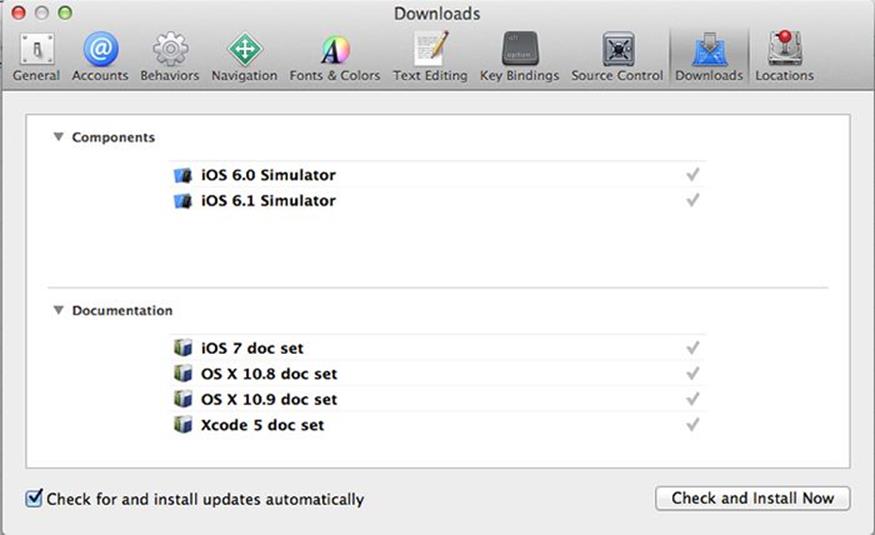
In Xcode, open Preferences -> Downloads and download all of the available simulators and any of the desired doc sets that you may want. These will feed the Xcode Service and determine what the available devices are that you will be able to run your tests against.
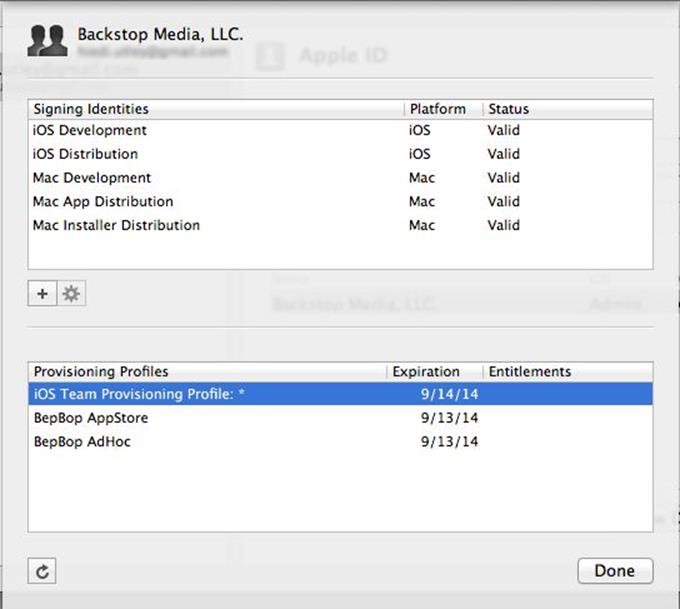
While those are downloading, head over to the Accounts tab and add your Apple Developer Account. You can then have Xcode automatically create certificates and provisioning profiles for you. Please refer to the App Distribution Guide for more information about how/what needs to be setup. Once you have created your certificates and provisioning profiles, your Xcode Accounts screen should look similar to this one:
Configuration - Xcode Service
Next up is to configure the OSX Server and the Xcode Service. It's pretty straightforward and the Continuous Integration Guide from Apple is your best resource to follow. Once you have completed that guide, you will have a configured service that has access to your source code repository and has been added as a Server to your Developer Portal. Now you can move on to actually getting ready to set up your targets in your workspace.
Workspace and Target Setup
First things first, you need a project with an executable app. You need it to build, run, and if you want, to have some tests running against the simulator and maybe even a device. It should work through the Xcode IDE for all the deployment combinations you seek to support. I'd recommend setting up a simple one or using the sample iOSEdge.xcworkspace to get you started at first.
Once you know your project works and builds, then you need to make sure that it builds from the command line properly. To build your app via command line, navigate in Terminal to the directory where you have cloned the repository and run this command:
0001:xcodebuild -workspace '${workspace.name}.xcworkspace'
0002: -scheme '${target.name}' -configuration ${Debug|Release|etc} archive
Assuming everything is setup properly, you will see an "** ARCHIVE SUCCEEDED **" message. If you have any build errors, you will need to resolve them before moving on to setting up the bots. Note: If you have tests, they should also be able to run successfully before you try to set up the OSX Server Bots. See the Unit Testing on Steroids section for more info on getting your commandline tests to run.
Now, as I promised...comes the fun part!
Configuring Your Xcode Service Bots
Once you are pretty confident that everything works as expected in the IDE and via command line, you are ready to setup your bots. It's actually pretty simple and there are detailed steps in the Continuous Integration Guide from Apple.
Our sample app actally has three targets that would be good to setup bots for:
1. BepBop – Builds the app and the static library
2. BepBopAndXCTests – Same as #1 but also includes the XCTests associated with the BepBop and BepBopLibrary targets
3. BepBopAndOCUnitTests – Same as #1 but also includes the OCUnit tests associated with the BepBop target
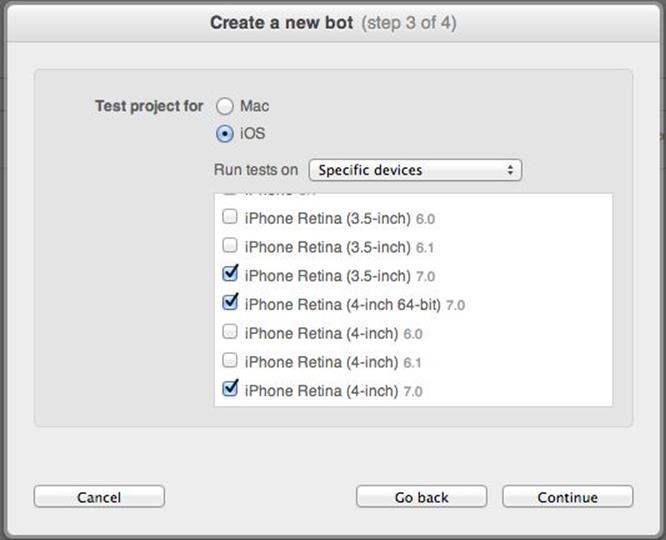
Why do I have two different test bots? XCTests can only run against the iOS 7 devices, so there is also an OCUnit target to cover the rest. If you want to try running a bot for the sample app, these are the settings for the 'BepBopAndXCTests' target.
Note: Make sure you have all of the other prerequisites setup before you attempt this or you will probably have random issues with provisioning profiles and integrating the bots.

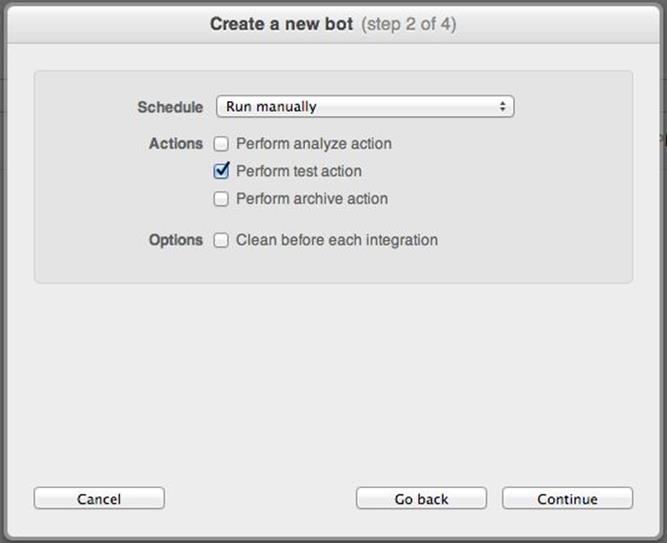
Step four is to setup notifications for success and failure.
Running Bots
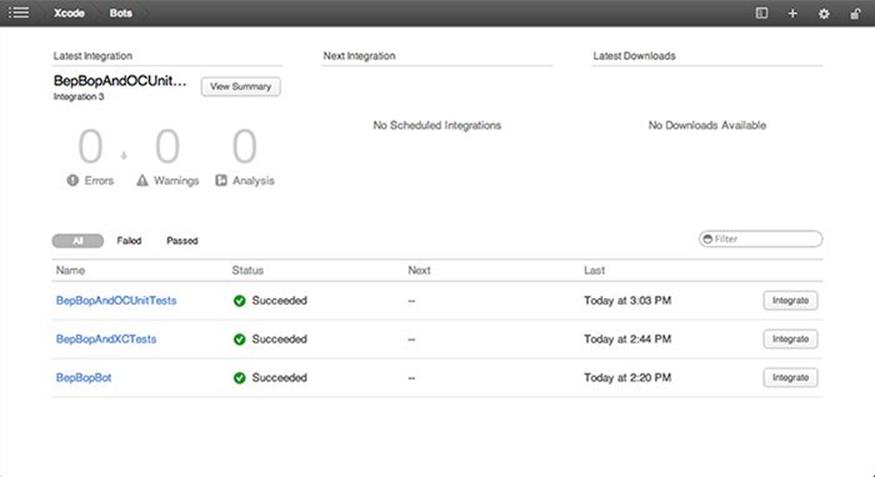
Once configured, you can "integrate" the bots and kick off the builds. Depending upon the size of your project and speed of your machine, this could take a bit. The sample project usually takes 2-3 minutes on a decent MacBook Pro to run one integration cycle. If it takes much longer you may have a problem. If all goes well, you will see something like this on your Bots UI indicating success/failure etc.
"It's GREEN! It's REALLY GREEN!!!!"
Troubleshooting
We don't know about your developer day, but we spend a huge chunk trying to figure out why things aren't working. So here are a few tidbits to help get your bots up and running.
Is your bot taking forever to integrate?
· Check out Activity Monitor for the xcodebuild process and see if it's still running or if it's not responding. Don't see one? Maybe it finished and the Bots UI didn't realize it. Refresh.
Didn't work? Maybe it's the tests.
· Is xcodebuild hung? Is there a simulator open on your desktop? What devices/simulators did you select to test against? If you have XCTests in your scheme and you selected iOS 6 devices, it may hang rather than give you a nice error. Check your configuration and restart the Xcode Service. Then try again.
Still having trouble? Take a look at the logs ...
· The logs are located at /Library/Server/Xcode/Data/BotRuns. You will need to change the permissions on the directories to get in there and take a look. Within the Latest/output directory there are usually a few files that may help to troubleshoot why it's not working properly. Note: If you restart the service, the permissions will change back.
Summary
In this chapter, we covered how to enable build module support in Xcode 5 to improve your application builds, as well as how to leverage the Xcode Service on OSX Mavericks to manage your Continuous Integration processes more effectively. In the next chapter, we will cover how to develop and run unit tests using the new additions to the Xcode IDE and how to run those tests and aggregate the results against multiple device configurations using the Xcode Service.