Head First iPhone and iPad Development (2013)
Chapter 9. Core data, mapkit, and core location: Finding a phone booth

Now it’s time to get to some goodies. These devices come with so much in the way of built-in capabilities. iPhones and iPads are part computer, part library, part still and video camera, and part GPS device. The field of location-based computing is in its infancy, but it’s very powerful. Fortunately, tapping into those hardware functions is something that iOS makes fairly easy.
Everything old is cool new again
GO RETRO UNLIMITED
We need your help!
Here at Go Retro Unlimited, we value what’s old... what’s cool... and what’s forgotten.
Before Goonies made it to the iTunes Store, we were the ones still laughing at a certain broken statue on our old VHS tape. Before most people had their mixtapes anywhere but in a shoe box, we turned ours into iTunes playlists.
But now there’s a new casualty of culture: the phone booth! As people have been snatching up the newest, coolest iPhone, the phone booths you knew, loved, and never had enough quarters for are being bulldozed and removed! But we can preserve these phone booths forever!
We want phone booth photos to put on our iPads and iPhones... lots and lots of phone booths! We want ‘em from San Francisco, from Sydney, from Darfur. We want pictures, and we want locations. And that’s where you come in... we want an app that anyone with an iPhone or iPad can pull up anytime they see a phone booth. Snap a picture, send it to us, and best of all, geotag it. Just think... before long, you and your friends can all be sharing your phone booth photos on your fifth-generation iPhone. It’s so very... meta!
NOTE
There really are phone booths in Darfur! And who wouldn’t want a picture of that?
We’ve gotten started, but now we need your help. Head out to GitHub now, and see what we’ve got. It’s not much... that’s why we need your help! So get coding, and we’ll get to looking for the nearest phone booth.
Anybody got a quarter?
Jimi Vain
CEO,
BRAIN BARBELL
After you download the app from GitHub, go ahead and check out what’s done so far. Then you can move into the work!
NOTE
Remember to check out the Chapter 9 branch and then pick the RetroPhoneHunter project.
An app, an iPad, and a phone booth
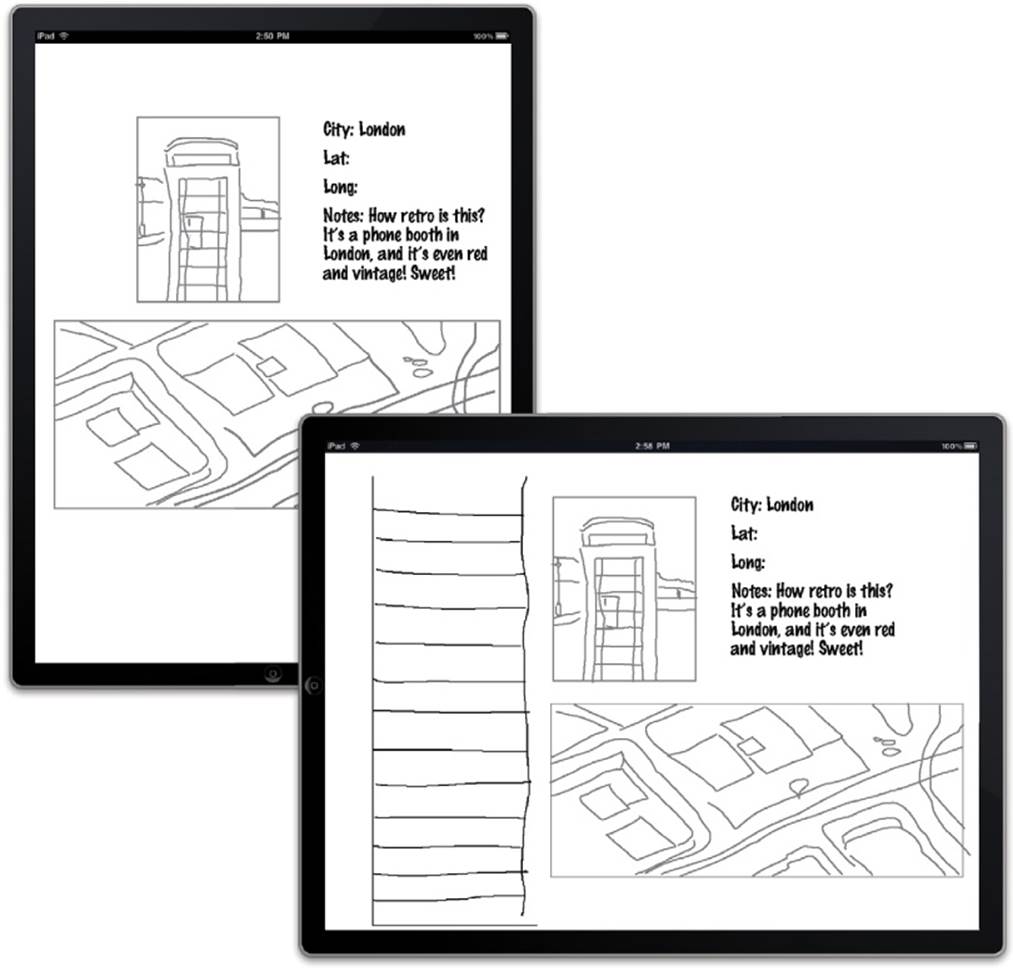
The app from GitHub really does need some work. Each phone booth needs to have a picture and several details: the city in which the phone booth was located, the zip code, and a place for the photographer to jot down a few notes... looks like there’s plenty to add to the app already.
SHARPEN YOUR PENCIL
Right now, the app doesn’t look very hot. Draw out where you think the pieces of information that need to be captured with each phone booth photo should go. We’ll add photos soon, too...
SHARPEN YOUR PENCIL SOLUTION
How’d you do? Here’s what we came up with. Remember, you can design your own app however you want. Just make sure you understand why you made the choices you did.
LONG EXERCISE
First up is the photos. Go Retro Unlimited isn’t going to be very impressed with your design drawings—or even a working app—if the app doesn’t show real pictures of phone booths. So put down those no. 2 pencils and get your favorite code editor up. You need to...
1. Connect your app to a database to pull those phone booth descriptions.
This is going to be similar to what we did for Spin City. The app that came from GitHub is just template code, so you’ll need to tweak that to work with our app.
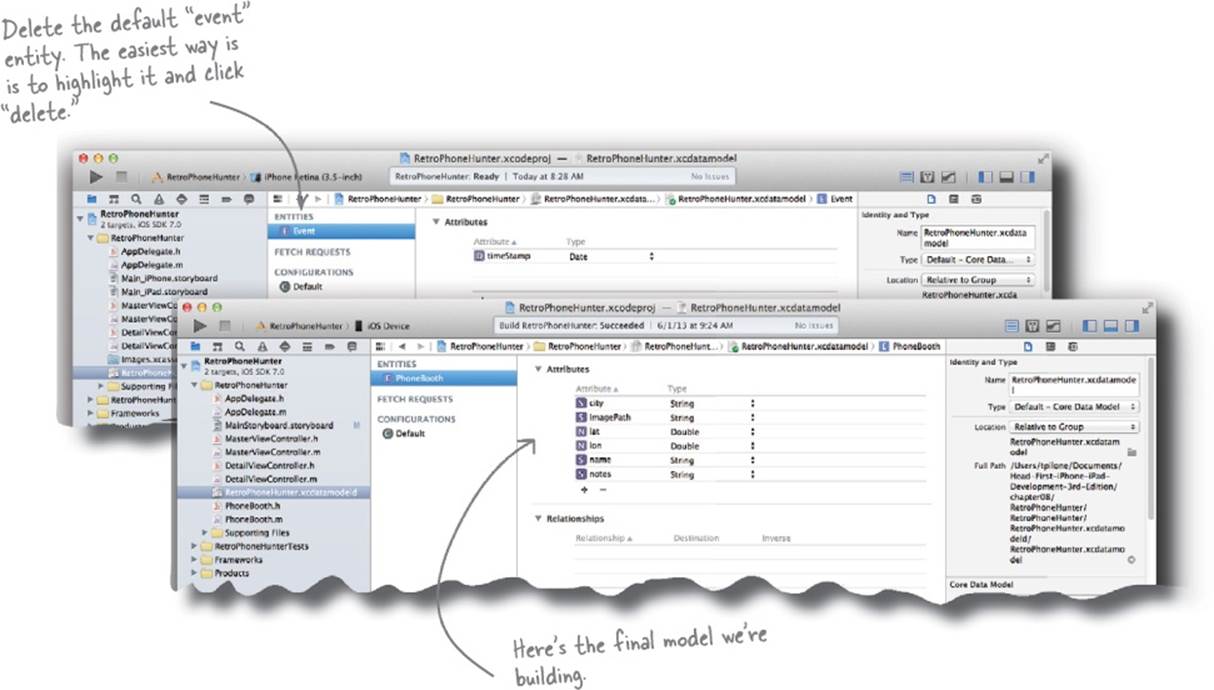
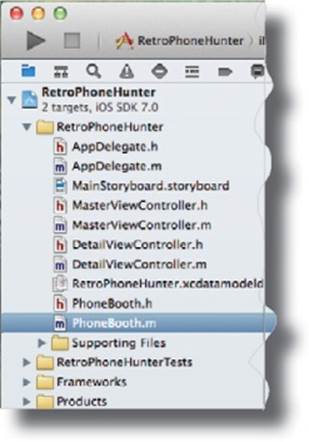
2. Generate the PhoneBooth class.
Like we did for Gilligizer, create an NSManagedObject subclass: go to “Editor” then “Create NSManagedObject Subclass.” Select PhoneBooth entity, confirm saving the entity in the project, then click Create.
NOTE
For now, don’t sweat actually taking the picture. You’ll add that ability soon...
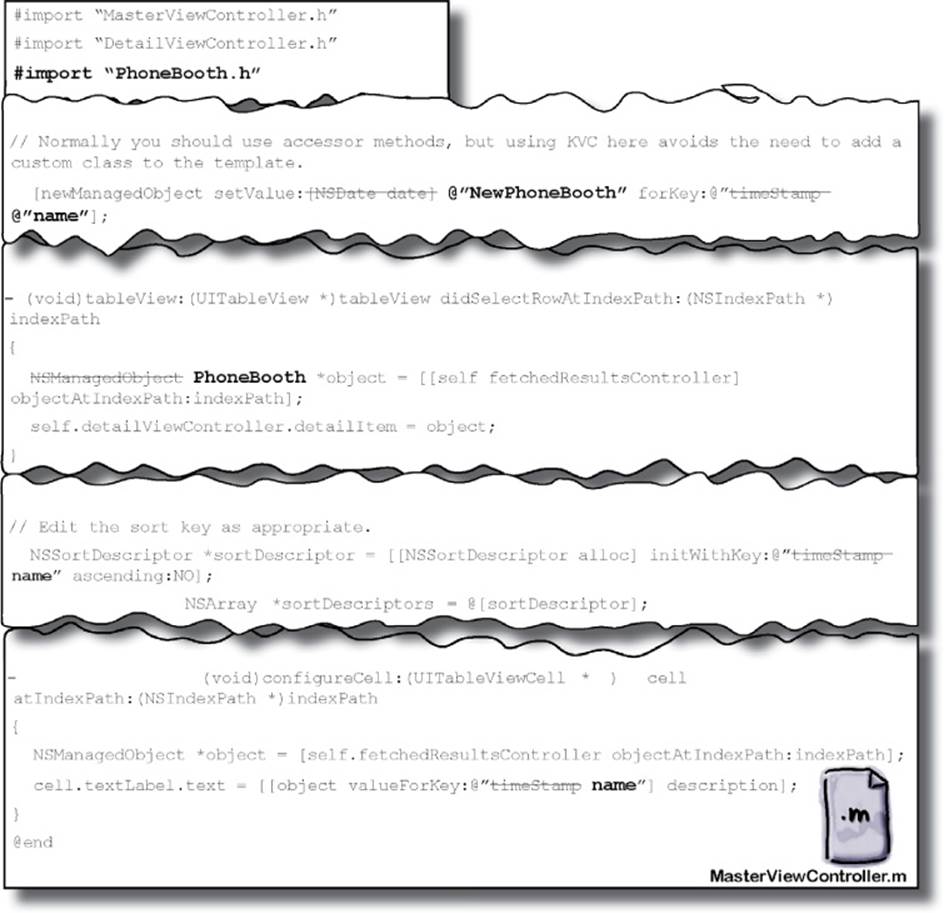
3. Fix the template to use the new PhoneBooth entity instead of the default Event entity in MasterViewController.m.
Edit the file to change references to “timestamp” to “name”, import the Phonebooth.h file, change the NSManagedObject in the didSelectRowAtIndexPath, change the NSManagedObject to a Phonebooth, and instead of using setValue for a data, change it to @“NewPhoneBooth”.
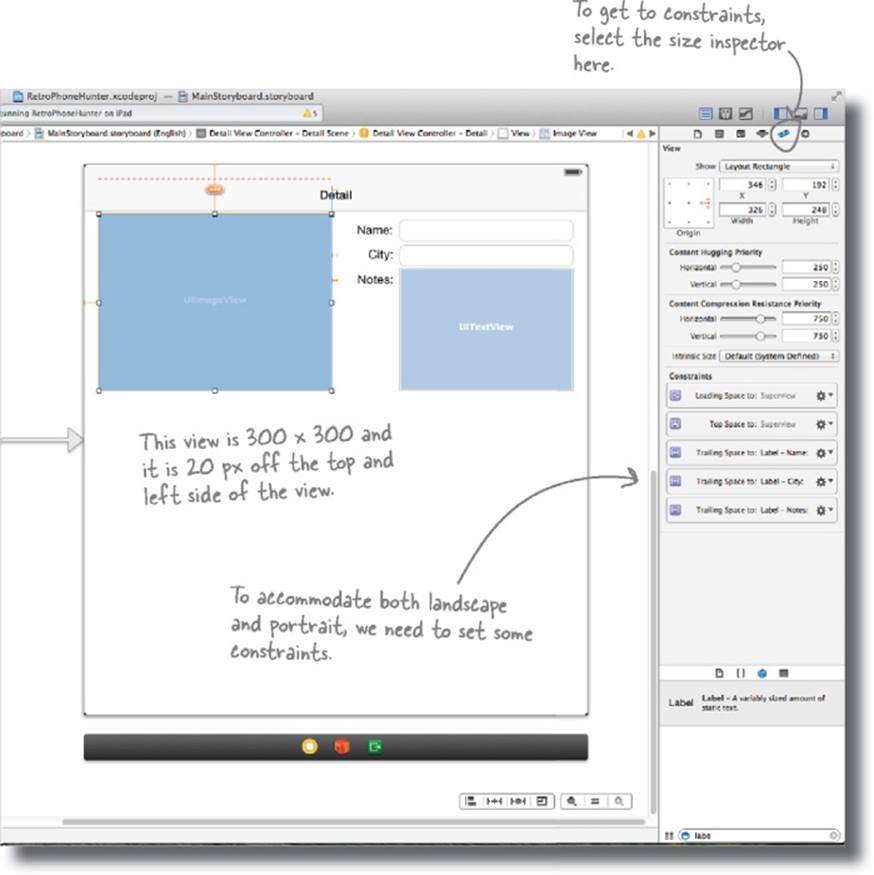
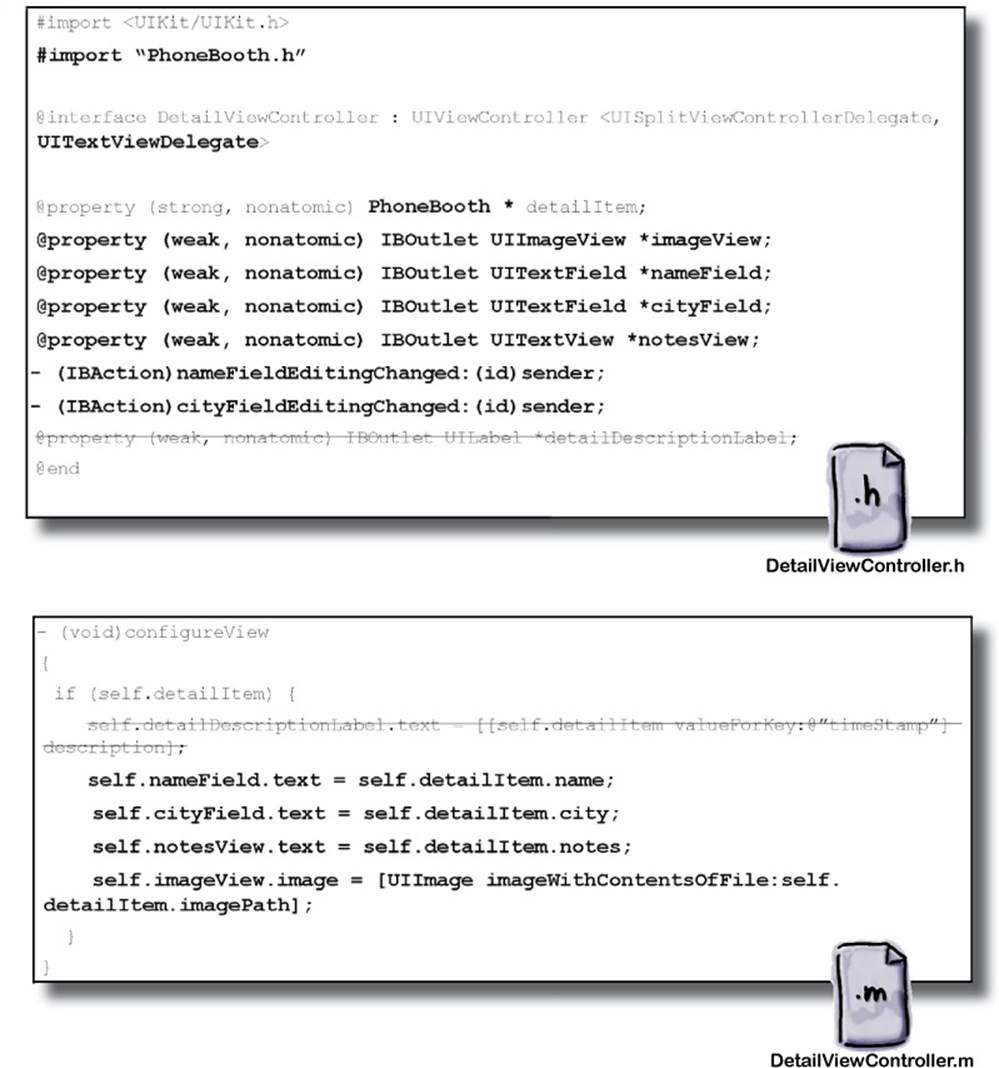
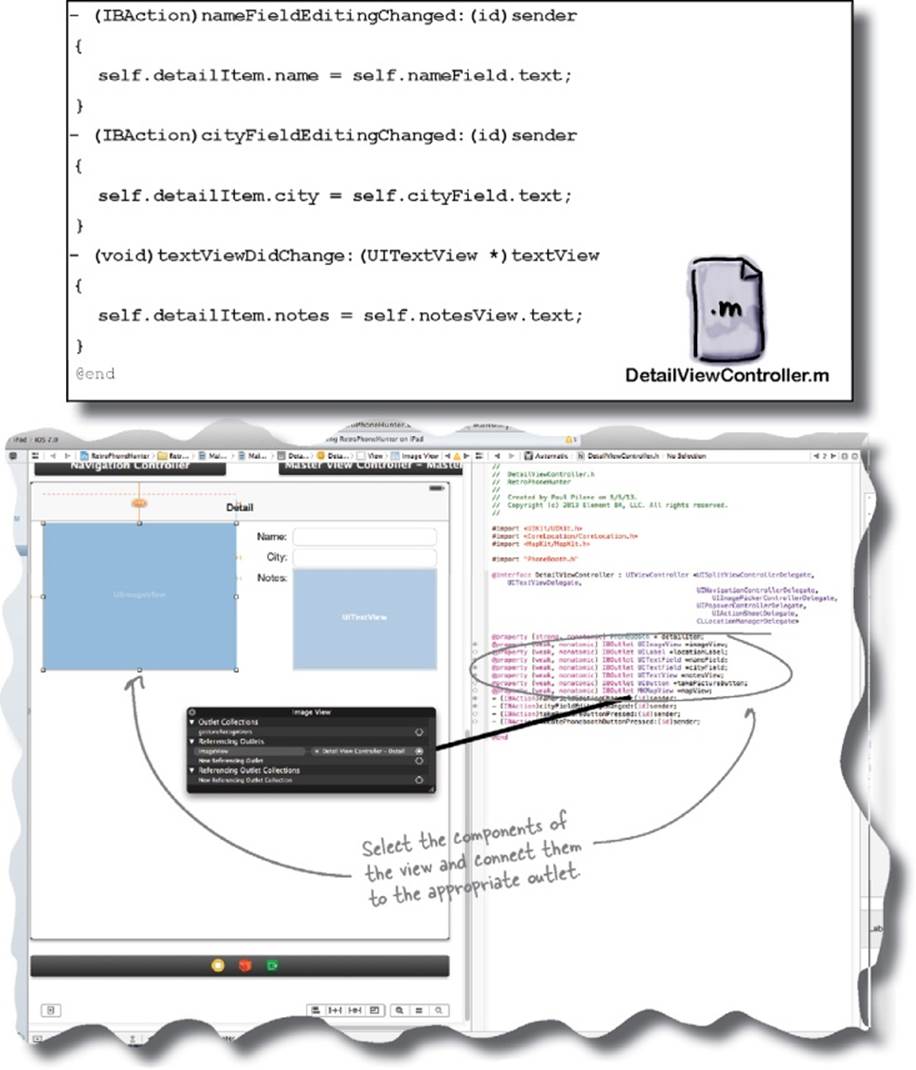
4. Layout the detail view and add the supporting code to make it work.
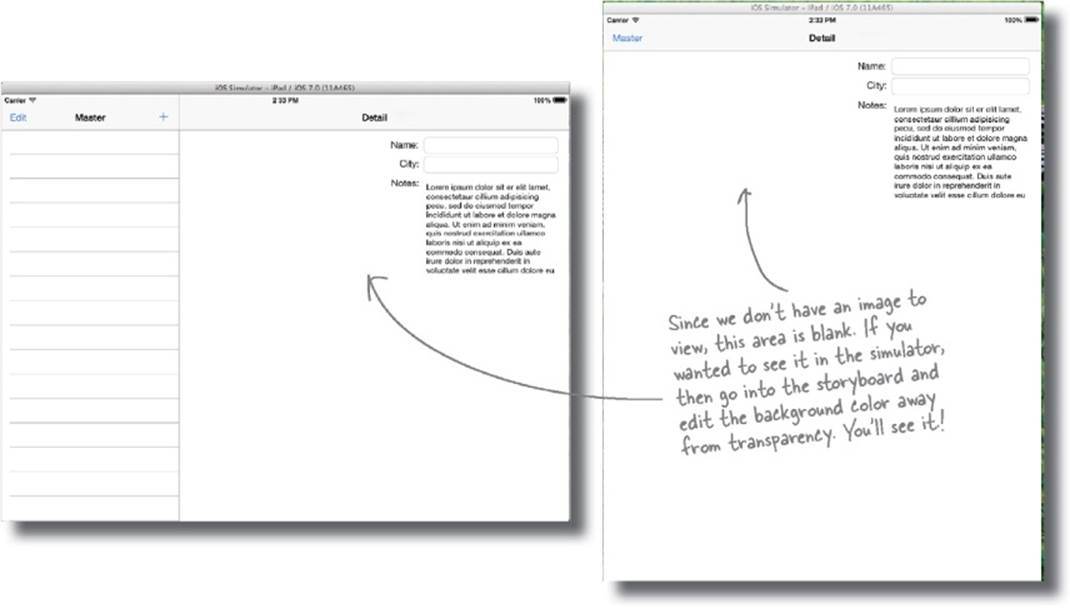
First, we’ll need to add the required elements to the storyboard file, a UIImageView, a Name label and text field, a City label and text field, a Notes label and a text view for the description.
LONG EXERCISE SOLUTION
This shouldn’t have been too hard, even though it might have taken a pretty fair bit of coding. Make sure you’ve got a working, buildable app. If you got stuck, you can walk through each step and see what we did.
1. Connect your app to a database to pull those phone booth descriptions.
This is going to be similar to what we did for Spin City. The app that came from GitHub is just template code, so you’ll need to tweak that to work with our app.
2. Generate the PhoneBooth class.
Like we did for Gilligizer, create an NSManagedObject subclass: go to “Editor” then “Create NSManagedObject Subclass.” Select PhoneBooth entity, confirm saving the entity in the project, then click Create.
3. Fix the template to use the new PhoneBooth entity instead of the default Event entity in MasterViewController.m.
Edit the file to change references to “timestamp” to “name”, import the Phonebooth.h file, change the NSManagedObject in the didSelectRowAtIndexPath, change the NSManagedObject to a Phonebooth, and instead of using setValue for a data, change it to @“NewPhoneBooth”.
LONG EXERCISE SOLUTION
4. Layout the detail view and add the supporting code to make it work.
First, we’ll need to add the required elements to the storyboard file, a UIImageView, a Name label and text field, a City label and text field, a Notes label and a text view for the description.
LONG EXERCISE SOLUTION
LONG EXERCISE SOLUTION
TEST DRIVE
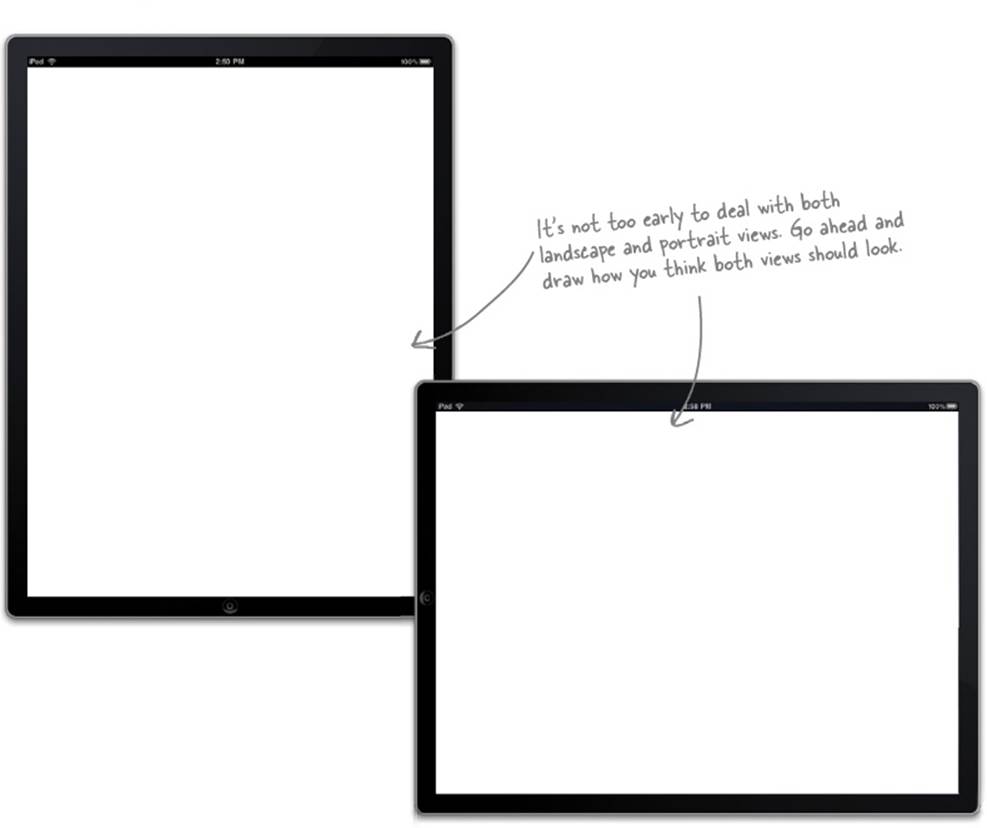
Go ahead and try it out! It should launch in the iPad simulator (the first time for us!) in portrait. To see it in landscape, go to Hardware→Rotate Left or Rotate Right.
SHARPEN YOUR PENCIL
Now that the views are working properly, what about the image itself? Think about the data model when you fill in the blanks below.
The UIImage will be stored in the ________________________________________.
The ____________________________ has to know about the image and where to display it.
The image has to come from the _________________ or the _____________________.
SHARPEN YOUR PENCIL SOLUTION
Here’s how we’ll be getting at the image itself.
The UIImage will be stored in the ___________documents directory____________________.
The ____DetailViewController_____________ has to know about the image and where to display it.
The image has to come from the camera or the documents directory.

Databases aren’t one size fits all.
Newer iPhones and iPads are taking really nice pictures... and that usually means really big pictures. If you try and stuff that big image into your database, you’re going to use up a lot of memory and space...fast.
But the image is already on your device... through the camera or in the user’s Photo Library. So instead of copying it into your database, you can just reference the existing image that’s on your phone.
But where is that image? What’s the path to it? And where can you write the image once you’ve got it?
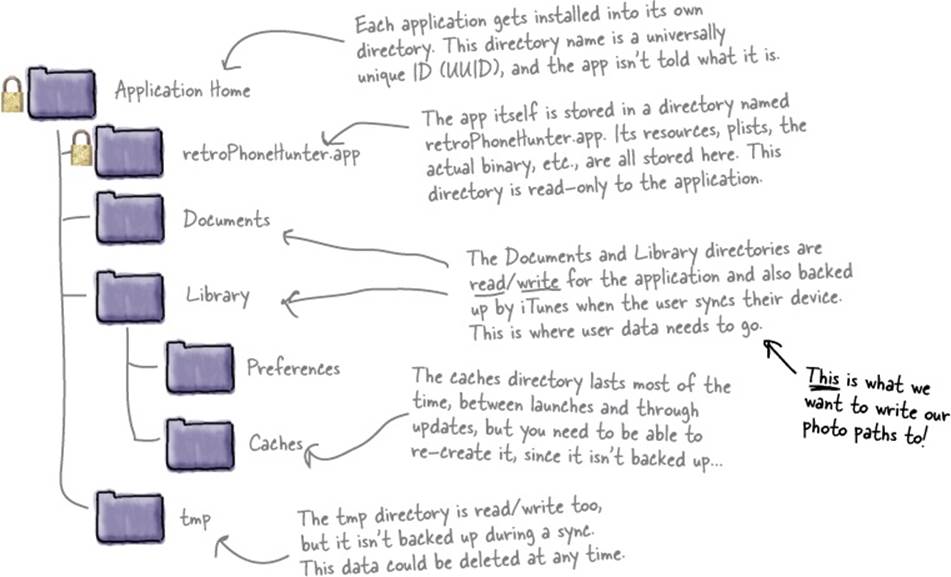
iOS apps are read-only (well, kind of...)
Since you won’t be storing images in a database, you’ve got to get down and dirty with the iOS filesystem. Then, you can just write to that filesystem, whether it’s the image itself or just a path to somewhere else on your device... right?
Well, sort of. Applications are installed on iOS devices as read-only. You can access resources that are bundled with your application, but you can’t modify them. The only way to actually change data on the filesystem is to write that data to one of the special places iOS gives you...just for that purpose.
NOTE
Apple calls the directory structure that apps are written to—both the read-only and the writable parts—the “app sandbox.”
For example, the Core Data templates automatically takes care of this for you. Here’s a short bit of code that creates a new database in one of those special writable places for your application:
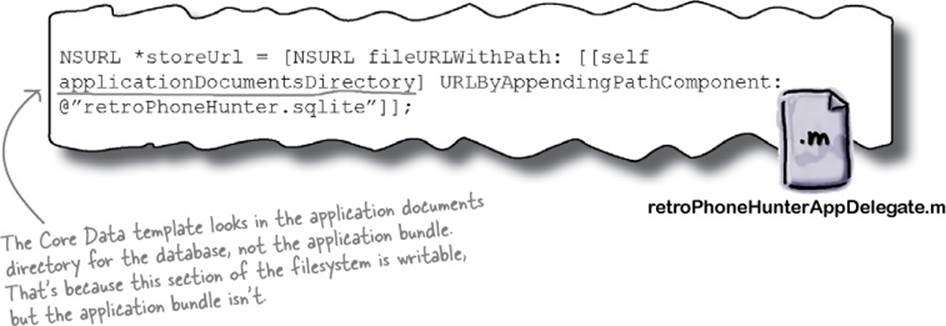
You need to do something similar: figure out where you can write data to, grab the path to the image of a phone booth that a user wants to use, and write that path to the filesystem.
An iOS application structure defines where you can read and write data
For security and stability reasons, iOS locks down the filesystem pretty tightly. When an application is installed, the iOS creates a directory under /User/Applications on your device using a unique identifier. The application is then installed into that directory, and a standard directory structure is created for the app, like this:
Get the photo path and then write that path to the filesystem!
Now you know what to do... and even where you can write photo paths: the Documents and Library directories. But how do you actually get the path to the photo? That’s what’s next. Fortunately, iOS makes this a lot easier than it might seem...
Enter... UIImagePicker
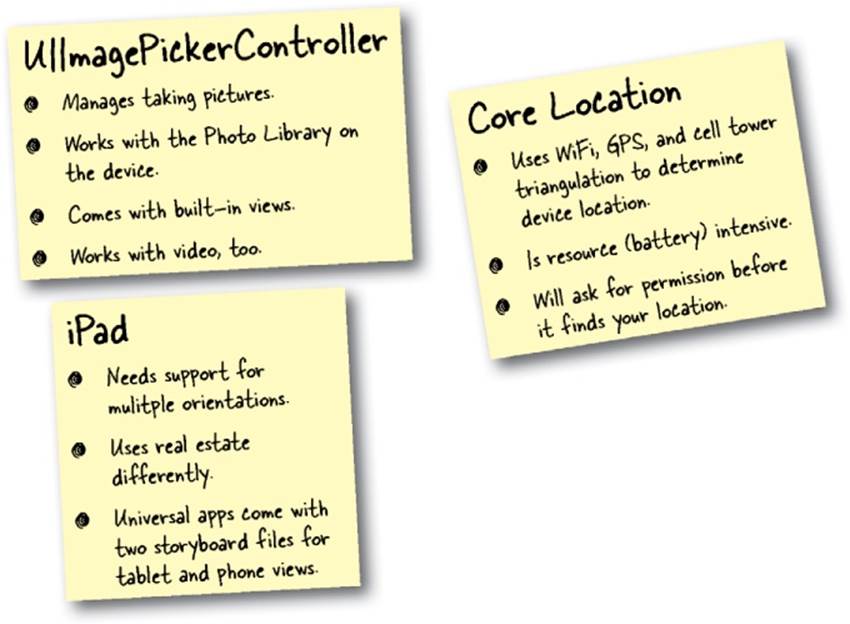
The real mission here is to pick an image (after one is taken by the camera, or from the Photo Library), and then do something with that image...or at least that path to it. iOS implements image selection through UIImagePicker, which allows you to get your image from different places, like the camera or the Photo Library.
Even better, you can let UIImagePickerController handle all the user interaction. It lets users take a photo or select an existing one, and it hands you... the path to that image. Perfect!
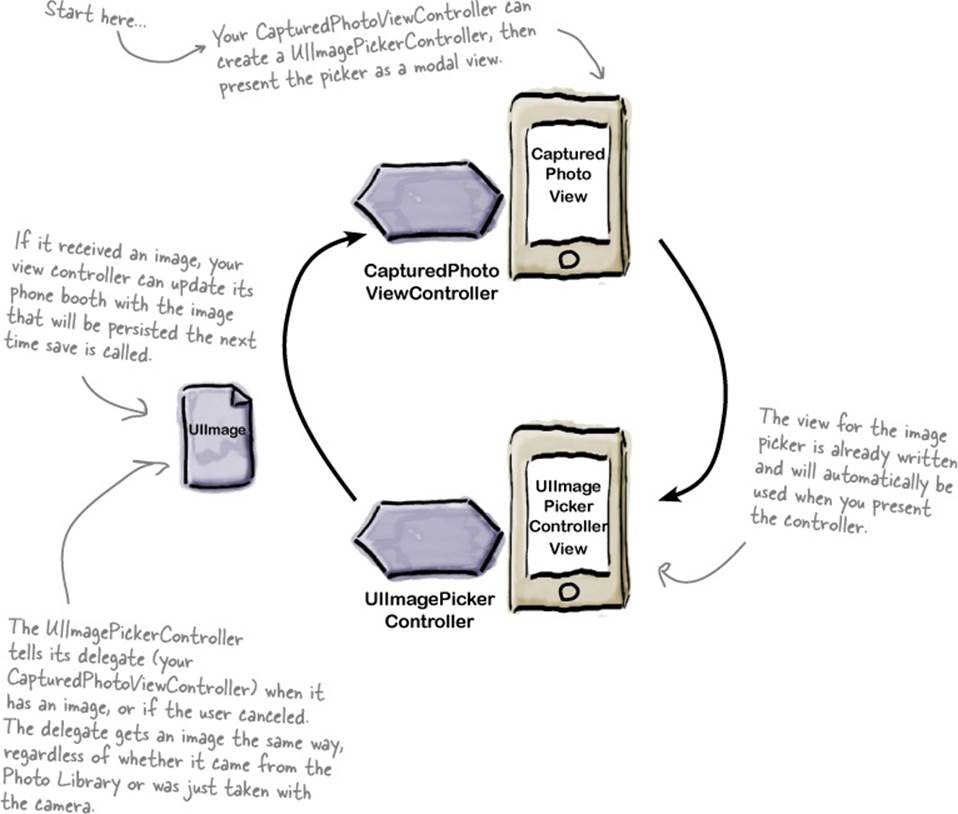
You just need to turn this diagram into actual code...
READY BAKE CODE
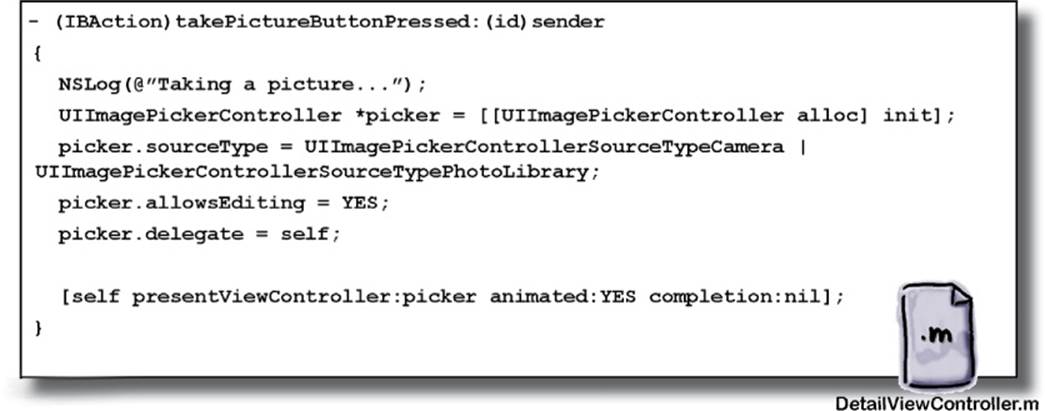
Here is some of the code you’ll need to tie the image picker together with your app. This code will go in your DetailViewController.m as part of the exercise on the next page.
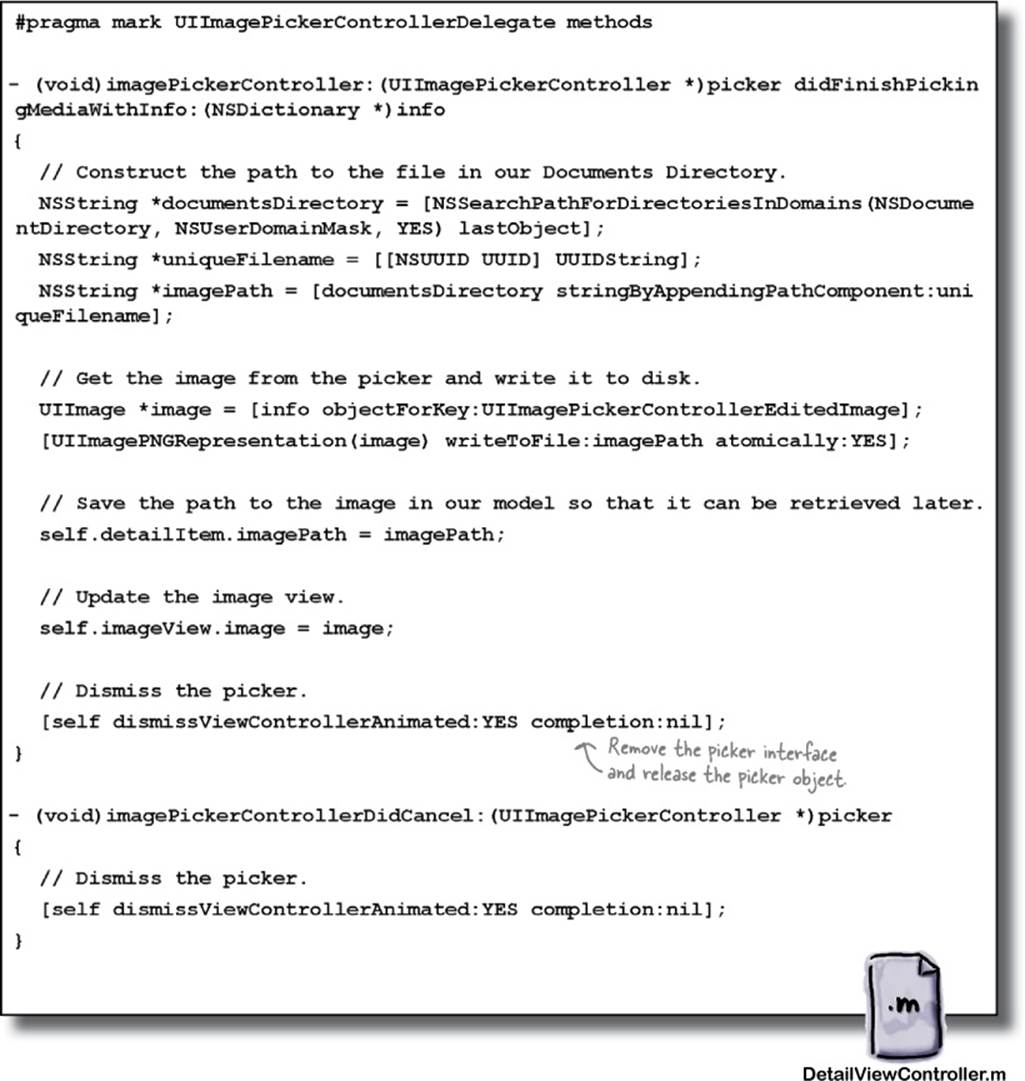
EXERCISE
Time to get some images! Using the code for the image picker on the previous page, as well as some of your Objective-C skills, it’s time for you to get the image selection going.
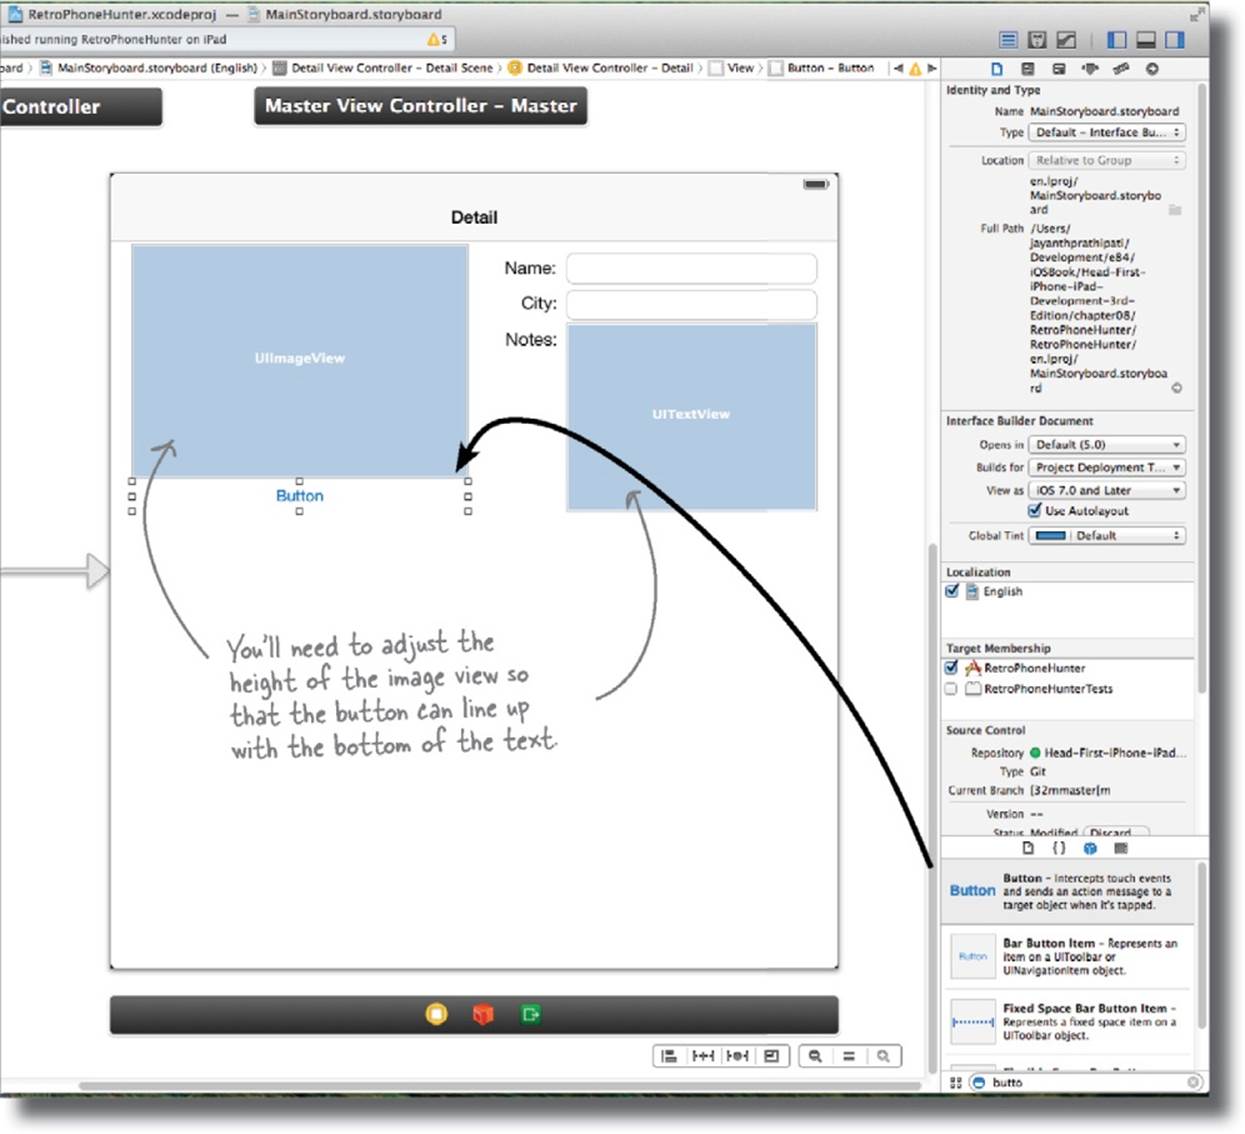
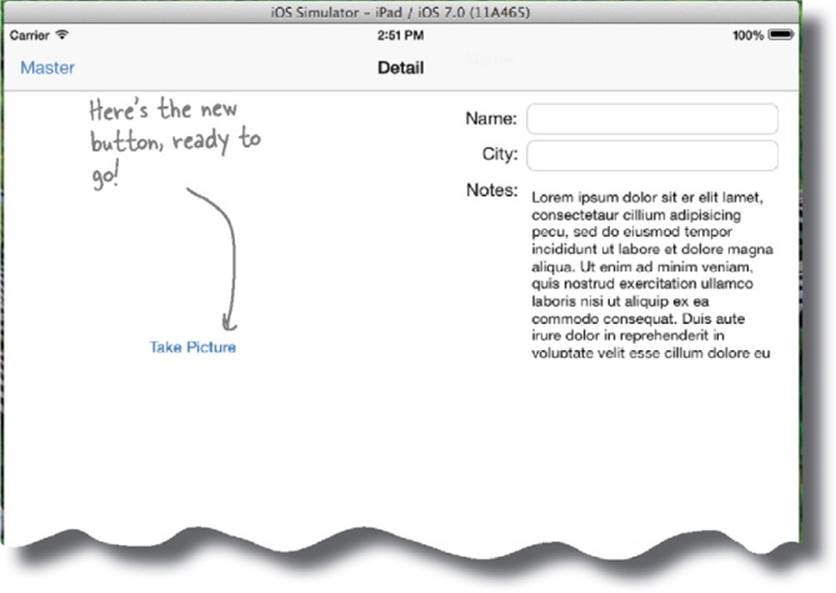
1. Add the “Take Picture” button.
Edit the storyboard to create a button that covers the entire UIImageView and is then set behind it. Don’t forget to connect it to your takePictureButton action. It should go right under the image view and be the same width as that image.
2. Add the code for the UIImagePickerController in the DetailViewController.m.
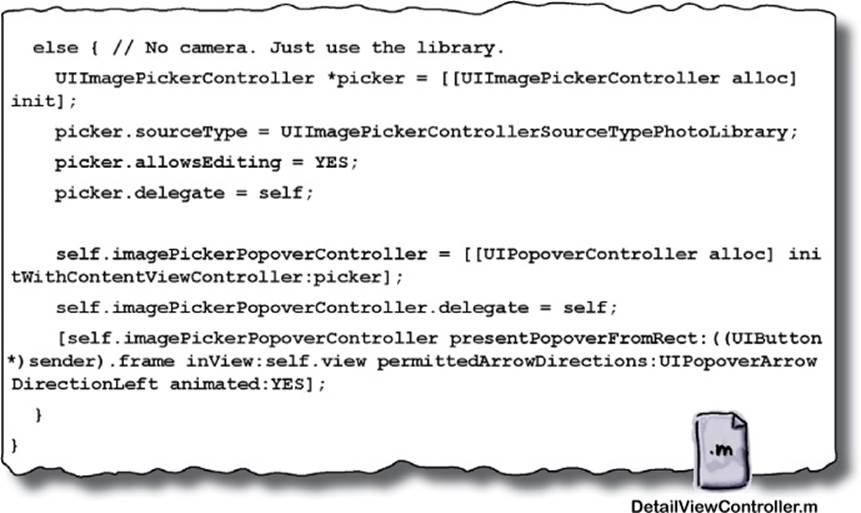
Now you can use that Ready Bake Code to finish up the UIImagePickerController. You’ll need to say that your DetailViewController conforms to the UIImagePickerControllerDelegate and UINavigationControllerDelegate protocols in order to make it the delegate.
3. Add code for the takePictureButtonPressed action.
In DetailViewController.m, add the Ready Bake Code for the takePictureButtonPressed action above.
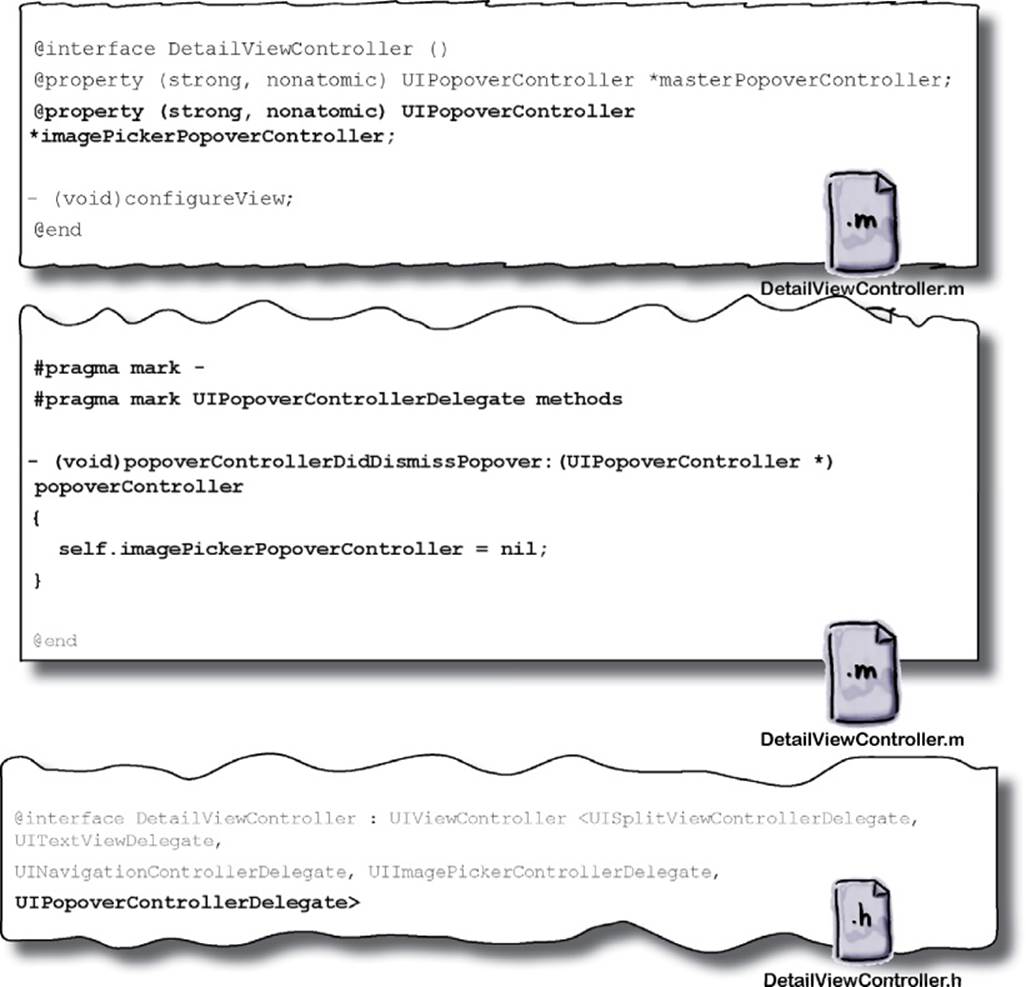
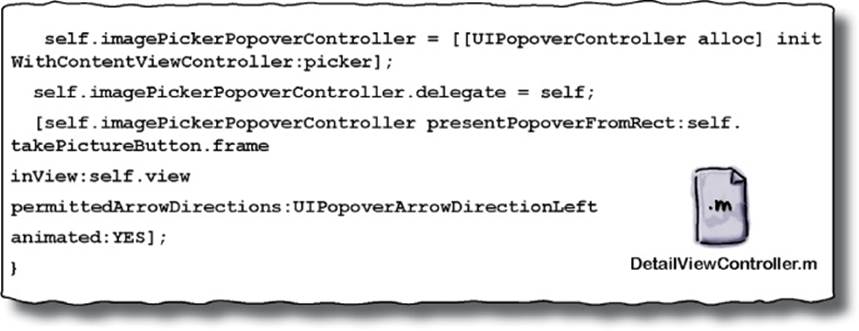
4. Wrap the whole thing up in a popover.
The image picker needs to be presented as a popover. Add a property for a UIPopoverController, make sure that DetailViewController.h conforms to the UIPopoverControllerDelegate, and implement popoverControllerDidDismissPopover in DetailViewController.m.
EXERCISE SOLUTION
Getting that ImagePicker working isn’t easy, but it’s oh so sweet when that camera or Photo Library appears. Make sure your code matches the solution shown below.
1. Add the “Take Picture” button.
Edit the storyboard to create a button that covers the entire UIImageView and is then set behind it. Don’t forget to connect it to your takePictureButton action. It should go right under the image view and be the same width as that image.
2. Add the code for the UIImagePickerController in the DetailViewController.m.
Now you can use that Ready Bake Code to finish up the UIImagePickerController. You’ll need to say that your DetailViewController conforms to the UIImagePickerControllerDelegate and UINavigationControllerDelegate protocols in order to make it the delegate.

3. Add code for the takePictureButtonPressed action.
In DetailViewController.m, add the Ready Bake Code for the takePictureButtonPressed action above.
NOTE
Those should just be copying the code.
4. Wrap the whole thing up in a popover.
The image picker needs to be presented as a popover. Add a property for a UIPopoverController, make sure that DetailViewController.h conforms to the UIPopoverControllerDelegate, and implement popoverControllerDidDismissPopover in DetailViewController.m.

This is one of those Apple-isms.
To conform with Apple standards, the image picker needs to be in a popover. If we don’t, an exception is thrown (when you try and show the Photo Library).
EXERCISE SOLUTION
Knock back all your Objective-C work with a tall glass of the storyboard editor. You’re almost ready to run this thing!
|
4 |
Wrap the whole thing up in a popover (continued). |
|
|
|
TEST DRIVE
Go ahead and take it for a spin! The new button should be there and ready to click. If you go ahead and try to use it though...well...
BRAIN POWER
So what happens when the user taps the “Take Picture” button? Your app checks for the camera... then what? What exactly should the user see? And then what? And what about after that?
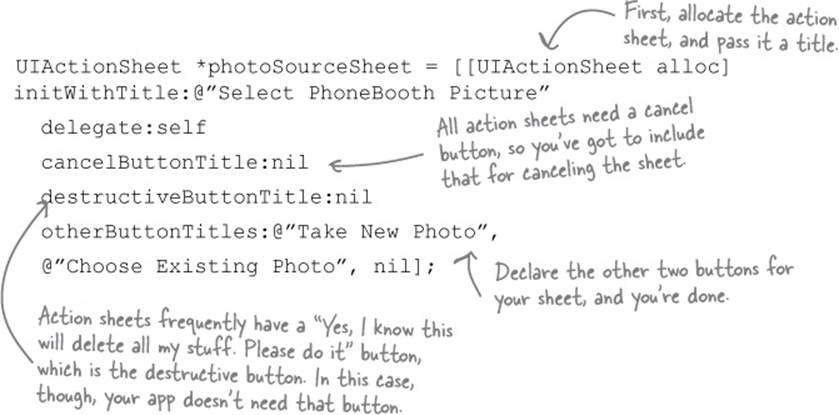
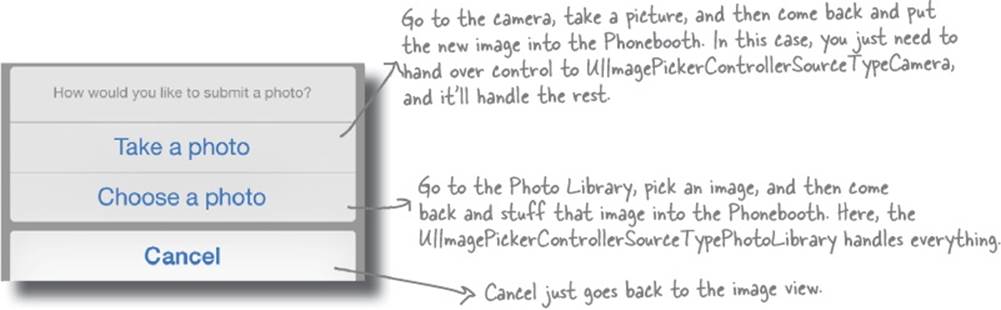
Prompt the user with action sheets
Action sheets slide up from the bottom of the page and give the user options about how they want to continue. These sheets are similar to a modal view because the user has to address a sheet before they can move on to anything else. Action sheets are really straightforward to use, too: they take strings for each of their buttons and have built-in animations for appearing and disappearing.
Here’s the code you’ll need for a sheet that asks whether to take a new photo or choose from the Photo Library:
Action sheets lead to...dactions!
You’ve got two actions in your sheet: “Take New Photo” and “Choose Existing Photo.” Even better, it’s pretty obvious what each choice should do:
SHARPEN YOUR PENCIL
Time to implement the action sheet. There’s a lot here to think about since you’re changing the flow of the app a bit... just take your time, and you’ll get it.
1. Implement the delegate methods for the action sheet.
Here’s what you need to get started. Think about the different options—including the default!
NOTE
Don’t forget to conform to the UIActionSheetProtocol in your header file!
- (void)actionSheet:(UIActionSheet *)actionSheet didDismissWith
ButtonIndex:(NSInteger)buttonIndex
{
if (buttonIndex == actionSheet.cancelButtonIndex) {
NSLog(@"The user canceled adding a image.");
return;
}
UIImagePickerController *picker = [[UIImagePickerController
alloc] init];
picker.delegate = self;
picker.allowsEditing = YES;
switch (buttonIndex) {
case 0:
NSLog(@"User wants to take a new picture.");
picker.sourceType =
UIImagePickerControllerSourceTypeCamera;
break;
2. Modify the takePictureButtonPressed action in CapturePhotoViewController.m to include the action sheet. retroPhoneHunter first needs to check for the camera. If there is one, the user gets to pick whether to use the camera or an existing picture. If not, the app should just go straight into the Photo Library.
NOTE
The action sheet lets the user choose which of these to do.
3. Add an outlet for the takePictureButton.
We need this because we have to show the popover controller from the button. Previously we used the ‘sender’ of the takePictureButtonPressed method, but we can’t do that in the action sheet delegate method. So we need a new outlet!
SHARPEN YOUR PENCIL SOLUTION
Lots of code here... take your time and make sure you got everything just right!
1. Implement the delegate methods for the action sheet

2. Modify the takePictureButtonPressed action in CapturePhotoViewController.m to include the action sheet.

SHARPEN YOUR PENCIL SOLUTION
|
2 |
Modify the takePictureButtonPressed action in CapturePhotoViewController.m to include the action sheet. |
3. Add an outlet for the takePictureButton.
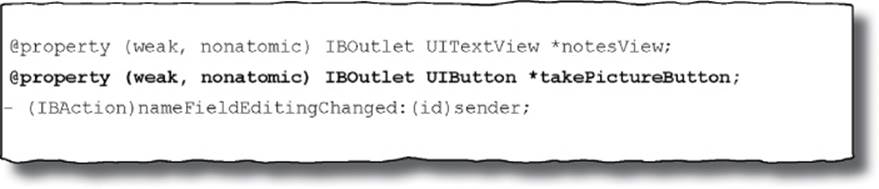
Make sure it’s wired up in the storyboard!
TEST DRIVE
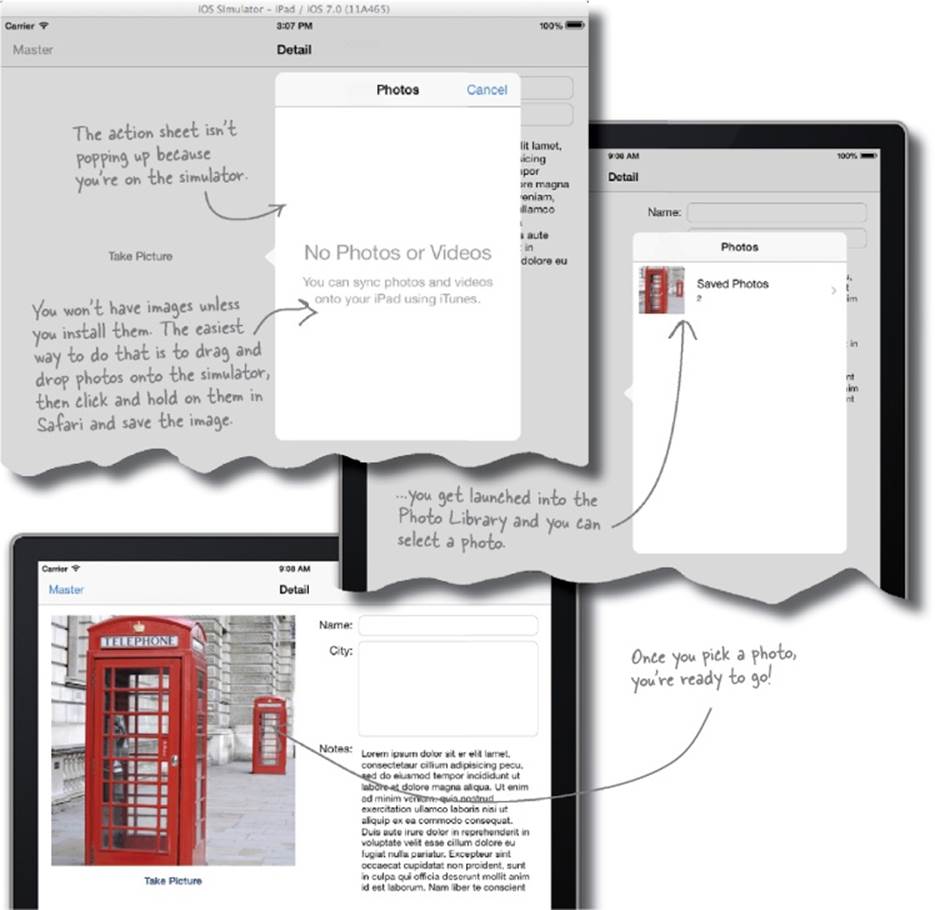
Fire up your retroPhoneHunter and add a phone booth. Now try out your new code: select a photo of a phone booth (or take a new photo). If you’ve used the SourceTypePhotoLibrary in the takePictureButtonPressed code, everything should work, and you’ll see your new action sheet.
THERE ARE NO DUMB QUESTIONS
|
Q: |
Q: Don’t newer iPhones and iPads support video now? How do I get to that? |
|
A: |
A: Video is another media type you can access when you use the UIImagePickerController. By default, the controller uses still images, which is what you probable want for retroPhoneHunter. |
|
Q: |
Q: What about the whole augmented reality thing with the camera? Can I do something like that? |
|
A: |
A: Yup. You can give the UIImagePickerController a custom overlay view to use if the camera is invoked. There are still limitations on what you can actually do in the camera view, but you can overlay it with your own information if you want. |
|
Q: |
Q: What’s with the allowEditing thing we turned on in the UIImagePickerController? |
|
A: |
A: The picker controller has built-in support for cropping and zooming images if you want to use it. The allowEditing flag controls whether or not the user gets a chance to move and resize their image before it’s sent to the delegate. If you enable this, and the user tweaks the image, you’ll be given editing information in the callback. |
|
Q: |
Q: Do I really have to worry about devices that don’t have cameras? |
|
A: |
A: Absolutely! When you submit your application to Apple for inclusion in the iTunes App Store, you specify the devices your application works with. If you say it works, Apple is going to test your app on both types of devices—with and without a camera. They also run tests where your application doesn’t have network access to ensure you handle that properly as well. Think defensively! Apple is going to test your application in all kinds of scenarios. |
|
Q: |
Q: Is there any way to test the camera in the simulator? |
|
A: |
A: No. The Test Drive on the last page is about as close as you can get, which is to implement the code for the camera and test it out with the Photo Library. You’ve learned a lot so far, and lots of the functionality that you’re moving into has outgrown the simulator. GPS functionality, the accelerometer, speaker capabilities... all of these things can’t be tested in the simulator. To really make sure they all work, you’ll need to install your apps on your own device. |
|
Q: |
Q: What’s the deal with Apple’s Developer Program again? |
|
A: |
A: In order to install an app on your device or to submit an app to the App Store, you need to be a registered iOS developer with Apple. The fee (currently) is $99. Even if you want to just install an app for your own personal use, you’ll need to be registered. |
GEEK BITS
It might be time to register with Apple’s Developer Program. If you do, you can install the retroPhoneHunter app on your actual iPad and test it for yourself.
Where Who... are you? Where Who, who?
NOTE
OK, you get the idea by now, right? It’s about the “where”...
The map view is important here because it will tell us where the phone booths are spotted. There are two pieces of information that we need to get there. We need to display the phone booth location if we know it and we also need to figure out where you are, so that when we show a location we have it’s relative placment to you; and when we take a picture the location of the phone booth is saved. Adding the view is actually pretty easy; it’s making it all go that is a little trickier.
So now the real question: how can an iOS device figure out that all-important location?
Core Location can find you in a few ways
GPS is often the first thing most people think of for getting location information, but the first-generation iPhone didn’t have GPS, and neither do current iPod Touches or WiFi iPads. That doesn’t mean that you’re out of options though. There are actually three ways available for iOS to determine your location: GPS, cell tower triangulation, and WiFi positioning service.
GPS is the most accurate, followed by cell towers and WiFi. iPhones can use two or three of these, while iPod Touches and WiFi iPads can only use WiFi...which is still better than nothing. If your head is starting to spin, don’t worry! Core Location actually decides which method to use based on what’s available to the device and what kind of accuracy you’re after. That means you don’t have much to do; the iOS will handle it for you with the LocationManager:
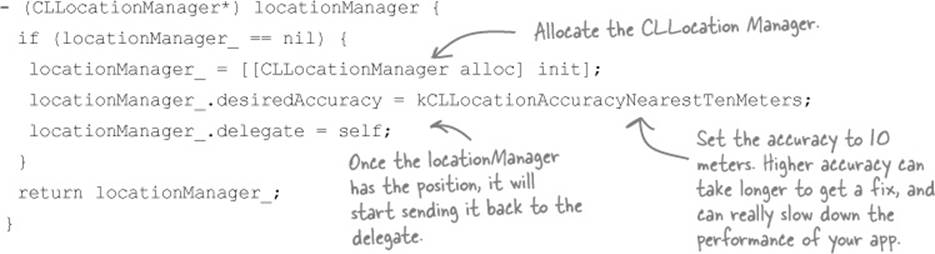
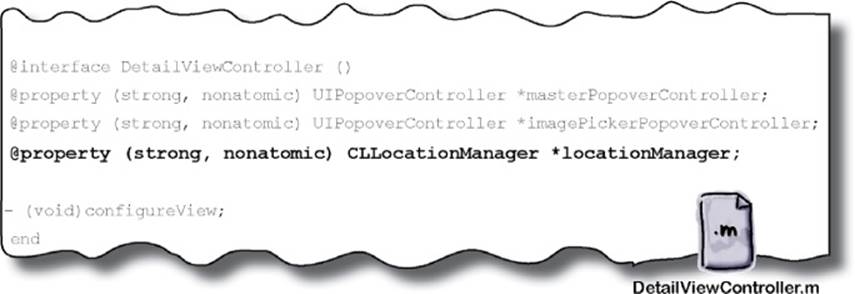
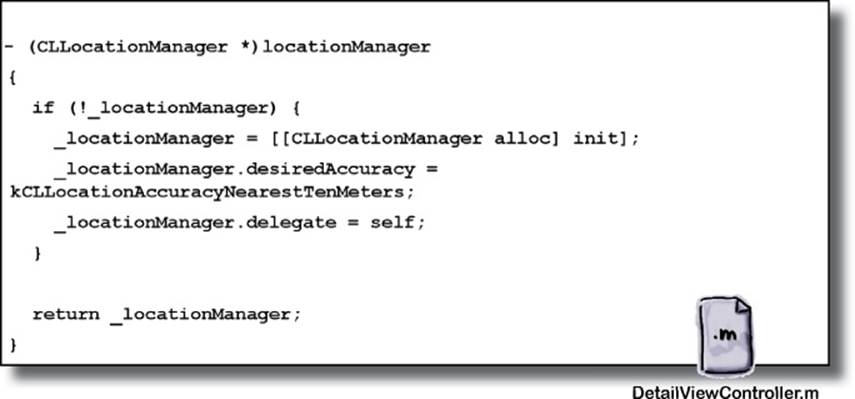
Core Location relies on the LocationManager
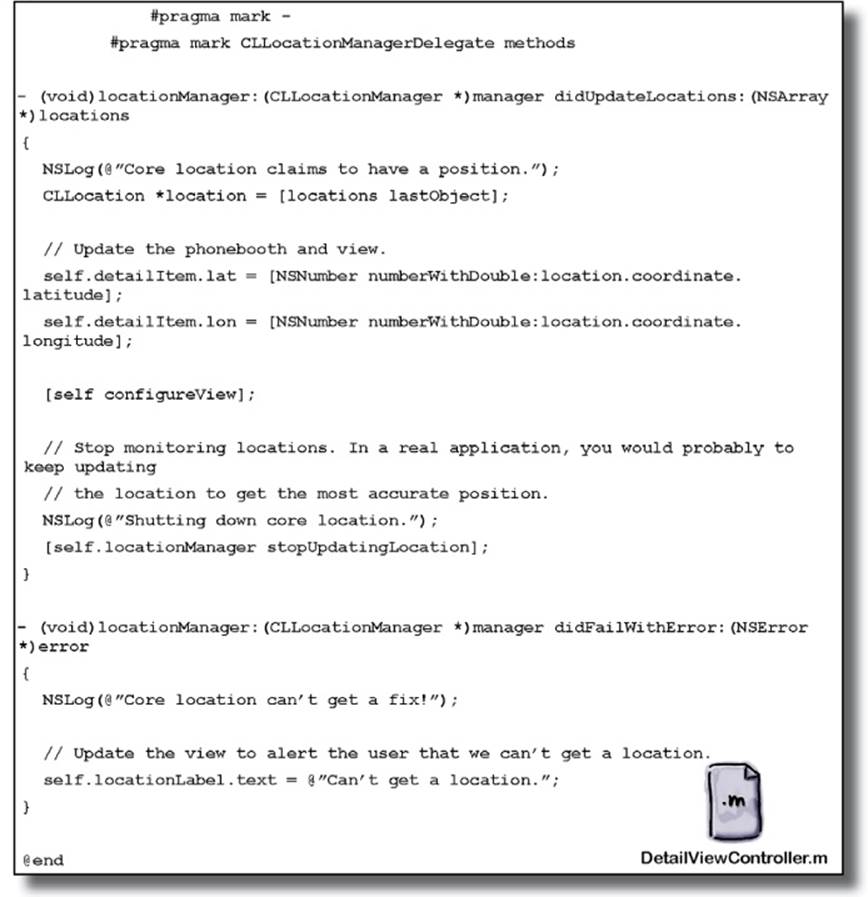
To use Core Location, you simply need to create a LocationManager and ask it to start sending updates. It can provide position, altitude, and orientation, depending upon the device’s capabilities. In order for it to send you this info, you just need to provide it with a delegate as well as your required accuracy.
The CLLocationManager will notify you when positions are available or if there’s an error. You’ll want to make sure you’re also properly handling when you don’t get a position from the location manager. Even if the device supports it, the users get asked before you collect location information, and can say “No” to having their position recorded (either intentionally or by accident).
BRAIN POWER
Where should you implement this code in your app?

You got it... and a new framework, too.
To keep the size of your app small, Apple breaks apart different features and functionality into frameworks. As you start adding new functionality, like Core Location, you’ll need to start adding in these new frameworks.
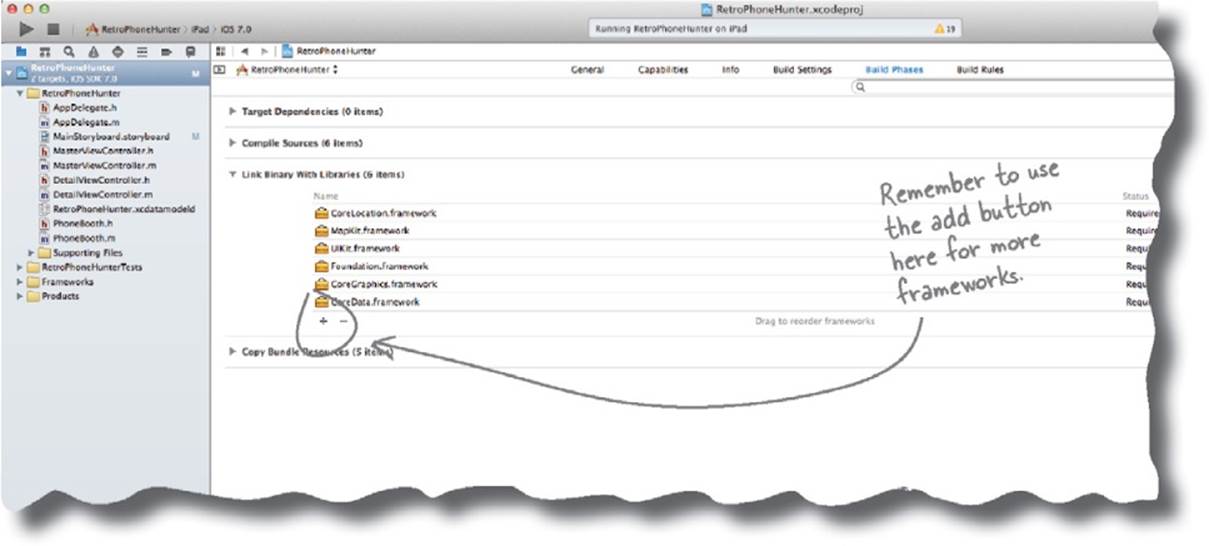
Since the Core Location framework isn’t included by default, you’ll need to explicitly add it.
DO THIS!
Add the CoreLocation Framework.
Select the project in the naviagator and then select the RetroPhoneHunter target, with the Build Phases tab. Then add the CoreLocation Framework.
WATCH IT!
Core Location is a battery killer.
Making frequent API calls from your app that checks for a location will quickly drain batteries, since it turns on the GPS/cellular/WiFi receiver. That’ll lead to upset users and cranky iTunes reviews. Keep these calls to a minimum!
BE THE APPLICATION FLOW
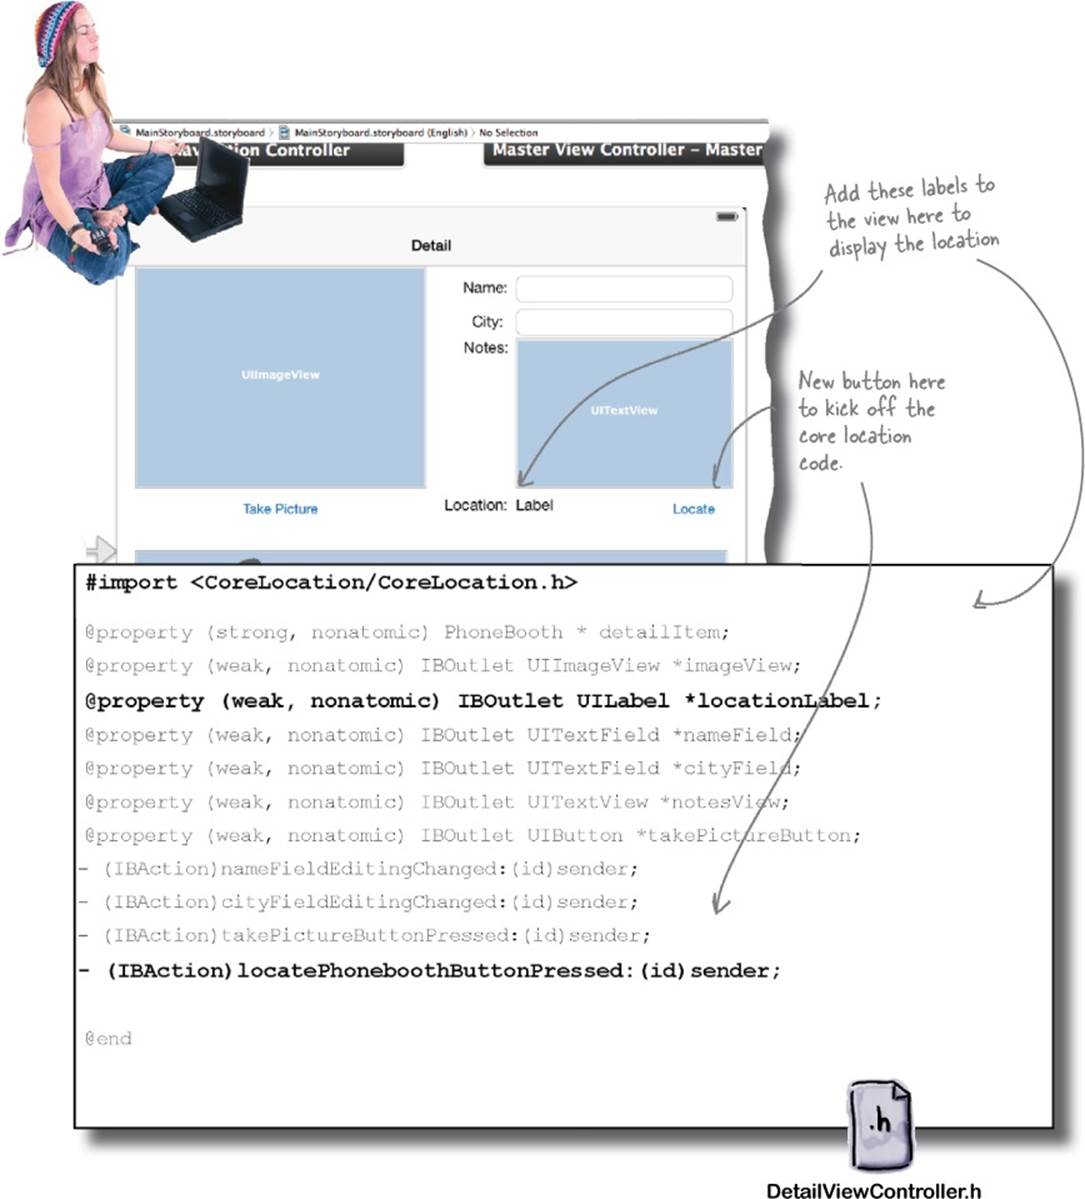
Your job is to be the application, and figure out where Core Location fits into the flow of action between and through the application views. Assume that finding a new phone booth requres a location, date, and time.
1. What method will be used to kick off Core Location when we take a picture?
____________________________________________________________
2. What happens when the location is returned to the view controller?
____________________________________________________________
____________________________________________________________
3. What happens if Core Location can’t get a position, or the user disables it?
____________________________________________________________
____________________________________________________________
What about other devices? What should happen with them?
____________________________________________________________
____________________________________________________________
BE THE APPLICATION FLOW SOLUTION
Your job was to be the application, and figure out where Core Location fit into the flow of action between and through the application views. Assume that finding a new phone booth requres a location, date, and time.
1. What method will be used to kick off Core Location when we take a picture?
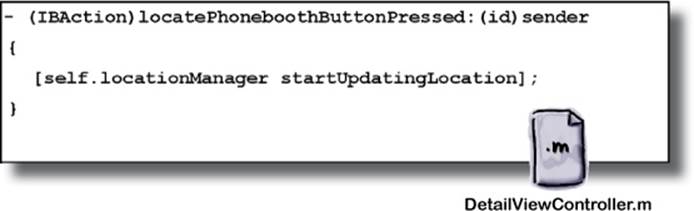
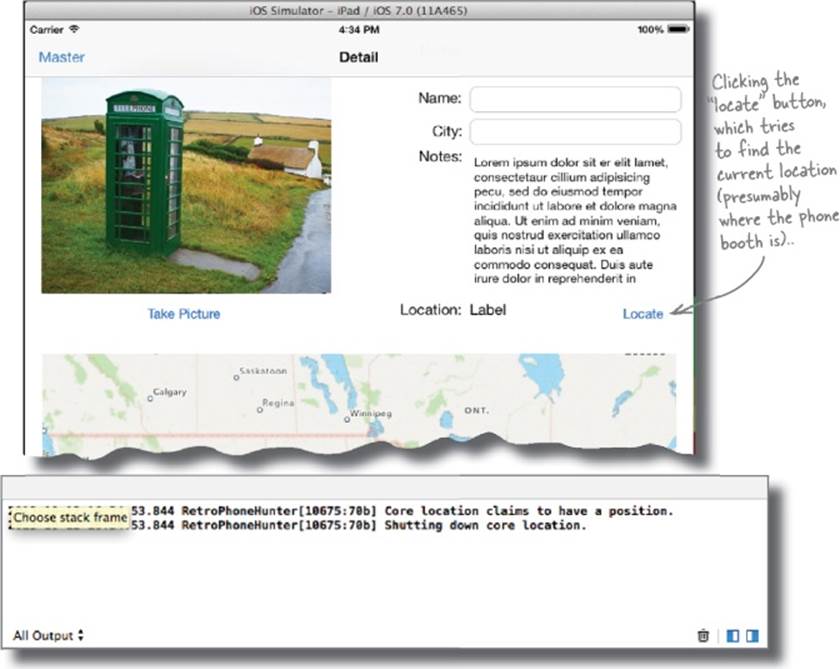
The code to initialize Core Location could go into viewWillAppear for the detail view on an iPhone, but since it’s an iPad, the detail view is always visible. To keep things simple, we’ll add a button to get the location at user request.
BE THE APPLICATION FLOW SOLUTION
BE THE APPLICATION FLOW SOLUTION
|
1 |
What method will be used to kick off Core Location when we take a picture? (cont.) |
|
|
|
2. What happens when the location is returned to the view controller?
It’ll mean that the location manager can get the current position. If the user is adding a phone booth, the app needs to get the current position from the location manager and update the phone booth info.
BE THE APPLICATION FLOW SOLUTION
|
2 |
What happens when the location is returned to the view controller? (cont.) |
BE THE APPLICATION FLOW SOLUTION
3. What happens if Core Location can’t get a position, or the user disables it?
It’s not ideal, but a location isn’t 100% required for this app. So the user can manually enter a city, but no location from Core Location... and no map.
4. What about other devices? What should happen with them?
It’s OK. Just tell Core Location the accuracy desired and it will deal with the rest. So, the iPod Touch gets the best data it can, and what’s returned to the app. Perfect!.
TEST DRIVE
Implementing Core Location really wasn’t that hard, but making it work in the user flow required a bit more work. Now that it’s all done, you should be up and running...
THERE ARE NO DUMB QUESTIONS
|
Q: |
Q: Is starting and stopping Core Location in viewWillAppear and viewWillDisappear normal? |
|
A: |
A: It’s normal to start and stop Core Location as you need it. It uses a fair amount of power while it’s running, so it’s best to shut it down when you don’t need it. This gets a little tricky, though, because Core Location can require some time to get its initial position information. To make that a little smoother for the user, you should enable it as soon as the view appears, which gives it a head start before the user needs the location. It’s a balancing act, for sure. |
|
Q: |
Q: Is there any way to speed up getting that initial position? |
|
A: |
A: Core Location will try to cache previous position information so it can give you something as quickly as possible. Because of this, if you’re really concerned about accuracy, you should check the timestamp sent along with the position information to make sure the position is recent enough for your app’s needs. |
|
Q: |
Q: Does location accuracy impact things like startup time or battery usage? |
|
A: |
A: Absolutely. The more accurate a position you ask for, the more battery Core Location will consume, and it will potentially take longer to figure out that position, too. Lower-fidelity information tends to come to you faster. Use whatever accuracy you need for your application, but be aware of the implications of high-resolution information... and only ask for it if you really need it. |
|
Q: |
Q: Is there a way to just wait for Core Location to have a position rather than having it call back to the delegate? |
|
A: |
A: Unfortunately, no. Core Location, like a lot of other frameworks in iOS, calls back asynchronously as data is available. Network access generally works this way as well. You need to make sure you keep your users informed of what’s going on in the application and what they can and can’t do at the moment. For example, you could display a wait indicator (like a spinning gear) or display position status with a disabled indicator like an icon, button, or label. |
|
Q: |
Q: Why did we have to move the code around and do all that refactoring? |
|
A: |
A: To follow the DRY principle (Don’t Repeat Yourself). That meant cleaning up the code and eliminating duplication by pulling that common code out into a separate method and calling that method from the two places that need it. Otherwise, you’d have the same code in two different places in the app. |
|
Q: |
Q: What’s the deal with private interfaces again? |
|
A: |
A: Remember that your header file captures your public interface or API. But with refreshPhoneboothInformation, you don’t want this internal method to be part of your API (in other words, you don’t want other people to call it). You want to declare it so the compiler can check that you’re calling a valid method, but can just add a private set of methods to your interface in the implementation file. Some people actually put an _ (underscore) before their private method names so that it’s obvious that you shouldn’t be calling this from anywhere but the class’s own implementation. Apple, however, reserves this convention for their own private methods. |
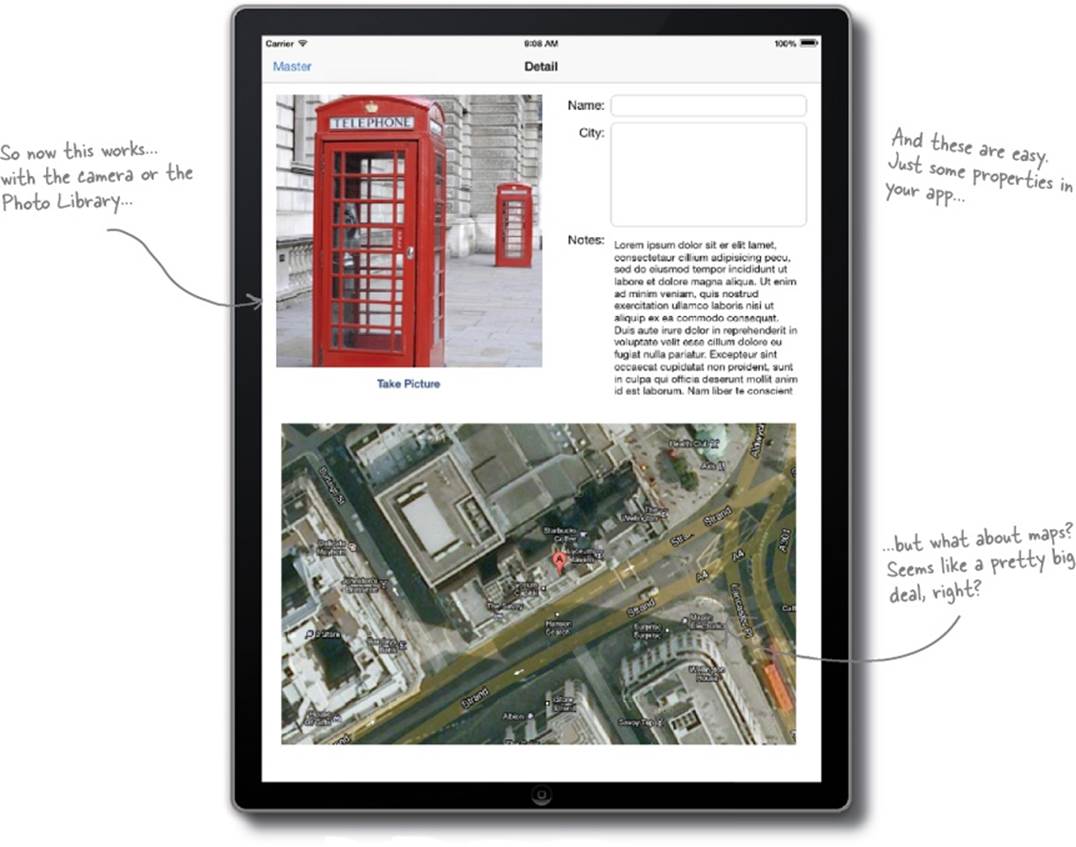
That location is great, but how about the map? Time for another framework.
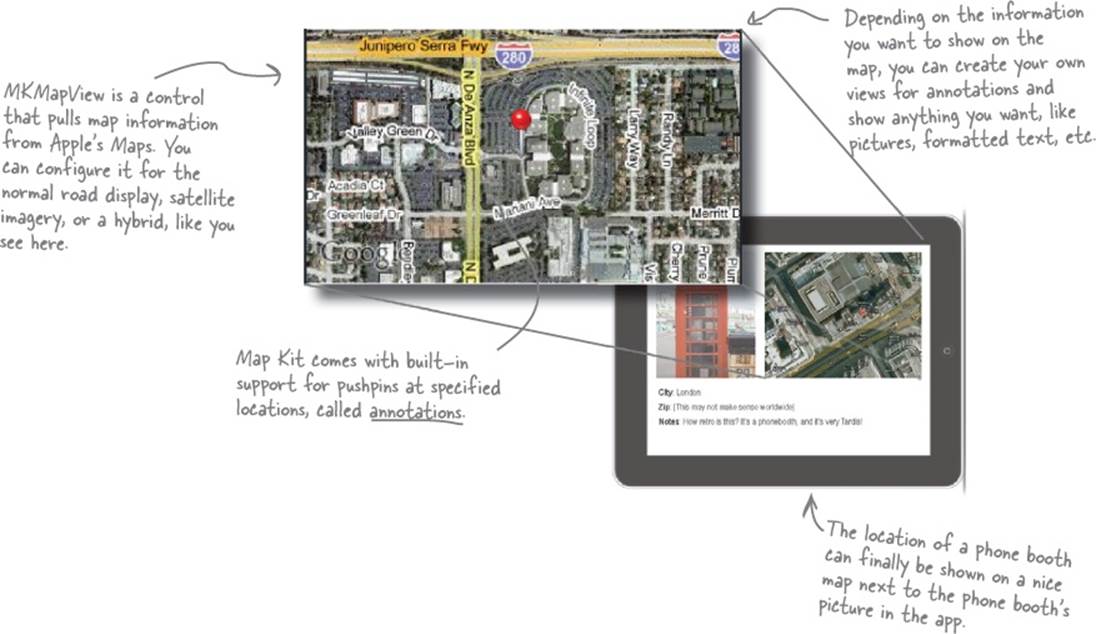
Map Kit comes with every iOS device
When Apple opened up the API for the Map Kit in iOS 3.0, developers gained access to Apple’s maps, including satellite imagery.
NOTE
In previous versions of iOS, Map Kit used Google Maps. Since iOS 6, though, Apple provides their own maps. You still get satellite imagery, but it’s no longer the same as what Google provides.
There’s lots of customization that you can do with the maps, too. You can specify how wide an area should be shown, the initial view start width, and even add pins and annotations. Basically, you’ve got everything available that you see when you use Apple Maps yourself.
WATCH IT!
Map Kit requires a network connection.
Since Map Kit pulls imagery information from Apple, apps have to have a network connection for it to be useful. That’s not a problem for the simulator (assuming your Mac is online), but it could be an issue for any device with limited connectivity, depending on their location. Map Kit handles this gracefully, but it’s something to be aware of.
THERE ARE NO DUMB QUESTIONS
|
Q: |
Q: What’s the difference between Core Location and Map Kit? |
|
A: |
A: Map Kit is about displaying a map, position-sensitive information, and the app’s user interface. Core Location is about getting information about where a device is. You can drag and drop a map onto your view in GUI editor, pass it some values, and everything will just work. Core Location, on the other hand, returns values to the delegate, and you’ll need to decide what to do with them. You’re going to take that information from Core Location and give it to Map Kit to show a map of the location of a phone booth, for example. |
|
Q: |
Q: Where do all these frameworks come from? What if I want one that’s not on the list? |
|
A: |
A: The frameworks are included as part of the iOS SDK. The actual path to the frameworks varies by version and what platform you’re developing for. For example, the Map Kit framework you’re using is here: /Developer/Platforms/iPhoneOS.platform/Developer/ SDKs/iPhoneOS7.0sdk/System/Library/Frameworks/MapKit. framework. In general, you should be able to add frameworks using Xcode and not worry about a specific location. However, if a framework isn’t listed or you’re adding a custom one, you can point Xcode to the actual path. |
EXERCISE
It’s time for the big finish! You’ve got to use the Map Kit framework to take the location you got from Core Location and show it on a nice shiny map. Go on... get busy!
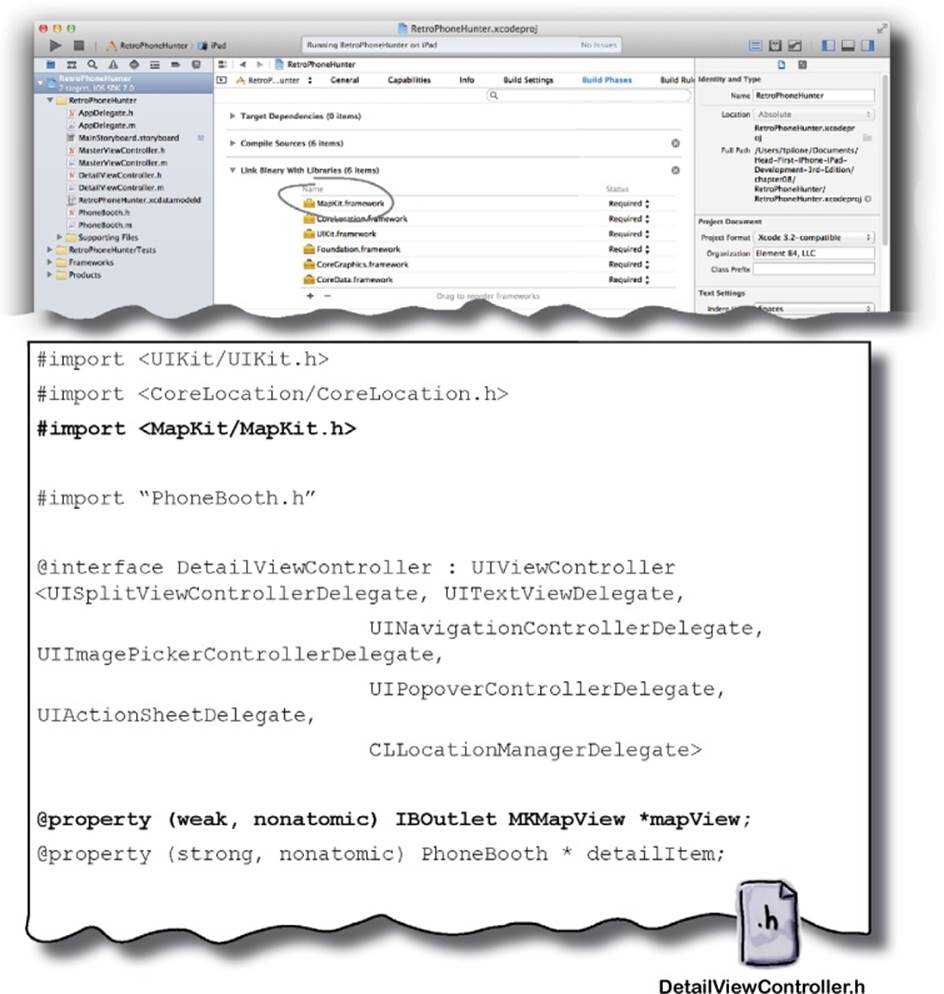
1. Add the Map Kit framework and the #import.
Add the Map Kit framework just like you did with Core Location. While you’re at it, make sure that you do the #import in the detail view to include the Map Kit header.
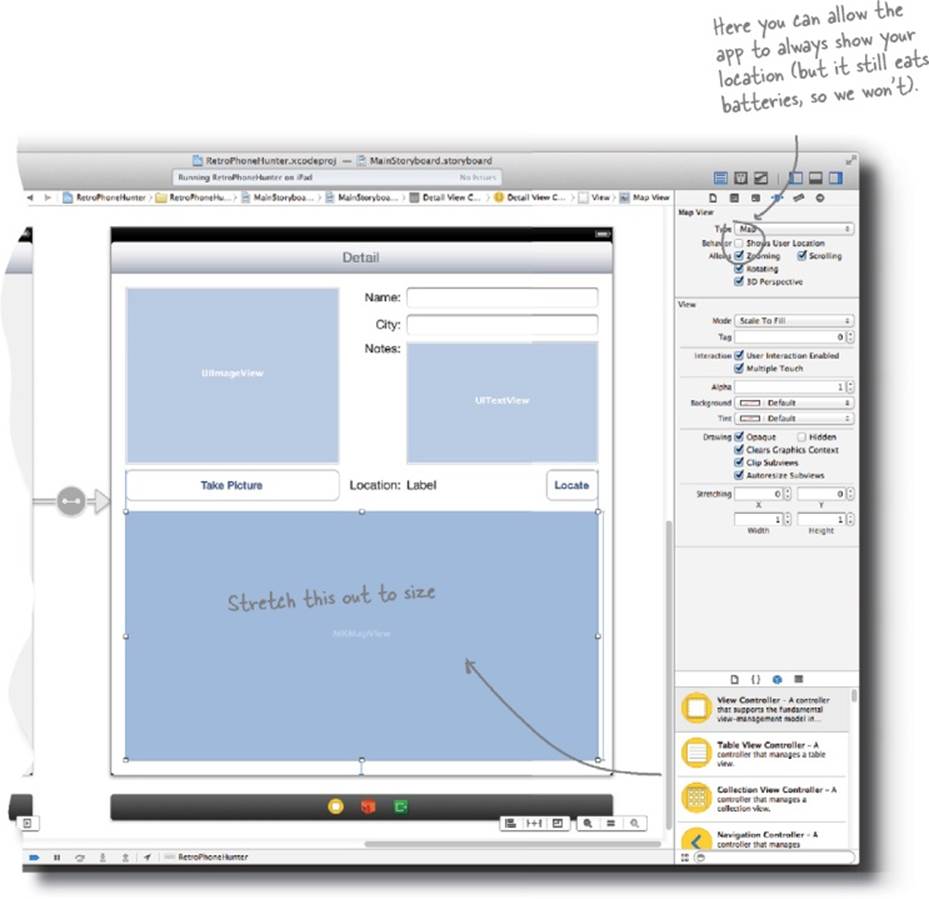
2. Configure the detail view to show the map.
We left room on the detail view, so in the storyboard file, drag an MKMapView to the bottom half of the view.
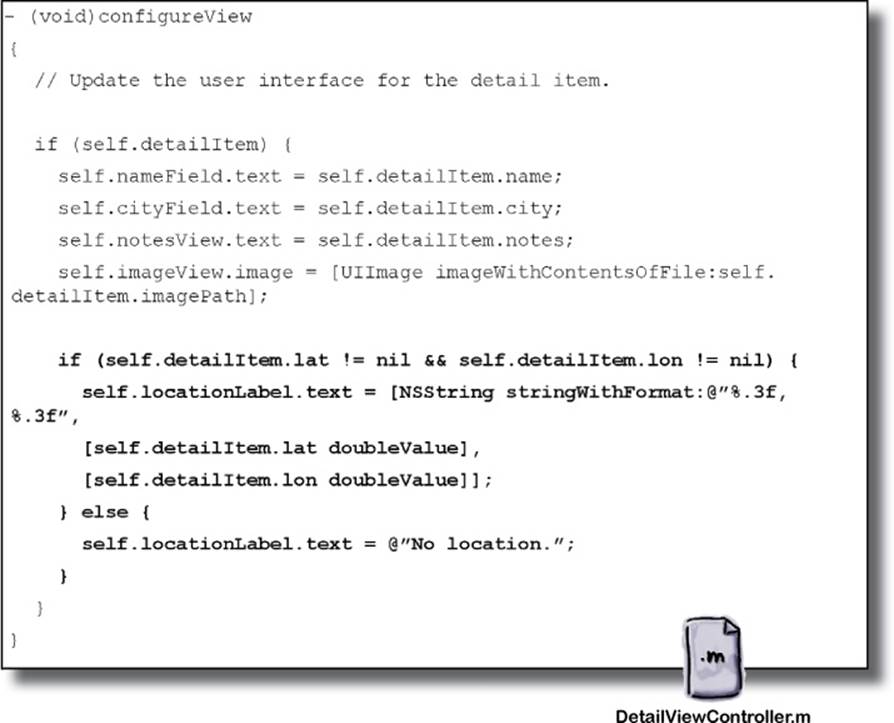
3. Add the outlets and code for the MKMapView.
Now that you have all the support stuff in place, go ahead and add the outlets and the actual Map Kit code to make the map work. Make sure you wire up the outlet in Xcode.
EXERCISE SOLUTION
1. Add the Map Kit framework and the #import.
Add the Map Kit framework just like you did with Core Location. While you’re at it, make sure that you do the #import in the detail view to include the Map Kit header.
EXERCISE SOLUTION
2. Configure the detail view to show the map.
We left room on the detail view, so in the storyboard file, drag an MKMapView to the bottom half of the view.
EXERCISE SOLUTION
3. Add the outlets and code for the MKMapView.
Now that you have all the support stuff in place, go ahead and add the outlets and the actual Map Kit code to make the map work. Make sure you wire up the outlet in Xcode.
TEST DRIVE
It’s time for the big finish! Try out what you have and see the map view working!
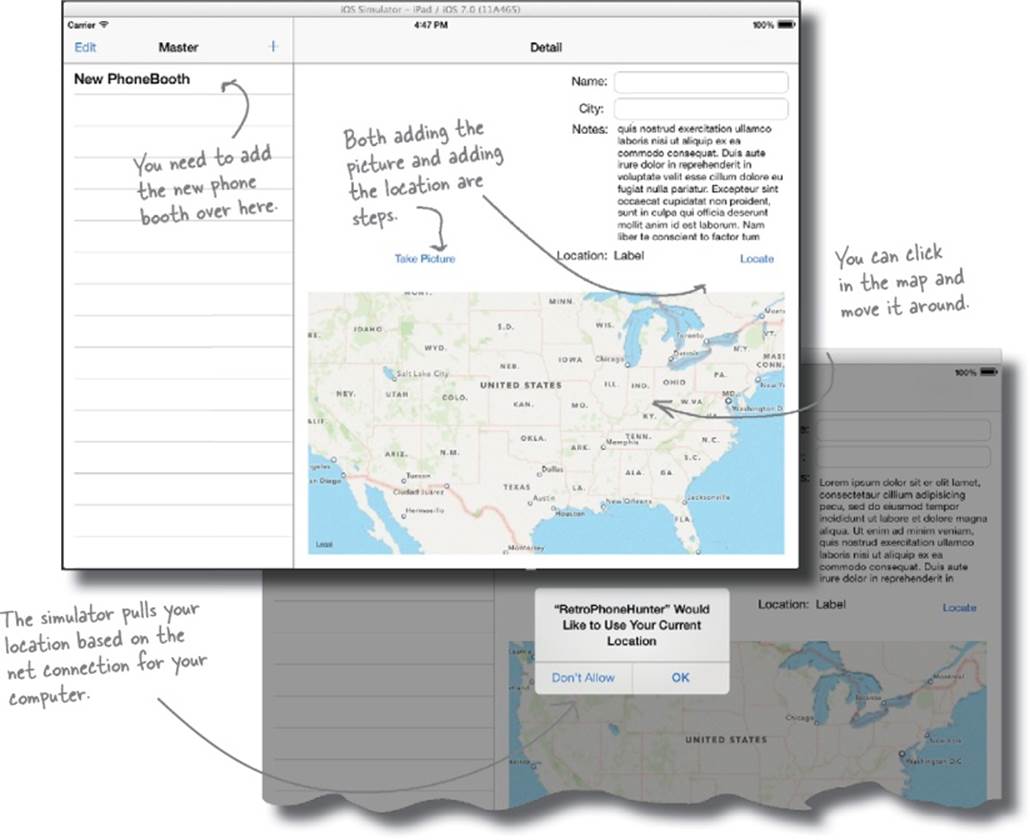
But there’s no pin showing where it is!
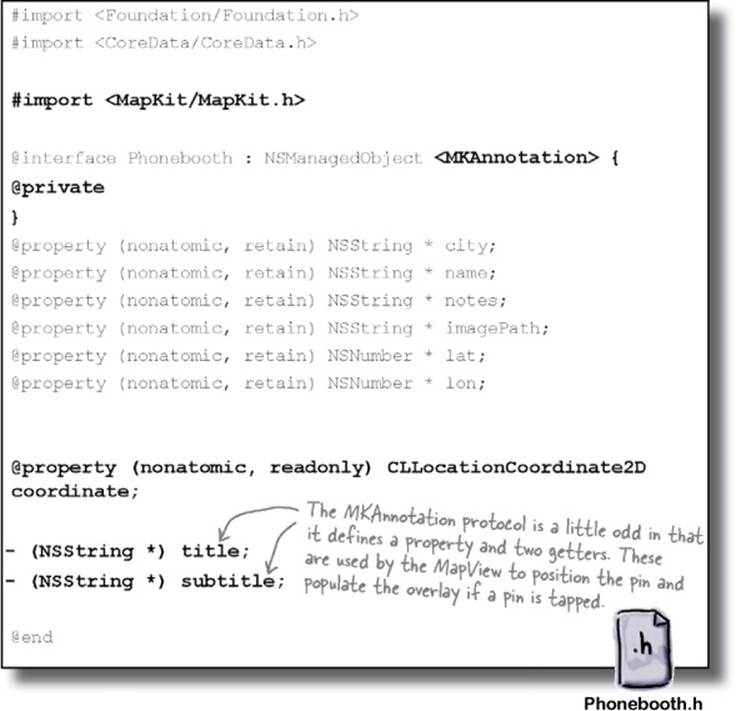
Annotations require a little more work finesse
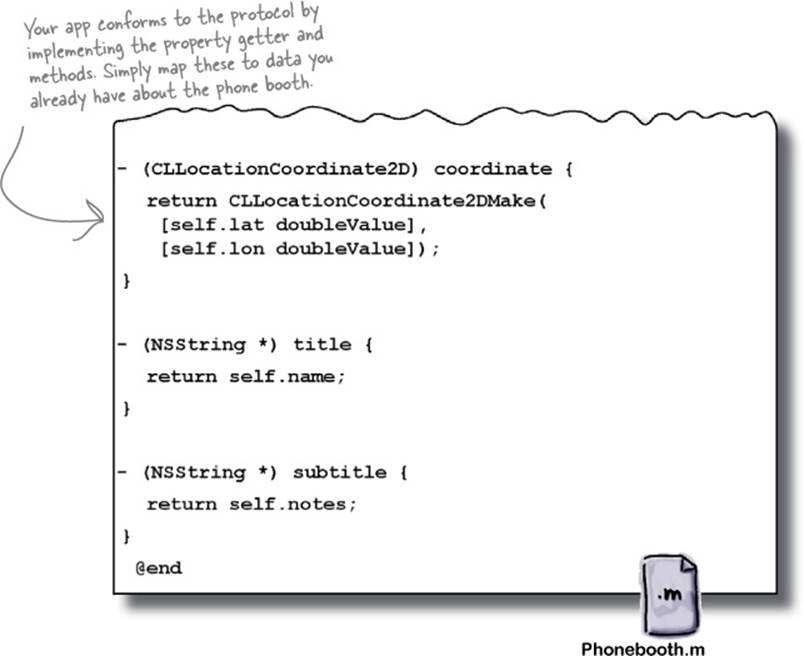
Annotations are the little flags that come up when you see a point of interest, represented by a pin. The catch? Incorporating annotations means conforming to the Map Kit annotation protocol. Map Kit uses an annotation protocol so that you can use your existing classes and provide them directly to Map Kit. The downside is that means you need to add just a little more code to your Phonebooth class:
WATCH IT!
If you use automatic NSManagedObject file generation again, you’ll wipe out these customizations.
Fully implement the annotation protocol
The protocol requires you to have a coordinate property, a title, and a subtitle. Instead of synthesizing that coordinate property, you should implement it yourself and just return the phone booth’s position, name, and so forth.
For an application in which you expect to have to do more data migration, you should implement a separate class conforming to the protocol that has a reference to its Phonebooth (through composition) rather than adding code to the Phonebooth class directly.
TEST DRIVE
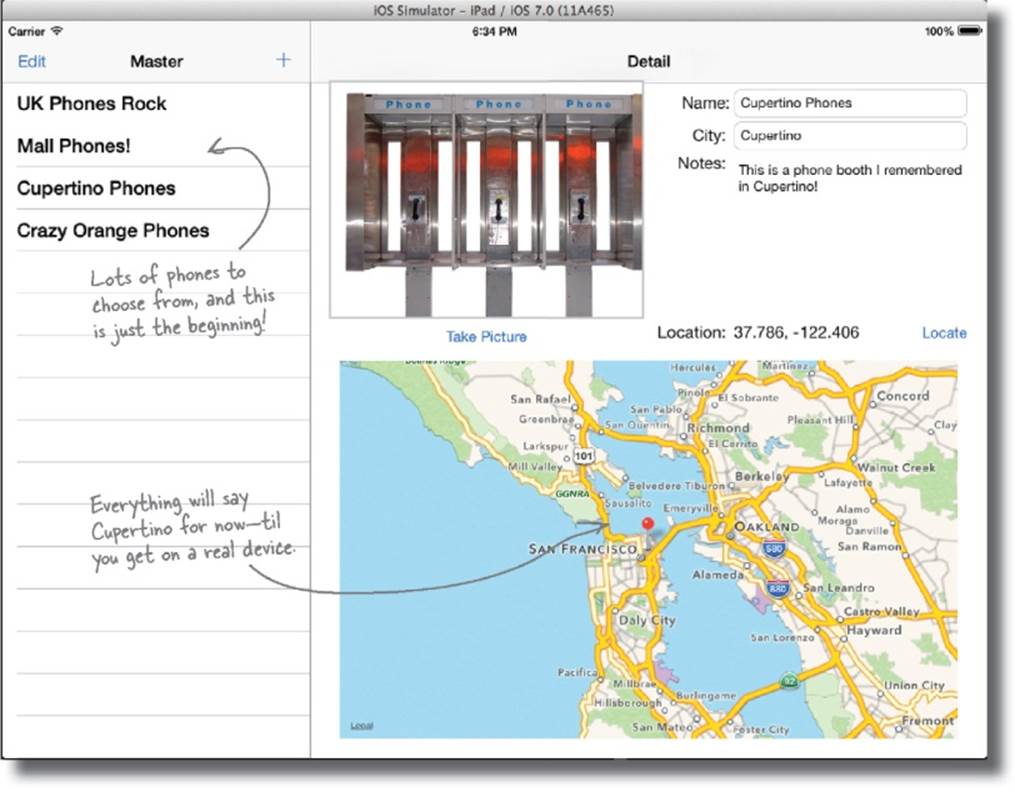
That’s it! Everything should be working now. Time to start adding phone booths, and let your friends do the same!
NOTE
Thanks to all the free help from Core Data, you can quit the app and restart, and everything is still there, ready to roll!
GO RETRO UNLIMITED
Fantastic job!
Your app is great! People are downloading it and sending us phone booths that we can’t believe! Great work...and the maps are awesome. Everyone seems to love trying to find the weirdest spots that these phone booths are located.
As a thanks for your hard work, we’re sending you our limited edition, #1 phone booth retro tee, hot off the presses. Enjoy!
Jimi Vain
CEO

IOS HARDWARE CROSS
Go ahead and flex some of those new vocab words that you've learned.
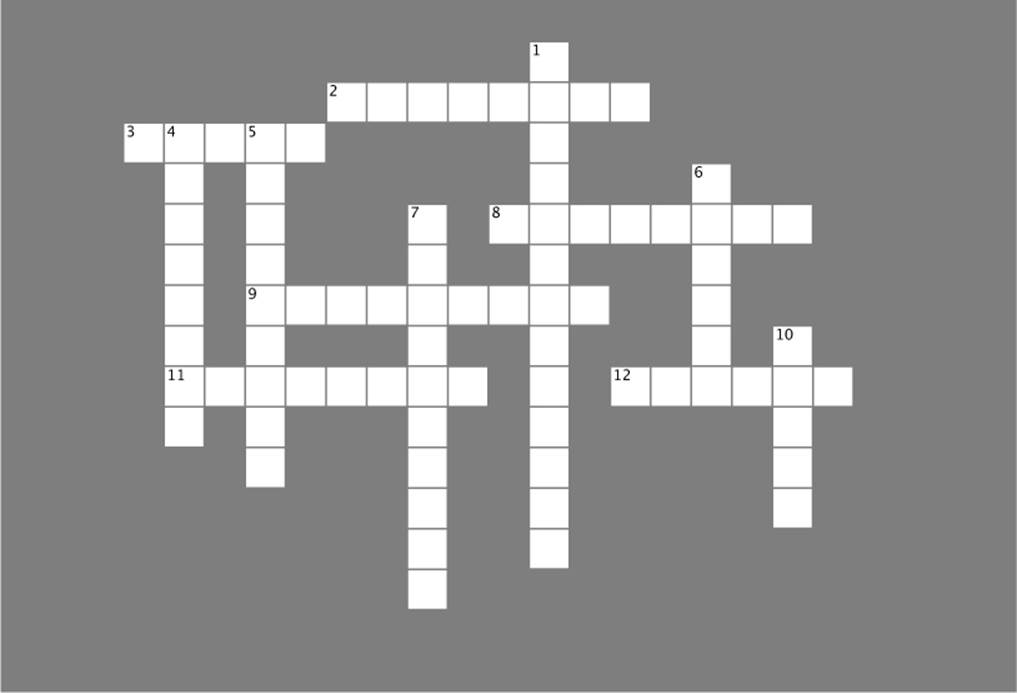
|
Across |
Down |
|
2. Core ______ enables you to access location information from your devices. 3. Map Kit allows you to access ________ maps, not Google’s! 8. We’re using a _________ to hold the descriptions of the phone booths. 9. For hierarchical data, iPad use _______ controllers. 11. Applications are installed on iOS devices as _________. 12. Use ________ sheets to prompt the user. |
1. ___________ helps manage images and photos. 4. _________ are used only in iPad apps. 5. iPad apps need to support both portrait and ______ orientations. 6. You _______ test the camera in the simulator. 7. Using _______ makes it easier to build multiple orientations. 10. Location services use a lot of ______. |
Your kit Toolbox
You’ve got Chapter 9 under your belt and now you’ve added hardware funcitonality to your toolbox.
BULLET POINTS
§ iOS apps are primarily read-only in their interactions with the device.
§ iOS apps are sandboxed by application in the device file structure.
§ Apps are allowed to read and write to the tmp and cache directories in the app sandbox.
§ The cache and tmp directories aren’t backed up by the system.
IOS HARDWARE CROSS SOLUTION
Go ahead and flex some of those new vocab words that you've learned.

|
Across |
Down |
|
2. Core ______ enables you to access location information from your devices. [LOCATION] 3. Map Kit allows you to access ________ maps, not Google’s! [APPLE] 8. We’re using a _________ to hold the descriptions of the phone booths. [DATABASE] 9. For hierarchical data, iPad use _______ controllers. [SPLITVIEW] 11. Applications are installed on iOS devices as _________. [READONLY] 12. Use ________ sheets to prompt the user. [ACTION] |
1. ___________ helps manage images and photos. [UIIMAGEPICKER] 4. _________ are used only in iPad apps. [POPOVERS] 5. iPad apps need to support both portrait and ______ orientations. [LANDSCAPE] 6. You _______ test the camera in the simulator. [CANNOT] 7. Using _______ makes it easier to build multiple orientations. [AUTOLAYOUT] 10. Location services use a lot of ______. [POWER] |
All materials on the site are licensed Creative Commons Attribution-Sharealike 3.0 Unported CC BY-SA 3.0 & GNU Free Documentation License (GFDL)
If you are the copyright holder of any material contained on our site and intend to remove it, please contact our site administrator for approval.
© 2016-2026 All site design rights belong to S.Y.A.