Head First iPhone and iPad Development (2013)
Chapter 1. Getting Started: Getting mobile with iOS

The iPhone changed everything.
When Steve Jobs said that’s what would happen at the unveiling of the iPhone, people were skeptical. Six years later, iPhones and iPads are being used in business and medicine as enterprise devices, and the App Store is a platform for every developer to use, from one-man shows to big-name companies. Apple provides the software and we’ll help you with the knowledge—we’re sure you’ve got the enthusiasm covered.
So you want to build an iOS app...
Mobile development used to be the hip new thing: you were trendy—edgy, even—if you had a mobile app. Those days are gone. Mobile development is everywhere. There are already over 500 million iOS devices out there. By writing an iOS app, you have access to millions of potential users (demanding users, but users all the same).
Back at the beginning of mobile development you could get away with a flashlight application or an app that made noises at the push of a button. Users expect more now. They expect high-resolution graphics that support multiple device orientations, and fast, reliable apps that handle coming in and out of train tunnels without batting an eyelash. Here’s the good news, though: jump into this book, work through the exercises, write some code, and you can have your moment of glory on the iTunes App Store right next to names like EA Games and Apple itself!
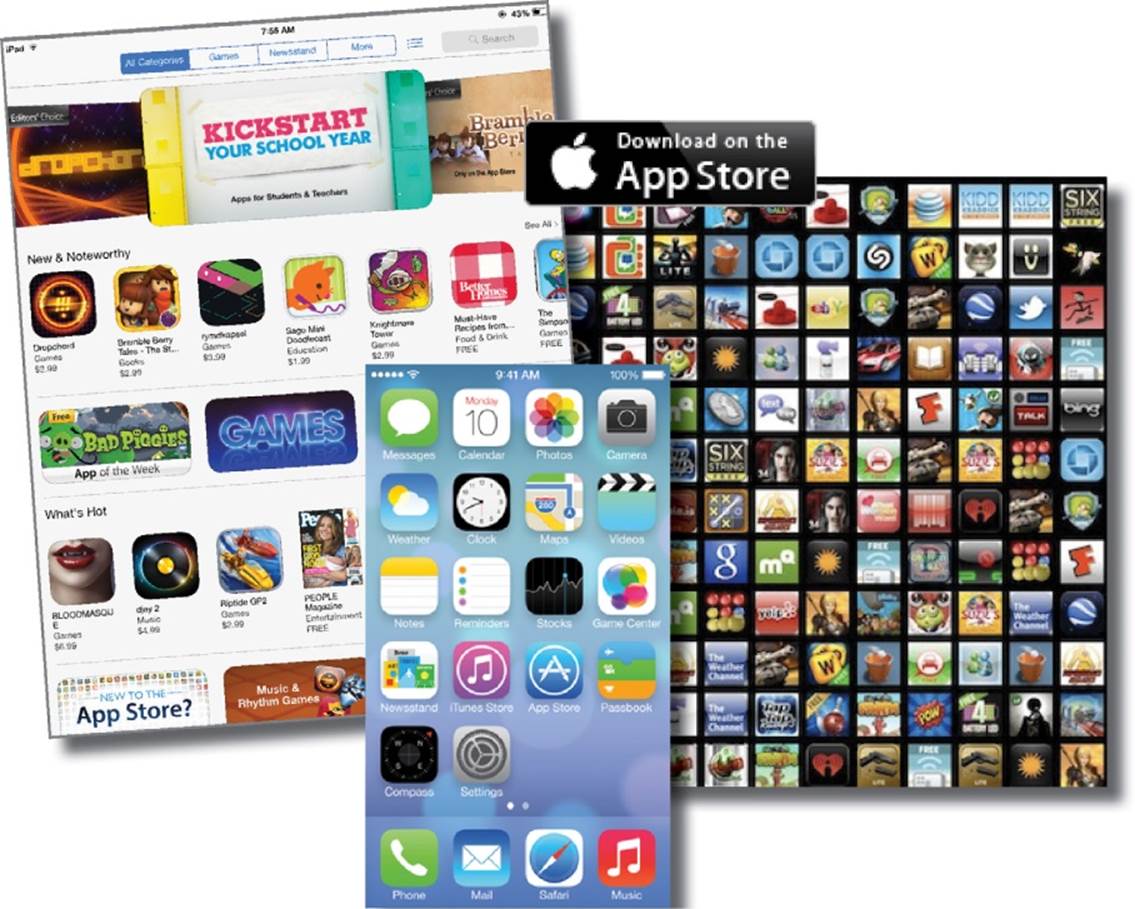
Welcome to the Apple universe!
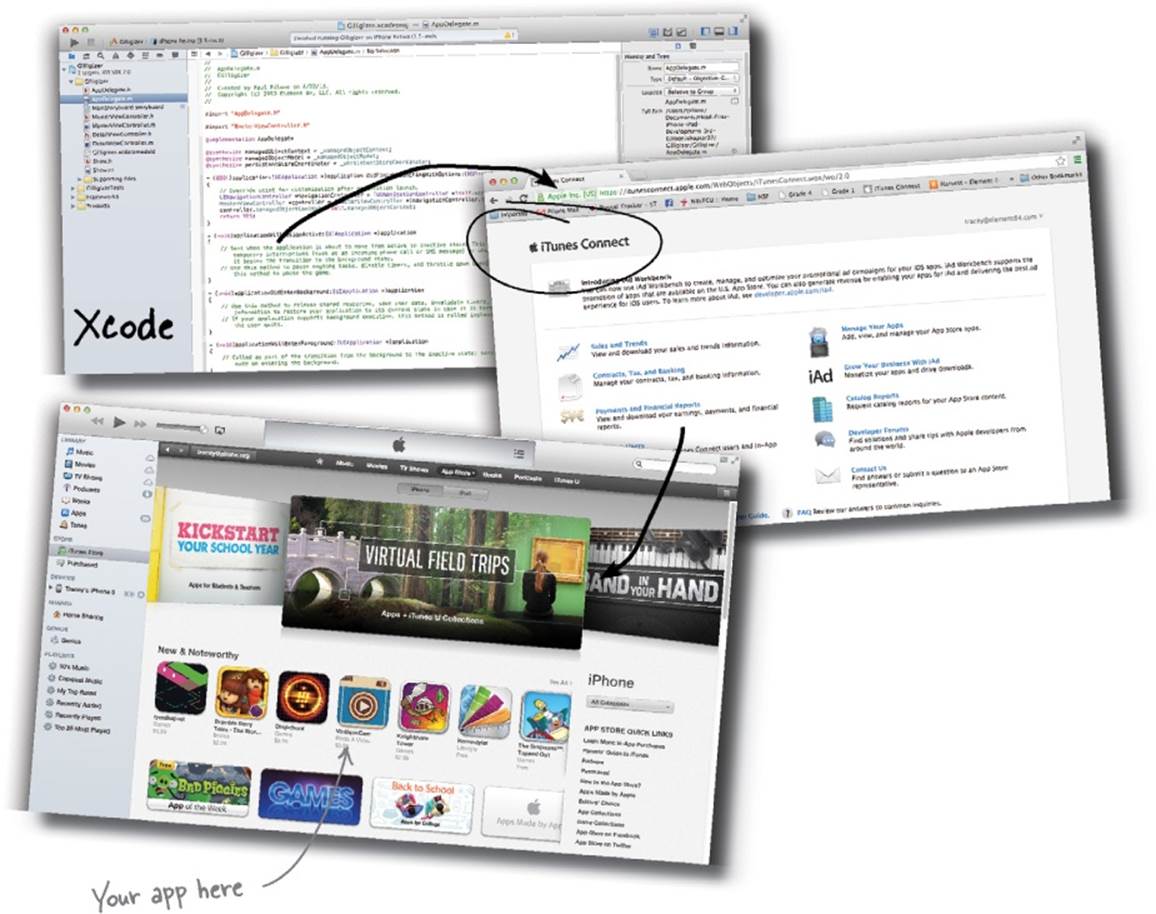
You probably know this already, but Apple does things a certain way. iTunes, the storefront for apps, was the first of its kind. To get on the App Store, you need to write your app using Xcode on a Mac, then submit it using iTunes Connect (the portal for submitting and tracking iOS apps) then have it approved by Apple reviewers in California, and then it will appear on the App Store.
NOTE
There really are live people reviewing these things. We’ve talked to them... too often.
There is a lot going on to develop an iOS app, but it all fits together. Let’s start with writing the app...
iOS apps are written in Objective-C
You’ve developed in other languages before, so most of the concepts we’ll be dealing with here won’t be new. Objective-C is a C-based, object-oriented language. The good news is that the concepts aren’t new. The bad news is that the syntax may be confusing because it’s somewhat similar to something you’ve already used. It’s probably going to break your brain a little. But that’s OK—you’ll get over it.
|
|
It’s like Java. |
|
Object-oriented, with its roots in Smalltalk. |
|
|
|
The syntax is familiar. |
|
Since it’s a C-based language, all the syntax is the same as that in C for loops, types, pointers, etc. It comes from a long line of Apple heritage, starting with NeXTStep, which led to OpenStep, and finally CocoaTouch. NOTE You’ll see NS before a lot of syntax in Objective-C. It comes from the NeXTStep heritage! |
|
|
|
It uses CocoaTouch frameworks. |
|
If you’ve worked with Mac programming, you already know all about Objective-C, but there’s still a lot of iOS-specific things that you need to learn. |
|
|
|
Memory management can be automatic. |
|
With iOS5, Apple finally introduced some automatic memory mangement tools, like in Java, called automatic reference counting (ARC). That means no more counting references to prevent memory leaks. |


It all starts with the SDK
NOTE
Software Development Kit
To write in Objective-C, you’ll need Xcode and a Mac. The development tools are free and easy to get your hands on. Just head over to the Mac App Store and search for Xcode. We wrote this book with Xcode 5.0.
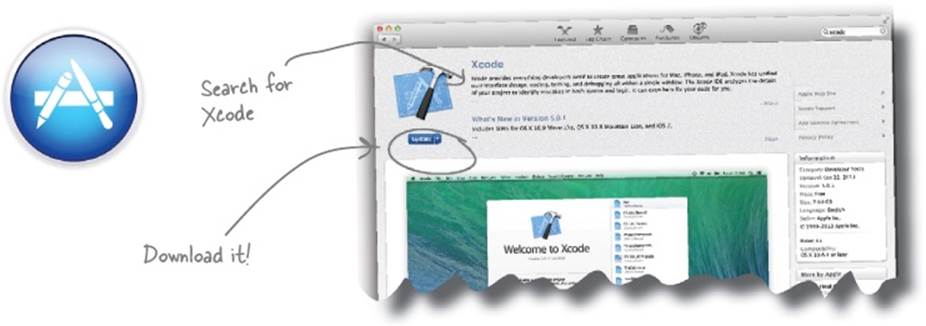
Once Xcode is downloaded, it’ll be dropped into your Applications folder. Xcode is actually a package with a ton of applications, including the compilers, bundled up together. We’ll dig into more of what else comes with the Xcode download later, but for now just fire it up. You can get to it by browsing to your Applications folder in Finder or by using Spotlight.

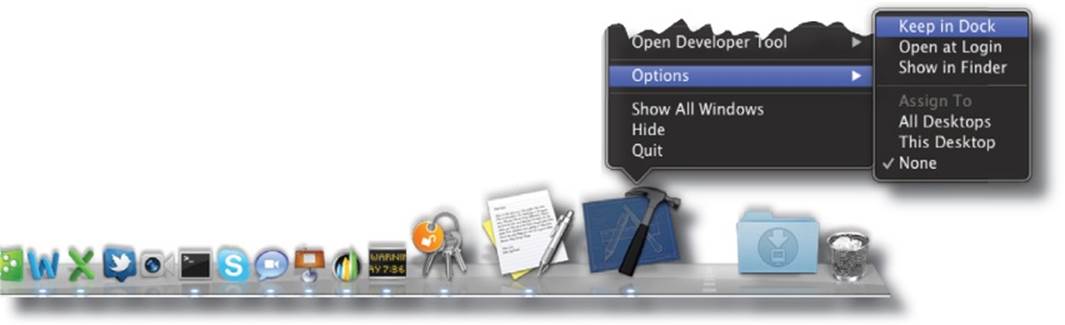
Pin Xcode...you’re going to be here a lot
Once you have Xcode up and running for the first time, take a second to add it to your dock. You’ll be using it throughout this book. Just right-click (Ctrl-click) on the Xcode icon, select “Options” and then “Keep in Dock.”
Meet Sue, your new boss
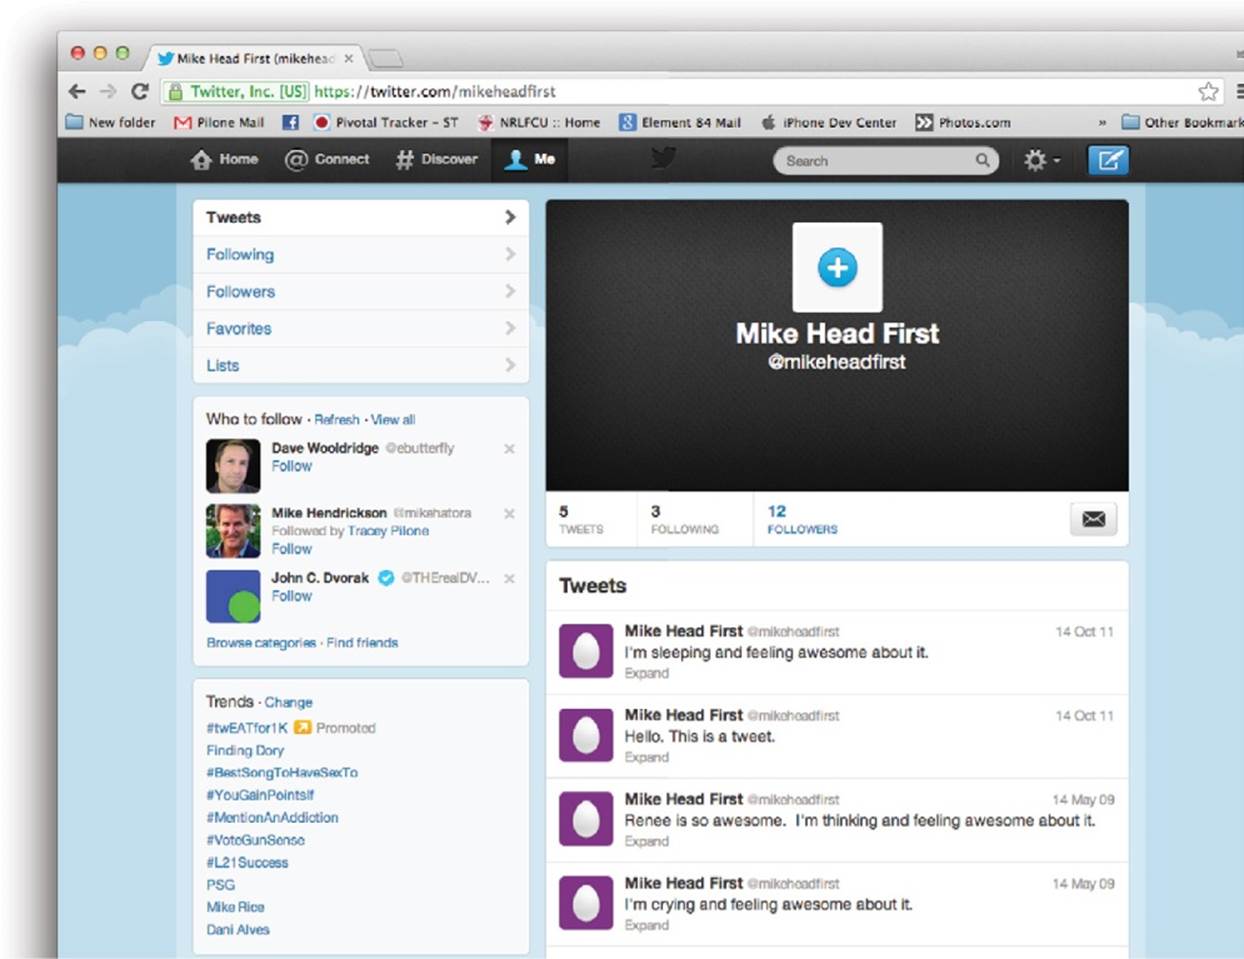
You’ve just started working at a new iOS development shop and you need to clean up a Twitter app that’s almost finished. We’ll make sure you know what you need to know to pull it off, but this is your chance to shine.

THERE ARE NO DUMB QUESTIONS
|
Q: |
Q: What is GitHub? |
|
A: |
A: GitHub is a place for “social coding.” It’s an online site that hosts millions of Git code repositories, many of which are publicly available. It’s great for distributed teams and open source projects. And code for books. You’ll find all the code for this book there, including the example code for this project. GitHub uses Git for its source control, which means you can grab a copy of the code you need for the book and keep track of the changes you make. And if everything falls apart, you can simply revert a change to undo whatever’s broken. |
Xcode and Git...new best friends
Xcode is the development environment for writing iOS apps. GitHub is an online repository (using Git) for software projects. Together, they can make life easier for development teams. You’re working by yourself on this project, but you’re using code from the rest of the team. You don’t need a GitHub account for this, but if you have one, feel free to fork the code and use it.
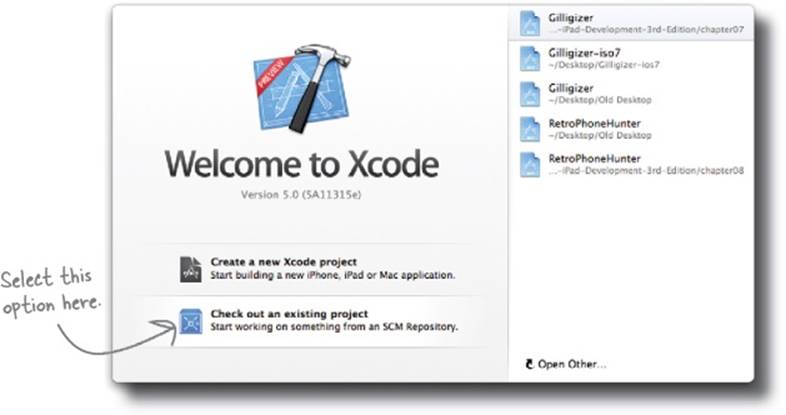
1. Don’t create a new project—we have one in progress.
Xcode’s welcome screen gives you the option to start your own project or connect to an existing one. In this case, we’ll select “Check out an existing project.”
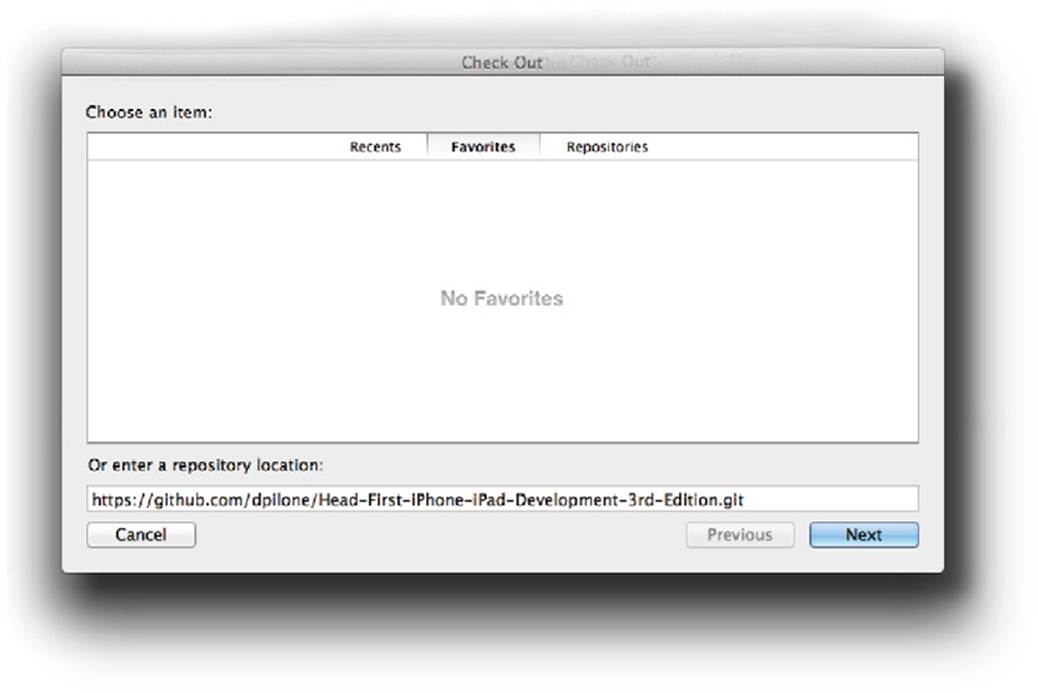
2. Clone the repository.
Next, you need to tell Xcode where to get the code. The URL is https://github.com/dpilone/Head-First-iPhone-iPad-Development-3rd-Edition.git. Once you’ve entered the URL into the repository location box, click Next.
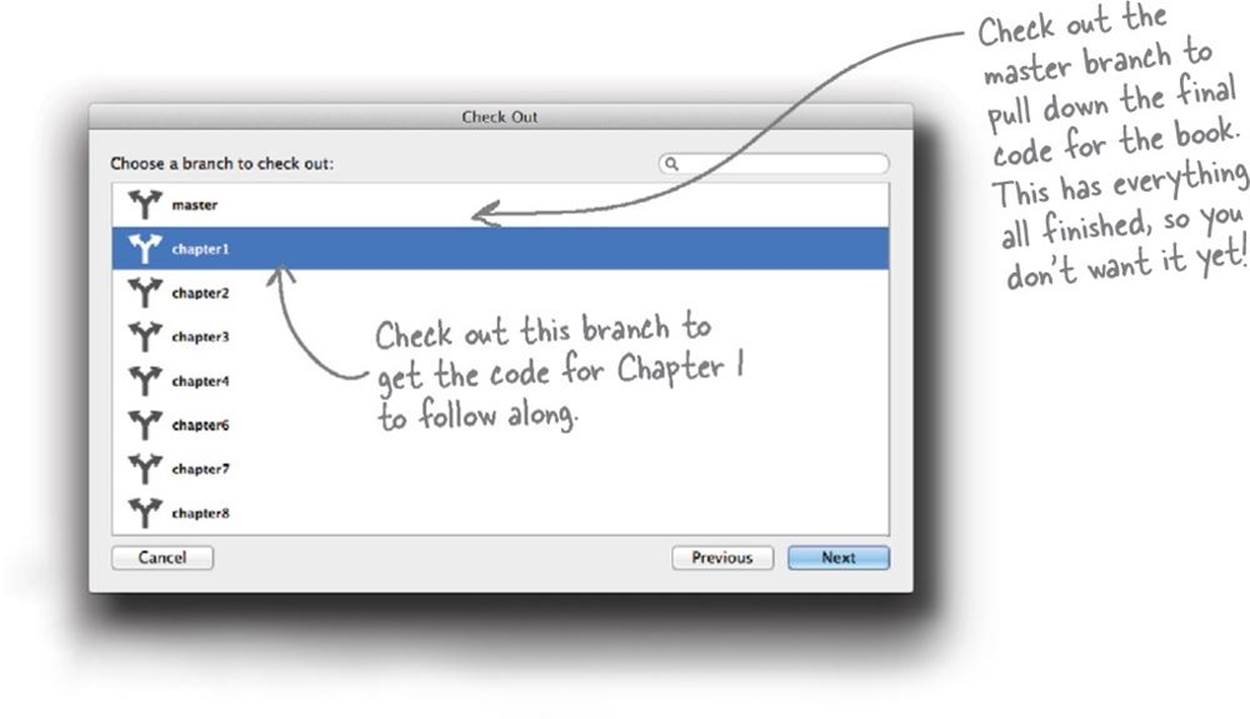
3. Here there are options.
We have the code for the book set up so that you can pull either the sample code you need for each chapter or the completed code for the book. To get the code for the chapter, you need to check out the branch for the chapter, (in this case, Chapter 1).
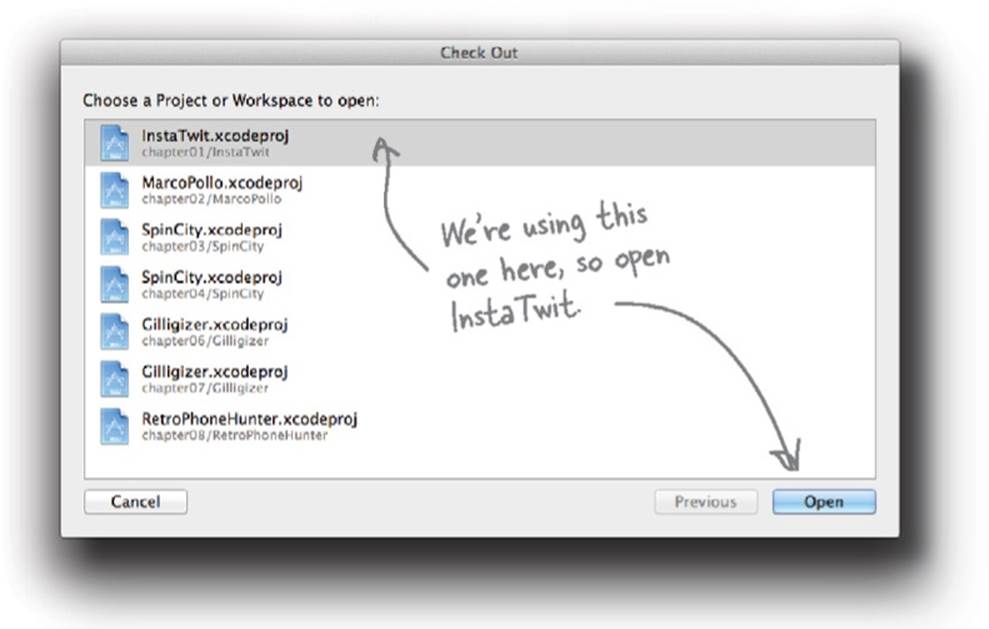
4. Pick your project.
This branch contains several different projects, but for now you need only Chapter 1’s project, InstaTwit. Select that project and click Open.
Lots of projects, private and open source, use GitHub as their online repository.
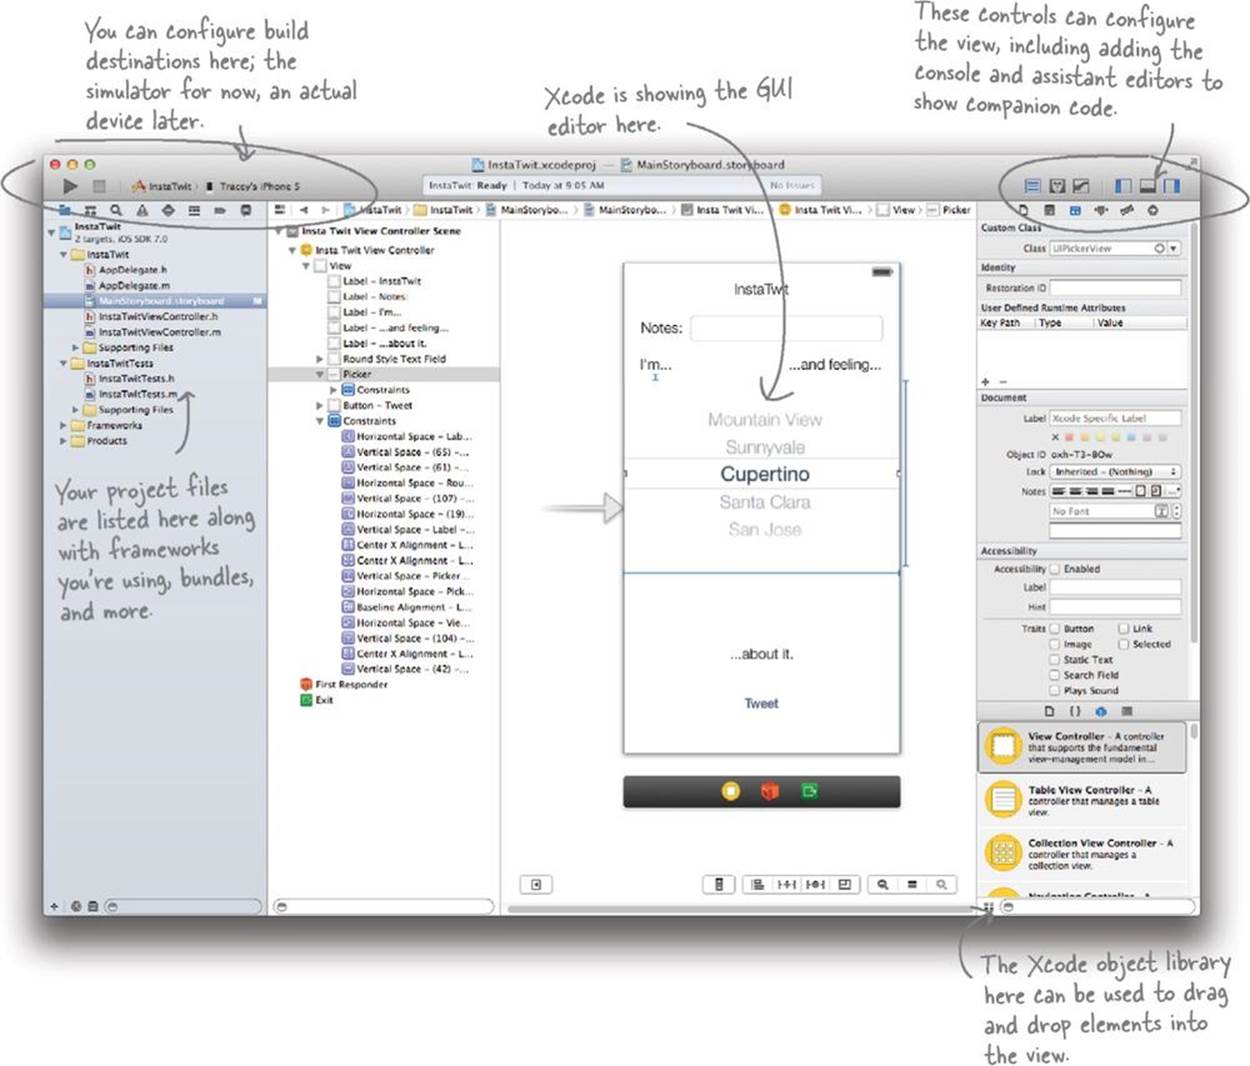
Xcode is the hub of your iOS project
Xcode is a full featured integrated development environment (IDE). You use Xcode to edit code and user interfaces (UIs) as well as to look up documentation. There’s a full featured debugger, compiler, contextual editing support for code implementation, static code analyzer, code quality suggestions and warnings, and full version control support using Git or Subversion.
RELAX
Xcode won’t look like this for you yet.
We’re showing you Xcode in the middle of editing things with a number of views turned on. Don’t worry about making yours look like this yet.
TEST DRIVE
1. Go ahead and build and run the new code.
Confirm that the schema listed is “InstaTwit” iPhone Retina (4-inch) simulator.

2. Click Build and Run.
It looks like a play button.
3. Enable Developer Mode.
You may get a pop up at this time to enable developer mode. Go ahead and do it now—it means you won’t have to enter your password all the time!
THERE ARE NO DUMB QUESTIONS
|
Q: |
Q: Git is what, again? |
|
A: |
A: Git is a version control management system originally developed for Linux development. It works differently than Subversion or CVS, in that every local copy of the repository is in itself a complete repository. That makes it more robust for distributed, asynchronous development teams. For more information about Git and its commands, see http://git-scm.com/about. |
|
Q: |
Q: And how is Git related to GitHub? |
|
A: |
A: Git is a type of version control that can be installed locally on one machine or on a private server for remote access. GitHub is a public, online repository for Git projects. |
|
Q: |
Q: What about Subversion? |
|
A: |
A: Subversion is also supported under Xcode. If you are working in an environment using Subversion, you can check out code using the same workflow (and URL supported by GitHub), but we don’t have a Subversion workflow for the book; you’ll need to use Git for InstaTwit code. |
|
Q: |
Q: What else does Xcode do with Git? |
|
A: |
A: Xcode uses Git to keep track of changes to files. It can tell you with a little icon which files you’ve modified, let you commit your changes right from inside Xcode, and even compare the old files versus the new ones. |
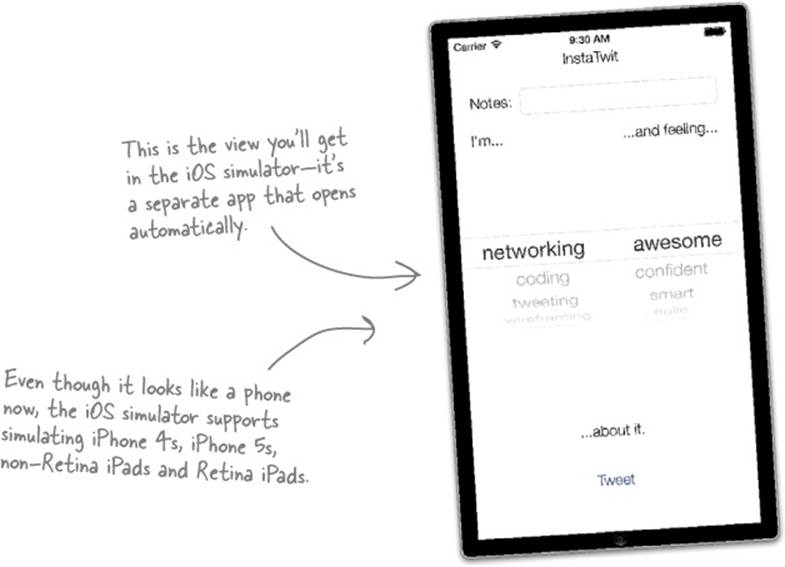
The iOS simulator
The simulator will launch automatically when you build and run the app for the first time. The simulator supports basic interactions besides just tapping on the screen, including rotating views, taking screenshots for app submission, and shaking the device for accelerometer support.

Xcode just did some major heavy lifting.
Even though Xcode makes it look like a simple play button a lot just happened. Even though we didn’t write any new code, you have a fully working project in front of you with a good bit of code. Xcode compiled, linked, processed, packaged, installed, and ran your app when you hit that button. Let’s take a closer look...
AN XCODE BUILD UP CLOSE
1. Xcode pulled the project from GitHub
This one you walked through, but Xcode pulled the original code from GitHub. Xcode pulled more than just the Objective-C source, though. It pulled a full project description, workspace layout, and icons and UIs we use in the app. These are all part of an Xcode project.
NOTE
Technically this isn’t part of the build process, but we didn’t want to skip where the code came from...
2. Classes in your project are compiled
Time to talk files a little. An Objective-C class typically has a .h and a .m file, used as the header and the implementation, respectively. A header file describes the public interface to a class—its API. The implementation file is just that, where the meat goes that makes the class do what it does. Those two get combined and compiled into binary form during the build process.

3. Your UIs are processed and converted to a binary form
UIs in Xcode are usually built as storyboards and are XML documents that describe what goes where. Xcode compiles those down into a binary format along with optimizing any images, icons, etc. that your app uses to a format that’s easily renderable by the target device.
4. Framework code is linked in
There’s lots of shared library code in an iOS app: UI drawing code (UIKit), mapping support (MapKit), low-level drawing code (CoreGraphics), etc. Apple calls these shared libraries frameworks. Frameworks are more than just shared compiled code like JARs or .so files from other languages. In Objective-C, frameworks can include header files, graphics resources, and more. Some frameworks, like MapKit, are optional and needed only if your application uses them, whereas others, like CoreGraphics, are required because every application relies on the code they contain.
5. Your compiled code, images, etc. get packaged up
If you’ve never worked with OS X or iOS applications before, SomeApp.app is actually just a directory with specific contents. An iOS application is a folder with a compiled executable, a number of configuration files, and any resources the app needs to run. We’ll talk more about the directory structure later.
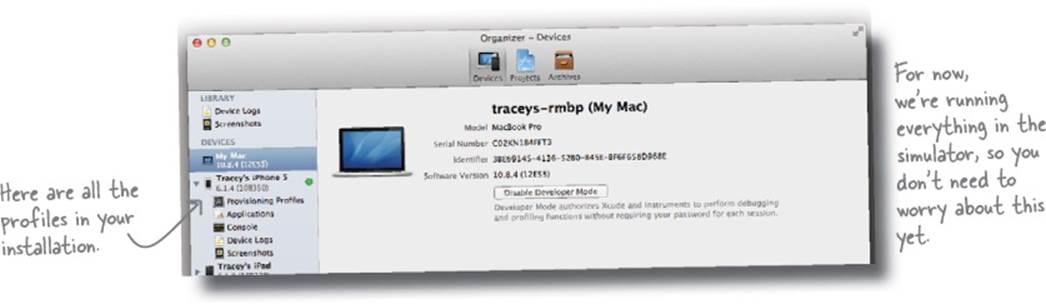
6. If you’re installing on a device, the code is signed
Installation onto devices—everything from just testing on your personal device to posting on the App Store—is controlled with certificates based on your developer credentials. This is how the iOS ecosystem controls what can be installed on devices. Certificates are managed in the organizer and you use provisioning profiles to match up applications with devices.
7. Your app is installed on the simulator
The simulator acts a lot like a real device. It has a directory where your data is stored, apps get their own directories by IDs, etc. We’ll talk more about that later, but it’s all happening right now when you hit Play...
8. Your app is launched and the debugger is attached
Xcode will start up your application in the simulator and then attach the debugger to it if you chose to debug the app (versus just running it without debugging). We’ll see more of this shortly, but the console will start logging events in the app and you can monitor it through a panel in Xcode.

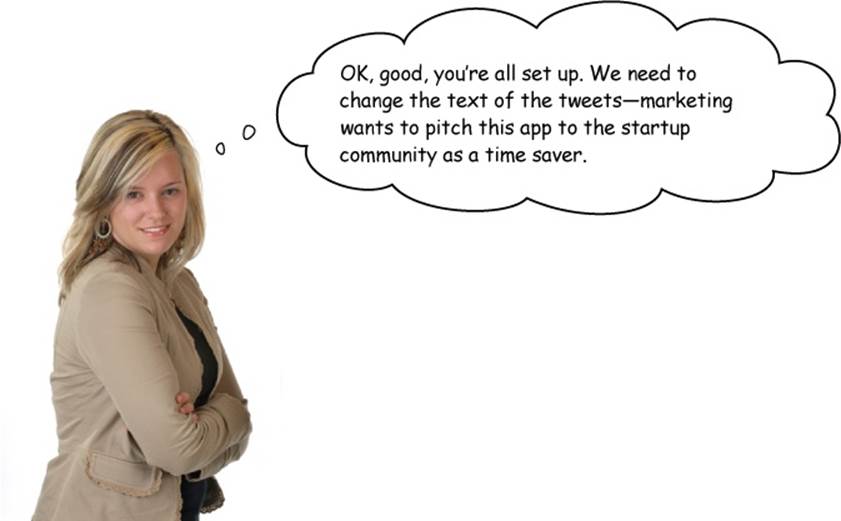
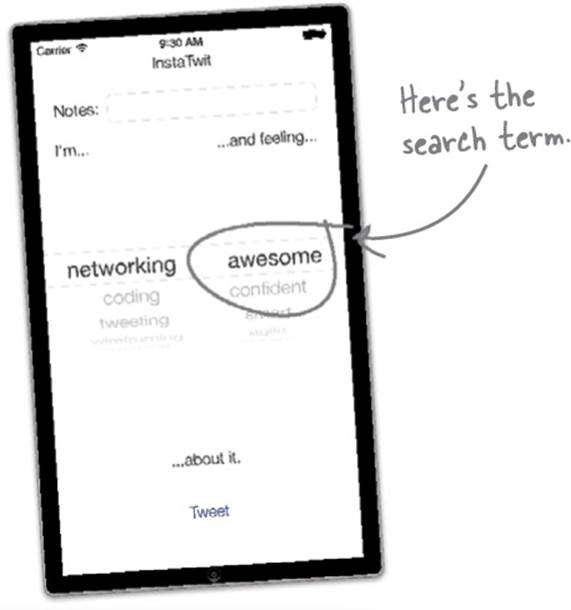
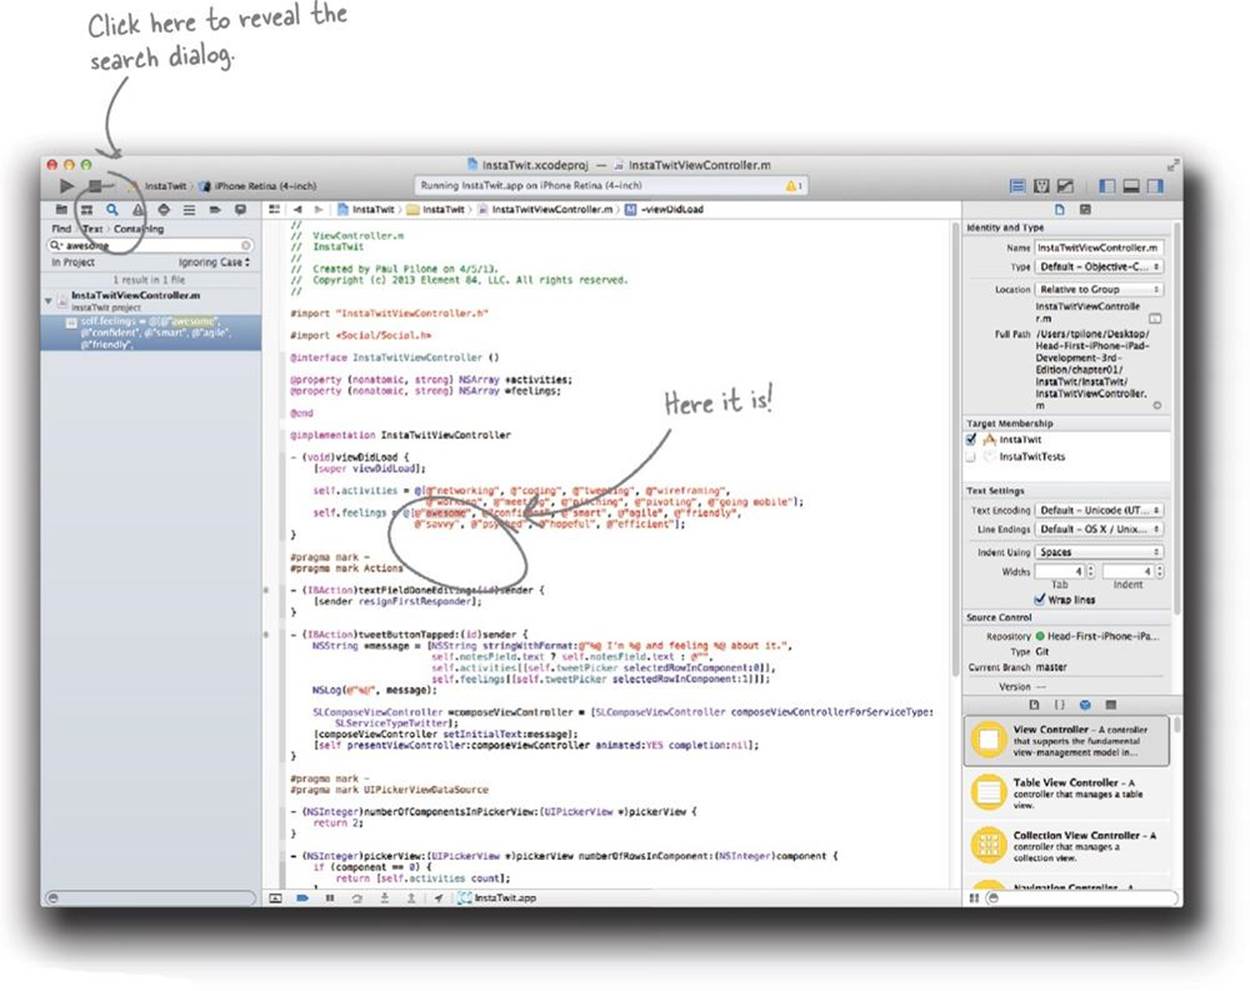
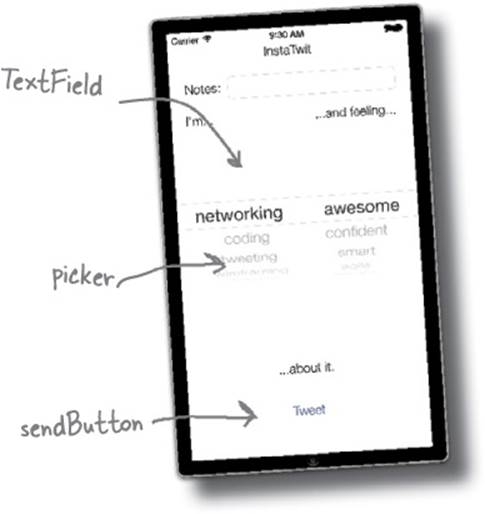
Sometimes search is your best friend.
It’s a minor change (we’re changing static content that’s hardcoded into the app). Let’s just be real: the easiest way to figure out where the code for that text lives is to use search. Since “awesome” is one of the labels, search for that.
Your code is stored in source files
The actual code for the application is broken up into classes and each class is made up of two files, a header (.h) file and an implementation (.m) file. The header file (.h) is the public API to the class, whereas the implementation file (.m) has all the meat. Our problem has to do with the data our app is showing, not some issue with a class’s API.
BRAIN BARBELL
InstaTwitViewController.h is the header file for this class; it declares the public interface, meaning the public properties and actions for this class. Navigate over to the header file and take a look if you’re curious.
DO THIS!
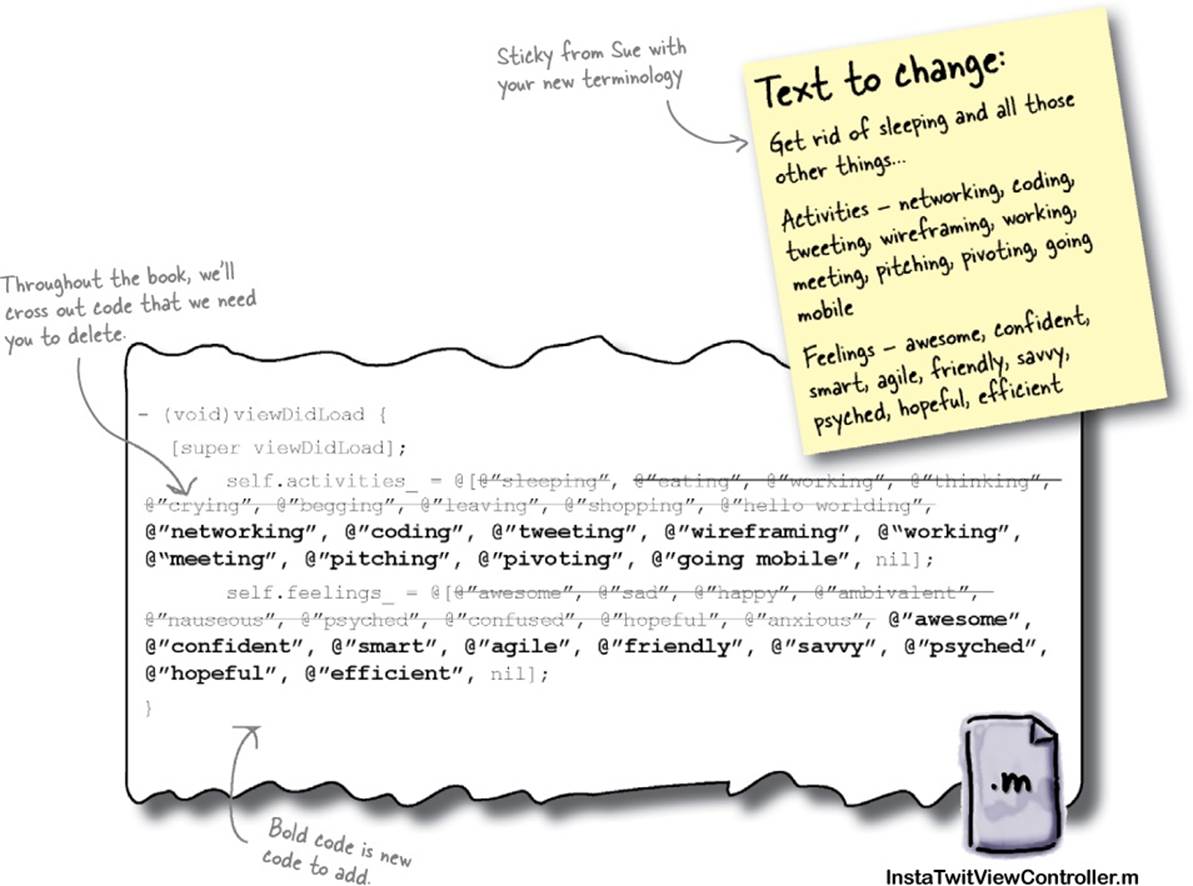
Make the following edits to the existing code base.
THERE ARE NO DUMB QUESTIONS
|
Q: |
Q: Do I always have to build and run the app to test things? |
|
A: |
A: Yes—some languages like Ruby and Javascript do away with the compilation step, but Objective-C is a compiled language. In order to test changes, you need to build the app, install it on the simulator (or a real device), and run it there. Xcode does have good support for unit and functional tests and you can use a tool called Instruments to do full application interaction tests. Using automated tests speeds up the testing cycle and avoids having to build and run the full app and run it, but that’s no substitute for full application testing. |
|
Q: |
Q: How important is it to run on a real device? Can I just do everything on the simulator? |
|
A: |
A: You can do a lot in the simulator. Depending on what you’re doing, you can probably do most of your testing there. But there are differences between running in the simulator and running on a real device. Ultimately you’ll need to test things on a real device, and depending on what features you use, you might need to do it sooner rather than later. We’ll talk about device-specific capabilities in later chapters. Regardless of what features you trust, you really really have to test performance on real devices—never test simulator performance when testing your application. |
SHARPEN YOUR PENCIL
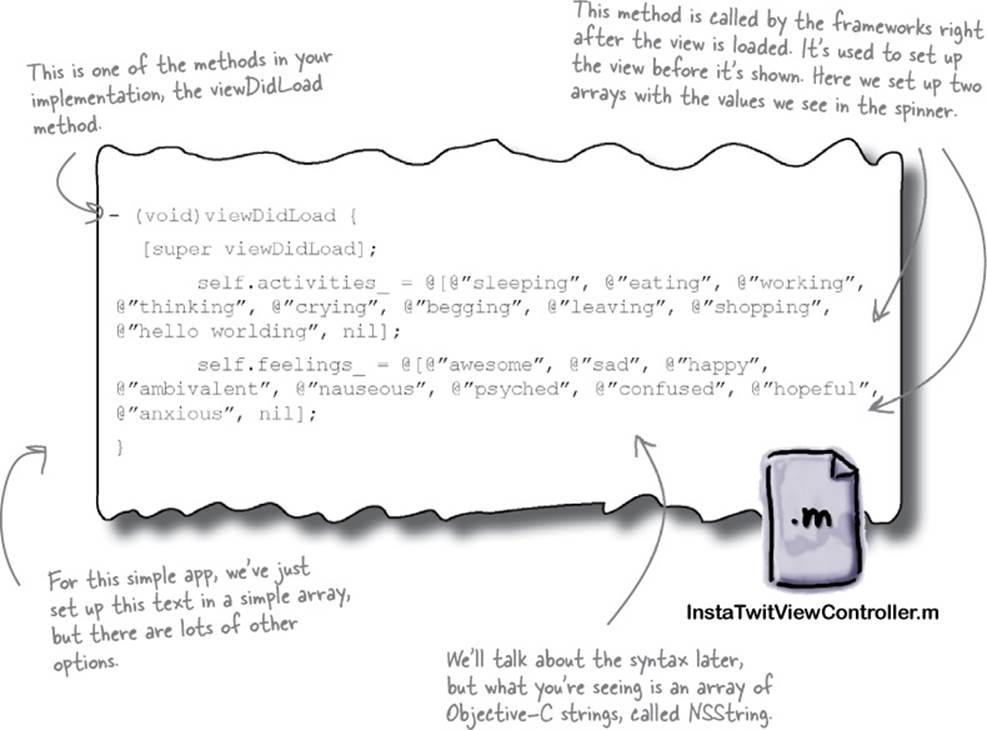
What does this do? Now that you know what viewDidLoad does, look at some other methods from the .m file and write what you think those methods do.
RELAX
It’s OK if the Objective-C still looks a little weird...
We’re throwing a bunch of Objective-C at you here. Hopefully you can guess what’s going on, but we’re going to talk a lot more about Objective-C throughout this book. Nothing to fear yet..
SHARPEN YOUR PENCIL SOLUTION
Here are some of the other methods that were in the InstaTwitViewController.m file.
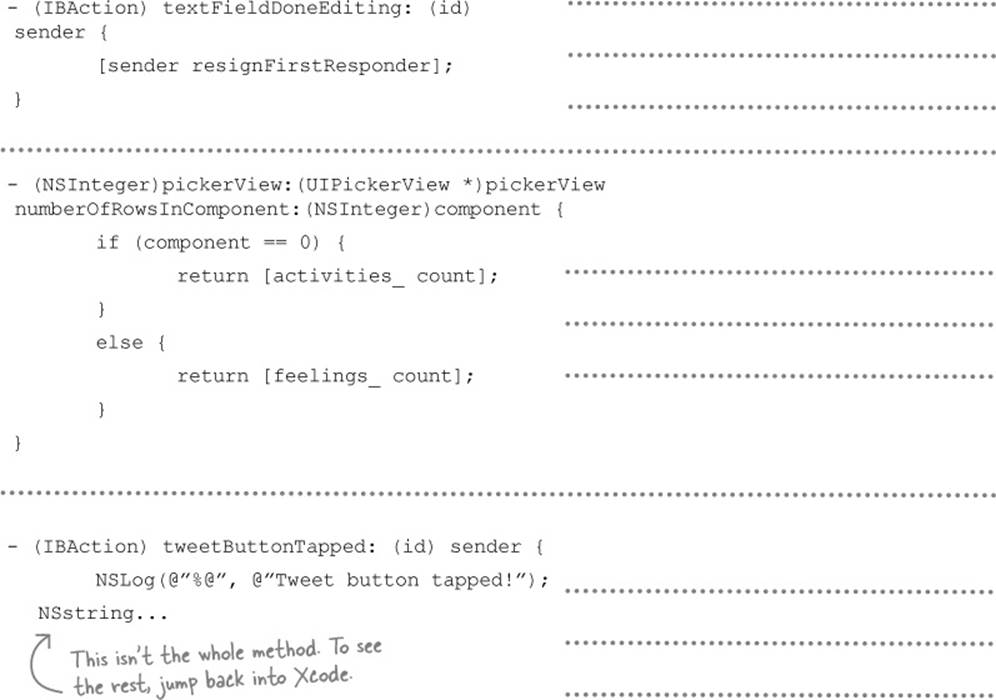
- (IBAction) textFieldDoneEditing: (id)
sender {
[sender resignFirstResponder];
}
This is a callback method that’s attached to the text field (we’ll show you how soon...). When the text field is “done editing,” it will send out a resignFirstResponder notification. We’ll learn more about FirstResponder status later, but for now know that the UI always has something that is acting as the first responder.
- (NSInteger)pickerView:(UIPickerView *)pickerView
numberOfRowsInComponent:(NSInteger)component {
if (component == 0) {
return [activities_ count];
}
else {
return [feelings_ count];
}
}
The picker component asks the view controller how many rows the picker should display. In our case, it’s going to vary based on the number of entities in the activities and feelings arrays.
- (IBAction) tweetButtonTapped: (id) sender {
NSLog(@"%@", @"Tweet it button
tapped!");
NSstring...
When the button gets tapped, it needs to do something. Just like with the text field, the button will send out an action when something happens. This code is hooked up to that action. This snippet will log a comment when the button is tapped. We’ll show you where to see that log shortly. The Twitter code follows.
TEST DRIVE
Now that you’ve found the code to update for this app, make the changes and rebuild the app.
1. Go into Xcode and make the text changes.
Flip back a couple of pages to the InstaTwitViewController.m file and make the edits on that page.
2. Save and rebuild the app.
After changing the text, go back and build and run the app.
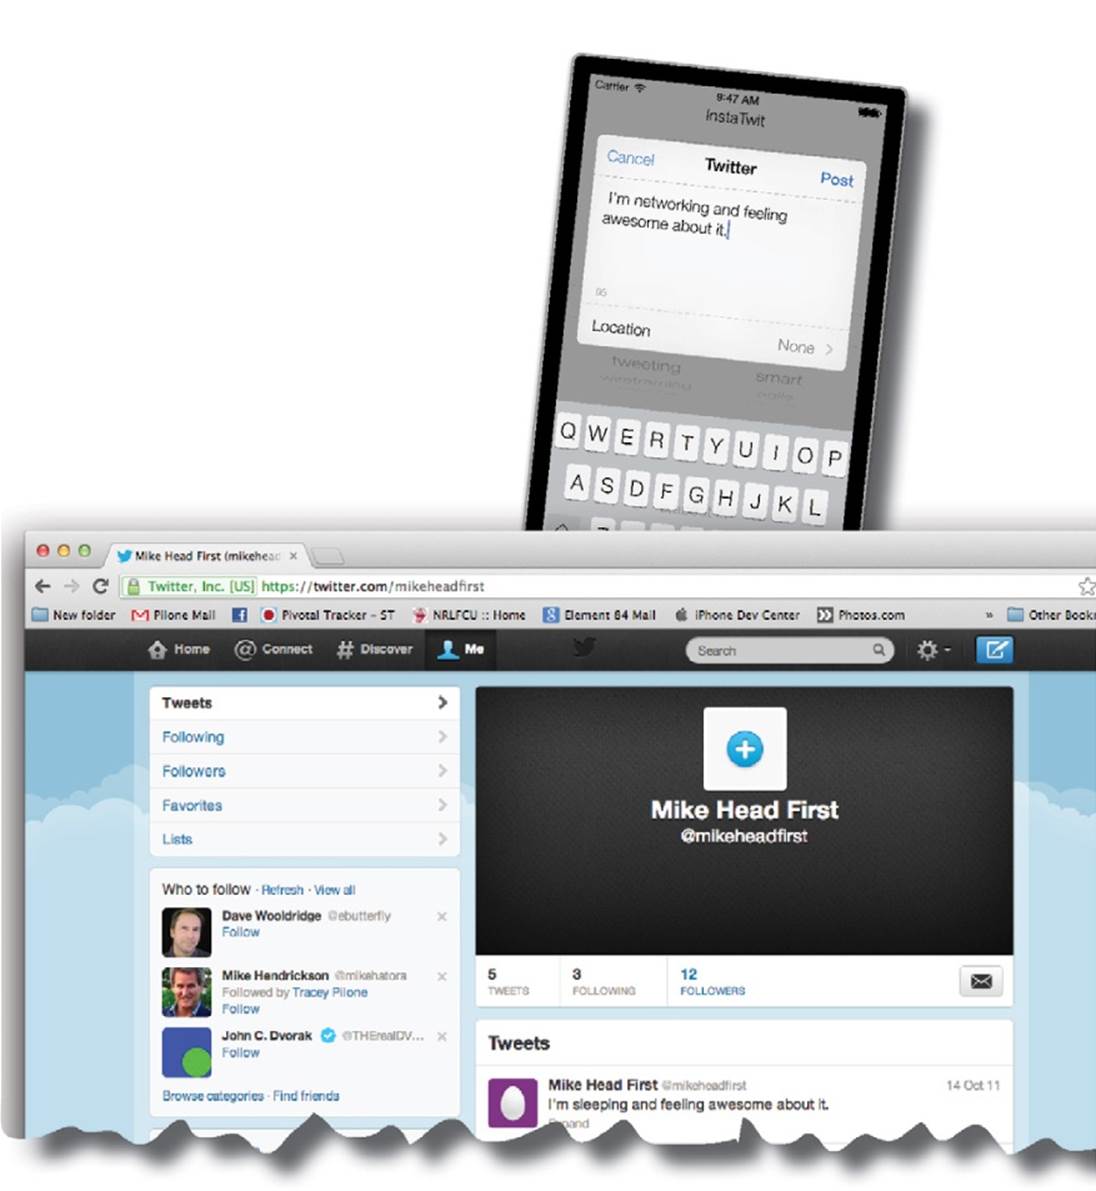
3. Configure your Twitter account in the simulator
If you want these tweets to show up live in the Twitter-verse, press the home button on the simulator, go into settings, and add your account details. Then go back into the app and send a tweet!
Xcode can provide lots of help with debugging if your app didn’t quite build right....
Code Editor, Hub...and debugging, too
Unless you are the most perfect typist and you’ve not been paying attention when your code is incomplete, you’ve probably noticed the warnings and errors coming in and out of the editor. Xcode tries to keep up while you write code and provides you inline warnings and errors before you build anything.
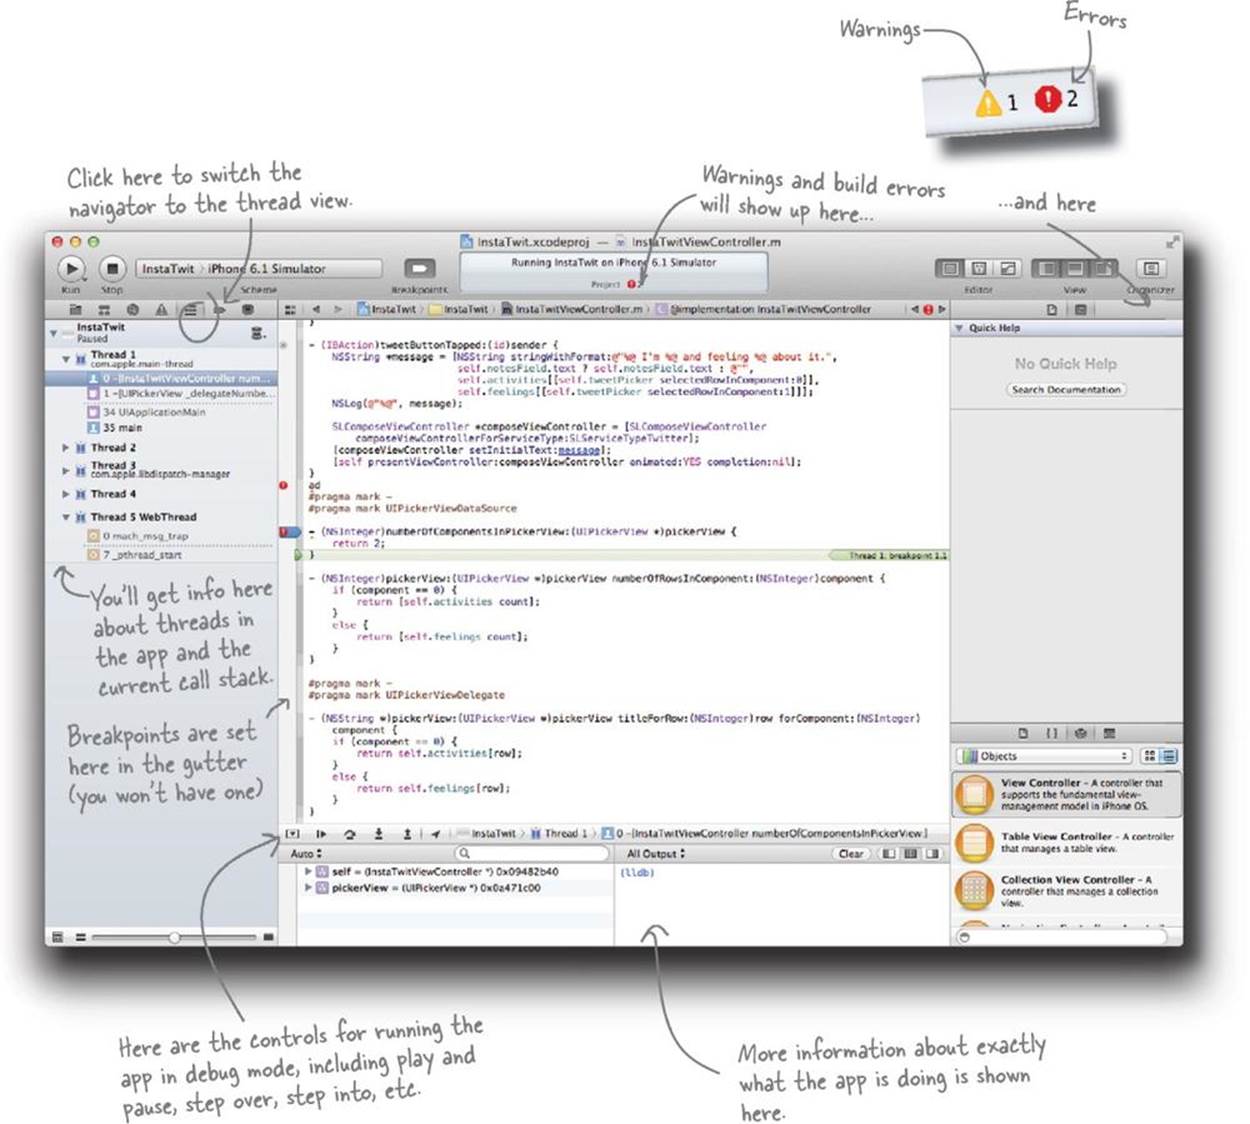
Once you get your code running, Xcode also has a full debugger to help you figure out what’s going on. You can set breakpoints by clicking in the gutters, set watches on variables, and, once things hit one of your breakpoints, inspect variable values and step through code.

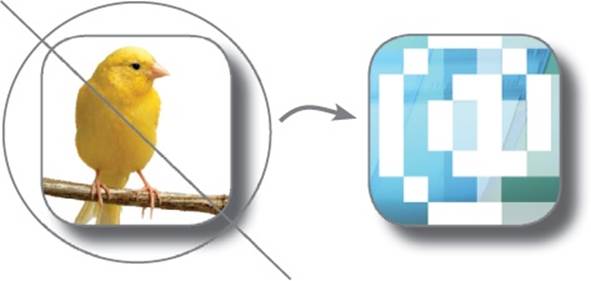
Did you notice the old icon?
It was kinda lame, really just a boring bird, (since it’s Twitter). To be more startup/tech friendly, marketing has this new retro 8-bit looking @.
Changing the app icon is easy with Xcode
Xcode treats graphics as application resources. Every app has some resources associated with it (even this one), varying from icons all the way up to high-res images and embedded video.
Xcode helps you organize all your images (you can view most image types), and then packages and preprocesses the images for use within the application.
One iPhone, two iPhones, red iPhone, blue iPhone...
NOTE
OK, not yet, but we heard from a guy who has a friend who knows this woman who says that Apple is working on glow-in-the-dark ones...
In Xcode, click on the main project name and bring up the summary page. This page is a high-level overview of your app including deployment info, some images, and version numbers. It also allows you access to the Asset Catalog for the app.
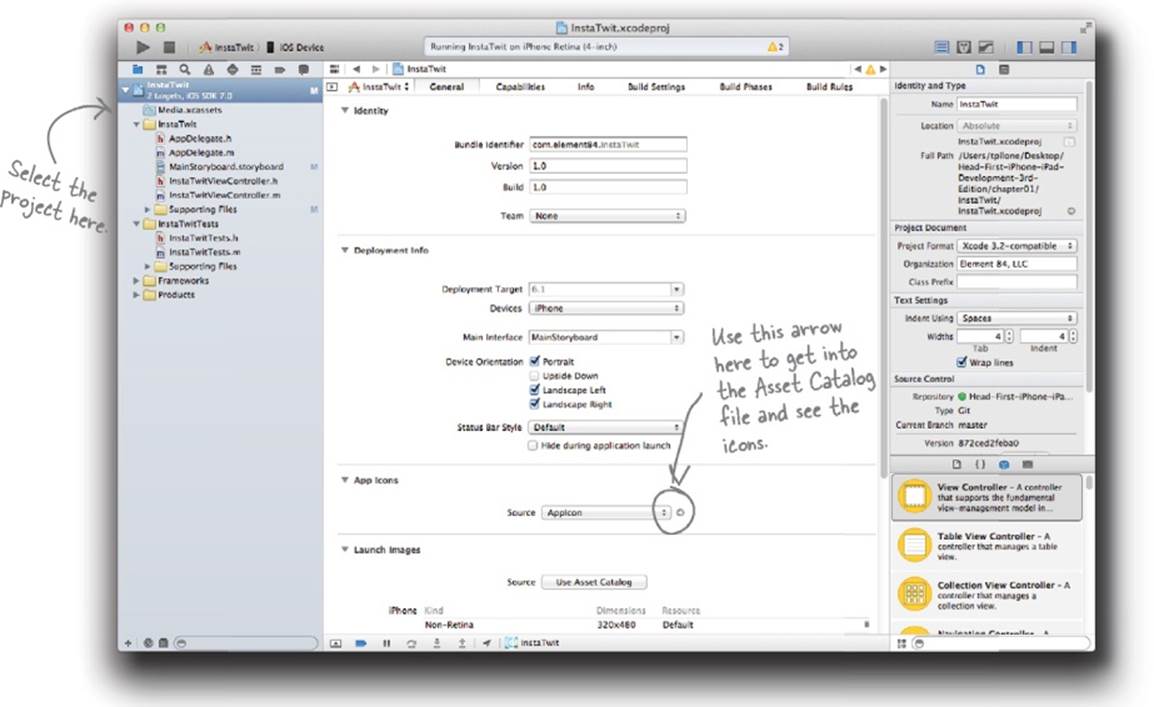
Asset catalogs are specialized files that help you keep all the images straight for your app. This page lets you use a nice graphic interface to organize the icons. You’ll see similar interfaces for the launch images and other graphics.


Absolutely! We’ll be dealing with device capabilities as we go.
Different devices and different generations of the same device have different capabilities. iOS generally does a good job of hiding these things from you. For example, when you lay out your user interface, iOS will automatically draw it at the higher resolution on a Retina display. There are some parts you need to know about, though, such as different icon sizes, whether or not the device has a camera, etc. We’ll point them out as we go.
TEST DRIVE
1. Find the icons from cloned project.
The code you cloned from GitHub has alternate icons in it. Use Finder and navigate to where you cloned the code.
2. Drag onto dialogs in the Asset catalog.
Take the new images and drag them in from Finder. The files are square-new-icon-60.png and square-new-icon-120.png.
3. Delete the app from the simulator.
To make sure that the old icon doesn’t persist, go into the simulator, hit the home button, and then click and hold on InstaTwit. Once the icon starts vibrating and a little x appears, click the x to delete the app.
4. Build and run from Xcode.
Click play again. The app will rebuild and reinstall in the simulator with the new icon. If you press the home key, you’ll see it!

TEST DRIVE
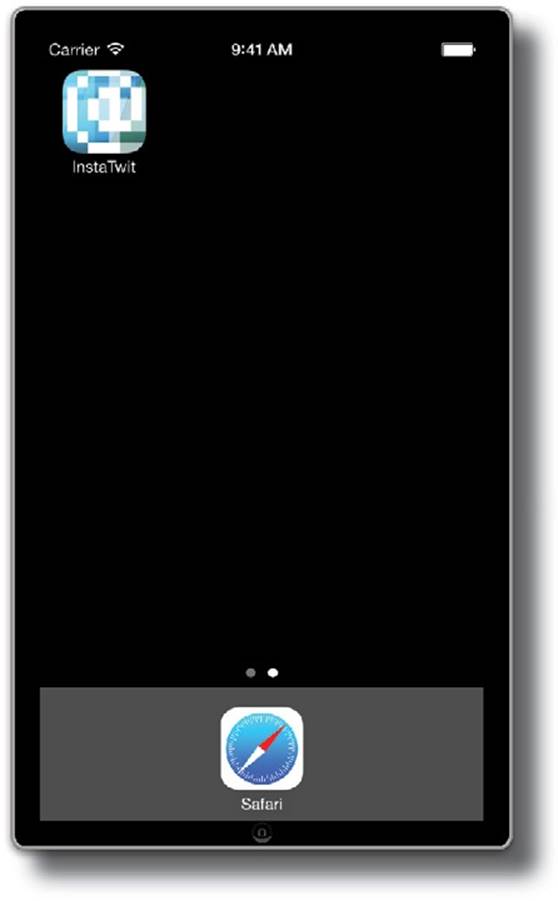
You should see that fancy new icon on the springboard!
BULLET POINTS
§ Xcode is the hub of your iOS development.
§ Xcode is a powerful IDE with documentation support, debugging, and user interface editors.
§ The simulator is good for testing, but it has its limitations; you’ll need to test on a real device.
§ To get an app on a device, you’ll need to be a paid Apple Developer.
§ Git support is built into Xcode.
§ You’ll need to care about different device capabilities as you build your app.


You can. Just pay $99 to Apple.
Seriously. To get an app on a device, there are some security things that need to be taken care of, certificates and profiles that need to be set up. To get access to those signing mechanisms, you have to be a registered and paid Apple iOS developer. To find out more information about the program, head over to http://www.apple.com/iosdeveloper.
For the purposes of this book, we’re going to stay in the simulator, so you won’t need to buy the program to keep up here.
Want more? Check out the Developer Site!

Great job!
You got your feet wet with Xcode and started navigating around the Apple Developer universe. Using the standard controls and Xcode, you can get some pretty good apps going fairly quickly. There’s nothing like seeing people actually using your app...we’re just getting warmed up.
IPHONE DEVELOPMENT CROSS
Take some time to exercise the other half of your brain and check your terminology.

|
Across |
Down |
|
2. The higher resolution screen name 4. Used to sign applications to put them on physical devices 5. Something that the simulator cannot reliably test 7. The language used to write iOS apps 8. The framework used to write iPhone apps 9. The term to describe each screen of an iPhone app 10. This is used on a desktop to test an app 11. These are used in Xcode to provide classes to be accessed. |
1. The name for the IDE for iPhone Apps 2. The folder used to organize the images for the app 3. This is the name of the editor used for Objective-C 6. The iPhone is a _________ device. |
Your iPhone Development toolbox
You’ve got Chapter 1 under your belt and now you’ve added some basics to your toolbox.

BULLET POINTS
§ Xcode is the hub of your iOS development.
§ Xcode is a powerful IDE with documentation support, debugging and user interface editors.
§ The simulator is good for testing, but it has its limitations; you’ll need to test on a real device
§ To get an app on a device, you’ll need to be a paid Apple Developer.
§ Git support is built into Xcode.
§ You’ll need to care about different device capabilities as you build your app.
IPHONE DEVELOPMENT CROSS SOLUTION
Take some time to exercise the other half of your brain and check your terminology.

|
Across |
Down |
|
2. The higher resolution screen name [RETINA] 4. Used to sign applications to put them on physical devices [CERTIFICATES] 5. Something that the simulator cannot reliably test [PERFORMANCE] 7. The language used to write iOS apps [OBJECTIVEC] 8. The framework used to write iPhone apps [COCOATOUCH] 9. The term to describe each screen of an iPhone app [VIEW] 10. This is used on a desktop to test an app [SIMULATOR] 11. These are used in Xcode to provide classes to be accessed. [FRAMEWORKS] |
1. The name for the IDE for iPhone Apps [INTERFACEBUILDER] 2. The folder used to organize the images for the app [RESOURCES] 3. This is the name of the editor used for Objective-C [XCODE] 6. The iPhone is |
All materials on the site are licensed Creative Commons Attribution-Sharealike 3.0 Unported CC BY-SA 3.0 & GNU Free Documentation License (GFDL)
If you are the copyright holder of any material contained on our site and intend to remove it, please contact our site administrator for approval.
© 2016-2026 All site design rights belong to S.Y.A.