iOS Game Development Cookbook (2014)
Chapter 3. Input
Without a way to collect input from the user, your game is nothing but a pretty graphics demo. In this chapter, we’ll look at common tasks that games often need to perform in order to get input from their players. The only way that a game can know about what the user wants to do is via the input that it collects, and the main way that the player provides that input is through the device’s built-in touchscreen.
Behind the scenes, a touchscreen is a very complex piece of technology. However, the information that it provides to your game is rather simple: you get told when a touch lands on the screen, when a touch moves, and when a touch is lifted from the screen. This might not sound like much—everyone knows you can detect taps, for example—but the touch system built in to iOS is able to use this information to determine when the user is dragging, pinching, rotating, and flicking, all of which can be used to interpret the user’s will.
In addition to the touch system, iOS devices have a number of built-in sensors that detect the current state of the hardware. These include an accelerometer (which detects force and movement), a gyroscope (which detects rotation), a magnetometer (which detects magnetic fields), and a receiver for the Global Positioning System, or GPS (which can calculate where on the planet the device is).
All of this information can be combined to learn a great deal about what the user’s doing with the device, which can be used as input to your game. For example, it’s possible to determine the user’s speed by observing the distance traveled over time, which can give you an idea of whether the player is in a vehicle—which you can then use as part of your game’s input.
Detecting When a View Is Touched
Problem
You want to know when the user touches a view.
Solution
You can override certain UIView methods that get called when a touch begins, moves, ends, and is cancelled.
Put this code in your view controller, or in your UIView subclasses:
- (void)touchesBegan:(NSSet *)touches withEvent:(UIEvent *)event {
for (UITouch* touch in touches) {
NSLog(@"A touch landed at %@", NSStringFromCGPoint([touch
locationInView:touch.view]));
}
}
- (void)touchesMoved:(NSSet *)touches withEvent:(UIEvent *)event {
for (UITouch* touch in touches) {
NSLog(@"A touch was moved at %@", NSStringFromCGPoint([touch
locationInView:touch.view]));
}
}
- (void)touchesEnded:(NSSet *)touches withEvent:(UIEvent *)event {
for (UITouch* touch in touches) {
NSLog(@"A touch ended at %@", NSStringFromCGPoint([touch
locationInView:touch.view]));
}
}
- (void)touchesCancelled:(NSSet *)touches withEvent:(UIEvent *)event {
for (UITouch* touch in touches) {
NSLog(@"A touch was cancelled at %@", NSStringFromCGPoint([touch
locationInView:touch.view]));
}
}
Discussion
A touch can be in one of four states:
Began
The touch just landed on the screen.
Moved
The touch moved from one location to another. (The related method is often called multiple times over the life of a touch.)
Ended
The touch was lifted from the screen.
Cancelled
The touch was interrupted by something happening on the iPhone, such as a phone call coming in.
When a touch lands on the screen, iOS first determines which view should be responsible for handling that touch. It does this by first determining where the touch landed on the screen, and which view happens to contain that point; second, it determines if this view, or any of its subviews, is capable of handling the touch. This is determined by checking to see if the view (or any of its subviews) has implemented any of the touchesBegan, touchesMoved, touchesEnded, or touchesCancelled methods.
Each of these methods is called when a touch that belongs to the view changes state; because several touches can change state at the same time (e.g., two fingers being moved simultaneously over a view), each of the methods takes an NSSet that contains each of the UITouch objects that recently changed state.
Responding to Tap Gestures
Problem
You want to detect when the user taps on a view.
Solution
A tap is when a finger lands on a view, and then lifts back up without having moved.
Use a UIGestureRecognizer (specifically, UITapGestureRecognizer):
UITapGestureRecognizer* tap = [[UITapGestureRecognizer alloc]
initWithTarget:self action:@selector(tapped:)];
[self.tapView addGestureRecognizer:tap];
}
- (void) tapped:(UITapGestureRecognizer*)tap {
if (tap.state == UIGestureRecognizerStateRecognized) {
self.tapCount++;
self.tapCountLabel.text = [NSString stringWithFormat:@"It's been tapped
%i times!", self.tapCount];
}
}
@end
Discussion
Gesture recognizers are objects that you can attach to views that look for specific patterns of touches, such as pinches, taps, and drags.
UITapGestureRecognizer is a gesture recognizer that looks for taps—that is, a touch landing and then being lifted up quickly, without moving. Taps are the most common gesture performed on the iPhone or iPad.
When the gesture recognizer detects that the user has performed the gesture that it’s looking for, it sends a message to a target object. You specify the message and the target object when you create the recognizer, as follows:
UITapGestureRecognizer* tap = [[UITapGestureRecognizer alloc] initWithTarget:self
action:@selector(tapped:)];
In this example, the message that’s sent is tapped:. This method needs to be implemented on the target object (in this example, self). The method takes one parameter, which is the gesture recognizer itself:
- (void) tapped:(UITapGestureRecognizer*)tap
By default, a tap gesture recognizer looks for a single finger that taps one time. However, you can configure the recognizer so that it looks for multiple taps (such as double taps, triple taps, or even the fabled quadruple tap), or taps with more than one finger at the same time (e.g., two-finger taps). These can also be combined to create, for example, double-fingered double-taps:
tap.numberOfTapsRequired = 2; // double tap
tap.numberOfTouchesRequired = 2; // with two fingers
Dragging an Image Around the Screen
Problem
You want to let the user directly manipulate the position of an image on the screen, by dragging it around.
Solution
In this example, self.draggedView is a property that connects to a UIView. It can be any type of view that you like, but image views work particularly well:
- (void) viewWillAppear:(BOOL)animated {
self.draggedView.userInteractionEnabled = YES;
UIPanGestureRecognizer* drag = [[UIPanGestureRecognizer alloc]
initWithTarget:self action:@selector(drag:)];
[self.draggedView addGestureRecognizer:drag];
}
- (void) drag:(UIPanGestureRecognizer*)pan {
if (pan.state == UIGestureRecognizerStateBegan ||
pan.state == UIGestureRecognizerStateChanged) {
CGPoint newPosition = [pan translationInView:pan.view];
newPosition.x += pan.view.center.x;
newPosition.y += pan.view.center.y;
pan.view.center = newPosition;
[pan setTranslation:CGPointZero inView:pan.view];
}
}
Discussion
This code uses a gesture recognizer to detect and handle the user dragging a finger over the screen (a drag is when the user places a single finger on the screen within the bounds of the view, and then begins moving that finger).
The first thing that happens in this code is this:
self.draggedView.userInteractionEnabled = YES;
It’s possible that the view may have interaction disabled by default. Some views do this, including UIImageViews. So, to be sure that it’s going to work correctly, the view is set to allow user interaction.
The next two lines create and add the gesture recognizer:
UIPanGestureRecognizer* drag = [[UIPanGestureRecognizer alloc]
initWithTarget:self action:@selector(drag:)];
[self.draggedView addGestureRecognizer:drag];
The drag: method is called when the recognizer changes state. For dragging, there are two states that we want to know about: when the drag begins, and when the drag changes. In both cases, we need to do the following:
1. Determine how much the drag has moved by.
2. Figure out where the view is on the screen.
3. Decide where it should now be, by adding the movement to the current position.
4. Make the view’s position be this new position.
Pan gesture recognizers expose a value called “translation,” which is the amount of movement that they’ve seen. This value allows your code to work out a new position for the view:
- (void) drag:(UIPanGestureRecognizer*)pan {
if (pan.state == UIGestureRecognizerStateBegan ||
pan.state == UIGestureRecognizerStateChanged) {
CGPoint newPosition = [pan translationInView:pan.view];
newPosition.x += pan.view.center.x;
newPosition.y += pan.view.center.y;
pan.view.center = newPosition;
[pan setTranslation:CGPointZero inView:pan.view];
}
}
The translation value needs to be manually reset once you’ve done this, because when the gesture recognizer next updates, you want to update the view’s position from its current position rather than its starting position.
Detecting Rotation Gestures
Problem
You want to let the user use two fingers to rotate something on the screen.
Solution
Use a UIRotationGestureRecognizer:
@interface ViewController ()
@property (strong, nonatomic) IBOutlet UIView *rotationView;
@property (strong, nonatomic) IBOutlet UILabel *rotationStatusLabel;
@property (assign) float angle;
@end
@implementation ViewController
- (void)viewDidLoad
{
[super viewDidLoad];
UIRotationGestureRecognizer* rotation = [[UIRotationGestureRecognizer alloc]
initWithTarget:self action:@selector(rotated:)];
[self.rotationView addGestureRecognizer:rotation];
}
- (void) rotated:(UIRotationGestureRecognizer*)rotation {
if (rotation.state == UIGestureRecognizerStateBegan) {
self.rotationStatusLabel.text = @"Rotation started";
}
if (rotation.state == UIGestureRecognizerStateChanged) {
self.angle += [rotation rotation];
rotation.rotation = 0.0;
self.rotationView.transform = CGAffineTransformMakeRotation(self.angle);
self.rotationStatusLabel.text = [NSString stringWithFormat:@"Rotation:
%.2f radians", self.angle];
}
if (rotation.state == UIGestureRecognizerStateEnded) {
self.rotationStatusLabel.text = @"Rotation ended";
}
if (rotation.state == UIGestureRecognizerStateCancelled) {
self.rotationStatusLabel.text = @"Rotation cancelled";
}
}
@end
Discussion
The UIRotationGestureRecognizer is a continuous gesture recognizer (in other words, unlike a tap, rotation starts, changes over time, and then ends).
When a rotation gesture recognizer realizes that the user has begun a rotation—that is, when the user has placed two fingers on the view and begun to rotate them around a central point—it sends its target the message that it was configured with when it was created.
This method then checks the current state of the recognizer, and reacts accordingly. Recognizers can be in several different states. The states relevant to the rotation gesture recognizer are the following:
UIGestureRecognizerStateBegan
The recognizer enters this state when it determines that a rotation gesture is in progress.
UIGestureRecognizerStateChanged
This state is entered when the angle of the rotation that the user is performing changes.
UIGestureRecognizerStateEnded
This state is entered when the fingers are lifted from the screen, ending the rotation gesture.
UIGestureRecognizerStateCancelled
This state is entered when the gesture is interrupted by a system-wide event, such as a phone call or an alert box appearing.
The UIRotationGestureRecognizer’s key property is rotation, which is a measure of how far the rotation has changed since it was last reset, in radians.
In the example code, whenever the gesture changes, the rotation is measured and used to update an angle. Once that’s done, the rotation property of the gesture recognizer is reset to zero.
Detecting Pinching Gestures
Problem
You want to track when the user pinches or spreads her fingers on the screen.
Solution
Use a UIPinchGestureRecognizer to detect when the user is pinching her fingers together, or spreading them apart:
@interface ViewController ()
@property (strong, nonatomic) IBOutlet UIView *scalingView;
@property (strong, nonatomic) IBOutlet UILabel *scalingStatusLabel;
@property (assign) float scale;
@end
@implementation ViewController
- (void)viewDidLoad
{
[super viewDidLoad];
self.scale = 1;
UIPinchGestureRecognizer* pinch = [[UIPinchGestureRecognizer alloc]
initWithTarget:self action:@selector(pinched:)];
[self.scalingView addGestureRecognizer:pinch];
}
- (void) pinched:(UIPinchGestureRecognizer*)pinch {
if (pinch.state == UIGestureRecognizerStateBegan) {
self.scalingStatusLabel.text = @"Pinch started";
}
if (pinch.state == UIGestureRecognizerStateChanged) {
self.scale *= pinch.scale;
pinch.scale = 1.0;
self.scalingView.transform = CGAffineTransformMakeScale(self.scale,
self.scale);
self.scalingStatusLabel.text = [NSString stringWithFormat:@"Scale:
%.2f%%", self.scale*100];
}
if (pinch.state == UIGestureRecognizerStateEnded) {
self.scalingStatusLabel.text = @"Pinch ended";
}
if (pinch.state == UIGestureRecognizerStateCancelled) {
self.scalingStatusLabel.text = @"Pinch cancelled";
}
}
@end
Discussion
UIPinchGestureRecognizer is your friend in this situation. A pinch gesture recognizer looks for fingers moving away from each other, or closer to each other.
The key property for UIPinchGestureRecognizer is scale. This starts at 1 when the gesture begins, and moves toward 0 when the fingers get closer together, or toward infinity when the fingers move away from each other. This value is always relative to the initial scale—so, for example, if the user spreads her fingers so that the scale becomes 2, and then pinches again, the scale will reset to 1 when the pinch begins.
To see this in action, comment out the following line of code:
pinch.scale = 1.0;
Creating Custom Gestures
Problem
You want to create a gesture recognizer that looks for a gesture that you define.
Solution
Creating a new gesture recognizer means subclassing UIGestureRecognizer. To get started, create a new Objective-C class that’s a subclass of UIGestureRecognizer.
In this example, we’ll create a new gesture recognizer that looks for a gesture in which the finger starts moving down, moves back up, and then lifts from the screen (Figure 3-1). However, there’s nothing stopping you from creating simpler or more complex gestures of your own.
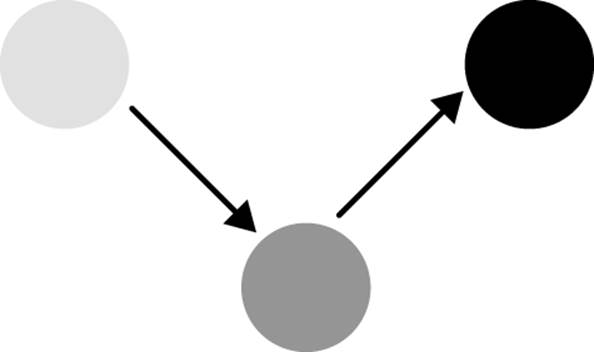
Figure 3-1. The gesture first goes down, then up again
This example shows a new UIGestureRecognizer called DownUpGestureRecognizer.
Create a file called DownUpGestureRecognizer.h with the following contents:
#import <UIKit/UIKit.h>
typedef enum {
DownUpGestureMovingDown = 0,
DownUpGestureMovingUp
} UpDownGesturePhase;
@interface DownUpGestureRecognizer : UIGestureRecognizer
@property (assign) UpDownGesturePhase phase;
@end
Next, put the following contents in DownUpGestureRecognizer.m:
#import "DownUpGestureRecognizer.h"
#import <UIKit/UIGestureRecognizerSubclass.h>
@interface DownUpGestureRecognizer ()
@end
@implementation DownUpGestureRecognizer
- (void)touchesBegan:(NSSet *)touches withEvent:(UIEvent *)event {
self.phase = DownUpGestureMovingDown;
self.state = UIGestureRecognizerStatePossible;
// If there's more than one touch, this is not the type of gesture
// we're looking for, so fail immediately
if (self.numberOfTouches > 1) {
self.state = UIGestureRecognizerStateFailed;
}
}
- (void)touchesMoved:(NSSet *)touches withEvent:(UIEvent *)event {
// We know we only have one touch, beacuse touchesBegan will stop
// recognizing when more than one touch is detected
UITouch* touch = [touches anyObject];
// Get the current and previous position of the touch
CGPoint position = [touch locationInView:touch.view];
CGPoint lastPosition = [touch previousLocationInView:touch.view];
// If the state is Possible, and the touch has moved down, the
// gesture has Begun
if (self.state == UIGestureRecognizerStatePossible) {
if (position.y > lastPosition.y) {
self.state = UIGestureRecognizerStateBegan;
}
}
// If the state is Began or Changed, and the touch has moved, the
// gesture will change state
if (self.state == UIGestureRecognizerStateBegan ||
self.state == UIGestureRecognizerStateChanged) {
// If the phase of the gesture is MovingDown, and the touch moved
// down, the gesture has Changed
if (self.phase == DownUpGestureMovingDown && position.y >
lastPosition.y) {
self.state = UIGestureRecognizerStateChanged;
}
// If the phase of the gesture is MovingDown, and the touch moved
// up, the gesture has Changed; also, change the phase to MovingUp
if (self.phase == DownUpGestureMovingDown && position.y <
lastPosition.y) {
self.phase = DownUpGestureMovingUp;
self.state = UIGestureRecognizerStateChanged;
}
// If the phase of the gesture is MovingUp, and the touch moved
// down, then the gesture has Cancelled
if (self.phase == DownUpGestureMovingUp && position.y >
lastPosition.y) {
self.state = UIGestureRecognizerStateCancelled;
}
}
}
- (void)touchesEnded:(NSSet *)touches withEvent:(UIEvent *)event {
// We know that there's only one touch.
// If the touch ends while the phase is MovingUp, the gesture has
// Ended. If the touch ends while the phase is MovingDown, the gesture
// has Failed.
if (self.phase == DownUpGestureMovingDown) {
self.state = UIGestureRecognizerStateFailed;
} else if (self.phase == DownUpGestureMovingUp) {
self.state = UIGestureRecognizerStateEnded;
}
}
@end
Finally, in ViewController.m:
#import "ViewController.h"
#import "DownUpGestureRecognizer.h"
@interface ViewController ()
@property (strong, nonatomic) IBOutlet UIView *customGestureView;
@property (strong, nonatomic) IBOutlet UILabel *customGestureStatusLabel;
@end
@implementation ViewController
- (void)viewDidLoad
{
[super viewDidLoad];
DownUpGestureRecognizer* downUpGesture = [[DownUpGestureRecognizer alloc]
initWithTarget:self action:@selector(downUp:)];
[self.customGestureView addGestureRecognizer:downUpGesture];
}
- (void) downUp:(DownUpGestureRecognizer*)downUp {
if (downUp.state == UIGestureRecognizerStateBegan) {
self.customGestureStatusLabel.text = @"Gesture began";
}
if (downUp.state == UIGestureRecognizerStateChanged) {
NSString* phaseString;
if (downUp.phase == DownUpGestureMovingDown)
phaseString = @"Down";
if (downUp.phase == DownUpGestureMovingUp)
phaseString = @"Up";
self.customGestureStatusLabel.text = [NSString
stringWithFormat:@"Gesture changed, phase = %@", phaseString];
}
if (downUp.state == UIGestureRecognizerStateEnded) {
self.customGestureStatusLabel.text = @"Gesture ended";
}
if (downUp.state == UIGestureRecognizerStateCancelled) {
self.customGestureStatusLabel.text = @"Gesture cancelled";
}
if (downUp.state == UIGestureRecognizerStateFailed) {
self.customGestureStatusLabel.text = @"Gesture failed";
}
}
- (void)didReceiveMemoryWarning
{
[super didReceiveMemoryWarning];
// Dispose of any resources that can be re-created.
}
@end
Discussion
The first step in creating a new UIGestureRecognizer is to import the UIKit/UIGestureRecognizerSubclass.h. This header file redefines the state property as readwrite, which lets you set the state of the recognizer. Everything else is simply watching touches, and changing state based on that.
A gesture recognizer works by receiving touches, via the touchesBegan, touchesMoved, touchesEnded, and touchesCancelled methods (much like a UIView) does. A recognizer is responsible for keeping track of whatever information it needs in order to determine the state of the gesture.
Recognizers don’t communicate directly with their targets; instead, they change the value of the state property, which controls whether they’re in the Began, Changed, Ended, Cancelled, or other states.
When your recognizer decides that it’s seen a gesture, it changes its state to UIGestureRecognizerStateBegan. This causes the gesture recognition system to send the recognizer’s target object its action message. Similarly, your recognizer changes the state property toUIGestureRecognizerStateChanged when it decides that the gesture has changed.
An important state that you can set your recognizer to is Failed. For complex gestures, it’s possible that the sequences of touches that the recognizer has been observing won’t turn out to actually constitute the kind of gesture you’re looking for. For example, if a drag gesture recognizer sees a touch land on the screen, it’s possible that it’s the start of a drag gesture, but it can’t be sure—it’s not a drag until the touch starts moving. If the touch immediately lifts up, the drag gesture recognizer changes to the Failed state. This allows other gesture recognizers to step in, if applicable.
Receiving Touches in Custom Areas of a View
Problem
By default, a UIView detects all touches that fall within its bounds. You want a view to receive touches in a different region.
Solution
To tell iOS that a point should be considered to be within the bounds of a view, you override the pointInside:withEvent: method.
In a UIView subclass:
- (BOOL)pointInside:(CGPoint)point withEvent:(UIEvent *)event {
// A point is inside this view if it falls inside a rectangle
// that's 40 pt larger than the bounds of the view
return CGRectContainsPoint(CGRectInset(self.bounds, -40, -40), point);
}
Discussion
When a touch lands on the screen, iOS starts checking all views to find out which view was touched. It does this by calling pointInside:withEvent: on the top-level view, and finding out whether the touch is considered “inside” that view. It then begins asking each of the subviews inside that view whether the touch should be considered inside it, proceeding until the lowest-level view is reached.
By default, a point is considered “inside” the view if it’s within the view’s bounds rectangle. However, you can override this by providing your own implementation of pointInside:withEvent:.
pointInside:withEvent: takes a CGPoint in the coordinate space of the view, and returns YES if the point should be considered inside the view and NO if the point is outside of the view.
Detecting Shakes
Problem
You want to detect when the user’s device is shaking.
Solution
Add this code to a view controller:
- (BOOL)canBecomeFirstResponder {
return YES;
}
- (void)motionBegan:(UIEventSubtype)motion withEvent:(UIEvent *)event {
self.shakingLabel.hidden = NO;
}
- (void)motionEnded:(UIEventSubtype)motion withEvent:(UIEvent *)event {
double delayInSeconds = 1.0;
dispatch_time_t popTime = dispatch_time(DISPATCH_TIME_NOW, (int64_t)
(delayInSeconds * NSEC_PER_SEC));
dispatch_after(popTime, dispatch_get_main_queue(), ^(void){
self.shakingLabel.hidden = YES;
});
}
Discussion
Shaking is a kind of gesture that views and view controllers can detect. If you want a view controller to detect it, you first need to indicate to the system that your view controller is capable of becoming the “first responder”—that is, that it’s able to receive motion gestures like shaking:
- (BOOL)canBecomeFirstResponder {
return YES;
}
When shaking begins, the view controller receives the motionBegan:withEvent: message. When shaking ends, the motionEnded:withEvent: message is sent:
- (void)motionBegan:(UIEventSubtype)motion withEvent:(UIEvent *)event {
// Shaking started, do something
}
- (void)motionEnded:(UIEventSubtype)motion withEvent:(UIEvent *)event {
// Shaking stopped, do something else
}
In the case of the example code, all we’re doing is making a label become visible when shaking begins, and making it invisible two seconds after shaking ends.
Detecting Device Tilt
Problem
You want to detect how the device has been tilted. For example, if you’re making a driving game, you want to know how far the device is being turned, so that you can figure out how the user’s car is being steered.
Solution
You get information about how the device is being moved and rotated by using the Core Motion framework. Select the project at the top of the Project Navigator and scroll down to “Linked Frameworks and Libraries.” Click the + button, search for “CoreMotion,” and double-click “CoreMotion.framework.” Then, in your view controller, import the Core Motion header file and create a motion manager that will give you information about how the device is being manipulated. To use it, you’ll first need to add CoreMotion.framework to your project:
#import "ViewController.h"
#import <CoreMotion/CoreMotion.h>
@interface ViewController () {
CMMotionManager* motionManager;
}
@property (strong, nonatomic) IBOutlet UILabel *pitchLabel;
@property (strong, nonatomic) IBOutlet UILabel *yawLabel;
@property (strong, nonatomic) IBOutlet UILabel *rollLabel;
@end
@implementation ViewController
- (void)viewDidLoad
{
[super viewDidLoad];
motionManager = [[CMMotionManager alloc] init];
NSOperationQueue* mainQueue = [NSOperationQueue mainQueue];
[motionManager startDeviceMotionUpdatesToQueue:mainQueue
withHandler:^(CMDeviceMotion *motion, NSError *error) {
float roll = motion.attitude.roll;
float rollDegrees = roll * 180 / M_PI;
float yaw = motion.attitude.yaw;
float yawDegrees = yaw * 180 / M_PI;
float pitch = motion.attitude.pitch;
float pitchDegrees = pitch * 180 / M_PI;
self.rollLabel.text = [NSString stringWithFormat:@"Roll: %.2f°",
rollDegrees];
self.yawLabel.text = [NSString stringWithFormat:@"Yaw: %.2f°",
yawDegrees];
self.pitchLabel.text = [NSString stringWithFormat:@"Pitch: %.2f°",
pitchDegrees];
}];
}
@end
Discussion
Objects can be tilted in three different ways. As illustrated in Figure 3-2, they can pitch, yaw, and roll: that is, rotate around three different imaginary lines. When an object pitches, it rotates around a line drawn from its left edge to its right edge. When it yaws, it rotates around a line drawn from the top edge to the bottom edge. When it rolls, it rotates around a line drawn from the middle of its front face to the middle of the back face.
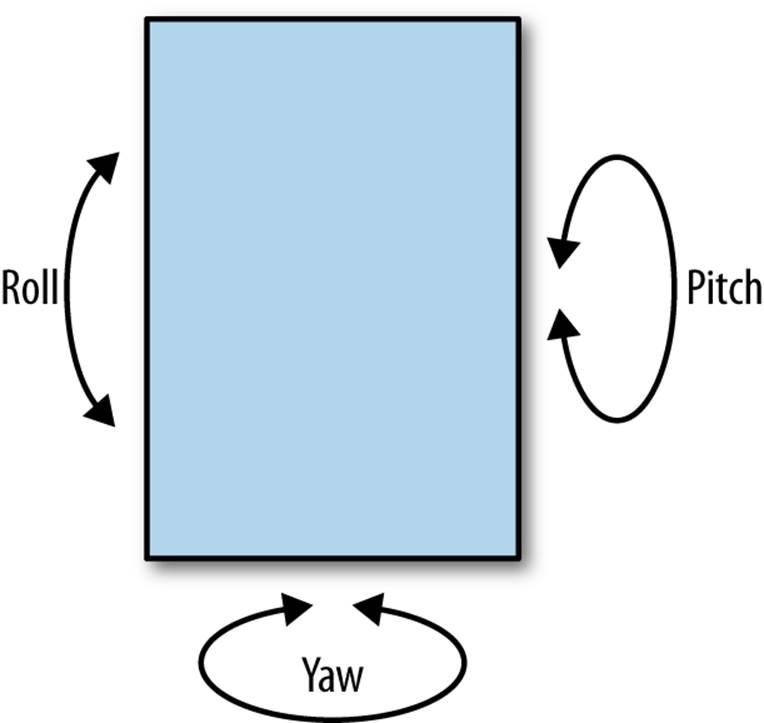
Figure 3-2. The three axes of rotation
Your app can get information regarding how the device is angled through the Core Motion framework. The main class in this framework is CMMotionManager, which allows you to sign up to be notified when the device is moved or tilted. So, to get started, you first need to create aCMMotionManager.
NOTE
It’s important to keep a reference to your CMMotionManager around. Without one, the automatic reference counting system will notice that there’s no reason to keep the CMMotionManager in memory, and it’ll be deallocated. This won’t lead to a crash, but it will mean that you won’t get any information from it when the device is rotated or moved.
That’s why, in the example, we store the CMMotionManager in an instance variable. Doing this means that the view controller has a strong reference to the CMMotionManager, which will keep it in memory.
Once you’ve created your motion manager, you can start receiving information about the device’s movement. To receive this information, you need to call startDeviceMotionUpdatesToQueue:withHandler: on your CMMotionManager:
[motionManager startDeviceMotionUpdatesToQueue:mainQueue
withHandler:^(CMDeviceMotion *motion, NSError *error) {
// Do something with the motion info here
}
This method takes two parameters: an NSOperationQueue and a block. Every time the device moves, the motion manager will call the block, using the operation queue you provide. In our example, we’re using the main queue (i.e., [NSOperationQueue mainQueue]), so that the block is able to update the user interface.
Every time the block is called, it receives two parameters: a CMMotion object, and an NSError object. The CMMotion object contains information about how the device is currently moving, and the NSError object either is nil if nothing’s gone wrong, or contains information about what’s gone wrong and why.
A CMMotion object contains a lot of information for you to work with:
§ You can access accelerometer information, which tells you how the device is moving and in which direction gravity is, through the userAcceleration and gravity properties.
§ You can access calibrated gyroscope information, which tells you how the device is oriented and how fast it’s currently rotating, through the attitude and rotationRate properties.
§ You can access calibrated magnetic field information, which tells you about the total magnetic field that the device is in (minus device bias), through the magneticField property.
NOTE
The magneticField property is really cool. It’s not too tricky to write an app that watches the magnetic field—once you’ve made that, wave your device near something made of iron or steel. Congratulations, you’ve just turned your phone into a metal detector! See Detecting Magnets.
In this particular example, we care most about the device’s attitude. The attitude of an object means how it’s oriented in space. The attitude of a device is represented by three angles, pitch, yaw, and roll, measured in radians—if you remember your high school math, there are 2π radians in a circle.
NOTE
To convert from radians to degrees, and vice versa, use these formulas:
degrees = radians / π * 180
radians = degrees * π / 180
This recipe talks about how you can access tilt across all axes; to use this information for steering, take a look at Detecting Magnets.
Getting the Compass Heading
Problem
You want to know which direction the user is facing, relative to north.
Solution
First, add the Core Motion framework to your project and set up a CMMotionManager, as per Detecting Device Tilt.
Then, when you ask the system to start delivering device motion information to your application, use the startDeviceMotionUpdatesUsingReferenceFrame:toQueue:withHandler: method and pass in CMAttitudeReferenceFrameXTrueNorthZVertical as the first parameter:
[motionManager startDeviceMotionUpdatesUsingReferenceFrame:
CMAttitudeReferenceFrameXTrueNorthZVertical toQueue:mainQueue
withHandler:^(CMDeviceMotion *motion, NSError *error) {
float yaw = motion.attitude.yaw;
float yawDegrees = yaw * 180 / M_PI;
self.directionLabel.text = [NSString stringWithFormat:@"Direction: %.0f°",
yawDegrees];
}];
Discussion
When you begin receiving device motion information, all attitude information is relative to a reference frame. The reference frame is your “zero point” for orientation.
By default, the zero point is set when you activate the device motion system. That is, the first attitude information you receive will indicate that the device is oriented at the zero point. As you rotate the device, the attitude information will change relative to the zero point.
The default reference frame is able to determine the device’s pitch and roll, by measuring the direction of gravity. That is, it’s always possible to know what direction “down” is. However, it isn’t possible for a gyroscope and accelerometer to measure the yaw, for the same reason that you don’t have a constant, innate knowledge of which direction is north.
To get this information, a magnetometer is needed. Magnetometers sense magnetic fields, which allows you to figure out where the north pole of the strongest magnet near you is. In other words, a magnetometer is able to function as a compass.
Magnetometers require additional power to use, as well as additional CPU resources necessary to integrate the magnetic field data with the accelerometer and gyroscope data. By default, therefore, the magnetometer is turned off. However, if you need to know where north is, you can indicate to the Core Motion system that you need this information.
When you call the startDeviceMotionUpdatesUsingReferenceFrame:toQueue:withHandler: method, you have a choice regarding what reference frame you can use. The options available are as follows:
CMAttitudeReferenceFrameXArbitraryZVertical
Yaw is set to zero when the device motion system is turned on.
CMAttitudeReferenceFrameXArbitraryCorrectedZVertical
Yaw is set to zero when the device motion system is turned on, and the magnetometer is used to keep this stable over time (i.e., the zero point won’t drift as much).
CMAttitudeReferenceFrameXMagneticNorthZVertical
The zero yaw point is magnetic north.
CMAttitudeReferenceFrameXTrueNorthZVertical
The zero yaw point is true north. The system needs to use the location system to figure this out.
If you need the most accuracy, CMAttitudeReferenceFrameXTrueNorthZVertical should be used. This uses the most battery power, and takes the longest time to get a fix. If you don’t really care about which direction north is, go withCMAttitudeReferenceFrameXArbitraryZVertical or CMAttitudeReferenceFrameXArbitraryCorrectedZVertical.
Accessing the User’s Location
Problem
You want to determine where on the planet the user currently is.
Solution
To get the user’s location, you first need to add the Core Location framework to your application. Refer to Detecting Device Tilt for instructions on doing this; choose the file CoreLocation.framework.
When you want to work with user location data, you need to explain to the user for what purpose the location data is going to be used:
§ Go to the project’s information screen by clicking on the project at the top of the Project Navigator (at the left of the Xcode window).
§ Go to the Info tab.
§ Add a new entry in the list of settings that appears: “Privacy - Location Usage Description.” In the Value column, add some text that explains what the user location will be used for. (In this example, it can be something like “the app will display your coordinates.”)
WARNING
Adding this information is mandatory. If you don’t explain why you need access to the user’s location, Apple will likely reject your app from the App Store.
The reason for this is that the user’s location is private information, and your app needs to have a good reason for using it. That’s not to say that you shouldn’t make games that ask for the user’s location—far from it! But don’t get the user’s location just so that you can gather statistics about where your users live.
To actually get the user’s location and work with it, you use a CLLocationManager:
#import "ViewController.h"
#import <CoreLocation/CoreLocation.h>
@interface ViewController () <CLLocationManagerDelegate> {
CLLocationManager* locationManager;
}
@property (strong, nonatomic) IBOutlet UILabel *latitudeLabel;
@property (strong, nonatomic) IBOutlet UILabel *longitudeLabel;
@property (strong, nonatomic) IBOutlet UILabel *locationErrorLabel;
@end
@implementation ViewController
- (void)viewDidLoad
{
[super viewDidLoad];
locationManager = [[CLLocationManager alloc] init];
locationManager.delegate = self;
[locationManager startUpdatingLocation];
self.locationErrorLabel.hidden = YES;
}
- (void)locationManager:(CLLocationManager *)manager
didUpdateLocations:(NSArray *)locations {
self.locationErrorLabel.hidden = YES;
CLLocation* location = [locations lastObject];
float latitude = location.coordinate.latitude;
float longitude = location.coordinate.longitude;
self.latitudeLabel.text = [NSString stringWithFormat:@"Latitude: %.4f",
latitude];
self.longitudeLabel.text = [NSString stringWithFormat:@"Longitude: %.4f",
longitude];
}
- (void)locationManager:(CLLocationManager *)manager
didFailWithError:(NSError *)error {
self.locationErrorLabel.hidden = NO;
}
@end
Discussion
A CLLocationManager, once set up and configured, sends messages to a delegate object, notifying it of the user’s location.
To receive messages from a CLLocationManager, an object needs to conform to the CLLocationManagerDelegate protocol:
@interface ViewController () <CLLocationManagerDelegate>
To set up a CLLocationManager, you create an instance of the class. You’ll also need to create and keep a strong reference to the CLLocationManager object, to keep it from being freed from memory, and indicate to it what object should receive location updates. Finally, you need to tell the CLLocationManager that it should activate the GPS system and begin telling the delegate object about the user’s location:
locationManager = [[CLLocationManager alloc] init];
locationManager.delegate = self;
[locationManager startUpdatingLocation];
Once you’ve told the location manager that you want to start receiving location information, you then need to implement one of the methods in the CLLocationManagerDelegate protocol: locationManager:didUpdateLocations:. This method is called every time the location manager decides that the user has changed location. It receives two parameters: the CLLocationManager itself, and an NSArray containing one or more CLLocation objects.
There can be more than one CLLocation object in the array. This can happen when, for some reason, your application hasn’t been able to receive location updates (e.g., it may have been in the background). In these cases, you’ll receive a bunch of CLLocations, which are delivered in the order that they occurred. The last object in the array is always the most recent location the device was observed at. You can access it through NSArray’s lastObject method:
CLLocation* location = [locations lastObject];
A CLLocation object represents the user’s current location on the planet. It contains, among other information, the user’s latitude, longitude, and altitude.
The user’s latitude and longitude, which are almost always the only things you want to know about, can be accessed through the CLLocation’s coordinate property, which is a CLLocationCoordinate2D. A CLLocationCoordinate2D contains two things:
float latitude = location.coordinate.latitude;
float longitude = location.coordinate.longitude;
NOTE
The user’s location is not guaranteed to be precise—the GPS system is good, but it’s not accurate enough to pinpoint the location down to the nearest centimeter (unless you’re in the U.S. military, in which case, greetings!).
Therefore, each CLLocation object contains a horizontalAccuracy property, which represents the “radius of uncertainty” of the location, measured in meters.
For example, if the horizontalAccuracy of a CLLocation is 5, this means that the user is within 5 meters of the location indicated by the latitude and longitude.
Calculating the User’s Speed
Problem
You want to determine how fast the user is moving.
Solution
This information can be gained through the Core Location framework.
First, set up a CLLocationManager, as discussed in the previous recipe, and start receiving updates to the user’s location:
- (void)locationManager:(CLLocationManager *)manager
didUpdateLocations:(NSArray *)locations {
CLLocation* lastLocation = [locations lastObject];
if (lastLocation.speed > 0) {
self.speedLabel.text = [NSString stringWithFormat:@"Currently
moving at %.0fm/s", lastLocation.speed];
}
}
Discussion
CLLocation objects contain a speed property, which contains the speed at which the device is traveling. This is measured in meters per second.
NOTE
If you want to convert this to kilometers per hour, you can do this:
float kPH = location.speed * 3.6;
If you want to convert meters per second to miles per hour, you can do this:
float mPH = location.speed * 2.236936;
Pinpointing the User’s Proximity to Landmarks
Problem
You want to calculate how far away the user is from a location.
Solution
We’ll assume that you already know the user’s location, represented by a CLLocation object. If you don’t already have this information, see Accessing the User’s Location.
We’ll also assume that you have the latitude and longitude coordinates of the location from which you want to measure the distance. You can use this information to determine the proximity:
CLLocation* userLocation = ... // get the user's location from CoreLocation
float latitude = ... // latitude of the other location
float longitude = ... // longitude of the other location
CLLocation* otherLocation = [CLLocation locationWithLatitude:latitude
longitude:longitude];
float distance = [userLocation distanceFromLocation:otherLocation];
Discussion
The distanceFromLocation: method returns the distance from the other location, measured in meters.
It’s important to note that the distance is not a direct straight-line distance, but rather takes into account the curvature of the earth. Also keep in mind that the distance traveled doesn’t take into account any mountains or hills between the user’s location and the other location.
Receiving Notifications When the User Changes Location
Problem
You want to be notified when the user enters a specific region, or exits it.
Solution
This code requires adding the Core Location framework to your application (see Detecting Device Tilt for instructions on adding a framework). Additionally, it requires using iOS 7.
Your application can receive updates to the user’s location even when it’s not running. To enable this, follow these steps:
1. After adding CoreLocation.framework to your application, go to your project’s Info screen, by clicking on the project at the top of the Project Navigator (at the left of the Xcode window, see Figure 3-3).
2. Click on the Capabilities tab.
3. Turn on “Background Modes.”
4. Check the “Location updates” checkbox, as shown in Figure 3-4.
Figure 3-3. An empty screen
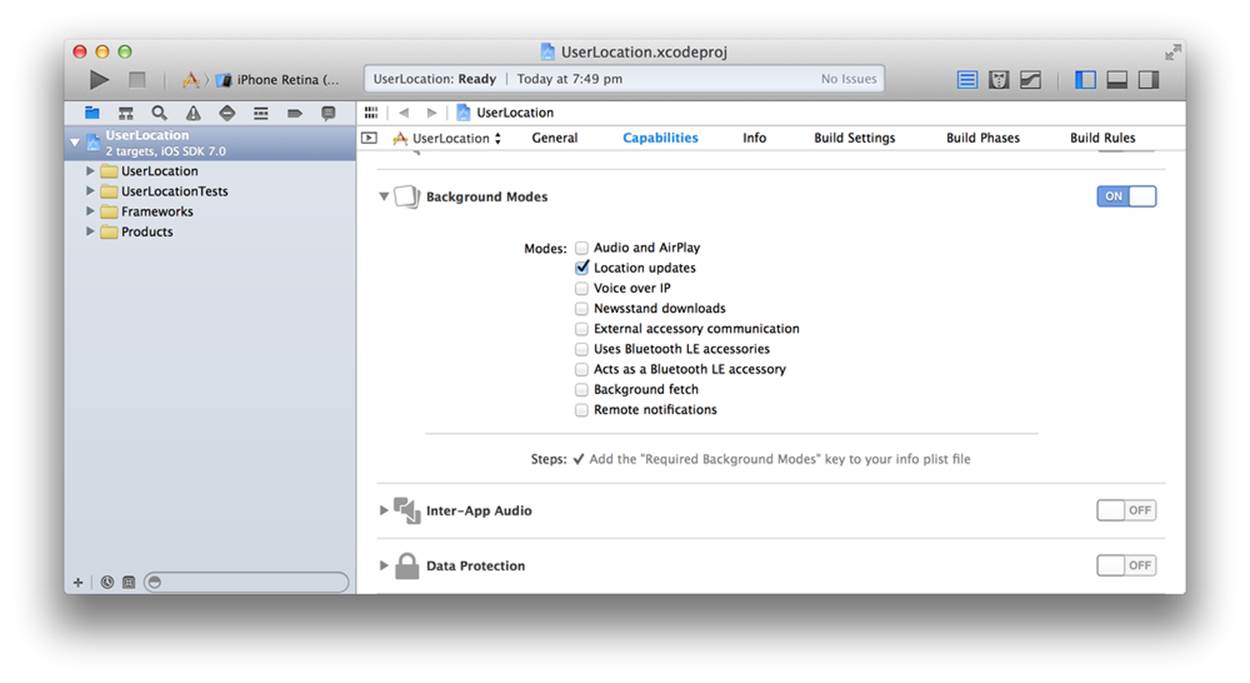
Figure 3-4. Adding the “Location updates” background mode
Make ViewController.m look like the following code:
#import "ViewController.h"
#import <CoreLocation/CoreLocation.h>
@interface ViewController () <CLLocationManagerDelegate> {
CLLocationManager* locationManager;
CLCircularRegion* regionToMonitor;
}
@end
@implementation ViewController
- (void)viewDidLoad
{
[super viewDidLoad];
locationManager = [[CLLocationManager alloc] init];
locationManager.delegate = self;
[locationManager startUpdatingLocation];
}
- (void)locationManager:(CLLocationManager *)manager
didUpdateLocations:(NSArray *)locations {
if (regionToMonitor == nil) {
CLLocation* location = [locations lastObject];
regionToMonitor = [[CLCircularRegion alloc]
initWithCenter:location.coordinate radius:20
identifier:@"StartingPoint"];
[locationManager startMonitoringForRegion:regionToMonitor];
NSLog(@"Now monitoring region %@", regionToMonitor);
}
}
- (void) locationManager:(CLLocationManager *)manager
didEnterRegion:(CLRegion *)region {
NSLog(@"Entering region!");
}
- (void)locationManager:(CLLocationManager *)manager
didExitRegion:(CLRegion *)region {
NSLog(@"Exiting region!");
}
@end
Discussion
Your application can be notified when the user enters or exits a region. A region is defined by a central point, and a radius—that is to say, regions are always circular.
You register a region by creating a CLRegion object and giving it a center point (latitude and longitude) and radius, as well as a name (a string that you will use to refer to the region):
float latitude = ... // latitude
float longitude = ... // longitude
float radius = ... // radius
NSString* name = @"My Region"; // something to call the region
CLCoordinate2D coordinate = CLCoordinate2DMake(latitude, longitude);
CLRegion* region = [[CLCircularRegion alloc] initWithCenter:coordinate
radius:radius identifier:name];
NOTE
The maximum allowed radius for a region might vary from device to device. You can check what the maximum allowed radius is by asking the CLLocationManager class for its maximumRegionMonitoringDistance property:
CLLocationDistance maximumRegionRadius = locationManager.maximumRegion
MonitoringDistance;
Once the region has been created, you indicate to your CLLocationManager that you want to be notified when the user enters and exits the region:
[locationManager startMonitoringForRegion:regionToMonitor];
Once this is done, the CLLocationManager’s delegate will receive a locationManager:didEnterRegion: message when the user enters the region, and a locationManager:didExitRegion: message when the user exits.
You can only register 20 regions at a time. You can ask the location manager to give you an NSArray of all of the CLRegions you’ve registered via the monitoredRegions method:
NSArray* monitoredRegions = locationManager.monitoredRegions;
When you no longer want to receive notifications regarding a region, you send the CLLocationManager the stopMonitoringForRegion: message:
[locationManager stopMonitoringForRegion:regionToMonitor];
Finally, a word about how precise regions can be. Later devices tend to be more precise, which means that on devices earlier than the iPhone 4S, you shouldn’t create regions with a radius of less than 400 meters. Additionally, when the user enters or exits a region, it generally takes about 3 to 5 minutes for the device to notice it and send a notification to your application. This means that using smaller regions may mean that your app receives notifications well after the user has left the area. In order to report region changes in a timely manner, the region monitoring service requires network connectivity.
Looking Up GPS Coordinates for a Street Address
Problem
You have a street address, and you want to get latitude and longitude coordinates for it. For example, you have a game that involves players moving from one named location to another, and you want to get the coordinates so you can monitor when they get close.
Solution
iOS has a built-in system that lets you convert between coordinates and street addresses. Geocoding is the process of converting a human-readable address (like “1 Infinite Loop, Cupertino, California”) into latitude and longitude coordinates, which you can then use with the location system.
First, add the Core Location framework to your project (see Detecting Device Tilt).
Next, create a CLGeocoder instance variable (in this example, we’ve named it geocoder):
NSString* addressString = @"1 Infinite Loop, Cupertino, California";
geocoder = [[CLGeocoder alloc] init];
[geocoder geocodeAddressString:addressString completionHandler:^(NSArray
*placemarks, NSError *error) {
CLPlacemark* placemark = [placemarks lastObject];
float latitude = placemark.location.coordinate.latitude;
float longitude = placemark.location.coordinate.longitude;
}];
Discussion
To use geocoding, you create a CLGeocoder object. A geocoder object communicates with Apple’s geocoding server, and runs the completion handler block that you provide when the geocoding request returns. This means that your device needs to be on the network in order to use geocoding.
When the geocoding request returns, you’ll either receive an NSArray that contains CLPlacemark objects, or an NSError that describes what went wrong. You might get more than one CLPlacemark object; for example, if the geocoding server is unsure about the exact location you meant, it may return a few different options.
CLPlacemark objects describe a location, and they contain quite a lot of information for you to use. The specific contents available for each placemark vary, but they include things like the name of the location, the street name, the town or city, country, and so on.
Additionally, every CLPlacemark contains a property called location, which is a CLLocation object that you can use to get the latitude and longitude.
Looking Up Street Addresses from the User’s Location
Problem
You know the user’s location, and you want to find the street address using their coordinates.
Solution
First, add the Core Location framework to your project (see Detecting Device Tilt).
Next, create a CLGeocoder instance variable (in this example, we’ve named it geocoder):
geocoder = [[CLGeocoder alloc] init];
CLLocation* location = ... // a CLLocation
[geocoder reverseGeocodeLocation:location completionHandler:^(NSArray
*placemarks, NSError *error) {
NSString* addressString = [placemarks lastObject]
self.labelTextView.text = addressString;
}];
Discussion
A CLGeocoder object is able to perform both geocoding and reverse geocoding. Whereas geocoding involves taking a street address and returning coordinates, reverse geocoding means taking coordinates and providing a street address.
Reverse geocoding works in a very similar manner to geocoding: you create a CLGeocoder, provide it with input data and a block that you want to run when the work is complete, and set it off.
Also like with normal geocoding, reverse geocoding returns an NSArray of CLPlacemark objects. However, there’s no built-in method for converting a CLPlacemark into a string (not counting description, which includes all kinds of information that the user doesn’t care about). It’s therefore up to you to pull the information out of the CLPlacemark object and format it into an NSString for the user to see.
Using the Device as a Steering Wheel
Problem
You want to let the user use the device as a steering wheel, and get information on how far he’s steering.
Solution
You can get information about how far the user is steering by deciding which axis you want to define as the “steering” axis, and using Core Motion to work out the rotation around that axis.
In most cases, games that involve steering are played in landscape mode. To make sure your game only appears in landscape, select the project at the top of the Project Navigator, and scroll down to Device Orientation. Make sure that only Landscape Left and Landscape Right are selected.
Next, import the Core Motion framework (see Detecting Device Tilt). Finally, add the following code to your project:
motionManager = [[CMMotionManager alloc] init];
[motionManager startDeviceMotionUpdatesToQueue:[NSOperationQueue mainQueue]
withHandler:^(CMDeviceMotion *motion, NSError *error) {
// Maximum steering left is -50 degrees,
// maximum steering right is 50 degrees
float maximumSteerAngle = 50;
// When in landscape,
float rotationAngle = motion.attitude.pitch * 180.0f / M_PI;
// -1.0 = hard left, 1.0 = hard right
float steering = 0.0;
UIInterfaceOrientation orientation = [UIApplication
sharedApplication]
.statusBarOrientation;
if (orientation == UIInterfaceOrientationLandscapeLeft) {
steering = rotationAngle / -maximumSteerAngle;
} else if (orientation == UIInterfaceOrientationLandscapeRight) {
steering = rotationAngle / maximumSteerAngle;
}
// Limit the steering to between -1.0 and 1.0
steering = fminf(steering, 1.0);
steering = fmaxf(steering, -1.0);
NSLog(@"Steering: %.2f", steering);
}];
Discussion
In this solution, the code figures out how the device is being held and generates a number to represent how the user is “steering” the device. –1.0 means the device is being steered hard left, and 1.0 means hard right.
In landscape mode, “steering” the device means changing its pitch—that is, changing the angle of the line that extends from the left of the screen to the right of the screen. However, “landscape” can mean that the device is being held in two different ways: “landscape left” means that the home button is to the left of the screen, and “landscape right” means that the home button is to the right. In other words, landscape right is an upside-down version of landscape left.
This means that if we want –1.0 to always mean left, we have to know which orientation the device is being held in. You can check this by asking the shared UIApplication object for the current statusBarOrientation.
Detecting Magnets
Problem
You want your game to detect when the device is near a magnet or other ferrous material.
Solution
First, you need to import CoreMotion.framework. See Detecting Device Tilt for instructions. Use the CMMotionManager class’s startMagnetometerUpdatesToQueue:withHandler: method to register to receive information from the device’s built-in magnetometer:
motionManager = [[CMMotionManager alloc] init];
[motionManager startMagnetometerUpdatesToQueue:[NSOperationQueue mainQueue]
withHandler:^(CMMagnetometerData *magnetometerData, NSError *error) {
CMMagneticField magneticField = magnetometerData.magneticField;
NSString* xValue = [NSString stringWithFormat:@"%.2f", magneticField.x];
NSString* yValue = [NSString stringWithFormat:@"%.2f", magneticField.y];
NSString* zValue = [NSString stringWithFormat:@"%.2f", magneticField.z];
double average = (magneticField.x + magneticField.y +
magneticField.z) / 3.0;
NSString* averageValue = [NSString stringWithFormat:@"%.2f", average];
NSLog(@"Magnetic field:\nAverage: %@\tX: %@\tY: %@\tZ: %@",
averageValue, xValue, yValue, zValue);
}];
Discussion
The built-in magnetometer in all devices shipped since the iPhone 3GS is used to find the heading of the device (i.e., the direction in which it’s pointing). By getting a reading on the magnetic fields surrounding the device, the iPhone can determine which direction is north.
However, this isn’t the only reason why magnetometers are cool. The magnetometer can be accessed directly, which gives you information on the presence of magnets (as well as ferromagnetic metals, like steel and iron) near the device.
When you want to start getting information about nearby magnetic fields, you use the CMDeviceMotion class’s startMagnetometerUpdatesToQueue:withHandler: method. This method works in a manner very similar to when you want to get overall device motion (see Detecting Device Tilt); however, instead of receiving a CMDeviceMotion object, you instead get a CMMagnetometerData object.
The CMMagnetometerData object contains two properties: an NSTimeInterval that represents when the information was sampled, and a CMMagneticField structure that contains the data itself.
The information stored in the CMMagneticField is represented in microteslas, which are a measurement of magnetic flux density—that is, the strength of the magnetic field currently affecting the device.
When the device is near a planet—which, at the time of writing, is very likely to be the case—it will be subjected to that planet’s magnetic field. Earth has a particularly strong magnetic field, which means that the measurements that come from the magnetometer will never be zero. Additionally, some components in the device itself are slightly magnetic, which contributes to the readings. Finally, the readings that you’ll get from the magnetometer will be stronger when the sensor is moving through a magnetic field, as opposed to remaining stationary within one.
This means that you can’t treat the information that comes from the magnetometer as absolute “near magnet"/"not near magnet” data. Instead, you need to interpret the information over time: if the values you’re getting from the magnetometer are rising or falling quickly, the device is near something magnetic.
Magnetometers haven’t seen much use in games to date, which means that there’s a huge potential area for new kinds of gameplay. This is left as an exercise for the reader—what kind of gameplay can you create that’s based on detecting metal?
Utilizing Inputs to Improve Game Design
Problem
You want to effectively utilize the inputs (some of them unique) that are available on iOS to make a better game.
Solution
When considering how your game is controlled, it pays to consider the environment in which iOS games are frequently played. The iPhone and iPad are, obviously, inherently mobile devices—they are used by people who are often out and about, or at work, lying in front of the television, or commuting to work on a loud train.
Because of this, iOS games should be simple and easy to control, and if possible should use as much direct manipulation—dragging, touching, gestures—as possible. People are distracted, and they don’t want to think about the myriad ways in which they could control something. If the obvious doesn’t work, they’ll go and play a different game—it’s hard enough trying to play a game on the train anyway!
If a player can directly drag her character around, rather than using an on-screen directional control, then you should enable that. If your game requires the player to shake loose enemy boarders from a spacecraft, why not let him shake the device instead of tapping a button marked “shake”?
Discussion
Give users direct control and your game will feel more responsive, be more entertaining, and end up getting played a whole lot more often.
All materials on the site are licensed Creative Commons Attribution-Sharealike 3.0 Unported CC BY-SA 3.0 & GNU Free Documentation License (GFDL)
If you are the copyright holder of any material contained on our site and intend to remove it, please contact our site administrator for approval.
© 2016-2026 All site design rights belong to S.Y.A.