iOS Game Development Cookbook (2014)
Chapter 6. 2D Graphics and Sprite Kit
Just about every game out there incorporates 2D graphics on some level. Even the most sophisticated 3D games use 2D elements, such as in the menu or in the in-game interface.
Creating a game that limits itself to 2D graphics is also a good way to keep your game simple. 2D is simpler than 3D, and you’ll end up with an easier-to-manage game, in terms of both gameplay and graphics. Puzzle games, for example, are a category of game that typically use 2D graphics rather than more complex 3D graphics.
2D is simpler for a number of reasons: you don’t need to worry about how objects are going to look from multiple angles, you don’t need to worry as much about lighting, and it’s often simpler to create a great-looking scene with 2D images than it is to create a 3D version of the same scene.
iOS comes with a system for creating 2D graphics, called Sprite Kit. Sprite Kit takes care of low-level graphics tasks like creating OpenGL contexts and managing textures, allowing you to focus on game-related tasks like showing your game’s sprites on the screen.
NOTE
Sprite Kit was introduced in iOS 7, and is available on both iOS and OS X Mavericks. The API for Sprite Kit is the same on both platforms, which makes porting your game from one platform to the other easier.
In this chapter, you’ll learn how to work with Sprite Kit to display your game’s graphics.
Getting Familiar with 2D Math
When you’re working with 2D graphics, it’s important to know at least a little bit of 2D math.
Coordinate System
In 2D graphics, you deal with a space that has two dimensions: x and y. The x-axis is the horizontal axis and goes from left to right, whereas the y-axis is the vertical axis and runs from top to bottom. We call this kind of space a coordinate system. The central point of the coordinate system used in graphics is called the origin.
To describe a specific location in a coordinate space, you just need to provide two numbers: how far away from the origin the location is on the horizontal axis (also known as the x coordinate), and how far away it is on the vertical axis (also known as the y coordinate). These coordinates are usually written in parentheses, like this: (x coordinate, y coordinate)
The coordinates for a location 5 units to the right of the origin and 2 units above it would be written as (5,2). The location of the origin itself is written as (0,0)—that is, zero units away from the origin on both the x- and y- axes.
NOTE
Coordinate spaces in 3D work in the exact same way as in 2D, with one difference: there’s one more axis, called the z-axis. In this coordinate system, coordinates have one more number, as in (0,0,0).
Vectors
In the simplest terms, a vector is a value that contains two or more values. In games, vectors are most useful for describing two things: positions (i.e., coordinates) and velocities.
An empty two-dimensional vector—that is, one with just zeros—is written like this: [0, 0].
When you’re working in iOS, you can use the CGPoint structure as a 2D vector, as illustrated in Figure 6-1:
CGPoint myPosition;
myPosition.x = 2;
myPosition.y = 2;
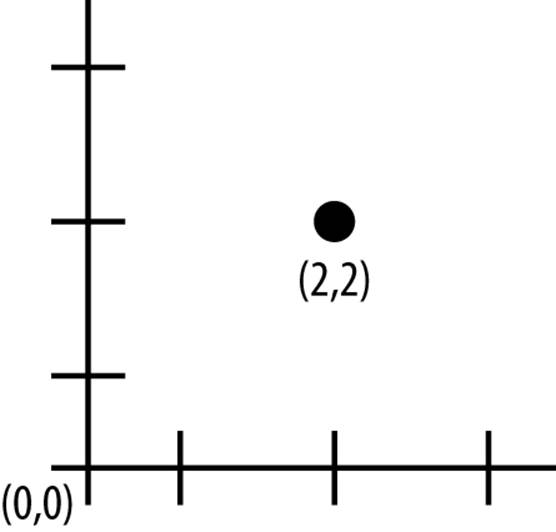
Figure 6-1. A vector used to define the position (2,2)
You can also use vectors to store velocities. A velocity represents how far a location changes over time; for example, if an object is moving 2 units right and 3 units down every second, you could write its velocity as [2, 3]. Then, every second, you would add the object’s velocity to its current position.
While you can store velocities in CGPoint structures, it’s slightly more convenient to store them in CGVector structures (see Figure 6-2). These are 100% identical to CGPoints, but the fields of the structure are named differently: x is named dx, and y is named dy. The d prefix stands for “delta,” which means “amount of change of.” So, “dx” means “delta x”—that is, “amount of change of x”:
CGVector myVector;
myVector.dx = 2;
myVector.dy = 3;
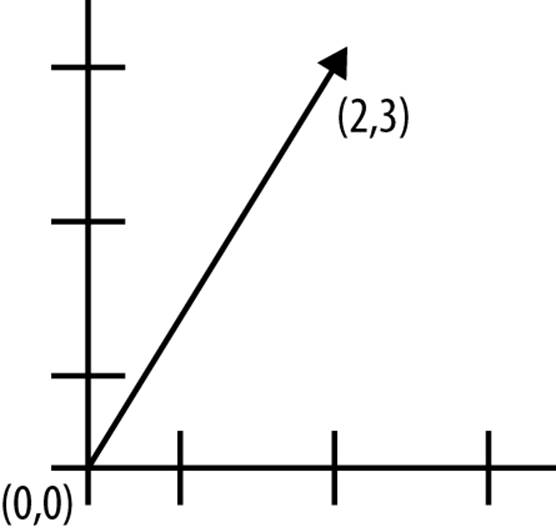
Figure 6-2. A vector used to define the direction (2,3)
Vector lengths
Let’s say you’ve got a velocity vector [2, 3]. In a given second, how far will an object move?
The first thing you might think of is to add the two values together, giving a value of 5. However, this isn’t correct, because the object is traveling in a straight line, not traveling a certain distance, turning, and traveling the rest of the distance.
To get the length of a vector (also sometimes referred to as the magnitude), you square each component of the vector, add them all up, and take the square root of the result:
CGVector myVector = CGVectorMake(4, 6);
float length = sqrt(myVector.dx * myVector.dx + myVector.dy * myVector.dy);
// float =~ 7.21
Moving vectors
When you want to move a point by a given velocity, you need to add the two vectors together.
To add two vectors together (also known as translating a vector), you just add the respective components of each vector—that is, you sum the x coordinates, then the y coordinates (Figure 6-3):
CGVector vector1 = CGVectorMake(1,2);
CGVector vector2 = CGVectorMake(1,1);
CGVector vector3;
vector3.dx = vector1.dx + vector2.dx;
vector3.dx = vector1.dy + vector2.dy;
// vector3 = (2, 3);
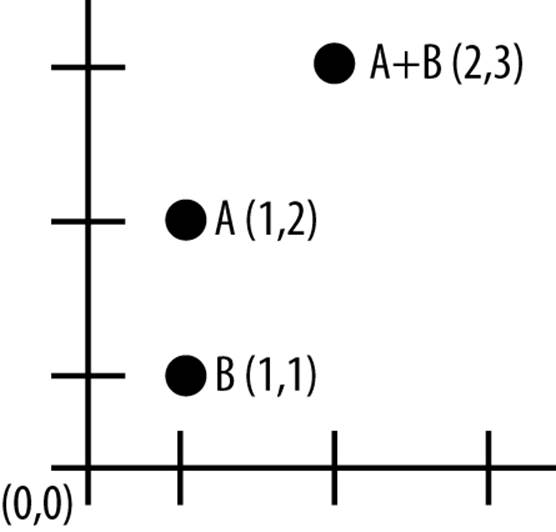
Figure 6-3. Adding vectors
The same thing applies to subtracting vectors: you just subtract the components, instead of adding them.
Rotating vectors
To rotate a vector, you first need to know the angle that you want to rotate it by.
In graphics, angles are usually given in radians. There are 2π radians in a full circle (and, therefore, π radians in half a circle, and π/2 radians in a quarter circle).
To convert from radians to degrees, multiply by 180 and divide by π:
float radians = 3.14159;
float degrees = radians * 180 / M_PI;
// degrees = 180
To convert from degrees to radians, divide by 180 and multiply by π:
float degrees = 45
float radians = degrees * M_PI / 180;
// radians = ~0.785
When you have your angle in radians, you can rotate a vector like this:
CGFloat angle = M_PI / 4.0; // equals 45 degrees
CGPoint point = CGPointMake(4, 4);
CGPoint rotatedPoint;
rotatedPoint.x = point.x * cos(angle) - point.y * sin(angle);
rotatedPoint.y = point.y * cos(angle) + point.x * sin(angle);
// rotatedPoint = (0, 6.283)
Doing this will rotate the vector counterclockwise around the origin. If you want to rotate around another point, first subtract that point from your vector, perform your rotation, and then add the first point back.
Scaling vectors
Scaling a vector is easy—you just multiply each component of the vector by a value:
CGPoint myPosition = CGVectorMake(2, 7);
myPosition.dx *= 4;
myPosition.dy *= 4;
Dot product
The dot product is a useful way to find out how much two vectors differ in the direction that they point in.
For example, let’s say you’ve got two vectors, [2, 2] and [2, 1], and you want to find out how much of an angle there is between them (Figure 6-4).
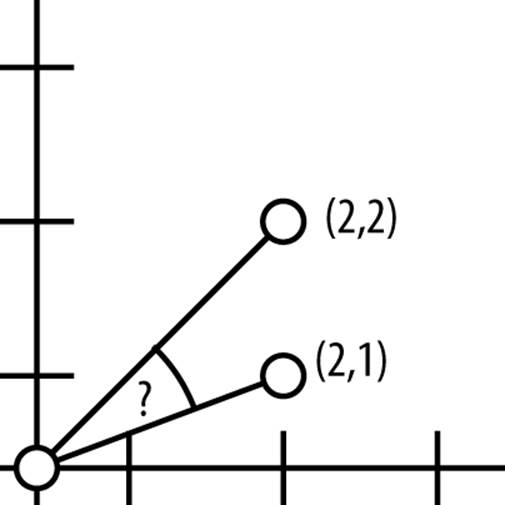
Figure 6-4. The dot product can be used to determine the angle between two vectors
You can figure this out by taking the dot product. The dot product can be calculated like this:
CGPoint v1 = CGPointMake(2,2);
CGPoint v2 = CGPointMake(2,1);
float dotProduct = (v1.x * v2.x + v1.y * v2.y);
An interesting property of the dot product is that the dot product of any two vectors is the same as the result of multiplying their lengths together along with the cosine of the angle between them:
A · B = |A| × |B| × cosα
This means that you can get the cosine of the angle by rearranging the equation as follows:
A · B ÷ (|A| × |B|) = cosα
Which means you can get the angle itself by taking the arc cosine, like this:
acos(A · B ÷ (|A| × |B|)) = α
NOTE
The GLKit framework, discussed in Chapter 8, includes functions for working out the dot product of vectors without you having to write out all of the math yourself:
GLKVector2 a = GLKVector2Make(1,2);
GLKVector2 b = GLKVector2Make(3,2);
float dotProduct = GLKVector2DotProduct(a, b);
Creating a Sprite Kit View
Problem
You want to display a Sprite Kit view, which you can use for showing 2D graphics.
Solution
To use any element of Sprite Kit, you need to add SpriteKit.framework to your project:
1. Select your project at the top of the Project Navigator, at the left of the Xcode window.
2. Go to the General tab, and scroll down until you see “Linked Frameworks and Libraries.”
3. Click the + button, and type “SpriteKit” in the search box that appears (Figure 6-5).
4. Double-click on “SpriteKit.framework” to add the framework to your project.
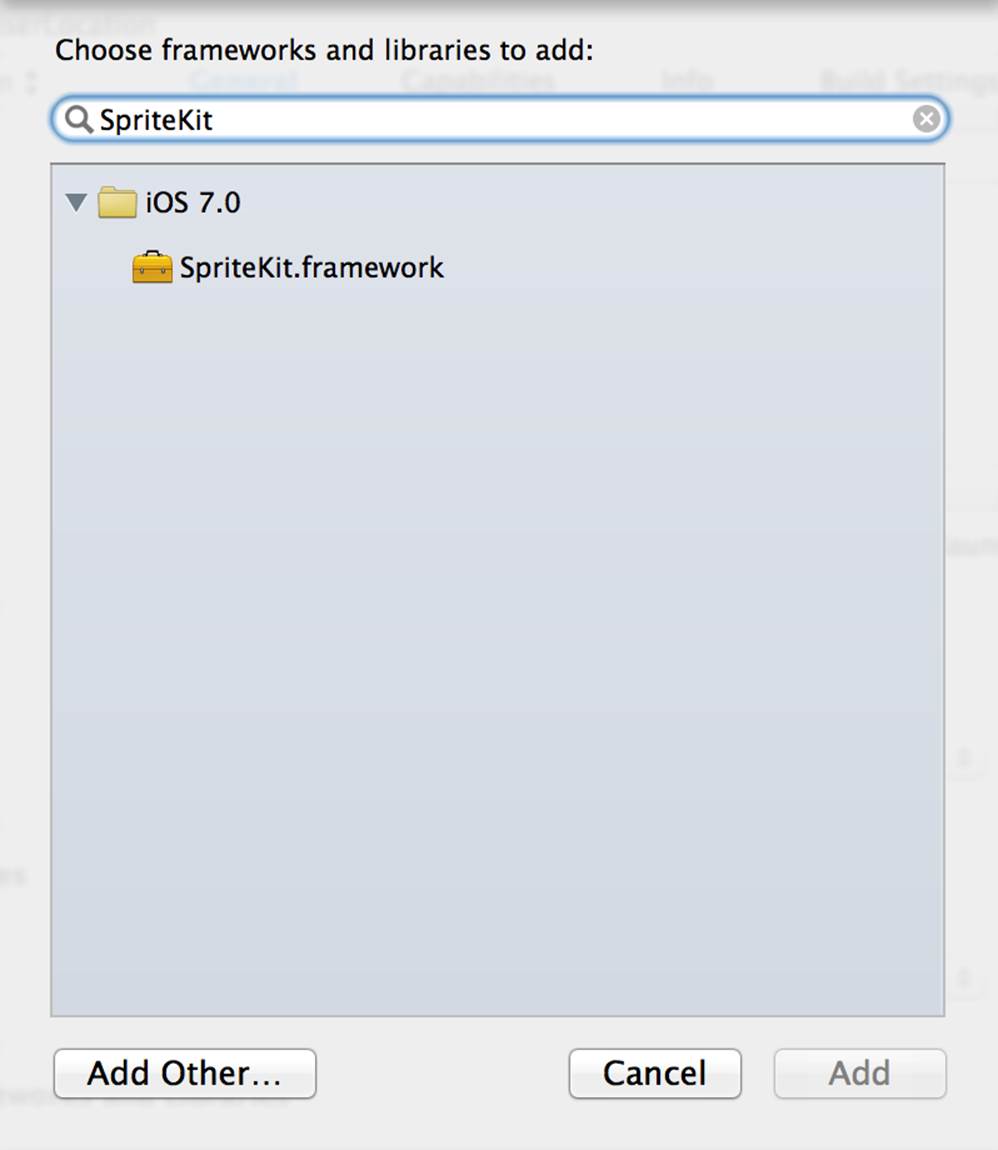
Figure 6-5. Adding Sprite Kit to the project
Once the framework has been added, go to your storyboard and select the view controller in which you want to show Sprite Kit content. Select the main view inside the view controller, and change its class to SKView.
Next, go to your view controller’s implementation, and add the following code to the viewDidLoad method:
SKView* spriteView = (SKView*)self.view;
spriteView.showsDrawCount = YES;
spriteView.showsFPS = YES;
spriteView.showsNodeCount = YES;
Finally, run the application. You’ll see a mostly empty screen; however, down in the lower-right corner of the screen, you’ll see additional information about how well your game is performing.
Discussion
An SKView is the area in which Sprite Kit content is drawn. All of your 2D graphics drawing happens inside this area.
An SKView is a subclass of UIView, which means you can work with it in the interface builder. Given that you’ll most likely want to use the entire screen for your sprites, it makes sense to make the view used by the view controller an SKView (rather than, for example, adding an SKView as a subview of the view controller’s main view.)
By default, an SKView doesn’t contain anything; you need to add content to it yourself. In this recipe, we’ve shown how to enable some debugging information: the frames per second (FPS), the number of draw calls that have been made, and the total number of nodes (items) in the scene.
Creating a Scene
Problem
You want to show a scene—that is, a collection of sprites—inside an SKView.
Solution
Create a new Objective-C object, and make it a subclass of SKScene. In this example, we’ll call it TestScene.
Add a new property to TestScene:
@property BOOL contentCreated;
Add the following code to TestScene.m:
- (void)didMoveToView:(SKView *)view
{
if (self.contentCreated == NO)
{
[self createSceneContents];
self.contentCreated = YES;
}
}
- (void)createSceneContents
{
self.backgroundColor = [SKColor blackColor];
self.scaleMode = SKSceneScaleModeAspectFit;
}
Import TestScene.h in your view controller’s .m file.
Finally, add the following code to your view controller’s viewWillAppear method:
- (void)viewWillAppear:(BOOL)animated {
TestScene* hello = [[TestScene alloc] initWithSize:CGSizeMake(768, 1024)];
SKView* spriteView = (SKView*)self.view;
[spriteView presentScene:hello];
}
Discussion
When an SKScene is added to an SKView, it receives the didMoveToView: message. This is your scene’s opportunity to prepare whatever content it wants to display.
However, it’s important to keep in mind that an SKScene might be presented multiple times over its lifetime. For that reason, you should use a variable to keep track of whether the content of the scene has already been created:
- (void)didMoveToView:(SKView *)view
{
if (self.contentCreated == NO)
{
[self createSceneContents];
self.contentCreated = YES;
}
}
In the createSceneContents method, the actual content that appears in the scene is prepared. In this example, the scene is empty, but shows a black background.
The black color is represented by an SKColor.
self.backgroundColor = [SKColor blackColor];
SKColor isn’t actually a class, but rather a macro that maps to the NSColor class on OS X, and to the UIColor class on iOS. This means that it’s a little easier to port code from iOS to OS X.
Additionally, the scene’s scaleMode is set. The scene’s scaleMode property determines how the SKView scales the scene—because your scene might appear in different sizes (e.g., on iPhone screens versus iPad screens), it’s important to know how the scene should be sized to fit into theSKView.
Several options exist for this:
SKSceneScaleModeFill
The scene will be scaled to fill the SKView.
SKSceneScaleModeAspectFill
The scene will be scaled to fill the SKView, preserving the aspect ratio of the scene. Some areas of the scene might be clipped off in order to achieve this.
SKSceneScaleModeAspectFit
The scene will be scaled to fit inside the SKView. You might see some letterboxing (i.e., some blank areas at the top and bottom or sides).
SKSceneScaleModeResizeFill
The scene will be resized—not scaled—in order to fill the SKView.
Once a scene has been prepared, it needs to be presented in order to appear in an SKView. This is quite straightforward—all you need to do is call presentScene:, and pass in an SKScene:
TestScene* hello = [[TestScene alloc] initWithSize:CGSizeMake(768, 1024)];
SKView* spriteView = (SKView*)self.view;
[spriteView presentScene:hello];
When you call presentScene:, the currently presented scene in the SKView is replaced with whatever you provided. Note that you have to cast self.view to an SKView before you can call presentScene:.
Adding a Sprite
Problem
You want to display a sprite in a Sprite Kit scene.
Solution
To show a sprite to the player, you create an SKSpriteNode, configure its size and position, and then add it to your SKScene object:
SKScene* scene = ... // an SKScene
SKSpriteNode* sprite = [[SKSpriteNode alloc] initWithColor:[SKColor grayColor]
size:CGSizeMake(32, 32)];
sprite.position = CGPointMake(100, 100);
[scene addChild:sprite];
Discussion
SKSpriteNode is a node: an object that can be put inside a scene. There are several different kinds of nodes, all of which are subclasses of the SKNode class.
SKSpriteNode is a type of node that can display either a colored rectangle, or an image. In this recipe, we’re focusing on just colored rectangles; to show an image, see Adding a Texture Sprite.
To create a colored rectangle sprite, you just need to provide the color you’d like to use, as well as the size of the rectangle:
SKSpriteNode* sprite = [[SKSpriteNode alloc] initWithColor:[SKColor grayColor]
size:CGSizeMake(32, 32)];
The position of the sprite is controlled by the sprite’s position property, which is a CGPoint. The position that you provide determines the location of the sprite’s anchor point, which is the center point of the sprite:
sprite.position = CGPointMake(100, 100);
Sprites aren’t visible unless they’re inside an SKScene, which means you need to call the addChild: method on the SKScene you want your sprite to appear in:
[scene addChild:sprite];
The position of a sprite—in fact, of any node—is determined relative to the position of the anchor point of the sprite’s parent. This means that you can add sprites as children of other sprites. If you do this, the child sprites will move with their parents.
Adding a Text Sprite
Problem
You want to display some text in a Sprite Kit scene.
Solution
Create an SKLabelNode, and add it to your scene:
SKScene* scene = ... // an SKScene
SKLabelNode* helloWorldNode = [SKLabelNode labelNodeWithFontNamed:@"Zapfino"];
helloWorldNode.text = @"Hello, world!";
helloWorldNode.fontSize = 42;
helloWorldNode.position = CGPointMake(CGRectGetMidX(scene.frame),
CGRectGetMidY(scene.frame));
helloWorldNode.name = @"helloNode";
[scene addChild:scene];
Discussion
An SKLabelNode is a node that displays text. Just like with other kinds of nodes, you add it to a scene to make it visible to the player (see Adding a Sprite.)
To create an SKLabelNode, all you need to provide is the font that the label should use:
SKLabelNode* helloWorldNode = [SKLabelNode labelNodeWithFontNamed:@"Zapfino"];
The specific font name that you provide to the labelNodeWithFontNamed: method needs to be one of the fonts that’s included in iOS, or a custom font included with your application. To learn what fonts are available for use in your game, see Determining Available Fonts; to learn how you can include a custom font in your app, see Including Custom Fonts.
Once you’ve got an SKLabelNode to use, you just need to provide it with the text that it needs to display, as well as the font size that it should use:
helloWorldNode.text = @"Hello, world!";
helloWorldNode.fontSize = 42;
By default, the text is aligned so that it’s centered horizontally on the x coordinate of the node’s position, and the baseline (i.e., the bottom part of letters that don’t have a descender—letter like e, a, and b) of the text is set to the y coordinate. However, you can change this: all you need to do is change the verticalAlignmentMode or horizontalAlignmentMode properties.
The verticalAlignmentMode property can be set to one of the following values:
SKLabelVerticalAlignmentModeBaseline
The baseline of the text is placed at the origin of the node (this is the default).
SKLabelVerticalAlignmentModeCenter
The center of the text is placed at the origin.
SKLabelVerticalAlignmentModeTop
The top of the text is placed at the origin.
SKLabelVerticalAlignmentModeBottom
The bottom of the text is placed at the origin.
Additionally, the horizontalAlignmentMode property can be set to one of the following values:
SKLabelHorizontalAlignmentModeCenter
The text is center-aligned (this is the default).
SKLabelHorizontalAlignmentModeLeft
The text is left-aligned.
SKLabelHorizontalAlignmentModeRight
The text is right-aligned.
Determining Available Fonts
Problem
You want to know which fonts are available for your game to use.
Solution
The following code logs the name of every font available for use in your game to the debugging console:
for (NSString* fontFamilyName in [UIFont familyNames]) {
for (NSString* fontName in [UIFont fontNamesForFamilyName:fontFamilyName]) {
NSLog(@"Available font: %@", fontName);
}
}
Discusion
The UIFont class, which represents fonts on iOS, allows you to list all of the available font families available to your code, using the familyNames method. This method returns an NSArray of NSString objects, each of which is the name of a font family.
However, a font family name isn’t the same thing as the name of a usable font. For example, the font Helvetica is actually a collection of different fonts: it includes Helvetica Bold, Helvetica Light, Helvetica Light Oblique, and so on.
Therefore, to get a font name that you can use with an SKLabel (or, indeed, any other part of iOS that deals in font names), you pass a font family name to the fontNamesForFamilyName method in UIFont. This returns another NSArray of NSString objects, each of which is the name of a font you can use.
Alternatively, you can visit iOS Fonts, which is a third-party site that lists all of the available fonts and includes additional information about which fonts are available on different versions of iOS.
Including Custom Fonts
Problem
You want to include a custom font in your game, so that you can show text using fancy letters.
Solution
First, you’ll need a font file, in either TrueType or OpenType format—that is, a .ttf or .otf file.
Add the file to your project. Next, go to your project’s Info tab, and add a new entry to the Custom Target Properties, called “Fonts provided by application.” This is an array; for each of the fonts you want to add, add a new entry in this array.
For example, if you’ve added a font file called MyFont.ttf, add MyFont.ttf to the “Fonts provided by application” list.
Discussion
Any fonts you include in your application are available through UIFont (see Determining Available Fonts); you don’t have to do anything special to get access to them.
If you don’t have a font, Dafont is an excellent place to find free fonts—just be sure that any fonts you get are allowed to be used for commercial purposes.
Transitioning Between Scenes
Problem
You want to move from one scene to another.
Solution
Use the presentScene: method on an SKView to change which scene is being shown:
SKView* spriteView = ... // an SKView
SKScene* newScene = ... // the new SKScene you want to present
[spriteView presentScene:newScene];
Using presentScene: immediately switches over to the new scene. If you want to use a transition, you create an SKTransition, and then call presentScene:transition::
SKTransition* crossFade = [SKTransition crossFadeWithDuration:1.0];
[spriteView presentScene:newScene transition:crossFade];
Discussion
When an SKScene is presented, the scene that’s about to be removed from the screen is sent the willMoveFromView: message. This gives the scene a chance to tidy up, or to remove any sprites that might take up a lot of memory. The SKScene that’s about to be shown in the SKView is sent the didMoveToView: message, which is its chance to prepare the scene’s content.
If you call presentScene:, the new scene will immediately appear. However, it’s often good to use an animation to transition from one scene to another, such as a fade or push animation.
To do this, you use the SKTransition class, and provide that to the SKView through the presentScene:transition: method.
You create an SKTransition through one of the factory methods, and provide any additional information that that type of transition needs. All transitions need to know how long the transition should run for, and a few transitions need additional information, such as a direction. For example, you create a cross-fade transition like this:
SKTransition* crossFade = [SKTransition crossFadeWithDuration:1.0];
There are a variety of transitions available for you to use, each with a corresponding method for creating it. Try them out! Options include:
Cross-fade (crossFadeWithDuration:)
The current scene fades out while the new scene fades in.
Doors close horizontal (doorsCloseHorizontalWithDuration:)
The new scene comes in as a pair of horizontal closing “doors.”
Doors close vertical (doorsCloseVerticalWithDuration:)
The new scene comes in as a pair of vertical closing “doors.”
Doors open horizontal (doorsOpenHorizontalWithDuration:)
The current scene splits apart, and moves off as a pair of horizontally opening “doors.”
Doors open vertical (doorsOpenVerticalWithDuration:)
The current scene splits apart, and moves off as a pair of vertically opening “doors.”
Doorway (doorwayWithDuration:)
The current scene splits apart, revealing the new scene in the background; the new scene approaches the camera, and eventually fills the scene by the time the transition is complete.
Fade with color (fadeWithColor:duration:)
The current scene fades out, revealing the color you specify; the new scene then fades in on top of this color.
Fade (fadeWithDuration:)
The current scene fades to black, and then the new scene fades in.
Flip horizontal (flipHorizontalWithDuration:)
The current scene flips horizontally, revealing the new scene on the reverse side.
Flip vertical (flipVerticalWithDuration:)
The current scene flips vertically, revealing the new scene on the reverse side.
Move in (moveInWithDirection:duration:)
The new scene comes in from off-screen, and moves in on top of the current scene.
Push in (pushWithDirection:duration:)
The new scene comes in from off-screen, pushing the current scene off the screen.
Reveal (revealWithDirection:duration:)
The current scene moves off-screen, revealing the new scene underneath it.
CIFilter transition (transitionWithCIFilter:duration:)
You can use a CIFilter object to create a custom transition.
Moving Sprites and Labels Around
Problem
You want your sprites and labels to move around your scene.
Solution
You can use SKAction objects to make any node in the scene perform an action. An action is something that changes the position, color, transparency, or size of any node in your scene.
The following code makes a node move up and to the right while fading away, then runs some code, and finally removes the node from the scene:
SKNode* node = ... // an SKNode - this can be a sprite, label, or anything
// Move 100 pixels up and 100 pixels to the right over 1 second
SKAction* moveUp = [SKAction moveByX:100 y:100 duration:1.0];
// Fade out over 0.5 seconds
SKAction* fadeOut = [SKAction fadeOutWithDuration:0.5];
// Run a block of code
SKAction* runBlock = [SKAction runBlock:^{
NSLog(@"Hello!");
}];
// Remove the node
SKAction* remove = [SKAction removeFromParent];
// Run the movement and fading blocks at the same time
SKAction* moveAndFade = [SKAction group:@[moveUp, fadeOut]];
// Move and fade, then run the block, then remove the node
SKAction* sequence = [SKAction sequence:@[moveAndFade, runBlock, remove]];
// Run these sequences on the node
[node runAction:sequence];
Discussion
An SKAction is an object that represents an action that a node can perform. There are heaps of different kinds of actions available for you to use—too many for us to list here, so for full information, check out Apple’s documentation for SKAction.
Generally, an action is something that changes some property of the node that it applies to. For example, the moveByX:y:duration: action in the preceding example changes the position of the node by making it move by a certain distance along the x- and y-axes. Some actions don’t actually change the node, though; for example, you can create an action that simply waits for an amount of time, or one that runs some code.
To run an action, you first create an SKAction with one of the factory methods. Then, you call runAction: on the SKNode that you’d like to have perform that action.
You can add an action to multiple nodes—if you want several nodes to all do the same thing, just create the SKAction once and then call runAction: on each of the SKNodes that you want to perform the action.
Most actions are things that take place over a period of time: for example, moving, rotating, fading, changing color, and so on. Some actions take place immediately, however, such as running code or removing a node from the scene.
An action can work on its own, or you can combine multiple actions with sequences and groups. A sequence is an SKAction that runs other actions, one after the other. The first action is run, and once it’s complete the next is run, and so on until the end; at this point, the sequence action is considered done. To create a sequence, use the sequence: method, which takes an NSArray of SKAction objects:
SKAction* sequence = [SKAction sequence:@[action1, action2, action3]];
A group, by contrast, runs a collection of actions simultaneously. A group action is considered complete when the longest-running of the actions it’s been given has completed. Creating groups looks very similar to creating sequences. To create a group, you pass an NSArray of SKActionobjects to the group: method:
SKAction* group = [SKAction group:@[action1, action2, action3]];
You can combine groups and sequences. For example, you can make two sequences run at the same time by combining them into a group:
SKAction* sequence1 = [SKAction sequence:@[action1, action2]];
SKAction* sequence2 = [SKAction sequence:@[action1, action2]];
SKAction* group = [SKAction group:@[sequence1, sequence2]];
You can also create sequences that contain groups; if, for example, you have a sequence with two groups in it, the second group will not run until all actions in the first group have finished.
Some actions are able to be reversed. By sending the reversedAction message to these actions, you get back an SKAction that performs the opposite action to the original. Not all actions can be reversed; for details on which can and can’t, check the documentation for SKAction.
As we’ve already mentioned, you start actions by calling runAction: on an SKNode. You can also make Sprite Kit run a block when the action that you’ve submitted finishes running, using the runAction:completion: block:
SKAction* action = ... // an SKAction of any kind
SKNode* node = ... // an SKNode
[node runAction:action completion:^{
NSLog(@"Action's done!");
}];
You can add multiple actions to a node, which will all run at the same time. If you do this, it’s often useful to be able to keep track of the actions you add to a node. You can do this with the runAction:withKey: method, which lets you associate actions you run on an SKNode with a name:
[node runAction:action withKey:@"My Action"];
If you add two actions with the same name, the old action is removed before the new one is added.
Once you’ve added an action with a name, you can use the actionForKey: method to get the action back:
SKAction* action = [node actionForKey:@"My Action"];
You can also remove actions by name, using the removeActionForKey: method:
[node removeActionForKey:@"My Action"]
Finally, you can remove all actions from a node in one line of code using the removeAllActions method:
[node removeAllActions];
NOTE
When you remove an action, the action stops whatever it was doing. However, any changes that the action had already made to the node remain.
For example, if you’ve added an action that moves the sprite, and you remove it before the action finishes running, the sprite will be left part-way between its origin point and the destination.
Adding a Texture Sprite
Problem
You want to create a sprite that uses an image.
Solution
First, add the image that you want to use to your project (see Adding Images to Your Project).
Next, create an SKSpriteNode with the initWithImageNamed: method:
SKScene* scene = ... // an SKScene
SKSpriteNode* imageSprite = [[SKSpriteNode alloc]
initWithImageNamed:@"ImageName"];
[scene addChild:]
Discussion
When you create a sprite with initWithImageNamed:, the size of the sprite is based on the size of the image.
Once you’ve created the sprite, it works just like any other node: you can position it, add it to the scene, run actions on it, and so on.
Creating Texture Atlases
Problem
You want to use texture atlases, which save memory and make rendering more efficient.
Solution
Create a folder named Textures.atlas and put all of the textures that you want to group in it.
Then, add this folder to your project by dragging the folder into the Project Navigator.
Finally, go to the Build Settings by clicking on the project at the top of the Project Navigator, and search for “SpriteKit.” Set Enable Texture Atlas Generation to Yes.
Discussion
A texture atlas is a texture composed of other, smaller textures. Using a texture atlas means that instead of several smaller textures, you use one larger texture. This atlas uses slightly less memory than if you were to use lots of individual textures, and more importantly is more efficient for rendering. When a sprite needs to be drawn, a subregion of the texture atlas is used for drawing.
If your game involves lots of sprites that each use different images, the Sprite Kit renderer needs to switch images every time it starts drawing a different sprite. Switching images has a small performance cost, which adds up if you’re doing it multiple times. However, if multiple sprites share the same texture, Sprite Kit doesn’t have to switch images, making rendering faster.
When you put images in a folder whose name ends with .atlas, and turn on Texture Atlas Generation, Xcode will automatically create a texture atlas for you based on whatever images are in that folder. You images will be automatically trimmed for transparency, reducing the number of wasted pixels, and images are packed together as efficiently as possible.
When you’re using texture atlases, your Sprite Kit code remains the same. The following code works regardless of whether you’re using atlases or not:
SKSpriteNode* imageSprite = [[SKSpriteNode alloc]
initWithImageNamed:@"ImageName"];
Using Shape Nodes
Problem
You want to use shape nodes to draw vector shapes.
Solution
Use an SKShapeNode to draw shapes:
SKScene* scene = ... // an SKScene
UIBezierPath* path = [UIBezierPath bezierPathWithRoundedRect:CGRectMake(-100,
-100, 200, 200) cornerRadius:20 ];
SKShapeNode* shape = [[SKShapeNode alloc] init];
shape.path = [path CGPath];
shape.strokeColor = [SKColor greenColor];
shape.fillColor = [SKColor redColor];
shape.glowWidth = 4;
shape.position = CGPointMake(CGRectGetMidX(scene.frame),
CGRectGetMidY(scene.frame));
[scene addChild:shape];
Discussion
SKSceneNode draws paths, which are objects that represent shapes. A path can be a rectangle, a circle, or any shape you can possibly think of. For more information on working with paths, see Using Bézier Paths.
The coordinates of the path that you provide are positioned relative to your node’s anchor point. For example, a shape that has a line that starts at (–10,–10) and moves to (10,10) starts above and to the left of the node’s position, and ends below and to the right of the position.
You can use the fillColor and strokeColor properties to change the colors used to draw the shape. Use SKColor to define the colors you want to use. The fill color is the color used to fill the contents of the shape, and the stroke color is the color used to draw the line around the outside of the shape. By default, the fill color is clear (i.e., no color, just empty space), while the stroke color is white.
Finally, you can specify how thick the line is. By default, the thickness is 1 point; Apple notes that specifying a line thickness of more than 2 pt may lead to rendering problems. In these cases, you’re better off using an SKSpriteNode. In addition, you can make the stroke line glow by setting the glowWidth property to a value higher than 0.
Using Blending Modes
Problem
You want to use different blending modes to create visual effects.
Solution
Use the blendMode property to control how nodes are blended with the rest of the scene:
SKNode* node = ... // any SKNode
node.blendMode = SKBlendModeAdd;
Discussion
When a node is drawn into the scene, the way that the final scene looks depends on the node’s blend mode. When a node is blended into the scene, the Sprite Kit renderer looks at the color of each pixel of the node, and the color underneath each pixel, and determines what the resulting color should be.
By default, all SKNodes use the same blending mode: SKBlendModeAlpha, which uses the alpha channel of the image multiplied by the sprite’s alpha property to determine how much the node’s color should contribute to the scene. This is generally the blending mode you want to use most of the time.
However, it isn’t the only blending mode that you can use. Other options exist:
SKBlendModeAdd
The colors of the node are added to the scene. This leads to a brightening, semitransparent effect. (Good for lights, fires, laser beams, and explosions!)
SKBlendModeSubtract
The colors of the node are subtracted from the scene. This creates a rather weird-looking darkening effect. (Not very realistic, but it can lead to some interesting effects.)
SKBlendModeMultiply
The colors of the node are multiplied with the scene. This darkens the colors. (Very good for shadows, and for tinting parts of the scene.)
SKBlendModeMultiplyX2
The same as SKBlendModeMultiply, but the colors of the sprite are doubled after the first multiplication. This creates a brighter effect than plain multiply.
SKBlendModeScreen
The colors of the node are added to the scene, multiplied by the inverse of the scene’s color. This creates a more subtle brightening effect than SKBlendModeAdd. (Good for glosses and shiny areas.)
SKBlendModeReplace
The colors of the node replace the scene and are not blended with any existing colors. This means that any alpha information is completely ignored. This mode is also the fastest possible drawing mode, since no blending calculations need to take place.
Using Image Effects to Change the Way that Sprites Are Drawn
Problem
You want to use image effects on your sprites, to create different effects.
Solution
Use an SKEffectNode with a CIFilter to apply visual effects to nodes:
SKScene* scene = ... // an SKScene
SKEffectNode* effect = [[SKEffectNode alloc] init];
effect.position = CGPointMake(550, 300);
CIFilter* filter = [CIFilter filterWithName:@"CIGaussianBlur"];
[filter setValue:@(20.0) forKey:@"inputRadius"];
effect.filter = filter;
SKSpriteNode* sprite = [[SKSpriteNode alloc] initWithImageNamed:@"MySprite"];
[effect addChild:sprite];
[scene addChild:effect];
Discussion
A CIFilter is an object that applies an effect to images. CIFilters are incredibly powerful, and are used all over iOS and OS X. One of the most popular examples of where they’re used is in the Photo Booth app, where they power the visual effects that you can apply to photos.
To use a CIFilter with Sprite Kit, you create an SKEffectNode and add any nodes that you want to have the effect apply to as children of that node. (Don’t forget to add the SKEffectNode to your scene.)
Once you’ve done that, you get a CIFilter, configure it how you like, and provide it to the SKEffectNode. You get a CIFilter using the filterWithName: method of the CIFilter class, which takes an NSString: the name of the filter you’d like to use.
Different filters have different properties, which you can configure using the CIFilter’s setValue:forKey: method.
There are dozens of CIFilters that you can use—lots more than we could sensibly list here. Here are a couple of especially cool ones:
CIGaussianBlur
Applies a Gaussian blur. The default blur radius is 10.0; change it by setting inputRadius to something different.
CIPixellate
Makes the image all blocky and pixelated. The default pixel size is 8.0; change it by setting inputScale to something different.
CIPhotoEffectNoir
Makes the image black and white, with an exaggerated contrast. This filter has no parameters you can change.
Using Bézier Paths
Problem
You want to draw shapes using Bézier paths (custom shapes and lines).
Solution
Use the UIBezierPath class to represent shapes:
UIBezierPath* path = [UIBezierPath bezierPathWithRoundedRect:CGRectMake(-100,
-100, 200, 200) cornerRadius:20 ];
UIBezierPath* rectangle = [UIBezierPath bezierPathWithRect:CGRectMake(0, 0,
100, 200)];
UIBezierPath* roundedRectagle = [UIBezierPath bezierPathWithRoundedRect:
CGRectMake(0, 0, 100, 200) cornerRadius:20];
UIBezierPath* oval = [UIBezierPath bezierPathWithOvalInRect:CGRectMake(0, 0,
100, 200)];
UIBezierPath* customShape = [UIBezierPath bezierPath];
[customShape moveToPoint:CGPointMake(0, 0)];
[customShape addLineToPoint:CGPointMake(0, 100)];
[customShape addCurveToPoint:CGPointMake(0, 0) controlPoint1:CGPointMake(100,
100) controlPoint2:CGPointMake(100, 0)];
[customShape closePath];
Discussion
UIBezierPath objects represent shapes, which you can display on the screen with an SKShapeNode.
Creating a rectangle, rounded rectangle, or oval is pretty easy—there are built-in factory methods for these. There’s no built-in method for creating circles, but it’s easy to make one—just create an oval inside a square rectangle (i.e., a rectangle with an equal width and height).
In addition to these basic shapes, you can also create your own custom shapes. You do this by using the moveToPoint:, addLineToPoint:, and addCurveToPoint:controlPoint1:controlPoint2: methods.
When you’re drawing a custom shape, it helps to imagine a virtual pen poised over a sheet of paper. When you call moveToPoint:, you’re positioning your hand over a specific point. When you call addLineToPoint:, you place the pen down on the paper and draw a straight line from the pen’s current location to the destination. You can call moveToPoint: again to lift the virtual pen from the paper and reposition your hand somewhere else.
The addCurveToPoint:controlPoint1:controlPoint2: method lets you draw a cubic Bézier curve. A Bézier curve is a curved line that starts at the pen’s current location and moves toward the destination point you provide, bending toward the two control points. A Bézier curve is often useful for drawing smoothly curving things in games, such as roads.
When you’re done creating a shape, you call closePath. Doing this draws a straight line from the pen’s current position to the starting position.
To use a UIBezierPath with an SKShapeNode, you ask the UIBezierPath for its CGPath property, and give that to the SKShapeNode. For more information on how SKShapeNode works, see Using Shape Nodes.
Creating Smoke, Fire, and Other Particle Effects
Problem
You want to create fire, smoke, snow, or other visual effects.
Solution
You can use particle effects to simulate these kinds of effects. To create a particle effect, follow these steps:
1. From the File menu, choose New→File. Select Resource, and then select SpriteKit Particle File.
2. You’ll be asked to pick a template to start from. Pick whichever you like—Jon happens to like the Fire template.
3. Open the newly created file, and you’ll enter the Emitter editor. This component of Xcode allows you to play with the various properties that define how the particle system looks, including how many particles are emitted, how they change over time, and how they’re colored. Additionally, you can click and drag to see how the particle system looks when it’s moving.
Once you’re done configuring the particle system, you can add the effect to your scene with the following code (adjust the filenames to suit your needs.):
NSString *firePath = [[NSBundle mainBundle] pathForResource:@"Fire"
ofType:@"sks"];
SKEmitterNode *fire = [NSKeyedUnarchiver unarchiveObjectWithFile:firePath];
[self addChild:fire];
Discussion
Particle effects can be used for a variety of natural-looking effects that would be difficult to create with individual sprites. Individual particles in a particle system have much less overhead than creating the sprites yourself, so you can create rather complex-looking effects without dramatically affecting performance.
Because there are so many different parameters available to customize, creating a particle system that suits your needs is very much more an art than a science. Be prepared to spend some time playing with the available settings, and try the different built-in presets to get an idea of what’s possible.
Shaking the Screen
Problem
You want the screen to shake—for example, an explosion has happened, and you want to emphasize the effect by rattling the player’s view of the scene around.
Solution
Create an empty node, and call it cameraNode. Add it to the screen. Put all of the nodes that you’d normally put into the scene into this new node.
Add the following method to your scene’s code:
- (void) shakeNode:(SKNode*)node {
// Reset the camera's position
node.position = CGPointZero;
// Cancel any existing shake actions
[node removeActionForKey:@"shake"];
// The number of individual movements that the shake will be made up of
int shakeSteps = 15;
// How "big" the shake is
float shakeDistance = 20;
// How long the shake should go on for
float shakeDuration = 0.25;
// An array to store the individual movements in
NSMutableArray* shakeActions = [NSMutableArray array];
// Start at shakeSteps, and step down to 0
for (int i = shakeSteps; i > 0; i--) {
// How long this specific shake movement will take
float shakeMovementDuration = shakeDuration / shakeSteps;
// This will be 1.0 at the start and gradually move down to 0.0
float shakeAmount= i / (float)shakeSteps;
// Take the current position - we'll then add an offset from that
CGPoint shakePosition = node.position;
// Pick a random amount from -shakeDistance to shakeDistance
shakePosition.x += (arc4random_uniform(shakeDistance*2) - shakeDistance)
* shakeAmount;
shakePosition.y += (arc4random_uniform(shakeDistance*2) - shakeDistance)
* shakeAmount;
// Create the action that moves the node to the new location, and
// add it to the list
SKAction* shakeMovementAction = [SKAction moveTo:shakePosition
duration:shakeMovementDuration];
[shakeActions addObject:shakeMovementAction];
}
// Run the shake!
SKAction* shakeSequence = [SKAction sequence:shakeActions];
[node runAction:shakeSequence withKey:@"shake"];
}
When you want to shake the screen, just call shakeNode: and pass in cameraNode:
[self shakeNode:cameraNode];
Discussion
Shaking the screen is a really effective way to emphasize to the player that something big and impressive is happening. If something forceful enough to shake the world around you is going on, then you know it means business!
So, what does a shake actually mean in terms of constructing an animation? Well, a shake is when you start at a neutral, resting point and begin moving large distances back and forth over that neutral point. An important element in realistic-looking shakes is that the shake gradually settles down, with the movements becoming less and less drastic as the shaking comes to an end.
To implement a shake, therefore, you need to construct several small movements. These can be implemented using SKActions: each step in the shake is an SKAction that moves the node from its current location to another location.
To attenuate the shake—that is, to make the movements smaller and smaller—the for loop that creates individual movements actually counts down to zero, and the number of steps remaining is divided by the total number of steps. This gives us a number from 0 to 1, by which the movement is multiplied. Eventually, the amount of movement is multiplied by 0—in other words, the movement settles back down to the neutral position.
Animating a Sprite
Problem
You want to make a SpriteKit animation using a collection of images. For example, you’ve got a “running” animation, and you want your sprite to play that animation.
Solution
In this solution, we’re going to assume that you’ve already got all of your individual frames, and you’ve put them into a folder named Animation.atlas, which has been added to your project.
Use SKAction’s animateWithTextures:timePerFrame: method to animate a collection of sprites:
// Load the texture atlas
SKTextureAtlas* atlas = [SKTextureAtlas atlasNamed:@"Animation"];
// Get the list of texture names, and sort them
NSArray* textureNames = [[atlas textureNames]
sortedArrayUsingSelector:@selector(compare:)];
// Load all textures
NSMutableArray* allTextures = [NSMutableArray array];
for (NSString* textureName in textureNames) {
[allTextures addObject:[atlas textureNamed:textureName]];
}
// Create the sprite, and give it the initial frame; position it
// in the middle of the screen
SKSpriteNode* animatedSprite = [SKSpriteNode
spriteNodeWithTexture:allTextures[0]];
animatedSprite.position = CGPointMake(CGRectGetMidX(self.frame),
CGRectGetMidY(self.frame));
[self addChild:animatedSprite];
// Make the sprite animate using the loaded textures, at a rate of
// 30 frames per second
SKAction* animationAction = [SKAction animateWithTextures:allTextures
timePerFrame:(1.0/30.0)];
[animatedSprite runAction:[SKAction repeatActionForever:animationAction]];
Discussion
The SKAction class is capable of changing the texture of a sprite over time. If you have a sequence of images that you want to use as an animation, all you need is an NSArray containing each of the textures you want, with each one stored as an SKTexture.
When you create the animation action using animateWithTextures:timePerFrame:, you provide the NSArray and the amount of time that each texture should be displayed. If you want to run your animation at 30 FPS, then each frame should be shown for 1/30th of a second (0.033 seconds per frame).
To get the SKTextures for display, you either need to load them using SKTexture’s textureWithImageNamed: method, or else get them from a texture atlas that contains them. Texture atlases were discussed in Creating Texture Atlases, and are an excellent way to group the frames for your animation together. They’re also better for memory, and ensure that all necessary frames are present for your animation—the game won’t pause halfway through your animation to load more frames.
Parallax Scrolling
Problem
Using SpriteKit, you want to show a two-dimensional scene that appears to have depth, by making more distant objects move slower than closer objects when the camera moves.
Solution
The specific approach for implementing parallax scrolling will depend on the details of your game. In this solution, we’re creating a scene where there are four components, listed in order of proximity:
§ A dirt path
§ Some nearby hills
§ Some further distant hills
§ The sky
You can see the final scene in Figure 6-6. (Unless you have magic paper, or possibly some kind of hyper-advanced computer reader technology yet to be invented, the image will not be scrolling.)
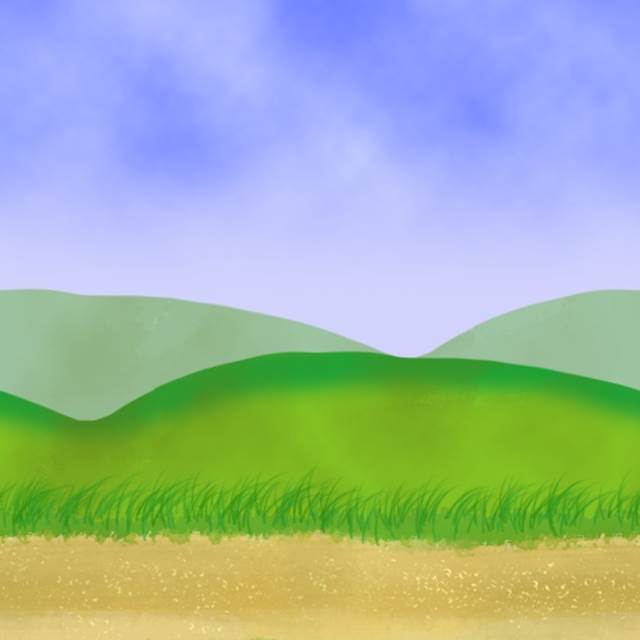
Figure 6-6. The final parallax scrolling scene.
In this scene, we’ve drawn the art so that each of these components is a separate image. Additionally, each of these images can tile horizontally without visible edges. The art has been put in a texture atlas (see Creating Texture Atlases to learn how to use these). The names of the textures for each of the components are Sky.png, DistantHills.png, Hills.png, and Path.png (shown in Figure 6-7).
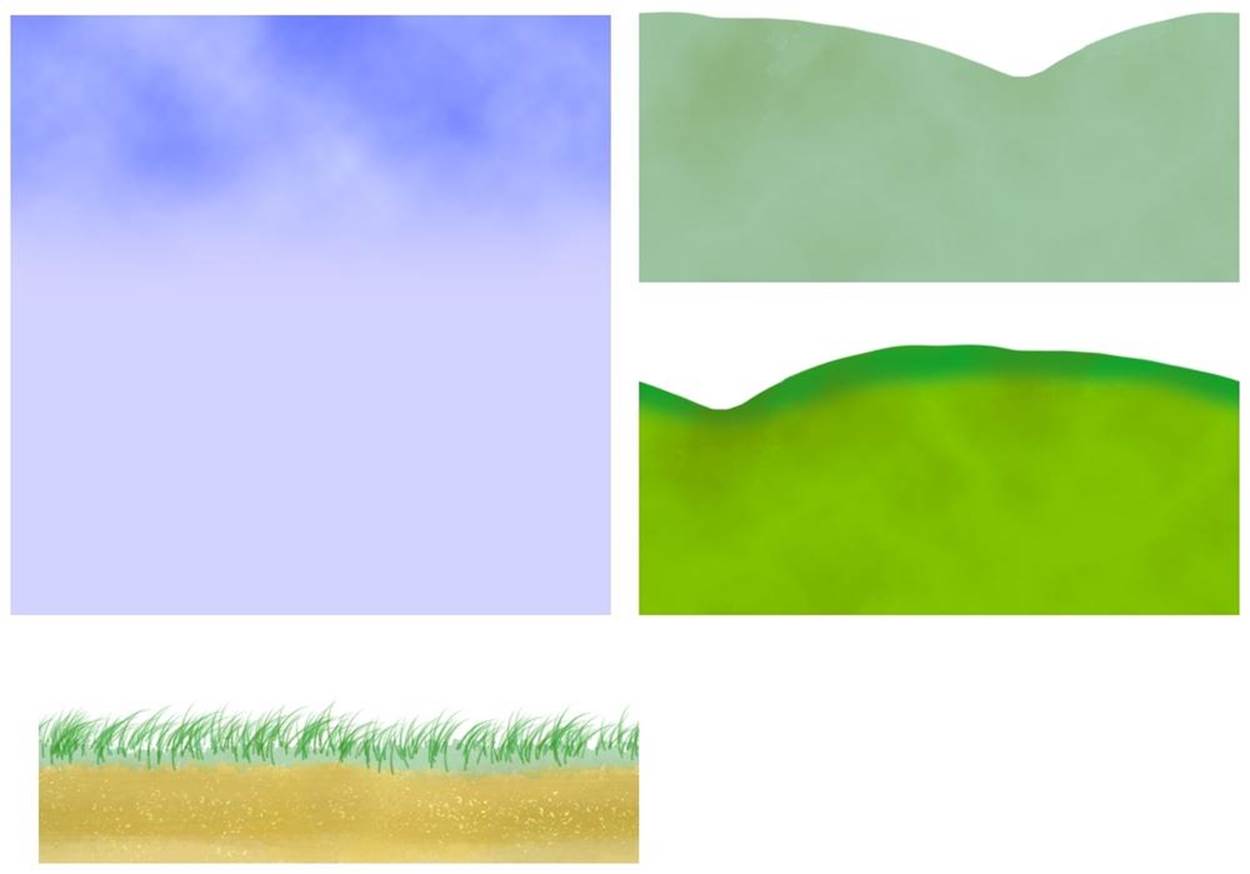
Figure 6-7. The components of the parallax scene. Note that all four components can tile horizontally.
With that out of the way, here’s the source code for the SKScene that shows these four components scrolling horizontally at different speeds:
@implementation MyScene {
// Sky
SKSpriteNode* skyNode;
SKSpriteNode* skyNodeNext;
// Foreground hills
SKSpriteNode* hillsNode;
SKSpriteNode* hillsNodeNext;
// Background hills
SKSpriteNode* distantHillsNode;
SKSpriteNode* distantHillsNodeNext;
// Path
SKSpriteNode* pathNode;
SKSpriteNode* pathNodeNext;
// Time of last frame
CFTimeInterval lastFrameTime;
// Time since last frame
CFTimeInterval deltaTime;
}
-(id)initWithSize:(CGSize)size {
if (self = [super initWithSize:size]) {
// Prepare the sky sprites
skyNode = [SKSpriteNode spriteNodeWithTexture:
[SKTexture textureWithImageNamed:@"Sky"]];
skyNode.position = CGPointMake(CGRectGetMidX(self.frame),
CGRectGetMidY(self.frame));
skyNodeNext = [skyNode copy];
skyNodeNext.position =
CGPointMake(skyNode.position.x + skyNode.size.width,
skyNode.position.y);
// Prepare the background hill sprites
distantHillsNode = [SKSpriteNode spriteNodeWithTexture:
[SKTexture textureWithImageNamed:@"DistantHills"]];
distantHillsNode.position =
CGPointMake(CGRectGetMidX(self.frame),
CGRectGetMaxY(self.frame) - 284);
distantHillsNodeNext = [distantHillsNode copy];
distantHillsNodeNext.position =
CGPointMake(distantHillsNode.position.x +
distantHillsNode.size.width,
distantHillsNode.position.y);
// Prepare the foreground hill sprites
hillsNode = [SKSpriteNode spriteNodeWithTexture:
[SKTexture textureWithImageNamed:@"Hills"]];
hillsNode.position =
CGPointMake(CGRectGetMidX(self.frame),
CGRectGetMaxY(self.frame) - 384);
hillsNodeNext = [hillsNode copy];
hillsNodeNext.position =
CGPointMake(hillsNode.position.x + hillsNode.size.width,
hillsNode.position.y);
// Prepare the path sprites
pathNode = [SKSpriteNode spriteNodeWithTexture:
[SKTexture textureWithImageNamed:@"Path"]];
pathNode.position =
CGPointMake(CGRectGetMidX(self.frame),
CGRectGetMaxY(self.frame) - 424);
pathNodeNext = [pathNode copy];
pathNodeNext.position =
CGPointMake(pathNode.position.x +
pathNode.size.width,
pathNode.position.y);
// Add the sprites to the scene
[self addChild:skyNode];
[self addChild:skyNodeNext];
[self addChild:distantHillsNode];
[self addChild:distantHillsNodeNext];
[self addChild:hillsNode];
[self addChild:hillsNodeNext];
[self addChild:pathNode];
[self addChild:pathNodeNext];
}
return self;
}
// Move a pair of sprites leftward based on a speed value;
// when either of the sprites goes off-screen, move it to the
// right so that it appears to be seamless movement
- (void) moveSprite:(SKSpriteNode*)sprite
nextSprite:(SKSpriteNode*)nextSprite
speed:(float)speed {
CGPoint newPosition;
// For both the sprite and its duplicate:
for (SKSpriteNode* spriteToMove in @[sprite, nextSprite]) {
// Shift the sprite leftward based on the speed
newPosition = spriteToMove.position;
newPosition.x -= speed * deltaTime;
spriteToMove.position = newPosition;
// If this sprite is now offscreen (i.e., its rightmost edge is
// farther left than the scene's leftmost edge):
if (CGRectGetMaxX(spriteToMove.frame) < CGRectGetMinX(self.frame)) {
// Shift it over so that it's now to the immediate right
// of the other sprite.
// This means that the two sprites are effectively
// leap-frogging each other as they both move.
spriteToMove.position =
CGPointMake(spriteToMove.position.x +
spriteToMove.size.width * 2,
spriteToMove.position.y);
}
}
}
- (void)update:(CFTimeInterval)currentTime {
// First, update the delta time values:
// If we don't have a last frame time value, this is the first frame,
// so delta time will be zero.
if (lastFrameTime <= 0)
lastFrameTime = currentTime;
// Update delta time
deltaTime = currentTime - lastFrameTime;
// Set last frame time to current time
lastFrameTime = currentTime;
// Next, move each of the four pairs of sprites.
// Objects that should appear move slower than foreground objects.
[self moveSprite:skyNode nextSprite:skyNodeNext speed:25.0];
[self moveSprite:distantHillsNode
nextSprite:distantHillsNodeNext speed:50.0];
[self moveSprite:hillsNode nextSprite:hillsNodeNext speed:100.0];
[self moveSprite:pathNode nextSprite:pathNodeNext speed:150.0];
}
Discussion
Parallax scrolling is no more complicated than moving some things quickly and other things slowly. In SpriteKit, the real trick is getting a sprite to appear to be continuously scrolling, showing no gaps.
In this solution, each of the four components in the scene—the sky, hills, distant hills, and path—are drawn with two sprites each: one shown onscreen, and one to its immediate right. For each pair of sprites, they both slide to the left until one of them has moved completely off the screen. At that point, it’s repositioned so it’s placed to the right of the other sprite.
In this manner, the two sprites are leap-frogging each other as they move. You can see the process illustrated in Figure 6-8.
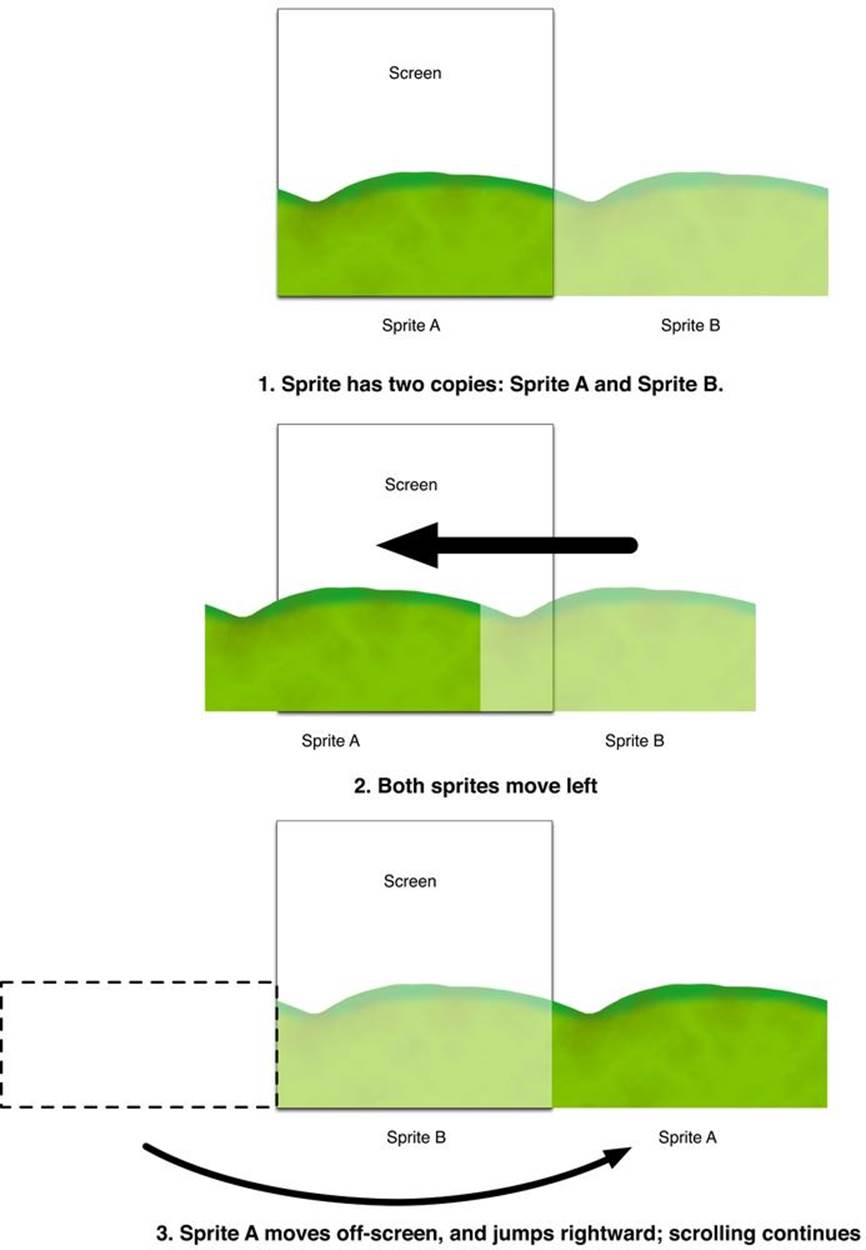
Figure 6-8. The scrolling process
Getting the speed values right for your scene is a matter of personal taste. However, the important thing is to make sure that the relationships between the speeds of the different layers makes sense: if you have an object that’s in the foreground and is moving much, much faster than a relatively close background, it won’t look right.
WARNING
Simulating perspective using parallax scrolling is a great and simple technique, but be careful with it. This recipe was written while in the back of a car that was driving down a winding road, and your fearless authors developed a little motion sickness while testing the source code.
Motion sickness in games, sometimes known as “simulation sickness,” is a real thing that affects many game players around the world. If you’re making a game that simulates perspective—either in a 3D game or a 2D game where you’re faking perspective—make sure you test with as many people as you can find.
Creating Images Using Perlin Noise
Problem
You want to create organic-looking textures and effects using the Perlin noise algorithm.
Solution
The Perlin noise algorithm is a really useful method for creating natural-looking patterns. It’s based on the idea of repeatedly adding successively more detailed layers of noise, and can be used for anything that needs to be random, but also look organic and natural. You can see an example of Perlin noise in Figure 6-9.
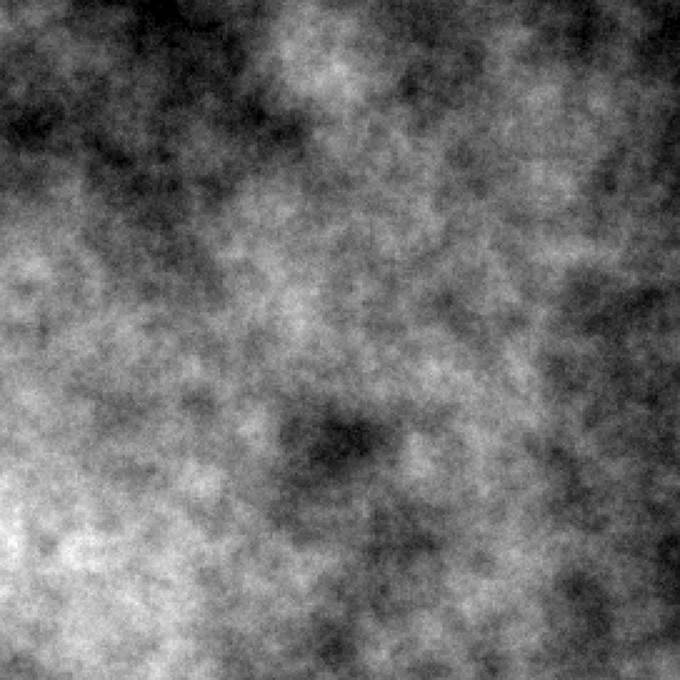
Figure 6-9. Perlin noise
The algorithm was invented by Ken Perlin in 1985, and was based on earlier work done for the Disney film Tron (1982). Perlin himself later won an Academy Award for Technical Achievement in 1997 for his work on Perlin noise.
The algorithm itself can be implemented in any language; the following is an example of an implementation you can use in Objective-C. This implementation is done inside a class, PerlinNoise, which provides a method that generates a UIImage on a background thread based on parameters that you provide.
To implement this class, create a new NSObject subclass called PerlinNoise by navigating to File→New→File…
Implement PerlinNoise.h as follows:
@interface PerlinNoise : NSObject
// The shared noise object.
+ (PerlinNoise*) noise;
// Begins generating a UIImage filled with perlin noise,
// given a size, a persistence value, the number of
// octaves, the random seed to use, and a block to call
// when the image is done.
- (void) imageWithSize:(CGSize)size persistence:(float)persistence
octaves:(int)octaves seed:(int) seed completion:(void (^)(UIImage* image))
completionBlock;
// Calculates Perlin noise at a position.
- (float) perlinNoiseAtPosition:(CGPoint)position persistence:(float)persistence
octaves:(int)octaves seed:(int)seed;
@end
Then, implement PerlinNoise.m as follows:
#import "PerlinNoise.h"
static PerlinNoise* _sharedNoise = nil;
@implementation PerlinNoise
// Returns the shared 'noise' object.
+ (PerlinNoise*) noise {
static dispatch_once_t onceToken;
dispatch_once(&onceToken, ^{
_sharedNoise = [[PerlinNoise alloc] init];
});
return _sharedNoise;
}
// Interpolates from one value to the next, using the cosine
// function to smooth the values.
- (float) interpolateCosineWithStart:(float)start
end:(float)end
amount:(float)amount {
// Perform cosine interpolation, which creates a smooth transition
// from one value to the next
float ft = amount * M_PI;
float f = (1 - cosf(ft)) * 0.5f;
return start * (1 - f) + end * f;
}
// Returns a random number generated by combining the components of
// the position and the random seed.
// This random number generator is guaranteed to provide the same
// results for the same inputs.
- (float) noiseAtPosition:(CGPoint)position seed:(int)seed {
int n = (int)position.x + (int)position.y * 57 * (seed * 131);
n = (n<<13) ^ n;
return ( 1.0 - ( (n * (n * n * 15731 + 789221) + 1376312589) & 0x7fffffff)
/ 1073741824.0);
}
// Given a position, return the noise value at that position based on the noise
// values of its neighbours.
- (float) smoothNoiseAtPosition:(CGPoint)position seed:(int)seed {
// Get the noise values for points at the corners...
float topLeftCorner = [self noiseAtPosition:(CGPoint){position.x-1,
position.y - 1}
seed:seed];
float topRightCorner = [self noiseAtPosition:(CGPoint){position.x+1,
position.y - 1}
seed:seed];
float bottomLeftCorner = [self noiseAtPosition:(CGPoint){position.x-1,
position.y + 1}
seed:seed];
float bottomRightCorner = [self noiseAtPosition:(CGPoint){position.x+1,
position.y + 1}
seed:seed];
// ... the sides...
float leftSide = [self noiseAtPosition:(CGPoint){position.x - 1,
position.y}
seed:seed];
float rightSide = [self noiseAtPosition:(CGPoint){position.x + 1,
position.y}
seed:seed];
float topSide = [self noiseAtPosition:(CGPoint){position.x,
position.y - 1}
seed:seed];
float bottomSide = [self noiseAtPosition:(CGPoint){position.x,
position.y + 1}
seed:seed];
// ... and the center.
float center = [self noiseAtPosition:(CGPoint){position.x, position.y}
seed:seed];
// Merge them all together. The corners affect the result the least,
// the center the most, and the sides halfway between.
float corners = (topLeftCorner + topRightCorner +
bottomLeftCorner + bottomRightCorner) / 16.0f;
float sides = (leftSide + rightSide + topSide + bottomSide) / 8.0f;
center = center / 4.0f;
// Return the result.
return corners + sides + center;
}
// Given a position in the image, work out how the noise values blend
// together in the image
- (float) interpolatedNoiseAtPosition:(CGPoint)position seed:(int)seed {
int integralX = (int)position.x;
int integralY = (int)position.y;
float fractionalX = position.x - integralX;
float fractionalY = position.y - integralY;
float v1 = [self smoothNoiseAtPosition:(CGPoint){integralX, integralY}
seed:seed];
float v2 = [self smoothNoiseAtPosition:(CGPoint){integralX+1, integralY}
seed:seed];
float v3 = [self smoothNoiseAtPosition:(CGPoint){integralX, integralY+1}
seed:seed];
float v4 = [self smoothNoiseAtPosition:(CGPoint){integralX+1, integralY+1}
seed:seed];
float i1 = [self interpolateCosineWithStart:v1 end:v2 amount:fractionalX];
float i2 = [self interpolateCosineWithStart:v3 end:v4 amount:fractionalX];
return [self interpolateCosineWithStart:i1 end:i2 amount:fractionalY];
}
// Calculate the value of the image at a given position by applying
// Perlin noise.
- (float) perlinNoiseAtPosition:(CGPoint)position
persistence:(float)persistence
octaves:(int)octaves seed:(int)seed {
float total = 0.0;
for (int i = 0; i <= octaves - 1; i++) {
int frequency = pow(2, i);
float amplitude = pow(persistence, i);
total += [self interpolatedNoiseAtPosition:(CGPoint)
{(position.x * frequency),
(position.y * frequency)}
seed:seed * (i+1)] * amplitude;
}
return total;
}
// Generate an image filled with Perlin noise.
- (void) imageWithSize:(CGSize)size persistence:(float)persistence
octaves:(int)octaves seed:(int) seed
completion:(void (^)(UIImage* image))completionBlock {
// If we don't have a completion block, immediately return
// after logging an error.
if (completionBlock == NULL) {
NSLog(@"Error: %@ was called with no completion block, so there's no way
to return the image. Provide a completion block.",
NSStringFromSelector(_cmd));
return;
}
// Create a background queue to run the operation on
NSOperationQueue* backgroundQueue = [[NSOperationQueue alloc] init];
// Run the work in the background
[backgroundQueue addOperationWithBlock:^{
// Begin a new graphics context
UIGraphicsBeginImageContextWithOptions(size, YES,
[UIScreen mainScreen].scale);
// Get the graphics context as a CGContextRef
// so that we can use CoreGraphics calls later
CGContextRef context = UIGraphicsGetCurrentContext();
// For each pixel in the image, work out the value using the
// Perlin noise algorithm.
for (int x = 0; x <= size.width; x+= 1) {
for (int y = 0; y <= size.height; y += 1) {
// Work out the Perlin noise value
// for this pixel.
float value = [self perlinNoiseAtPosition:(CGPoint)
{x / size.width, y / size.height}
persistence:persistence octaves:octaves
seed:seed];
// Example of banding the output (uncomment to apply)
/*
if (value > 0.5)
value = 0.9;
else if (value > 0.3)
value = 0.5;
else if (value > 0.2)
value = 0.3;
else
value = 0.2;
*/
// Once we have the value, we turn that into a grayscale color...
CGContextSetGrayFillColor(context, value, 1.0);
// ...and fill the appropriate pixel.
CGRect rect = CGRectMake(x, y, x+1, y+1);
CGContextFillRect(context, rect);
}
}
// Once the rendering is done, grab the image from the context
UIImage* image = UIGraphicsGetImageFromCurrentImageContext();
// And then call the completion block, making sure
// to do it on the main queue
[[NSOperationQueue mainQueue] addOperationWithBlock:^{
completionBlock(image);
}];
// Finally, tidy up by removing the image context
// we created.
UIGraphicsEndImageContext();
}];
// We don't return anything in this method because the image
// is returned to the caller via the completion block.
}
@end
Discussion
At its core, the Perlin noise algorithm is very simple: for each octave, a slightly more detailed amount of noise is overlaid on top.
The three key parameters that you feed into the algorithm are as follows:
Random seed
Used to determine the specific pattern that the algorithm generates. You’ll note that the built-in random number generator function, random(), isn’t used. This is because we don’t actually want properly random numbers, in which it (hopefully) isn’t possible to determine what the next random number is going to be.
Instead, we want random-like numbers, which change based on the input and nothing else. This allows the Perlin noise algorithm to be able to calculate noise values relative to neighboring pixels because the values for neighboring pixels aren’t going to change between different calculations.
octaves
The number of octaves controls how many times the algorithm is run. Each time it’s run, an additional level of detail is added to the result, which means that more octaves means higher levels of detail in the final result, and fewer octaves means less-detailed, blurrier noise.
persistence value
Controls how much of an effect higher octaves have on the final result. High persistence values mean a greater contrast between the dark and light areas of the noise image.
NOTE
You can tweak and tune the number of octaves and the persistence value to get the kind of noise you want. The sample code provided with this book contains an app that lets you play around with these values.
Perlin noise is an incredibly effective method for creating natural, organic looking textures. You can use it for a number of things, including fire, fog, smoke, lightning; additionally, its uses aren’t limited to and terrain generation—all you need to do is change how you’re using the results that the Perlin noise algorithm gives you. Perlin noise works best when blended with other images.
For example, instead of using Perlin noise only for images, consider a case where you use it to work out how a bumblebee randomly moves about as it hovers. To do that, all you need to do is to generate two Perlin noise values, each with their own random seed:
- (void) updateBumblebeePositionAtTime:(float)time {
CGPoint inputPosition = CGPointMake(time,0);
float movementX = [[PerlinNoise noise] perlinNoiseAtPosition:inputPosition
persistence:0.75
octaves:10
seed:18273];
float movementY = [[PerlinNoise noise] perlinNoiseAtPosition:inputPosition
persistence:0.75
octaves:10
seed:21516];
CGPoint bumblebeeMovement = CGPointMake(movementX, movementY);
// The perlin method returns values from 0 to 1, so multiply by 2
// and subtract 1 to get values from -1 to 1
bumblebeeMovement.x *= 2;
bumblebeeMovement.y *= 2;
bumblebeeMovement.x -= 1;
bumblebeeMovement.y -= 1;
// The bumblebeeMovement variable now contains a position somewhere
// from (-1, -1) to (1, 1). Additionally, as time increases, this position
// will smoothly and randomly change.
// The bumblebeeMovement position can now be used to change the position
// of the bee, e.g.:
[self moveBumblebeeByPosition:bumblebeeMovement];
}
All materials on the site are licensed Creative Commons Attribution-Sharealike 3.0 Unported CC BY-SA 3.0 & GNU Free Documentation License (GFDL)
If you are the copyright holder of any material contained on our site and intend to remove it, please contact our site administrator for approval.
© 2016-2026 All site design rights belong to S.Y.A.