iOS 7 Game Development: Develop powerful, engaging games with ready-to-use utilities from Sprite Kit (2014)
Chapter 7. Publishing to the iTunes App Store
In this chapter, we will discuss how to prepare your application for the App Store, what steps need to be taken, and the logistics of the process. You will learn how to register yourself as an Apple developer and post your application on the App Store.
Registering as a developer
In order to be able to get your applications published on the App Store, you need to be registered as a developer with Apple. There is another added benefit of being a registered developer—you will be able to test your software on the device. This is the only way to do this. And as the simulator's performance is unreliable, you will eventually have to do that, and I suggest that you get it as soon as possible, especially if you are working with games – rendering on iOS simulator is very slow and laggy. You can get very severe frame rate drops in most trivial situations, where even old devices will show a solid 60 frames per second.
In order to register as a developer, we need to perform the following steps: 1. Create an Apple ID or log in to the iOS developer portal available at https://developer.apple.com/register/index.action.
2. As the next step, you will have to accept the legal agreement with Apple about your rights and duties as a developer.
Publishing to the iTunes App Store
3. After accepting the agreement, Apple will enquire you about your role as a developer or designer and what platforms you are planning to develop for.
4. You will gain access to a limited number of resources as a developer, such as videos and documentation, different guides, and other things.
5. The next thing that you should do is join the iOS Developer program at https://developer.apple.com/programs/ios/. There are huge benefits to this. You will get access to various developer resources and WWDC videos (materials from yearly conferences for Apple developers, which used to cost few hundreds by itself). On the downside, you will have to pay 99 dollars per year.
6. You will need to pick a program: an individual or company program.
The company program offers adding more developers to the same account and enhanced distribution profiles (if you want to distribute your applications in-house). Its license requires much more paperwork, and it takes much longer to register as a company. If you are a sole developer, there are no benefits in registering as a company, as you will get equal possibilities for App Store distribution.
After performing all these steps, you will become a registered iOS developer.
If you have chosen to register as a company, it will take you a few weeks to send the paperwork, but if you are a sole developer, the process will be instant.
Now you will need to set up your programming environment as follows: 1. The first thing that you need to do is add your developer account to Xcode (remember that you will need Xcode 5 or a higher version for this) by navigating to Xcode | Preferences.
2. Click on Accounts from the top menu.
3. Click on the + button in the bottom-left corner and add Apple ID, as shown in the following screenshot:
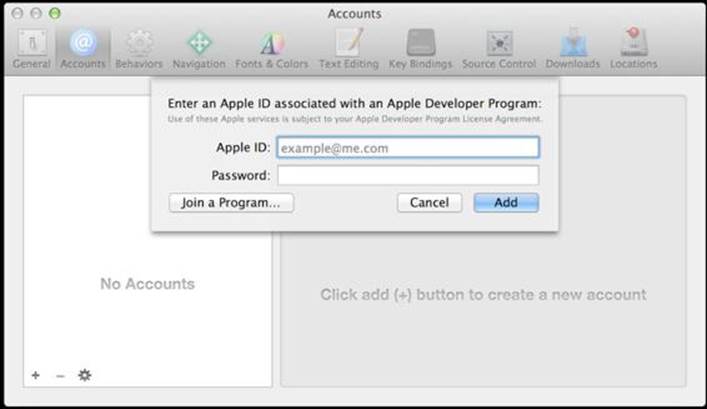
Adding your Apple ID to Xcode
After this, you will be able to use all the features available to registered developers.
Bundle ID
Bundle ID is a unique identifier that allows Apple to uniquely identify your application among all others. It is used for the following purposes:
• To enter in the Xcode project
• To enter in iTunes Connect (a platform to configure distribution of your applications)
• App ID
• iCloud container ID
• Other services like Game Center or in-app purchases
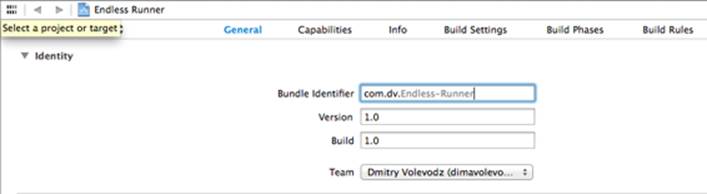
In order to change a bundle ID of an already existing application, select it in the project navigator, click on General present in the top menu, and if needed, open the disclosure triangle near Identity. There you will have the bundle ID
as shown in the following screenshot. The usual format for the bundle ID is com.<company>.<project>, and this helps to keep your ID unique.
Changing the bundle ID
Occasionally, you will need to change your bundle identifiers as they are used in many places.
Provisioning profiles
The following are the two kinds of provisioning profiles that are used in development:
• Developer provisioning profile: This is a collection of digital certificates and other entities that uniquely identify you as a developer, devices that you chose to use for testing, and enables devices to be used for testing.
Each provisioning profile will contain your developer certificates, unique identifiers of devices that are used for testing, and your App ID.
• A store provisioning profile: This is a profile that ensures that the application was made by you, and authorizes the use of certain features and technologies. It contains your developer certificate that you need to submit your application to the App Store.
In the past, you had to handle provisioning yourself, but starting with Xcode 5.0, most of this is handled for you. This is a great feature, as provisioning was a huge pain for developers, and you could spend endless hours trying to fix incomprehensible issues.
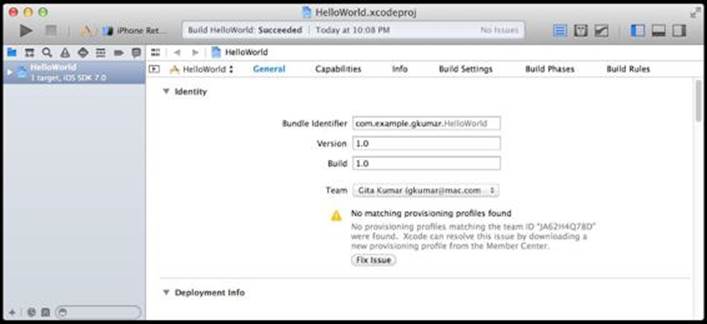
Now, all you need to do is click on Use for development in Organizer when your device is connected and build the application. Organizer is an instrument within Xcode that helps you with various tasks such as adding more devices to your profile and handling crash logs. To access it, navigate to Window | Organizer in the top menu.
If there are some issues, Xcode will propose to fix them as displayed in the following screenshot. Usually, clicking on the Fix Issue button will magically fix everything without your intervention. In some cases, you will need to wait for a few minutes, but mostly that's it.
The Fix Issue button will help you when something goes wrong Preparing our application for the
App Store
In order to prepare our application for App Store, we need to perform the following steps:
1. Set the deployment info by selecting a project in the project navigator and opening Deployment info if needed. Here, we set different settings of our application, such as supported versions (Sprite Kit only supports iOS 7 and higher versions), devices (our application is iPhone only), orientations (make sure only Landscape ones are selected), and others such as the status bar's style and the first launching storyboard.
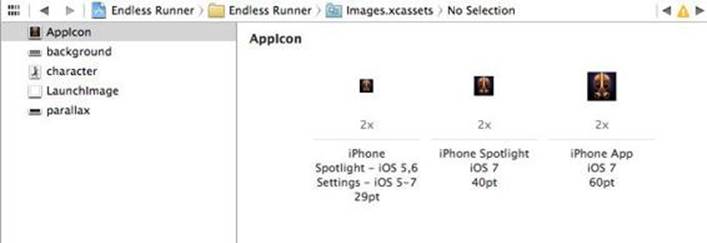
2. Add app icons by performing the following steps:
1. Open Images.xcassets in the project navigator.
2. Select AppIcon.
3. Add icons from resources of this chapter 58.png, 80.png, and 120.
png respectively and drop them to the icon places, as shown in the following screenshot. Since our application is iPhone-only, we only need three icons. If we made an iPad version, we would have to add many more icons.
Adding icons to the project
Managing applications in iTunes Connect
iTunes Connect is an Apple and web-based tool that iOS developers use to set up contracts, banking, and tax information, and submit new applications or newer versions of old applications. We will use it to add a new record about our application. This record contains the following:
• Basic application information
• Pricing and territories where the application is available
• Adding languages and keywords
• Uploading large icons and screenshots
• Additional questions about your application (does it use cryptography or have other legally restricted uses)
• Preparing for a binary upload
Before registering the application in the App Store, you might have to fill some legal paperwork, such as accepting agreements with Apple about various distribution issues and providing Apple with information of your bank account and tax. This is available in iTunes Connect in theContracts, Tax and Banking tab. You won't be able to distribute without accepting those agreements.
In order to register an application in iTunes Connect, perform the following steps: 1. Log in to iTunes Connect at http://itunesconnnect.apple.com.
2. On the iTunes Connect home page, click on Manage your apps.
3. On the Manage your apps screen, click on Add New App.
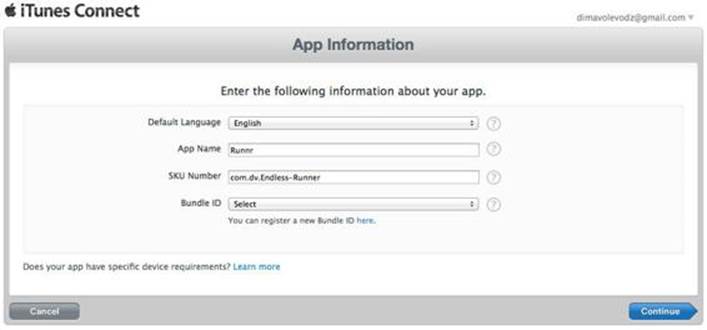
4. On the next screens, follow the directions and fill everything that is required, as shown in the following screenshot:
Entering basic info about an application
5. You will need to create a new bundle ID for your application. Click on the link to create it and pick it after you create it.
6. After this, you will need to set the version of the application (1.0 will do), copyrights, the category of the application, and ratings.
7. You will need to upload large icons (1024 x 1024) and screenshots from both 3.5 and 4-inch retina devices.
When you are done registering your application in iTunes Connect, you will see the Waiting for Upload status in your Application Details page. If it is of some other state, fix the issues that prevent the ready state, such as missing screenshots or text.
Now you will need to build the application for distribution. In order to do that, perform the following steps:
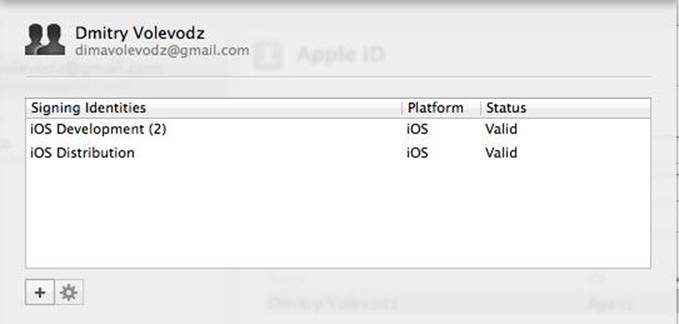
1. Make sure you have distribution certificates. To check this, navigate to Xcode in the top menu and then to Preferences | Accounts in the top pane.
Select your account and click on View Detail. Under Signing Identities, you should see iOS Development (2) and iOS Distribution, as shown in the following screenshot. If something is missing, click on the + button on the same screen and it will add a distribution certificate to your account.
Go to the iTunes developer center and click on Certificates and download it. After it is downloaded, run it to add to Keychain. After that is done, it should appear on the list.
Both iOS Development and Distribution profiles are installed 2. After your profiles are set up, you will need to make a build for distribution.
To do that, change the iOS device from the iOS simulator near the Build button on the left-hand side of the Xcode window. After that, click on Product in the top menu and archive the profiles there by clicking on the Archive option as shown in the following screenshot:
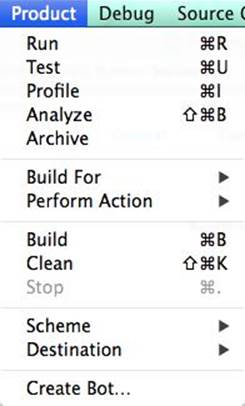
Archiving your application
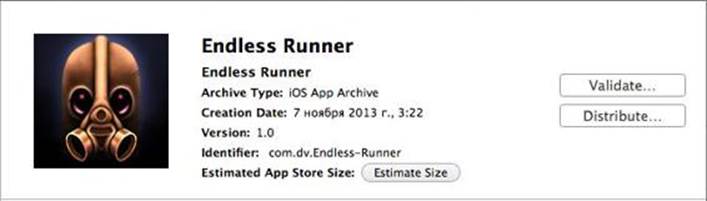
3. The Organizer should open with details about your application, as shown in the following screenshot. You can click on Validate… there to check if everything is right, and on Distribute… as soon as you want to upload it for review. Xcode will prompt you for your Apple ID and password, and if you have your application set up in iTunes Connect, it will be uploaded for review. You can also use the Distribute… button to create a .IPA file of your game, and you may make it available for your testers as shown in the following screenshot. For further details on this, read about ad hoc distribution on the Apple Developer website.
Application archived for distribution
Life after uploading
Your application can have several states, which are as follows:
• Waiting for upload: This is the state after you have registered your application in iTunes Connect but have not uploaded the binary yet.
• Waiting for review: This is the state in iTunes Connect after uploading your application.
• In review: This is the state when your application is currently in review.
It takes any amount of time from minutes to days, depending on a few factors such as the complexity of the application or the reviewers' workload, but mostly they are random.
• Ready for sale: This means that if you have not changed the default date of the availability of your application, it will be available for download from the App Store on the day it gets approved.
Sales statistics and other useful data can be found in iTunes Connect. Please make sure you check all the available tools that it offers such as sales and trends, iAd, and catalog reports.
Summary
In this chapter, we have learned what steps need to be taken in order to post your application to the App Store. You have learned about provisioning profiles, code signing, development and distribution certificates, and a process that needs to be undertaken each time you want to upload your application to the iTunes App Store.
All materials on the site are licensed Creative Commons Attribution-Sharealike 3.0 Unported CC BY-SA 3.0 & GNU Free Documentation License (GFDL)
If you are the copyright holder of any material contained on our site and intend to remove it, please contact our site administrator for approval.
© 2016-2025 All site design rights belong to S.Y.A.