iOS Programming: The Big Nerd Ranch Guide (2014)
20. Dynamic Type
Creating an interface that appeals to everyone can be daunting. Some people prefer more compact interfaces so they can see more information at a time. Others might want to be able to easily see information at a glance, or perhaps they have poor eyesight. These people have different needs, and good developers strive to make apps that meet those needs.
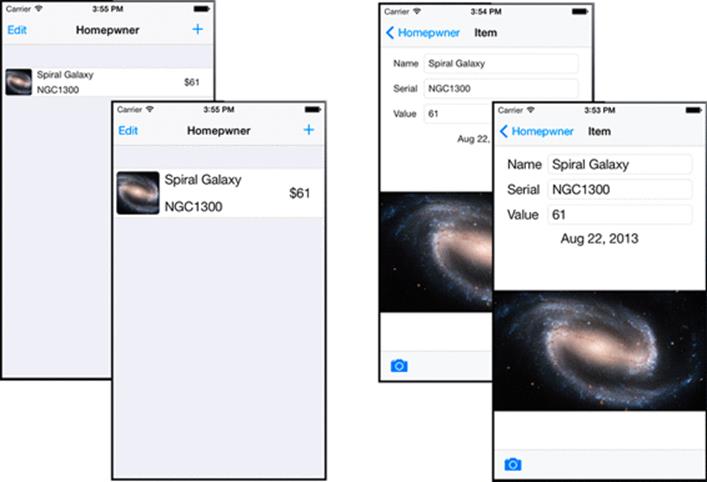
Dynamic Type is a technology introduced in iOS 7 that helps realize this goal by providing specifically designed text styles that are optimized for legibility. Perhaps more importantly, users can select one of seven different preferred text sizes from within Apple’s Settings application, and apps that support Dynamic Type will have their fonts scaled appropriately. In this chapter, you will update Homepwner to support Dynamic Type. Figure 20.1 shows the application rendered at the smallest and largest user selectable Dynamic Type sizes.
Figure 20.1 Homepwner with Dynamic Type supported
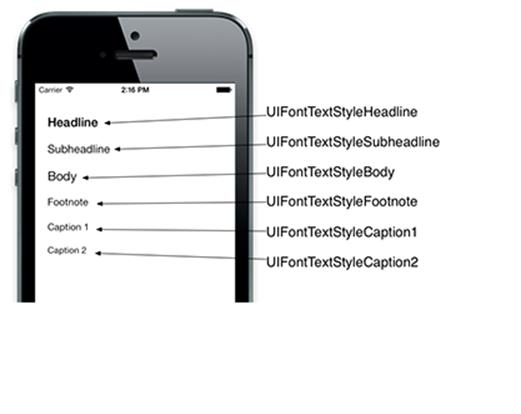
The Dynamic Type system is centered around text styles. When a font is requested for a given text style, the system will use the user’s preferred text size in association with the text style to return an appropriately configured font. Figure 20.2 shows the six different text styles.
Figure 20.2 Different text styles
Using Preferred Fonts
Implementing Dynamic Type is straightforward. At its most basic level, you get a UIFont for a specific text style and then apply that font to something that displays text, such as a UILabel. Let’s start by updating BNRDetailViewController.
You are going to need to update some attributes of the labels programmatically soon, so add outlets to each of the labels to the class extension in BNRDetailViewController.m.
@interface BNRDetailViewController ()
@property (nonatomic, strong) UIPopoverController *imagePickerPopover;
@property (weak, nonatomic) IBOutlet UITextField *nameField;
@property (weak, nonatomic) IBOutlet UITextField *serialNumberField;
@property (weak, nonatomic) IBOutlet UITextField *valueField;
@property (weak, nonatomic) IBOutlet UILabel *dateLabel;
@property (weak, nonatomic) IBOutlet UIImageView *imageView;
@property (weak, nonatomic) IBOutlet UIToolbar *toolbar;
@property (weak, nonatomic) IBOutlet UIBarButtonItem *cameraButton;
@property (weak, nonatomic) IBOutlet UILabel *nameLabel;
@property (weak, nonatomic) IBOutlet UILabel *serialNumberLabel;
@property (weak, nonatomic) IBOutlet UILabel *valueLabel;
@end
Now that there is an outlet to each of the labels, add a method that sets the font for each to use the preferred Body style.
- (void)updateFonts
{
UIFont *font = [UIFont preferredFontForTextStyle:UIFontTextStyleBody];
self.nameLabel.font = font;
self.serialNumberLabel.font = font;
self.valueLabel.font = font;
self.dateLabel.font = font;
self.nameField.font = font;
self.serialNumberField.font = font;
self.valueField.font = font;
}
Now call this method at the end of viewWillAppear: to update the labels before they are visible.
self.imageView.image = imageToDisplay;
[self updateFonts];
}
The preferredFontForTextStyle: method will return a preconfigured font that is customized for the user’s preferences. Build and run the application, and you will notice that the interface looks largely the same.
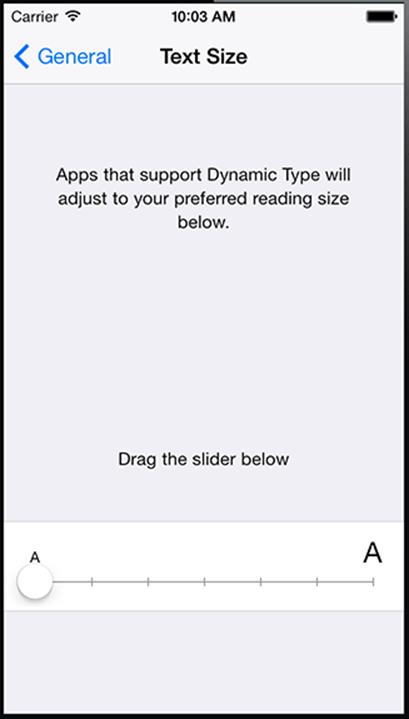
Now let’s change the preferred font size. Press the Home button (or use Home from the Hardware menu), and open Apple’s Settings application. Under General, select Text Size, and then drag the slider all the way to the left to set the font size to the smallest value (Figure 20.3).
Figure 20.3 Text size settings
Now, go back into Homepwner. If you return to the BNRDetailViewController, you will notice that the interface has not changed at all! Why is this? Since viewWillAppear: is not called when the application returns from the background, your interface is not getting updated. Luckily, you can be informed when the user changes the preferred font size.
Responding to User Changes
When the user changes the preferred text size, a notification gets posted that the application’s objects can register to listen for. This is the UIContentSizeCategoryDidChangeNotification, and this is a great time to update the user interface.
In BNRDetailViewController.m, register for this notification in initForNewItem: and remove the class as an observer in dealloc.
self.navigationItem.leftBarButtonItem = cancelItem;
}
// Make sure this is NOT in the if (isNew ) { } block of code
NSNotificationCenter *defaultCenter = [NSNotificationCenter defaultCenter];
[defaultCenter addObserver:self
selector:@selector(updateFonts)
name:UIContentSizeCategoryDidChangeNotification
object:nil];
}
return self;
}
- (void)dealloc
{
NSNotificationCenter *defaultCenter = [NSNotificationCenter defaultCenter];
[defaultCenter removeObserver:self];
}
Notice that the method getting called from the notification center is the same method you implemented earlier that also gets called on viewWillAppear:. Build and run the application again, and the interface will update as you change the Dynamic Type preferred text size in Settings. The labels and text fields in BNRDetailViewController will now scale elegantly to the user’s preferences.
Is that it? Well, mostly. Now that your interface can grow and shrink dynamically, you need to revisit your Auto Layout constraints.
Updating Auto Layout
When the constraints were set up for the Name, Serial Number, and Value labels, you pinned the width and the height. This worked well when the text was a fixed font and text size, but now that you have introduced Dynamic Type, your interface does not scale. If the user selects a small text size, there will be a lot of empty whitespace; if the user selects a very large text size, there is a chance that the text could be clipped. What you need to do is utilize the intrinsicContentSize of the labels to allow them to resize themselves to exactly the size they need to be.
Open BNRDetailViewController.xib. In the canvas, select each of the four labels, one by one, and remove their explicit width and height constraints. If you have any misplaced views, select the UIControl on the canvas and then Update All Frames in Control from the Resolve Auto Layout Issues menu.
If you look closely, or if you temporarily change the text of one of the labels to be a bit shorter or longer, you may notice that the text fields no longer line up. It would look better if they lined up, but before we investigate a fix you should understand how Auto Layout is computing all of the frames.
Content Hugging and Compression Resistance Priorities revisited
Recall that every view has a preferred size, which is its intrinsicContentSize. This gives each view an implied width and height constraint. For a view to grow larger than its intrinsicContentSize in a given dimension, there has to be a constraint with a higher priority than that view’s Content Hugging Priority. For a view to grow smaller than its intrinsicContentSize in a given dimension, there has to be a constraint with a higher priority than that view’s Content Compression Resistance Priority.
This is important to remember when you are determining how your interfaces will get laid out. Let’s inspect the layout of the Name label and corresponding text field in the horizontal direction. The constraints affecting these views are:
· nameLabel.leading = superview.leading + 8
·
· nameField.leading = nameLabel.trailing + 8
·
· nameField.trailing = superview.trailing - 8
·
This gives us a visual format string that looks like:
H:|-8-[nameLabel]-8-[nameField]-8-|
Notice that there are no constraints directly impacting the widths of the views. Because of this, both views want to be at the width of their intrinsicContentSize. One or both of the labels will have to stretch in order to satisfy the existing constraints.
So which view will get stretched? Since both views want to be wider than their intrinsicContentSize, the view with the lower Content Hugging Priority will stretch. If you compare the UILabel and the UITextField, you will see that the label has a Content Hugging Priority of 251 whereas the text field’s is 250. Since the label wants to “hug” more, the label will be the width of its intrinsicContentSize and the text field will stretch enough to satisfy the equations.
Remember that the goal is to have all of the text fields aligned. The way that you will accomplish this is by having the three top labels be the same width. This may sound like what you just removed, but there is a subtle difference: earlier, each of the labels independently had their width (and height) pinned, but now they will instead always have equal widths.
Select the Name, Serial, and Value labels together and open the Pin menu. Select Equal Widths and from the Update Frames drop-down choose All Frames in Container. Finally, click Add 2 Constraints. Your interface should look like Figure 20.4.
Figure 20.4 Equal width constraints added
That was easy to achieve, but you may now be wondering how this is all working. Let’s take a detailed look, recapping some earlier information along the way. First, the Content Hugging Priority of each label (251) is higher than that of its corresponding text field (250), so the label will hug before the text field will. Finally, you just added equal width constraints for the three top labels.
So each of the top three labels has two constraints impacting its width: a required (priority 1000) Equal Widths constraint, and the two implicit constraints that try to keep the label at its intrinsicContentSize. (Content Hugging with a priority of 251, and Content Compression Resistance with a priority of 750). Each of the views wants to satisfy all of these constraints. The only view that will be able to do this, however, is the view that has the maximum width. The other two views will have a required constraint with a higher priority than their Content Hugging Priority, so they will stretch to be the same width as the longest label.
What has happened here is very important. You have created an interface that scales beautifully as the text content changes. Text changes can be due to a number of different reasons. Most commonly, this will be due to the use of Dynamic Type or localizing the application for different languages (which we will discuss in Chapter 25).
The interface for BNRDetailViewController is done. Go ahead and test the BNRDetailViewController at different Dynamic Type sizes, and you should notice that the interface scales appropriately.
Determining the User’s Preferred Text Size
Now it is time to turn our attention to the BNRItemsViewController. You will need to update two parts of this view controller for Dynamic Type: the rows of your table view will grow or shrink in response to the user changing the preferred text size, and the BNRItemCell will need to be updated similarly to how you updated the BNRDetailViewController. Let’s begin by updating the table view row height.
The goal is to have the table view row heights reflect the preferred Dynamic Type text size of the user. If the user chooses a larger text size, the rows will be taller in order to accommodate the text. Since this is not a problem that Auto Layout will solve, the row heights will need to be set manually. To do this, you need a way of determining which text size the user has selected.
UIApplication exposes the text size that user selected through its preferredContentSizeCategory property. The method will return a constant NSString with the name of the content size category, which will be one of the following values:
· UIContentSizeCategoryExtraSmall
· UIContentSizeCategorySmall
· UIContentSizeCategoryMedium
· UIContentSizeCategoryLarge (Default)
· UIContentSizeCategoryExtraLarge
· UIContentSizeCategoryExtraExtraLarge
· UIContentSizeCategoryExtraExtraExtraLarge
Open BNRItemsViewController.m. Create a method that will update the table view row height based on the user-selected text size and call this method in viewWillAppear:.
- (void)viewWillAppear:(BOOL)animated
{
[super viewWillAppear:animated];
[self.tableView reloadData];
[self updateTableViewForDynamicTypeSize];
}
- (void)updateTableViewForDynamicTypeSize
{
static NSDictionary *cellHeightDictionary;
if (!cellHeightDictionary) {
cellHeightDictionary = @{ UIContentSizeCategoryExtraSmall : @44,
UIContentSizeCategorySmall : @44,
UIContentSizeCategoryMedium : @44,
UIContentSizeCategoryLarge : @44,
UIContentSizeCategoryExtraLarge : @55,
UIContentSizeCategoryExtraExtraLarge : @65,
UIContentSizeCategoryExtraExtraExtraLarge : @75 };
}
NSString *userSize =
[[UIApplication sharedApplication] preferredContentSizeCategory];
NSNumber *cellHeight = cellHeightDictionary[userSize];
[self.tableView setRowHeight:cellHeight.floatValue];
[self.tableView reloadData];
}
Build and run the application. If you change the Dynamic Type preferred text size and restart the application again, you should notice that the table view row heights reflects the user’s selected text size. (If you don’t restart the application from Xcode, you’ll need to go to theBNRDetailViewController and then return to the BNRItemsViewController.)
Just as you did with the BNRDetailViewController earlier, you need to have the BNRItemsViewController register itself as an observer for the UIContentSizeCategoryDidChangeNotification.
In BNRItemsViewController.m, register for the notification in init, and remove the view controller as an observer in dealloc. Finally, implement the notification call back to call the updateTableViewForDynamicTypeSize method that you just created.
self.navigationItem.rightBarButtonItem = bbi;
self.navigationItem.leftBarButtonItem = [self editButtonItem];
NSNotificationCenter *nc = [NSNotificationCenter defaultCenter];
[nc addObserver:self
selector:@selector(updateTableViewForDynamicTypeSize)
name:UIContentSizeCategoryDidChangeNotification
object:nil];
}
return self;
}
- (void)dealloc
{
NSNotificationCenter *nc = [NSNotificationCenter defaultCenter];
[nc removeObserver:self];
}
The table view row height should update now as you change the preferred Dynamic Type text size. Build and run the application and test this out.
Updating BNRItemCell
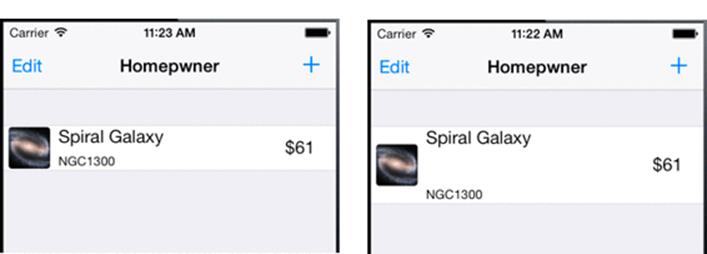
Although the row heights adjust based on the preferred text size, the cell content is not adjusting. You will add Dynamic Type support to BNRItemCell shortly. First, pay attention to how the cell subviews adjust appropriately based on the cell height. Because of your thoughtful use of Auto Layout when creating BNRItemCell, the interface adjusts elegantly (Figure 20.5). The imageView stays vertically centered in the cell and pinned to the left, nameLabel is pinned to the top, serialNumberLabel is pinned to the bottom, and valueLabel stays centered and pinned to the right.
Figure 20.5 Auto Layout in action
This worked great while the text was a fixed size, but when you update the class to use Dynamic Type you will need to make some changes. Let’s begin by implementing the Dynamic Type code to update the labels, which will closely follow what you did with BNRDetailViewController andBNRItemsViewController.
Open BNRItemCell.m and make the following changes:
- (void)updateInterfaceForDynamicTypeSize
{
UIFont *font = [UIFont preferredFontForTextStyle:UIFontTextStyleBody];
self.nameLabel.font = font;
self.serialNumberLabel.font = font;
self.valueLabel.font = font;
}
- (void)awakeFromNib
{
[self updateInterfaceForDynamicTypeSize];
NSNotificationCenter *nc = [NSNotificationCenter defaultCenter];
[nc addObserver:self
selector:@selector(updateInterfaceForDynamicTypeSize)
name:UIContentSizeCategoryDidChangeNotification
object:nil];
}
- (void)dealloc
{
NSNotificationCenter *nc = [NSNotificationCenter defaultCenter];
[nc removeObserver:self];
}
The only new piece of information here is the awakeFromNib method. This is called on an object after it has been unarchived from a NIB file, and is a great place to do any additional UI work that cannot be done within the XIB file. You can do any additional configuration for the cell that cannot be done within the XIB file within this method. Build and run the application, and the text will update to reflect the user’s preferred text size.
Now there are a few Auto Layout issues that you need to resolve.
Initially, you pinned the height of nameLabel and serialNumberLabel. This does not work well now that your text sizes can dynamically change.
In BNRItemCell.xib, delete the two height constraints from those two labels. If you have any misplaced views now, open the Resolve Auto Layout Issues menu and select Update All Frames in Homepwner Item Cell. Build and run the application and the label heights will be based on the preferred text size.
The interface is looking fantastic now, but wouldn’t it be great if the size of imageView reflected the preferred font size? It makes sense that the image should scale with the text size. Let’s do this.
Constraint outlets
To update the position or size of a view, either in absolute terms or relative to another view, you should update the constraints on that view. This is very important! If you modify the frame (or bounds), instead of the constraints, the next time the view needs to be laid out, it will be laid out based on the constraints that it has. In other words, the changes made to the frame will not persist.
In order to change the width and height of the image view, the constants on the respective constraints will need to be updated at run time. To do this, you will need to create an outlet to both the vertical and horizontal constraints. Constraints are objects (NSLayoutConstraint), so just like you can create outlets to views, the same can be done with constraints.
In BNRItemCell.m, create and connect the outlet for these two constraints to the class extension. When you are done, the class extension should look like this:
@interface BNRItemCell ()
@property (nonatomic, weak) IBOutlet NSLayoutConstraint *imageViewHeightConstraint;
@property (nonatomic, weak) IBOutlet NSLayoutConstraint *imageViewWidthConstraint;
@end
With outlets to the size constraints of imageView created, you can now adjust imageView’s size programmatically. In BNRItemCell.m, modify updateInterfaceForDynamicTypeSize to get the currently selected preferred text size, and use that to adjust the size of imageView.
- (void)updateInterfaceForDynamicTypeSize
{
UIFont *font = [UIFont preferredFontForTextStyle:UIFontTextStyleBody];
self.nameLabel.font = font;
self.serialNumberLabel.font = font;
self.valueLabel.font = font;
static NSDictionary *imageSizeDictionary;
if (!imageSizeDictionary) {
imageSizeDictionary = @{ UIContentSizeCategoryExtraSmall : @40,
UIContentSizeCategorySmall : @40,
UIContentSizeCategoryMedium : @40,
UIContentSizeCategoryLarge : @40,
UIContentSizeCategoryExtraLarge : @45,
UIContentSizeCategoryExtraExtraLarge : @55,
UIContentSizeCategoryExtraExtraExtraLarge : @65 };
}
NSString *userSize =
[[UIApplication sharedApplication] preferredContentSizeCategory];
NSNumber *imageSize = imageSizeDictionary[userSize];
self.imageViewHeightConstraint.constant = imageSize.floatValue;
self.imageViewWidthConstraint.constant = imageSize.floatValue;
}
Build and run the application, and play with the Dynamic Type text sizes. The imageView adjusts its size appropriately. Also notice that because you pinned the leading edge of nameLabel and serialNumberLabel to the trailing edge of the imageView, the interface scales very well as the preferred text size changes. Had those two labels been pinned to their superview’s leading edge instead, the imageView would have overlapped the labels.
The interface is great, but let’s make one final change.
Placeholder constraints
Currently, you are updating both the width and height constraints for the imageView. This is not a problem, but you can do better. Instead of updating both constraints, you will add one additional constraint to imageView that will constrain the imageView’s width and height to be equal.
You cannot create this constraint in Interface Builder, so return to BNRItemCell.m and create this constraint programmatically in awakeFromNib.
- (void)awakeFromNib
{
[self updateInterfaceForDynamicTypeSize];
NSNotificationCenter *nc = [NSNotificationCenter defaultCenter];
[nc addObserver:self
selector:@selector(updateInterfaceForDynamicTypeSize)
name:UIContentSizeCategoryDidChangeNotification
object:nil];
NSLayoutConstraint *constraint =
[NSLayoutConstraint constraintWithItem:self.thumbnailView
attribute:NSLayoutAttributeHeight
relatedBy:NSLayoutRelationEqual
toItem:self.thumbnailView
attribute:NSLayoutAttributeWidth
multiplier:1
constant:0];
[self.thumbnailView addConstraint:constraint];
}
Now, remove the imageViewWidthConstraint property and corresponding code.
@interface BNRItemCell ()
@property (nonatomic, weak) IBOutlet NSLayoutConstraint *imageViewHeightConstraint;
@property (nonatomic, weak) IBOutlet NSLayoutConstraint *imageViewWidthConstraint;
@end
@implementation
- (void)updateInterfaceForDynamicTypeSize
{
// Other code here
NSNumber *imageSize = imageSizeDictionary[userSize];
self.imageViewHeightConstraint.constant = imageSize.floatValue;
self.imageViewWidthConstraint.constant = imageSize.floatValue;
}
Open BNRItemCell.xib and make sure that the outlet for imageViewWidthConstraint is removed, since the outlet no longer exists.
There is one final change that must be made. There are now two constraints affecting the width of the imageView: the programmatic constraint you just created and the explicit width constraint in the XIB file. This will create unsatisfiable (conflicting) constraints if the two constraints do not agree on a size.
To fix this, you could delete the explicit width constraint from the imageView. This will work, but Interface Builder might warn about misplaced views or an ambiguous layout. Instead, you can make the width constraint a placeholder constraint. Placeholder constraints, as the name implies, are only temporary and are removed at build time, so they will not exist when the application is running.
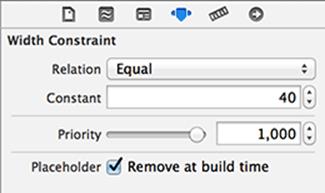
In BNRItemCell.xib, select the width constraint on the imageView, and open the attributes inspector. Check the Placeholder box that says Remove at build time (Figure 20.6). Build and run the application, and everything will work just as it did before. Homepwner now scales appropriately with the user’s preferred text size.
Figure 20.6 Placeholder constraints
All materials on the site are licensed Creative Commons Attribution-Sharealike 3.0 Unported CC BY-SA 3.0 & GNU Free Documentation License (GFDL)
If you are the copyright holder of any material contained on our site and intend to remove it, please contact our site administrator for approval.
© 2016-2026 All site design rights belong to S.Y.A.