iOS Programming: The Big Nerd Ranch Guide (2014)
22. UISplitViewController
The iPhone and iPod touch have a limited amount of screen real estate. Given their small screen size, when presenting a drill-down interface, a UINavigationController is used to swap between a list of items and a detailed view for an item.
The iPad, on the other hand, has plenty of screen space to present both views using a built-in class called UISplitViewController. UISplitViewController is an iPad-only class that presents two view controllers in a master-detail relationship. The master view controller occupies a small strip on the lefthand side of the screen, and the detail view controller occupies the rest of the screen.
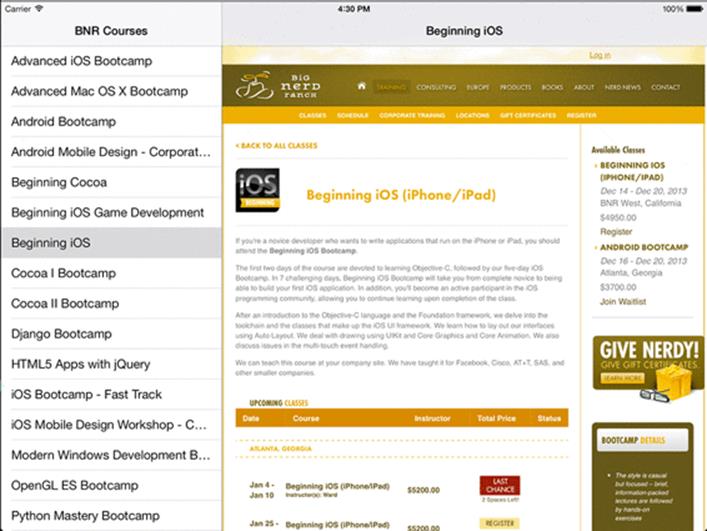
In this chapter, you will have Nerdfeed present its view controllers in a split view controller when running on an iPad (Figure 22.1). You will also make Nerdfeed a universal application and have it continue to use a UINavigationController when run on the iPhone.
Figure 22.1 Nerdfeed with UISplitViewController
Splitting Up Nerdfeed
Creating a UISplitViewController is simple since you have already learned about navigation controllers and tab bar controllers. When you initialize a split view controller, you pass it an array of view controllers just like with a tab bar controller. However, a split view controller’s array is limited to two view controllers: a master view controller and a detail view controller. The order of the view controllers in the array determines their roles in the split view; the first entry is the master view controller, and the second is the detail view controller.
Open Nerdfeed.xcodeproj in Xcode. Then, open BNRAppDelegate.m.
In application:didFinishLaunchingWithOptions:, check whether the device is an iPad before instantiating a UISplitViewController. The UISplitViewController class does not exist on the iPhone, and trying to create an instance of UISplitViewController will cause an exception to be thrown.
- (BOOL)application:(UIApplication *)application
didFinishLaunchingWithOptions:(NSDictionary *)launchOptions
{
self.window = [[UIWindow alloc] initWithFrame:[[UIScreen mainScreen] bounds]];
BNRCoursesViewController *lvc =
[[BNRCoursesViewController alloc] initWithStyle:UITableViewStylePlain];
UINavigationController *masterNav =
[[UINavigationController alloc] initWithRootViewController:lvc];
BNRWebViewController *wvc = [[BNRWebViewController alloc] init];
lvc.webViewController = wvc;
self.window.rootViewController = masterNav;
// Check to make sure we are running on the iPad
if ([UIDevice currentDevice].userInterfaceIdiom == UIUserInterfaceIdiomPad) {
// webViewController must be in navigation controller; you will see why later
UINavigationController *detailNav =
[[UINavigationController alloc] initWithRootViewController:wvc];
UISplitViewController *svc = [[UISplitViewController alloc] init];
// Set the delegate of the split view controller to the detail VC
// You will need this later - ignore the warning for now
svc.delegate = wvc;
svc.viewControllers = @[masterNav, detailNav];
// Set the root view controller of the window to the split view controller
self.window.rootViewController = svc;
} else {
// On non-iPad devices, just use the navigation controller
self.window.rootViewController = masterNav;
}
self.window.backgroundColor = [UIColor whiteColor];
[self.window makeKeyAndVisible];
return YES;
}
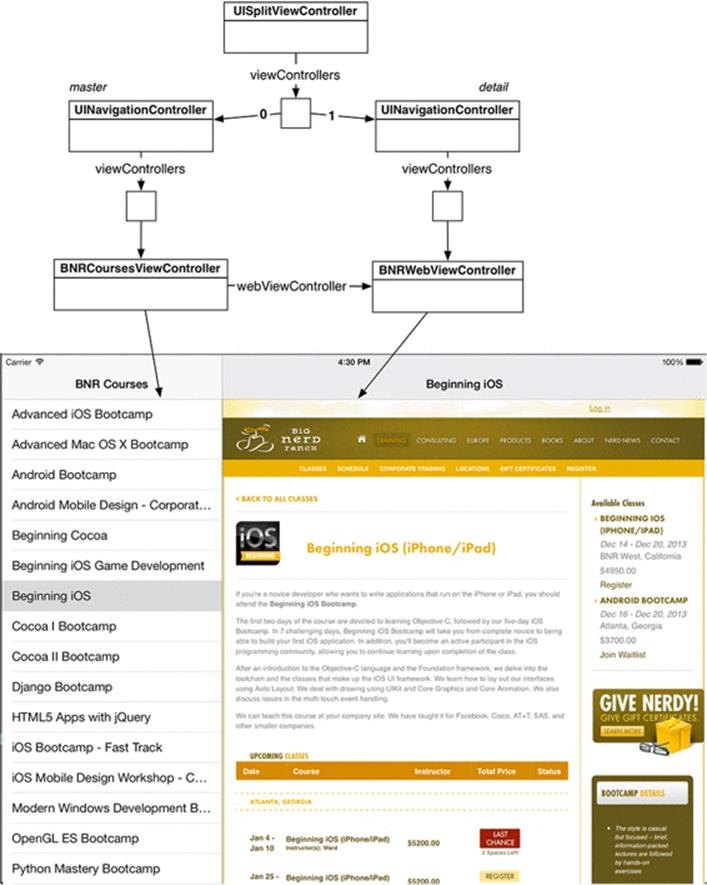
By placing the UISplitViewController code within an if statement in this method, you are laying the groundwork for making Nerdfeed a universal application. Also, now you can see why you created the instance of BNRWebViewController here instead of following the typical pattern of creating the detail view controller inside the implementation for the root view controller. A split view controller must have both the master and the detail view controller when it is created. The diagram for Nerdfeed’s split view controller is shown in Figure 22.2.
Figure 22.2 Split view controller diagram
Build and run the application. You may not see anything yet if you are in portrait mode; however, if you rotate the device to landscape you will see both view controllers on the screen. This is how a UISplitViewController works: in landscape mode, there master view controller is shown in a small strip on the left hand side of the screen and the detail view controller takes over the rest of the screen.
But you are not done yet. If you tap a row in the list view controller, the web view controller will not appear in the detail panel like you want. Instead, it is pushed onto the master panel and replaces the list view controller. To address this problem, when a row is tapped, you need to check whether the BNRCoursesViewController is a member of a split view controller and, if it is, take a different action.
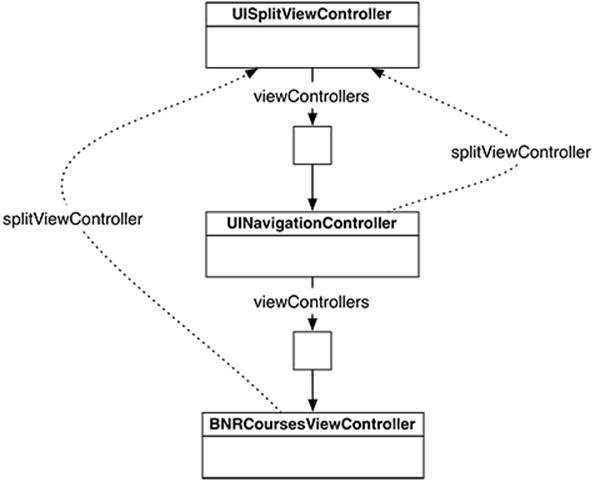
You can send the message splitViewController to any UIViewController, and if that view controller is part of a split view controller it will return a pointer to the split view controller (Figure 22.3). Otherwise, it returns nil. View controllers are smart: a view controller will return this pointer if it is a member of the split view controller’s array or if it belongs to another controller that is a member of a split view controller’s array (as is the case with both BNRCoursesViewController and BNRWebViewController).
Figure 22.3 UIViewController’s splitViewController property
In BNRCoursesViewController.m, locate the method tableView:didSelectRowAtIndexPath:. At the top of this method, check for a split view controller before pushing the BNRWebViewController onto the navigation stack.
- (void)tableView:(UITableView *)tableView
didSelectRowAtIndexPath:(NSIndexPath *)indexPath
{
NSDictionary *course = self.courses[indexPath.row];
NSURL *URL = [NSURL URLWithString:course[@"url"]];
self.webViewController.title = course[@"title"];
self.webViewController.URL = URL;
[self.navigationController pushViewController:self.webViewController
animated:YES];
if (!self.splitViewController) {
[self.navigationController pushViewController:self.webViewController
animated:YES];
}
}
Now, if the BNRCoursesViewController is not in a split view controller, you assume the device is not an iPad and BNRCoursesViewController pushes the BNRWebViewController onto the navigation controller’s stack. If BNRCoursesViewController is in a split view controller, then it is left to theUISplitViewController to place the BNRWebViewController on the screen.
Build and run the application again. Rotate to landscape and tap one of the rows. The class web page will now load in the detail panel.
Displaying the Master View Controller in Portrait Mode
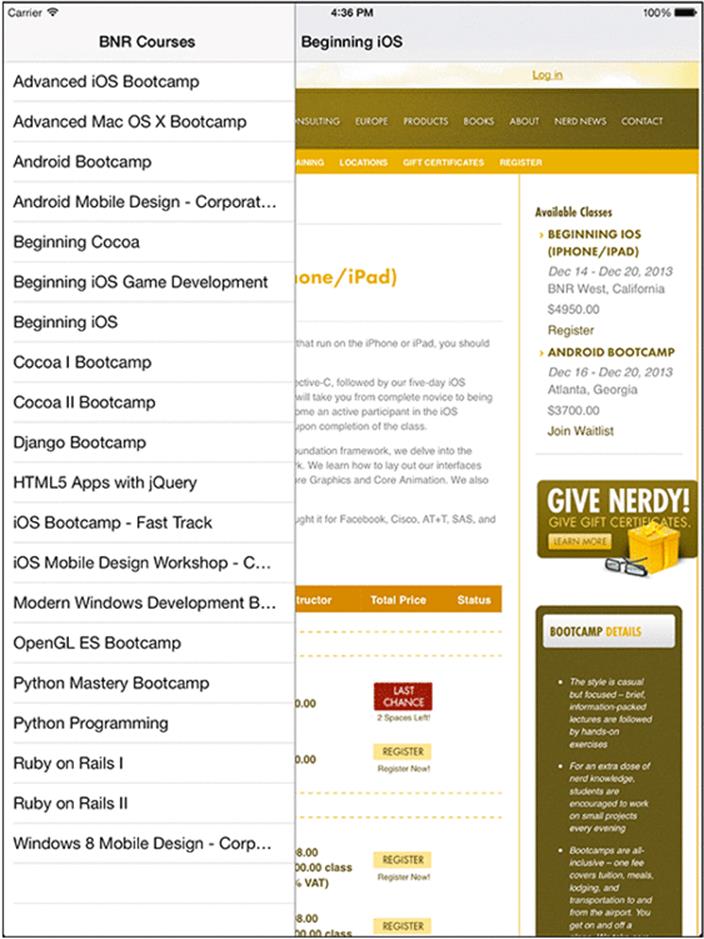
While in portrait mode, the master view controller is missing in action. It would be nice if you could see the master view controller to select a new post from the list without having to rotate the device. UISplitViewController lets you do just that by supplying its delegate with a UIBarButtonItem. Tapping this button shows the master view controller in a specialized UIPopoverController (Figure 22.4).
Figure 22.4 Master view controller in UIPopoverController
In your code, whenever a detail view controller was given to the split view controller, that detail view controller was set as the split view controller’s delegate. As the delegate, the detail view controller will get a pointer to the UIBarButtonItem when rotating to portrait mode.
In BNRWebViewController.h, add this declaration:
@interface BNRWebViewController : UIViewController <UISplitViewControllerDelegate>
Build and run the application. The behavior will be the same, but there will not be any warnings.
In BNRWebViewController.m, implement the following delegate method to place the bar button item in the BNRWebViewController’s navigation item.
- (void)splitViewController:(UISplitViewController *)svc
willHideViewController:(UIViewController *)aViewController
withBarButtonItem:(UIBarButtonItem *)barButtonItem
forPopoverController:(UIPopoverController *)pc
{
// If this bar button item does not have a title, it will not appear at all
barButtonItem.title = @"Courses";
// Take this bar button item and put it on the left side of the nav item
self.navigationItem.leftBarButtonItem = barButtonItem;
}
Notice that you explicitly set the title of the button. If the button does not have a title, it will not appear at all. (If the master view controller’s navigationItem has a title, then the button will be automatically set to that title. )
Build and run the application. Rotate to portrait mode, and you will see the bar button item appear on the left of the navigation bar. Tap that button, and the master view controller’s view will appear in a UIPopoverController.
This bar button item is why we always had you put the detail view controller inside a navigation controller. You do not have to use a navigation controller to put a view controller in a split view controller, but it makes using the bar button item much easier. (If you do not use a navigation controller, you can instantiate your own UINavigationBar or UIToolbar to hold the bar button item and add it as a subview of the BNRWebViewController’s view.)
There are two small issues left to address with your Courses button. First, when the device is rotated back to landscape mode, the button is still there. To remove it, the delegate needs to respond to another message from the UISplitViewController. Implement this delegate method inBNRWebViewController.m.
- (void)splitViewController:(UISplitViewController *)svc
willShowViewController:(UIViewController *)aViewController
invalidatingBarButtonItem:(UIBarButtonItem *)barButtonItem
{
// Remove the bar button item from the navigation item
// Double check that it is the correct button, even though we know it is
if (barButtonItem == self.navigationItem.leftBarButtonItem) {
self.navigationItem.leftBarButtonItem = nil;
}
}
Build and run the application. The Courses button will now appear and disappear as you rotate between portrait and landscape modes.
Universalizing Nerdfeed
You created Nerdfeed as an iPad-only application; now you are going to universalize it. Select the Nerdfeed project from the project navigator. In the editor area, choose the Nerdfeed target and then the General tab.
Figure 22.5 Universalizing Nerdfeed
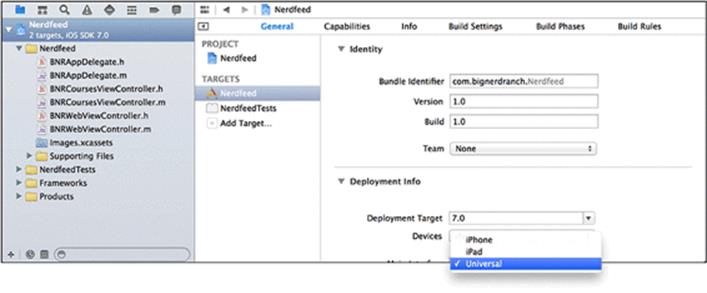
From the Devices pop-up menu, choose Universal.
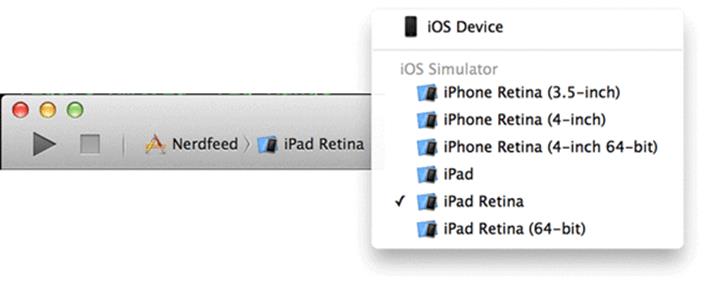
The application is now universal. It will run fine as-is on an iPhone. You can test it by building and running again on one simulator and then the other.
Figure 22.6 Changing simulators
There are two reasons the universalization process was so simple for Nerdfeed. Remembering these reasons will help you when you are writing your own applications.
· As you built Nerdfeed, you were careful about the device differences in the classes used. For example, knowing that a UISplitViewController does not exist on the iPhone or iPod touch, you included an alternative interface for those devices. In general, when using an Apple-provided class, you should read the discussion in the documentation about that class. It will give you tips about the availability of the class and its methods on the different devices.
· Nerdfeed is still a relatively simple application. It is always easier to universalize an application early in development. As an application grows, its details get buried in the massive pile of code. Finding and fixing issues as you are writing code is much easier than coming back later. Details are harder to find, and there is the risk of breaking what already works.