iOS Programming: The Big Nerd Ranch Guide (2014)
26. NSUserDefaults
When you start an app for the first time, it uses its factory settings. As you use it, a good app learns your preferences. Where are your preferences stored? Inside each app bundle there is a plist that holds the user’s preferences. As a developer, you will access this plist using the NSUserDefaultsclass. The preferences plist for your app can also be edited by the Settings app. To allow this, you create a settings bundle inside your app.
In this chapter, you will teach Homepwner how to read and write user preferences. Then you will create a settings bundle.
NSUserDefaults
The set of defaults for a user is a collection of key-value pairs. The key is the name of the default, and the value is some data that represents what the user prefers for that key. You ask the shared user defaults object for the value of that key – not unlike getting an object from a dictionary:
NSUserDefaults *defaults = [NSUserDefaults standardUserDefaults];
NSString *greeting = [defaults objectForKey:@"FavoriteGreeting"];
If the user expresses a preference, you can set the value for that key:
NSUserDefaults *defaults = [NSUserDefaults standardUserDefaults];
[defaults setObject:@"Hello" forKey:@"FavoriteGreeting"];
This value will automatically be stored to the app’s preferences plist. Thus, the value must be a plist type: NSArray, NSDictionary, NSString, NSData, NSDate, or NSNumber. If you want to store a non-plist type to the user defaults, you will need to convert it to a plist. Often this is accomplished by archiving the object (or objects) into an NSData, which is a plist.
What if you ask for the value of a preference that has not been set by the user? NSUserDefaults will return the factory settings, the “default default,” if you will. These are not stored on the file system, so you need to tell the shared instance of NSUserDefaults what the factory settings are every time your app launches. And you need to do it early in the launch process – before any of your classes try to read the defaults. Typically you will override +initialize on your app delegate:
+ (void)initialize
{
NSUserDefaults *defaults = [NSUserDefaults standardUserDefaults];
NSDictionary *factorySettings = @{@"FavoriteGreeting": @"Hey!",
@"HoursBetweenMothershipConnection : @2};
[defaults registerDefaults:factorySettings];
}
The class method initialize is called automatically by the Objective-C runtime before the first instance of that class is created.
In this section, you are going to add preferences for an item’s initial value and name.
Register the factory settings
At launch time, the first thing that will happen is the registering of the factory settings. It is considered good style to declare your preference keys as global constants. Open BNRAppDelegate.h and declare two constant global variables:
#import <UIKit/UIKit.h>
extern NSString * const BNRNextItemValuePrefsKey;
extern NSString * const BNRNextItemNamePrefsKey;
@interface BNRAppDelegate : UIResponder <UIApplicationDelegate>
@property (strong, nonatomic) UIWindow *window;
@end
In BNRAppDelegate.m, define those global variables and use them to register the factory defaults in +initialize:
#import "BNRAppDelegate.h"
#import "BNRItemsViewController.h"
#import "BNRItemStore.h"
NSString * const BNRNextItemValuePrefsKey = @"NextItemValue";
NSString * const BNRNextItemNamePrefsKey = @"NextItemName";
@implementation BNRAppDelegate
+ (void)initialize
{
NSUserDefaults *defaults = [NSUserDefaults standardUserDefaults];
NSDictionary *factorySettings = @{BNRNextItemValuePrefsKey: @75,
BNRNextItemNamePrefsKey: @"Coffee Cup"};
[defaults registerDefaults:factorySettings];
}
Read a preference
When you create a new item in BNRItemStore.m, use the default values. Be sure to import BNRAppDelegate.h at the top of BNRItemStore.m so that the compiler knows about BNRNextItemValuePrefsKey.
- (BNRItem *)createItem
{
double order;
if (_allItems.count == 0) {
order = 1.0;
} else {
order = [[self.privateItems lastObject] orderingValue] + 1.0;
}
BNRItem *item = [NSEntityDescription insertNewObjectForEntityForName:@"BNRItem"
inManagedObjectContext:self.context];
item.orderingValue = order;
NSUserDefaults *defaults = [NSUserDefaults standardUserDefaults];
item.valueInDollars = [defaults integerForKey:BNRNextItemValuePrefsKey];
item.itemName = [defaults objectForKey:BNRNextItemNamePrefsKey];
// Just for fun, list out all the defaults
NSLog(@"defaults = %@", [defaults dictionaryRepresentation]);
[self.privateItems addObject:item];
return item;
}
Notice the method integerForKey:. It is there as a convenience. It is equivalent to:
item.valueInDollars = [[defaults objectForKey:BNRNextItemValuePrefsKey] intValue];
There are also convenience methods for setting and getting float, double, BOOL, and NSURL values.
Change a preference
You could create a view controller for editing these preferences. Or, you could create a settings bundle for setting these preferences. Or, you can just try to guess the user’s preferences from their actions. For example, if the user sets the value of an item to $100, that may be a good indication that the next item might also be $100. For this exercise, you will do that.
Open BNRDetailViewController.m and edit the viewWillDisappear: method.
- (void)viewWillDisappear:(BOOL)animated
{
[super viewWillDisappear:animated];
[self.view endEditing:YES];
BNRItem *item = self.item;
item.itemName = self.nameField.text;
item.serialNumber = self.serialNumberField.text;
int newValue = [self.valueField.text intValue];
// Is it changed?
if (newValue != item.valueInDollars) {
// Put it in the item
item.valueInDollars = newValue;
// Store it as the default value for the next item
NSUserDefaults *defaults = [NSUserDefaults standardUserDefaults];
[defaults setInteger:newValue
forKey:BNRNextItemValuePrefsKey];
}
item.valueInDollars = [self.valueField.text intValue];
}
Import BNRAppDelegate.h so that the compiler knows about the BNRNextItemValuePrefsKey constant. Build and run your app. Create an item named “Coffee Cup” with a value of $75. The next item you create should default to the same value.
Also, on the console, you will see a list of all the defaults that are available to you. Most of them are from the NSGlobalDomain, which holds the global defaults for your entire device, like what language you prefer. NextItemName, because you have never set the value, is being read from the factory defaults, which is known as the NSRegistrationDomain. Now that you have set NextItemValue, it is being read from the com.bignerdranch.Homepwner domain, which is held in the preferences plist in your app’s sandbox. You can think of each domain as a dictionary of key-value pairs.NSUserDefaults gives the dictionaries different precedence. For example, the com.bignerdranch.Homepwner domain gets precedence over the NSRegistrationDomain – if the default has a value in the app’s preference plist, the registration domain is ignored.
Sometimes you will give the user a button that says “Restore factory default”, which will remove some defaults from the app’s preferences plist. To remove key-value pairs from your app’s preferences plist, NSUserDefaults has a removeObjectForKey: method.
Settings Bundle
Now you are going to create a settings bundle so that the NextItemName preference can be changed from “Coffee Cup” to whatever string the user desires.
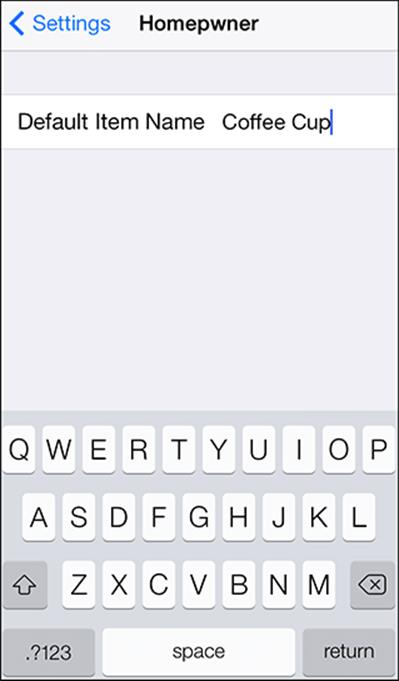
Figure 26.1 Homepwner settings bundle
These days many designers consider settings bundles to be distasteful and most apps do not include a settings bundle. That said, many apps do have settings bundles, so it is a good idea to know how to make them.
The phrase “settings bundle” makes it sound scarier than it is. The bundle is just a directory that holds a plist that describes what controls should appear in this view and what default each control is manipulating. You will pull the user visible strings (like the label “Default Item Name” inFigure 26.1) into a strings file that is localized for the user. Those strings files will also be in the settings bundle.
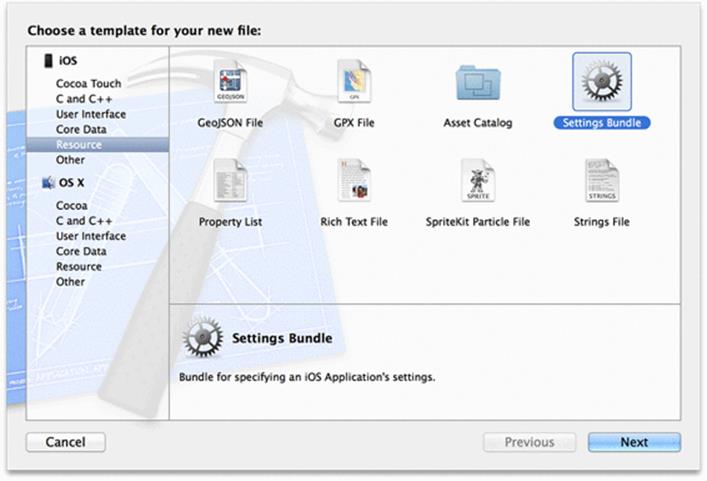
To create a settings bundle inside your app, open Xcode’s File menu and choose New → File.... Under the iOS Resources pane, choose Settings Bundle (Figure 26.2).
Figure 26.2 Creating a new settings bundle
Accept the default name. Notice that a directory called Settings.bundle has been created in your project directory. It has a Root.plist file and an en.lprog subdirectory.
Editing the Root.plist
The Root.plist describes what controls will appear in your app’s settings pane. It contains an array of dictionaries; each dictionary represents one view (typically a control) that will appear on the pane. Every dictionary must have Type key. Here are the acceptable values for Type:
PSTextFieldSpecifier
a labeled text field
PSToggleSwitchSpecifier
a labeled toggle switch
PSSliderSpecifier
a slider (not labeled)
PSRadioGroupSpecifier
a list of radio buttons; only one can be selected
PSMultiValueSpecifier
a table view of possibilities; only one can be selected
PSTitleValueSpecifier
a title for formatting
PSGroupSpecifier
a group for formatting
PSChildPaneSpecifier
lets you move some preferences onto a child pane
Several of these appear in the default Root.plist. Take a look, then build and run Homepwner. As soon as Homepwner is running, go to the Settings app and look at Homepwner’s pane.
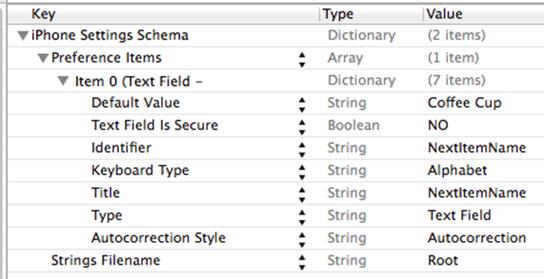
Back in Xcode, open Root.plist and reduce it to an array containing just one text field:
· Set Identifier to NextItemName. This is the key for the default that is being set.
· Set DefaultValue to Coffee Cup. This is what comes up if the is no value for Key in your app’s preferences plist.
· Set Title to NextItemName. This is used to look up the title in the strings file.
Your settings should look like Figure 26.3.
Figure 26.3 Root.plist
Notice that you have been laying out a user interface using a plist file. When you create a settings bundle, you are not writing any executable code, and you are not creating any view controllers or other objects that you control. The Settings application will read your application’s Root.plist and will construct its own view controllers based on the contents of the plist file.
If you are creating a settings bundle for one of your apps, you will need to refer to Apple’s Settings Application Schema Reference for a complete list of all the keys/values that will work in this plist.
Localized Root.strings
Inside your settings bundle is an en.lproj which will hold your English strings. You can delete all the key-value pairs and give the title for your text field:
"NextItemName" = "Default Item Name";
That is it. Build and run your application. It should use the item name from the Settings app whenever you create a new item.
One final point: when your defaults are changed (by your own app or the Settings app) an NSUserDefaultsDidChangeNotification will get posted to your application. If you want to respond to changes in the Settings app immediately, register as an observer of this notification.
All materials on the site are licensed Creative Commons Attribution-Sharealike 3.0 Unported CC BY-SA 3.0 & GNU Free Documentation License (GFDL)
If you are the copyright holder of any material contained on our site and intend to remove it, please contact our site administrator for approval.
© 2016-2026 All site design rights belong to S.Y.A.