iOS Programming: The Big Nerd Ranch Guide (2014)
27. Controlling Animations
The word “animation” is derived from a Latin word that means “the act of bringing to life.” Animations are what bring your applications to life, and when used appropriately, they can guide your users through a course of actions, orient them, and overall create a delightful experience.
In this chapter, you will use a variety of animation techniques to animate various views in the HypnoNerd application.
Basic Animations
Animations are a great way to add an extra layer of polish to any application; games are not the only type of application to benefit from animations. Animations can smoothly bring interface elements on screen or into focus, they can draw the user’s attention to an actionable item, and they give clear indications of how your app is responding to the user’s actions.
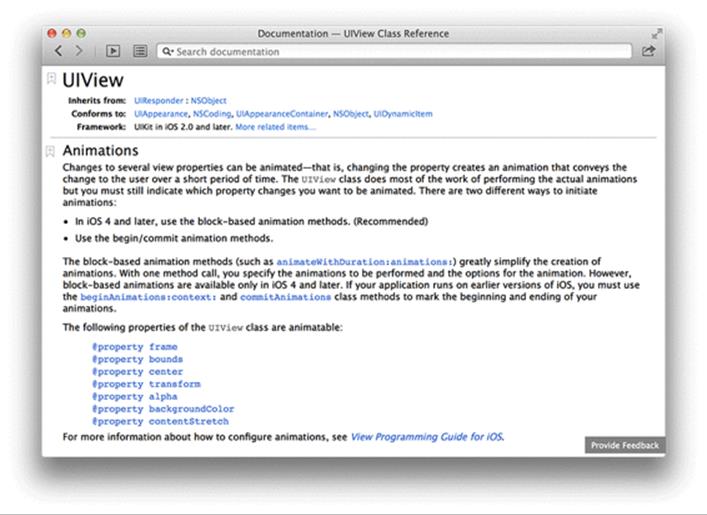
Before updating the HypnoNerd application, let’s take a look at what can be animated. Open the documentation to the UIView Class Reference, and scroll down to the section titled Animations. The documentation will give some animation recommendations (which we will follow in this book) and also list the properties on UIView that can be animated (Figure 27.1).
Figure 27.1 UIView animation documentation
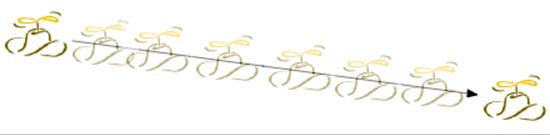
The documentation is always a good starting point in learning about any iOS technology. With that little bit of information under your belt, let’s go ahead and add some animations to HypnoNerd. The first type of animation you are going to use is the basic animation. A basic animation animates between a start value and an end value (Figure 27.2).
Figure 27.2 Basic animation
Open HypnoNerd.xcodeproj.
The first animation you will add will animate the alpha value of the labels when they are added to the view.
Open BNRHypnosisViewController.m and add an animation to the labels in drawHypnoticMessage:.
[self.view addSubview:messageLabel];
// Set the label's initial alpha
messageLabel.alpha = 0.0;
// Animate the alpha to 1.0
[UIView animateWithDuration:0.5 animations:^{
messageLabel.alpha = 1.0;
}];
UIInterpolatingMotionEffect *motionEffect =
[[UIInterpolatingMotionEffect alloc] initWithKeyPath:@"center.x"
type:UIInterpolatingMotionEffectTypeTiltAlongHorizontalAxis];
Build and run the application. After you enter some text and tap the return key, the labels should fade into view. Animations provide a less jarring user experience than having the views just pop into existence.
The method animateWithDuration:animations: returns immediately. That is, it starts the animation, but does not wait around for the animation to complete.
The simplest block-based animation method on UIView is animateWithDuration:animations:. This method takes in the duration that the animation should run for and a block of changes to animate. The animation will follow an ease-in/ease-out animation curve, which will cause the animation to begin slowly, accelerate through the middle, and finally slow down at the end.
Timing functions
The acceleration of the animation is controlled by its timing function. The method animateWithDuration:animations: uses an ease-in/ease-out timing function. To use a driving analogy, this would mean the driver accelerates smoothly from rest to a constant speed, and then gradually slows down at the end, coming to rest.
Other timing functions include linear (a constant speed from beginning to end), ease-in (accelerating to a constant speed, and then ending abruptly), and ease-out (beginning at full speed, and then slowing down at the end).
In order to use one of these other timing functions, you will need to use the UIView animation method that allows options to be specified: animateWithDuration:delay:options:animations:completion:. This method gives you the most control over the animation. In addition to the duration and animation block, you can also specify how long to delay before the animations should begin, some options (which we will look at shortly), and a completion block that will get called when the animation sequence completes.
In BNRHypnosisViewController.m, change the animation in drawHypnoticMessage: to use this new animation method:
[self.view addSubview:messageLabel];
// Set the label's initial alpha
messageLabel.alpha = 0.0;
// Animate the alpha to 1.0
[UIView animateWithDuration:0.5 animations:^{
messageLabel.alpha = 1.0;
}];
[UIView animateWithDuration:0.5
delay:0.0
options:UIViewAnimationOptionCurveEaseIn
animations:^{
messageLabel.alpha = 1.0;
}
completion:NULL];
UIInterpolatingMotionEffect *motionEffect =
[[UIInterpolatingMotionEffect alloc] initWithKeyPath:@"center.x"
type:UIInterpolatingMotionEffectTypeTiltAlongHorizontalAxis];
Now, as opposed to using the default ease-in/ease-out animation curve, the animation will just ease-in. The options argument is a bitmask, so you can bitwise-or multiple values together. Here are some of the useful options that you can supply:
Animation curve options
These control the acceleration of the animation. Possible values are
· UIViewAnimationOptionCurveEaseInOut
· UIViewAnimationOptionCurveEaseIn
· UIViewAnimationOptionCurveEaseOut
· UIViewAnimationOptionCurveLinear
UIViewAnimationOptionAllowUserInteraction
By default, views cannot be interacted with when animating. Specifying this option will override the default. This can be useful for repeating animations, such as a pulsing view.
UIViewAnimationOptionRepeat
This will repeat the animation indefinitely. This is often paired with the UIViewAnimationOptionAutoreverse option.
UIViewAnimationOptionAutoreverse
This will run the animation forward and then backward, returning the view to its initial state.
Be sure to check out the Constants section of the UIView Class Reference to see all of the possible options. We will look at a few more later in this chapter.
Keyframe Animations
The animations you have added so far have been basic animations; they animate from one value to another value. If you want to animate a view’s properties through more than two values, you use a keyframe animation. A keyframe animation can be made up of any number of individual keyframes (Figure 27.3). You can think of keyframe animations as multiple basic animations going back to back.
Figure 27.3 Keyframe animation

Keyframe animations are set up similarly to basic animations, but each keyframe is added separately. To create a keyframe animation, use the animateKeyframesWithDuration:delay:options:animations:completion: class method on UIView, and add keyframes in the animation block using theaddKeyframeWithRelativeStartTime:relativeDuration:animations: class method.
In BNRHypnosisViewController.m, update drawHypnoticMessage: to animate the center of the labels first to the middle of the screen and then to another random position on the screen.
[UIView animateWithDuration:0.5
delay:0.0
options:UIViewAnimationOptionCurveEaseIn
animations:^{
messageLabel.alpha = 1.0;
}
completion:NULL];
[UIView animateKeyframesWithDuration:1.0 delay:0.0 options:0 animations:^{
[UIView addKeyframeWithRelativeStartTime:0 relativeDuration:0.8 animations:^{
messageLabel.center = self.view.center;
}];
[UIView addKeyframeWithRelativeStartTime:0.8 relativeDuration:0.2 animations:^{
int x = arc4random() % width;
int y = arc4random() % height;
messageLabel.center = CGPointMake(x, y);
}];
} completion:NULL];
UIInterpolatingMotionEffect *motionEffect =
[[UIInterpolatingMotionEffect alloc] initWithKeyPath:@"center.x"
type:UIInterpolatingMotionEffectTypeTiltAlongHorizontalAxis];
Keyframe animations are created using animateKeyframesWithDuration:delay:options:animations:completion:. The parameters are all the same as with the basic animation except that the options are of type UIViewKeyframeAnimationOptions instead of UIViewAnimationOptions. The duration passed into this method is the duration of the entire animation.
Individual keyframes are added using addKeyframeWithRelativeStartTime:relativeDuration:animations:. The first argument is the relative start time, which will be a value between 0 and 1. The second argument is the relative duration, which is a percent of the total duration and will also be a value between 0 and 1. The first keyframe starts 0% into the animation (a relative start time of 0.0) and will last 80% of the total duration (a relative duration of 0.8). The last keyframe starts 80% into the total duration (a relative start time of 0.8) and lasts 20% of the total duration (a relative duration of 0.2).
Build and run the application and enter some text. The labels will now animate to the center of the screen before exploding out to a random final position.
Animation Completion
It can often be useful to know when an animation completes. For instance, you might want to chain different kinds of animations together or update another object when the animation completes. To know when the animation finishes, pass a block for the completion argument.
Update BNRHypnosisViewController.m so that it logs a message to the console when the animations complete.
[UIView animateKeyframesWithDuration:1.0 delay:0.0 options:0 animations:^{
[UIView addKeyframeWithRelativeStartTime:0 relativeDuration:0.8 animations:^{
messageLabel.center = self.view.center;
}];
[UIView addKeyframeWithRelativeStartTime:0.8 relativeDuration:0.2 animations:^{
int x = arc4random() % width;
int y = arc4random() % height;
messageLabel.center = CGPointMake(x, y);
}];
} completion:NULL];
[UIView animateKeyframesWithDuration:1.0 delay:0.0 options:0 animations:^{
[UIView addKeyframeWithRelativeStartTime:0 relativeDuration:0.8 animations:^{
messageLabel.center = self.view.center;
}];
[UIView addKeyframeWithRelativeStartTime:0.8 relativeDuration:0.2 animations:^{
int x = arc4random() % width;
int y = arc4random() % height;
messageLabel.center = CGPointMake(x, y);
}];
} completion:^(BOOL finished) {
NSLog(@"Animation finished");
}];
UIInterpolatingMotionEffect *motionEffect =
[[UIInterpolatingMotionEffect alloc] initWithKeyPath:@"center.x"
type:UIInterpolatingMotionEffectTypeTiltAlongHorizontalAxis];
Build and run the application, and log messages will appear in the console as soon as the animations complete.
You might be wondering, “What if the animation repeats? Will the completion block be executed after each repeat?” No, the completion block will only be executed once, at the very end.
Spring Animations
iOS has a powerful physics engine built into the SDK, and one of the easiest ways to use it is with the new spring animations. This type of animation has a timing function like that of an actual spring. You will use this to animate the text field dropping in from the top of the screen, as if it was attached to a spring.
In BNRHypnosisViewController.m, add a property for the text field to the class extension and update loadView to store the reference to the text field. Then start with the text field offscreen:
@interface BNRHypnosisViewController () <UITextFieldDelegate>
@property (nonatomic, weak) UITextField *textField;
@end
@implementation BNRHypnosisViewController
// Other methods
- (void)loadView
{
CGRect frame = [UIScreen mainScreen].bounds;
BNRHypnosisView *backgroundView = [[BNRHypnosisView alloc] initWithFrame:frame];
CGRect textFieldRect = CGRectMake(40, 70, 240, 30);
UITextField *textField = [[UITextField alloc] initWithFrame:textFieldRect];
// Setting the border style on the text field will allow us to see it more easily
textField.borderStyle = UITextBorderStyleRoundedRect;
[backgroundView addSubview:textField];
self.textField = textField;
self.view = backgroundView;
}
@end
It will be best to begin the animation as soon as the view is on the screen, so the animation code will go into viewDidAppear:. Currently there is no property pointing to the text field, but you will need one in order to update its frame in viewDidAppear:.
Now, in BNRHypnosisViewController.m, override viewDidAppear: to drop in the text field using a spring animation.
- (void)viewDidAppear:(BOOL)animated
{
[super viewDidAppear:animated];
[UIView animateWithDuration:2.0
delay:0.0
usingSpringWithDamping:0.25
initialSpringVelocity:0.0
options:0
animations:^{
CGRect frame = CGRectMake(40, 70, 240, 30);
self.textField.frame = frame;
}
completion:NULL];
}
The individual components of this method are relatively straightforward:
|
duration |
The total time the animation should last. |
|
delay |
How long until the animation should begin. |
|
spring damping |
A number between 0 and 1. The closer to 0, the more the animation oscillates. |
|
spring velocity |
The relative velocity of the view when the animation is to begin. You will almost always pass in 0 for this. |
|
options |
UIViewAnimationOptions, just like with the other animations. |
|
animations |
A block of changes to animate on one or more views. |
|
completion |
A block to run when the animation is finished. |
Build and run the application, and the text field should animate from the top of the screen, bouncing like a spring at the end.
Silver Challenge: Improved Quiz
Add some animations to the Quiz app that you worked on in Chapter 1.
When a new question or answer is shown, it should fly in from the left side of the screen, animating its opacity from 0 to 1 on the way. The old question or answer should fly off the right side of the screen, losing its opacity as it goes.
Tinker with timings and animation curves to make it look good.
All materials on the site are licensed Creative Commons Attribution-Sharealike 3.0 Unported CC BY-SA 3.0 & GNU Free Documentation License (GFDL)
If you are the copyright holder of any material contained on our site and intend to remove it, please contact our site administrator for approval.
© 2016-2026 All site design rights belong to S.Y.A.