iOS Programming: The Big Nerd Ranch Guide (2014)
6. View Controllers
In Chapter 5, you created a view hierarchy (a scroll view with two subviews) and presented it on screen by explicitly adding the scroll view as a subview of the application’s window. It is more common to do this using a view controller.
A view controller is an instance of a subclass of UIViewController. A view controller manages a view hierarchy. It is responsible for creating view objects that make up the hierarchy, for handling events associated with the view objects in its hierarchy, and for adding its hierarchy to the window.
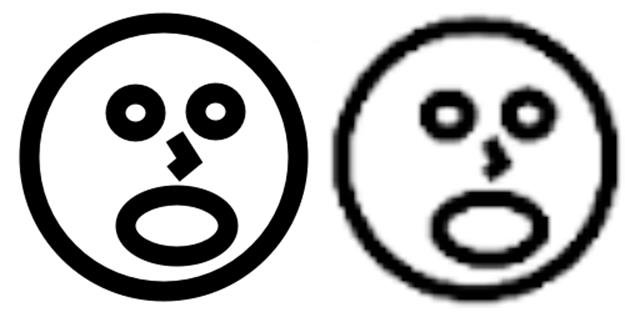
In this chapter, you will create an application named HypnoNerd. In HypnoNerd, the user will be able to switch between two view hierarchies – one for being hypnotized and the other for setting a reminder for hypnosis on a future date.
Figure 6.1 The two faces of HypnoNerd
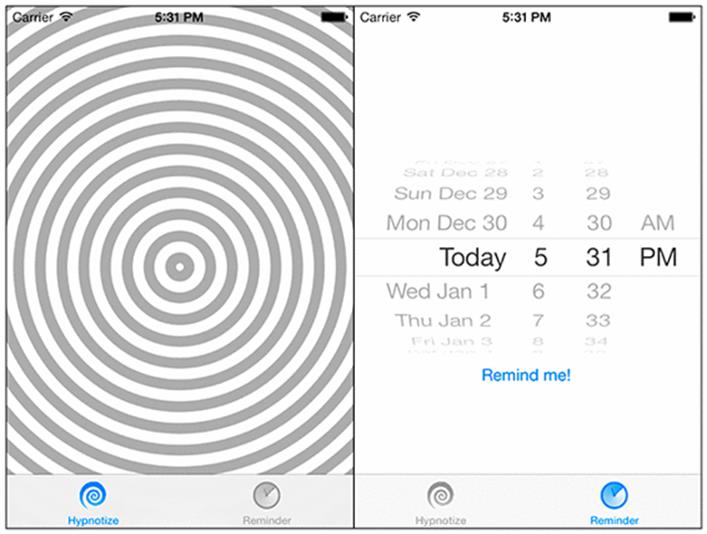
To make this happen, you are going to create two UIViewController subclasses: BNRHypnosisViewController and BNRReminderViewController. You will use the UITabBarController class to allow the user to switch between the view hierarchies of the two view controllers.
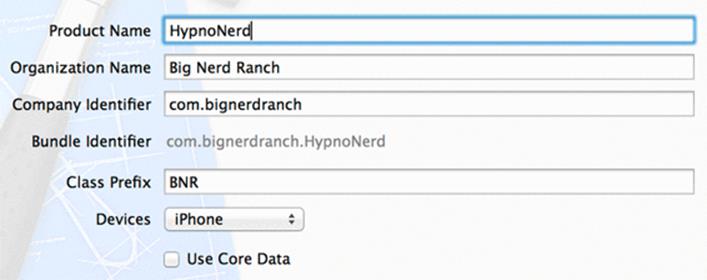
Create a new iOS project (Command-Shift-N) from the Empty Application template. Name this project HypnoNerd and configure the project as shown in Figure 6.2.
Figure 6.2 Creating a new project
You are going to reuse the BNRHypnosisView class from Hypnosister in this project.
In Finder, locate the directory containing your Hypnosister project. Drag the BNRHypnosisView.h and BNRHypnosisView.m files from Finder into the project navigator in Xcode.
In the sheet that appears, check the box to Copy items into destination group’s folder (if needed) and the box next to the HypnoNerd target and click Finish (Figure 6.3).
Figure 6.3 Copy files to HypnoNerd

This will create copies of the two files and add them to HypnoNerd’s directory on the filesystem and to the HypnoNerd project.
Subclassing UIViewController
From the File menu, select New → File... From the iOS section, select Cocoa Touch and then choose Objective-C class. Click Next.
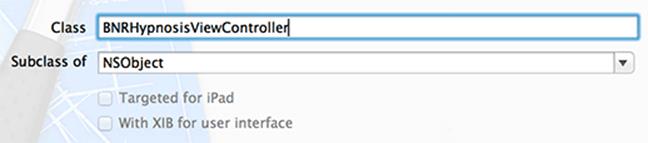
Name this class BNRHypnosisViewController and choose NSObject as its superclass (Figure 6.4). Click Next and save the files to finish creating the class.
Figure 6.4 Creating BNRHypnosisViewController
You created the class with the NSObject template to start with the simplest template possible. By starting simple, you get the chance to see how the pieces work together.
Open BNRHypnosisViewController.h and change the superclass to UIViewController.
@interface BNRHypnosisViewController : NSObject
@interface BNRHypnosisViewController : UIViewController
@end
The view of a view controller
As a subclass of UIViewController, BNRHypnosisViewController inherits an important property:
@property (nonatomic, strong) UIView *view;
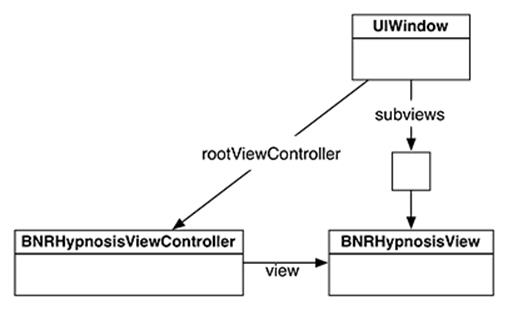
This property points to a UIView instance that is the root of the view controller’s view hierarchy. When the view of a view controller is added as a subview of the window, the view controller’s entire view hierarchy is added.
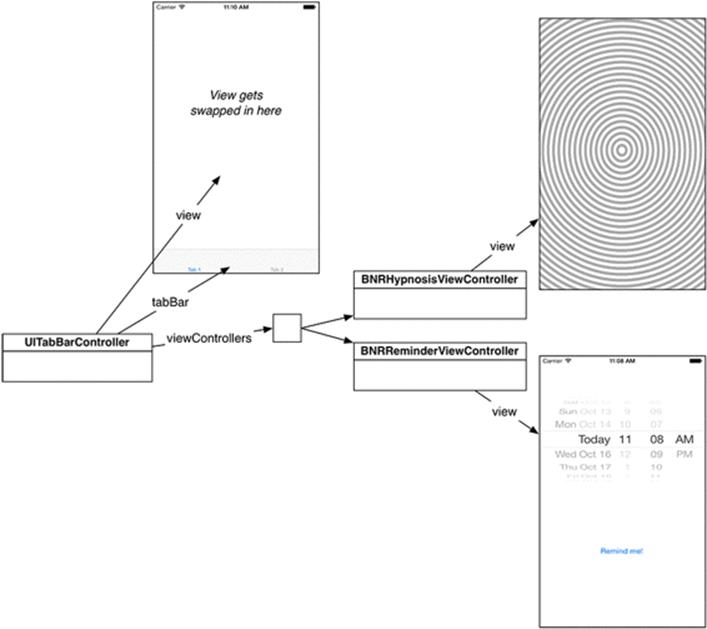
Figure 6.5 Object diagram for HypnoNerd
A view controller’s view is not created until it needs to appear on the screen. This optimization is called lazy loading, and it can often conserve memory and improve performance.
There are two ways that a view controller can create its view hierarchy:
· programmatically, by overriding the UIViewController method loadView.
· in Interface Builder, by loading a NIB file. (Recall that a NIB file is the file that gets loaded and the XIB file is what you edit in Interface Builder.)
Because the view hierarchy of BNRHypnosisViewController consists of only one view, it is a good candidate for being created programmatically.
Creating a view programmatically
Open BNRHypnosisViewController.m and import the header file for BNRHypnosisView. Then override loadView to create a screen-sized instance of BNRHypnosisView and set it as the view of the view controller.
#import "BNRHypnosisViewController.h"
#import "BNRHypnosisView.h"
@implementation BNRHypnosisViewController
- (void)loadView
{
// Create a view
BNRHypnosisView *backgroundView = [[BNRHypnosisView alloc] init];
// Set it as *the* view of this view controller
self.view = backgroundView;
}
@end
When a view controller is created, its view property is nil. If a view controller is asked for its view and its view is nil, then the view controller is sent the loadView message.
The next step is to add the view hierarchy of the BNRHypnosisViewController to the application window so that it will appear on screen to users.
Setting the root view controller
There is a convenient method for adding a view controller’s view hierarchy to the window: UIWindow’s setRootViewController:. Setting a view controller as the rootViewController adds that view controller’s view as a subview of the window. It also automatically resizes the view to be the same size as the window.
In BNRAppDelegate.m, import BNRHypnosisViewController.h at the top of the file. Then create an instance of BNRHypnosisViewController and set it as the rootViewController of the window.
#import "BNRAppDelegate.h"
#import "BNRHypnosisViewController.h"
@implementation BNRAppDelegate
- (BOOL)application:(UIApplication *)application
didFinishLaunchingWithOptions:(NSDictionary *)launchOptions
{
self.window = [[UIWindow alloc] initWithFrame:[[UIScreen mainScreen] bounds]];
// Override point for customization after application launch
BNRHypnosisViewController *hvc = [[BNRHypnosisViewController alloc] init];
self.window.rootViewController = hvc;
self.window.backgroundColor = [UIColor whiteColor];
[self.window makeKeyAndVisible];
return YES;
}
The view of the root view controller appears at the start of the run of the application. Thus, the window asks for it when setting the view controller as its rootViewController.
Given what you learned in Chapter 4, you can imagine what the core of setRootViewController: looks like:
- (void)setRootViewController:(UIViewController *)viewController
{
// Get the view of the root view controller
UIView *rootView = viewController.view;
// Make a frame that fits the window's bounds
CGRect viewFrame = self.bounds;
rootView.frame = viewFrame;
// Insert this view as window's subview
[self addSubview:rootView];
// Update the instance variable
_rootViewController = viewController;
}
At the beginning of this implementation, the BNRHypnosisViewController is asked for its view. Because the BNRHypnosisViewController has just been created, its view is nil. So it is sent the loadView message that creates its view.
Build and run the application. HypnoNerd looks a lot like Hypnosister did. Under the hood, however, it is quite different. You are using a view controller to present the BNRHypnosisView instead of adding the view object itself to the window. This adds a layer of complexity, which, as you will see by the end of the chapter, gives you power and flexibility to do neat things.
Another UIViewController
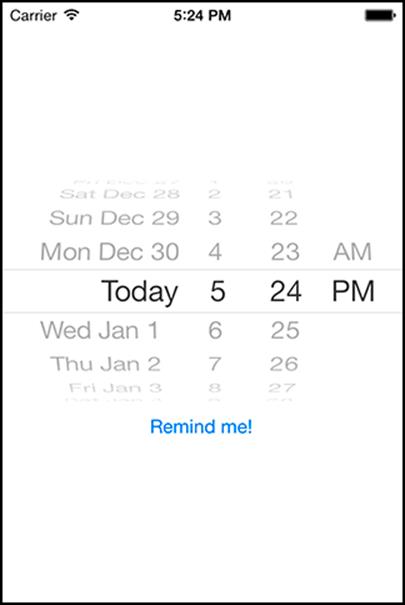
In this section, you are going to create the BNRReminderViewController class. Eventually, this view controller will enable the user to pick a date to receive a reminder to be hypnotized. This reminder will take the form of a notification that will appear even if HypnoNerd is not running at the time.
Figure 6.6 BNRReminderViewController
Create a new Objective-C class (Command-N). Name it BNRReminderViewController and make it a subclass of NSObject.
In BNRReminderViewController.h, change the superclass to UIViewController.
@interface BNRReminderViewController : NSObject
@interface BNRReminderViewController : UIViewController
The BNRReminderViewController’s view will be a full-screen UIView with two subviews – an instance of UIDatePicker and an instance of UIButton (Figure 6.7).
Figure 6.7 Object diagram of BNRReminderViewController’s view hierarchy
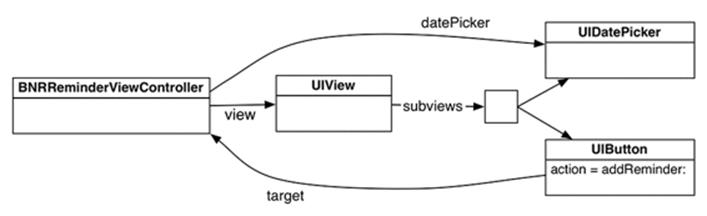
In addition, the view controller will have a datePicker property that points to the UIDatePicker object. Finally, the view controller will be the target of the UIButton and must implement its action method addReminder:.
Because BNRReminderViewController’s view has subviews, it will be easier to create this view controller’s view hierarchy in Interface Builder.
Creating a view in Interface Builder
First, open BNRReminderViewController.m. Add a class extension for BNRReminderViewController that includes a declaration of the datePicker property. Then add a simple implementation for addReminder: that logs the picked date.
#import "BNRReminderViewController.h"
@interface BNRReminderViewController ()
@property (nonatomic, weak) IBOutlet UIDatePicker *datePicker;
@end
@implementation BNRReminderViewController
- (IBAction)addReminder:(id)sender
{
NSDate *date = self.datePicker.date;
NSLog(@"Setting a reminder for %@", date);
}
@end
Recall from Chapter 1 that the IBOutlet and IBAction keywords tell Xcode that you will be making these connections in Interface Builder. The first step is creating a XIB file.
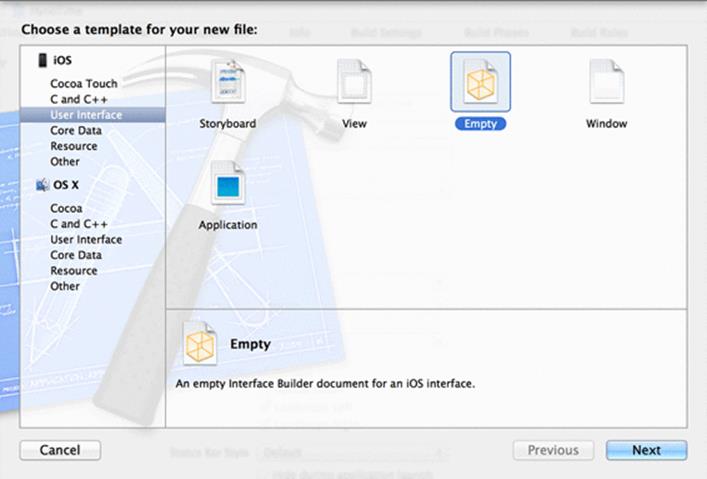
Create a new XIB file by selecting File → New → File.... From the iOS section, select User Interface, choose the Empty template, and click Next (Figure 6.8).
Figure 6.8 Creating an empty XIB
Select iPhone from the pop-up menu that appears and click Next.
Name this file BNRReminderViewController.xib and save it. (It is important to name this and other files as we tell you. Sometimes, people will name files something different as they are working through this book. This is not a good idea. Many of the names are based on assumptions built into the iOS SDK.)
You now have a new file: BNRReminderViewController.xib. Select this file in the project navigator to open it in Interface Builder.
Creating view objects
In the object library (at the bottom of Xcode’s righthand pane), search for UIView. Drag a View object onto the canvas. By default, it will be screen-sized, which is what you want.
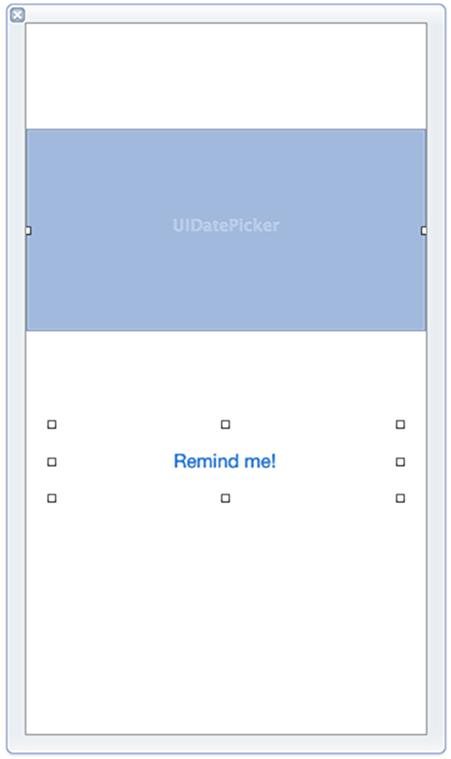
Next, find a Date Picker and a Button in the library and drag them onto the view. Position and resize the subviews as shown in Figure 6.9. Remember that you can double-click the button to change its title.
Figure 6.9 BNRReminderViewController’s XIB file
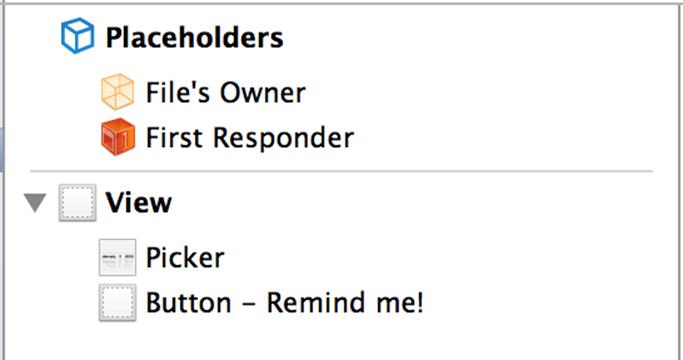
In the document outline to the left of the canvas, you can see your view hierarchy: the View is the root and the Picker and Button are its subviews.
Figure 6.10 Hierarchy in BNRReminderViewController.xib
Loading a NIB file
When a view controller gets its view hierarchy by loading a NIB file, you do not override loadView. The default implementation of loadView knows how to handle loading a NIB file.
The BNRReminderViewController does need to know which NIB file to load. You can do this in UIViewController’s designated initializer:
- (instancetype)initWithNibName:(NSString *)nibName bundle:(NSBundle *)nibBundle;
In this method, you pass the name of the NIB file to be loaded and the bundle in which to look for that file.
In BNRAppDelegate.m, import BNRReminderViewController.h. Then create an instance of BNRReminderViewController and tell it where to find its NIB file. Finally, make the BNRReminderViewController object the rootViewController of the window.
#import "BNRReminderViewController.h"
@implementation BNRAppDelegate
- (BOOL)application:(UIApplication *)application
didFinishLaunchingWithOptions:(NSDictionary *)launchOptions
{
self.window = [[UIWindow alloc] initWithFrame:[[UIScreen mainScreen] bounds]];
// Override point for customization after application launch
// This line will generate a warning, ignore it for now
BNRHypnosisViewController *hvc = [[BNRHypnosisViewController alloc] init];
// This will get a pointer to an object that represents the app bundle
NSBundle *appBundle = [NSBundle mainBundle];
// Look in the appBundle for the file BNRReminderViewController.xib
BNRReminderViewController *rvc =
[[BNRReminderViewController alloc] initWithNibName:@"BNRReminderViewController"
bundle:appBundle];
self.window.rootViewController = hvc;
self.window.rootViewController = rvc;
self.window.backgroundColor = [UIColor whiteColor];
[self.window makeKeyAndVisible];
return YES;
}
The bundle that you are getting by sending the mainBundle message is the application bundle. This bundle is a directory on the filesystem that contains the application’s executable as well as resources (like NIB files) that the executable will use. This is where BNRReminderViewController.xib will be.
You have created and configured the objects in the view hierarchy. You have written an initializer for the view controller so that it can find and load the correct NIB file. You have set the view controller to be the root view controller to add it to the window’s view hierarchy. But if you build and run now, the application will crash. Try it and see. When the application crashes, notice the exception in the console:
'-[UIViewController _loadViewFromNibNamed:bundle:] loaded the
"BNRReminderViewController" nib but the view outlet was not set.'
When the corresponding NIB file was loaded, these objects were instantiated. But you have not made connections to link the instantiated objects with the BNRReminderViewController in the running application. This includes the view controller’s view property. Thus, when the view controller tries to get its view added to the screen, an exception is thrown because view is nil.
How can you associate a view object created in a XIB file with a view controller in a running application? This is where the File's Owner object comes in.
Connecting to File's Owner
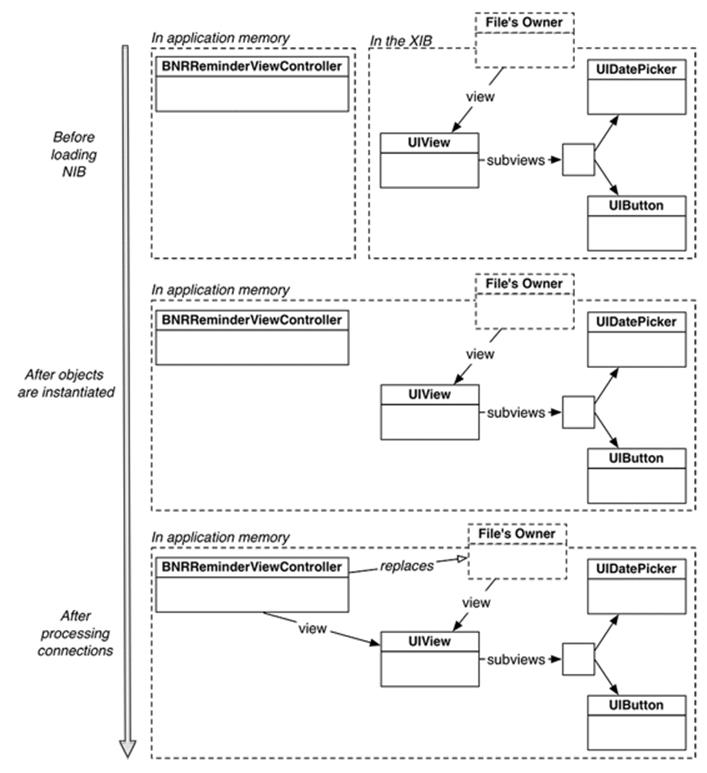
The File's Owner object is a placeholder – it is a hole intentionally left in the XIB file. Loading a NIB, then, is a two-part process: instantiate all of the objects archived in the XIB and then drop the object that is loading the NIB into the File's Owner hole and establish the prepared connections (Figure 6.11).
Figure 6.11 NIB loading timeline
So if you want to connect to the object that loads the NIB at runtime, you connect to the File's Owner when working in the XIB. The first step is to tell the XIB file that the File's Owner is going to be an instance of BNRReminderViewController.
Reopen BNRReminderViewController.xib. Select the File's Owner object in the document outline. Then click the ![]() tab in the inspector area to show the identity inspector. Change the Class for File's Owner to BNRReminderViewController (Figure 6.12).
tab in the inspector area to show the identity inspector. Change the Class for File's Owner to BNRReminderViewController (Figure 6.12).
Figure 6.12 Identity inspector for File's Owner

Now you can make the missing connections. Let’s start with the view outlet.
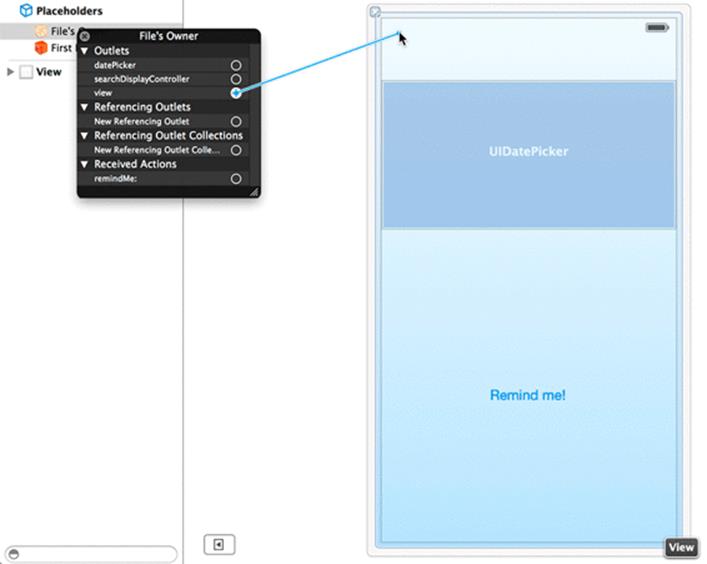
In the dock, Control-click File's Owner to bring up the panel of available connections. Drag from view to the UIView object in the canvas to set the view outlet to point at the UIView (Figure 6.13).
Figure 6.13 Set view outlet
Now when the BNRReminderViewController loads the NIB file, it will be able to load its view. Build and run the application to confirm that the BNRReminderViewController’s view that you created in BNRReminderViewController.xib now appears and that the application no longer crashes right away.
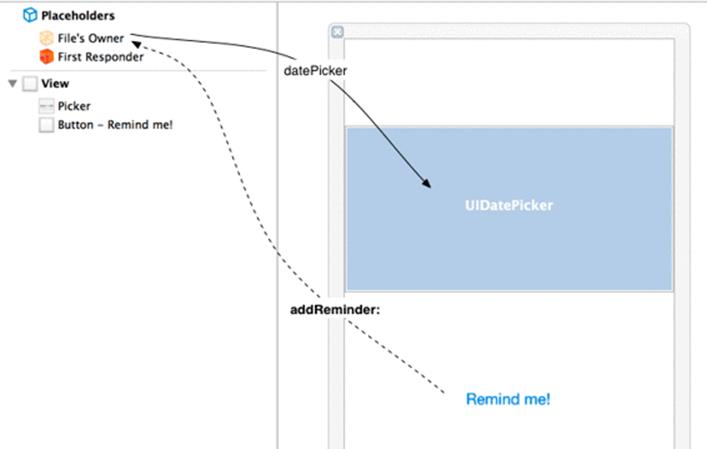
Finish by making the remaining connections (Figure 6.14). Right-click to reveal the File's Owner’s outlets and drag to connect the datePicker outlet to the UIDatePicker. Then Control-drag from the UIButton in the canvas to the File's Owner and select addReminder: to set the action.
Figure 6.14 BNRReminderViewController XIB connections
Build and run the application. Select a time, tap the Remind Me button, and check the console for your reminder date. Later in the chapter, you will update addReminder: to register a local notification.
Earlier in BNRReminderViewController.m, you declared the datePicker outlet as weak. Declaring outlets as weak is a convention from earlier versions of iOS. In these versions, a view controller’s view was automatically destroyed any time that system memory was low and then was recreated later if needed. Ensuring that the view controller only had weak ownership of the subviews meant that destroying the view also destroyed all of its subviews and avoided memory leaks.
UITabBarController
View controllers become more interesting when the user’s actions can cause another view controller to be presented. In this book, you will learn a number of ways to present view controllers. You will start with a UITabBarController that will allow the user to swap between instances ofBNRHypnosisViewController and BNRReminderViewController.
UITabBarController keeps an array of view controllers. It also maintains a tab bar at the bottom of the screen with a tab for each view controller in this array. Tapping on a tab results in the presentation of the view of the view controller associated with that tab.
In BNRAppDelegate.m, create an instance of UITabBarController, give it both view controllers, and install it as the rootViewController of the window.
- (BOOL)application:(UIApplication *)application
didFinishLaunchingWithOptions:(NSDictionary *)launchOptions
{
self.window = [[UIWindow alloc] initWithFrame:[[UIScreen mainScreen] bounds]];
// Override point for customization after application launch
BNRHypnosisViewController *hvc = [[BNRHypnosisViewController alloc] init];
// This will get a pointer to an object that represents the app bundle
NSBundle *appBundle = [NSBundle mainBundle];
// Look in the appBundle for the file BNRReminderViewController.xib
BNRReminderViewController *rvc = [[BNRReminderViewController alloc]
initWithNibName:@"BNRReminderViewController"
bundle:appBundle];
UITabBarController *tabBarController = [[UITabBarController alloc] init];
tabBarController.viewControllers = @[hvc, rvc];
self.window.rootViewController = rvc;
self.window.rootViewController = tabBarController;
self.window.backgroundColor = [UIColor whiteColor];
[self.window makeKeyAndVisible];
return YES;
}
Build and run the application. The bar at the bottom is actually two tabs. Tap on the left and right sides of the tab bar to switch between the two view controllers. In the next section, you will create tab bar items to make the two tabs obvious.
UITabBarController is itself a subclass of UIViewController. A UITabBarController’s view is a UIView with two subviews: the tab bar and the view of the selected view controller (Figure 6.15).
Figure 6.15 UITabBarController diagram
Tab bar items
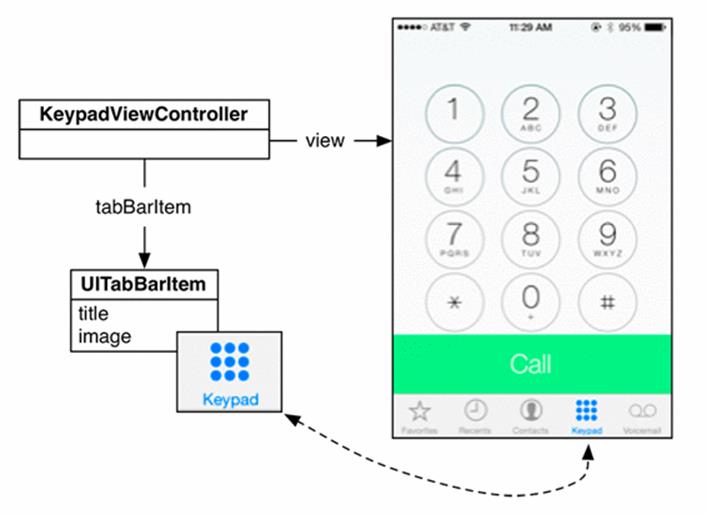
Each tab on the tab bar can display a title and an image. Each view controller maintains a tabBarItem property for this purpose. When a view controller is contained by a UITabBarController, its tab bar item appears in the tab bar. Figure 6.16 shows an example of this relationship in the iPhone’sPhone application.
Figure 6.16 UITabBarItem example
First, you need to add a few files to your project that will be the images for the tab bar items. Open the Asset Catalog by opening Images.xcassets in the project navigator. Then, find Hypno.png, Time.png, Hypno@2x.png, and Time@2x.png in the Resources directory of the file that you downloaded earlier (http://www.bignerdranch.com/solutions/iOSProgramming4ed.zip). Drag these files into the images set list on the left side of the Asset Catalog.
In BNRHypnosisViewController.m, override UIViewController’s designated initializer, initWithNibName:bundle:, to get and set a tab bar item for BNRHypnosisViewController.
- (instancetype)initWithNibName:(NSString *)nibNameOrNil
bundle:(NSBundle *)nibBundleOrNil
{
self = [super initWithNibName:nibNameOrNil
bundle:nibBundleOrNil];
if (self) {
// Set the tab bar item's title
self.tabBarItem.title = @"Hypnotize";
// Create a UIImage from a file
// This will use Hypno@2x.png on retina display devices
UIImage *i = [UIImage imageNamed:@"Hypno.png"];
// Put that image on the tab bar item
self.tabBarItem.image = i;
}
return self;
}
In BNRReminderViewController.m, do the same thing.
- (instancetype)initWithNibName:(NSString *)nibNameOrNil
bundle:(NSBundle *)nibBundleOrNil
{
self = [super initWithNibName:nibNameOrNil
bundle:nibBundleOrNil];
if (self) {
// Get the tab bar item
UITabBarItem *tbi = self.tabBarItem;
// Give it a label
tbi.title = @"Reminder";
// Give it an image
UIImage *i = [UIImage imageNamed:@"Time.png"];
tbi.image = i;
}
return self;
}
Build and run the application, and you will see helpful images and titles in the tab bar. (Figure 6.17).
Figure 6.17 Tab bar items with labels and icons

UIViewController Initializers
When you created a tab bar item for BNRHypnosisViewController, you overrode initWithNibName:bundle:. However, when you initialized the BNRHypnosisViewController instance in BNRAppDelegate.m, you sent it init and still got the tab bar items. This is because initWithNibName:bundle: is the designated initializer of UIViewController. Sending init to a view controller calls initWithNibName:bundle: and passes nil for both arguments.
BNRHypnosisViewController does not use a NIB file to create its view, so the filename parameter is irrelevant. What happens if you send init to a view controller that does use a NIB file? Let’s find out.
In BNRAppDelegate.m, change your code to initialize the BNRReminderViewController with init rather than initWithNibName:bundle:.
BNRHypnosisViewController *hvc = [[BNRHypnosisViewController alloc] init];
// This will get a pointer to an object that represents the app bundle
NSBundle *appBundle = [NSBundle mainBundle];
// Look in the appBundle for the file BNRReminderViewController.xib
BNRReminderViewController *rvc =
[[BNRReminderViewController alloc] initWithNibName:@"BNRReminderViewController"
bundle:appBundle];
BNRReminderViewController *rvc = [[BNRReminderViewController alloc] init];
UITabBarController *tabBarController = [[UITabBarController alloc] init];
Build and run the application, and it will work just as before. When a view controller is initialized with nil as its NIB name, it searches for a NIB file with the name of the class. Passing nil as the bundle means that the view controller will look in the main application bundle. Thus,BNRReminderViewController will still search for BNRReminderViewController.xib in the main bundle.
This is why we warned you earlier about sticking to the given names when naming files. If you are creating a FidoViewController class that fetches its view from a NIB file, then the only appropriate name for that XIB file is FidoViewController.xib.
Adding a Local Notification
Now you are going to implement the reminder feature using a local notification. A local notification is a way for an application to alert the user even when the application is not currently running.
(An application can also use push notifications that are implemented using a backend server. For more about push notifications, read Apple’s Local and Push Notification Programming Guide.)
Getting a local notification to display is easy. You create a UILocalNotification and give it some text and a date. Then you schedule the notification with the shared application – the single instance of UIApplication.
Update the addReminder: method to do this:
- (IBAction)addReminder:(id)sender
{
NSDate *date = self.datePicker.date;
NSLog(@"Setting a reminder for %@", date);
UILocalNotification *note = [[UILocalNotification alloc] init];
note.alertBody = @"Hypnotize me!";
note.fireDate = date;
[[UIApplication sharedApplication] scheduleLocalNotification:note];
}
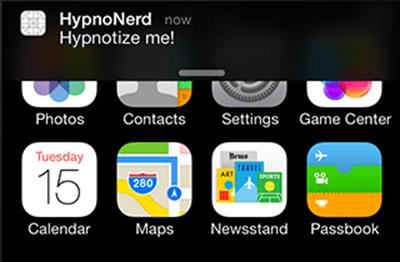
Build and run the application. Use the date picker to select a time in the very near future and tap the Remind Me button. To see the notification, HypnoNerd needs to not be in the foreground. Press the Home button at the bottom of the device or select Hardware → Home in the simulator. When the time that you picked is reached, a notification banner will appear at the top of the screen (Figure 6.18). Tapping on the notification will launch the HypnoNerd application.
Figure 6.18 Local notification
There is an issue: the user can select a time in the past. It would be nice if the date picker did not allow this. You will take care of this shortly.
Loaded and Appearing Views
Now that you have two view controllers, the lazy loading of views that you learned about earlier becomes more important.
When the application launches, the tab bar controller defaults to loading the view of the first view controller in its array, the BNRHypnosisViewController. This means that the BNRReminderViewController’s view is not needed and will only be needed when (or if) the user taps the tab to see it.
You can test this behavior for yourself – when a view controller finishes loading its view, it is sent the message viewDidLoad.
In BNRHypnosisViewController.m, override viewDidLoad to log a statement to the console.
- (void)viewDidLoad
{
// Always call the super implementation of viewDidLoad
[super viewDidLoad];
NSLog(@"BNRHypnosisViewController loaded its view.");
}
In BNRReminderViewController.m, override the same method.
- (void)viewDidLoad
{
[super viewDidLoad];
NSLog(@"BNRReminderViewController loaded its view.");
}
Build and run the application. The console reports that BNRHypnosisViewController loaded its view right away. Tap BNRReminderViewController’s tab, and the console will report that its view is now loaded. At this point, both views have been loaded, so switching between the tabs now will no longer trigger the viewDidLoad method. (Try it and see.)
To preserve the benefits of lazy loading, you should never access the view property of a view controller in initWithNibName:bundle:. Asking for the view in the initializer will cause the view controller to load its view prematurely.
Accessing subviews
Often, you will want to do some extra initialization of the subviews that are defined in the XIB file before they appear to the user. However, you cannot do this in the view controller’s initializer because the NIB file has not yet been loaded. If you try, any pointers that the view controller declares that will eventually point to subviews will be pointing to nil. The compiler will not complain if you send a message to one of these pointers, but whatever you intended to happen to that view object will not happen.
So where can you access a subview? There are two main options, depending on what you need to do. The first option is the viewDidLoad method that you overrode to spot lazy loading. The view controller receives this message after the view controller’s NIB file is loaded, at which point all of the view controller’s pointers will be pointing to the appropriate objects. The second option is another UIViewController method viewWillAppear:. The view controller receives this message just before its view is added to the window.
What is the difference? You override viewDidLoad if the configuration only needs to be done once during the run of the app. You override viewWillAppear: if you need the configuration to be done and redone every time the view controller appears on screen.
There is a subview of the BNRReminderViewController’s view that needs some extra work – the date picker. Currently, users can pick reminder times in the past. You are going to configure the date picker to only allow users to select a time that is at least 60 seconds in the future.
This is something that will need to be done every time the view appears, not just once after the view is loaded, so you are going to override viewWillAppear:.
In BNRReminderViewController.m, override viewWillAppear: to set the minimumDate of the date picker.
- (void)viewWillAppear:(BOOL)animated
{
[super viewWillAppear:animated];
self.datePicker.minimumDate = [NSDate dateWithTimeIntervalSinceNow:60];
}
Build and run the application. Select the Reminder tab and confirm that the date picker will only allow the user to select a date in the future.
If you had overridden viewDidLoad instead, then datePicker’s minimumDate would be set to 60 seconds after the view was initially loaded and would likely remain unchanged for the entire run of the application. If the app ran for very long, then users would soon be able to select times in the past. Sometimes a view controller’s view may get destroyed and reloaded, but that is not the typical behavior on newer devices.
Wondering about the animated flag on this method? It indicates whether the appearance or disappearance transition is animated or not. In the case of UITabBarController, the transition is not animated. Later in the book, in Chapter 10, you will use UINavigationController, which animates view controllers being pushed on and off screen.
Interacting with View Controllers and Their Views
Let’s look at some methods that are called during the lifecycle of a view controller and its view. Some of these methods you have already seen, and some are new:
· application:didFinishLaunchingWithOptions: is where you instantiate and set an application’s root view controller.
This method gets called exactly once when the application has launched. Even if you go to another app and come back, this method does not get called again. If you reboot your phone and start the app again, application:didFinishLaunchingWithOptions: will get called again.
· initWithNibName:bundle: is the designated initializer for UIViewController.
When a view controller instance is created, its initWithNibName:bundle: gets called once. Note that in some apps, you may end up creating several instances of the same view controller class. This method will get called once on each as it is created.
· loadView: is overridden to create a view controller’s view programmatically.
· viewDidLoad can be overridden to configure views created by loading a NIB file. This method gets called after the view of a view controller is created.
· viewWillAppear: can be overridden to configure views created by loading a NIB file.
This method and viewDidAppear: will get called every time your view controller is moved on screen. viewWillDisappear: and viewDidDisappear: will get called every time your view controller is moved offscreen. So if you launch the app you are working on and hop back and forth betweenHypnosis and Reminder, BNRReminderViewController’s viewDidLoad method will be called once, but viewWillAppear: will be called dozens of times.
Bronze Challenge: Another Tab
Give the UITabBarController a third tab that presents a quiz to the user. (Hint: you can reuse files from your Quiz project for this challenge.)
Silver Challenge: Controller Logic
Add a UISegmentedControl to BNRHypnosisViewController’s view with segments for Red, Green, and Blue. When the user taps the segmented control, change the color of the circles in BNRHypnosisView. Be sure to create a copy of the project and work from that copy while attempting this challenge.
For the More Curious: Key-Value Coding
When a NIB file is read in, the outlets are set using a mechanism called Key-value coding (or KVC). Key-value coding is a set of methods defined in NSObject that enable you to set and get the values of properties by name. Here are two of the methods:
- (id)valueForKey:(NSString *)k;
- (void)setValue:(id)v forKey:(NSString *)k;
valueForKey: is a universal getter method. You can ask any object for the value of its fido property like this:
id currentFido = [selectedObj valueForKey:@"fido"];
If there is a fido method (the fido-specific getter), it will be called and the returned value will be used. If there is no fido method, the system will go looking for an instance variable named _fido or fido. If either instance variable exists, the value of the instance variable will be used. If neither an accessor nor an instance variable exists, an exception is thrown.
setValue:forKey: is a universal setter method. It lets you set the value of an object’s fido property like this:
[selectedObject setValue:userChoice forKey:@"fido"];
If there is a setFido: method, it will be called. If there is no such method, the system will go looking for a variable named _fido or fido and set the value of that variable directly. If neither the accessor nor either instance variable exists, an exception will be thrown.
When the NIB file is being loaded, the outlets are set using setValue:forKey:. Thus, if you set an outlet rex for an object in Interface Builder, that object must have an accessor called setRex:, an instance variable called rex, or an instance variable called _rex. If you have none of those, an exception will be thrown when the NIB file is read in at runtime. The error will look like this:
[<BNRSunsetViewController 0x68c0740> setValue:forUndefinedKey:]:
this class is not key value coding-compliant for the key rex.'
Typically, a developer sees this error when he creates an outlet property, connects it in Interface Builder, and then renames the property.
The most important moral of this section: Using the accessor method naming conventions is more than just something nice you do for other people who might read your code. The system expects that a method called setFido: is the setter for the fido property. The system expects that the method fido is the getter for the fido property. Bad things happen when you violate the naming conventions.
Let me give you an example. When I was a young buck, I created a controller class with an outlet called clock that pointed to a clock-like view. I also had a button that triggered an action method (in that same controller) that went out to the Internet, got the correct time, and updated the clock-like view. I, being dumb, named this action method thusly:
- (IBAction)setClock:(id)sender;
This generated the strangest bug: When the NIB file was loaded, the action method was triggered immediately. And the clock outlet never got set properly, even though I had connected it correctly in the NIB file. Why? The system was trying to use my setClock: action method as if it were an accessor for setting my clock outlet.
I renamed the method updateClock:, and everything worked perfectly – but that was four hours of my life that I will never get back. Following naming conventions is really important for iOS developers.
For the More Curious: Retina Display
With the release of iPhone 4, Apple introduced the Retina display for the iPhone and iPod touch. The Retina display has much higher resolution – 640x1136 pixels (on a 4-inch display) and 640x960 pixels (on a 3.5-inch display) compared to 320x480 pixels on earlier devices. Let’s look at what you should do to make graphics look their best on both displays.
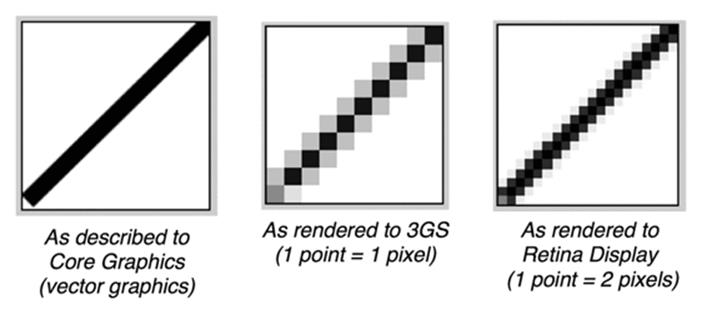
For vector graphics, like BNRHypnosisView’s drawRect: method and drawn text, you do not need to do anything; the same code will render as crisply as the device allows. However, if you draw using Core Graphics functions, these graphics will appear differently on different devices. In Core Graphics, also called Quartz, lines, curves, text, etc. are described in terms of points. On a non-Retina display, a point is 1x1 pixel. On a Retina display, a point is 2x2 pixels (Figure 6.19).
Figure 6.19 Rendering to different resolutions
Given these differences, bitmap images (like JPEG or PNG files) will be unattractive if the image is not tailored to the device’s screen type. Say your application includes a small image of 25x25 pixels. If this image is displayed on a Retina display, then the image must be stretched to cover an area of 50x50 pixels. At this point, the system does a type of averaging called anti-aliasing to keep the image from looking jagged. The result is an image that is not jagged – but it is fuzzy (Figure 6.20).
Figure 6.20 Fuzziness from stretching an image
You could use a larger file instead, but the averaging would then cause problems in the other direction when the image is shrunk for a non-Retina display. The only solution is to bundle two image files with your application: one at a pixel resolution equal to the number of points on the screen for non-Retina displays and one twice that size in pixels for Retina displays.
Fortunately, you do not have to write any extra code to handle which image gets loaded on which device. All you have to do is suffix the higher-resolution image with @2x. Then, when you use UIImage’s imageNamed: method to load the image, this method looks in the bundle and gets the file that is appropriate for the particular device.
All materials on the site are licensed Creative Commons Attribution-Sharealike 3.0 Unported CC BY-SA 3.0 & GNU Free Documentation License (GFDL)
If you are the copyright holder of any material contained on our site and intend to remove it, please contact our site administrator for approval.
© 2016-2026 All site design rights belong to S.Y.A.