Pro iOS Persistence: Using Core Data (2014)
Chapter 1. Touring Core Data
That computer in your purse or pocket—the one that purportedly places phone calls—stores gigabytes’ worth of data: pictures, e-mails, texts, tweets, restaurant reviews, high scores, books, what your friends ate for breakfast, and countless other combinations of zeros and ones that inform and entertain you every day. As Apple’s offering to manage data, Core Data manages much of that information, and the percentage of Core Data–managed information on iOS devices continues to grow. In this chapter, we’ll discover why.
This chapter explains what Core Data is and what components Core Data comprises. It outlines and explains the basic classes that Core Data uses and how they work together. It shows how to set up Core Data in your applications, whether you take advantage of Xcode’s Core Data code generation or add Core Data functionality by hand. It also shows the basics of creating an object model for your objects, storing objects, and retrieving them.
In this chapter, you build two applications: one that tells Xcode to set up Core Data for you and one to which you add Core Data by hand. Neither application has an interface beyond a blank screen, but, rather, they both focus on Core Data interaction. Applications in later chapters will have actual user interfaces, but be patient and focus on learning the basics of Core Data. The information you learn in this chapter will provide a solid foundation for you throughout the rest of this book and with your own Core Data projects.
What Is Core Data?
Imagine computers couldn’t store data. Imagine each time you powered on your iPhone or iPad, you started fresh with each application you worked with. All your documents were gone: your school papers, your budget projection spreadsheets, your crafted pitch presentations for another round of venture capitalist funding, all vanished. You’re back to Level 1 on Angry Birds. You have no more grumpy cat pictures. Your texts from last night have disappeared (which, for some of you, might be a good thing). In short, your device is the classic tabula rasa, day after day, blank and empty of any data, and not very useful.
What those imaginary computers lack is persistence: the ability to store and retrieve data over time. We want to persist information, like our pictures and our high scores and our documents. Core Data, Apple’s solution for persistence, allows applications to persist data of any form and retrieve it.
Core Data isn’t technically a database, although it usually stores its data in one (an SQLite database, to be precise). It’s not an object-relational mapper (ORM), though it can feel like one. It’s truly an object graph, allowing you to create, store, and retrieve objects that have attributes and relationships to other objects. Its simplicity and power allow you to persist data of any form, from basic data models to complex.
Core Data Components
Newcomers to Core Data often express dismay at the complexity of the framework, but as we’ll see, that initial response is unfounded. Cocoa’s predilection for long names probably contributes to the mistaken sense of the complexity; after all, NSPersistentStoreCoordinator is a mouthful. Once you get past the long names, however, and understand the purpose of each of the classes, you’ll recognize both the elegance and the simplicity of the Core Data framework.
We can divide the Core Data classes into two groups: the ones we generally set up once, when our programs launch, and the ones we work with throughout the running time of our programs. In addition, Cocoa provides a set of classes that Core Data uses that aren’t limited in scope to Core Data. Core Data leverages classes like NSPredicate and NSSortDescriptor, which are also used in other contexts in Cocoa applications, to augment its capabilities. We’ll touch on those other classes throughout this book.
Let’s first discuss the classes we set up once, when our programs launch. These classes are
· NSPersistentStore
· NSPersistentStoreCoordinator
· NSManagedObjectModel
The NSPersistentStore class represents a persistent store: a place on your device’s file system that actually stores data. This is usually an SQLite database, though Core Data also offers other types of persistent stores:
· XML (OS X only)
· Atomic
· In-memory
XML stores, which are available only on OS X, store data (as you’d guess) in XML files. Atomic stores, so named because they read and write the entire data store when accessed, can be useful if you want to create your own file format for storing files. Core Data provides one atomic store implementation called the binary store type, and you can create custom stores based on atomic stores. Understand, though, that atomic stores tend to be slower, especially as your data set grows large, because they write and read the data files atomically. In-memory stores are useful if you don’t require your data to persist beyond the current launch of the application but still want to use the power of Core Data to interact with the data. Most, if not all, of your persistent stores will be SQLite stores, though. They’re fast, since they can read and write partial data, and they persist data beyond just the current launch of your applications. Each of your applications will often have one persistent store, though they can have more than one.
The NSPersistentStoreCoordinator class represents a persistent store coordinator, which coordinates among persistent stores, object models, and object contexts. The persistent store coordinator uses an object model, which we’ll see next, and ties it to one or more persistent stores. It also coordinates the storage and retrieval of objects between one or more managed object contexts and one or more persistent stores. It’s in a sense the hub of Core Data, tying together all the Core Data classes. Luckily for you, though, it’s easy to create and configure, and then it performs all its complicated magic for you while your application runs.
The NSManagedObjectModel class represents a managed object model or, more simply, an object model, which looks so much like a data model that you’re forgiven for thinking of it in that way. Just as an entity-relationship (ER) diagram defines tables, columns, and relationships, an object model defines entities, attributes, and relationships. You can create an object model in code, but Xcode provides an object model editor that lets you visually create object models that your application loads and uses.
You use the next two classes throughout the runtime of your applications. They are
· NSManagedObjectContext
· NSManagedObject
The NSManagedObjectContext class represents a managed object context, or just an object context. Your applications can use one or more of these, though often they’ll use only one. Object contexts provide places for objects to live, and the Apple documentation calls it a “scratch pad.” You create objects in the object context, retrieve objects from the object context, and tell the object context to save itself. The object context takes care of talking to the persistent store coordinator to actually store and retrieve objects. You’ll talk to the object contexts a lot in your Core Data applications.
The NSManagedObject class represents a managed object, or an object that Core Data manages. You can think of these as rows in a database. Managed objects have attributes and relationships, as defined by an object model, and use key-value coding (KVC) so you can easily set and get their data. You can also create a subclass of NSManagedObject to create properties that match your object model and convenience methods to work with your managed objects.
Figure 1-1 shows the Core Data classes and how they work together.
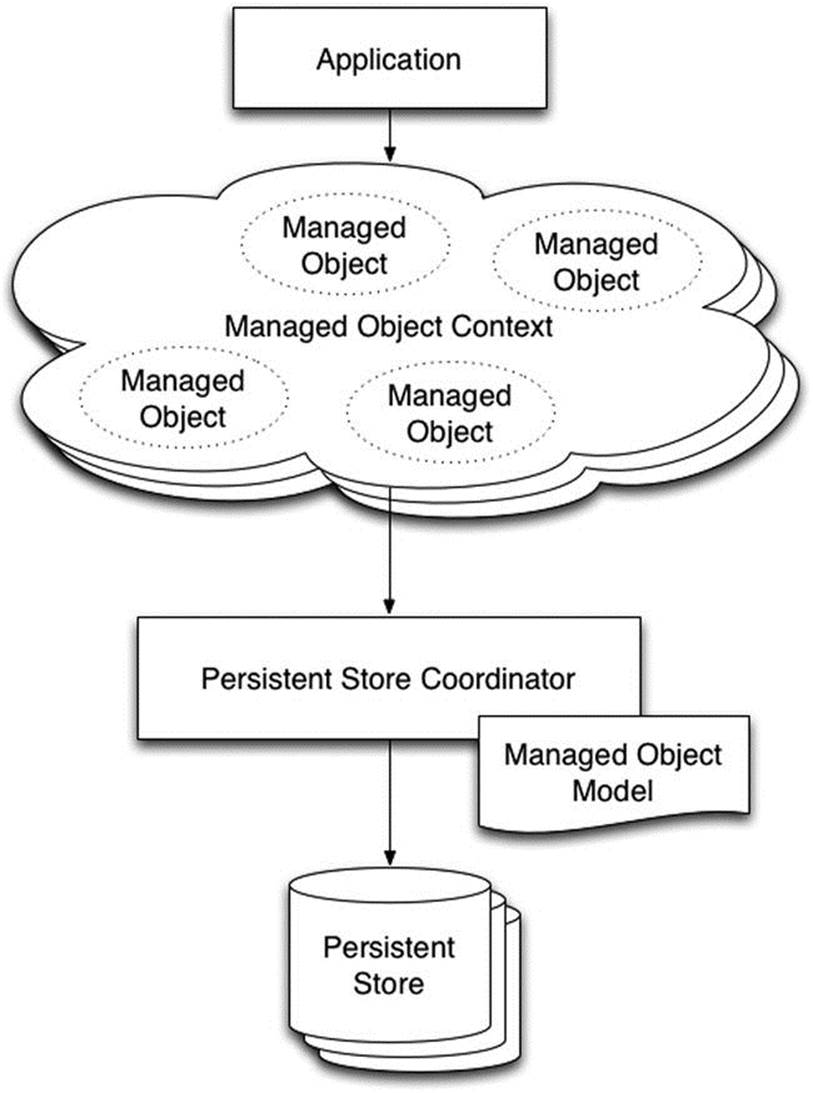
Figure 1-1. The Core Data classes
Creating a New Core Data Project
Theory and diagrams work well for gaining an understanding of how something works, but actual working code cements the concepts into true comprehension. We’ve talked about theory and seen a diagram; now, let’s see Core Data in practice. In this section, we create an Xcode project that uses Core Data from its outset. Later in this chapter, we show how to add Core Data to an existing project.
This first application, not so imaginatively named CoreDataApp, stores Person objects with a single attribute, name. It has a blank screen for an interface, so you can’t interact with it. You run it, it creates data in an SQLite database, and then we use the sqlite3 command-line application to browse the database.
Creating the Project
Launch Xcode and create a new single view application project. Call it CoreDataApp and set the organization identifier to book.persistence. Make sure the Use Core Data check box is checked, as shown in Figure 1-2, and create and save the project. Throughout this book, we use Objective-C as the primary language, but we include Swift versions of the listings as well.
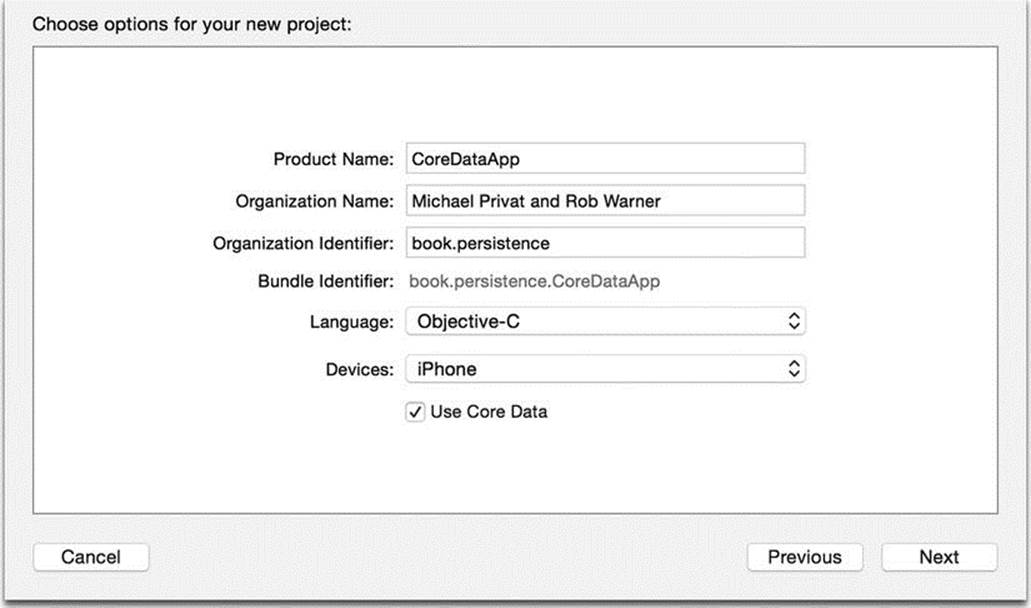
Figure 1-2. Creating the CoreDataApp project
Touring the Core Data Components
By checking the Use Core Data check box, you’ve instructed Xcode to add the Core Data framework to your project. If you selected Objective-C as the project language, Xcode has added the Core Data header file, CoreData/CoreData.h, to the project’s AppDelegate.h file. If you selected Swift as the language, you’ll find the line import CoreData in the project’s AppDelegate.swift file.
You’ve also told Xcode to create a model that will be loaded into an NSManagedObjectModel instance in your application. To see this, expand the CoreDataApp folder in Xcode’s Project Navigator. You should see an entry called CoreDataApp.xcdatamodeld, which is a directory that contains the various artifacts that make up the project’s data model. When we build the application, Xcode will compile this to a directory called CoreDataApp.momd inside the application bundle. This directory will contain the artifacts that CoreDataApp loads to create theNSManagedObjectModel instance.
Finally, you’ve told Xcode to create properties in your application delegate class, AppDelegate, to materialize the Core Data stack. Open the header file, AppDelegate.h, which should match Listing 1-1.
Listing 1-1. AppDelegate.h
#import <UIKit/UIKit.h>
#import <CoreData/CoreData.h>
@interface AppDelegate : UIResponder <UIApplicationDelegate>
@property (strong, nonatomic) UIWindow *window;
@property (readonly, strong, nonatomic) NSManagedObjectContext *managedObjectContext;
@property (readonly, strong, nonatomic) NSManagedObjectModel *managedObjectModel;
@property (readonly, strong, nonatomic) NSPersistentStoreCoordinator *persistentStoreCoordinator;
- (void)saveContext;
- (NSURL *)applicationDocumentsDirectory;
@end
You should recognize the three Core Data properties: managedObjectContext, managedObjectModel, and persistentStoreCoordinator. Xcode puts them all in the application delegate class, which works fine, but application delegate classes tend to grow to unwieldy sizes. When we add Core Data to an existing project later in this chapter, we use a different approach that partitions the Core Data stack to a different class.
You should also notice two methods that Xcode has created to help us with Core Data interaction.
- (void)saveContext;- (NSURL *)applicationDocumentsDirectory;
The saveContext method gives us a central location for saving the managed object context. We can save the managed object context from anywhere in the code, of course, but having one place to do the save allows us to do things like localize error handling. Chapter 4 goes more in depth into error handling. Xcode has generated some default error handling in the generated saveContext method that works well enough for now. Ultimately, the saveContext method checks whether we have any changes floating in the managed object context by calling its hasChangesmethod, and then calls save.
The applicationDocumentsDirectory method returns, as you would imagine, this application’s documents directory. The persistent store coordinator calls this method to determine where on the file system to create the persistent store.
The Swift version of the generated project doesn’t have a header file, of course, but it has the same properties, as well as corresponding calls for the method declarations we just examined (saveContext and applicationDocumentsDirectory:). The source doesn’t group the properties for the Core Data stack together, but if you read through AppDelegate.swift, you’ll find them, initialized using closures (not shown here), as Listing 1-2 shows.
Listing 1-2. Core Data properties in AppDelegate.swift
lazy var managedObjectModel: NSManagedObjectModel
lazy var persistentStoreCoordinator: NSPersistentStoreCoordinator?
lazy var managedObjectContext: NSManagedObjectContext?
Initializing the Core Data Components
Xcode’s generated code for Core Data initializes the Core Data stack lazily, when its components are first accessed. You can certainly use this approach for all your Core Data applications, and for CoreDataApp we’ll leave the default Xcode implementation. You also, however, can set up your Core Data stack when your application launches. We also use that approach in this book.
The Core Data stack for CoreDataApp initializes when you first access the managed object context, materialized by the managedObjectContext property. Listing 1-3 contains the code for managedObjectContext’s Objective-C accessor, and Listing 1-4 shows the same accessor in Swift.
Listing 1-3. The Accessor for managedObjectContext in Objective-C
// Returns the managed object context for the application.
// If the context doesn't already exist, it is created and bound to the persistent store coordinator for the application.
- (NSManagedObjectContext *)managedObjectContext
{
if (_managedObjectContext != nil) {
return _managedObjectContext;
}
NSPersistentStoreCoordinator *coordinator = [self persistentStoreCoordinator];
if (coordinator != nil) {
_managedObjectContext = [[NSManagedObjectContext alloc] init];
[_managedObjectContext setPersistentStoreCoordinator:coordinator];
}
return _managedObjectContext;
}
Listing 1-4. The Accessor for managedObjectContext in Swift
lazy var managedObjectContext: NSManagedObjectContext? = {
// Returns the managed object context for the application (which is already bound to the persistent store coordinator for the application.) This property is optional since there are legitimate error conditions that could cause the creation of the context to fail.
let coordinator = self.persistentStoreCoordinator
if coordinator == nil {
return nil
}
var managedObjectContext = NSManagedObjectContext()
managedObjectContext.persistentStoreCoordinator = coordinator
return managedObjectContext
}()
As the comment generated by Xcode attests, the accessor checks to see whether the managedObjectContext property (synthesized as _managedObjectContext) has been created. If so, the accessor returns it. If not, it retrieves the persistentStoreCoordinator property, allocates and initializes the managed object context, and sets its persistent store coordinator to the retrieved persistentStoreCoordinator.
The accessor for persistentStoreCoordinator, shown in Listing 1-5 (Objective-C) and Listing 1-6 (Swift), does its own lazy initialization. Note that we’ve removed the long comment about error handling, which Chapter 4 covers. As you can see, this code checks whether thepersistentStoreCoordinator property (synthesized as _persistentStoreCoordinator) has been created. If not, it determines the URL (uniform resource locator) for the persistent store by tacking the file name, CoreDataApp.sqlite (or CoreDataAppSwift.sqlite), onto the directory returned by the applicationDocumentsDirectory helper discussed earlier in this chapter, and stores it in storeURL. It then allocates the persistentStoreCoordinator property, initializes it with the managed object model returned by the managedObjectModel accessor, and adds a persistent store that points to the URL created in storeURL.
Listing 1-5. The Objective-C Accessor for persistentStoreCoordinator
// Returns the persistent store coordinator for the application.
// If the coordinator doesn't already exist, it is created and the application's store added to it.
- (NSPersistentStoreCoordinator *)persistentStoreCoordinator
{
if (_persistentStoreCoordinator != nil) {
return _persistentStoreCoordinator;
}
NSURL *storeURL = [[self applicationDocumentsDirectory] URLByAppendingPathComponent:@"CoreDataApp.sqlite"];
NSError *error = nil;
_persistentStoreCoordinator = [[NSPersistentStoreCoordinator alloc] initWithManagedObjectModel:[self managedObjectModel]];
if (![_persistentStoreCoordinator addPersistentStoreWithType:NSSQLiteStoreType configuration:nil URL:storeURL options:nil error:&error]) {
/* Comment deleted */
NSLog(@"Unresolved error %@, %@", error, [error userInfo]);
abort();
}
return _persistentStoreCoordinator;
}
Listing 1-6. The Swift Accessor for persistentStoreCoordinator
lazy var persistentStoreCoordinator: NSPersistentStoreCoordinator? = {
// The persistent store coordinator for the application. This implementation creates and return a coordinator, having added the store for the application to it. This property is optional since there are legitimate error conditions that could cause the creation of the store to fail.
// Create the coordinator and store
var coordinator: NSPersistentStoreCoordinator? = NSPersistentStoreCoordinator(managedObjectModel: self.managedObjectModel)
let url = self.applicationDocumentsDirectory.URLByAppendingPathComponent("CoreDataAppSwift.sqlite")
var error: NSError? = nil
var failureReason = "There was an error creating or loading the application's saved data."
if coordinator!.addPersistentStoreWithType(NSSQLiteStoreType, configuration: nil, URL: url, options: nil, error: &error) == nil {
coordinator = nil
// Report any error we got.
let dict = NSMutableDictionary()
dict[NSLocalizedDescriptionKey] = "Failed to initialize the application's saved data"
dict[NSLocalizedFailureReasonErrorKey] = failureReason
dict[NSUnderlyingErrorKey] = error
error = NSError(domain: "YOUR_ERROR_DOMAIN", code: 9999, userInfo: dict)
// Replace this with code to handle the error appropriately.
// abort() causes the application to generate a crash log and terminate. You should not use this function in a shipping application, although it may be useful during development.
NSLog("Unresolved error \(error), \(error!.userInfo)")
abort()
}
return coordinator
}()
We have one more piece of lazy initialization to review, found in the accessor for managedObjectModel and shown in Listing 1-7 (Objective-C) and Listing 1-8 (Swift). This code, like the other accessors, returns the managedObjectModel property (synthesized as_managedObjectModel) if it has been initialized. Otherwise, the code initializes it by storing the URL for the compiled managed object model, CoreDataApp.momd (CoreDataAppSwift.momd), in the modelURL variable, allocating the managedObjectModel property, and initializing it with the URL to the managed object model.
Listing 1-7. The Objective-C Accessor for managedObjectModel
// Returns the managed object model for the application.
// If the model doesn't already exist, it is created from the application's model.
- (NSManagedObjectModel *)managedObjectModel
{
if (_managedObjectModel != nil) {
return _managedObjectModel;
}
NSURL *modelURL = [[NSBundle mainBundle] URLForResource:@"CoreDataApp" withExtension:@"momd"];
_managedObjectModel = [[NSManagedObjectModel alloc] initWithContentsOfURL:modelURL];
return _managedObjectModel;
}
Listing 1-8. The Swift Accessor for managedObjectModel
lazy var managedObjectModel: NSManagedObjectModel = {
// The managed object model for the application. This property is not optional. It is a fatal error for the application not to be able to find and load its model.
let modelURL = NSBundle.mainBundle().URLForResource("CoreDataAppSwift", withExtension: "momd")!
return NSManagedObjectModel(contentsOfURL: modelURL)!
}()
The lazy-initialization approach works just fine and ensures that all pieces of the Core Data stack get initialized when they’re needed. Feel free to continue to use this approach in your Core Data–based applications. The second application we build in this chapter, PersistenceApp, takes a different approach: it contains all the Core Data interactions in a single class, Persistence, that directly initializes the Core Data stack. Feel free to use either approach in your Core Data applications.
Creating a Managed Object Model
Xcode has created an empty object model for us, CoreDataApp.xcdatamodeld (or CoreDataAppSwift.xcdatamodeld), which you can see by selecting it in the Xcode Project Navigator (see Figure 1-3).
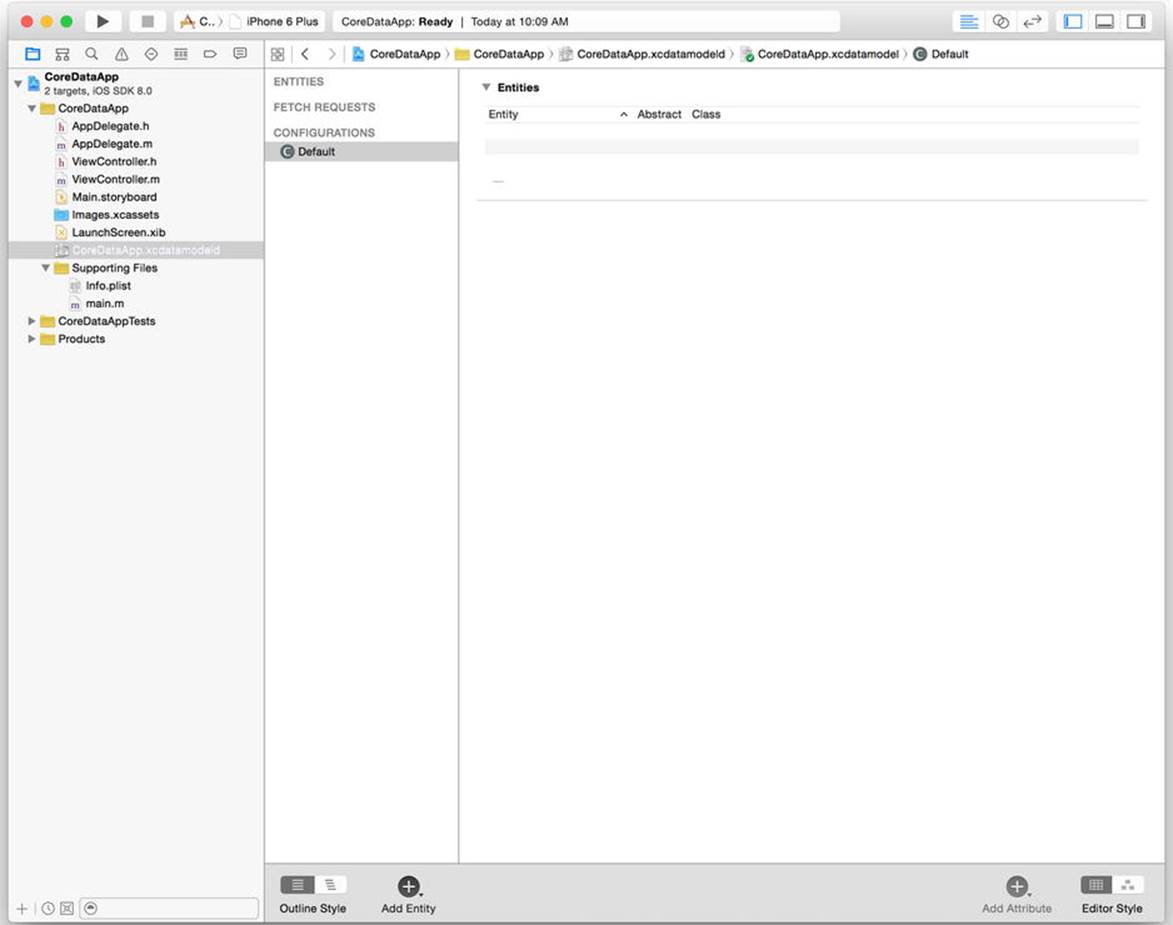
Figure 1-3. An empty object model
For the CoreDataApp application, we want to create a single entity called Person that has a single attribute called name. Note the convention of capitalizing the entity name and lowercasing the attribute name; this naming approach is optional but conforms well to standard coding practices. We use it throughout the book.
To create this entity, click the Add Entity button at the bottom of the Xcode window. This will create an entity called Entity. Rename it Person. Then, click the + button under Attributes and create an attribute called name and change its type from Undefined to String. Your object model should now match Figure 1-4.
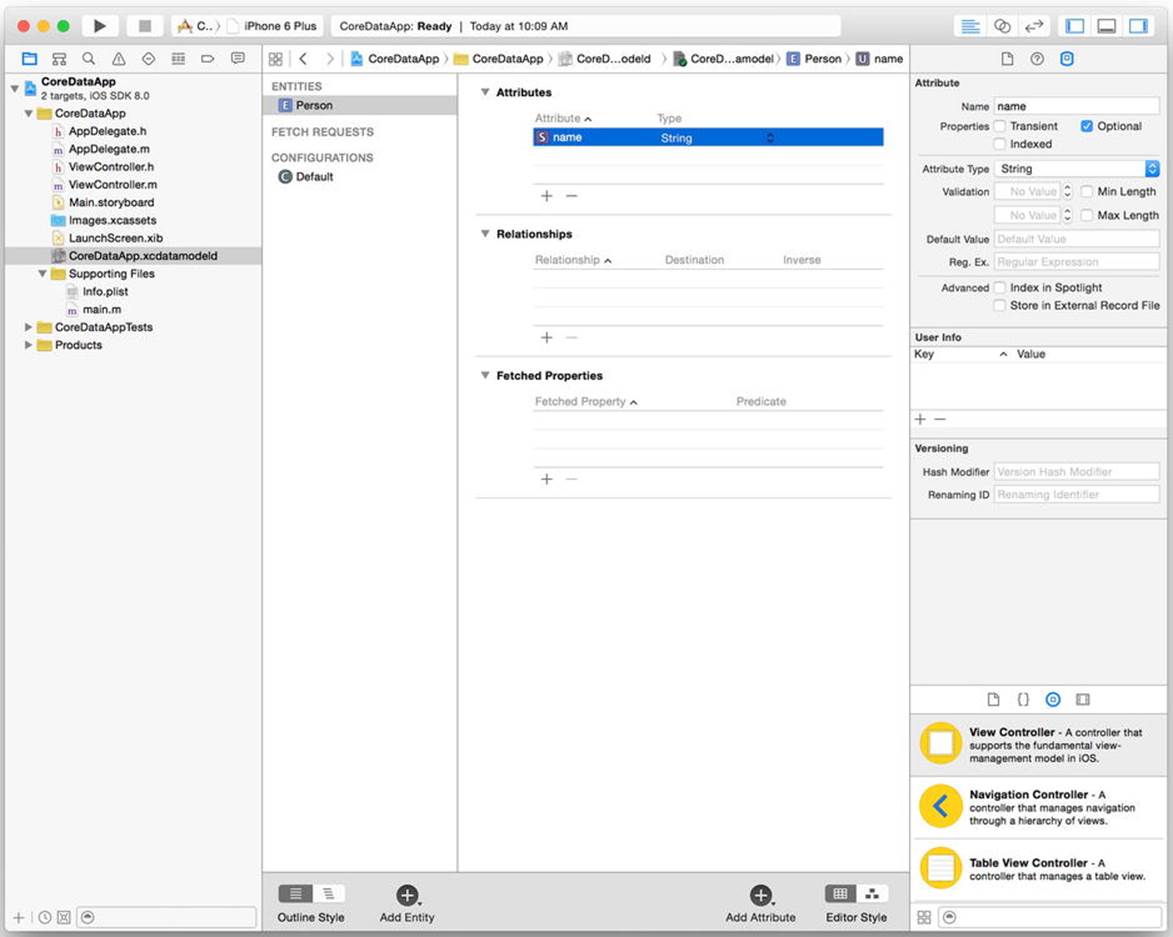
Figure 1-4. The object model with the Person entity
Xcode will compile and load this object model into the managedObjectModel property.
Adding Some Objects
Before running the CoreDataApp application, open AppDelegate.m, add code to the application:didFinishLaunchingWithOptions: method to initialize the Core Data stack by accessing the managedObjectContext property, create some managed objects, and save the managed object context. Listing 1-9 shows the updated method.
Listing 1-9. The Updated application:didFinishLaunchingWithOptions: Method
- (BOOL)application:(UIApplication *)application didFinishLaunchingWithOptions:(NSDictionary *)launchOptions {
NSManagedObject *object1 = [NSEntityDescription insertNewObjectForEntityForName:@"Person" inManagedObjectContext:self.managedObjectContext];
[object1 setValue:@"Tarzan" forKey:@"name"];
NSManagedObject *object2 = [NSEntityDescription insertNewObjectForEntityForName:@"Person" inManagedObjectContext:self.managedObjectContext];
[object2 setValue:@"Jane" forKey:@"name"];
[self saveContext];
return YES;
}
If you’re working with Swift, open AppDelegate.swift instead, and update as shown in Listing 1-10.
Listing 1-10. The updated application:didFinishLaunchingWithOptions: function
func application(application: UIApplication!, didFinishLaunchingWithOptions launchOptions: NSDictionary!) -> Bool {
let object1 = NSEntityDescription.insertNewObjectForEntityForName("Person", inManagedObjectContext: self.managedObjectContext!) as NSManagedObject
object1.setValue("Tarzan", forKey: "name")
let object2 = NSEntityDescription.insertNewObjectForEntityForName("Person", inManagedObjectContext: self.managedObjectContext!) as NSManagedObject
object2.setValue("Jane", forKey: "name")
saveContext()
return true
}
This code creates two new Person managed objects, object1 and object2, and sets their name attributes to “Tarzan” and “Jane,” respectively. Note that managed objects use Cocoa’s standard KVC to set values for attributes. You can also create custom classes for your entities with direct accessors for attributes, so that you can write code as follows:
object1.name = @"Tarzan";
Chapter 2 discusses custom classes.
We create the managed objects by inserting them into a managed object context: our managedObjectContext property. By accessing that property, we start the chain that initializes our entire Core Data stack.
After creating the two managed objects, this code saves the managed object context using the saveContext helper, before throwing a blank window onto the screen. Build and run the application to create the managed objects in the persistent store and see the blank window. Then stop the application.
Viewing the Data
The CoreDataApp application doesn’t have any code to display the contents of its persistent store. How, then, can we verify that the application actually created and stored data? For that, we examine the SQLite database file, CoreDataApp.sqlite or CoreDataAppSwift.sqlite, directly. When you run the application in the iOS Simulator, the application writes this file to a directory below your home directory. The easiest way to find this file is to open a terminal and type
find ~ -name 'CoreDataApp.sqlite'
Once you locate the file, change to that directory and open the file using the sqlite3 application.
sqlite3 CoreDataApp.sqlite
Alternatively, you can open the file directly using the find command:
find ~ -name 'CoreDataApp.sqlite' -exec sqlite3 {} \;
Let’s first examine the database schema by typing the .schema command at the sqlite> prompt.
sqlite> .schema
CREATE TABLE ZPERSON ( Z_PK INTEGER PRIMARY KEY, Z_ENT INTEGER, Z_OPT INTEGER, ZNAME VARCHAR);
CREATE TABLE Z_METADATA (Z_VERSION INTEGER PRIMARY KEY, Z_UUID VARCHAR(255), Z_PLIST BLOB);
CREATE TABLE Z_PRIMARYKEY (Z_ENT INTEGER PRIMARY KEY, Z_NAME VARCHAR, Z_SUPER INTEGER, Z_MAX INTEGER);
You see three tables, two of which (Z_METADATA and Z_PRIMARYKEY) Core Data uses for database management tasks. The third, ZPERSON, stores Person entities. You can see it has a column called ZNAME, of type VARCHAR, for storing the name attribute. Note that this schema, including tables, table names, and column names, among others, are undocumented implementation details subject to change. You can’t rely on these patterns and should never access SQLite databases directly in any of your Core Data–based applications. For testing purposes, however, like what we’re doing here, you’re safe to mess around.
Let’s verify that the CoreDataApp application created and stored the two Person managed objects:
sqlite> select * from zperson;
1|1|1|Tarzan
2|1|1|Jane
sqlite> .quit
You can confirm that, indeed, the CoreDataApp application has successfully used the Core Data framework to create and store data.
Adding Core Data to an Existing Project
Now that you understand how Core Data works, you can see how easy it is to add to an existing project. Just follow the same steps that Xcode does when you check the Use Core Data check box.
· Import the Core Data header file (CoreData/CoreData.h) or add @import CoreData for Objective-C, or add import CoreData for Swift.
· Add a managed object model to your application.
· Add code to your application to initialize the Core Data stack and grant access to the managed object context.
You can mimic Xcode’s generated code for initializing the Core Data stack or follow a different pattern. We use both approaches throughout this book. However you approach the problem, the basic steps are the same.
Creating a Core Data-less Application
To add Core Data to an existing application, we must first have a Core Data-less application to add to. Create a new Xcode project using the single view application template and call it PersistenceApp. Be sure to uncheck the Use Core Data check box (see Figure 1-5).
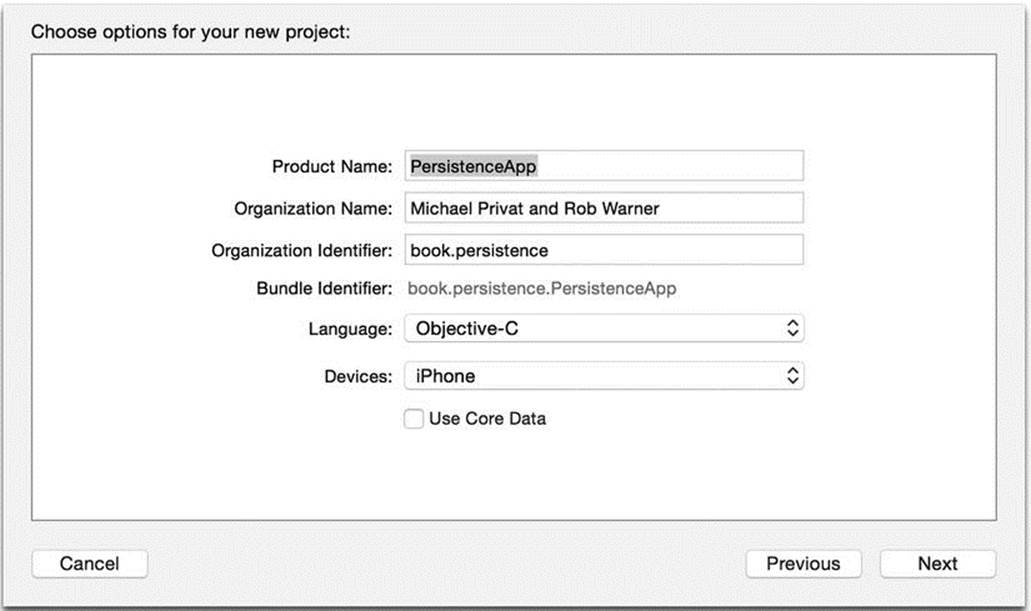
Figure 1-5. Creating the PersistenceApp project
Adding the Core Data Framework
Your application must link against the Core Data framework, aptly named CoreData.framework, in order to use Core Data classes. While adding the Core Data framework to your project used to require a dozen mouse clicks, Xcode’s recent updates have introduced the notion of module imports. To link the Core Data framework to your project, simply add an @import CoreData; directive when you need access to Core Data classes in your Objective-C project, or import CoreData in your Swift project. Xcode will do the rest of the linking work.
Adding a Managed Object Model
A Core Data–based application requires a managed object model, so add a new file to the PersistenceApp group using the Core Data ![]() Data Model template. Yes, even Xcode calls it a data model, not a managed object model. You can call the model whatever you’d like; you just have to match the name when creating your persistence store. For the sake of convention, though, call it PersistenceApp.xcdatamodeld. When you’re done, you should have an empty Core Data model called PersistenceApp.xcdatamodeld, as shown in Figure 1-6.
Data Model template. Yes, even Xcode calls it a data model, not a managed object model. You can call the model whatever you’d like; you just have to match the name when creating your persistence store. For the sake of convention, though, call it PersistenceApp.xcdatamodeld. When you’re done, you should have an empty Core Data model called PersistenceApp.xcdatamodeld, as shown in Figure 1-6.

Figure 1-6. The empty PersistenceApp.xcdatamodeld managed object model
We’ll add entities and attributes to the model later. For now, we’ll continue to focus on adding everything necessary for Core Data to the application.
Adding and Initializing the Core Data Stack
For the PersistenceApp application, we’re going to put all the Core Data stuff into a separate class called Persistence, and add an instance of that class as a property in our AppDelegate class. This will allow us to keep our AppDelegate class’s code cleaner and provide a clean interface for Core Data access.
Create a new file in the PersistenceApp group using the Source ![]() Cocoa Touch Class template, call it Persistence, and make it a subclass of NSObject. Now, if you’re doing this in Objective-C, add the Core Data properties and helper method declarations toPersistence.h, as shown in Listing 1-11.
Cocoa Touch Class template, call it Persistence, and make it a subclass of NSObject. Now, if you’re doing this in Objective-C, add the Core Data properties and helper method declarations toPersistence.h, as shown in Listing 1-11.
Listing 1-11. Persistence.h
#import <Foundation/Foundation.h>
@import CoreData;
@interface Persistence : NSObject
@property (readonly, strong, nonatomic) NSManagedObjectContext *managedObjectContext;
@property (readonly, strong, nonatomic) NSManagedObjectModel *managedObjectModel;
@property (readonly, strong, nonatomic) NSPersistentStoreCoordinator *persistentStoreCoordinator;
- (void)saveContext;
- (NSURL *)applicationDocumentsDirectory;
@end
In the implementation file, Persistence.m, add implementations for the two helper methods, which don’t deviate much from the Xcode-generated versions, as shown in Listing 1-12.
Listing 1-12. Helper Method Implementations in Persistence.m
- (void)saveContext {
NSError *error;
if ([self.managedObjectContext hasChanges] && ![self.managedObjectContext save:&error]) {
NSLog(@"Unresolved error %@, %@", error, [error userInfo]);
abort();
}
}
- (NSURL *)applicationDocumentsDirectory {
return [[[NSFileManager defaultManager] URLsForDirectory:NSDocumentDirectory inDomains:NSUserDomainMask] lastObject];
}
Notice that we don’t check whether the managedObjectContext property is nil before saving, because we’re going to create it when the Persistence instance is initialized so we know it won’t be nil. We retain the naive error handling, though, for now.
To initialize the Core Data stack, add an implementation for init that creates the managed object model, the persistent store coordinator, and the managed object context, as shown in Listing 1-13.
Listing 1-13. Initializing the Core Data Stack in Persistence.m
- (id)init {
self = [super init];
if (self != nil) {
// Initialize the managed object model
NSURL *modelURL = [[NSBundle mainBundle] URLForResource:@"PersistenceApp" withExtension:@"momd"];
_managedObjectModel = [[NSManagedObjectModel alloc] initWithContentsOfURL:modelURL];
// Initialize the persistent store coordinator
NSURL *storeURL = [[self applicationDocumentsDirectory] URLByAppendingPathComponent:@"PersistenceApp.sqlite"];
NSError *error = nil;
_persistentStoreCoordinator = [[NSPersistentStoreCoordinator alloc] initWithManagedObjectModel:self.managedObjectModel];
if (![_persistentStoreCoordinator addPersistentStoreWithType:NSSQLiteStoreType
configuration:nil
URL:storeURL
options:nil
error:&error]) {
NSLog(@"Unresolved error %@, %@", error, [error userInfo]);
abort();
}
// Initialize the managed object context
_managedObjectContext = [[NSManagedObjectContext alloc] init];
[_managedObjectContext setPersistentStoreCoordinator:self.persistentStoreCoordinator];
}
return self;
}
In Chapter 9, we modify this approach to use threads for better performance, but for now we perform all the initialization on the main thread.
To finish initializing the Core Data stack, we add a Persistence property to the application delegate and create it when the application loads. Open AppDelegate.h, add a forward declaration for Persistence, and add the property, so that the file matches Listing 1-14.
Listing 1-14. AppDelegate.h
#import <UIKit/UIKit.h>
@class Persistence;
@interface AppDelegate : UIResponder <UIApplicationDelegate>
@property (strong, nonatomic) UIWindow *window;
@property (strong, nonatomic) Persistence *persistence;
@end
Next, open AppDelegate.m and add an import for Persistence.h:
#import "Persistence.h"
As the last step of initializing the Core Data stack, allocate and initialize the persistence property in the application:didFinishLaunchingWithOptions method. This method should now match Listing 1-15.
Listing 1-15. Allocating and Initializing the persistence Property
- (BOOL)application:(UIApplication *)application didFinishLaunchingWithOptions:(NSDictionary *)launchOptions {
self.persistence = [[Persistence alloc] init];
return YES;
}
If you’re building this project in Swift, your work follows the same sort of pattern, albeit without the header files. In your Persistence class, add a variable for your managed object context. We’ll do all the initialization in the closure for this managed object context variable. You also add helpers for saving the context and getting the application document directory. Listing 1-16 shows the updated Persistence.swift file, and Listing 1-17 shows the additions to AppDelegate.swift to create a Persistence instance. Note that the Core Data stack will initialize when we create the Persistence instance; if we wanted, instead, to initialize Core Data when the managed object context is first accessed, we’d simply add the @lazy annotation to the managed object context variable.
Listing 1-16. Persistence.swift Updated for Core Data
import Foundation
import CoreData
class Persistence: NSObject {
var managedObjectContext: NSManagedObjectContext? = {
// Initialize the managed object model
let modelURL = NSBundle.mainBundle().URLForResource("PersistenceAppSwift", withExtension: "momd")!
let managedObjectModel = NSManagedObjectModel(contentsOfURL: modelURL)
// Initialize the persistent store coordinator
let storeURL = Persistence.applicationDocumentsDirectory.URLByAppendingPathComponent("PersistenceAppSwift.sqlite")
var error: NSError? = nil
let persistentStoreCoordinator = NSPersistentStoreCoordinator(managedObjectModel: managedObjectModel!)
if persistentStoreCoordinator.addPersistentStoreWithType(NSSQLiteStoreType, configuration: nil, URL: storeURL, options: nil, error: &error) == nil {
abort()
}
// Initialize the managed object context
var managedObjectContext = NSManagedObjectContext()
managedObjectContext.persistentStoreCoordinator = persistentStoreCoordinator
return managedObjectContext
}()
func saveContext() {
var error: NSError? = nil
if {
if managedObjectContext.hasChanges && !managedObjectContext.save(&error) {
abort()
}
}
}
class var applicationDocumentsDirectory: NSURL {
let urls = NSFileManager.defaultManager().URLsForDirectory(.DocumentDirectory, inDomains: .UserDomainMask)
return urls[urls.endIndex-1] as NSURL
}
}
Listing 1-17. The Updated AppDelegate.swift
import UIKit
import CoreData
@UIApplicationMain
class AppDelegate: UIResponder, UIApplicationDelegate {
var window: UIWindow?
var persistence: Persistence?
func application(application: UIApplication!, didFinishLaunchingWithOptions launchOptions: NSDictionary!) -> Bool {
persistence = Persistence()
return true
}
/* Code snipped */
}
The Core Data stack now properly initializes when the application runs, but without an object model or any objects in it, we can’t really see evidence of that. The next step is to create an object model.
Creating the Object Model
At this point, we’ve added all the Core Data pieces to the application that Xcode would have done for us had we checked the Use Core Data check box. For an application that you manually add Core Data to, you create the object model in the same way that you did for an application for which you checked Xcode’s Use Core Data check box.
For PersistenceApp, we store gadgets that have a name and a price. Open the object model, PersistenceApp.xcdatamodeld, in Xcode’s Project Navigator, and add a Gadget entity with a String attribute called name and a Float attribute called price. Your data model should match Figure 1-7.
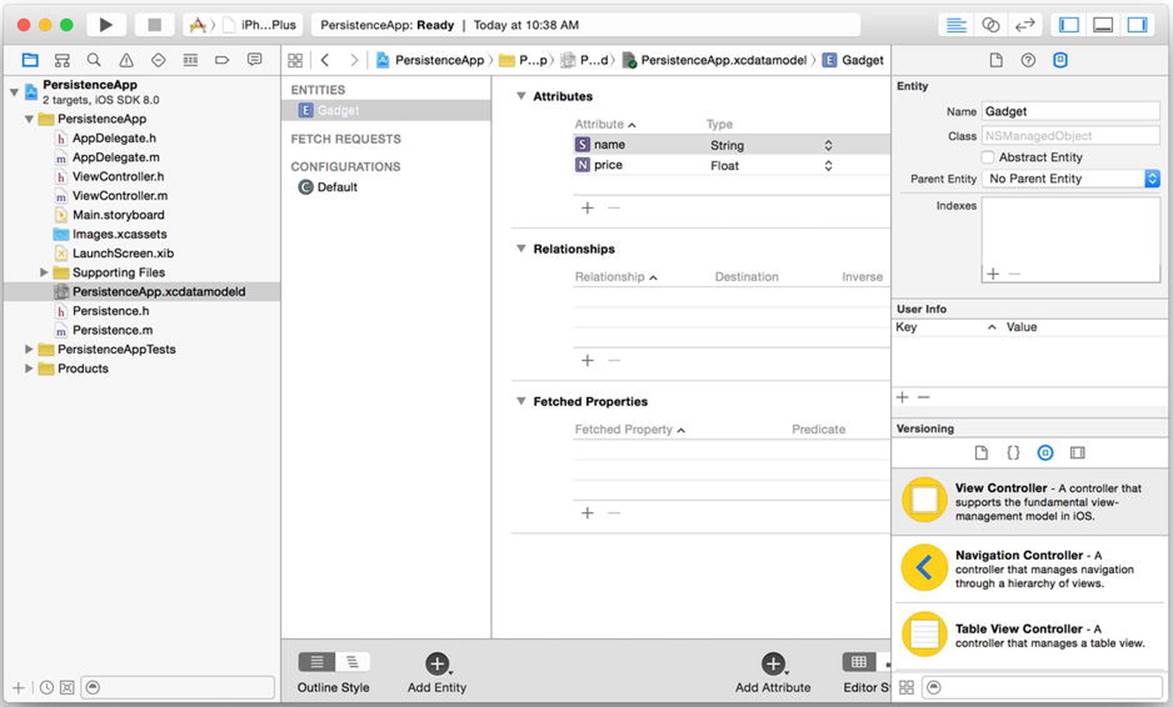
Figure 1-7. The Gadget entity in the PersistenceApp.xcdatamodeld managed object model
Now that we have an object model, we can create some objects in it.
Adding Objects to PersistenceApp
Once again, we use the application:didFinishLaunchingWithOptions method to add objects to the object model. This time, however, we’ll do that work in another method that we call from application:didFinishLaunchingWithOptions. Also, instead of relying on the sqlite3 command-line tool to view the stored data, we fetch the objects from the persistent store and log them to the console—again, from a separate method. To begin, add calls to the two methods that we will create in application:didFinishLaunchingWithOptions, so that the code matches Listing 1-18 (Objective-C) or Listing 1-19 (Swift).
Listing 1-18. Adding Calls to Create and Fetch Objects (Objective-C)
- (BOOL)application:(UIApplication *)application didFinishLaunchingWithOptions:(NSDictionary *)launchOptions {
self.persistence = [[PAPersistence alloc] init];
[self createObjects];
[self fetchObjects];
return YES;
}
Listing 1-19. Adding Calls to Create and Fetch Objects (Swift)
func application(application: UIApplication!, didFinishLaunchingWithOptions launchOptions: NSDictionary!) -> Bool {
persistence = Persistence()
createObjects()
fetchObjects()
return true
}
Then, create implementations for the new methods. The createObjects method should look familiar; as before, you create the objects in the managed object context, then save the context. This code creates four Gadget instances: an iPad, an iPad Mini, an iPhone, and an iPod touch. The prices for them are in US dollars, and may or may not be accurate! Listing 1-20 shows the Objective-C code, and Listing 1-21 shows the Swift code. One thing to notice: since KVC requires object values, not primitives, the prices we set on the objects are NSNumber instances, not primitive floats.
Listing 1-20. The Objective-C createObjects Method
- (void)createObjects {
NSManagedObject *iPad = [NSEntityDescription insertNewObjectForEntityForName:@"Gadget" inManagedObjectContext:self.persistence.managedObjectContext];
[iPad setValue:@"iPad" forKey:@"name"];
[iPad setValue:@499.0f forKey:@"price"];
NSManagedObject *iPadMini = [NSEntityDescription insertNewObjectForEntityForName:@"Gadget" inManagedObjectContext:self.persistence.managedObjectContext];
[iPadMini setValue:@"iPad Mini" forKey:@"name"];
[iPadMini setValue:@329.0f forKey:@"price"];
NSManagedObject *iPhone = [NSEntityDescription insertNewObjectForEntityForName:@"Gadget" inManagedObjectContext:self.persistence.managedObjectContext];
[iPhone setValue:@"iPhone" forKey:@"name"];
[iPhone setValue:@199.0f forKey:@"price"];
NSManagedObject *iPodTouch = [NSEntityDescription insertNewObjectForEntityForName:@"Gadget" inManagedObjectContext:self.persistence.managedObjectContext];
[iPodTouch setValue:@"iPod touch" forKey:@"name"];
[iPodTouch setValue:@299.0f forKey:@"price"];
[self.persistence saveContext];
}
Listing 1-21. The Swift createObjects function
func createObjects() {
if let persistence = persistence {
let iPad = NSEntityDescription.insertNewObjectForEntityForName("Gadget", inManagedObjectContext: persistence.managedObjectContext!) as NSManagedObject
iPad.setValue("iPad", forKey: "name")
iPad.setValue(499, forKey: "price")
let iPadMini = NSEntityDescription.insertNewObjectForEntityForName("Gadget", inManagedObjectContext: persistence.managedObjectContext!) as NSManagedObject
iPadMini.setValue("iPad Mini", forKey: "name")
iPadMini.setValue(329, forKey: "price")
let iPhone = NSEntityDescription.insertNewObjectForEntityForName("Gadget", inManagedObjectContext: persistence.managedObjectContext!) as NSManagedObject
iPhone.setValue("iPhone", forKey: "name")
iPhone.setValue(199, forKey: "price")
let iPodTouch = NSEntityDescription.insertNewObjectForEntityForName("Gadget", inManagedObjectContext: persistence.managedObjectContext!) as NSManagedObject
iPodTouch.setValue("iPod Touch", forKey: "name")
iPodTouch.setValue(299, forKey: "price")
persistence.saveContext()
}
else {
println("Error, persistence layer not initialized")
}
}
The fetchObjects method fetches the objects from the persistent store and uses NSLog (or println) to log them to the console. To fetch objects, we use the NSFetchRequest class, which represents a fetch request. A fetch request is tied to a particular entity and contains all the criteria describing what you want to fetch from that entity. With a fetch request, you can do things like set limits, specify criteria that objects must match, sort the results, and use advanced aggregators to massage the results the fetch request returns. Chapter 2 explains more about how to useNSFetchRequest, and then Chapter 3 goes deeper into the powers of fetching data. At this point, however, we stay simple in our usage of NSFetchRequest and just fetch all of the objects from our Gadget entity.
Before iOS 5.0, you typically created and used an NSFetchRequest instance by allocating and initializing one, creating an NSEntityDescription instance, and setting the entity for the NSFetchRequest instance to the NSEntityDescription instance, as shown in Listing 1-22.
Listing 1-22. Pre-iOS 5.0 NSFetchRequest Creation
NSFetchRequest *fetchRequest = [[NSFetchRequest alloc] init];
[fetchRequest setEntity:[NSEntityDescription entityForName:@"Gadget"
inManagedObjectContext:self.persistence.managedObjectContext]];
In iOS 5.0, Apple added a couple of convenience methods for NSFetchRequest so you don’t have to create an NSEntityDescription instance or take two lines of code to tie your NSFetchRequest instance to an entity. One is an initializer that takes an entity name, and the other is a class method that takes an entity name. Listing 1-23 shows two ways to create an NSFetchRequest instance in iOS 5.0 or later.
Listing 1-23. Creating NSFetchRequest Instances in iOS 5.0 and Later
NSFetchRequest *fetchRequest1 = [[NSFetchRequest alloc] initWithEntityName:@"Gadget"];
NSFetchRequest *fetchRequest2 = [NSFetchRequest fetchRequestWithEntityName:@"Gadget"];
You can use any of the approaches. You might notice, however, that the pre-iOS 5.0 approach specified the managed object context for the entity, while the iOS 5.0-and-later approach does not. How, then, does the NSFetchRequest instance know which managed object context to use to find the entity?
The answer to that is that actually executing a fetch request is a method on the managed object context. For the later approaches, the managed object context uses the fetch request’s entity name to look up the actual NSEntityDescription when it executes the fetch request. Listing 1-24shows how to execute a fetch request.
Listing 1-24. Executing a Fetch Request
NSError *error;
NSManagedObjectContext *managedObjectContext = ...; // Get from somewhere
NSArray *objects = [managedObjectContext executeFetchRequest:fetchRequest error:&error];
You can pass nil for error if you don’t care about any error results, but you’ll usually want error information so you can handle the errors. Again, Chapter 4 covers error handling.
With this nascent knowledge of fetch requests, we can implement the fetchObjects method, as shown in Listing 1-25 (Objective-C) or Listing 1-26 (Swift). This method creates a fetch request, executes it against the managed object context, and displays the results in the console.
Listing 1-25. The Objective-C fetchObjects Method
- (void)fetchObjects {
// Fetch the objects
NSFetchRequest *fetchRequest = [NSFetchRequest fetchRequestWithEntityName:@"Gadget"];
NSArray *objects = [self.persistence.managedObjectContext executeFetchRequest:fetchRequest error:nil];
// Log the objects
for (NSManagedObject *object in objects) {
NSLog(@"%@", object);
}
}
Listing 1-26. The Swift fetchObjects function
func fetchObjects() {
if let persistence = persistence {
let fetchRequest = NSFetchRequest(entityName: "Gadget")
var error : NSError?
let objects = persistence.managedObjectContext!.executeFetchRequest(fetchRequest, error: &error) as [NSManagedObject]
if let error = error {
println("Something went wrong: \(error.localizedDescription)")
}
for object in objects {
println(object)
}
}
else {
println("Error, persistence layer not initialized")
}
}
Build and run the application. You should see a blank screen in the iOS Simulator, and in the Xcode Console you should see output that looks something like the following:
2014-07-07 21:49:40.537 PersistenceApp[8878:83583] <NSManagedObject: 0x7faa21e380b0> (entity: Gadget; id: 0xd000000000040000 <x-coredata://D2570307-5795-4E9A-96C9-7B477D27AB5D/Gadget/p1> ; data: {
name = "iPad Mini";
price = 329;
})
2014-07-07 21:49:40.538 PersistenceApp[8878:83583] <NSManagedObject: 0x7faa21e386a0> (entity: Gadget; id: 0xd000000000080000 <x-coredata://D2570307-5795-4E9A-96C9-7B477D27AB5D/Gadget/p2> ; data: {
name = "iPod touch";
price = 299;
})
2014-07-07 21:49:40.538 PersistenceApp[8878:83583] <NSManagedObject: 0x7faa21e38580> (entity: Gadget; id: 0xd0000000000c0000 <x-coredata://D2570307-5795-4E9A-96C9-7B477D27AB5D/Gadget/p3> ; data: {
name = iPhone;
price = 199;
})
2014-07-07 21:49:40.538 PersistenceApp[8878:83583] <NSManagedObject: 0x7faa21e37340> (entity: Gadget; id: 0xd000000000100000 <x-coredata://D2570307-5795-4E9A-96C9-7B477D27AB5D/Gadget/p4> ; data: {
name = iPad;
price = 499;
})
If you’re running the Swift version of the app, the output is a little more compact, as the following shows:
<NSManagedObject: 0x7be633a0> (entity: Gadget; id: 0x7be68180 <x-coredata://9796AAF7-58AA-4B3A-86B8-A1897330E17F/Gadget/p1> ; data: {
name = iPad;
price = 499;
})
<NSManagedObject: 0x7be66d60> (entity: Gadget; id: 0x7be681e0 <x-coredata://9796AAF7-58AA-4B3A-86B8-A1897330E17F/Gadget/p2> ; data: {
name = iPhone;
price = 199;
})
<NSManagedObject: 0x7be666b0> (entity: Gadget; id: 0x7be681d0 <x-coredata://9796AAF7-58AA-4B3A-86B8-A1897330E17F/Gadget/p3> ; data: {
name = "iPad Mini";
price = 329;
})
<NSManagedObject: 0x7be66e20> (entity: Gadget; id: 0x7be68250 <x-coredata://9796AAF7-58AA-4B3A-86B8-A1897330E17F/Gadget/p4> ; data: {
name = "iPod Touch";
price = 299;
})
As before, you can also explore the SQLite database using sqlite3, but the log messages evidence that the objects were stored and retrieved.
Wrapping Up
In this chapter, you learned what Core Data is and what it’s used for. You learned about the importance of persistence for data. You learned about the components of Core Data and how they work together. You built two Core Data–based applications: one that makes Xcode set up for you, and one in which you set up Core Data for yourself. You stored data in your Core Data persistent stores and retrieved them.
The applications you built in this chapter used anemic object models. In the next chapter, we build on the knowledge from this chapter to create more complex object models. You’ll also learn about concepts like sorting and using predicates, and you’ll understand the power of the Core Data object model.