iOS Core Animation: Advanced Techniques (2014)
Part II. Setting Things in Motion
Chapter 10. Easing
In life, as in art, the beautiful moves in curves.
Edward G. Bulwer-Lytton
In Chapter 9, “Layer Time,” we discussed animation timing and the CAMediaTiming protocol. We now look at another time-related mechanism—a system known as easing. Core Animation uses easing to make animations move smoothly and naturally instead of seeming robotic and artificial, and in this chapter we explore how to control and customize the easing curves for your animations.
Animation Velocity
Animation is the change of a value over time, and that implies that the change must happen at a particular rate or velocity. The velocity of an animation is related to its duration by the following equation:
velocity = change / time
The change would be (for example) the distance that a moving object travels, and the time is the duration of the animation. This is easier to visualize for an animation that involves movement (such as animation of the position or bounds property), but it applies equally to any animatable property (such as color or opacity).
The equation above assumes that the velocity is constant throughout the animation (which was the case for the animations we created in Chapter 8, “Explicit Animations”). Using a constant velocity for an animation is known as linear pacing, and it’s the simplest way to implement animation, from a technical standpoint. It’s also completely unrealistic.
Consider a car driving a short distance. It would not start at 60 mph, drive to the destination and then immediately drop to 0 mph. For one thing, that would require infinite accelerating capability (even the best sports car can’t do 0 to 60 in 0 seconds), and for another, it would kill all the passengers. In reality, it would slowly accelerate up to full speed, then when it was nearing its destination, it would begin to slow down until it finally comes to a gentle stop.
What about a weight that is dropped onto a hard surface? It would start stationary, then continue to accelerate right up until it hits the surface, at which point it would stop suddenly (probably with a loud bang as its accumulated kinetic energy is turned into sound).
Every physical object in the real world accelerates and decelerates when it moves. So, how do we implement this kind of acceleration in our animations? One option is to use a physics engine to realistically model the friction and momentum of our animated objects, but this is overkill for most purposes. For an animated user interface, we just want some timing equations that make our layers move like plausible real-world objects, but which aren’t too complicated to calculate. The name for these types of equations are easing functions, and fortunately Core Animation comes with a bunch of standard ones built in and ready to use.
CAMediaTimingFunction
To make use of easing functions, we need to set the timingFunction property of CAAnimation, which is an object of class CAMediaTimingFunction. We can also use the +setAnimationTimingFunction: method of CATransaction if we want to change the timing function for implicit animations.
There are a couple of ways to create a CAMediaTimingFunction. The simplest option is to call the +timingFunctionWithName: constructor method. This takes one of a number of possible name constants:
kCAMediaTimingFunctionLinear
kCAMediaTimingFunctionEaseIn
kCAMediaTimingFunctionEaseOut
kCAMediaTimingFunctionEaseInEaseOut
kCAMediaTimingFunctionDefault
The kCAMediaTimingFunctionLinear option creates a linear paced timing function, which is the same function that is used if you leave a CAAnimation timingFunction property with its default value of nil. Linear pacing makes sense when modeling something that accelerates almost instantaneously, and then doesn’t slow down significantly until it arrives at its destination (for example, a bullet fired from the barrel a gun), but it’s an odd choice for the default because it’s rarely what you want for most animations.
The kCAMediaTimingFunctionEaseIn constant creates a function that starts slow and gradually accelerates up to full speed before stopping suddenly. This is a good fit for something like the dropped weight example we mentioned earlier, or a missile launched at a target.
The kCAMediaTimingFunctionEaseOut constant does the opposite; it starts off at full speed and then gradually slows to a stop. This has a sort of damping effect, and is good for representing something like a door that starts to swing closed and then slows to a gradual stop instead of slamming shut.
The kCAMediaTimingFunctionEaseInEaseOut constant creates a gradual acceleration up to full speed and then a smooth deceleration back down to a stop. This is generally how most real-world objects move, and is the best choice for most animations. If you could only ever use one easing function, it would be this one. Given this fact, you might wonder why this isn’t the default, and in fact when you use UIView animation methods, this is the default, but when creating a CAAnimation, you will need to specify it yourself.
Finally, we have kCAMediaTimingFunctionDefault, which is very similar to kCAMediaTimingFunctionEaseInEaseOut, but creates a slightly more rapid initial acceleration up to full speed, followed by a slightly more gradual deceleration. The difference between this andkCAMediaTimingFunctionEaseInEaseOut is almost imperceptible, but Apple presumably felt that this was a better choice as the default for implicit animations (although they subsequently changed their mind for UIKit, which useskCAMediaTimingFunctionEaseInEaseOut as the default instead). Remember that despite the name, this is not the default value when creating an explicit CAAnimation, it is only used as the default for implicit animations. (In other words, the default layer action animations usekCAMediaTimingFunctionDefault as their timing function.)
You can try out these different easing functions using a simple test project (see Listing 10.1). Just adjust the timing function in the code before running the project, and then tap anywhere to see the layer move with the specified easing.
Listing 10.1 Simple Project for Testing Easing Functions
@interface ViewController ()
@property (nonatomic, strong) CALayer *colorLayer;
@end
@implementation ViewController
- (void)viewDidLoad
{
[super viewDidLoad];
//create a red layer
self.colorLayer = [CALayer layer];
self.colorLayer.frame = CGRectMake(0, 0, 100, 100);
self.colorLayer.position = CGPointMake(self.view.bounds.size.width/2.0,
self.view.bounds.size.height/2.0);
self.colorLayer.backgroundColor = [UIColor redColor].CGColor;
[self.view.layer addSublayer:self.colorLayer];
}
- (void)touchesBegan:(NSSet *)touches withEvent:(UIEvent *)event
{
//configure the transaction
[CATransaction begin];
[CATransaction setAnimationDuration:1.0];
[CATransaction setAnimationTimingFunction:
[CAMediaTimingFunction functionWithName:kCAMediaTimingFunctionEaseOut]];
//set the position
self.colorLayer.position = [[touches anyObject] locationInView:self.view];
//commit transaction
[CATransaction commit];
}
@end
UIView Animation Easing
UIKit’s animation methods also support the use of easing functions, although the syntax and constants are different. To change the easing for the UIView animation methods, add one of the following constants to the options parameter for the animation:
UIViewAnimationOptionCurveEaseInOut
UIViewAnimationOptionCurveEaseIn
UIViewAnimationOptionCurveEaseOut
UIViewAnimationOptionCurveLinear
These correspond directly to their CAMediaTimingFunction counterparts. UIViewAnimationOptionCurveEaseInOut is the default value that will be used unless you specify otherwise. (There is no counterpart in UIKit for kCAMediaTimingFunctionDefault.)
See Listing 10.2 for how these functions are used. (Note that we have switched from using a hosted layer to a UIView in this example because UIKit animation doesn’t work with hosted layers.)
Listing 10.2 Easing Test Project Converted to Use UIKit Animation
@interface ViewController ()
@property (nonatomic, strong) UIView *colorView;
@end
@implementation ViewController
- (void)viewDidLoad
{
[super viewDidLoad];
//create a red layer
self.colorView = [[UIView alloc] init];
self.colorView.bounds = CGRectMake(0, 0, 100, 100);
self.colorView.center = CGPointMake(self.view.bounds.size.width / 2,
self.view.bounds.size.height / 2);
self.colorView.backgroundColor = [UIColor redColor];
[self.view addSubview:self.colorView];
}
- (void)touchesBegan:(NSSet *)touches withEvent:(UIEvent *)event
{
//perform the animation
[UIView animateWithDuration:1.0
delay:0.0
options:UIViewAnimationOptionCurveEaseOut
animations:^{
//set the position
self.colorView.center =
[[touches anyObject] locationInView:self.view];
} completion:NULL];
}
@end
Easing and Keyframe Animations
You may recall that the color switching keyframe animation from Chapter 8 (refer to Listing 8.5) looked a bit odd due to the linear pacing between colors, which made the transition between them occur in an unnatural fashion. To correct that, we can apply a more appropriate easing function such as kCAMediaTimingFunctionEaseIn, which will add a slight pulse effect as the layer changes color—more like a colored light bulb would behave in real life.
We don’t want to apply the function uniformly across the whole animation, though; we want to repeat the easing for each animation step so that each color transition pulses in turn.
CAKeyframeAnimation has a timingFunctions property, which is an NSArray. We can use this to specify a different timing function for each step in the animation. The number of functions specified must be equal to the number of items in the keyframes array minus one, because the function describes the animation velocity between each pair of keyframes.
In this case, we actually want to use the same easing function throughout, but we still need to provide an array of functions so that the animation knows that the function should be repeated for each step instead of applied once across the whole sequence. We simply use an array containing multiple copies of the same function (see Listing 10.3).
If you run the updated project, you will find that the animation now looks a bit more natural.
Listing 10.3 Using CAMediaTimingFunction with CAKeyframeAnimation
@interface ViewController ()
@property (nonatomic, weak) IBOutlet UIView *layerView;
@property (nonatomic, weak) IBOutlet CALayer *colorLayer;
@end
@implementation ViewController
- (void)viewDidLoad
{
[super viewDidLoad];
//create sublayer
self.colorLayer = [CALayer layer];
self.colorLayer.frame = CGRectMake(50.0f, 50.0f, 100.0f, 100.0f);
self.colorLayer.backgroundColor = [UIColor blueColor].CGColor;
//add it to our view
[self.layerView.layer addSublayer:self.colorLayer];
}
- (IBAction)changeColor
{
//create a keyframe animation
CAKeyframeAnimation *animation = [CAKeyframeAnimation animation];
animation.keyPath = @"backgroundColor";
animation.duration = 2.0;
animation.values = @[
(__bridge id)[UIColor blueColor].CGColor,
(__bridge id)[UIColor redColor].CGColor,
(__bridge id)[UIColor greenColor].CGColor,
(__bridge id)[UIColor blueColor].CGColor
];
//add timing function
CAMediaTimingFunction *fn = [CAMediaTimingFunction functionWithName:
kCAMediaTimingFunctionEaseIn];
animation.timingFunctions = @[fn, fn, fn];
//apply animation to layer
[self.colorLayer addAnimation:animation forKey:nil];
}
@end
Custom Easing Functions
In Chapter 8, we updated our clock project to include animation. That looks good, but it would be even better with the right easing function. When a real-life analog clock’s hand moves, it usually starts slowly then suddenly snaps into position before easing to a stop at the last moment. None of the standard easing functions is quite right for the effect we want though. How can we create a new one?
In addition to the +functionWithName: constructor, CAMediaTimingFunction also has an alternative constructor method, +functionWithControlPoints::::, that has four floatingpoint arguments. (Note the bizarre method syntax, which doesn’t include separate names for each argument. This is perfectly legal in objective-C, but contravenes Apple’s own guidelines for method naming, and seems like a curious design choice.)
Using this method, we can construct a custom easing function that is ideally suited to our clock animation. To understand how to use this method, though, we must learn a bit more about how CAMediaTimingFunction works.
The Cubic Bézier Curve
The basic principle of CAMediaTimingFunction function is that it transforms an input time into a proportional change between a start and end value. We can represent these as a simple graph, with time (t) on the x axis and change (delta) on the y axis. The graph for linear easing is therefore a simple diagonal from the origin (see Figure 10.1).
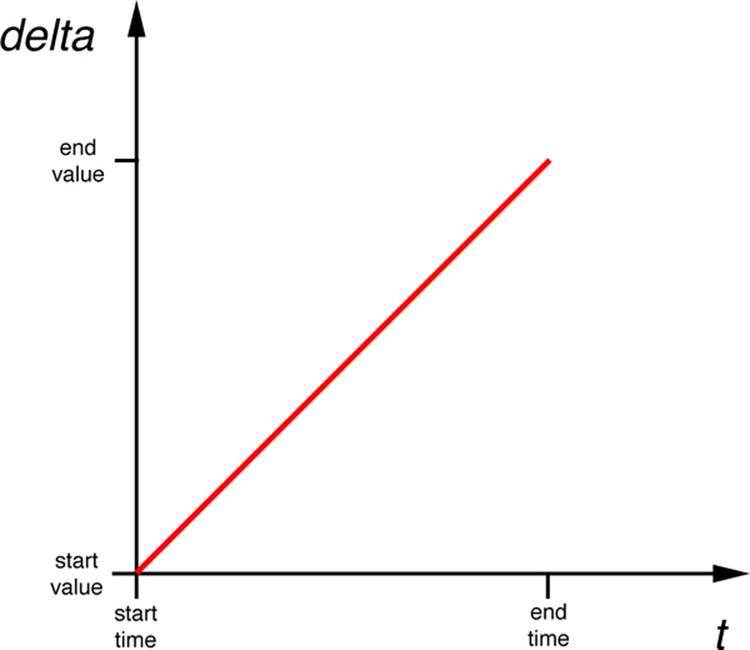
Figure 10.1 A graph of the linear easing function
The slope of this line represents the velocity of change. Changes in the slope represent acceleration or deceleration. In principle, any sort of acceleration curve can be represented on a graph like this, but CAMediaTimingFunction uses a specific function known as a cubic Bézier curve,which can only produce a specific subset of easing functions. (We previously encountered cubic Bézier curves in Chapter 8 when we used them to create a CAKeyframeAnimation path.)
As you may recall, a cubic Bézier curve is defined by four points: The first and last points indicate the starting and ending points for the curve, and the two middle points are called control points, because they control the shape of the curve. The control-points of a Bézier curve are off-curvepoints, meaning that the curve does not necessarily pass through them. You can think of these points as acting like magnets that attract the curve as it passes them.
Figure 10.2 shows an example of a cubic Bézier easing function.

Figure 10.2 A cubic Bézier easing function
This would be a rather strange function in practice—it goes quickly at first, then slows down, then speeds up at the end. So how do the standard easing functions look when represented in graph form?
CAMediaTimingFunction has a method -getControlPointAtIndex:values: that can be used to retrieve the curve points. The design of this method is a bit quirky (why it doesn’t simply return a CGPoint is a mystery that only Apple can answer) but using it we can find out the points for the standard easing functions and then plot them using UIBezierPath and CAShapeLayer.
The start and end points of the curve are always at {0, 0} and {1, 1}, respectively, so we only need to retrieve the second and third points of the curve (the control points). The code to do this is shown in Listing 10.4. The graphs of all of the standard easing functions are shown in Figure 10.3.
Listing 10.4 Graphing a CAMediaTimingFunction Using UIBezierPath
@interface ViewController ()
@property (nonatomic, weak) IBOutlet UIView *layerView;
@end
@implementation ViewController
- (void)viewDidLoad
{
[super viewDidLoad];
//create timing function
CAMediaTimingFunction *function =
[CAMediaTimingFunction functionWithName:
kCAMediaTimingFunctionEaseOut];
//get control points
CGPoint controlPoint1, controlPoint2;
[function getControlPointAtIndex:1 values:(float *)&controlPoint1];
[function getControlPointAtIndex:2 values:(float *)&controlPoint2];
//create curve
UIBezierPath *path = [[UIBezierPath alloc] init];
[path moveToPoint:CGPointZero];
[path addCurveToPoint:CGPointMake(1, 1)
controlPoint1:controlPoint1
controlPoint2:controlPoint2];
//scale the path up to a reasonable size for display
[path applyTransform:CGAffineTransformMakeScale(200, 200)];
//create shape layer
CAShapeLayer *shapeLayer = [CAShapeLayer layer];
shapeLayer.strokeColor = [UIColor redColor].CGColor;
shapeLayer.fillColor = [UIColor clearColor].CGColor;
shapeLayer.lineWidth = 4.0f;
shapeLayer.path = path.CGPath;
[self.layerView.layer addSublayer:shapeLayer];
//flip geometry so that 0,0 is in the bottom-left
self.layerView.layer.geometryFlipped = YES;
}
@end

Figure 10.3 The standard CAMediaTimingFunction easing curves
For our custom clock hand easing function, we want a shallow curve initially, then a steep curve right up until the last second where it eases off. With a bit of experimentation, we end up with this:
[CAMediaTimingFunction functionWithControlPoints:1 :0 :0.75 :1];
If we drop this into our timing function graphing app, we get the curve shown in Figure 10.4. If we add this into the clock program, we have the nice tick effect we were looking for (see Listing 10.5).
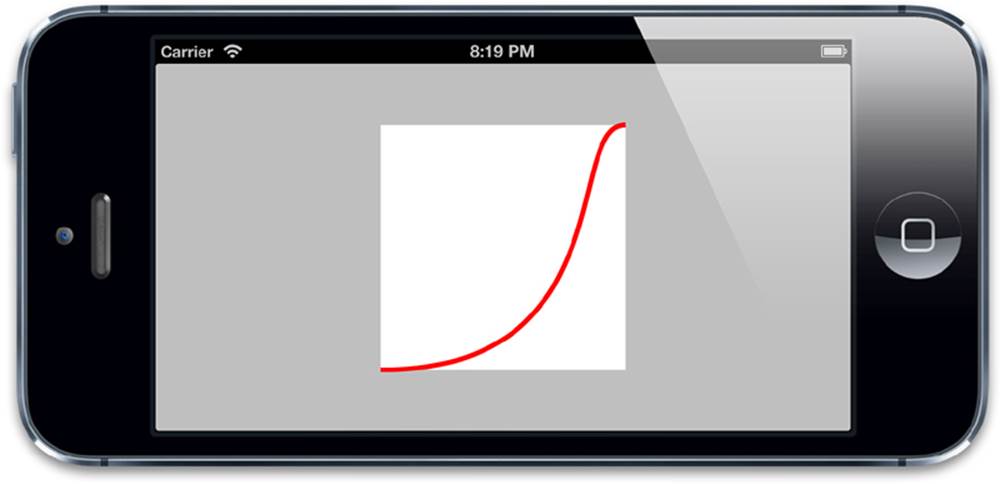
Figure 10.4 A custom easing function, suitable for a clock tick
Listing 10.5 The Clock Program with Custom Easing Function Added
- (void)setAngle:(CGFloat)angle
forHand:(UIView *)handView
animated:(BOOL)animated
{
//generate transform
CATransform3D transform = CATransform3DMakeRotation(angle, 0, 0, 1);
if (animated)
{
//create transform animation
CABasicAnimation *animation = [CABasicAnimation animation];
animation.keyPath = @"transform";
animation.fromValue =
[handView.layer.presentationLayer valueForKey:@"transform"];
animation.toValue = [NSValue valueWithCATransform3D:transform];
animation.duration = 0.5;
animation.delegate = self;
animation.timingFunction =
[CAMediaTimingFunction functionWithControlPoints:1 :0 :0.75 :1];
//apply animation
handView.layer.transform = transform;
[handView.layer addAnimation:animation forKey:nil];
}
else
{
//set transform directly
handView.layer.transform = transform;
}
}
More Complex Animation Curves
Consider a rubber ball dropped onto a hard surface: When dropped, it will accelerate until it hits the ground, bounce several times, and then eventually come to a stop. If we were to represent this with a graph, it would look something like Figure 10.5.
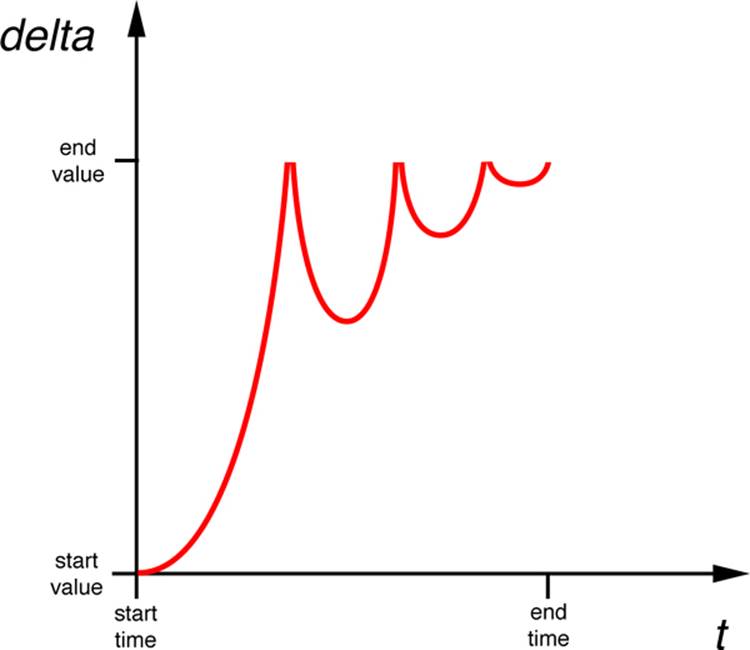
Figure 10.5 A bounce animation; not possible with a cubic Bézier curve
This sort of effect cannot be represented with a single cubic Bézier curve, and therefore cannot be achieved using CAMediaTimingFunction. If you want an effect like this, you have a couple of options:
![]() You can create the animation using a CAKeyframeAnimation, by splitting your animation into several steps, each with its own timing function (described in the next section).
You can create the animation using a CAKeyframeAnimation, by splitting your animation into several steps, each with its own timing function (described in the next section).
![]() You can implement the animation yourself using a timer to update each frame (as explored in Chapter 11, “Timer-Based Animation”).
You can implement the animation yourself using a timer to update each frame (as explored in Chapter 11, “Timer-Based Animation”).
Keyframe-Based Easing
To implement our bounce using keyframes, we need to create a keyframe for each significant point in the easing curve (in this case, the peak and trough of each bounce) and then apply an easing function that matches up with that segment of the graph. We also need to specify the time offset for each keyframe using the keyTimes property, as the time between bounces will decrease each time, so the keyframes will not be evenly spaced.
Listing 10.6 shows the code for implementing a bouncing ball animation using this approach (see Figure 10.6).
Listing 10.6 Implementing a Bouncing Ball Animation Using Keyframes
@interface ViewController ()
@property (nonatomic, weak) IBOutlet UIView *containerView;
@property (nonatomic, strong) UIImageView *ballView;
@end
@implementation ViewController
- (void)viewDidLoad
{
[super viewDidLoad];
//add ball image view
UIImage *ballImage = [UIImage imageNamed:@"Ball.png"];
self.ballView = [[UIImageView alloc] initWithImage:ballImage];
[self.containerView addSubview:self.ballView];
//animate
[self animate];
}
- (void)touchesBegan:(NSSet *)touches withEvent:(UIEvent *)event
{
//replay animation on tap
[self animate];
}
- (void)animate
{
//reset ball to top of screen
self.ballView.center = CGPointMake(150, 32);
//create keyframe animation
CAKeyframeAnimation *animation = [CAKeyframeAnimation animation];
animation.keyPath = @"position";
animation.duration = 1.0;
animation.delegate = self;
animation.values = @[
[NSValue valueWithCGPoint:CGPointMake(150, 32)],
[NSValue valueWithCGPoint:CGPointMake(150, 268)],
[NSValue valueWithCGPoint:CGPointMake(150, 140)],
[NSValue valueWithCGPoint:CGPointMake(150, 268)],
[NSValue valueWithCGPoint:CGPointMake(150, 220)],
[NSValue valueWithCGPoint:CGPointMake(150, 268)],
[NSValue valueWithCGPoint:CGPointMake(150, 250)],
[NSValue valueWithCGPoint:CGPointMake(150, 268)]
];
animation.timingFunctions = @[
[CAMediaTimingFunction functionWithName:
kCAMediaTimingFunctionEaseIn],
[CAMediaTimingFunction functionWithName:
kCAMediaTimingFunctionEaseOut],
[CAMediaTimingFunction functionWithName:
kCAMediaTimingFunctionEaseIn],
[CAMediaTimingFunction functionWithName:
kCAMediaTimingFunctionEaseOut],
[CAMediaTimingFunction functionWithName:
kCAMediaTimingFunctionEaseIn],
[CAMediaTimingFunction functionWithName:
kCAMediaTimingFunctionEaseOut],
[CAMediaTimingFunction functionWithName:
kCAMediaTimingFunctionEaseIn]
];
animation.keyTimes = @[@0.0, @0.3, @0.5, @0.7, @0.8, @0.9, @0.95, @1.0];
//apply animation
self.ballView.layer.position = CGPointMake(150, 268);
[self.ballView.layer addAnimation:animation forKey:nil];
}
@end
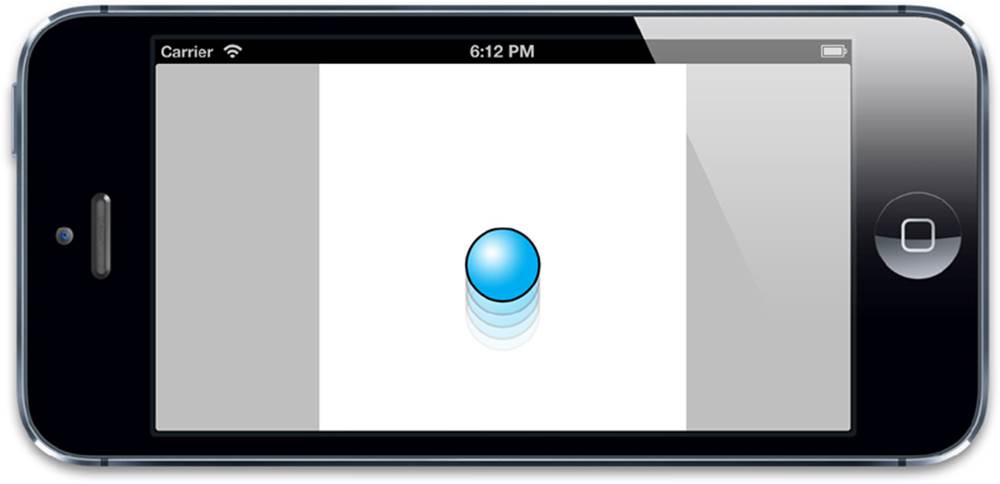
Figure 10.6 A bouncing ball animation implemented using keyframes
This approach works reasonably well, but it’s cumbersome (calculating the keyframes and keytimes is basically a matter of trial and error) and highly animation specific (if you change any properties of the animation, you need to recalculate all the keyframes). What would be really useful would be if we could write a method to convert any simple property animation into a keyframe animation with an arbitrary easing function. Let’s do that.
Automating the Process
In Listing 10.6, we split the animation into fairly large sections and used Core Animation’s ease-in and ease-out functions to approximate the curve we wanted. But if we split the animation into smaller parts, then we can approximate any sort of curve just by using straight lines (a.k.a linear easing). To automate this, we need to figure out how to do two things:
![]() Automatically split an arbitrary property animation into multiple keyframes
Automatically split an arbitrary property animation into multiple keyframes
![]() Represent our bounce animation as a mathematical function that we can use to offset our frames
Represent our bounce animation as a mathematical function that we can use to offset our frames
To solve the first problem, we need to replicate Core Animation’s interpolation mechanism. This is the algorithm for taking a start and end value and producing a new value at a specific point in time between those two. For simple floating-point start/end values, the formula for this (assuming that time is normalized to a value between 0 and 1) is as follows:
value = (endValue – startValue) × time + startValue;
To interpolate a more complex value type such as a CGPoint, CGColorRef, or CATransform3D, we can simply apply this function to each individual element (that is, the x and y values in a CGPoint, the red, green, blue, and alpha values in a CGColorRef, or the individual matrix coordinates in a CATransform3D). We also need some logic to unbox the values from an object type before interpolating, and rebox it afterward, which means inspecting the type at runtime.
Once we have the code to get an arbitrary intermediate value between the start and end values of our property animation, we can quite easily split our animation into as many individual keyframes as we like and produce a linear keyframe animation. Listing 10.7 shows the code to do this.
Note that we have used 60 × the animation duration (in seconds) as the number of keyframes. This is because Core Animation renders updates to the screen at 60 frames per second, so if we generate 60 keyframes per second, we guarantee that the animation is smooth (although in practice we could probably get away with using fewer frames and still get a good result).
We have only included the code to interpolate CGPoint values in the example. However, it should be clear from the code how this could be extended to handle other types. As a fallback for types we don’t recognize, we simply return the fromValue for the first half of the animation and the toValue for the second half.
Listing 10.7 Creating a Keyframe Animation by Interpolating Values
float interpolate(float from, float to, float time)
{
return (to - from) * time + from;
}
- (id)interpolateFromValue:(id)fromValue
toValue:(id)toValue
time:(float)time
{
if ([fromValue isKindOfClass:[NSValue class]])
{
//get type
const char *type = [fromValue objCType];
if (strcmp(type, @encode(CGPoint)) == 0)
{
CGPoint from = [fromValue CGPointValue];
CGPoint to = [toValue CGPointValue];
CGPoint result = CGPointMake(interpolate(from.x, to.x, time),
interpolate(from.y, to.y, time));
return [NSValue valueWithCGPoint:result];
}
}
//provide safe default implementation
return (time < 0.5)? fromValue: toValue;
}
- (void)animate
{
//reset ball to top of screen
self.ballView.center = CGPointMake(150, 32);
//set up animation parameters
NSValue *fromValue = [NSValue valueWithCGPoint:CGPointMake(150, 32)];
NSValue *toValue = [NSValue valueWithCGPoint:CGPointMake(150, 268)];
CFTimeInterval duration = 1.0;
//generate keyframes
NSInteger numFrames = duration * 60;
NSMutableArray *frames = [NSMutableArray array];
for (int i = 0; i < numFrames; i++)
{
float time = 1/(float)numFrames * i;
[frames addObject:[self interpolateFromValue:fromValue
toValue:toValue
time:time]];
}
//create keyframe animation
CAKeyframeAnimation *animation = [CAKeyframeAnimation animation];
animation.keyPath = @"position";
animation.duration = 1.0;
animation.delegate = self;
animation.values = frames;
//apply animation
[self.ballView.layer addAnimation:animation forKey:nil];
}
That works, but it’s not especially impressive. All we have really achieved so far is a very complicated way to replicate the behavior of a CABasicAnimation with linear easing. The advantage of this approach, however, is that we are now in a position to precisely control the easing, which means we can apply a completely bespoke easing function. So, how do we create one?
The math behind easing is nontrivial, but fortunately we don’t need to implement it from first principles. Robert Penner has a web page devoted to easing functions (http://www.robertpenner.com/easing) that contains links to public domain code samples for all common (and some less-common) easing functions in multiple programming languages, including C. Here is an example of an ease-in-ease-out function. (There are actually several different ways to implement ease-in-ease-out.)
float quadraticEaseInOut(float t)
{
return (t < 0.5)? (2 * t * t): (-2 * t * t) + (4 * t) - 1;
}
For our bouncing ball animation, we will be using the bounceEaseOut function:
float bounceEaseOut(float t)
{
if (t < 4/11.0)
{
return (121 * t * t)/16.0;
{
else if (t < 8/11.0)
{
return (363/40.0 * t * t) - (99/10.0 * t) + 17/5.0;
}
else if (t < 9/10.0)
{
return (4356/361.0 * t * t) - (35442/1805.0 * t) + 16061/1805.0;
}
return (54/5.0 * t * t) - (513/25.0 * t) + 268/25.0;
}
If we modify our code from Listing 10.7 to include the bounceEaseOut function, our task is complete: Just by swapping the easing function, we can now create an animation with any easing type we choose (see Listing 10.8).
Listing 10.8 Implementing a Custom Easing Function Using Keyframes
- (void)animate
{
//reset ball to top of screen
self.ballView.center = CGPointMake(150, 32);
//set up animation parameters
NSValue *fromValue = [NSValue valueWithCGPoint:CGPointMake(150, 32)];
NSValue *toValue = [NSValue valueWithCGPoint:CGPointMake(150, 268)];
CFTimeInterval duration = 1.0;
//generate keyframes
NSInteger numFrames = duration * 60;
NSMutableArray *frames = [NSMutableArray array];
for (int i = 0; i < numFrames; i++)
{
float time = 1/(float)numFrames * i;
//apply easing
time = bounceEaseOut(time);
//add keyframe
[frames addObject:[self interpolateFromValue:fromValue
toValue:toValue
time:time]];
}
//create keyframe animation
CAKeyframeAnimation *animation = [CAKeyframeAnimation animation];
animation.keyPath = @"position";
animation.duration = 1.0;
animation.delegate = self;
animation.values = frames;
//apply animation
[self.ballView.layer addAnimation:animation forKey:nil];
}
Summary
In this chapter, you learned about easing, and the CAMediaTimingFunction class, which allows us to create custom easing functions to fine-tune our animations. You also learned how to use CAKeyframeAnimation to bypass the limitations of CAMediaTimingFunction and create your own completely bespoke easing functions.
In the next chapter, we look at timer-based animation—an alternative approach to animation that gives us more control and makes it possible to manipulate animations on-the-fly.
All materials on the site are licensed Creative Commons Attribution-Sharealike 3.0 Unported CC BY-SA 3.0 & GNU Free Documentation License (GFDL)
If you are the copyright holder of any material contained on our site and intend to remove it, please contact our site administrator for approval.
© 2016-2026 All site design rights belong to S.Y.A.