iOS Core Animation: Advanced Techniques (2014)
Part III. The Performance of a Lifetime
Chapter 14. Image IO
The idea of latency is worth thinking about.
Kevin Patterson
In Chapter 13, “Efficient Drawing,” we looked at performance issues relating to Core Graphics drawing and how to fix them. Closely related to drawing performance is image performance. In this chapter, we investigate how to optimize the loading and display of images from the flash drive or over a network connection.
Loading and Latency
The time taken to actually draw an image is not usually the limiting factor when it comes to performance. Images consume a lot of memory, and it may be impractical to keep all the images that your app needs to display loaded in memory at once, meaning that you will need to periodically load and unload images while the app is running.
The speed at which an image file can be loaded is limited not only by the CPU but also by IO (Input/Output) latency. The flash storage in an iOS device is faster than a traditional hard disk, but still around 200 times slower than RAM, making it essential that you manage loading carefully to avoid noticeable delays.
Whenever possible, try to load images at inconspicuous times in your application’s lifecycle, such as at launch, or between screen transitions. The maximum comfortable delay between pressing a button and seeing a reaction onscreen is around 200ms—much more than the ~16ms between animation frames. You can get away with taking even more time to load your images when the app first starts up, but the iOS watchdog timer will terminate your app if it doesn’t start within 20 seconds (and users won’t be impressed if it takes more than 2 or 3).
In some cases, it simply isn’t practical to load everything in advance. Take something like an image carousel that may potentially contain thousands of images: The user will expect to be able to flick through the images quickly without any slowdown, but it would be impossible to preload all of the images; it would take too long and consume too much memory.
Images may also sometimes need to be retrieved from a remote network connection, which can take considerably more time than loading from the flash drive and may even fail altogether due to connection problems (after several seconds of trying). You cannot do network loading on the main thread and expect the user to wait for it with a frozen screen. You need to use a background thread.
Threaded Loading
In our contacts list example in Chapter 12, “Tuning for Speed,” the images were small enough to load in real time on the main thread as we scrolled. But for large images, this doesn’t work well because the loading takes too long and causes scrolling to stutter. Scrolling animations are updated on the main run loop, and are therefore more vulnerable to CPU-related performance issues than CAAnimation, which is run in the render server process.
Listing 14.1 shows the code for a basic image carousel, implemented using UICollectionView. The image loading is performed synchronously on the main thread in the -collectionView:cellForItemAtIndexPath: method (see Figure 14.1 for an example).
Listing 14.1 Implementing an Image Carousel Using UICollectionView
#import "ViewController.h"
@interface ViewController() <UICollectionViewDataSource>
@property (nonatomic, copy) NSArray *imagePaths;
@property (nonatomic, weak) IBOutlet UICollectionView *collectionView;
@end
@implementation ViewController
- (void)viewDidLoad
{
//set up data
self.imagePaths =
[[NSBundle mainBundle] pathsForResourcesOfType:@"png"
inDirectory:@"Vacation Photos"];
//register cell class
[self.collectionView registerClass:[UICollectionViewCell class]
forCellWithReuseIdentifier:@"Cell"];
}
- (NSInteger)collectionView:(UICollectionView *)collectionView
numberOfItemsInSection:(NSInteger)section
{
return [self.imagePaths count];
}
- (UICollectionViewCell *)collectionView:(UICollectionView *)collectionView
cellForItemAtIndexPath:(NSIndexPath *)indexPath
{
//dequeue cell
UICollectionViewCell *cell =
[collectionView dequeueReusableCellWithReuseIdentifier:@"Cell"
forIndexPath:indexPath];
//add image view
const NSInteger imageTag = 99;
UIImageView *imageView = (UIImageView *)[cell viewWithTag:imageTag];
if (!imageView)
{
imageView = [[UIImageView alloc] initWithFrame:
cell.contentView.bounds];
imageView.tag = imageTag;
[cell.contentView addSubview:imageView];
}
//set image
NSString *imagePath = self.imagePaths[indexPath.row];
imageView.image = [UIImage imageWithContentsOfFile:imagePath];
return cell;
}
@end
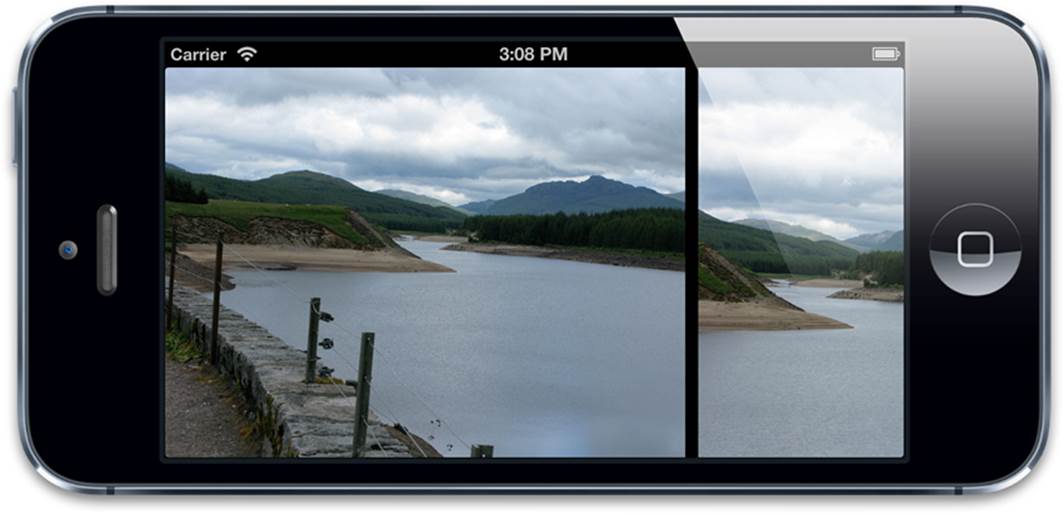
Figure 14.1 The image carousel in action
The images in the carousel are 800×600-pixel PNGs of around 700KB each—slightly too large for an iPhone 5 to load within one-sixtieth of a second. These images are loaded on-the-fly as the carousel scrolls, and (as expected) the scrolling stutters. The Time Profiler instrument (see Figure 14.2) reveals that a lot of time is being spent in the UIImage +imageWithContentsOfFile: method. Clearly, image loading is our bottleneck.
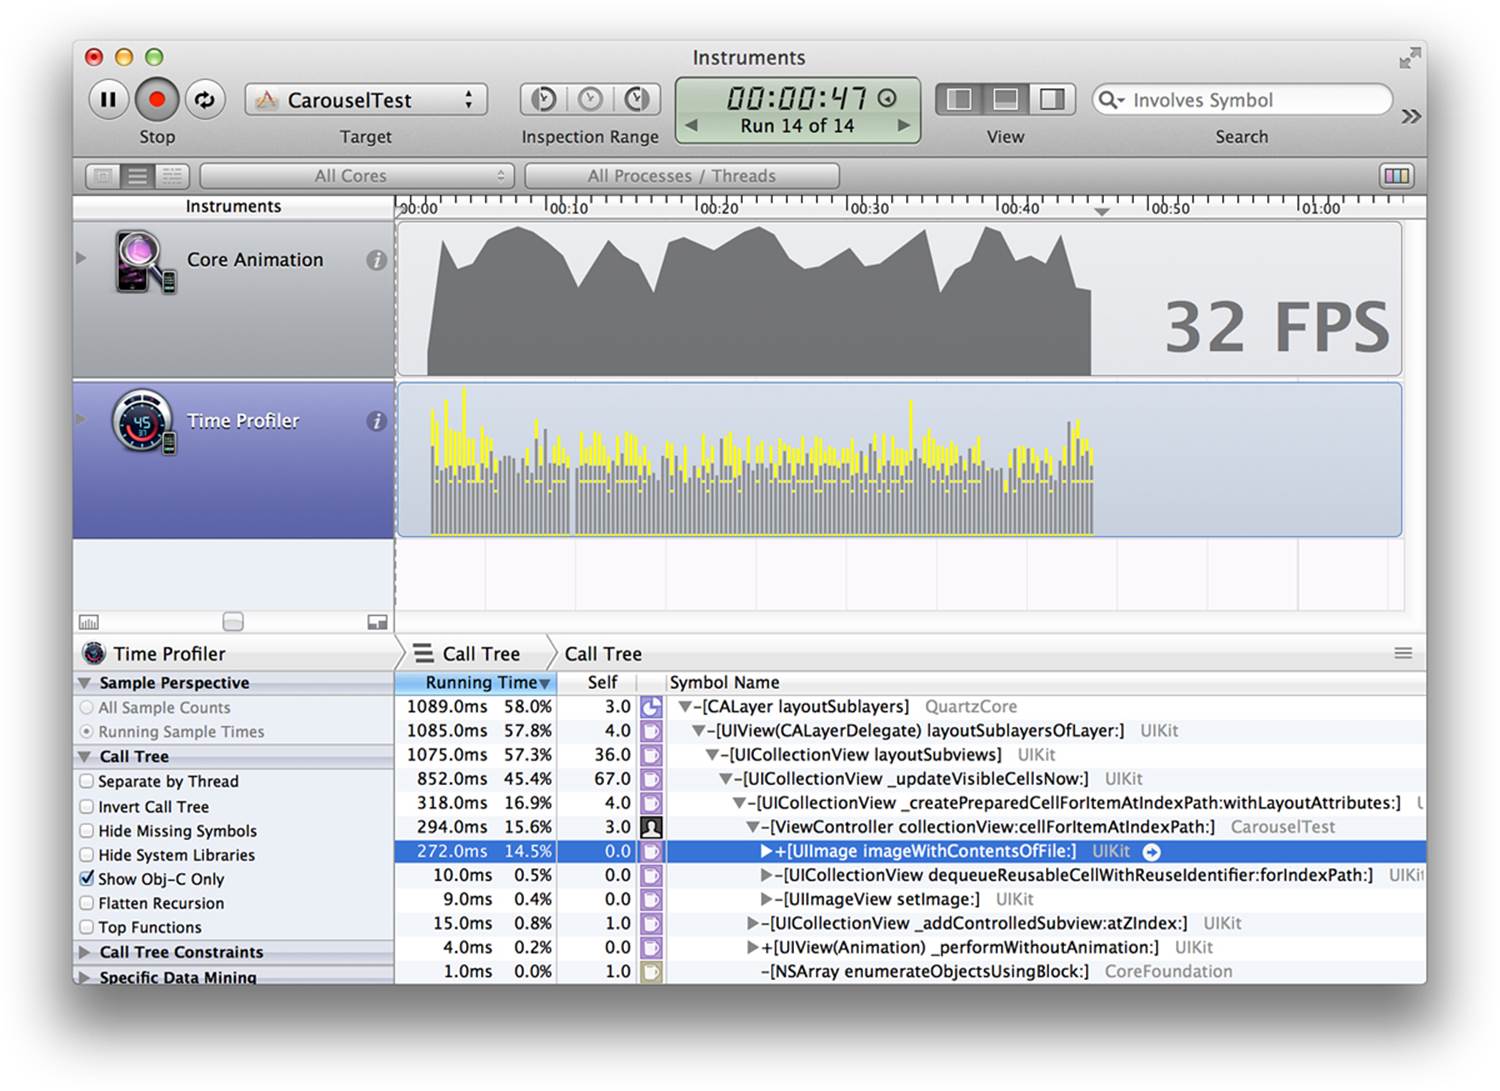
Figure 14.2 The Time Profiler instrument showing the CPU bottleneck
The only way to improve the performance here is to move the image loading onto another thread. This won’t help to reduce the actual loading time (it might even make it slightly worse, because the system will potentially be devoting a smaller slice of CPU time to processing the loaded image data), but it means that the main thread can continue doing other things, like responding to user input and animating the scroll.
To load the images on a background thread, we can either create our own threaded loading solution using CGD or NSOperationQueue, or we can use CATiledLayer. To load images from a remote network, we could use an asynchronous NSURLConnection, but that’s not a very efficient option for locally stored files.
GCD and NSOperationQueue
GCD (Grand Central Dispatch) and NSOperationQueue are similar in that they both allow us to queue blocks to be executed sequentially on a thread. NSOperationQueue has an Objective-C interface (as opposed to the global C functions used by GCD) and provides fine-grained control over operation prioritization and dependencies, but requires a bit more setup code.
Listing 14.2 shows an updated -collectionView:cellForItemAtIndexPath: method that uses GCD to load the images on a low priority background queue instead of on the main thread. We switch back to the main thread before we actually apply the newly loaded image to the cell because it’s unsafe to access views on a background thread.
Because cells are recycled in a UICollectionView, we can’t be sure that the cell hasn’t been reused with a different index in the meantime while we were loading the image. To avoid images being loaded into the wrong cells, we tag the cell with the index before loading and check that the tag hasn’t changed before we set the image.
Listing 14.2 Using GCD to Load the Carousel Images
- (UICollectionViewCell *)collectionView:(UICollectionView *)collectionView
cellForItemAtIndexPath:(NSIndexPath *)indexPath
{
//dequeue cell
UICollectionViewCell *cell =
[collectionView dequeueReusableCellWithReuseIdentifier:@"Cell"
forIndexPath:indexPath];
//add image view
const NSInteger imageTag = 99;
UIImageView *imageView = (UIImageView *)[cell viewWithTag:imageTag];
if (!imageView)
{
imageView = [[UIImageView alloc] initWithFrame:
cell.contentView.bounds];
imageView.tag = imageTag;
[cell.contentView addSubview:imageView];
}
//tag cell with index and clear current image
cell.tag = indexPath.row;
imageView.image = nil;
//switch to background thread
dispatch_async(
dispatch_get_global_queue(DISPATCH_QUEUE_PRIORITY_LOW, 0), ^{
//load image
NSInteger index = indexPath.row;
NSString *imagePath = self.imagePaths[index];
UIImage *image = [UIImage imageWithContentsOfFile:imagePath];
//set image on main thread, but only if index still matches up
dispatch_async(dispatch_get_main_queue(), ^{
if (index == cell.tag)
{
imageView.image = image;
}
});
});
return cell;
}
When we run this updated version, the performance is better than the original nonthreaded version, but still not perfect (see Figure 14.3).
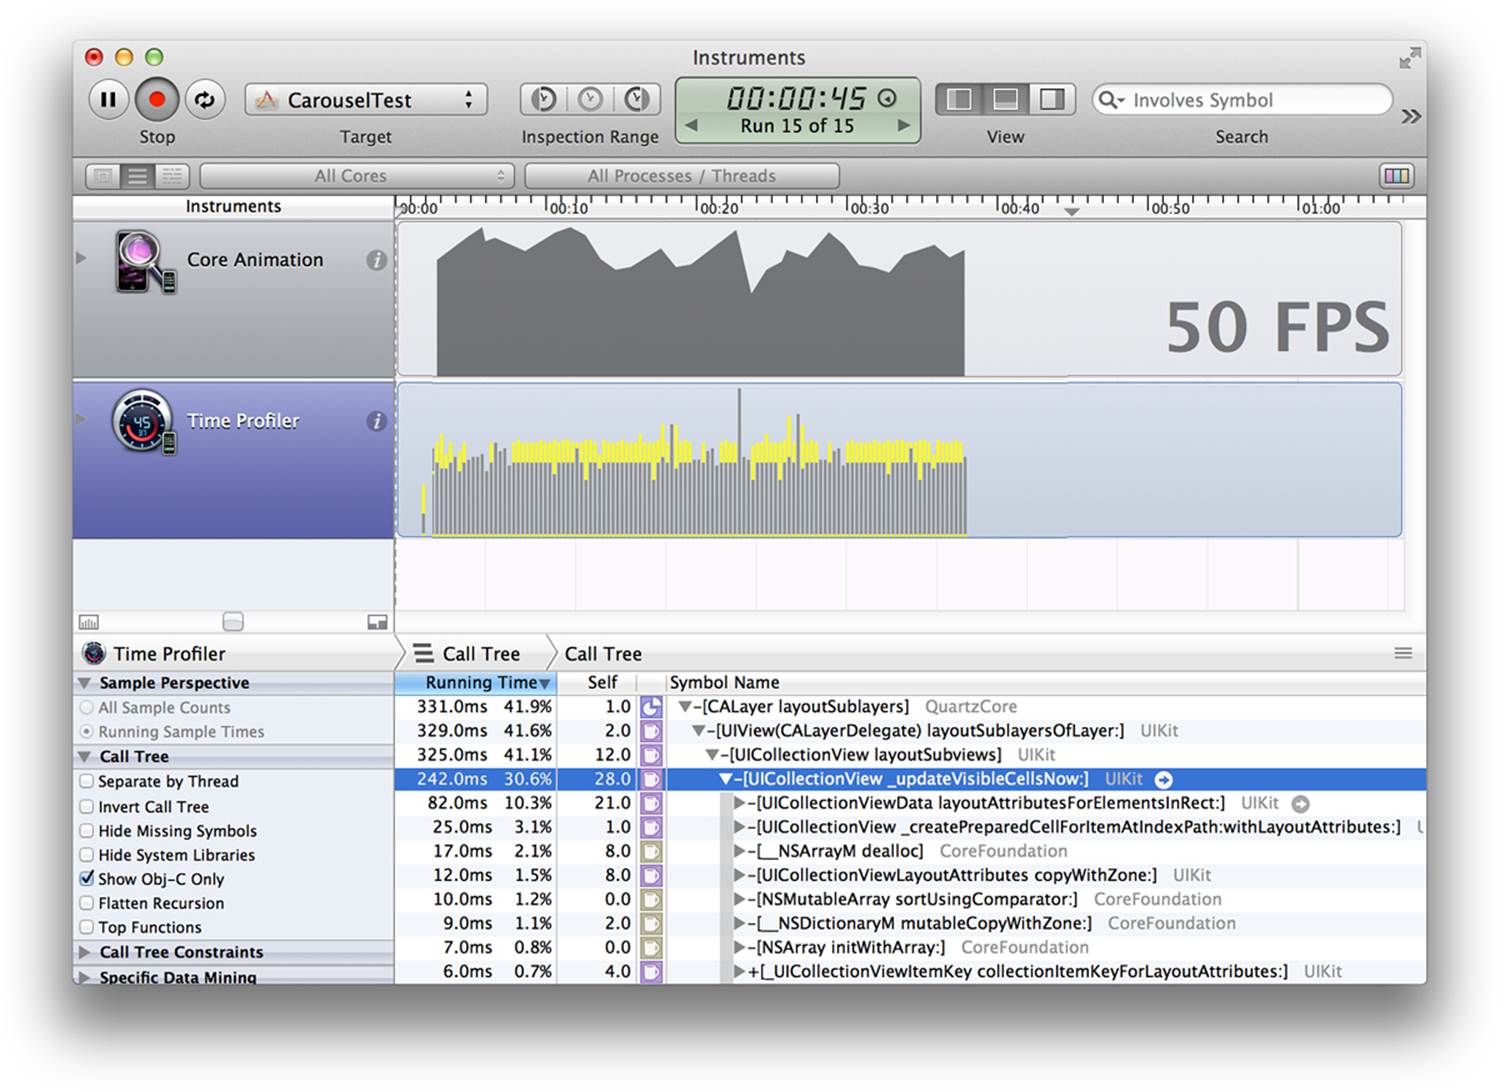
Figure 14.3 Improved performance when loading on a background thread
We can see that the +imageWithContentsOfFile: method no longer appears at the top of the CPU time trace, so we have fixed the loading delay. The problem is that we were assuming that the only performance bottleneck for our carousel was the actual loading of the image file, but that’s not the case. Loading the image file data into memory is only the first part of the problem.
Deferred Decompression
Once an image file has been loaded, it must then be decompressed. This decompression can be a computationally complex task and take considerable time. The decompressed image will also use substantially more memory than the original.
The relative CPU time spent loading versus decompressing will depend on the image format. For PNG images, loading takes longer than for JPEGs because the file is proportionally larger, but decompression is relatively fast, especially since Xcode recompresses any PNGs included in the project using optimal settings for fast decoding. JPEG images are smaller and load quicker, but the decompression step is more expensive because the JPEG decompression algorithm is more complex than the zip-based algorithm used in PNG.
When you load an image, iOS usually defers decompression until later to conserve memory. This can cause a performance hiccup when you actually try to draw the image, as it has to be decompressed at the point of drawing (which is often the worst possible time).
The simplest way to avoid deferred decompression is to load images using the UIImage +imageNamed: method. Unlike +imageWithContentsOfFile: (and all the other UIImage loading methods), this method decompresses the image immediately after loading (as well as having other benefits that we discuss later in the chapter). The problem is that +imageNamed: works only for images loaded from within the application resources bundle, so it’s not an option for user-generated content, or downloaded images.
Another way to decompress an image immediately is to assign it as the contents of a layer or as the image property of a UIImageView. Unfortunately, this has to be done on the main thread and so usually won’t help with performance problems.
A third approach is to bypass UIKit altogether and load the image using the ImageIO framework instead, as follows:
NSInteger index = indexPath.row;
NSURL *imageURL = [NSURL fileURLWithPath:self.imagePaths[index]];
NSDictionary *options = @{(__bridge id)kCGImageSourceShouldCache: @YES};
CGImageSourceRef source = CGImageSourceCreateWithURL(
(__bridge CFURLRef)imageURL, NULL);
CGImageRef imageRef = CGImageSourceCreateImageAtIndex(source, 0,
(__bridge CFDictionaryRef)options);
UIImage *image = [UIImage imageWithCGImage:imageRef];
CGImageRelease(imageRef);
CFRelease(source);
This allows you to make use of the kCGImageSourceShouldCache option when creating the image, which forces it to decompress immediately and retain the decompressed version for the lifetime of the image.
The final option is to load the image using UIKit as normal, but immediately draw it into a CGContext. An image must be decompressed before it is drawn, so this forces the decompression to happen immediately. The advantage of doing this is that the drawing can be done on a background thread (like the loading itself) so it need not block the UI.
There are two approaches you can take when pre-drawing an image for the purpose of forcing decompression:
![]() Draw a single pixel of the image into a single-pixel sized CGContext. This still decompresses the entire image, but the drawing itself takes essentially no time. The disadvantage is that the loaded image may not be optimized for drawing on the specific device and may take longer to draw in future as a result. It is also possible that iOS may discard the decompressed image again to conserve memory.
Draw a single pixel of the image into a single-pixel sized CGContext. This still decompresses the entire image, but the drawing itself takes essentially no time. The disadvantage is that the loaded image may not be optimized for drawing on the specific device and may take longer to draw in future as a result. It is also possible that iOS may discard the decompressed image again to conserve memory.
![]() Draw the entire image into a CGContext, discard the original, and replace it with a new image created from the context contents. This is more computationally expensive than drawing a single pixel, but the resultant image will be optimized for drawing on that specific iOS device, and since the original compressed image has been discarded, iOS can’t suddenly decide to throw away the decompressed version again to save memory.
Draw the entire image into a CGContext, discard the original, and replace it with a new image created from the context contents. This is more computationally expensive than drawing a single pixel, but the resultant image will be optimized for drawing on that specific iOS device, and since the original compressed image has been discarded, iOS can’t suddenly decide to throw away the decompressed version again to save memory.
It’s worth noting that Apple specifically recommends against using these kinds of tricks to bypass the standard image decompression logic (which is not surprising—they chose the default behavior for a reason), but if you are building apps that use a lot of large images, then you sometimes have to game the system if you want great performance.
Assuming that using +imageNamed: isn’t an option, drawing the entire image into a CGContext seems to work best. Although you might think that the extra drawing step would make this perform unfavorably compared with the other decompression techniques, the newly created image (which is optimized specifically for the particular device on which it was created) seems to draw faster on every subsequent use than if you keep the original.
Also, if you intend to display the image at a smaller-than-actual size, redrawing it at the correct size for display on a background thread once and for all will perform better than re-applying the scaling every time it’s displayed (although in this example, our loaded images are the correct size anyway, so that particular benefit doesn’t apply here).
If you modify the -collectionView:cellForItemAtIndexPath: method to redraw the image prior to display (see Listing 14.3), you should find that the scrolling is now perfectly smooth.
Listing 14.3 Forcing Image Decompression Prior to Display
- (UICollectionViewCell *)collectionView:(UICollectionView *)collectionView
cellForItemAtIndexPath:(NSIndexPath *)indexPath
{
//dequeue cell
UICollectionViewCell *cell =
[collectionView dequeueReusableCellWithReuseIdentifier:@"Cell"
forIndexPath:indexPath];
...
//switch to background thread
dispatch_async(
dispatch_get_global_queue(DISPATCH_QUEUE_PRIORITY_LOW, 0), ^{
//load image
NSInteger index = indexPath.row;
NSString *imagePath = self.imagePaths[index];
UIImage *image = [UIImage imageWithContentsOfFile:imagePath];
//redraw image using device context
UIGraphicsBeginImageContextWithOptions(imageView.bounds.size, YES, 0);
[image drawInRect:imageView.bounds];
image = UIGraphicsGetImageFromCurrentImageContext();
UIGraphicsEndImageContext();
//set image on main thread, but only if index still matches up
dispatch_async(dispatch_get_main_queue(), ^{
if (index == imageView.tag)
{
imageView.image = image;
}
});
});
return cell;
}
CATiledLayer
As demonstrated in Chapter 6, “Specialized Layers,” CATiledLayer can be used to load and display very large images asynchronously without blocking user interaction. But we can also use CATiledLayer to load our carousel images by creating a separate CATiledLayer instance for every cell in the UICollectionView, with just a single tile for each.
There are potentially a couple of disadvantages to using CATiledLayer in this way:
![]() The CATiledLayer algorithm for queuing and caching is not exposed, so we have to hope that it’s tuned appropriately for our purposes.
The CATiledLayer algorithm for queuing and caching is not exposed, so we have to hope that it’s tuned appropriately for our purposes.
![]() CATiledLayer always requires us to redraw our image into a CGContext, even if it is already the same size as our tile and has already been decompressed (and could therefore be used directly as the layer contents, without redrawing).
CATiledLayer always requires us to redraw our image into a CGContext, even if it is already the same size as our tile and has already been decompressed (and could therefore be used directly as the layer contents, without redrawing).
Let’s find out if those potential disadvantages make a difference in practice: Listing 14.4 shows a reimplementation of our image carousel using CATiledLayer.
Listing 14.4 The Image Carousel Updated to Use CATiledLayer for Loading
#import "ViewController.h"
#import <QuartzCore/QuartzCore.h>
@interface ViewController() <UICollectionViewDataSource>
@property (nonatomic, copy) NSArray *imagePaths;
@property (nonatomic, weak) IBOutlet UICollectionView *collectionView;
@end
@implementation ViewController
- (void)viewDidLoad
{
//set up data
self.imagePaths =
[[NSBundle mainBundle] pathsForResourcesOfType:@"jpg"
inDirectory:@"Vacation Photos"];
//register cell class
[self.collectionView registerClass:[UICollectionViewCell class]
forCellWithReuseIdentifier:@"Cell"];
}
- (NSInteger)collectionView:(UICollectionView *)collectionView
numberOfItemsInSection:(NSInteger)section
{
return [self.imagePaths count];
}
- (UICollectionViewCell *)collectionView:(UICollectionView *)collectionView
cellForItemAtIndexPath:(NSIndexPath *)indexPath
{
//dequeue cell
UICollectionViewCell *cell =
[collectionView dequeueReusableCellWithReuseIdentifier:@"Cell"
forIndexPath:indexPath];
//add the tiled layer
CATiledLayer *tileLayer = [cell.contentView.layer.sublayers lastObject];
if (!tileLayer)
{
tileLayer = [CATiledLayer layer];
tileLayer.frame = cell.bounds;
tileLayer.contentsScale = [UIScreen mainScreen].scale;
tileLayer.tileSize = CGSizeMake(
cell.bounds.size.width * [UIScreen mainScreen].scale,
cell.bounds.size.height * [UIScreen mainScreen].scale);
tileLayer.delegate = self;
[tileLayer setValue:@(indexPath.row) forKey:@"index"];
[cell.contentView.layer addSublayer:tileLayer];
}
//tag the layer with the correct index and reload
tileLayer.contents = nil;
[tileLayer setValue:@(indexPath.row) forKey:@"index"];
[tileLayer setNeedsDisplay];
return cell;
}
- (void)drawLayer:(CATiledLayer *)layer inContext:(CGContextRef)ctx
{
//get image index
NSInteger index = [[layer valueForKey:@"index"] integerValue];
//load tile image
NSString *imagePath = self.imagePaths[index];
UIImage *tileImage = [UIImage imageWithContentsOfFile:imagePath];
//calculate image rect
CGFloat aspectRatio = tileImage.size.height / tileImage.size.width;
CGRect imageRect = CGRectZero;
imageRect.size.width = layer.bounds.size.width;
imageRect.size.height = layer.bounds.size.height * aspectRatio;
imageRect.origin.y = (layer.bounds.size.height - imageRect.size.height)/2;
//draw tile
UIGraphicsPushContext(ctx);
[tileImage drawInRect:imageRect];
UIGraphicsPopContext();
}
@end
We’ve used some tricks here that are worth explaining:
![]() The tileSize property of CATiledLayer is measured in pixels, not points, so to ensure that the tile exactly matches the size of the cell, we’ve multiplied the size by the screen scale.
The tileSize property of CATiledLayer is measured in pixels, not points, so to ensure that the tile exactly matches the size of the cell, we’ve multiplied the size by the screen scale.
![]() In the -drawLayer:inContext: method, we need to know which indexPath the layer relates to so that we can load the correct image. We’ve taken advantage of the feature of CALayer that allows us to store and retrieve arbitrary values using KVC, and tagged each layer with the correct image index.
In the -drawLayer:inContext: method, we need to know which indexPath the layer relates to so that we can load the correct image. We’ve taken advantage of the feature of CALayer that allows us to store and retrieve arbitrary values using KVC, and tagged each layer with the correct image index.
Despite our concerns, it turns out that CATiledLayer works very well in this case; the performance problems are gone, and the amount of code needed is comparable to the GCD approach. The only slight issue is that there is a notable fade-in as each image appears onscreen after loading (see Figure 14.4).
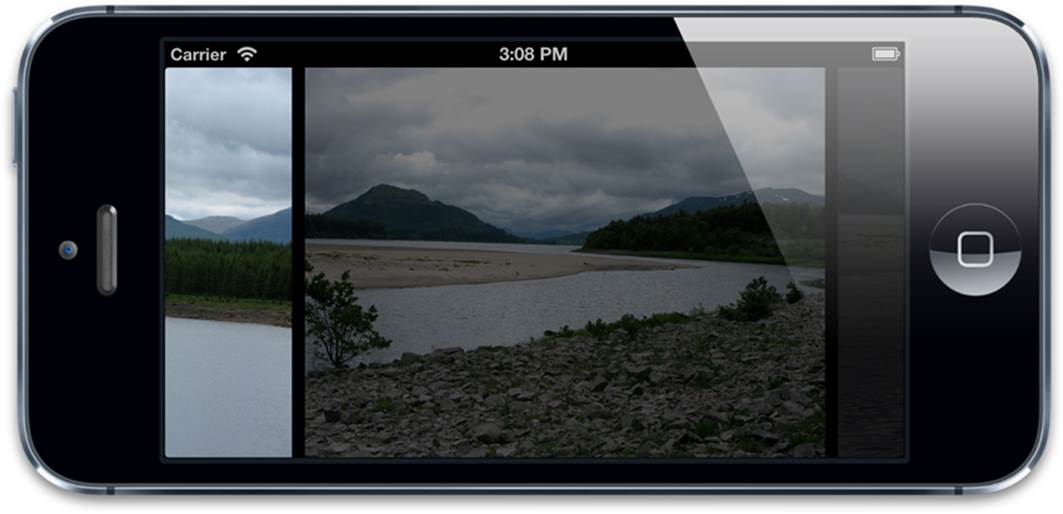
Figure 14.4 The images fading in as they are loaded
We can adjust the speed of the fade-in using the CATiledLayer fadeDuration property, or even remove the fade altogether, but it doesn’t address the real issue: There will always be a delay between when the image begins loading and when it is ready to draw, and that will result inpop-in of new images as we scroll. This problem isn’t specific to CATiledLayer; it also affects our GCD-based version.
Even with all the image loading and caching techniques we’ve discussed, you will sometimes find that an image is simply too large to load and display in real time. As mentioned in Chapter 13, a full-screen Retina-quality image on an iPad has a resolution of 2048×1536 and consumes 12MB of RAM (uncompressed). The third-generation iPad’s hardware simply is not capable of loading, decompressing, and displaying such an image within one-sixtieth of a second. Even if we load on a background thread to avoid animation stutter, we will still see gaps in our carousel.
We could display a placeholder image in the gap while the real image loads, but that’s really just plastering over the problem. We can do better than that.
Resolution Swapping
Retina resolution (according to Apple’s marketing) represents the smallest pixel size that the human eye is capable of distinguishing at a normal viewing distance. But that only applies to static pixels. When you observe a moving image, your eye is much less sensitive to detail, and a lower-resolution image is indistinguishable from Retina quality.
If we need to load and display very large moving images quickly, the simple solution is to cheat, and display smaller (or rather, lower resolution) images while the carousel is moving, and then swap in the full-res images when it comes to a stop. This means that we need to store two copies of each of our images at different resolutions, but fortunately that’s common practice anyway as we still need to support both Retina and non-Retina devices.
If you are loading the image from a remote source, or the user’s photo library, and don’t already have a lower resolution version readily available, you can generate it dynamically by drawing the larger image into a smaller CGContext and then saving the resultant smaller image somewhere for later use.
To schedule the image swap, we can take advantage of a couple of delegate methods called by UIScrollView (as well as other scrollview-based controls such as UITableView and UICollectionView) as part of its UIScrollViewDelegate protocol:
- (void)scrollViewDidEndDragging:(UIScrollView *)scrollView
willDecelerate:(BOOL)decelerate;
- (void)scrollViewDidEndDecelerating:(UIScrollView *)scrollView;
You can use these methods to detect when the carousel has come to rest, and defer loading the high-resolution versions of your images until that point. You’ll find that the changeover is pretty much imperceptible as long as the low-res and high-res versions of the image match up perfectly in terms of color balance. (Be sure to generate them both on the same machine, using the same graphics application or script, so that they do.)
Caching
When you have a large number of images to display, it isn’t practical to load them all in advance, but that doesn’t mean that after you’ve gone to the trouble of loading them, you should just throw them away as soon as they move offscreen. By selectively caching the images after loading, you can avoid repeating the pop-in as users scroll back and forth across images that they’ve already seen.
Caching is simple in principle: You just store the result of an expensive computation (or a file that you’ve loaded from the flash drive or network) in memory so that when you need it again, it’s quicker to access. The problem is that caching is essentially a tradeoff—you gain performance in return for consuming memory, but because memory is a limited resource, you can’t just cache everything indefinitely.
Deciding when and what to cache (and for how long) is not always straightforward. Fortunately, most of the time, iOS takes care of image caching for us:
The +imageNamed: Method
We mentioned earlier that loading images using [UIImage imageNamed:] has the advantage that it decompresses the image immediately instead of deferring until it’s drawn. But the +imageNamed: method has another significant benefit: It automatically caches the decompressed image in memory for future reuse, even if you don’t retain any references to it yourself.
For the majority of images that you’ll use in a typical iOS app (such as icons, buttons, and background images), loading the image using the +imageNamed: method is both the simplest and most performant approach. Images that you include in a nib file are loaded using the same mechanism, so often you’ll use it implicitly without even realizing.
The +imageNamed: method isn’t a magic bullet, though. It’s optimized for user interface furniture and isn’t appropriate for every type of image that an application might need to display. Here are a few reasons why it may be a good idea to implement your own image caching mechanism:
![]() The +imageNamed: method only works for images that are stored in the application bundle resources directory. In reality, most apps that display a lot of large images will need to load them from the Internet, or from the user’s camera roll, so +imageNamed: won’t work.
The +imageNamed: method only works for images that are stored in the application bundle resources directory. In reality, most apps that display a lot of large images will need to load them from the Internet, or from the user’s camera roll, so +imageNamed: won’t work.
![]() The +imageNamed: cache is used to store all of your application interface images (buttons, backgrounds, and so on). If you fill the cache with large images like photographs, you increase the chances that iOS will remove those interface images to make room, which may lead to worse performance as you navigate around the app, as those images will then have to be reloaded. By using a separate cache for your carousel images, you can decouple their lifespan from the rest of your app images.
The +imageNamed: cache is used to store all of your application interface images (buttons, backgrounds, and so on). If you fill the cache with large images like photographs, you increase the chances that iOS will remove those interface images to make room, which may lead to worse performance as you navigate around the app, as those images will then have to be reloaded. By using a separate cache for your carousel images, you can decouple their lifespan from the rest of your app images.
![]() The +imageNamed: caching mechanism is not public, so you have no fine-grained control. For example, you cannot test to see whether an image has already been cached before loading it, you cannot control the cache size, and you cannot remove objects from the cache when they are no longer needed.
The +imageNamed: caching mechanism is not public, so you have no fine-grained control. For example, you cannot test to see whether an image has already been cached before loading it, you cannot control the cache size, and you cannot remove objects from the cache when they are no longer needed.
Custom Caching
Building a bespoke caching system is nontrivial. Phil Karlton once said, “There are only two hard problems in computer science: cache invalidation and naming things.”
If we do decide to write our own image cache, how should we go about it? Let’s look at the challenges involved:
![]() Choosing a suitable cache key—The cache key is used to uniquely identify an image in the cache. If you are creating images at runtime, it’s not always obvious how to generate a string that will distinguish one cached image from another. In the case of our image carousel, though, it’s pretty straightforward because we can use either the image filename or the cell index.
Choosing a suitable cache key—The cache key is used to uniquely identify an image in the cache. If you are creating images at runtime, it’s not always obvious how to generate a string that will distinguish one cached image from another. In the case of our image carousel, though, it’s pretty straightforward because we can use either the image filename or the cell index.
![]() Speculative caching—If the effort of generating or loading data is high, you may want to load and cache it before it is needed the first time. Speculative preloading logic is inherently application specific, but in the case of our carousel, it is relatively simple to implement, because for a given position and scroll direction, we can determine exactly which images will be coming up next.
Speculative caching—If the effort of generating or loading data is high, you may want to load and cache it before it is needed the first time. Speculative preloading logic is inherently application specific, but in the case of our carousel, it is relatively simple to implement, because for a given position and scroll direction, we can determine exactly which images will be coming up next.
![]() Cache invalidation—If an image file changes, how do we know that our cached version needs to be updated? This is an extremely hard problem (as Phil Karlton quipped), but fortunately it’s not something we have to worry about when loading static images from our application resources. For user-supplied images (which may be modified or overwritten unexpectedly), a good solution is often to store a timestamp for when the image was cached and compare it with the modified date of the file.
Cache invalidation—If an image file changes, how do we know that our cached version needs to be updated? This is an extremely hard problem (as Phil Karlton quipped), but fortunately it’s not something we have to worry about when loading static images from our application resources. For user-supplied images (which may be modified or overwritten unexpectedly), a good solution is often to store a timestamp for when the image was cached and compare it with the modified date of the file.
![]() Cache reclamation—When you run out of cache space (memory), how do you decide what to throw away first? This may require you to write speculative algorithms to determine the relative likelihood of cached items to be reused. Thankfully, for the cache reclamation problem, Apple provides a handy general-purpose solution called NSCache.
Cache reclamation—When you run out of cache space (memory), how do you decide what to throw away first? This may require you to write speculative algorithms to determine the relative likelihood of cached items to be reused. Thankfully, for the cache reclamation problem, Apple provides a handy general-purpose solution called NSCache.
NSCache
NSCache behaves a lot like an NSDictionary. You can insert and retrieve objects from the cache by key using the -setObject:forKey: and -object:forKey: methods, respectively. The difference is that unlike a dictionary, NSCache automatically discards stored objects when the system is low on memory.
The algorithm that NSCache uses to determine when to discard objects is not documented, but you can provide hints for how you would like it to behave using the -setCountLimit: method to set the total cache size and -setObject:forKey:cost: to specify a “cost” value for each stored object.
The cost is a numeric value that you can assign to an object to indicate the relative effort of recreating it. If you assign a large cost for large images, the cache knows that these are more expensive objects to store and that discarding a “costly” object will potentially have a greater performance impact than a “cheap” one. You can specify the total cache size in terms of cost instead of item count by using -setTotalCostLimit:.
NSCache is a general-purpose caching solution, and we could probably create a custom caching class that is better optimized for our specific carousel if we had to. (For example, we could determine which images to release first based on the difference between the cached image index and the currently centered index.) But NSCache should be sufficient for our current caching requirements; we don’t want to indulge in premature optimization.
Let’s extend our carousel example with an image cache and a basic speculative preloading implementation and see if that improves the pop-in effect for new images (see Listing 14.5).
Listing 14.5 Adding Caching and Speculative Loading
#import "ViewController.h"
@interface ViewController() <UICollectionViewDataSource>
@property (nonatomic, copy) NSArray *imagePaths;
@property (nonatomic, weak) IBOutlet UICollectionView *collectionView;
@end
@implementation ViewController
- (void)viewDidLoad
{
//set up data
self.imagePaths =
[[NSBundle mainBundle] pathsForResourcesOfType:@"png"
inDirectory:@"Vacation Photos"];
//register cell class
[self.collectionView registerClass:[UICollectionViewCell class]
forCellWithReuseIdentifier:@"Cell"];
}
- (NSInteger)collectionView:(UICollectionView *)collectionView
numberOfItemsInSection:(NSInteger)section
{
return [self.imagePaths count];
}
- (UIImage *)loadImageAtIndex:(NSUInteger)index
{
//set up cache
static NSCache *cache = nil;
if (!cache)
{
cache = [[NSCache alloc] init];
}
//if already cached, return immediately
UIImage *image = [cache objectForKey:@(index)];
if (image)
{
return [image isKindOfClass:[NSNull class]]? nil: image;
}
//set placeholder to avoid reloading image multiple times
[cache setObject:[NSNull null] forKey:@(index)];
//switch to background thread
dispatch_async(
dispatch_get_global_queue(DISPATCH_QUEUE_PRIORITY_LOW, 0), ^{
//load image
NSString *imagePath = self.imagePaths[index];
UIImage *image = [UIImage imageWithContentsOfFile:imagePath];
//redraw image using device context
UIGraphicsBeginImageContextWithOptions(image.size, YES, 0);
[image drawAtPoint:CGPointZero];
image = UIGraphicsGetImageFromCurrentImageContext();
UIGraphicsEndImageContext();
//set image for correct image view
dispatch_async(dispatch_get_main_queue(), ^{
//cache the image
[cache setObject:image forKey:@(index)];
//display the image
NSIndexPath *indexPath = [NSIndexPath indexPathForItem:
index inSection:0];
UICollectionViewCell *cell =
[self.collectionView cellForItemAtIndexPath:indexPath];
UIImageView *imageView = [cell.contentView.subviews lastObject];
imageView.image = image;
});
});
//not loaded yet
return nil;
}
- (UICollectionViewCell *)collectionView:(UICollectionView *)collectionView
cellForItemAtIndexPath:(NSIndexPath *)indexPath
{
//dequeue cell
UICollectionViewCell *cell =
[collectionView dequeueReusableCellWithReuseIdentifier:@"Cell"
forIndexPath:indexPath];
//add image view
UIImageView *imageView = [cell.contentView.subviews lastObject];
if (!imageView)
{
imageView = [[UIImageView alloc] initWithFrame:
cell.contentView.bounds];
imageView.contentMode = UIViewContentModeScaleAspectFit;
[cell.contentView addSubview:imageView];
}
//set or load image for this index
imageView.image = [self loadImageAtIndex:indexPath.item];
//preload image for previous and next index
if (indexPath.item < [self.imagePaths count] - 1)
{
[self loadImageAtIndex:indexPath.item + 1];
}
if (indexPath.item > 0)
{
[self loadImageAtIndex:indexPath.item - 1];
}
return cell;
}
@end
Much better! There is still some pop-in if we scroll very quickly, but for normal scrolling it’s now pretty rare, and the caching means that we’re doing less loading anyway. Our preloading logic is very crude at the moment, and could be improved by taking into account the scroll speed and direction of the carousel, but it’s already substantially better than our uncached version.
File Format
Image loading performance depends crucially on a tradeoff between the time taken to load a larger image file format and the time taken to decompress a smaller one. A lot of Apple documentation still states that PNG is the preferred format for all images on iOS, but this is outdated information and grossly misleading.
The lossless compression algorithm used by PNG images allows slightly faster decompression than the more complex lossy algorithm used for JPEG images, but this difference is usually dwarfed by the difference in loading time due to (relatively slow) flash storage access latency.
Listing 14.6 contains the code for a simple benchmarking app that loads images at various sizes and displays the time taken. To ensure a fair test, we measure the combined loading and drawing time of each image to ensure that the decompression performance of the resultant image is also taken into account. We also load and draw each image repeatedly for a duration of at least one second so that we can take the average loading time for a more accurate reading.
Listing 14.6 A Simple Image Loading Performance Benchmarking App
#import "ViewController.h"
static NSString *const ImageFolder = @"Coast Photos";
@interface ViewController () <UITableViewDataSource>
@property (nonatomic, copy) NSArray *items;
@property (nonatomic, weak) IBOutlet UITableView *tableView;
@end
@implementation ViewController
- (void)viewDidLoad
{
[super viewDidLoad];
//set up image names
self.items = @[@"2048x1536", @"1024x768", @"512x384",
@"256x192", @"128x96", @"64x48", @"32x24"];
}
- (CFTimeInterval)loadImageForOneSec:(NSString *)path
{
//create drawing context to use for decompression
UIGraphicsBeginImageContext(CGSizeMake(1, 1));
//start timing
NSInteger imagesLoaded = 0;
CFTimeInterval endTime = 0;
CFTimeInterval startTime = CFAbsoluteTimeGetCurrent();
while (endTime - startTime < 1)
{
//load image
UIImage *image = [UIImage imageWithContentsOfFile:path];
//decompress image by drawing it
[image drawAtPoint:CGPointZero];
//update totals
imagesLoaded ++;
endTime = CFAbsoluteTimeGetCurrent();
}
//close context
UIGraphicsEndImageContext();
//calculate time per image
return (endTime - startTime) / imagesLoaded;
}
- (void)loadImageAtIndex:(NSUInteger)index
{
//load on background thread so as not to
//prevent the UI from updating between runs
dispatch_async(
dispatch_get_global_queue(DISPATCH_QUEUE_PRIORITY_HIGH, 0), ^{
//setup
NSString *fileName = self.items[index];
NSString *pngPath = [[NSBundle mainBundle] pathForResource:filename
ofType:@"png" inDirectory:ImageFolder];
NSString *jpgPath = [[NSBundle mainBundle] pathForResource:filename
ofType:@"jpg" inDirectory:ImageFolder];
//load
NSInteger pngTime = [self loadImageForOneSec:pngPath] * 1000;
NSInteger jpgTime = [self loadImageForOneSec:jpgPath] * 1000;
//updated UI on main thread
dispatch_async(dispatch_get_main_queue(), ^{
//find table cell and update
NSIndexPath *indexPath =
[NSIndexPath indexPathForRow:index inSection:0];
UITableViewCell *cell =
[self.tableView cellForRowAtIndexPath:indexPath];
cell.detailTextLabel.text =
[NSString stringWithFormat:@"PNG: %03ims JPG: %03ims",
pngTime, jpgTime];
});
});
}
- (NSInteger)tableView:(UITableView *)tableView
numberOfRowsInSection:(NSInteger)section
{
return [self.items count];
}
- (UITableViewCell *)tableView:(UITableView *)tableView
cellForRowAtIndexPath:(NSIndexPath *)indexPath
{
//dequeue cell
UITableViewCell *cell =
[self.tableView dequeueReusableCellWithIdentifier:@"Cell"];
if (!cell)
{
cell = [[UITableViewCell alloc] initWithStyle:
UITableViewCellStyleValue1 reuseIdentifier:@"Cell"];
}
//set up cell
NSString *imageName = self.items[indexPath.row];
cell.textLabel.text = imageName;
cell.detailTextLabel.text = @"Loading...";
//load image
[self loadImageAtIndex:indexPath.row];
return cell;
}
@end
The PNG and JPEG compression algorithms are tuned for different image types: JPEG works well for noisy, imprecise images like photographs; and PNG is better suited to flat areas of color, sharp lines, or exact gradients. To make the benchmark fairer, we’ll run it with a couple of different images: a photograph and a rainbow color gradient. The JPEG versions of each image were encoded using the default Photoshop “high-quality” setting of 60%. Figure 14.5 shows the results.
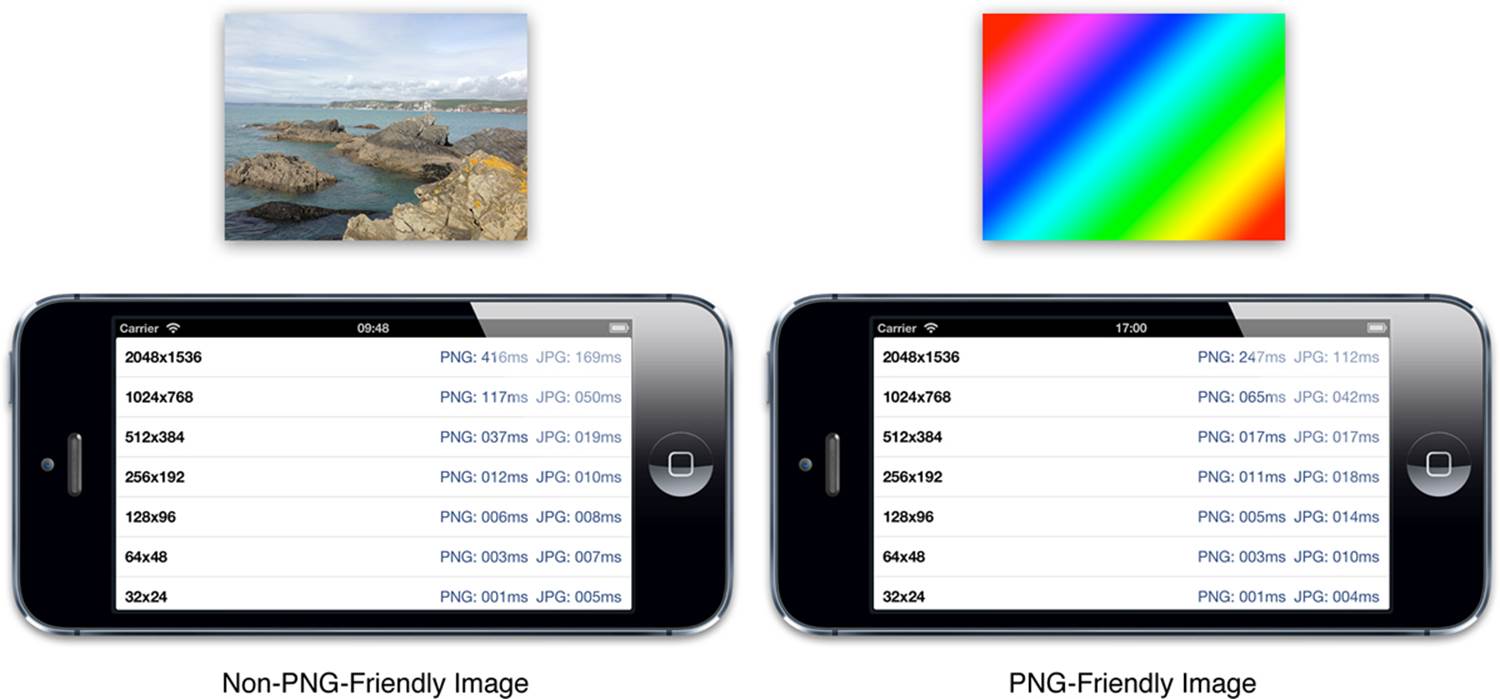
Figure 14.5 Relative loading performance for different types of images
As the benchmark demonstrates, for PNG-unfriendly images, JPEGs are consistently faster to load than PNGs of the same dimensions, unless the images are very small. For PNG-friendly images, they are still better for medium-to-large images.
In light of this, JPEG would have been a better choice for our image carousel app. If we had used JPEG rather than PNG, some of the threaded loading and caching tricks may not have been necessary at all.
Unfortunately, it’s not always possible to use JPEG images. If the image requires transparency or has fine details that compress poorly using the JPEG algorithm, you have no choice but to use a different format. Apple has specifically optimized the PNG and JPEG loading code paths for iOS, so these are generally the preferred formats. That said, there are some other options are available that can be useful in certain circumstances.
Hybrid Images
For images containing alpha transparency, it’s possible to get the best of both worlds by using a PNG to compress the alpha channel and a JPEG to compress the RGB part of the image and then combine them after loading. This plays to the strengths of each format, and results in an image with close-to-PNG quality and close-to-JPEG file size and loading performance. Listing 14.7 shows the code to load a separate color and mask image and then combine them at runtime.
Listing 14.7 Creating a Hybrid Image from a PNG Mask and a JPEG
#import "ViewController.h"
@interface ViewController ()
@property (nonatomic, weak) IBOutlet UIImageView *imageView;
@end
@implementation ViewController
- (void)viewDidLoad
{
[super viewDidLoad];
//load color image
UIImage *image = [UIImage imageNamed:@"Snowman.jpg"];
//load mask image
UIImage *mask = [UIImage imageNamed:@"SnowmanMask.png"];
//convert mask to correct format
CGColorSpaceRef graySpace = CGColorSpaceCreateDeviceGray();
CGImageRef maskRef =
CGImageCreateCopyWithColorSpace(mask.CGImage, graySpace);
CGColorSpaceRelease(graySpace);
//combine images
CGImageRef resultRef = CGImageCreateWithMask(image.CGImage, maskRef);
UIImage *result = [UIImage imageWithCGImage:resultRef];
CGImageRelease(resultRef);
CGImageRelease(maskRef);
//display result
self.imageView.image = result;
}
@end
Using two separate files for each image in this way can be a bit cumbersome. The JPNG library (https://github.com/nicklockwood/JPNG) provides an open source, reusable implementation of this technique that reduces the burden by packing both images into a single file and adding support for loading hybrid images directly using the +imageNamed: and +imageWithContentsOfFile: methods.
JPEG 2000
iOS supports various image formats in addition to JPEG and PNG, such as TIFF and GIF, but for the most part, these are not worth bothering with as they have worse compression, quality, and performance tradeoffs than JPEG or PNG.
However, in iOS 5, Apple added support for the JPEG 2000 image format. This was added with little fanfare and is not well known. It’s not even properly supported by Xcode—JPEG 2000 images don’t show up in Interface Builder.
JPEG 2000 images do work at runtime however (both on device and simulator), and they offer better image quality than JPEG for a given file size, as well as full support for alpha transparency. JPEG 2000 images are significantly slower to load and display than either PNG or JPEG, however, so they’re only really a good option if reducing file size is a higher priority than runtime performance.
It’s worth keeping an eye on JPEG 2000 in case it improves significantly in future iOS releases, but for now, hybrid images offer better performance for a similar file size and quality.
PVRTC
Every iOS device currently on the market uses an Imagination Technologies PowerVR graphics chip as its GPU. The PowerVR chip supports a proprietary image compression standard called PVRTC (PowerVR Texture Compression).
Unlike most image formats available on iOS, PVRTC images can be drawn directly to the screen without needing to be decompressed beforehand. This means that there is no decompression step after loading, and the size in memory is substantially smaller than any other image type (as little as one-sixteenth of the size, depending on the compression settings used).
There are several disadvantages to PVRTC, however:
![]() Although they consume less RAM when loaded, PVRTC files are larger than JPEG and may even be larger than PNG (depending on the contents) because the compression algorithm is optimized for performance rather than file size.
Although they consume less RAM when loaded, PVRTC files are larger than JPEG and may even be larger than PNG (depending on the contents) because the compression algorithm is optimized for performance rather than file size.
![]() PVRTC images must be exactly square and have power-of-two dimensions. If the source image doesn’t meet these requirements, you’ll have to stretch it or pad it with empty space before converting to PVRTC.
PVRTC images must be exactly square and have power-of-two dimensions. If the source image doesn’t meet these requirements, you’ll have to stretch it or pad it with empty space before converting to PVRTC.
![]() The quality is not fantastic, especially for images with transparency. It generally looks like a heavily compressed JPEG file.
The quality is not fantastic, especially for images with transparency. It generally looks like a heavily compressed JPEG file.
![]() PVRTC images cannot be drawn using Core Graphics, displayed in an ordinary UIImageView or used directly as a layer’s contents. You have to load PVRTC images as an OpenGL texture and then map it onto a pair of triangles for display in a CAEAGLLayer or GLKView.
PVRTC images cannot be drawn using Core Graphics, displayed in an ordinary UIImageView or used directly as a layer’s contents. You have to load PVRTC images as an OpenGL texture and then map it onto a pair of triangles for display in a CAEAGLLayer or GLKView.
![]() Creating an OpenGL context for drawing a PVRTC image is quite expensive initially. Unless you plan to draw a lot of images into the same context, this may cancel out the performance benefit of using PVRTC.
Creating an OpenGL context for drawing a PVRTC image is quite expensive initially. Unless you plan to draw a lot of images into the same context, this may cancel out the performance benefit of using PVRTC.
![]() PVRTC images use an asymmetric compression algorithm. Although they decompress almost instantly, compressing them takes a phenomenally long time. On a modern, fast desktop Mac, it can take a minute or more to generate a single large PVRTC image. It is therefore not viable to generate them on-the-fly on an iOS device.
PVRTC images use an asymmetric compression algorithm. Although they decompress almost instantly, compressing them takes a phenomenally long time. On a modern, fast desktop Mac, it can take a minute or more to generate a single large PVRTC image. It is therefore not viable to generate them on-the-fly on an iOS device.
If you don’t mind working with OpenGL, and have the luxury of generating your images in advance, PVRTC offers amazing loading performance compared to any other format available on iOS. For example, it’s possible to load and display a 2048×2048 PVRTC image on the main thread in less than one-sixtieth of a second on a modern iOS device (that’s more than big enough to fill a Retina iPad screen), avoiding a lot of the threading and caching complexity required when loading other formats.
Xcode includes a command line tool called texturetool for generating PVRTC images, but it’s awkward to access (it’s inside the Xcode application bundle) and rather limited in functionality. A better option is to use the Imagination Technologies PVRTexTool, which you can download for free as part of the PowerVR SDK from http://www.imgtec.com/powervr/insider/sdkdownloads.
After you’ve installed PVRTexTool, you can convert a suitably sized PNG image to a PVRTC file by using the following command in the Terminal:
/Applications/Imagination/PowerVR/GraphicsSDK/PVRTexTool/CL/OSX_x86/PVRTexToolCL -i
{input_file_name}.png -o {output_file_name}.pvr -legacypvr -p -f PVRTC1_4 -q
pvrtcbest
Listing 14.8 shows the code required to load and display a PVRTC image (adapted from the CAEAGLLayer example code in Chapter 6).
Listing 14.8 Loading and Displaying a PVRTC Image
#import "ViewController.h"
#import <QuartzCore/QuartzCore.h>
#import <GLKit/GLKit.h>
@interface ViewController ()
@property (nonatomic, weak) IBOutlet UIView *glView;
@property (nonatomic, strong) EAGLContext *glContext;
@property (nonatomic, strong) CAEAGLLayer *glLayer;
@property (nonatomic, assign) GLuint framebuffer;
@property (nonatomic, assign) GLuint colorRenderbuffer;
@property (nonatomic, assign) GLint framebufferWidth;
@property (nonatomic, assign) GLint framebufferHeight;
@property (nonatomic, strong) GLKBaseEffect *effect;
@property (nonatomic, strong) GLKTextureInfo *textureInfo;
@end
@implementation ViewController
- (void)setUpBuffers
{
//set up frame buffer
glGenFramebuffers(1, &_framebuffer);
glBindFramebuffer(GL_FRAMEBUFFER, _framebuffer);
//set up color render buffer
glGenRenderbuffers(1, &_colorRenderbuffer);
glBindRenderbuffer(GL_RENDERBUFFER, _colorRenderbuffer);
glFramebufferRenderbuffer(GL_FRAMEBUFFER, GL_COLOR_ATTACHMENT0,
GL_RENDERBUFFER, _colorRenderbuffer);
[self.glContext renderbufferStorage:GL_RENDERBUFFER
fromDrawable:self.glLayer];
glGetRenderbufferParameteriv(
GL_RENDERBUFFER, GL_RENDERBUFFER_WIDTH, &_framebufferWidth);
glGetRenderbufferParameteriv(
GL_RENDERBUFFER, GL_RENDERBUFFER_HEIGHT, &_framebufferHeight);
//check success
if (glCheckFramebufferStatus(GL_FRAMEBUFFER) != GL_FRAMEBUFFER_COMPLETE)
{
NSLog(@"Failed to make complete framebuffer object: %i",
glCheckFramebufferStatus(GL_FRAMEBUFFER));
}
}
- (void)tearDownBuffers
{
if (_framebuffer)
{
//delete framebuffer
glDeleteFramebuffers(1, &_framebuffer);
_framebuffer = 0;
}
if (_colorRenderbuffer)
{
//delete color render buffer
glDeleteRenderbuffers(1, &_colorRenderbuffer);
_colorRenderbuffer = 0;
}
}
- (void)drawFrame
{
//bind framebuffer & set viewport
glBindFramebuffer(GL_FRAMEBUFFER, _framebuffer);
glViewport(0, 0, _framebufferWidth, _framebufferHeight);
//bind shader program
[self.effect prepareToDraw];
//clear the screen
glClear(GL_COLOR_BUFFER_BIT);
glClearColor(0.0, 0.0, 0.0, 0.0);
//set up vertices
GLfloat vertices[] =
{
-1.0f, -1.0f,
-1.0f, 1.0f,
1.0f, 1.0f,
1.0f, -1.0f
};
//set up colors
GLfloat texCoords[] =
{
0.0f, 1.0f,
0.0f, 0.0f,
1.0f, 0.0f,
1.0f, 1.0f
};
//draw triangle
glEnableVertexAttribArray(GLKVertexAttribPosition);
glEnableVertexAttribArray(GLKVertexAttribTexCoord0);
glVertexAttribPointer(GLKVertexAttribPosition, 2,
GL_FLOAT, GL_FALSE, 0, vertices);
glVertexAttribPointer(GLKVertexAttribTexCoord0, 2,
GL_FLOAT, GL_FALSE, 0, texCoords);
glDrawArrays(GL_TRIANGLE_FAN, 0, 4);
//present render buffer
glBindRenderbuffer(GL_RENDERBUFFER, _colorRenderbuffer);
[self.glContext presentRenderbuffer:GL_RENDERBUFFER];
}
- (void)viewDidLoad
{
[super viewDidLoad];
//set up context
self.glContext =
[[EAGLContext alloc] initWithAPI:kEAGLRenderingAPIOpenGLES2];
[EAGLContext setCurrentContext:self.glContext];
//set up layer
self.glLayer = [CAEAGLLayer layer];
self.glLayer.frame = self.glView.bounds;
self.glLayer.opaque = NO;
[self.glView.layer addSublayer:self.glLayer];
self.glLayer.drawableProperties =
@{kEAGLDrawablePropertyRetainedBacking: @NO,
kEAGLDrawablePropertyColorFormat: kEAGLColorFormatRGBA8};
//load texture
glActiveTexture(GL_TEXTURE0);
NSString *imageFile = [[NSBundle mainBundle] pathForResource:@"Snowman"
ofType:@"pvr"];
self.textureInfo = [GLKTextureLoader textureWithContentsOfFile:imageFile
options:nil
error:NULL];
//create texture
GLKEffectPropertyTexture *texture =
[[GLKEffectPropertyTexture alloc] init];
texture.enabled = YES;
texture.envMode = GLKTextureEnvModeDecal;
texture.name = self.textureInfo.name;
//set up base effect
self.effect = [[GLKBaseEffect alloc] init];
self.effect.texture2d0.name = texture.name;
//set up buffers
[self setUpBuffers];
//draw frame
[self drawFrame];
}
- (void)viewDidUnload
{
[self tearDownBuffers];
[super viewDidUnload];
}
- (void)dealloc
{
[self tearDownBuffers];
[EAGLContext setCurrentContext:nil];
}
@end
As you can see, it’s nontrivial to do this, but if you are interested in using PVRTC images in a regular app (as opposed to an OpenGL-based game), the GLView library (https://github.com/nicklockwood/GLView) provides a simple GLImageView class that replicates most of the functionality of UIImageView, but can display PVRTC images without requiring you to write any OpenGL code.
Summary
In this chapter, we investigated the performance problems relating to image loading and decompression and explored a range of different workarounds and solutions.
In Chapter 15, “Layer Performance,” we discuss performance issues relating to layer rendering and compositing.
All materials on the site are licensed Creative Commons Attribution-Sharealike 3.0 Unported CC BY-SA 3.0 & GNU Free Documentation License (GFDL)
If you are the copyright holder of any material contained on our site and intend to remove it, please contact our site administrator for approval.
© 2016-2026 All site design rights belong to S.Y.A.