iOS Core Animation: Advanced Techniques (2014)
Part I. The Layer Beneath
Chapter 2. The Backing Image
A picture is worth a thousand words. An interface is worth a thousand pictures.
Ben Shneiderman
Chapter 1, “The Layer Tree,” introduced the CALayer class and created a simple layer with a blue background. Background colors are all very well, but layers would be rather boring if all they could display was a flat color. A CALayer can actually contain a picture of anything you like. This chapter explores the backing image of CALayer.
The contents Image
CALayer has a property called contents. This property’s type is defined as id, implying that it can be any kind of object. This is true—in the sense that you can assign any object you like to the contents property and your app will still compile—however, in practice, if you supply anything other than a CGImage, then your layer will be blank.
This quirk of the contents property is due to Core Animation’s Mac OS heritage. The reason that contents is defined as an id is so that on Mac OS, you can assign either a CGImage or an NSImage to the property and it will work automatically. If you try to assign a UIImage on iOS, however, you’ll just get a blank layer. This is a common cause of confusion for iOS developers who are new to Core Animation.
The headaches don’t stop there, though. The type you actually need to supply is a CGImageRef, which is a pointer to a CGImage struct. UIImage has a CGImage property that returns the underlying CGImageRef. If you try to assign that to the CALayer contents property directly, though, it won’t compile because CGImageRef is not really a Cocoa object; it’s a Core Foundation type.
Although Core Foundation types behave like Cocoa objects at runtime (known as toll-free bridging), they are not type compatible with id unless you use a bridged cast. To assign the image of a layer, you actually need to do the following:
layer.contents = (__bridge id)image.CGImage;
If you are not using ARC (Automatic Reference Counting), you do not need to include the __bridge part, but why are you not using ARC?!
Let’s modify the project we created in Chapter 1 to display an image rather than a background color. We don’t need the additional hosted layer any more now that we’ve established that it’s possible to create layers programmatically, so we’ll just set the image directly as the contents of the backing layer of our layerView.
Listing 2.1 shows the updated code. Figure 2.1 shows the results.
Listing 2.1 Setting a CGImage as the Layer contents
@implementation ViewController
- (void)viewDidLoad
{
[super viewDidLoad];
//load an image
UIImage *image = [UIImage imageNamed:@"Snowman.png"];
//add it directly to our view's layer
self.layerView.layer.contents = (__bridge id)image.CGImage;
}
@end
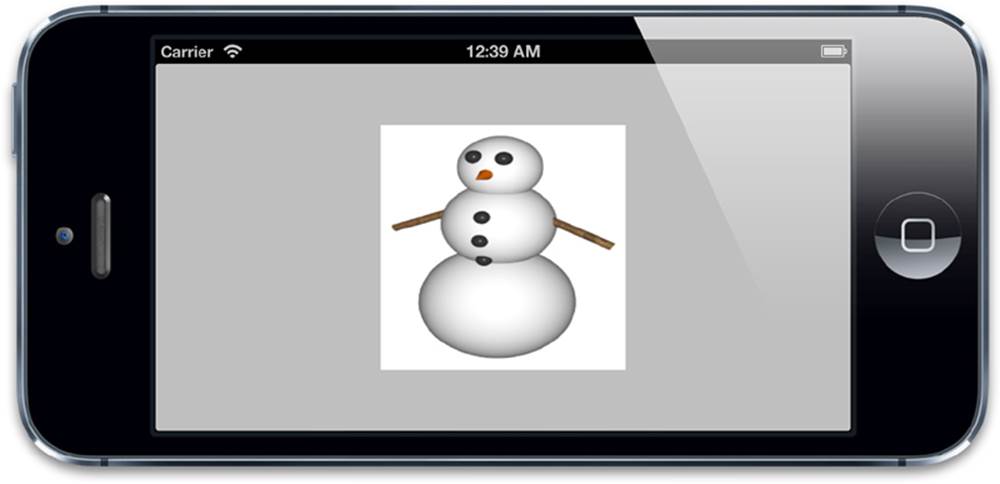
Figure 2.1 An image displayed inside the backing layer of a UIView
That was some very simple code, and yet we’ve done something quite interesting here: Using the power of CALayer, we’ve displayed an image inside an ordinary UIView. This isn’t a UIImageView; it’s not designed to display images normally. By manipulating the layer directly, we’ve exposed new functionality and made our humble UIView a lot more interesting.
contentsGravity
You might have noticed that our snowman looks a bit... fat. The image we loaded wasn’t precisely square, but it’s been stretched to fit the view. You’ve probably seen a similar situation when using UIImageView, and the solution there would be to set the contentMode property of the view to something more appropriate, like this:
view.contentMode = UIViewContentModeScaleAspectFit;
That approach works here as well (give it a try), but most visual properties of UIView—such as contentMode—are really just manipulating equivalent properties of the underlying layer.
The equivalent property of CALayer is called contentsGravity, and it is an NSString rather than an enum like its UIKit counterpart. The contentsGravity string should be set to one of the following constant values:
kCAGravityCenter
kCAGravityTop
kCAGravityBottom
kCAGravityLeft
kCAGravityRight
kCAGravityTopLeft
kCAGravityTopRight
kCAGravityBottomLeft
kCAGravityBottomRight
kCAGravityResize
kCAGravityResizeAspect
kCAGravityResizeAspectFill
Like contentMode, the purpose of contentsGravity is to determine how content should be aligned within the layer bounds. We will use kCAGravityResizeAspect, which equates to UIViewContentModeScaleAspectFit, and has the effect of scaling the image to fit the layer bounds without distorting its aspect ratio:
self.layerView.layer.contentsGravity = kCAGravityResizeAspect;
Figure 2.2 shows the results.

Figure 2.2 The snowman image displayed with the correct contentsGravity
contentsScale
The contentsScale property defines a ratio between the pixel dimensions of the layer’s backing image and the size of the view. It’s a floating-point value that defaults to 1.0.
The purpose of the contentsScale property is not immediately obvious. It doesn’t always have the effect of scaling the backing image onscreen; if you try setting it to various values in our snowman example, you’ll see it has no effect because the contents image is already being scaled to fit the layer bounds by the contentsGravity property.
If you want to simply zoom the layer contents image, you can do so using the layer’s transform or affineTransform properties (see Chapter 5, “Transforms,” for an explanation of transforms), but that’s not the purpose of contentsScale.
The contentsScale property is actually part of the mechanism by which support for high-resolution (a.k.a. Hi-DPI or Retina) screens is implemented. It is used to determine the size of the backing image that the layer should automatically create when drawing, and the scale at which thecontents image should be displayed (assuming that it isn’t already being scaled by the contentsGravity setting). UIView has an equivalent-but-little-used property called contentScaleFactor.
If contentsScale is set to 1.0, drawing will be done at a resolution of 1 pixel per point. If it is set to 2.0, drawing will be done at 2 pixels per point, a.k.a. Retina resolution. (In case you are unclear on the distinction between pixels and points, this is explained later in the chapter.)
This doesn’t actually make any difference when using kCAGravityResizeAspect because it scales the image to fit the layer, regardless of its resolution. But if we switch our contentsGravity to kCAGravityCenter instead (which doesn’t scale the image), the difference will be more apparent (see Figure 2.3).
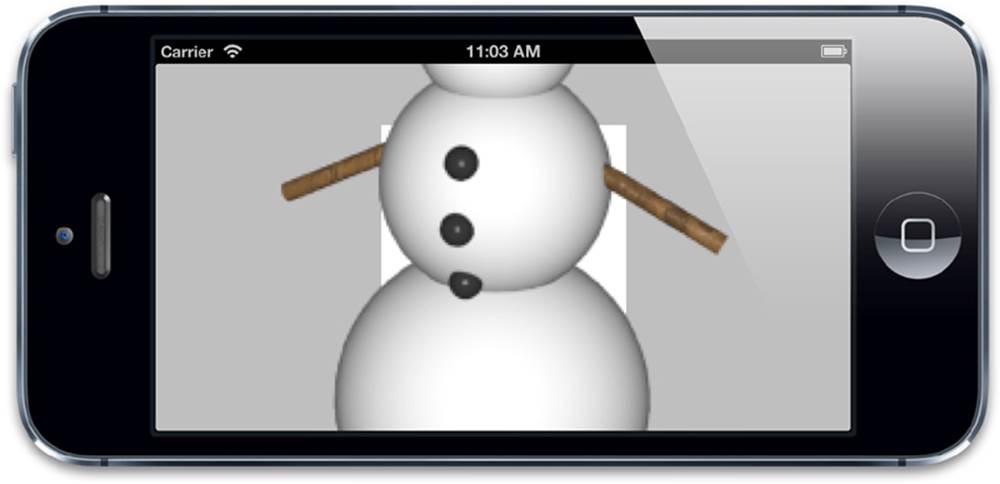
Figure 2.3 A Retina image displayed with the wrong contentsScale by default
As you can see, our snowman is huge and pixelated. That’s because CGImage (unlike UIImage) has no internal concept of scale. When we used the UIImage class to load our snowman image, it correctly loaded the high-quality Retina version. But when we used the CGImagerepresentation to set that image as our layer contents, the scale factor was lost in translation. We can fix that by manually setting the contentsScale to match our UIImage scale property (see Listing 2.2). Figure 2.4 shows the result.
Listing 2.2 Using contentsScale to Correct the Image Display Scale
@implementation ViewController
- (void)viewDidLoad
{
[super viewDidLoad];
//load an image
UIImage *image = [UIImage imageNamed:@"Snowman.png"];
//add it directly to our view's layer
self.layerView.layer.contents = (__bridge id)image.CGImage;
//center the image
self.layerView.layer.contentsGravity = kCAGravityCenter;
//set the contentsScale to match image
self.layerView.layer.contentsScale = image.scale;
}
@end
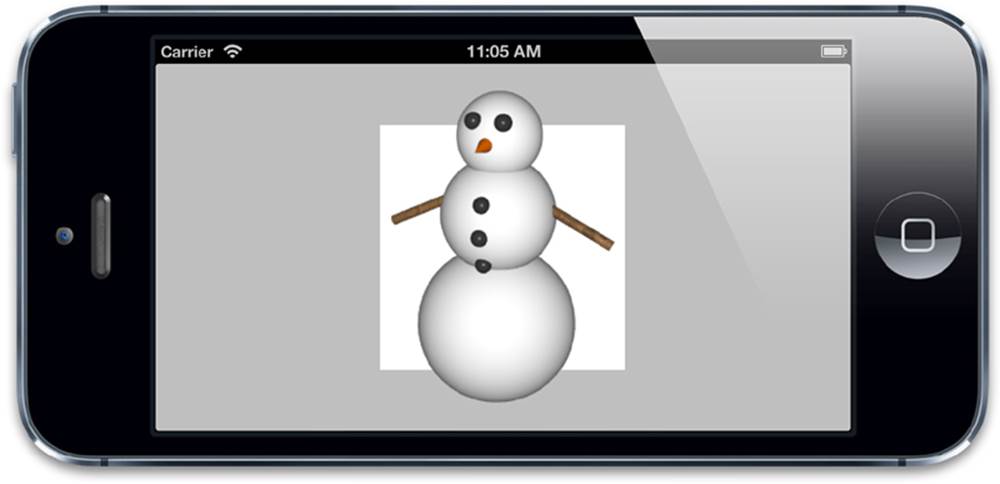
Figure 2.4 The same Retina image displayed with the correct contentsScale
When working with backing images that are generated programmatically, you’ll often need to remember to manually set the layer contentsScale to match the screen scale; otherwise, your images will appear pixelated on Retina devices. You do so like this:
layer.contentsScale = [UIScreen mainScreen].scale;
masksToBounds
Now that our snowman is being displayed at the correct size, you might have noticed something else about him—he’s poking outside of the view bounds. By default, UIView will happily draw content and subviews outside of its designated bounds. The same is true for CALayer.
There is a property on UIView called clipsToBounds that can be used to enable/disable clipping (that is, to control whether a view’s contents are allowed to spill out of their frame). CALayer has an equivalent property called masksToBounds. By setting the property to YES, we can keep our snowman confined (see Figure 2.5).
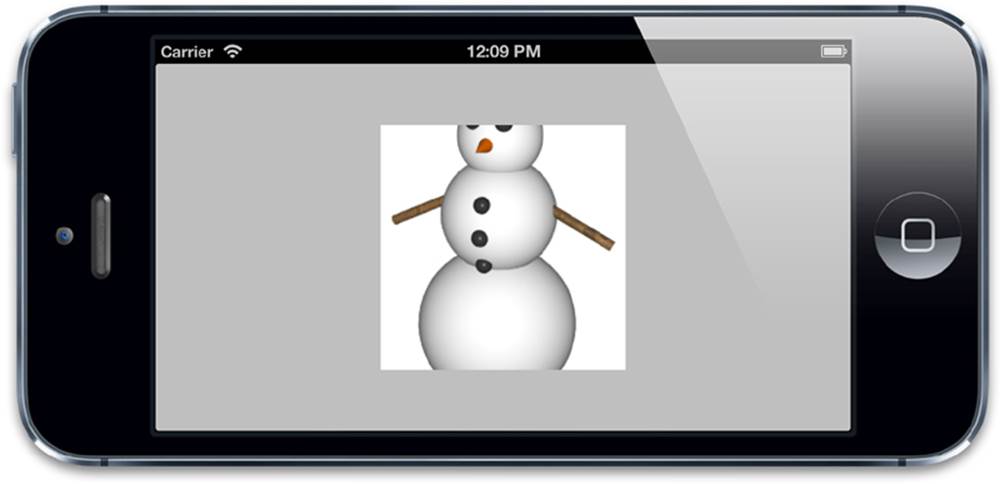
Figure 2.5 Using masksToBounds to clip the layer contents
contentsRect
The contentsRect property of CALayer allows us to specify a subrectangle of the backing image to be displayed inside the layer frame. This allows for much greater flexibility than the contentsGravity property in terms of how the image is cropped and stretched.
Unlike bounds and frame, contentsRect is not measured in points; it uses unit coordinates. Unit coordinates are specified in the range 0 to 1, and are relative values (as opposed to absolute values like points and pixels). In this case, they are relative to the backing image’s dimensions. The following coordinate types are used in iOS:
![]() Points—The most commonly used coordinate type on iOS and Mac OS. Points are virtual pixels, also known as logical pixels. On standard-definition devices, 1 point equates to 1 pixel, but on Retina devices, a point equates to 2×2 physical pixels. iOS uses points for all screen coordinate measurements so that layouts work seamlessly on both Retina and non-Retina devices.
Points—The most commonly used coordinate type on iOS and Mac OS. Points are virtual pixels, also known as logical pixels. On standard-definition devices, 1 point equates to 1 pixel, but on Retina devices, a point equates to 2×2 physical pixels. iOS uses points for all screen coordinate measurements so that layouts work seamlessly on both Retina and non-Retina devices.
![]() Pixels—Physical pixel coordinates are not used for screen layout, but they are often still relevant when working with images. UIImage is screen-resolution aware, and specifies its size in points, but some lower-level image representations such as CGImage use pixel dimensions, so you should keep in mind that their stated size will not match their display size on a Retina device.
Pixels—Physical pixel coordinates are not used for screen layout, but they are often still relevant when working with images. UIImage is screen-resolution aware, and specifies its size in points, but some lower-level image representations such as CGImage use pixel dimensions, so you should keep in mind that their stated size will not match their display size on a Retina device.
![]() Unit—Unit coordinates are a convenient way to specify measurements that are relative to the size of an image or a layer’s bounds, and so do not need to be adjusted if that size changes. Unit coordinates are used a lot in OpenGL for things like texture coordinates, and they are also used frequently in Core Animation.
Unit—Unit coordinates are a convenient way to specify measurements that are relative to the size of an image or a layer’s bounds, and so do not need to be adjusted if that size changes. Unit coordinates are used a lot in OpenGL for things like texture coordinates, and they are also used frequently in Core Animation.
The default contentsRect is {0, 0, 1, 1}, which means that the entire backing image is visible by default. If we specify a smaller rectangle, the image will be clipped (see Figure 2.6).
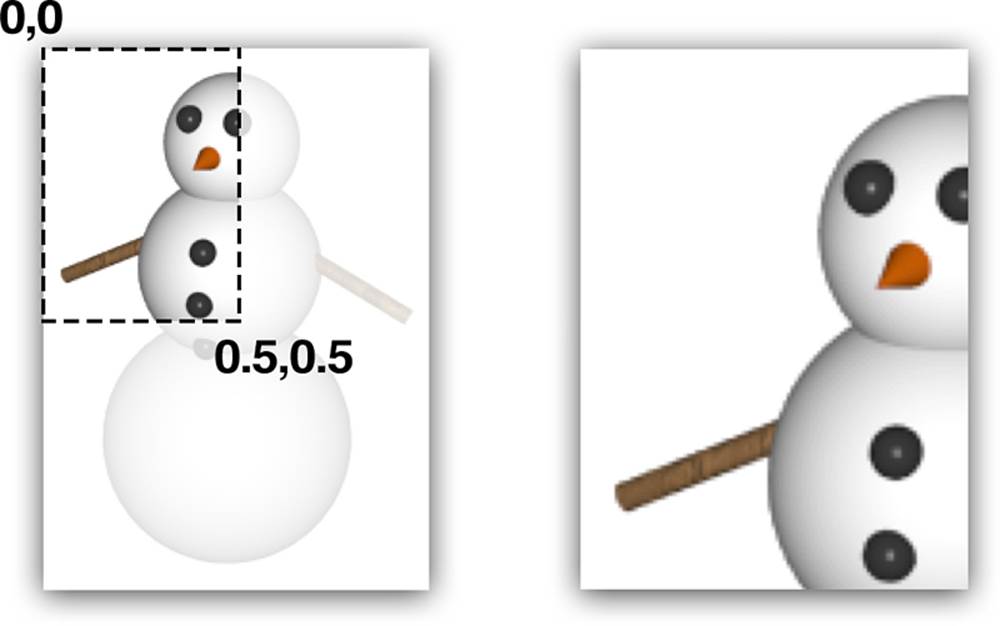
Figure 2.6 A custom contentsRect (left) and the displayed contents (right)
It is actually possible to specify a contentsRect with a negative origin or with dimensions larger than {1, 1}. In this case, the outermost pixels of the image will be stretched to fill the remaining area.
One of the most interesting applications of contentsRect is that it enables the use of so-called image sprites. If you’ve ever done any games programming, you’ll be familiar with the concept of sprites, which are really just images that can be moved around the screen independently of one another. But outside of the gaming world, the term is usually used to refer to a common technique for loading sprite images, rather than having anything to do with movement.
Typically, many sprites will be packed into a single large image that can be loaded in one go. This carries various benefits over using multiple individual image files in terms of memory usage, load time, and rendering performance.
Sprites are used in 2D game engines like Cocos2D, which uses OpenGL to display the images. But we can use sprites in an ordinary UIKit application by leveraging the power of contentsRect.
To start off with, we need a sprite sheet—a large image containing our smaller sprite images. Figure 2.7 shows an example sprite sheet.
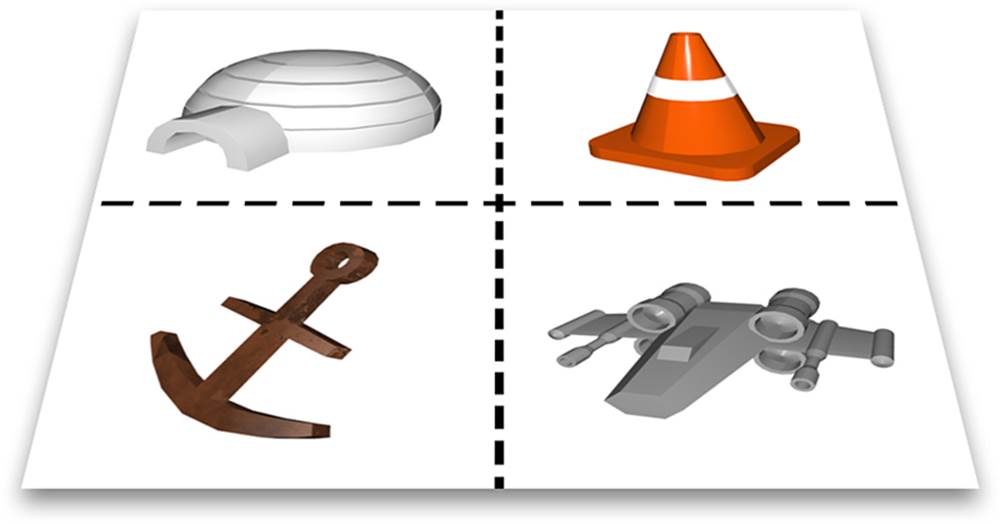
Figure 2.7 A sprite sheet
Next, we need to load and display these sprites in our app. The principle is quite simple: We load our large image as normal, assign it as the contents for four separate layers (one for each sprite), and then set the contentsRect of each of them to mask off the parts we don’t want.
We need to add some additional views to our project for the sprite layers. (These views were positioned using Interface Builder to avoid cluttering the code, but you could create them programmatically if you prefer.) Listing 2.3 shows the code, and Figure 2.8 shows the end result.
Listing 2.3 Splitting Up a Sprite Sheet Using contentsRect
@interface ViewController ()
@property (nonatomic, weak) IBOutlet UIView *coneView;
@property (nonatomic, weak) IBOutlet UIView *shipView;
@property (nonatomic, weak) IBOutlet UIView *iglooView;
@property (nonatomic, weak) IBOutlet UIView *anchorView;
@end
@implementation ViewController
- (void)addSpriteImage:(UIImage *)image
withContentRect:(CGRect)rect
toLayer:(CALayer *)layer
{
//set image
layer.contents = (__bridge id)image.CGImage;
//scale contents to fit
layer.contentsGravity = kCAGravityResizeAspect;
//set contentsRect
layer.contentsRect = rect;
}
- (void)viewDidLoad
{
[super viewDidLoad];
//load sprite sheet
UIImage *image = [UIImage imageNamed:@"Sprites.png"];
//set igloo sprite
[self addSpriteImage:image
withContentRect:CGRectMake(0, 0, 0.5, 0.5)
toLayer:self.iglooView.layer];
//set cone sprite
[self addSpriteImage:image
withContentRect:CGRectMake(0.5, 0, 0.5, 0.5)
toLayer:self.coneView.layer];
//set anchor sprite
[self addSpriteImage:image
withContentRect:CGRectMake(0, 0.5, 0.5, 0.5)
toLayer:self.anchorView.layer];
//set spaceship sprite
[self addSpriteImage:image
withContentRect:CGRectMake(0.5, 0.5, 0.5, 0.5)
toLayer:self.shipView.layer];
}
@end
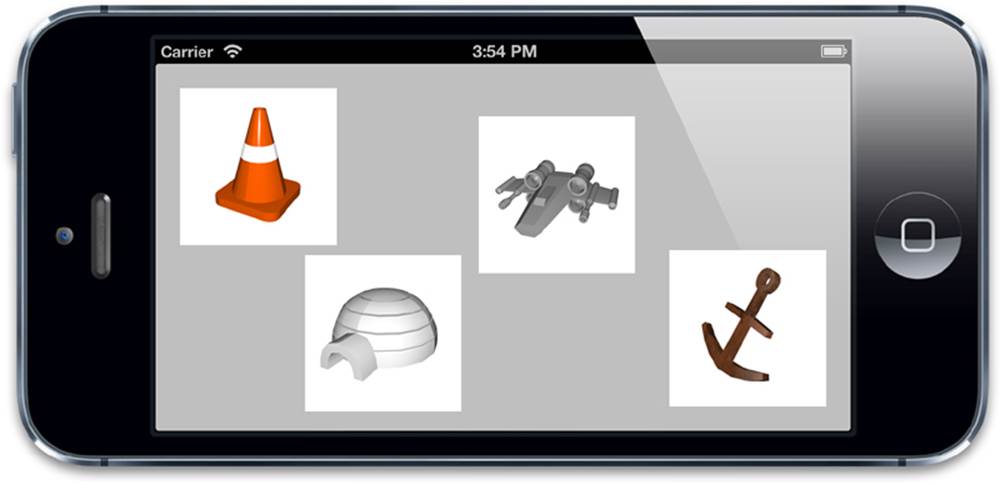
Figure 2.8 Four sprites, arranged randomly onscreen
Sprite sheets are a neat way of reducing app size and loading performance (a single large image compresses better and loads quicker than multiple small ones), but they can be cumbersome to arrange manually, and they create a maintenance burden if you need to add new sprites or need to change the dimensions of any of the existing ones after the sheet has been created.
Several commercial applications are available for creating sprite sheets automatically on your Mac. These tools simplify the use of sprites by automatically generating an XML or Property List (Plist) file containing the sprite coordinates. This file can then be loaded along with the image and used to set the contentsRect for each sprite, instead of the developer having to manually code the positions into the application.
These files are usually designed to be used in OpenGL games, but if you are interested in using sprite sheets in a regular app, the open source LayerSprites library (https://github.com/nicklockwood/LayerSprites) can read sprite sheets in the popular Cocos2D format and display them using ordinary Core Animation layers.
contentsCenter
The last contents-related property we look at in this chapter is contentsCenter. You might expect from the name that contentsCenter would have something to do with the position of the contents image, but the name is misleading. The contentsCenter is actually a CGRectthat defines a stretchable region inside the layer and a fixed border around the edge. Changing the contentsCenter makes no difference to how the backing image is displayed, until the layer is resized, and then its purpose becomes clear.
By default, the contentsCenter is set to {0, 0, 1, 1}, which means that the backing image will stretch uniformly when the layer is resized (depending on the contentsGravity). But if we increase the origin values and reduce the size, we can create a border around the image. Figure 2.9 shows how the scaling works for a contentsCenter value of {0.25, 0.25, 0.5, 0.5}.
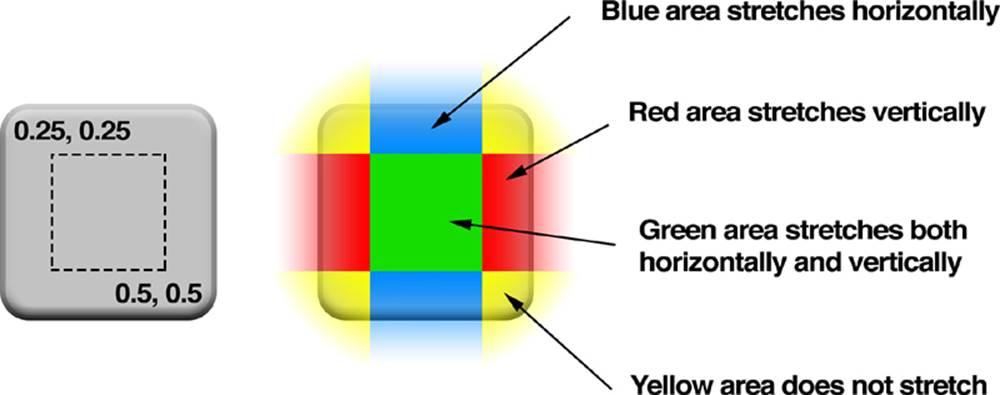
Figure 2.9 An example of a contentsCenter rectangle, and the effect it has on the image
This means that we can resize our views arbitrarily and the border will remain consistent (see Figure 2.10). This works in a similar way to the -resizableImageWithCapInsets: method of UIImage, but can be applied to any layer backing image, including one that is drawn at runtime using Core Graphics (as covered later in this chapter).
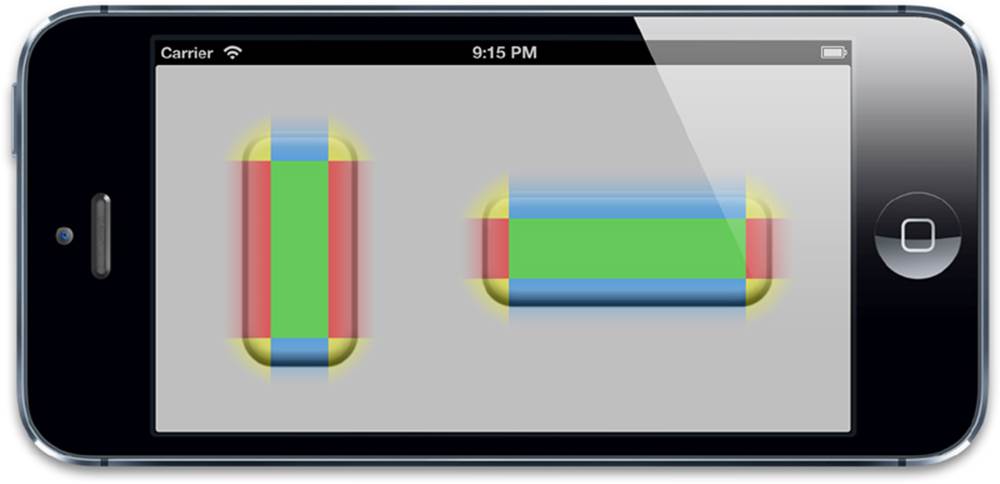
Figure 2.10 A couple of views using the same stretchable backing image
Listing 2.4 shows the code for setting up these stretchable views programmatically. However, an additional cool feature of contentsCenter is that it can be configured in Interface Builder without writing any code at all by using the Stretching controls in the Inspector window, as shown in Figure 2.11.
Listing 2.4 Setting Up Stretchable Views Using contentsCenter
@interface ViewController ()
@property (nonatomic, weak) IBOutlet UIView *button1;
@property (nonatomic, weak) IBOutlet UIView *button2;
@end
@implementation ViewController
- (void)addStretchableImage:(UIImage *)image
withContentCenter:(CGRect)rect
toLayer:(CALayer *)layer
{
//set image
layer.contents = (__bridge id)image.CGImage;
//set contentsCenter
layer.contentsCenter = rect;
}
- (void)viewDidLoad
{
[super viewDidLoad];
//load button image
UIImage *image = [UIImage imageNamed:@"Button.png"];
//set button 1
[self addStretchableImage:image
withContentCenter:CGRectMake(0.25, 0.25, 0.5, 0.5)
toLayer:self.button1.layer];
//set button 2
[self addStretchableImage:image
withContentCenter:CGRectMake(0.25, 0.25, 0.5, 0.5)
toLayer:self.button2.layer];
}
@end
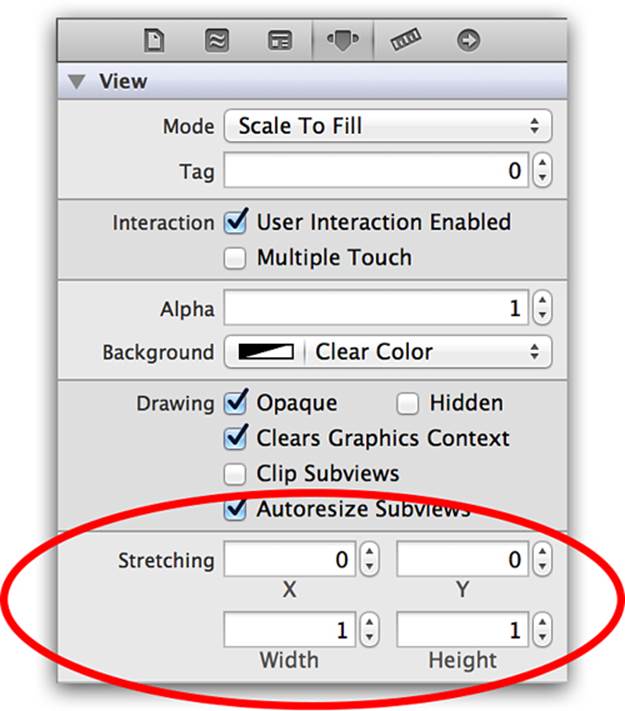
Figure 2.11 The Interface Builder Inspector controls for contentsCenter
Custom Drawing
Setting the layer contents with a CGImage is not the only way to populate the backing image. It is also possible to draw directly into the backing image using Core Graphics. The -drawRect: method can be implemented in a UIView subclass to implement custom drawing.
The -drawRect: method has no default implementation because a UIView does not require a custom backing image if it is just filled with a solid color or if the underlying layer’s contents property contains an existing image instance. If UIView detects that the -drawRect: method is present, it allocates a new backing image for the view, with pixel dimensions equal to the view size multiplied by the contentsScale.
If you don’t need this backing image, it’s a waste of memory and CPU time to create it, which is why Apple recommends that you don’t leave an empty -drawRect: method in your layer subclasses if you don’t intend to do any custom drawing.
The -drawRect: method is executed automatically when the view first appears onscreen. The code inside -drawRect: method uses Core Graphics to draw into the backing image, and the result will then be cached until the view needs to update it (usually because the developer has called the -setNeedsDisplay method, although some view types will be redrawn automatically whenever a property that affects their appearance is changed [such as bounds]). Although -drawRect: is a UIView method, it’s actually the underlying CALayer that schedules the drawing and stores the resultant image.
CALayer has an optional delegate property that conforms to the CALayerDelegate protocol. When CALayer requires content-specific information, it requests it from the delegate. CALayerDelegate is an informal protocol, which is a fancy way of saying that there is no actualCALayerDelegate @protocol that you can reference in your class interface. You just add the methods you need and CALayer will call them if present. (The delegate property is just declared as an id, and all the delegate methods are treated as optional.)
When it needs to be redrawn, CALayer asks its delegate to supply a backing image for it to display. It does this by attempting to call the following method:
- (void)displayLayer:(CALayerCALayer *)layer;
This is an opportunity for the delegate to set the layer contents property directly if it wants to, in which case no further methods will be called. If the delegate does not implement the -displayLayer: method, CALayer attempts to call the following method instead:
- (void)drawLayer:(CALayer *)layer inContext:(CGContextRef)ctx;
Before calling this method, CALayer creates an empty backing image of a suitable size (based on the layer bounds and contentsScale) and a Core Graphics drawing context suitable for drawing into that image, which it passes as the ctx parameter.
Let’s modify the test project from Chapter 1 so that it implements the CALayerDelegate protocol and does some drawing (see Listing 2.5). Figure 2.12 shows the result.
Listing 2.5 Implementing the CALayerDelegate
@implementation ViewController
- (void)viewDidLoad
{
[super viewDidLoad];
//create sublayer
CALayer *blueLayer = [CALayer layer];
blueLayer.frame = CGRectMake(50.0f, 50.0f, 100.0f, 100.0f);
blueLayer.backgroundColor = [UIColor blueColor].CGColor;
//set controller as layer delegate
blueLayer.delegate = self;
//ensure that layer backing image uses correct scale
blueLayer.contentsScale = [UIScreen mainScreen].scale;
//add layer to our view
[self.layerView.layer addSublayer:blueLayer];
//force layer to redraw
[blueLayer display];
}
- (void)drawLayer:(CALayer *)layer inContext:(CGContextRef)ctx
{
//draw a thick red circle
CGContextSetLineWidth(ctx, 10.0f);
CGContextSetStrokeColorWithColor(ctx, [UIColor redColor].CGColor);
CGContextStrokeEllipseInRect(ctx, layer.bounds);
}
@end
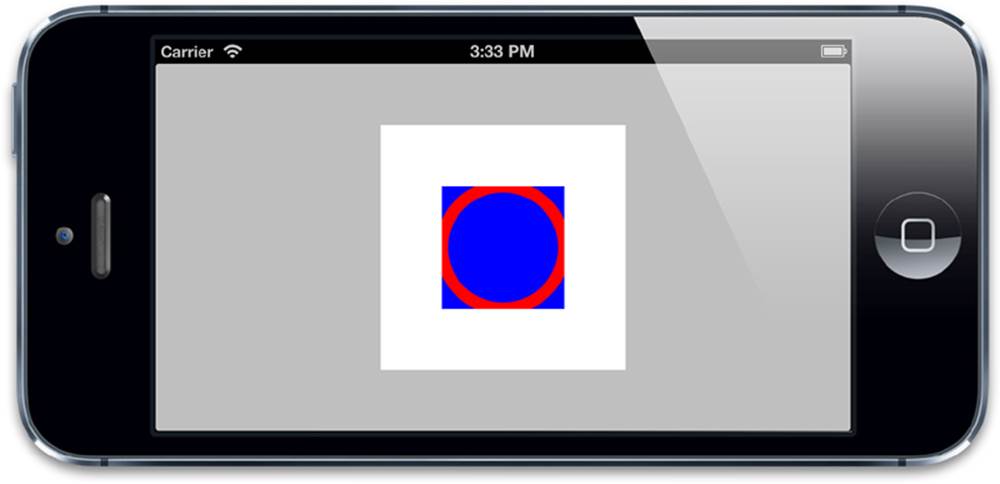
Figure 2.12 A layer with backing image drawn using CALayerDelegate
Note a couple of interesting things here:
![]() We have to manually call -display on blueLayer to force it to be updated. Unlike UIView, CALayer does not redraw its contents automatically when it appears onscreen; it is left to the discretion of the developer to decide when the layer needs redrawing.
We have to manually call -display on blueLayer to force it to be updated. Unlike UIView, CALayer does not redraw its contents automatically when it appears onscreen; it is left to the discretion of the developer to decide when the layer needs redrawing.
![]() The circle that we have drawn is clipped to the layer bounds even though we have not enabled the masksToBounds property. That’s because when you draw the backing image using the CALayerDelegate, the CALayer creates a drawing context with the exact dimensions of the layer. There is no provision made for drawing that spills outside of those bounds.
The circle that we have drawn is clipped to the layer bounds even though we have not enabled the masksToBounds property. That’s because when you draw the backing image using the CALayerDelegate, the CALayer creates a drawing context with the exact dimensions of the layer. There is no provision made for drawing that spills outside of those bounds.
So now you understand the CALayerDelegate and how to use it. But unless you are creating standalone layers, you will almost never need to implement the CALayerDelegate protocol. The reason for this is that when UIView creates its backing layer, it automatically sets itself as the layer’s delegate and provides an implementation for -displayLayer: that abstracts these issues away.
When using view-backing layers, you do not need to implement -displayLayer: or -drawLayer:inContext: to draw into your layer’s backing image; you can just implement the -drawRect: method of UIView in the normal fashion, and UIView takes care of everything, including automatically calling -display on the layer when it needs to be redrawn.
Summary
This chapter explored the layer backing image and its associated properties. You learned to position and crop the image, cut individual images out of a sprite sheet, and to draw layer contents on-the-fly using the CALayerDelegate and Core Graphics.
In Chapter 3, “Layer Geometry,” we look at the geometry of a layer and examine how layers are positioned and resized relative to one another.
All materials on the site are licensed Creative Commons Attribution-Sharealike 3.0 Unported CC BY-SA 3.0 & GNU Free Documentation License (GFDL)
If you are the copyright holder of any material contained on our site and intend to remove it, please contact our site administrator for approval.
© 2016-2026 All site design rights belong to S.Y.A.